Items filtered by date: December 2014
Advanced Portfolio Pro
This is the how to use advanced portfolio
General
- you can have nested categories
- there is an inbuilt media mamanger
Projects
- Projects are the individual Items
- a project has a list view and a details view (like mosets)
- you must create category before you can create a project
- you can select images or videos for the project type
- Either have a video gallery or an image gallery for the project
- you can upload mutiple images at once
- you can make 1 project featured
** From official project notes
https://extstore.com/support/documentation/components/advanced-portfolio-pro#usage
- Project URL: Enter a valid url in this field. This url will be used for Permalink button on the project's overlay (list view) and Launch Project in the project view (details view).
- Short Description: Give the project some short introduction lines that will be displayed on the list view.
- Description: Description has got the same role as a brief document of a project that provides specified information in the detailed page. (details view)
Categories
- This is just your basic container for the projects
- A category cand be used to group a load of projects together ie groups
Menu
- In the menu item it is possible to select which categories you want to display
Image Settings and their description
There is no direct control of gallery/slider image sizes. I have added it to the forum
These are where you can control the images, it can be a bit awkward at first but when you have read the list below it all makes sense.
General/Default Settings
- Configuration settings (General layout tab)
- Image quality
- File Locations
- Watermark
- Configuration settings (list layout tab) (thumbnails)
- Image width
- Image height – fixed height or auto to keep ratio with width
- Configuration settings (details layout tab)
- You can set the description box width (1 – 11, bootstrap?) which alters the image size by proxy
- There are no direct settings to control the sliding image sizes
- Configuration settings (transform tab) (thumbnails)
- These control animation effects when you hover over a thumbnail
- Scale – animate bigger or smaller
- Rotate – rotate the image
- Skew – like ringing a cloth or trapezium shape
Category Settings
- Category (Options Tab)
- Image – set an image for the category
Project Settings
- Project (Project Options Tab) per project setting which will override the defaults
- Description Width (on details page)
- Image width (project thumbnail)
- Image height (project thumbnail) – fixed height or auto to keep ratio with width
Menu Item Settings
- Menu Item (list layout tab) - will override the defaults
- Scale (project thumbnail)
- Rotate (project thumbnail)
- Skew (project thumbnail)
My Prefered Settings
Apply these settings or as required
- Project details description width = 6
My Fixes
These fixes should all be applied as needed
List styling is turned off / Enable bullet list icons
This prevents me adding any custom icons for my list items or just using the themes.
In media/com_advportfoliopro/css/style.css line 749, I disabled the following block of code
.portfolio-module ul, li {
    list-style: none;
    padding: 0;
    margin: 0;
}
'Go Back and 'Launch Project' Buttons are not in the middle
/* Launch Project Button to the middle */
.project-wrapper .project-link {
	margin: 18px 0;
	padding: 10px 0 0;
	border-top: 1px solid #E5E5E5;
}

style.css:691
+ text-align: center;
/* Go Back Button to the middle */
.btn-go-back {
	border: medium none;
	color: #ffffff;
	font-size: 16px;
	margin: 15px 0;
	padding: 15px 30px;
	text-align: center;
	text-decoration: none;
	transition-duration: 0.4s;
	background: #008cba;
	border-radius: 4px;
}

style.css:654
+ display: block;
+ margin: auto auto;

Does not work well because it is in a 100% width div spanning both columns
Change Launch Project Name
It is controlled by
COM_ADVPORTFOLIOPRO_LAUNCH_PROJECT="Launch Project"
Override / Change in language translation thing via Joomla
- Make sure you select site and English before creating a new override
- Call it ‘Launch Website’
Make list items same height
- jsn-time changes it to uses class 'jsn-com-advportfoliopro' and not 'com_advportfoliopro'
- .com_advportfoliopro is not 100% required
This is my first attempt to keep all of the list ietms the same height. It is better than nothign but there seems a bit of difference between how Firefox and Chrome handles this.
/*-- Advanced Portfolio - unify list item height --*/

/* - This is not 100% - */

.com_advportfoliopro .project-item-meta {
    min-height: 300px;
}

@media only screen and (max-width: 975px) {
    .com_advportfoliopro .project-item-meta {
        min-height: 400px;
    }
}

@media only screen and (max-width: 783px) {
    .com_advportfoliopro .project-item-meta {
        min-height: 650px;
    }
}

@media only screen and (max-width: 631px) {
    .com_advportfoliopro .project-item-meta {
        min-height: 700px;
    }
}

/* (this is where 3 columns goto 2 columns) */
@media only screen and (max-width: 615px) {
    .com_advportfoliopro .project-item-meta {
        min-height: 400px;
    }
}
Building a Portfolio
Image Names and Sizes
You need images for your protfolio item so these are some pointers on their sizes and names. I use Firefox addon called Fireshot
suggested sizes
- Thumbnails - 100x100, 300x300, 600x600 (all square)
- Project Details - 1280x720, 640 x 320 (all widescreen). You can use other sizes if they keep the same ratio.
Suggested Names
All pages have these areas so do not need a page name in. The header will either have the slider or not, you do not need 2 images, one with and one without.
- Header
- Content
- Footer
- Special images (gallery.jpg, testimonals.jpg...)
Special features, they do not need page references
- gallery
- testimonials
- thumbsgallery
- contact-form
Aquire an image with FireShot
This is quite straight forward when you have got things configured. Using Firefox:
- install FireShot addon
- install webdeveloper toolbar addon
- create a custom 'Resize Dimension' in the webdeveloper toolbar
- Goto Resize menu --> Edit Resize Dimension
- add a new dimension called 'Advanced Portfolio' with the dimensions 1313 x 720. (The weired dimensions account for the scroll bars and once an image is taken the dimensions end up correct)
- Under the 'Resize' menu select 'Advanced Portfolio' to resize the browser windows
- take an image with FireShot by clicking the 'S' icon in your toolbar at the top (or wherever)
- verify the image's dimensions
Workflow to create 1 list item
Here I will outline the rules I used for makinga single project item. These are obviously forcused on websitres but can easily be applied to other variations.
- Create a Category called ‘Website Portfolio’
- Pick a website
- Get the images
- Screen grab the pages of the website (1280 x 720 – use FF FireShot window resize)
- Keep originals and always use ‘save as’
- Currently all images need to be the same height otherwise the gallery/slider goes up and down to show each slide.
- Take images of specific areas (1280 x 720 or possible 640 x 360) using the Fixed Size select tool in Paint.Net (use pixels)
- When using selection tool be very careful you have got all of the area selected. It is very precise
- Zooming in helps
- Images should be W x H – alter in paint.net as needed (all need to be same size details = 620x400 thumbnails = 300x300, image width 8, detail width 4)
- Use 1280 x 720 and 90% quality jpg (set FireShot to 1313 to get 1280 images this is because of the scroll bars width)
- Create thumbnail (home-page or other image) – using paint.net
- get full home page image
- set the secondary colour to e6e6e6 / ececec
- expand canvas width to match height giving a square (note the secondary colour will fill the gap
- resize to whatever (300x300)
- save as jpg 90% quality
- Create a project - Use the JSN Template name for the Project
- Short Description - Write a 1 line describing the template
- Long description – bullet point the aspects of the theme (maybe add things like the slider)
- Create a folder for the template – should be the same as the project name
- Upload the altered images to the CORRECT folder
- Give the images titles in advanced portfolio (as per rules)
- Set the thumbnail
- (optional) add each entry to the demo toolbar. The short description and thumbnail (resize to 100 x 100, the extstore demo resizes 600 x 600 to 100x100 lol)
- Order of images
- Header
- Content
- Footer
- Special images (gallery.jpg, testimonals.jpg...)
- Advance Pro image names/titles – Just capitalize the image name ie 'content' --> 'Content'
Examples
Short Description (HTML)
<p>A light and versatile modern theme ideal for small companies who want to be presented as professional but accessible.</p>
Long Description (HTML)
<p> </p>
<ul style="display: table; margin: 0 auto; list-style-image: url('/images/common/tick.png');">
<li>Responsive / Mobile Friendly</li>
<li>Light</li>
<li>Modern</li>
<li>Versatile</li>
<li>Animated Slider</li>
</ul>
Keywords
- Responsive / Mobile Friendly
- Clean
- Simple
- Dark
- Versatile
- Modern
- Fresh
- Adaptable
- Animated Slider
- Professional
- Slider
- Funky
- Light
- Eye Catching
- Visually Attractive
- Corporate
- Impressive
- Unique
- Informative
- Popular
- Accessible
- SEO Friendly
- Expandable
- Inspired Design
- Warm
- Easy to look at
- Refreshing
- Straight Forward
- Multi Purpose
- Family
- Homely
- CTA
- Call To Action
- Increased Conversion
- Elegant
- Colourful
- Functional
- Interesting
- Memorable
- Personal
Notes
- The thumbnail are not cropped but ‘strectch by X-axis’.
- Having images in the gallery of different heights can cause the cycling of images to be a bit crap. As it goes up and down
- All images use the cached reduced quality version
- Gallery is in a responsive modal box so there are no settings for this but does use the cached version
- don’t forget it has a search plugin, smart search plugin and carousel module
- contains the actuall script
- C:\Desktop\com_advportfoliopro_v3.8.1_j3\media\js\script.js
- C:\Desktop\com_advportfoliopro_v3.8.1_j3\site\views\project\tmpl\default_images.php
- /public_html/components/com_advportfoliopro/views/project/tmpl/default_images.php
- transform tab description should make a note that it is the thumbnail animation
- When you make all images have the same heigh (720px), some are thinner than others because they are stretched along the width and then then grow taller because of this to maintain ratio.
- Autoheight – changes the physical size of the container, id does NOT resize the image
- Owl carousel is the library used and is not good at image resizing
Template Width
In Firefox (using Dona)
- 1211 / from wide to narrow
- 976 / 976 is the firefox change over from desktop to mobile
Max-Width
The following code snippets will allow you to set the maximum width (max width, max-width) of your joomlashine template in various guises.
NB: You can also get this code from you joomlashine template by setting the template to a fixed width and look at the source code. Usually at the top you will see the code fixing the width. Just copy this and alter it as needed, i.e. set max-width only to stop templates going mental.
I also need to see which ones actually work and how specific to a particular template they are.
/* Reta - Max Width */
#jsn-pos-topbar,
	#jsn-topheader-inner,
	#jsn-header-inner,
	#jsn-promo-inner,
	#jsn-pos-content-top-over,
	#jsn-pos-content-top,
	#jsn-pos-content-top-below,
	#jsn-content_inner,
	#jsn-content-bottom-over-inner,
	#jsn-content-bottom-inner,
	#jsn-content-bottom-below-inner,
	#jsn-usermodules3-inner,
	#jsn-footer-inner,
	#jsn-menu.jsn-menu-sticky,
	#jsn-nav-inner {
		max-width: 960px;
}
/* Force max width - Untested */
#header-inner,
#jsn-header-inner,
#jsn-topheader-inner,
#jsn-promo-inner,
#jsn-content,
#jsn-footer-inner {
	max-width: 1000px;
}
/* Fixed width website */
NB: there is dynamic css in the html and this is where i have got this.
	#jsn-page,
	#jsn-menu.jsn-menu-sticky,
	#jsn-pos-topbar {
		width: 1200px;
		min-width: 1200px;
}
/* set max page width */
#jsn-pos-topbar,
#jsn-headerright-inner,
#jsn-header_inner2,
#jsn-content-top_inner,
#jsn-content,
#jsn-promo_inner,
#jsn-pos-content-top_inner,
#jsn-footer_inner,
#jsn-content-bottom_inner {
	max-width: 1024px;
}
Responsive Triggers
/* Prevent template going responsive for devices with screen size 1024px or above */
/* All devices with screen size 1024px and above will be forced to 1200px wide layout */
@media only screen and (min-device-width: 1024px) {
	#jsn-page,
	#jsn-menu.jsn-menu-sticky,
	#jsn-pos-topbar {
		width: 1200px;
		min-width: 1200px;
	}
}
/* Force Desktop Version for screens 1024 and above */

/*@media only screen and (min-width: 1024px), (min-device-width: 1024px) {*/
/*@media only screen and (min-device-width: 1024px) {*/

@media only screen and (min-width: 961px), (min-device-width: 1024px) {
	#jsn-page,
	#jsn-menu.jsn-menu-sticky,
	#jsn-pos-topbar {
		width: 1200px;
		min-width: 1200px;
	}
}
Convert Windows 10 MBR System disk to a GPT hard drive type
Why Convert from MBR to GPT hard drive type?
The reason for these instructions is that at some point if you might need to change your windows system disk from a legacy MBR hard disk type to the new style GPT format without loosing data to take advantage of the following features.
- Hard drives larger than 2.2TiB
- UEFI
- Secure Boot (allows only signed drivers to be loaded by the OS)
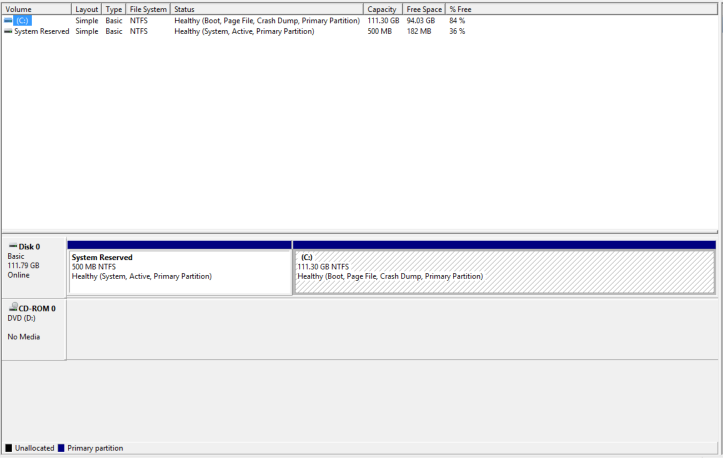
MBR and GPT default partition layouts
It might be helpful to see what the default layout on a Windows 10 installation for both disk types so I installed Windows 10 on the same Corsair 120GB SSD under both disk types and took images of their various partition settings in both the Windows Disk Management and the Paragon Disk Manager.
MBR
Windows Disk Management
Paragon Hard Disk Manager


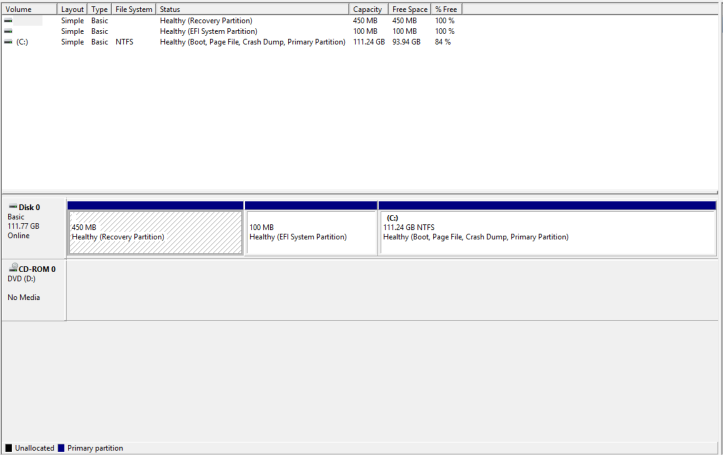
GPT
Partition Names
- Recovery
- System (EFI)
- Reserved (MSR)
- Primary (Windows System)
Windows Disk Management
Paragon Hard Disk Manager


The Instructions
Before continuing
BACKUP your whole drive !!!!
These instructions preserve the recovery partition and the default partition layout exactly like they would be on a fresh default installation of windows 10 on a GPT/UEFI installations. There is a reason for windows having a default layout so without knowing I prefer mine to be the same.
Your files and settings will be preserved.
Absolute Minimum steps required (To convert from MBR to GPT)
These 4 steps are only to remind the advanced user or those messing about.
- Convert drive to GPT
- Create an EFI partition
- Run bcdboot command to repair the boot config
- A 64-bit UEFI PC with it enabled in the BIOS
Notes
- When I refer to the Paragon Boot Disk I am using the WinPe version and I always goto the full manager
- If paragon asks about processing a RAW partition just click ok.
- All of these instructions referrer to Windows 10 x64
Prerequsites
- Your live PC with its data and HDD
- A spare HDD
- An external USB HDD
- Paragon Disk Manager 15 Premium
- Windows 10 boot disk
- Reprofiler - for correcting broken Windows User Profiles
- Windows Repair v3.8.4 Released - To repair permissions
Stage 1 – Make GPT/UEFI Windows Image
We need to make an image file for a fresh installation of Windows 10 using the UEFI /GPT system.
- Install the spare hard drive in to your computer as the sole hard drive (removing your current live HDD)
- Make sure the computer is configured to boot via UEFI
- Boot from the Paragon boot disk
- Make sure that the new hard drive is configured as a GPT hard drive, if not, delete everything on the HDD and make it in to a GPT hard drive (right click on the drive etc…) but do not create any partitions
- Save the changes and power down the PC
- Boot of your Windows 10 boot disk and install windows 10 64bit
- Once windows 10 is installed power down the PC
- Attach your USB hard drive and boot of your Paragon boot disk
- Image the whole hard disk holding the windows 10 installation to an image file located on your external USB HDD
- You now have a suitable windows 10 image file for the next stage. You could also have used the hard drive directly but it can make things a bit messy. My way has fewer issues as you always know which drive is which.
Stage 2 – Configure New Partitions and Disk Type on your Live Drive
- Re-install you original disk back into your PC removing the spare HDD
- Keep your external USD HDD attached
- Configure the PC BIOS to boot legacy/MBR mode
- Boot of the Paragon boot disk.
- Working on the PCs internal HDD.
NB: all disk operations can be queued and applied in 1 go but if you find gaps in-between your partitions consider doing each step separately:- convert to GPT (Right click on the internal/live HDD)
- Delete the ‘Recovery’ partition
- Resize the C: partition 120mb smaller and have the free space appear before it
- In to the free space I want you to restore the following partitions, in order, from the image file we made earlier. Do not add drive letters
- Recovery (450mb)
- NO NAME /EFI (100mb)
- MSR (16mb)
- If there is space between the C: partition and the MSR partition (the last one just added), resize the C: partition again to remove the gap.
- Apply all changes.
- Turn the PC off
- Disconnect the USB hard drive
Stage 3 – Correct the Boot Record on your Live Drive
The disk is now converted and all the partitions are in place but Windows will still not boot. You now need to correct booting information in a process similar to repairing a MBR or BCD.
- Configure the Bios to boot from UEFI
- Boot off the Windows 10 boot disk.
- Load the command prompt (shortcut = Alt + F10)
- Run diskpart
- Type: select disk 0
- Type: list volume
- The volume list is now shown
DISKPART> list volume

  Volume ###  Ltr  Label        Fs     Type        Size     Status     Info
  ----------  ---  -----------  -----  ----------  -------  ---------  --------
  Volume 0     D   ESD-ISO      UDF    DVD-ROM     5605 MB  Healthy
  Volume 1     C                NTFS   Partition    111 GB  Healthy
  Volume 2         Recovery     NTFS   Partition    450 MB  Healthy    Hidden
  Volume 3                      FAT32  Partition    100 MB  Healthy    Hidden
- Your windows system disk should have the drive letter C:, if not set it to C:
- Type: select volume 1
- Type: assign letter=c
- We need to give the EFI partition a drive letter S:. The EFI partition is 100mb and in this example volume 3 so:
- Type: select volume 3
- Type: assign letter=s
- We have now finished with diskpart
- Type: exit
- Type: bcdboot c:\windows /s s: /f UEFI
- Type: exit
- Turn your PC off.
- Make sure your bios is set to boot UEFI Secure Boot
- Reboot the computer making sure you have removed the windows 10 boot disk
- Your windows installation should now load
Full diskpart command routine
Microsoft Windows [Version 10.0.10586]


X:\Sources>diskpart

Microsoft DiskPart version 10.0.10586

Copyright (C) 1999-2013 Microsoft Corporation.
On computer: MININT-5HVULE8

DISKPART> list disk

  Disk ###  Status         Size     Free     Dyn  Gpt
  --------  -------------  -------  -------  ---  ---
  Disk 0    Online          111 GB  6144 KB        *

DISKPART> select disk 0

Disk 0 is now the selected disk.

DISKPART> list partition

  Partition ###  Type              Size     Offset
  -------------  ----------------  -------  -------
  Partition 1    Recovery           450 MB  1024 KB
  Partition 2    System             100 MB   452 MB
  Partition 3    Reserved            16 MB   552 MB
  Partition 4    Primary            111 GB   572 MB

DISKPART> list volume

  Volume ###  Ltr  Label        Fs     Type        Size     Status     Info
  ----------  ---  -----------  -----  ----------  -------  ---------  --------
  Volume 0     D   ESD-ISO      UDF    DVD-ROM     5605 MB  Healthy
  Volume 1     C                NTFS   Partition    111 GB  Healthy
  Volume 2         Recovery     NTFS   Partition    450 MB  Healthy    Hidden
  Volume 3                      FAT32  Partition    100 MB  Healthy    Hidden

DISKPART> select volume 3

Volume 3 is the selected volume.

DISKPART> assign letter=s

DiskPart successfully assigned the drive letter or mount point.

DISKPART> exit

Leaving DiskPart...

X:\Sources>bcdboot c:\windows /s s: /f UEFI
Boot files successfully created.

X:\Sources> exit
Stage 4 – Correct User Profile Issues (optional)
If when your windows 10 for the 1st time it is asking you to create a profile before continuing, this is because there as some permission issues with the user profiles so to continue:
- At the user creation form/prompt, create a profile called uefi and don’t give it a password
- You have now logged on using the new account.
You need to do the following to fix it to re-establish the link between the user accounts and their profiles and correct the relevant permissions:
This fix might be useful to run even if you don’t appear to have problems (I have not verified this).
- Enable the administrator account via an administrator level command prompt
net user administrator /active:yes
- Log off the uefi user and login in to the administrator account
- Download the reprofiler program
- Run reprofiler and reattach the user accounts to their correct profile location as per the instructions on the reprofiler website
- Reboot your computer and make sure your old accounts work as they should
- Now disable the administrator account via an administrator level command prompt
net user administrator /active:no
- Delete the uefi user if it is no longer needed
- Your profiles are now fixed
Stage 5 – Things are not quite right (optional)
Are there services that are not running or things seem to be missing, then it is likely to be permissions across the windows install that is wrong. This however is easily fixed
- Download windows AIO repair from tweaking.com
- Boot into safe mode
- Run the software and repair
- Service Permissions
- File Permissions
- Registry Permissions
Stage 6 – Multiple boot options appear
When you load windows you keep getting prompted which install your want to use. To remove this you need to delete the unwanted OS reference.
- From the run menu load MSCONFIG
- Goto the Boot tab
- Delete the rogue entry and save the changes
Links
MBR --> GPT Conversion
- Converting Windows BIOS installation to UEFI - TechNet Articles - United States (English) - TechNet Wiki - Nehal J Wani based his work on this original solution and I have also taken the boot correction aspect from here.
- How to Convert Windows 7/8/8.1/10 Installation from Legacy to UEFI Without Data Loss! - YouTube - A video on how to convert MBR to GPT without data loss - Nehal J Wani
- Convert Windows 7/8/10 Installation from Legacy to UEFI Without Data Loss (Simpler Method) - YouTube - A video on how to convert MBR to GPT without data loss - Nehal J Wani
- Convert MBR to GPT using Macrium Reflect. See description for the steps. - YouTube - How to move you windows installation to a GPT Hard disk and boot it, no conversion method
- How to Convert MBR to GPT Disk in Windows 10 / 8 / 7
- Convert Disk between MBR and GPT in Windows 10 without Data Loss
- Converting MBR to GPT for EFI boot? - Windows 10 Forums
- Installing Windows 7 on UEFI based computer | Ask the Core Team - This shows different sizez for the EFI and MSR partitions for Windows 7. You should use the sizez for Windows 10.
Diskpart
- How to Use the Diskpart Utility to Assign and Remove Drive Letters | How To Geek
- Assign, change, or remove a drive letter with Diskpart | TechNet
Other
Virgin Mobile - Configure MMS and Internet
These instructions show you how to setup Picture messaging/MMS and internet on your mobile phone.
Automatic SMS Based setup instructions from Virgin Rep
Instead of manually configuring the APN you can use the links from virgin to automatically configure you phone (just like ringing virgin and getting them to do it)
- goto http://www.virginmedia.com/
- click mobile
- click help (on top row)
- click mobile (in that weired shape)
- look under device supprt and click 'Phone Support' (Click Here)
- click search for my phone samsung note 3 (or select from the list), this gives manual settings. For some reason the 'internet' option is not in the fact thus not giving you a link, this is why you have to go via another phone to ge to the page wherte you can send the text messages your self.
or - seach for samsung s6 / click on samsung s6
- expand the internat faq option
- click on 'How do I manually enter the Mobile internet & Picture Messaging settings?'
- at the top of the new faq section there is a link 'click here in the sentence:
- To download the right ones, just click here
- click search for my phone samsung note 3 (or select from the list), this gives manual settings. For some reason the 'internet' option is not in the fact thus not giving you a link, this is why you have to go via another phone to ge to the page wherte you can send the text messages your self.
To manually set up follow these instructions:
- click the 'click here' link
- this displays the options to set up the samsung s6 by sending a text message, this is not the phone i want, so click "Not your phone? Choose another"
- now search for the 'Samsung SM-N9005 Galaxy Note 3' and click it
You are now able to send the SMS message to configure you samsung note 3.
Direct Page Links
- Phone Settings - Choose your manufacturer
- Phone Settings - Choose your manufacturer (Samsung selected)
- Phone Settings - Samsung SM-N9005 Galaxy Note 3
Notes
- The PIN is usually the last 4 digits of your phone, if required
- Setting up the APN settings from the virgin site (as per that link for that other samsung phone i used) gets you on the internet on striaght away (possibly because i was alreay on though) and configures the MMS.
- MMS does not work straight away, you have to:
- reboot your phone so it registers the new functionality on the network (educated guess)
- possibly send a MMS message to activate the server. (this seems stupid and I am not 100% this is require anymore). You can send this message to your own.
My IP Camera Notes
I need to figure out how to discover the URL for a specific camera.
- Br401/801 is compatible with our cameras
- The ip cam viewer software worked with our cameras selecting KGurad BR401/801
- Only port 9000 is needed as this supplied the rtsp feed and authentication
- Other software
- Blue iris
- Ispay
- Webcamxp
- Ip cam viewer has a camera scanner to autodetct what sort of camera you have
- How did livesey aquire the url
- Most cheap shitty cameras are probably rtsp
- Ip camera also has a webserver (which I have not got to work yet)
- The camera stream 9000 needs to be TCP, this is also refered to as the media port
- Port 80 is only for the web interface and does not work outside internet explorer on windows XP. This is not required for viewing cameras remotely
- The stream is probably RSTP and is instigated by a get request using a particular string.
- 18004 seems to be exposed aswell
My SEO Notes
The following is my research I have done on the various aspects of SEO. The notes are not fully soreted and probably could do with a going over but it is a good start to see what things affect SEO.
General SEO
- https is better for seo
- mobile responsive is better for SEO
- each main page (not homepage) must be all optimised for one key word. the pages are linked from the hompage ie nav - see lesson 10.
- try not to have a website with no more that 3 levels (ie subcategories)
- Create Sitemap xml
- submit sitemap to google msn yahoo etc..] (do last)
- create google account
- verify website with yahoo google msn
- google places/business ?
- Register site with google yahoo ie webmaster tools
- check for missing meta data
- <h1> and <h2> Tags – h1 most important
- after intial lauch the site gets 2 – 3 weeks serps enhancmnet
- utilise error pages
- Successful websites tend to have a number of factors in common:
- Useful and appropriate information
- Ease of navigation on the site
- Quick response time
- Excellent product information flow
- Good quality copy - original and readable
- Friendly layout
- Strong visibility on the major search engines
- [Moz Ranking Factors] Ranking Factors Home - Moz
- How Google Uses Joomla Meta Title, Description and Keyword Tags - Compassdesigns.net
- A VISUAL GUIDE TO KEYWORD TARGETING AND ON-PAGE SEO - Moz
-
Sandbox - Where Websites can go.
-
Whereas all types of sites can be placed for scrutiny in the Sandbox, it is more of a threat to the new websites seeking rankings for highly competitive keyword phrases.
-
For those who are anxious to know how long does the site stay in Sandbox, the answer is it varies from one to six months, with three to four months being the normal duration. The simple rule is the more competitive the usage of keyword, the longer the site spends in the Sandbox.
- make sure you visit the new site with google chrome as this browser definately sends metrics back to google. perhaps the same with edge and microsoft for bing.
- One of my new sites on a new domain on a new server was found with 24 hours of me visiting the site with Google Chrome for the first time. I know this because all of the development work was done in my preferred browser, FireFox.
- maybe visiting a few pages with edge and chrome will help send metrics back to the search engines. I dont know if Edge and Bing have a relationship but it cannot harm.
- bing is literal about www and non-www sites when doing a direct search, perhaps google does a little of this. This makes it important to have a cannonical url/domain.
- Dont ignore search results on Bing and potential Yahoo. You might find that a well design site ranks on them all in the same way.
- Creating a Google Webmaster and bing Webmater Account is a useful thing and I am sure it helps with ranking or at minimum getting content found and spidered.
Sections
On-Page Optimization
- Use the keyword in the title tag at least once, and possibly twice (or as a variation) if it makes sense and sounds good (this is subjective, but necessary). Try to keep the keyword as close to the beginning of the title tag as possible. More detail on title tags follows later in this section.
- Once in the H1 header tag of the page.
- At least 3X in the body copy on the page (sometimes a few more times if there's a lot of text content). You may find additional value in adding the keyword more than 3X, but in our experience, adding more instances of a term or phrase tends to have little to no impact on rankings.
- At least once in bold. You can use either the <strong> or <b> tag, as search engines consider them equivalent.
- At least once in the alt attribute of an image on the page. This not only helps with web search, but also image search, which can, occasionally bring valuable traffic.
- Once in the URL. Additional rules for URLs and keywords are discussed later on in this section.
- At least once (sometimes 2X when it makes sense) in the meta description tag. Note that the meta description tag does NOT get used by the engines for rankings, but rather helps to attract text used by the search engines).
- Generally not in link anchor text on the page itself that points to other pages on your site or different domains (this is a bit blog post for details).
- check for errors on website with google webmaster tools
- off page development
- submit to directories + local directories
- 1 way links have higher value
- distrubute article with your website name in it
- when creating an article
- make sure your keywords are in the tile
- make sure you web address is in the footer
- make keywords in article link to your site
- on page reviews
- clear call to action
- rel next, rel previous cause a series to be classed as one item rather than leaking link juice when paginated.
- rich snippets can be good
- automatic meta data? This can be a bad thing?
- 300 words minimum on a webpate (and this is not good)
Title Tag / Meta Title / Page Title
- The Title Tag is located at the top of your html page
- When you open your page in a browser these are the words at the very top of the screen in the blue bar (Title Bar)
- it tells the search engines what your page is about.
- it is what is shown in the title bar of the browser
- should include all main keywords
- 63 characters or less if you want your title to appear in full on google
- This is thought to be one of the most important aspects of SEO
- The title element of a page is meant to be an accurate, concise description of a page's content. It creates value in three specific areas (covered to the left) and is critical to both user experience and search engine optimization.
- As title tags are such an important part of search engine optimization, following best practices for title tag creation makes for terrific low-hanging SEO fruit. The recommendations below cover the critical parts of optimizing title tags for search engine and usability goals:
- Be mindful of length - 70 characters is the maximum amount that will display in the search results (the engines will show an ellipsis - "..." to indicate a title tag has been cut off), and sticking to this limit is generally wise.
- However, if you're targeting multiple keywords (or an especially long keyword phrase) and having them in the title tag is essential to ranking, it may be advisable to go longer.
- Place important keywords close to the front - The closer to the start of the title tag your keywords are, the more helpful they'll be for ranking and the more likely a user will be to click them in the search results (at least, according to SEOmoz's testing and experience).
- Leverage branding - At SEOmoz, we love to start every title tag with a brand name mention, as these help to increase brand awareness, and create a higher click-through rate for people who like and are familiar with a brand. Many SEO firms recommend using the brand name at the end of a title tag instead, and there are times when this can be a better approach – think about what matters to your site (or your client's site) and how strong the brand is.
- Consider readability and emotional impact - Creating a compelling title tag will pull in more visits from the search results and can help to invest visitors in your site. Thus, it's important to not only think about optimization and keyword usage, but the entire user experience. The title tag is a new visitor's first interaction with your brand and should convey the most positive impression possible.
- good idea to have the main keyword at the beginning of the title (or the one for that page), and description
- title is 70 max
- title of the page = the same as the 'headline' (actual page title ie heading at top of content)
- title is also used in the url. using a keyword rich url is another way to signal the contents of the page to search engines.
- each title tag should be different, never duplicate
- enclose main heading in <h1> tags
- "According to SEOmoz's testing and experience, the closer to the start of the title tag a keyword is, the more helpful it will be for ranking and the more likely a user will be to click them in search results. SEOmoz"
Meta Keywords
- These are not used anymore because people used them to keyword stuff and search engines have go better at reading webpages.
- Some people believe that most search engines ignore these, I am not convinced. I think they are suplemenatary now rather than a main source. Google and the larger search engines probably dont use these much but the smaller search engines most likely still use these. So it does not harm to set these upas if they were still being used.
- is also used by search engines to understand the content and meaning of the page
- in the example the list is automatically generated from tags and categories
- The meta keywords tag had value at one time, but is no longer valuable or important to search engine optimization. For more on the history and a full account of why meta keywords has fallen in disuse, read Meta Keywords Tag 101 from SearchEngineLand.
- Meta Keywords – 20 max
- Online Shops/Stores use the Meta Keywords for internal categorisation and searches so they do still have some use. I am pretty sure google will read them as other content on the page but just not with as much weight as in the past and if you dont have any you will not get penalised.
Meta Description
- This is very important and can help your SERPS enormously if considered and written properly.
- contains the description of your site and will show up in all the search engines so write precisely and objectively.
- it should be around 140 characters or 20 words
- Meta Description - 156 max before google snips
- include your keywords but dont spam/keyword stuff)
- dont repeat your keywords more than twice, making variations is more than helpful
- good webmasters make it stand out from the croud and entice the surfer to click their link.
- it is also the first description of your site/page the visitor usually sees because this is what they see in the search engine
- A brief description of the page that is used by search engines to provide more information and is sometimes displayed in the search engine results
- not visible and only exist in the source code
- in the example the meta description is created automatically form the first 25 words; so edit the first line of your release so the first few words are as relevant as possible when using automatic.
- The meta description tag exists as a short description of a page's content. Search engines do not use the keywords or phrases in this tag for rankings, but meta descriptions are the primary source for the snippet of text displayed beneath a listing in the results.
- The meta description tag serves the function of advertising copy, drawing readers to your site from the results and thus, is an extremely important part of search marketing. Crafting a readable, compelling description using important keywords (notice how google "bolds" the searched keywords in the description) can draw a much higher click-through rate of searchers to your page.
- Meta descriptions can be any length, but search engines generally will cut snippets longer than 160 characters (as in the Balboa Park example to the right), so it's generally wiae to stay in these limits.
- Google will only look at first 67-68 characters of the page title and approximately first 255
- characters in meta description. Anything beyond that will still be displayed in user’s browser but will be truncated in search engine results and discarded from search engine indexes.
- Using the joomla global meta description field has some pitfalls. If you don't enter any specific meta descriptions for your articles and other items, you will end up with a lot of duplicate descriptions. This is not good for SEO, and Google specifically alert you to this in Google Webmaster Tools (more on that in a later post).
Images
- put description on images
- image file name should be relavant to the keyword, ie it should have the keyword in it
- Use the alt attribute to provide descriptive text. In addition, we recommend using a human-readable caption and descriptive text around the image.
Content
- all content must be relevant to each other
- title
- Meta Keywords (optional)
- Meta description
- Copy (the actual content)
- h1 - h6
- backlinks to related sites (neighbourhoods) are a great way of increasing ranking as long as they are relevant.
- write your content for your client /user first and then check for SEO mistakes.
- Content is very important, google especially, but other search engines like to see varying content, like blogs for instance, google loves these because the content is always changing so these sites will tend to get crawled and indexed more often and probably get a higher SERPS.
- If you can not do a blog or varying content a well thought out homepage is the key to getting google to put you up the SERPS.
- spelling errors and possibly bad grammar. google might not like this but mainly you will get a higher bounce ratt
- bold and italic keywords – putting key phrases or words in bold or itlaics can help with ranking
- Search engines look at several elements of a page to determine which words are the most important. Those elements include bold and italic words.
- Bolding, after all, may make clear the most important words or phrases in an article, while italicizing is also used to mark titles
- Microdata
- Rich snippet markup
- Social buttons
- External links to site
- Blog articles on large well known PR1 sites
- Product schema
- Breadcrumbs (possibly)
- after updates use ping (pingback)
- ping a search engine when u have new content
- if your site is getting scrapped include a link back to your site with full url, this makes google think you are the orginator of this content. scrapers do not tend to edit content
- When you are trying to rank a location specific website such as an Estate Agent (for Americans I beleive you call them Realtors)
- areas covered must be on everypage. dont specifiy to larger area, these wont be successful until the site has more organic traffic logged at the search engines. the areas section must also have its own H tag eg 'Areas Covered'
<h> Tags (Very important)
- <h> tags are definately the keywords used by search engines for their results ****important*****
- After messing around with a low ranking site I found that it's <h> tags were the only search terms that google found.
- more <h> tags with keywords must be the key along with relevance
- How to maximise search results requires relevance between:
- <h> tag
- Relevant paragraph
- [repeat]
- the <h2> must be relevant to the <h1> tag so company name is probably not the best when not related
Domain
- domain name max 56 characters
- cannoicalise links www and non www 301
- domain name with keyword in it
- Try to get a domain name with your primary keyword included. When you include your keyword in your URL it tells the search engine spiders immediately what your site is about.
- domain name should be properely owned and for longer than a year. It is shown that if your renewal is a couple of years rather than one it is less likely to be seen as a spam site
- older sites are golden
- Age of domain
- When a domain has its owner changed google now removes any earned points from it
- Amount of years in the future the website is registered for
- Possible non-obviscated domain ownership details
- Check to see if the domain is black listed
- Dont have multiple sites with similiar domain names and content. This is an old technique and will get you penalised for duplicate content.
Elements
Different elements that can be used on page, that are not sections or areas.
Anchor Tag or URL
- Anchor text is also important to know - these are the underlined, clickable text or words in a link.
<a href="https://www.example.com/"> anchor text </a> - the anchor tag is used to form links within websites or from site to site.
- this tag should have your title or the main keywords from your page title to be most effective
- 'Anchor text'
- these are the underlined clickable text or words in a link
- if you want to check google for all keywords in the anchor tags type
allinanchor: yourkeywords - Visible part of the link is called the anchor text
Anchor Examples (for client sites)
-
<div>© Copyright 2022 Bob Builder | All Rights Reserved<br />QuantumWarp: <a href="https://quantumwarp.com/#internet-marketing" target="_blank">Internet Marketing</a>, <a href="https://quantumwarp.com/#seo" target="_self">SEO</a></div>
-
Website designed by QuantumWarp
QuantumWarp: SEO, Internet Marketing<p><b>Website designed by</b> <a href="https://quantumwarp.com" target="_blank"><b>QuantumWarp</b></a><br /> QuantumWarp: <a href="https://www.quantumwarp.com/seo/" target="_blank">SEO</a>, <a href="https://quantumwarp.com/internet-marketing" target="_blank">Internet Marketing</a></p>
SEF / Pretty URLs / URLs
URLs should not have '?' in them as search enigines do not like dynamic content, this is not as critical as it use to be but still will hurt SERPS.
- www.example.com and www.example.com/ are classed as different pages, i should do a 301 to fix this according to Slash vs no slash? | SEO Forum | Moz
- "The first think i do when i build a site, is setup my redirects, to ensure a canonical domain, none slash( or slash one of the other), and make sure all urls are lowercase. These things are a nightmare to fix later."
- keyword should be in the url
- with or without .html/.htm at the end seems to have no bearing on serps but general consensous it is the way forwards because the content supplied is define by mime header information. It also future proofs urls if you change server technology. So remove if possible
- use hyphens to separate words
- Canonicalization is the practice of organizing your content in such a way that every unique piece has one and only one URL.
- <link rel="canonical" href="https://www.seomoz.org/blog"/>
- This would tell Yahoo!, Bing & Google that the page in question should be treated as though it were a copy of the URL The Moz Blog [SEO] - Moz and that all of the link & content metrics the engines apply should technically flow back to that URL.
- Always have SEF URLs
URL construction guidelines
- Employ Empathy - Place yourself in the mind of a user and look at your URL. If you can easily and accurately predict the content you'd expect to find on the page, your URLs are appropriately descriptive. You don't need to spell out every last detail in the URL, but a rough idea is a good starting point.
- Shorter is better - While a descriptive URL is important, minimizing length and trailing slashes will make your URLs easier to copy and paste (into emails, blog posts, text messages, etc) and will be fully visible in the search results.
- Keyword use is important(by overuse is dangerous) - If your page is targeting a specific term or phrase, make sure to usable URLs and can trip spam filters (from email clients, search engines, and even people!).
Sitemaps
If you have a new site which has never been online, then creating a sitemap and then submitting it to google is a quick way of telling google that you exist.
If you have a site on but it is now indexed well, or not at all, then a sitempa could also help that by giving google a reference to use.
robots.txt
With this you can add a reference to your sitemap, this makes it easier for google to search your site and content if it doesn't know about your sitemap it will when it reads robots.txt. search engines look for robots.txt every time they visit your site, it tells them what it can read and what it cants.
robots.txt can be used to remove content from search engines by using the disallow statement, the removal is not immediate but will happen ( 2 - 3 weeks).
If you have a massive number of invalid urls in a search engines index this will hurt SERPs.i.e you have removed a massive gallery component on Joomla you will get a SERPS hit because google keeps finding invalid URLs and will give you a minus point for each one. Eventually if left unchecked you site could become delisted if you have lets say 14,000 bad links. use a robots.txt disallow statement and within a week or so you should become listed again.
NoFollow / Follow
the rel="nofollow" attribute of the A tag for hyperlinking has been a powerful tool in preserving Page Rank and Search Engine Optimization strategy.
basically when you link to an external site you give up some of your pagerank / linkjuice to them reducing them. so to prevent this the use of a NoFollow tag says to google do not give them any of my pagerank/link juice.
put on one of your links to tell search engines spiders and dont index as part of their spidering.
.htaccess (possibly blackhat)
- robots.txt - by disallow etc..
- Robots Meta Tag
<meta name="robots" content="index,follow">
<meta name="robots" content="noindex,follow">
<meta name="robots" content="index,nofollow">
<meta name="robots" content="noindex,nofollow">
joomla component (does one of the above)
A Joomla 1.5 Plugin to insert the rel="nofollow" attribute within outgoing links.
The "nofollow" is an HTML attribute value used to instruct some search engines that a hyperlink should not influence the link target's ranking in the search engine's index.
- robots.txt – useful for adding sitemaps and directing search engines (or not)
Links
- links to other sites in an article give authority to that page by including it in a neighbourhood
- bol and italics
- h2 - h3 tags
- internal links to one page
- Backlink from site have same topic with your site.
- You know that incoming links to your site are important for search engine optimization. But did you know that the internal links INSIDE your site are also important? Linking a sales page, for example, to every mention on your site of that page’s most important keyword will help to associate that keyword with the page, improving your SEO.
Making Links - Important Info:
- anchor text (the clickable bit) is the most important and should have the keywords in it – true
- the url the link is going to, should also have the keywords in it to give the link more authority to those keywords (see search quest example below)
- links have more weight if the keywords used and the primary keywords, are on the target page
- bold/italics/underline for links, i am not sure wheather this makes any difference
- alt="" tag, - this is only for images and should be used when putting images on a page, this is not needed in a link
- title="" - optional - (might be valuable now) some say it is only read like normal text on a website and can be used for users while not taking up real estate on the page, can be used as advisor not as a pickup for search engines.
- so no use for search engines but good for advising users.
- Do not add link titles to all links: if it is obvious from the link anchor and its surrounding context where the link will lead, then a link title will reduce usability by being one more thing users have to look at.
- How to Use the Link Title Attribute Correctly
- Top SEOs believe that external links are the most important source of ranking power. - it is a factor now
- Top SEOs don't believe that the title attribute is used for rankings purposes. - External Links - Moz - check this
- add the slash on the end according to matt cutts - on an apache server it will redirect www.mysite.com to www.mysite.com/
- - see video from matt Cutts (Google) If I get links to a URL with and without a trailing slash, will my PageRank be split? - YouTube
- - this makes a very small difference, matt cutts says it introduces a 302 redirect and this reduces link juice slightly otherwise people would abuse this and 301 redirect everywhere
- Should my URL end with a slash (/) ?
- Page = no slash at end
- Folder = slash at end
- bold/italics/underline - in-page content, definately helps give points to keywords and should be used without overdoing it.
Site/CMS Optimisations
- Page Caching
- cannonical redirect (non www to www)
- canonical redirect in htaccess even with enable in CMS to catch the few assets that are missed (i.e outside of the CMS scope)
- Sitemap.xml
- set up sitemap (sitemap index if needed) use sitemap.xml for both index or plain sitemap because it is standard file to look for
- point to sitemap in robots.txt
- set up site map frequency and other settings properely
- submit sitemaps to yahoo, bing, google
- Dont have slow running plugins on your site. 3rd party extensions can cause issue so always be careful and only have what you need installed.
- when you move something use 301 redirect
- redirecting non www to www helps, you can also set prefered domain in google panel (make seo hit (is a good thing i think), but not caused of non indexing)
WordPress
- disable uncategorised blog page in wordpress (https://quantumwarp.com/category/uncategorised/)
- disable all other unwanted pages such as search. do i not have a plugin for this
- use yoast
Server Optimisations
- turn on compression (mod_deflate), sppeds up website + google likes this
- make sure no 403, 404 errors (can have big impact)
- make sure no 404 errors as they can really slow a website and hurt SEO
- Have custom error pages
- (optional) links to the home page
- (optional) search box for site
- (optional) suggested URLs
- always redirect with 301
- website load speed is important
- minimise java and css
- webpage files sizes down (ie jpg and splutic)
- gzip/deflate output
- cache output including joomla cache header thing
- utilise error pages ie 404.html
- Not on a shared IP
- Speed of site
- if an established site check that it is not on a spam list
- 403 and 404 errors etc.. can cause a drop in page rank.
- ie google crawler finds lots of missing stuff, missing sitemaps,
- my htaccess file can cause 403 and 404 etc. this can hurt google if it is crawler traffic gettings stopped.
- fixxing my bookmark 403 errors caused my pagerank 2 weeks later to go from 1 --> 2
- make sure there is a proper 404 error page and that is referenced if needed in the htaccess file.
Default - /home/mywebsite/public_html/404.shtml - HTTP2
- HTTPS - This is mandatory now unless you want a big hit on your site.
To ETag or not to ETag
- ETags exist for a reason. It's part of the standard HTTP protocol ( https://www.w3.org/Protocols/rfc2616/rfc2616-sec14.html#sec14.19 ) and is designed to help optimize cache utilization.
- ETags are very useful for checking if the browser cache is valid. By default, Apache creates the ETag out of the file size, the inode and the modified date of the file. It's the inode that can cause trouble, but that doesn't kick in until your website is spread out over multiple servers. (The inode is specific to the file system that the file is stored on, so the same file with have a different ETag on each server, leading to cache confusion)
- If you're using multiple servers, either disable ETags or do not use the inode to create them. Until then, go ahead and use them, they do help.
FileETag INode MTime Size
- You can configure your Apache server (in your httpd.conf file) to strip the server component out of each ETag, like so:
<Directory /usr/local/httpd/htdocs>

   FileETag MTime Size

</Directory>
- If you're not taking advantage of the flexible validation model that ETags provide, it's better to just remove the ETag altogether. The Last-Modified header validates based on the component's timestamp. And removing the ETag reduces the size of the HTTP headers in both the response and subsequent requests. This Microsoft Support article describes how to remove ETags. In Apache, this is done by simply adding the following line to your Apache configuration file:
FileETag none
- However, most of the websites that we tested don't bother configuring their ETags, so a simpler solution is to turn off ETags entirely and rely on Expires or Cache-Control headers to enable efficient caching of resources. To turn off ETags, add the following lines to one of your configuration files in Apache (this requires mod_headers, which is included in the default Apache build):
Header unset Etag
FileETag none
- s
Research
These are research techniques I have come across
Finding Backlinks
- one of keys to higher rankins is to building quality links from relavent, related quality sites, preferably in the same neighbourhood
- the search engines especially google count each link as a vote for your site or content.
- many experts suggest that you include your main keywords in the anchor text of these inbound links in order to rank high
- if you want to find the number of backlinks your site has type this into google
link:example.com - google doesnt give you the exact number of back links so you could try yahoo and type in:
linkdomain: example.com
Checking Indexed Pages
- it is very important for you to know what content the search engines have indexed from your site
- you can also checked to how your links are displayed and see if any titles or descriptions are missing from your pages
- you can see how many of your pages are indexed in google by:
site:example.com - also try "https://example.com" or "www.example.com" to see the exact numbers of listings for each
Checking the Google Cache
- to see when it was last retrieved
cache:yoursite.com
Keywords
General Notes
- Keyword notes
- Keyword Use in title tag
- Keyword use in body text
- Relationship of body text content to keywords (topic analysis)
- Keyword use in H1 Tag
- Keyword use in domain name
- Keyword use in page URL
- Keyword use in H2, H3, H(x) Tags
- Keyword use in ALT Tags and Image Titles
- Keyword use in Bold/Strong tags
- Keyword use in meta tag description.
- keyword should be:
- once in bold
- once in title
- once in meta description
- once in meta keywords
- once in h1
- 1% - 3% density in body
- product title should be h1 tag
- meta descrition and keywords description
https://www.youtube.com/watch?v=5GX-03Eom5Y 9.03 - meta description – relevant keywords
- keyword/description/title should nverer be duplicate
- Remember, SEO experts agree that it’s not enough to have the keywords on the title metatag; the keyword or phrase should also appear four or five times in the content itself.
Finding Associated Keywords
keywords are the heart of the internet, you must dominate the search engines for your chosen keywords if you are to suceed online.
- make sure you have your main keywords in your meta description tag on your page.
- experts suggest that you place your main keywords in the first and last 25 words on that page
- variations are vital (synonyms), you must find and use variations of your keywords to rank better for your targeted niche
- to find out what other variations google has associated with your main keywords use the tilde command. this will provide variations on the term internet marketing and be highlighted in bold print
~internet marketing
Finding Titled keywords
- if you want to find competing sites that have your keywords in the title use the following
allintitle:internet marketing
Keyword Analysis
The best keyword tool out there at the moment is Google's own https://adwords.google.com/select/KeywordToolExternal
You can either enter a URL and get Google to make keyword suggestions from what it see's, or you can enter a seed keyword and Google will produce all the derivatives. However, on the results page Google set it by default to "broad" on the drop down menu midway down the screen - make sure you change this to "exact" and you'll get much lower but more precise figures as to search demand per keyword. Google also conveniently gives you average search amount figures plus the data from the previous month which helps if your markets are seasonal.
- Existing Keyword Analysis is undertaken to establish effectiveness. SEOmoz identified the following keyword factors as having most influence on Google's ranking algorithm (the method by which the search engine orders results), for example:
- Keyword Use in title tag
- Keyword use in body text
- Relationship of body text content to keywords (topic analysis)
- Keyword use in H1 Tag
- Keyword use in domain name
- Keyword use in page URL
- Keyword use in H2, H3, H(x) Tags
- Keyword use in ALT Tags and Image Titles
- Keyword use in Bold/Strong tags
- Keyword use in meta tag description.
Keyword Research
- find all competitors/websites websites
- find out how important these websites are
- find link popularity
- find out how many pages each website has indexed
- check competitors because they have already done the work
- search for the rewuired keyword and then look at the best ranking sites
- check their title + description
keyword research tools
- yahoo search engine marketing (overture)
- microsoft ad center
- seobook has keyword search tool (free)
- seochat has a free ctool to show how many competitors on a keyword
- the best free keyword spying tools is www.alexa.com
- type in a competitors website
- click search analytics tab
- on the right you will see top search quireies from search traffic
SEO Tools (check and add to my tools)
- google keyword tool
- Website Grader
- By HubSpot. Grade your website in seconds. Then learn how to improve it for free.
- Blue Backlinks - The world's most powerful Backlink Checker
- BlueBacklinks is the world's most powerful backlink checker. Our powerful machines scours the internet daily, reading pages and counting backlinks. We continually update our massive database of links, storing the most valuable information to give you the perfect picture of a website's linking profile.
- Search Engine Spider Simulator | Webconfs
- A lot of Content and Links displayed on a webpage may not actually be visible to the Search Engines, eg. Flash based content, content generated through javascript, content displayed as images etc.
- This tool Simulates a Search Engine by displaying the contents of a webpage exactly how a Search Engine would see it.
- It also displays the hyperlinks that will be followed (crawled) by a Search Engine when it visits the particular webpage.
- SEObook: We Love SEO - Not sure if this is any good.
- SpyFu - Competitor Keyword Research Tools for Google Ads PPC & SEO
- Search for any competitor. Download their keywords. It's that simple. Learn competitors' PPC & SEO tricks and avoid their mistakes. Try it free. No CC Required.
- seomoz + seomoz youtube videos
- keyword suggestion tools
- SEObook Keyword Tool
- The Fast, Free & Detailed Alternative to the Google AdWords Keyword Planner Tool
- Free Keyword Research Tool from Wordtracker
- The best FREE alternative to the Keyword Planner. Use Wordtracker to reveal 1000s of profitable longtail keywords with up to 10,000 results per search
- SEObook Keyword Tool
- 10 Awesome SEO Tools To Try In 2013 - YouTube | Koozai
- simliarpages - chrome plugin
- wayback machine
- gsite crawler
- crowd booster - social media
- google web master tools
- copyscape
- screaming frog (crawling tool), keyord research?
- uber suggest - keyword research tool
- majestic sEO - for backlink analysis
- panguin - access google analytics and put algorthim updates over ytour traffic to see if causes
- Free SEO Tools: Our Top 11 Tools - YouTube | Koozai
- keyword research
- google keyword tool
- google insights / trends
- competitive analysis
- google search operators
- traffic travis
- domain
- domain samuri
- website
- wordpress
- content
- dont use content tools
- graphics
- gimp
- on-page
- traffic travis
- woorank
- ranking
- cuterank
- analytics
- google analytics
- site speed
- tools.pingdom.com
- backlinks
- majestic seo
- traffic travis
- keyword research
- x keyword optimiser
- yes - micro niche finder 5.0
- yes - market samuri
- x traffic travis v4
- search.creative commons.org
- pond5.com
- SEOMOZ has some excellent tools
- Google Webmaster Tools
- The best keyword tool out there at the moment is Google's own - AdWords Keyword Tool - Google Ads
You can either enter a URL and get Google to make keyword suggestions from what it see's, or you can enter a seed keyword and Google will produce all the derivatives. However, on the results page Google set it by default to "broad" on the drop down menu midway down the screen - make sure you change this to "exact" and you'll get much lower but more precise figures as to search demand per keyword. Google also conveniently gives you average search amount figures plus the data from the previous month which helps if your markets are seasonal.
Site Submitters
- Increase the number of your backlinks and submit your domain to the major Search Engines.
- Submit your website to the major search engines and directories in one click! Site Submitter Tool by Web SEO Analytics allows you to submit your website URL to Google, Yahoo!, Bing, Ask, Moreover, Alexa and more than 30 search engines and directories. The Website Submission has become simpler than ever!
website not getting indexed worked example of what I did to try an resolve
- dns record check
- sitemap helps a lot - 6 hours
- keywords
- to many pictures on front page (slow loading)
- meta description to long
- keyword dilution (10 at most)
- backlinks
- need blog artilces point to site
- massive keyword dump at bottom
- mass site submission webseo
- sitemap submission google,yahoo,msn/bing,ask
- check noindex, nofollow in meta and robots
- resubmission request for google
- check spam ip block list
Google - Notes
- google tends to recognise words seperated by a - as seperate (or perioeds) but those separated with a _ (underscore) are classed as the same word
- use different meta description on everypage
- 3 -4 keywords in url is good
- pretty urls are good because of keywords in them
- make sure index page is always www.mywebsite.com/ not www.mywebsite.com/index.html
- real testomonials
- google sandbox can last up to 6 months for certain types of domain names and site types
- caching on my site takes about 21 days to change (14 days to 28 days)
SEO Combined Techniques
Many seo experts develop in a 3 prong approach
Place title (ie 'Internet Marketing', see vid 1:25) in the:
- title tag
- on the webpage itself
- and in the url for that page (the clickable reference bit i think)
sometimes they will just pick the main keywords and put them in the anchor instead.
eg www.yourwebsite.com/keywords.html
How to search engine optimize your Joomla website in 10 easy steps.
- Keyword Use in Title Tag
- Anchor Text of Inbound Link
- Global Link Popularity of Site (PageRank)
- Age of Site
- Link Popularity within the Site
- Topical Relevance of Inbound Links and Popularity of Linking Site
- Keyword Use in Body Text
- File Size
- Clean URL (Joomla SEF)
- Utilize Your Error Pages.
Video Walkthroughs
seo notes for busting seo myths video - specifically links – anchor text
- Taken from SEO Myths Busted - Theo van der Zee on Vimeo
-
<a href = “https://joomla.org”>This is anchor Text</a>
'this is anchor text' is the most important fact in racking on search engines
- visible location of an element on a page (24:11)
- google can see menu and content divisions
- link 1 in content divisions is highest value
- link 2 in left side is medium value
- link 3 in footer less value
- when trading links keep them natural, google can tell unatural link strategies
- (27:05) suffix, dont add suffix. This is because when technology changes you do not have to redue all your links ie html → php. Extensions are not needed because of mime headers take care of idetification
- send free samples to the biggest bloggers for a free review about the product
- meta descriptions only used for snippets ?
- Extract meta keywords from a page source from a competitors website. Seeing thy have done all the work it is rude not to borrow it
- dont enter keywords because of the above, the competition could just see what keywords you have optimized for
- you should always try to have good outgoing links (ie to good websites) because google then likes you site because it is not on its own and show good interactions in the neightbour hood. Also google see it a good service to link to other good sites.
- Do not link to bad sites but if you must use the rel=no follow on these links
- add quality links on a regular basis
- stop entering meta keywords start using them as research
- spammy comments = bad
- only link out to good sites
- can be a good thing linking to a good site
rel=”nofollow” is like a 'link wrapper'
- reciprocal linking not very good anymore (black hat) ie you link to me and I will link to you
- 3-way reciprocal linking = not very good anymore (blackhat), but can be good in small amounts in a natural pattern.
- Google can spot un-natural linking patterns
Delete Services/Domains/Accounts in WHMCS
In WHMCS the account references services on 3rd party systems aswell as it s own.
- The Internal WHMCS records and accounts used for operations and billing.
- Service/Products Account
- Domain Account
- The WHM/cPanel hosting account - This is the actuall server account
- Domain Registrars - This is where the domains actually live
To completely delete an account you need to remove all 3 of the items above and in a particular order. You might not want to delete all of the items. I prefer to delete all services and domain references (if needed) but keep the billing account just incase the customer comes back. Depending how you run your WHMCS you might decided you want to leave everythign in place. these instructiond do not tell you how to manage you site but just tell you how to delete stuff.
Service / Hosting Accounts
Do this for each hosting service you want to delete.
Delete the hosting/cPanel account(s)
- Open the client's profile
- Go to the Products/Services Tab
- Select the domain you want to delete
double check everything is selected correctly and you have the right domain - Under 'Module Commands press the terminate button and a confirmation prompt will appear
- Click ok/terminate, this then sends delete command to WHM
- The cPanel account is now deleted on the server but the WHMCS record is still present.
Delete the WHMCS record
Althought the cPanel account is now deleted WHMCS still has a record for that service. This need to be deleted aswell.
- Press delete (at the bottom of the page in red),
- A prompts appears saying:
Are you sure you want to delete this service? This will also remove any associated addons but not run the module terminate function.
- Click ok and the WHMCS record is now deleted
The hosting account/service is now deleted and the record in WHMCS is also deleted.
Notes
- If you have deleted the service record before running the terminate command you will need to go into your WHM manager and delete the account manually.
- This does not delete the domain record for the domain
- http://docs.whmcs.com/Products_Management#Cancelling_a_Product.2FService
Deleting a Domain
- Open the client's profile
- Go to the Domains Tab
- Goto the 'Registrar commands' (the buttons at the bottom)
- Click 'Request Delete'
- A confirmation prompt appears
Are you sure you want to send the domain registrar a deletion request? - click yes and the domain will get deleted at the registrar
You might get the following error message
Domain Deletion Request Failed
Since the domain is no longer in the Money Back Guarantee period, it cannot be deleted from here. If however, you want to delete this domain, please contact us and we will delete it for you.
So the delete button does not work with reseller club as expected, it is only for deleteing within the intial promo period to get your money back rather than a permanent deletion. You could follow the instructions from the message and get the Registrar to delete the domain at their end or just delete the record in WHMC and let the domain expiry naturally.
Now Delete the WHMCS Record
- Press delete (at the bottom of the page in red),
- A prompts appears saying:
Are you sure you want to delete this Domain?
- Click ok and the WHMCS record is now deleted
Deleting the WHMCS Account
Assuming you have deleted all Domains and services as required and you really want to delete teh WHMCS Client Profile/Account
- Goto the Client's Profile and select the Summary Tab
- At the bottom right there is an option to:
- Close Clients Account
- Delete Clients Account
- Select One as needed and follow the instructions.
I have never deleted an account or even just closed one so please read up on these options before continuing.
All 3 Deleted !!!
You have now completly removed all traces of the client and their accoutns from WHMCS except for previous transcations, payments and the like.
Domain Renewal
There might be many question about how WHMCS domain renewal works when you first start off so I have collected my notes here.
Configuring an Automatic Domain Registrar
One of the main functions of WHMCS is the ability to purchase domains, this feature can become difficult to manage if you use a third party Domainname provider and manully configure the dates, names and addresses etc.. associated with a domainname purchase.
This is where having an 'Automatic Domain Registrar', the service when configured will allow seemless purchase and management of domain names and their purchase.
I will be using 'ResellerClub UK' which offers a fully functional API that works with WHMCS. ResellerClub has the best prices and most importantly all domain managemnt features are enabled.
Here is a list of features that made me decided on Reseller Club
-
Fully supported API via WHMCS plugin
-
Cheapest Prices
-
Most TLD are supported
-
ID Protection for free
-
Email Forwarding for free
-
DNS Management for free
add setup instructions here
Domain Renewal Questions
-
set the domain expiry date the same as the due date for the primary domain otherwise the invoiceing gets messy - on the primary domain set the exipry date the same as the Next Due Date
-
make sure for domains, free domains you add 1 year renewal unless you are doing 2 year only packages. (ie .co.uk)
-
also setting the .co.uk to 2 years only, disabling the 1 year, ment that accounts with free tld were getting billed.
-
how does the date move forward. on payment of the invoice does it apply the registration period extension to the domain and the next due date, perhaps
-
searching how to configure autorenewing free domains when they have 10 years on them
-
if auto renew automatically renews for one year, how does whmcs cope with .co.uk
-
on domain pricing for TLd, if you use -1 for transfer and rebewa; it will disable this option! (should transefer boxes be lareger as you go donw th elist)
-
If a domain has more that one yearleft and is being rewed as a free domain will whmcs decline to send the renewal request to the registrar
-
TLDs (and ccTLDs) supporting EPP and ID Protect http://forum.whmcs.com/showthread.php?t=13390
-
better way of setting up a domain name, register and renewl should always be the same and disable all transfers apart from year 1
-
if free domain is already registered for more than one year will whmcs still add a year?
Domain Renewal when no automatic Registrar
An issue cropped up while i was setting up my client accounts in WHMCS that your system might sort.
when you setup a domain name you have 3 date boxes:
- Registered Date: when the domain is registered
- Expiry Date: when the domain name expires
- Next Due Date: when the WHMCS should bill the client
My problem arises if a client transfers in with a domain with lets say 2 years on it. currently i do not use an automatic registrar, when the client is invoice the date the domain is to be renewed is a year on top of what is there so i have changed the expiry date to match the 'Next Due Date', this makes the invoice reflect the next year along with hosting renewal. this scenario is only valid for the free domain on a hosting package.
Dealing with domain provision where auto registrar setup and mail in payments
- intially i set the order from pending to active in the order page, this did not seem to work
- i set it back to pending
- i then click on view order and it had a button on this page to set back to pending which i did - the order was tagged as incomplete
- (manage orders page popped up) the registrar options then poped up and allowed me to select an auitomatic registrar, for some reason reseller club was not selected
- i have also addded both domains IP address, my main server one and my static ip as it is the main server that seems to do the curl things, see this thread
http://forum.whmcs.com/showthread.php?t=38581&page=2#18
good website
http://www.resellerclub-mods.com/whmcs/knowledgebase/49/I-whitelist-my-Server-IP-at-ResellerClub-but-the-FREE-tools-still-does-not-work.html
- i will reporvision the domain which seems to need all details filled in for it to work
Manual Renewal Required message
on the page http://docs.whmcs.com/Domains_Tab#Domain_Sync_Enabled the section: "Auto Renew Requires Product"
With this option ticked, domain names with a Recurring Amount value of 0.00 will only be renewed if there is a corresponding service under the same client with a matching domain name. If there is none, the domain renewal will not be processed and a "Free Domain Renewal Manual Action Required" error is emailed to admins along with an entry in the Activity Log. "
When a domain do not have a product associated with it giving a free domain, the administrator will receive the following message:
The domain example.co.uk (ID: 11) was just invoiced for renewal and automatically marked paid due to it being free, but because no active Product/Service matching the domain was found in order to qualify for the free domain offer, the renewal has not been automatically submitted to the registrar. You must login to review & process this renewal manually should it be desired.
There is not activation link in this email but would be a great feature to have an activation link.
Unsorted Notes
The following note might be already in place in the instructions above, but just incase until I get more time I will inclued them here
Free Domain Questions
-
next dues dates should be the same for free
-
keeps invoicing nice, but as soon as you run a sync script will not work currently i beleive on the primary domain that you should have the domain expiry date the same as the 'Next Due Date', maybe 00/00/0000 is the same (not 100% sure about that) as a non registrar is dumb and cannot work this out.
-
Offering Free Domain Registration with Selected Packages http://docs.whmcs.com/Domains_Configuration
-
when you buy hosting with a free domain, it tells you which domains are free
-
when it creates a domain it show 0.00 in first payment and recurring payment, this is how it is free
-
free domain, applies to select all domains, select requires and select all domains types. payment method dont selecet any (transfers are probably one time)
-
the fact that the free domain and the domain is linked just by the domain name is a bit ambigous ast eh client might elect to have another domain name as his free one
-
what happens if a client wants to change the domain name that is hosted, would changing this change which domain is free
-
to kill birds with one stone add a free domain name tick next to the cost in a domain. this ouwld allow an ivoice to show the domain name cost but then show it free ie..
1 mydomain.co.uk (value £8.00) £FREE
this would also allow german users to set more than one free domain name for their clients.
- on the hosting page make it clear what domain is their attached free one and/or the free domain to show which hosting package iot belongs to
WHMCS Domain renewal logic notes
- whmcs is made of 2 parts. one with logic and the second is where all the account info and pricing for them is kept and is static so once set it is et unitl the bulk changer is used
- £0.00 = FREE, this can cause confusioin as the two for me are different
- a free domain is maintain as free as long as a qualifying product is on file. the domain and product are matched by the domain name
What happens when the qualifying product is removed? - The domain price reverted to a normal price
According to matt there is logic to prevent free domains remaining free when their qualifying product is removed.
A free domain renew logic issue
A free domain will not renew unless there is an active product for the same domain so there is protection against a free domain renewing when it shouldn't.
what about domains set to free/0.00 where they do not have an associated product. ie my domains are set to free so will these not renew
#439408 - Renewing a free domain after they transfer in with 3+ years
This is a thread from WHMCS Support and explains a alot about how the domain renewal logic works. I will also put my conclusions at the bottom.
Me
- I will be using resellerclub as my automatic registrar.
- since writing this, .co.uk now support 1 years renewals
I have transfered in several clients recently and their domains have 3+ years on them which means i do not need to add any more years on to them for a while. But the problem is they are on a hosting package with a free domain. Their 'Next Due Dates' match in the hosting and domain name to allow for correct renewal. now from reading up, a free domain is renewed every year which gives rise to 2 problems.
- if the domain has, lets say 3 years left on it before it expires, will whmcs recognise this and not add any more years on until it needs to, ie less than one year left when renewing
- how does it handle .co.uk domains when they must be renewed for a minumum of 2 years at a time.
WHMCS Staff
- You would need to set the next due date accordingly for the future date it is currently due for. Otherwise, a renewal would be generated sooner than you wish.
- You need to ensure the period on the .co.uk domains is 2 years and the next due date is correct for the current expiry.
Me
This does not answer my question at all. also if I have 900 domains to monitor how can I check them all manually and I will also be using a expiry date sync cron job which will always set the correct expiry date for domain.
Just in case I did not put it in my previous email, these renewals I talk about are for hosting with free domains. According to your literature your system auto renews them once a year with hosting when they are set to have a free domain and the 2 'Next Due Dates match'.
I refer you back to my original question. I need to know the logic of renewal for Free domains in reguards to the 2 scenarios below.
I can try and write a better client scenario if this will help.
I am not a noobie i have wrote a 21 page installation guide. The answer i seek is technical not end user level.
WHMCS Staff
- The domain would be renewed with the registrar and the due date in WHMCS increment forward when the renewal invoice was paid by the client. If you just want the due date to increment forward and not be renewed you should set the registrar setting for that individual domain to "None", then you can set it back at a later date.
- As long as you've only configured a 2 year renewal price as Andrew advised then .uk domains will only be renewed for 2 years at a time.
Me
Your answer did not help
WHMCS Staff
Sorry for the frustration. However there shouldn't actually be any problem here. Free domains don't renew every year regardless of the settings on them. They only renew when the domain is set to be due. So if the next due and expiry dates are both 3 years out in the future, then that domain will not renew until 3 years time. So basically I think the answer to your original first question is infact Yes, WHMCS will recognise it's not due and not renew it, since the due date won't be the same time as the hosting package.
And for .uk domains, you would ever setup a 1 year period pricing for them, so they always default to a 2 year minimum. Again with the above clarification that should clear this up for you as free domains do not renew every year. Just when set as due, which for a .uk would be ever 2 years only.
Me
Hi, i can see you read the ticket to tried to answer but again no logic was descibed. this question is fundamental to how free domains work and depending on the outcome maybe a bug or feature request is needed. so i will try once more.
This question is around the question 'what happens with autorenewals of free domains which already have a number of years on them?'
You do not want to keep adding years on to a domain that already has loads. It is a waste of money and might not be possibly. so i have writtena worked example below hopefully that might help explain myself.
Lets assume:
- All my hosting packages are for one year
- All my hosting packages will get one free domain
- I have configured resellerclub as an automatic registrar
i use the cron job to sync domain expiry dates
Scenario:
I manually transfered in one customer today (10-01-12) with a .com address, he has 4 years left on his domain. The following are the dates in the clients profile
- Hosting Next Due Date: 09-01-2013
- Domain Next Due Date: 09-01-2013
- Domain Expiry Date: 05-05-2016
When 09-01-2013 (or slightly earlier) comes and the customer renews for one year 1 of 3 things will happen:
- the domain and hosting is extended in whmcs for one year, the domain at resellerclub is extended a further year till 04-05-2017 and the expiry date in whmcs is updated
The following invoice(s) are sent
invoice for hosting 09-01-2013 - 10-01-2014
invoice for 1 year domain 05-05-2016 to 04-05-2017 (£0.00? full value then discounted?) - hosting only is extended in whmcs for one year, the domain at resellerclub remains unchanged at 05-05-2016
invoice for hosting 09-01-2013 - 10-01-2014
invoice for 1 year domain 09-01-2013 - 10-01-2014 (£0.00? full value then discounted?) - hosting only is extended in whmcs for one year, the domain at resellerclub remains unchanged at 05-05-2016
invoice for hosting 09-01-2013 - 10-01-2014
no invoice for domain is sent
We will deal the .co.uk after this. i need the logic so i can figure out how whmcs works with free domains
Me
it is recommended to have the 'Next Due Date' of both the domain and the hosting to match otherwise you send out invoice for them both the hosting and domain and the customer does not get a free domain.
please advise ( i refer you to my worked example)
WHMCS Staff
The domain would be renewed on 09-01-2013 for 1 year and therefore extended until 05-05-2017, the Next Due Date would then become 09-01-2014.
Normally the Next Due Date of the domain and hosting should be the same yes, this ensures they are invoiced for renewal on the same invoice and therefore the domain is only renewed when this invoice is paid. However you seem to be implying that because the domain has 4 years to expiry you don't want to actually renew the domain until the year of expiry (ie. 05-05-2016) Is that correct?
If that is the case you'd set the domain's Next Due Date to 09-01-2016 and the domain will not be renewed in 2012, 2013, 2014 or 2015, but the renewal invoice in 2016 will include both hosting and domain for 1 year. The expiry date would become 05-05-2017 and the next due date 09-01-2017.
Me
After reading you reply i have concluded:
- that free domains DO NOT WORK. They only work in one situation which all be it, is the most common it is by no means the only one.
- unless the domain is bought new when a client buys hosting with me, the free domain is not guranteed to work and the client is most likely going to receive an invoice for the domain
- there is no way of tagging a domain name to a hosting package to make sure it that one domain is free with this hosting package.
- using the 'Next Due Date' by you own answer only works by virtue and if i set another date on this account it will get billed on that date separately. matching and altering dates on automatic transfers etc.. is a stupid thing to try and do manually.
- the work load to manage a large hosting site with the setup is massive
Solution:
- make an option in a domain's setting to tag it as a free domain belonging to a certain hosting package
- make an option in a domain's setting to tag it as a domain belonging to a certain hosting package
- this options is really important especially if the customer has many domains, should i go and hunt the domain name that he is getting free and manually check the dates.
- allow a domain or free domain to be invoiced for one year to match the hosting to keep it neat (cutomers like that) for that year period
- make an option in settings somewhere to only extend/renew a domain if it is required. this would check the Expiry date automatically) ie if more than one year do not renew. (i am surprised why this is not so and why i wanted to get to the bottom of these settings) or whatever number of years is appropriate etc.. this is required for full automation especially on transfers.
- allow someway of handling .co.uk properely, if these are renewed every year for 2 years this will get stupid, i tried setting up 2 years only with a free domain package and it just billed for 2 years
- proper instructions on how to setup domains and free domains including all the issues with dates i have outlined here when you have imported using the whm import utility.(all instructions you have written are clear and concise but have totally ignored this particular section)
I hope these ideas help. I am not alone in this plight but i have been a bit more vocal and concise. please can you clarify these points and let me know if they are something you will take forward as i really like whmcs but i found this particular part of whmcs very lacking but should be easily fixed.
WHMCS Staff
Thanks for taking the time to send in your feedback. I think there are still a few misunderstandings here of how it actually works but we do appreciate your comments. In response to some of the points you raised:
- The free domain always needs to match the products domain, therefore it's quite easy to pair the 2 items up
- A .co.uk free domain is handled properly. It does not renew every year. No 2 year minimum TLDs renew every year, not just .uk
- A free domain will not renew unless there is an active product for the same domain so there is potection against a free domain renewing when it shouldn't.
All you need to do for the existing domains is add the domain records, set the price to free, next due date to match the product, and expiry date to the real expiry date of the domain.
#TYY-003776 - what happens with renewals of a serivce with a free domain with premature domain renewal
Me
firstly let me confirm my situation
- Domain Sync and Sync Next Due Date are enabled
- i have CRON enabled
- i am computer literate etc....
can you answer/confirm the 2 following questions:
- if you create a new service with a new domain which is free, payment period 1 year, the domain will get renewed when the service is paid for in 1 years time?
- if you create a new service with a new domain which is free, payment period 1 year, and "Enable - Number of Days to Set Due Date in Advance of Expiry: 14days". How does this work because the Free domain would be out of sync with the service. 1 of 2 things i can see would happen here:
- whmcs will only send an invoice for the domain, and the domain will get automatically renewed for free seperate to the hosting service
- WHMCS is clever and will send the service + domain renewal on the same invoice 14days before expiry
The reason i ask these questions is i dont want a domain name to get renewed automatically if a client does not renew their hosting with a free domain name.
WHMCS Staff
To address your points:
- Provided the Next Due Date and Payment Method of the domain and the product were exactly the same; yes.
- In this situation, scenario i will occur.
You can enable the Setup > General Settings > Domains tab > Auto Renew Requires Product option, which means that the domain will only be renewed if the service is still active at the time the domain comes up for renewal.
Me
as a followup to the option "Only auto renew free domains that have a corresponding active product/service for the same domain"
how would this apply to my situation (option 2) if i set the domain to be renewed 14days before. From what i can see the domain will still get renewed automatically because there is an active service and then, if in 14days my client decides not to renew his hosting i will of renewed his domain when not required costing me money.
Have i found a bug. I would of expected the following when using this option:
when using "Enable - Number of Days to Set Due Date in Advance of Expiry: 14days"., the php should check to see if the domain is a free domain, which if dependent on a service to be free, has the same start/renew date, the service should also be billed 14days earlier so as to keep the invoicing and financials connected. Then if the hosting/service is not paid for the domain is not renewed.
This really is targeted at new domains that are taken out with hosting packages.
WHMCS Staff
In that situation the domain would still be renewed for free separate from the product of the same name. It is for this reason we recommend that when offering domains which renew for free to disable the Sync Due Date option: http://docs.whmcs.com/Common_Promotions#Notes
Me
thats my point. This is a bug.
This needs fixing how i described below. This domain sync features is very useful for me and my clients.
can you clarify that you will add this to your bug tracker.
WHMCS Staff
We welcome feature requests online at http://requests.whmcs.com . Feel free to search for and vote up existing requests or submit your own ideas.
In the meantime you may find a member of our community has developed a solution for this, so it would be worth searching our App Store: http://www.whmcs.com/appstore/
Me
I would just like to clarify the behavior of a setting - Auto Renew Requires Product.
(http://docs.whmcs.com/Domains_Tab#Auto_Renew_Requires_Product)
- this option purely gets WHMCS to do a Boolean check to see if there is an active product/service for this domain when processing a domain for a renewal. Dates are ignored.
- if there is no active product/service for this domain an email is sent out to the WHMCS admin with a "Free Domain Renewal Manual Action Required" error message so that the admin can manually go to WHMCS and renew the domain (an accept/approve link in the email would be easier and a nice feature). Dates are ignored.
- As a small followup, if the domain and service renewal dates match, an auto renewal would not occur until the customer had paid and "Auto Renew on Payment" was turned on.
WHMCS Staff
Yes your assertions in points 1 & 2 are true.
- Yes that is also a correct assertion.
#MTS-670914 - free domains and preventing auto renewal
Me
I currently have annual hosting services with free domains packages on my whmcs.
some of these accounts have domains that expire years in the future so when the hosting service is renewed they do no need their free domains renewed at a cost to me that i do not need to pay for.
is it possible to set a hosting package with a free domain that will only renew that domain at hosting renewal if that the doamin expiry is less than 1 year (or xxx years).
WHMCS Staff
WHMCS will attempt to automatically renew the domain name when the Expiry Date that it has stored comes up.
If this date does not match the date with the registrar then this could cause the domains to be renewed early or late.
If you haven't done so already I would recommend going to Setup > General Settings > Domains and enabling Domain Sync, after doing so you'll want to set up a cron job to run the domainsync.php script. This will allow WHMCS to contact your registrar, find out the expiry dates for your domains, and then update this information in WHMCS.
You can read more about this at http://docs.whmcs.com/Domains_Tab#Domain_Sync_Enabled
Me
i am not sure this answer my question.
i have all the cron stuff setup with reseller club etc..
My question relates to FREE domains.
when a hosting service is renewed it seems to renew the domain as well because it is attached to the hosting service. Can you clarify this is what happens.
WHMCS Staff
> when a hosting service is renewed it seems to renew the domain as well because it is attached to the hosting service.
That's kind of what happens. It's a bit more complicated than that though.
When you use the Free Domain option with a Product/Service it will offer the client a free domain name which will be renewed as long as the associated service is active. This free domain will always have a billing cycle of 1 year regardless of what the customer selects.
Example:
http://screencast.com/t/iaJEmwUNq
So, there are two things to address to clarify how this all works.
> 1. How do the domain and service get invoiced together?
This works because the domain name and the service share a Next Due Date. WHMCS groups invoices together entirely based on the due date.
> 2. How is the domain name free?
If you go to the domain name page you'll see that the domain name has a recurring amount of "0.00". Anything that is "0.00" is automatically marked as paid by WHMCS.
It's not free because it's attached to the service. It's free because it was purchased along with the service. It's still an individual entity that has its own due date and its own recurring value. If, for some reason, the domain has been registered for longer than 1 year or the expiration date has changed with the registrar then WHMCS has no way of knowing that unless you have domain sync enabled.
Me
Can you just clarify the scenario below because i think you have identified the 2 variables in this equation.
domains and hosting are seperate items and it is just by their invoice date that they appear on the same invoice.
So if a customer transfers in with let say 10 years on their domain i obviously dont want to keep renewing that domain and wasting money or a domain might of got extended automatically along the transfer line, ie enom automatically renews a domain for a year if there is not many days left on the domain when transferring.
So (still with free domain)
when the domain is transferred in, the hosting services configured etc.. I can then manually change the due date on the domain next due date for some time in the future and the domain will stay free because it has 0.00 set.
The domain would then not get renewed until the time i have set in the future, thus saving me renewal fees on a domain with extra years.
the domain and hosting services only appear on the same invoice because of the invoicing date but they are both quite seperate.
WHMCS Staff
> The domain would then not get renewed until the time i have set in the future, thus saving me renewal fees on a domain with extra years.
Yeah, that's correct. WHMCS won't attempt to renew the domain until the Next Due Date for that domain name.
So, if you had Domain Sync enabled then WHMCS would automatically check with your registrar to see what the expiration date was; it would then update the Expiration Date and Next Due Date in WHMCS to match that date.
Me
i am a little confused now.
- why would the CRON job alter the 'invoice due date'. (ps i have date syncing enabled).
- And if it does alter the due date, what does it alter it to? (i know the CRON syncs the expiry dates of the domain)
if what you said is true above, then all my domains would not get renewed or purchased until their expiry date meaning that i would never have to pay for extra years when i did not need to which is the opposite of what i was told earlier.
WHMCS Staff
> - why would the CRON job alter the 'invoice due date'. (ps i have date syncing enabled).
The domainsync.php file does not alter the "Invoice Due Date". If you have the "Sync Next Due Date" option enabled at Setup > General Settings > Domain then it will alter the domain's Next Due Date in addition to the Expiration Date.
> if what you said is true above, then all my domains would not get renewed or purchased until their expiry date meaning that i would never have to pay for extra years when i did not need to which is the opposite of what i was told earlier.
WHMCS will only attempt to generate a renewal invoice around the time of the Next Due Date for the domain name. If you have Domain Sync enabled, with Sync Next Due Date also enabled then WHMCS will automatically update the Expiration Date and Next Due Date of the domain name for you.
If you do not have this for you then you will need to update these manually.
Me
I appreciate the help but you have given me 2 different scenarios for the orginal question.
NB this is for a domain transferring in with extra years (lets say 5) to a hosting service with a free domain (this will be the one transfered in)
- not matter what the settings are because the domain is set to free and matches the hosting services it will get renewed every year adding additional years on.
- the cron job changes the expiration date and next due date for the domain in whmcs to match the real domain expiration date, this breaks the shared invoice with the hosting service, but the domain is not renewed until it is near expiration thus i do not end up paying for the extra years. this is what i want. so to clarify with this option, if a domain is transfered in with extra years those years are used up before the domain is renewed at the register irrespective of whether it is free or not.
WHMCS Staff
Honestly, I think the confusion here lies with the phrase "cron job". A cron job is something you set up on your server to tell it to run a particular file repeatedly.
There are a few different files that you can create a cron job for in WHMCS; the cron.php file, the domainsync.php file, and the pop.php file.
By default you would have only set up a cron job to run the cron.php file; this is because this file is required. The cron.php file DOES NOT automatically sync domains with your registrar; even if you have Domain Sync enabled it will not do it.
In order to have WHMCS do this you need to set up an ADDITIONAL cron job to run the domainsync.php file. This file syncs domains with your registrar.
In short:
If you don't have Domain Sync and Sync Next Due date enabled AND a cron job set up to run the domainsync.php file then WHMCS will not automatically update the Expiration Date and Next Due Date for you. It will simply go by whatever it has set for the Next Due Date for the domain and generate invoices accordingly.
Me
I have already told you i have all the CRON stuff setup(at the beginning, my second post) (cron.php file, domainsync.php = setup). i understand what a cron job does. I write my own php code. i understand these things. There is no confusion at my end. My whmcs is setup correctely.
so can you look at the 2 scenarios (2 posts below) i pointed out below (which you have suggested) and tell me which is true.
1. or 2.
WHMCS Staff
Both of the scenarios that you've provided can be correct.
If you do not have Domain Sync and Sync Next Due Date enabled then Scenario 1 is correct.
If you have Domain Sync and Sync Next Due Date enabled then Scenario 2 is correct.
Me
that is exactly what i needed.
thanks
Now I have the correct EPP code, how do I reinitiate the domain transfer request?
Domain Transfer using WHMCS
I received a domain transfer request from my client, the EPP code supplied was wrong. Now I have the correct EPP code, how do I reinitiate the domain transfer request?
If anyone can be give me the steps to be done in WHMCS to re-initiate the domain transfer ?
Solution:
First Read this wiki article at whmcs.com for reference http://docs.whmcs.com/Domains_Management#Handling_a_Failed_Domain_Registration
- So you have to go to your client profile.
- You choose tab domain
- You select the right domain if your client have many domains
- You correct the wrong EPP code
- You save at the bottom of the page your modification
- Finally you click on Transfer
Dont see options to modify EPP code and Transfer?
When I go to "Domain" tab, it displays :
Order Type : Transfer
Domain : xxxx.com
Registrar : xxxxx

Status : Pending Transfer

etc...
Near the bottom of the Domain Tab in the client's profile there is a row of buttons. On that row is "transfer".
If you click that, it will take you to a second page that has a field for the EPP code. Input the EPP code and then under "Are you sure you want to Transfer this domain?", click yes.
Manually adding Domains to WHMCS
This process can be useful if you:
- Want to setup a domain record in WHMCS but have already transfered the domain in directly by your Registrar.
- You have created an account on your WHM server manually and need to add in a matching record for the domain.
- You have run the WHM import utility but now need to add all of the domain records into WHMCS to match the cPanel accounts added.
Instructions
Manually adding a domain name does not required that you have configured TLD and their registrars. What having these setup before this process means is that all the settings, price and associated registrar will be correctely written in to the domain profile.
- if this is the first domain and you get the following message displayed, just click on 'Click Here' and go to the next section:
No Domains
No domains found for this user. Click Here to place a new order.
- if this is the second domain that is being added you need to go to the summary of the client you are working on and click on 'Add New Order' in the middle of the page and then proceed to the next section
Next Section:
- The clients name will be auto filled in
- Goto 'Domain Registration' section
- Select 'Registration' (as per WHMCS wiki)
- Enter the domain i.e. example.com
- Leave registration period alone, should be set to 1yr usually.
- Don’t add domain addons as clients don’t need these (optional)
- Goto 'Order Settings' section
- Untick all the boxes unless the customer needs notifying
- Put order status to Active (unless Pending is required)
- Submit order
- Click on the 'Domain' link. It should be the only one under the item column
- Get the whois record for the domain and fill in the 'Registration Date' and 'Expiry Date' for the domain, click save changes. (If you have Due Date and Expiry date CRON setup you don't need to do this althought it looks betters until the database is synced.)
- Goto the 'Products/Services' Tab and get the 'Next Due Date' for the relevant account, copy and Paste that into the 'Next Due Date' on the Domain page for the domain that has just been setup. Save changes
- (Not Sure this is needed)
- Currently I am using the 'Next Due Date' for the domain expiry as well so the date ranges billed for look correct on a customers invoice
- Also make sure the registrar and payment methods are the same to ensure a free domain is applied.
- If this is a second domain that you need to add as free, use a coupon code to add 100% off see http://docs.whmcs.com/Promotions, ie. Free Domain
Notes
- When setting up a domain, the first and recurring pricing amounts should be the same
- On my developers accounts where the actual hosting is free I can not match up 'Next Dues Date' so I just use the expiry date and put the price down to 0.00 or you could use promo code (not Preferred) which has 100% off /Free
Links