This article will include the capturing of non-digital media from Cassettes, Cassette Inlays, Disks, Disk Sleeves, Manuals, Newsletters, Packaging and anything else that is printed.
Scanning Software
- NAPS2 - Scan documents to PDF and more - NAPS2 is free scanner software made easy. Scan to PDF, edit your documents, and use advanced features like OCR. Available on Windows, Mac, and Linux.
- SANE - Scanner Access Now Easy - SANE is an application programming interface (API) that provides standardized access to any raster image scanner hardware (flatbed scanner, hand-held scanner, video- and still-cameras, frame-grabbers, etc.).
- IrfanView - One of the most popular viewers worldwide. This software also handles batch scanning.
- ScanTailor Advanced | Book Scanning Post-Processing Hub - The official community portal for ScanTailor Advanced. Explore professional book digitization tools, advanced image processing algorithms, and comprehensive guides for modern archiving.
Plus4world
Preferred method for Inlay, Tape and Disk Scans
- Forum (#44544) - Plus/4 World - Their recommendations for capture
- About the covers: if readable, a 950px max wider JPG would be enough, if you want or need (for readability needs) a bigger one, we use to put up the 950px wide one with a [Larger picture] link for a bigger version.
- About disks and cassettes: 950px wide JPGs would be large enough.
- Manuals: if simply leaflets, or limited to few pages, page(s)'s scans would work; if they're quite big, sort of *real* manuals, we use to include'em as publications, and yes PDF is the preferred format in that specific case, although sometimes in the past times we also used to simply add a link to the PDF manual straight in the archived software's page.
- I also prefer that the inlay scans should be a single front and back so they can be printed out, unlike some of the scans where the inlays have been cut up into to several bits.
- Examples: All newer inlay scans are kept as one, e.g. check Hidra for a recently added one. A lot of the older ones have been replaced already, e.g. check Tycoon Tex (which used to be "cut" as well). If you see anything like Bandits At Zero - those can be replaced with higher quality scans as well. Not a high priority, but should be done if possible.
- Q: Is it best to use a flatbed scanner or a camera to get the tape images?
- best approach:
- Flatbed scanner for paper
- Camera for cassettes.
- best approach:
- Q: Can scanning 5 1/4 inch disks in a flatbed scanner harm them? i.e. ionise the magnetic material etc..
- I'm not sure if it would be affected, I don't remember this question ever coming up. My suggestion would be: either try this with a dummy disk first (that you wouldn't mind getting destroyed), or scan only the disk sleeve, or just take a photo as if it were a cassette.
- Don't worry, it will not affect the disk when you put it in a photocopy machine or scanner. It is the same as if you'd use a torchlight on it...
- Digitally imaging and verifying them first, negates this issue.
- Will Scanning Floppy Disks Corrupt The Magnetic Disc? - This tutorial sets out to test whether the process of scanning the surface of 3.5 inch floppy disks will damage the disk's magnetic storage medium?
- Can you scan a floppy disk safely? - Commodore 64 - Lemon64 - Commodore 64 - Probably a very silly question, but can you safely scan 5'' 1/4 disks without damaging the contents? As in putting them in a scanner. Thanks.
- Further Notes
- All scanned tapes, they should all be rewound before taking a picture.
- When scanning floppy disks, if they are in the sleeve make sure all of the label is shown.
- Good Tape examples
Retro Commodore
- Recommended Software
- IrfanView
- ScanTailor Advanced
- Tutorials
- The rules of scanning for Preservation | Retro Commodore - In the need of preserving retro hardware as well as software + packages etc, there’s usually a lot of confusion on how and what to scan. This page should partially give the information needed to make good scans.
- Scanning Tutorial 3 - part 1 - for making great pdfs - YouTube | Tomse - ScanTailor Advanced
- Tomse - YouTube - Many more scanning tutorials
- PNG vs. TIFF: Which is better? | Adobe - Learn how to choose between PNG and TIFF files when youâre looking to save and store digital images. Discover which file type is right for you in this handy guide.
- Specific Notes
- Make sure, when you scan that you scan in a lossless format.
- PNG/TIFF and 600dpi (TIFF can be lossless or lossey, if you use JPG compression, so if using TIFF, either do it uncompressed or use lzw, deflate or zip algorithms for compression which does not affect the byte stream.)
- Most scanning software can be configured to use other formats, but even very expensive highends scan in jpg and sends to the software to be saved in png/tiff.
- My own does it.. so I'm using sane on linux for this scanner.
- Automatic doc2pdf software/drivers etc tend to make lossy formats, which is why I've built my own pipeline.
- if you want to check your scanning capabilities, make a single scan, and send it to me before you start scanning.
- I tell this to people, unfortunately most don't do it, so they scan everything.
- Only to find out they need to redo all their work, I recently had a bloke who wanted to scan his books, he did so in 150dpi and jpg, destroying the books spine (the glue crystalized), and he didn't want to start over.
- I have just tested naps2.
- even though saving as tiff, my scanned images have jpg artifacts so they are saved in a lossy format.I wouldn't use it.
- I wouldn't use it.
- for batch scanning on windows, I use irfanview, otherwise as I said, using sane on linux.
- shoulders: See my notes above on NAPS2 on mitgation
- For the material that has clamps/staples(?), remove them, and make them on the document scanner.
- When it isn't possible to use the adf scanner, one of these makes wonders - choose the right size for your flatbed
- A4 Cutting Mat 30cm x 22cm - Crafting Board Mat, Self Healing, Double Sided, for Quilting, Sewing, Scrap Booking, Fabric & Paper Craft. Flexible, Non-Slip, Accurate Grid Lines & Measurement : Amazon.co.uk
- They are heavy ish, and quite good to flatten the paper.. sometimes I put extra weight gently on top of it, I don't close the lid when doing this.
- The reason for the weight and the cutting mat is for "ironing" out the paper.. it doesn't take much before text seems wobbly/wavy.
- When your scans here are great, that contributes quite a lot to the final result.
- Always work on a copy of the original. (I'm starting to remember quite alot of things that I really don't think about anymore, kinda like breathing - also because many of the processes are automated now).
- Irfanview is free and does a great job of batch scanning
- I've been using it for scanning since I began scanning, and as a pic viewer before that... I'd guess for some 20+ years.
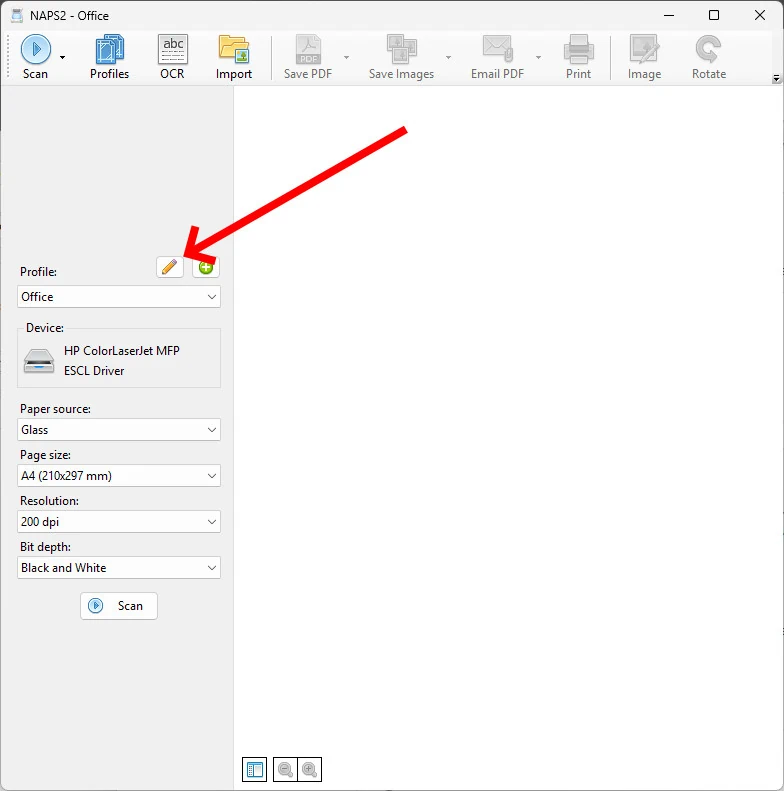
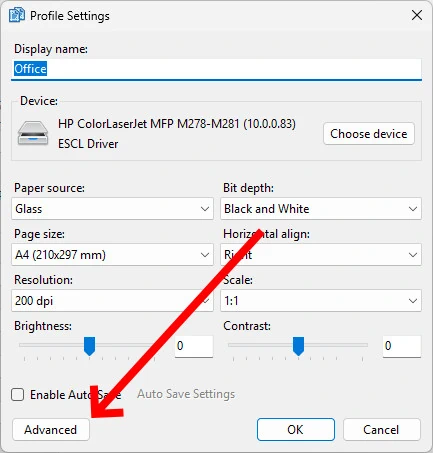
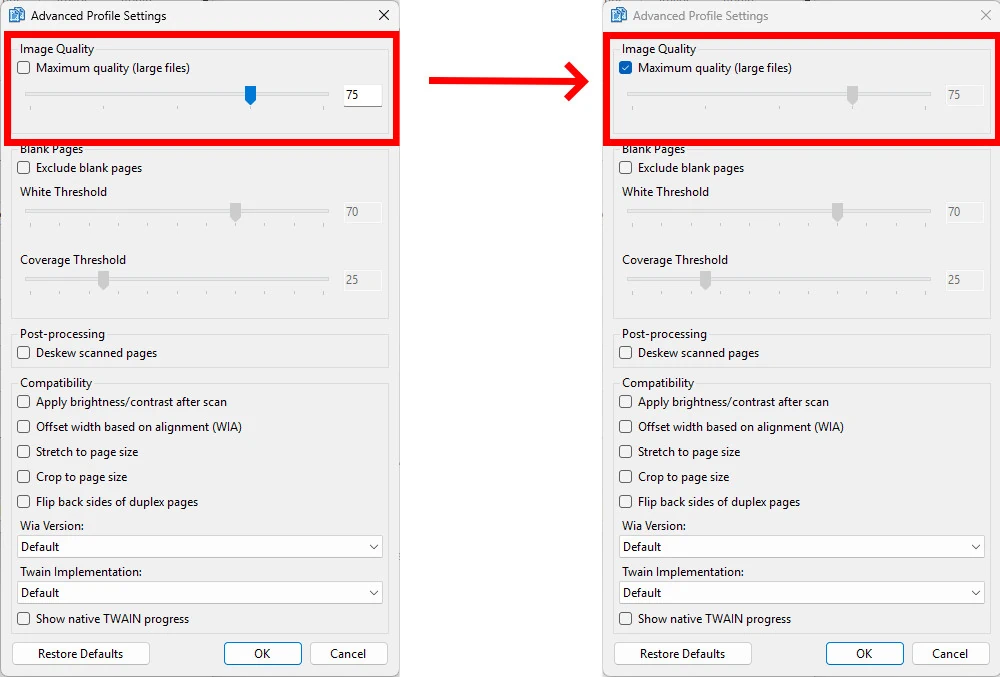
NAPS2 - Resolving Lossy Image Quality
I have just tested NAPS2 and even though saving the scans as TIFF, my scanned images have JPG artifacts indicating they are saved in a lossy format.
Cause
- By default the scans are saved as JPEG when first made. So when you go on to save/export them the artifacts will already be present.
- The program does not save the scans in memory, it commits them straight to disk.
Solution
- Edit the profile's advanced options and enable "Maximum quality (large files)". This force the lossless PNG format to be used for the initial save to disk.
- Step 1
- Step 2
- Step 3
- Step 1
Additional
- If by default JPEG is used, artifacts will always be present, the user should be informed of this upon first use.
- I have raised an issue at the NAPS2 GitHub: Make Lossless scanning more obvious for archivers in the app and add some documentation · Issue #811 · cyanfish/naps2 · GitHub
- TIFF and JPG have their own options under "Save Images" for when you want to save the scans directly as images. when you perform the save you can select the target format.
Links
- NAPS2 General Discussion: Which quality when checkbox "Maximum quality" is unchecked? | Sourceforge
- Q:
- In "Advanced Profile Settings" there is an option "Maximum quality" which determines the jpeq quality of the scanned page.
- Which quality level is taken when this checkbox is disabled/unchecked?
- A:
- "Maximum quality" means that PNG encoding (lossless) is used instead of JPEG.
- If you're saving to PNG, that option makes sense, otherwise just pick a high JPEG quality because PNG takes up a lot more disk space.
- Q:
- NAPS2 - Question about PDF sizes | Sourceforge
- The quality slider is just for JPEG I think?
- PPP probably uses JBIG2 compression, which NAPS2 doesn't support at the moment (it uses G4 which isn't quite as good). I don't think I will be able to add support for JBIG2 in the near future.
- Yes, it would have to be the lossless version of JBIG2 to avoid that problem.
- NAPS2 - picture compression within pdf files | Sourceforge
- Yes, NAPS2 only uses JPEG and PNG currently. JPEG2000 and JBIG2 support is something I'd like to add in the future (for JBIG2 specifically lossless only, to avoid the known issues with lossy mode).
- Imported .jpg images are reencoded => quality loss · Issue #160 · cyanfish/naps2 · GitHub = Fixed
- colour pdf size - compression · Issue #80 · cyanfish/naps2 · GitHub
- I've implemented this on my fork, from an old pull request from Luca De Petrillo that was sent here years ago. It add JPG codec to the compression and we can change the compression quality. I had to adapt it since the code was there from a long time and rewrite it.
- It work really well. Using it in combination of MAX Quality in your profile, allow you to keep your source at full quality without any losses (PNG), and then tweak the PDF Export to your liking to have the best file size and quality.
- Also since the source is not degraded, you can do edits and it still look perfect.
- Was able to get almost a ratio of 5/1 on certain PDF files (75% quality). To propose a new Pull Request I need to get accustomed with this new code since that was done with the 6.1.2 source.
Stargazer Manual Scanning Notes
These are just for reference at the minute as they are very in complete
- Create PDF from images
- select images
- tick 'Fit picture to frame'
- use custom size
- select portrait in printer properties
- print using `Microsoft Print to PDF`
- use an online convert tool to put to A6
- eg Stirling or PDF24
Other Preservation Links
- Better Anime & VGM Soundtrack Ripping - YouTube - Tips on scanning and ripping CD's. With focus on Anime and Videogame Soundtracks.