I struggled to find instructions on how someone actually transferred a real Commodore Plus4 or C16 tape into a TAP file written for newbies. I hope to address that and once you have done a couple everything will make sense. I always find once I have got something to work everything else gets easier.
Prerequisites
Hardware
- 2 x Pendrives
- One for booting Dos
- One for holding all of the software we will run (Commodore and PC) and to hold TAP of captures tapes.
- 1 x Transfer cable (X1531 / XE1541)
- X1531
- Used for connecting 1531 directly to the PC's parallel port.
- XE1541
- Is better for newer PCs.
- is compatible with VC1541 and MTAP so I will use this one.
- This is the same as X1541 but with diodes for newer types of parallel ports.
- Other cables such as can be used, but for the purposes of this tutorial this is what I am going to use becasue it is what I have
- X1531
- 1 x Old PC with a compatible Parallel port (LPT) (DOS PC)
- 1 x Modern Windows 10 PC
- 1 x Commodore Computer (C16 / Plus4 / C64)
Software
- Rufus - For creating bootable USB Pendrives
- Windows 98 SE Boot Disk Image
- Enhanced DOSKEY
- Enhanced DosKey with autocompletion
- You can probably use DOSKEY from MS-DOS if you can find it.
- CWSDPMI - (Is included in MTAP and VC1541)
- MTAP
- TAPSERV (included in MTAP)
- Software that runs on a C64 to aid in generating digital backups of tapes (TAP) of the X1541 cable range.
- Only Wholewave (V1 TAP) format is supported.
- PTAP
- VC1541
- 1541 Drive emulator you run on your PC (supports X1541 or XE1541)
- This works with any Commodore that has the serial port.
- TTAPSERV
- By Ulysses777
- Software that runs on a C16/Plus4 to aid in generating digital backups of tapes (TAP) of the X1541 cable range.
- Both Wholewave (V1 TAP) and Halfwave (V2 TAP) formats are supported.
- Tape Wave Checker (formerly WAVCHECK) (will add link later)
- By Ulysses777
- A VERY experimental program for checking the waveform of a tape.
- PTAP
- Temporary download link
- By Ulysses777
- This is an experimental modification of PTAP which will also work with halfwave tapes. There are no extra command line switches needed.
- TAPClean Front End
- A fork of FinalTAP with a GUI
- Maintained by Luigi Di Fraia (and is maintained)
- Archiver-Copy
- Plus4
- Written by Pigmy, a legendary member of the early Plus/4 scene
- Should handle reading halfwave.
- Copy between any combination of tape and disk.
Batch Files and Commands
We now need to work out what commands we are going to need and then build the relevant batch files.
Bach files are optional because they just run the command we program them to do but they will save you a lot of time and heartache when you get the command wrong and have to type it again.
MTAP
Most of the transfer methods below use MTAP so it is important we deal with the MTAP commands now and while we are at it, we will make some batch files to make life easier.
The Commands
mtap - Commodore TAP file Generator v0.36

usage: mtap [-lpt] [-x[e]] [-buffer <size>] [-v] <tap output file>
  -lpt<x>:  use parallel port x (default: lpt1)
  -x:       use X1541  cable for transfer
  -xa:      use XA1541 cable for transfer
  -xe:      use XE1541 cable for transfer
  -b:       increase buffer size (default: 4 MB)
  -h:       halfwaves
  -v:       record Version 0 TAP
  -vicntsc: record VIC-20 NTSC tape
  -vicpal:  record VIC-20 PAL  tape
  -c16ntsc: record C16 NTSC tape
  -c16pal:  record C16 PAL  tape
  -c64ntsc: record C64 NTSC tape
  -c64pal:  record C64 PAL  tape
Once you understand these you can write your own as required.
Explained Examples
mtap -lpt1 -b 10 -h -c16pal C:\TAPS\OUTPUT.TAP
- -lpt1 - MTAP only works on the parallel port so what is this. This is X1531 mode and is the original method to grab tapes using the X1531 cable (or C64S adapter)
- -b 10 - Use a buffer of 10MB. MTAP needs to store the whole tape in memory otherwise it will fail. The buffer default is 4MB but some tapes are bigger (not many) so it does not harm to set it to 10MB.
- -h - Sample the tape in halfwave mode. This sets MTAP to sample in halfwaves which is specific to C16 and Plus4 computers
- -c16pal - There is a need to set the frequency of the sampling because it is different in the NTSC and PAL regions and also across the different devices.
- C:\TAPS\OUTPUT.TAP - This is obviously the output location of the TAP file. Keep the filepath and filename all in CAPS so VC1541 can handle the TAPs.
mtap -xa -b 10 -c16pal C:\TAPS\OUTPUT.TAP
- -xa - use XA1541 cable for transfer. This requires you are running either TTAPSERV.PRG (C16/Plus4) or TAPSERV.PRG (C64) on your Commodore of choice. These are called Tape Servers and aid in getting full digital copies of tapes via real hardware.
Batch Files
In this section you build your own MTAP commands and then move them into batch files (makew.bat and makeh.bat).
These batch files will go in the root of the Software pendrive and can be called instead of typing out the whole command every time (unless you install DOSKEY)
- Create your MTAP commands.
- We are going to make one for Wholewave and one for Halfwave tapes.
- There are some examples below.
mtap -lpt1 -b 10 -h -c16pal C:\TAPS\OUTPUT.TAP
mtap -lpt1 -b 10 -c16pal C:\TAPS\OUTPUT.TAP
- Make the MTAP Batch commands.
- We are going to make one for Halfwave and one for Wholewave tapes.
- Edit the file makeh.bat (Halfwave) and put your command in it with the format:
mtap -lpt1 -b 10 -h -c16pal C:\TAPS\%1.TAP
- Create a file called makew.bat (Wholewave) and put your command in it with the format:
mtap -lpt1 -b 10 -c16pal C:\TAPS\%1.TAP
- To run the command from DOS, enter the relevant command below to which will create a TAP with the name OUTPUT.TAP
makew OUTPUT
makeh OUTPUT
- When the batch file is run, the batch variable %1 will be replaced by the name, OUTPUT.
- So from this you can see you only have to type in the new name for the TAP file whether you are sampling a Wholewave or Halfwave tape.
- Done
VC1541 Batch file (Virtual Disk Drive)
- Create a file called diskemu.bat and its contents should be this command line
vc1541 -dir C:\DISKS -lpt 1 -cable XE1541
- Move this batch file to the the root of the Software pendrive
- Done
Setup Windows PC
We all need one of these.
- Install Emulator
- VICE Commodore Emulator or YAPE C16-Plus/4 Emulator
- You need to make sure the TAP files work.
Setup DOS PC
This is your old computer with a compatible parallel port.
Build DOS
Now we need to configure the DOS environment.
- Bootable pendrive
- Install and run Rufus on your Windows PC
- Take one of the pendrives and make it bootable with Rufus using the Win98SE boot disk image.
- Software Pendrive
- Take the other pendrive and format it with FAT32
- Put the software on the pendrive as shown below:
/DISKS/AZIMUTH.D64
/DISKS/TAPSERV.PRG
/DISKS/TTAPSERV.PRG
/DISKS/TAPE_WAVE_CHECKE.PRG
/TAPS/
CWSDPMI.EXE
diskemu.bat
doskey.com
makeh.bat
makew.bat
MTAP.EXE
PTAP
VC1541.EXE
- The folders 'DISKS' and 'TAPS' must be in capitals for VC1541 to use them.
- Yes I know they are not all disks !!! but is a nice easy name for a folder.
- You might not use all this software but it makes it easier for these instructions.
Boot DOS
We need to boot from the DOS pendrive (on the DOS PC) you have just built and follow these instructions to complete your DOS environment preparation.
Connect your Commodore cables to the PC before turning on either the PC or the Commodore on to prevent damage.
- Place both pendrives in your DOS PC
- Ensure in the BIOS that the following are set
- LPT1 = ECP (this is a good default but this depend on your cable)
- Boot from USB is enabled
- Legacy USB Keyboard/Mouse
- Check other settings are suitable.
- Turn the DOS PC on
- Window 98SE Boot disk will load
- Select "Start computer without CD-ROM support." as this prevents any junk being loaded
The bootable pendrive will map to the drive letter A:
The Software pendrive will map to the drive letter C: - Run the following commands
c:
doskey
CWSDPMI   (optional, see below)
- C: just puts us where we should be.
- DOSKEY just makes life easier because you can use the up and down arrows to save re-typing commands.
- CWSDPMI
- Is not always needed.
- To check, run MTAP.EXE and if it runs without error, installing CWSDPMI can be skipped.
- I had one motherboard that needed this another that ran with the need. This might be the difference between AMD and Intel but I am not sure.
- If CWSDPMI is required, the error will be "Load error: no DPMI - Get csdpmi*b.zip"
- In Windows you don't need the CWS*.EXE files at all, since Windows uses DPMI already. But don't use MTAP in Windows, this just helps explain the issue.
- DPMI = (DOS Protected-Mode Interface) server
- The sed (Stream Editor) FAQ - 5.5. What is CSDPMI*B.ZIP and why do I need it?
- This explains the issue well.
- binaries and sources are available here.
- Alt Downloads
- HDPMI - DPMI Server (Version 3.17) - An alternative to CWSDMPI but I have not used it or had the need. This is for reference only.
- Your DOS environment is now setup and ready for use.
- Proceed to 'Transfer Methods' section and pick which options suits you and your equipment.
Notes
- This is my setup which works well but you can
- Try other DOS disks such as FreeDos which will only require 1 pendrive
- Different software for creating bootable USB
- Be crazy and boot from a real floppy disk
- Use a Win98SE disk with the bare minimum of files on it. I just used the default one because I did not want to spend the time removing all of the unneeded stuff.
- if you use Rufus and to create bootable USB pendrive then the partition on it will only be 1.44MB which is normal.
- MS-DOS 6.22 does not support FAT32 so that is why we use Win98SE boot diisk which supports it.
- You might need to try different LPT modes on your mother board (SPP/ECP/EPP/ECP+EPP) to see which one works. bear in mind your adapter cable has to be compatible with that LPT mode.
- Parallel Port (additional)
- Parallel port - Wikipedia - An article on Parallel Ports and their different modes.
- Downtown Doug Brown » Parallel Port Tester
- After playing around with a ton of parallel port cards in an attempt to figure out Willem programmer compatibility, I decided it would be useful to write a parallel port tester program. Just a simple utility where you can set the output value of each output pin and read the value of each input pin.
- An easy to use Windows utility
- Parallel port output - Simple circuits and examples to describe how to use PC parallel port as general purpose output port.
- How to Use a PC's Parallel Port to Commun | Maxim Integrated - This tutorial shows how to build a quick, simple, and cost-effective 2-wire (I2C-compatible) interface using a PC's parallel port. No difficult to procure ICs, microcontrollers, or firmware needed.
- DOS Utilities Collection
- Many DOS utilities
- LPTstat v1.0 (LPTSTAT.EXE) - The PC parallel port uses a practically direct I/O port to pin connection. LPTstat shows each bit's status in real-time, and includes the bit's location in the PC address space and its corresponding pin number on a DB-25 connector. You can use the left and right arrow keys to switch LPT ports, and the up and down arrow keys followed by ENTER to toggle a bit.
- PCI Parallel port doesn't work under DOS 6.22 | PC Review
- Hi all,I tried to get a PCI parallel port (LPT2) to work under DOS 6.22, but without luck. When I connect the printer to LPT1 it is immediately online even if the computer is turned off, whereas for LPT2 the card isn't recognized, and the printer never gets online.
- Some PCI parallel cards just will not work under as a DOS parallel port. Under DOS, there were only 3 recognized addresses ( 0x3bc, 0x378, and 0x278) and 2 recognized IRQs 7 & 5. These are not normally assigned to a PCI device because of possible conflicts with existing devices. Any PCI card that will work with DOS programs must be settable to these settings, either through a utility program/driver or jumpers. I know there are some out there, just don't remember who makes or sells them. You need to search for a PCI card that specifically says it will work with DOS programs. Or rewrite the DOS program to use the addresses and irqs the PCI card is being assigned.
- Check if printer is on LPT from DOS batch file - 'm searching for a method to check from a batch file if a printer is connected to LPT port.
- How can I make a test lpt port in MS-DOS ? - Techyv.com - Hi everyone, I think my lpt port is damaged, please, how to proceed to check this error? And how to make a dos lpt test? thank you in advance!
- LPT Port Test Utility i386 / x64
- https://www.xlentelectronics.nl/LPTTest/LPTTestUtility.exe is the home page but the software is not available.
- LPT Port Tester
- The LPTPortTest software (LPT Port Test) is used to test the correct software and physical (electrical) operation of a parallel port (LPT), both on the inputs and on the outputs.
- Logiciels - Freewares - LPTPortTest - Homepage
- https://www.sonelec-musique.com/logiciels/lptporttest/lptporttest_files_v2_0_0_0.zip
- LPT Port Test Utility i386 / x64
Transfer Methods (Commodore Tape to PC)
There are several methods on transferring tapes to .TAP files on a PC but are mostly the same for Vic20, C16, Plus4, C64, C128, PET tapes.
- Plus4 and C16 tapes should be always sampled in Halfwave mode (TAP V2)
- C64, C128, VIC20 and other Commodore tapes should be always sampled in Wholewave mode (TAP V1)
Connect Parallel Port direct to a Commodore Cassette drive (X1531 Method)
There are 2 adaptors that can be used to connect your tape drive directly to your LPT port on the PC, this just depends on whether it is a 1530 or a 1531 drive. These two drives are identical inside and just differ in their connectors. The 1531 has a mini DIN connector whereas the 1530 (C2N) has a female edge connector. When people refer to the X1531 Cable this can mean either drive setup with their appropriate adapter.
- C64S tape adapter
- In this link you can see a modified X1541 connector with a tape port added. You can make an adapter without the serial port.
- Don't connect the tape drive and a serial device at the same time
- Only connect the power when using the tape drive.
- X1531 tape connector - A simple tutorial on how to make the adapter for the 1531 Tape Drive.
- Will only work on a SPP parallel port on older PCs.
- More notes on cables below in the 'Cables' section
Some people online say that the 'Game Port' might not be able to supply enough power to the Datassette when doing long tapes. I am unable to confirm this but perhaps should be something to watch out for.
Instructions
- (Optional) Edit your batch files on the Software pendrive
- Make sure the PC is turned off.
- Connect the X1531 cable to the PC and the 1531 Datassette.
- Make sure the parallel port is set to SPP
- Load your DOS environment on the DOS PC
- Turn the Commodore computer on.
- Place a cassette into the 1530/1531 the drive that you want to sample.
- Make sure the tape is fully rewound before you start.
- Now sample the tape with MTAP by running one of these commands on the DOS PC, select the appropriate one or use your own:
mtap -lpt1 -b 10 -h -c16pal C:\TAPS\OUTPUT.TAP
mtap -lpt1 -b 10 -c16pal C:\TAPS\OUTPUT.TAP
makeh OUTPUT
makew OUTPUT
- The batch commands assume you have set your batch files as follows (to match the examples above):
makeh.bat
mtap -lpt1 -b 10 -h -c16pal C:\TAPS\%1.TAP

makew.bat
mtap -lpt1 -b 10 -c16pal C:\TAPS\%1.TAP
- The batch commands assume you have set your batch files as follows (to match the examples above):
- "Press <PLAY> on tape!" will appear, now press play on your Commodore Datassette.
- The tape will play to the end and then play button will pop up as normal.
- (optional) Re-run to get a second copy
- Binary compare the 2 tapes (or quickly by size with DOS dir command), they should be the same. same size or very close.
- If they don't match it could be because 'the tape is damaged or dirty'/head needs aligning/tape players is defective/heads are dirty/rubber band faulty
- Regular cleaning of the tape heads when using old tapes is important
- Turn off the DOS PC and move the Software pendrive to the Windows PC
- Load the TAP in an emulator and see if it works.
- Done
TTAPSERV (Preferred Method)
This will do Wholewave and Halfwave tapes (i.e. All Commodore tapes)
This is the most reliable method of reading taps because it is using real Commodore C16 or Plus4 that supports both Wholewave and Halfwave tapes, and this method ensures the Datassette will get enough power for it's motors when dealing with long tapes.
This is what I do to transfer my commodore tapes to the PC.
Instructions
- (Optional) Edit your batch files on the Software pendrive
- Make sure the PC is turned off.
- Connect the Plus4 to the parallel port of the PC using the XE1541 cable
- Make sure the parallel port is set to ECP
- This is recommended in the VC1541 instructions because of auto-detection of EPP/DMA is dodgy.
- Load your DOS environment.
- Turn the Commodore computer on now otherwise you will might get a cable detection error and file transfers will be disabled.
- Run the VC1541 software on the DOS PC. (CWSDPMI.EXE might not be needed on your system, see notes above)
VC1541.EXE -dir C:\DISKS -lpt 1 -cable XE1541
or
diskemu.bat
- The 'DISKS' folder should already be selected because we defined it in the commands above and this folder has the TTAPSERV.PRG in it, if not, just browse for the file with your cursor keys.
- The directory shown on the left is what is presented as the directory to the Commodore computer.
- Load TTAPSERV.PRG on your Plus4 by typing in the following command:
LOAD "TTAPSERV.PRG",8
- VC1541 now will transfer the file from the PC to the Plus4 as if it were a real 1541 disk drive.
- Type RUN on the Plus4 to launch TTAPSERV.
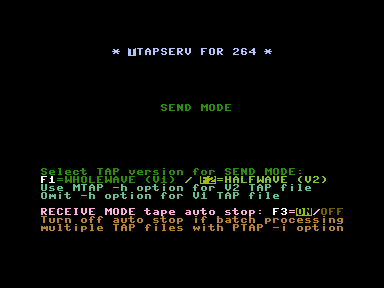
- Set TTAPSERV to the appropriate mode to match your MTAP command.
- F1 = Wholewave
- F2 = Halfwave
- Exit VC1541 on the DOS PC
- Place a cassette into the 1530/1531 the drive that you want to sample.
- Make sure the tape is fully rewound before you start.
- Now sample the tape with MTAP by running one of these commands on the DOS PC, select the appropriate one or use your own:
mtap -xe -b 10 -h -c16pal C:\TAPS\OUTPUT.TAP
mtap -xe -b 10 -c16pal C:\TAPS\OUTPUT.TAP
makeh OUTPUT
makew OUTPUT
- The batch commands assume you have set your batch files as follows (to match the examples above):
makeh.bat
mtap -xe -b 10 -h -c16pal C:\TAPS\%1.TAP

makew.bat
mtap -xe -b 10 -c16pal C:\TAPS\%1.TAP
- The batch commands assume you have set your batch files as follows (to match the examples above):
- "Press <PLAY> on tape!" will appear, now press play on your Commodore Datasette.
- The tape will play to the end and then play button will pop up as normal.
- (optional) Re-run to get a second copy
- Binary compare the 2 tapes (or quickly by size with DOS dir command), they should be the same. same size or very close.
- If they don't match it could be because 'the tape is damaged or dirty'/head needs aligning/tape players is defective/heads are dirty/rubber band faulty
- Regular cleaning of the tape heads when using old tapes is important
- Turn off the DOS PC and move the Software pendrive to the Windows PC
- Load the TAP in an emulator and see if it works.
- Done
These instructions were adapted from the forum thread Best or easiest way to transfer from tape - Commodore 64 (C64) Forum
TAPSERV
This will do Wholewave tapes only. (Cannot sample some C16 and Plus4 tapes)
- Same as for TTAPSERV.PRG except
- You use a Commodore C64
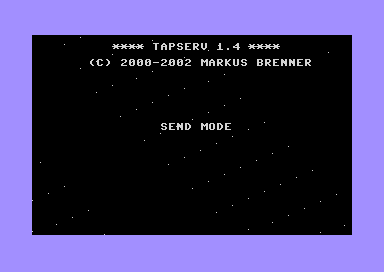
- You use TAPSERV.PRG as the tape server
- There is no option to select Wholewave or Halfwave tapes.
- This is the original tape server that is designed to run on the C64 but is only capable of capturing Wholewave tapes.
- TAPSERV for the C64 cannot read halfwave tapes, as the C64 is unable to read them itself.
1530USB (Audio and WAV)
I have not used this method
This is a little more around the houses but might be useful when the tape is really dirty.
- 1530USB Homepage | Load64
- Setting up the USB1530 adapter and how to use | Load64
- Use TAPClean instead of FinalTAP becasue it is a newer fork and is currently maintained.
- TAPClean will only work with Wholewave TAPs and possibly only C64
- There is no hardware limitation. You can create half, full, triangle etc. wave ,and it will be recorded to the tape.
- USB1530 advantages
- can be used to sample really dirty tapes and then clean them up if you cannot load normally
- This device can do many brands of tape (possibly)
- 1530USB Datasette To PC Adapter Cable Backup C64 Cassette Tapes Commodore 64 Preserve Back up X1531 | Youtube | Remzi | Load64
- Commodore 1530USB Datasette - PC Adaptor C2N Tape Recorder Tapuino C64 VIC20 PET | eBay - I bought my 1530USB from Remzi here
- WAV-PRG and Audiotap: from Commodore tapes to PC and back
- WAV-PRG
- WAV-PRG is a program able to create a .TAP file or Commodore 64 tape from a C64 emulator file (.PRG, .P00, .T64), create a clean .TAP file from a .TAP or .WAV file, and create emulator files (.PRG, .P00, .T64) from a Commodore 64 tape. The latter can only be done if the tape is in a format supported by an existing plug-in.
- Audiotap
- Audiotap is a program for conversion between .TAP files and Commodore 64 tapes.
- Audiotap can read/write WAV files containing the sampled sound of a tape, and can also record tapes from the sound card and play sound to the sound card.
- WAV-PRG
- Tape Mastering | The New Dimension
- Have you written a game and you wanted to master the game to tape/tap format with a loading picture, etc then run the game so that your game has a spiffy loading picture and then run (or prompt the user to press spacebar). There are different methods in which can be used to master your programs to .tap or tape. Some not recommended, and some which are highly recommended.
- PC->Plus/4 trasfer without spec. cable! - This is a thread about create PRG from WAV rather than using a X1541 cable. Some useful insites fro when I revisit this topic.
- Step-by-step instructions on how to transfer cassette tapes programs to your PC – Vintage is The New Old
- This is not specifically for a Commodore tape but it goes through how to setup Audacity and your tape player. This is a good reference guide.
- Loading Tapes - How To (Mike D)
- How to sample tapes using a standard cassette deck by Mike D.
- I've decided to put this how-to document together to help you to load in your plus/4 tapes. It's fairly hard to do, but once you've found a setting that works, you can load everything you have!
- What is the default Tape wave format for the Plus4 - Forum (#44961) - Plus/4 World
- Don't know if you ever got to see it, Mike D who used to have his +4 emulator Minus4 on plus4.com in the very early 2000's did a great write up on how to make .wav tapes using any old cassette player and a PC. It was no means easy to get working, but once you had something setup I managed to copy a few tapes, see Rockman.wav which was one of mine.
- That little write-up first appeared on his scotch.demon.co.uk site
DC2N (DMP Files)
I have not used this method, hence the lack of detailed instructions
DC2N is a piece of hardware that can do high resolutions dumps of tapes to it's own DMP format which can be converted to TAP but requires a special piece of hardware
- The DC2N Project Homepage - A tape preservation device for Commodore and Sinclair home computers
- Luigi Di Fraia's e-Footsteps | Retro-blogging since 2011 - Retro-blogging since 2011 and the latest information from Luigi.
- Luigi Di Fraia's Homepage | Retro-inventing and automating since 2002 - Another of Luigi's homepages.
This seems to be the preferred way of making tape backups in the scene because they are high res and you can make TAP files from them.
OpenCBM - ZoomTape/ZoomTAP/TapeXUM/tapread.exe
I don't know much about this, but I discovered TAP utilities in the OpenCBM package and references to a ZoomTape device.
- TapeXUM - c64scene.pl
- TapeXUM is an adapter that connects a tape recorder (Datasette) to a PC via USB. With its help, you can save and archive data on a cassette from/to TAP files. TapeXUM is based on the ZoomTape project.
- ZoomTape was an appetizer for ZoomFloppy whose audience is mainly Commodore fans from overseas. In the states, the purchase of a computer with a station in the 1980s was not a utopia and the cassette player was forgotten very quickly and probably often never even found its way into homes, which results in their lack of sentiment towards the cassette medium. The story was different with us, the tape recorder was the basic accessory.
- I decided to resurrect ZoomTape on a new board using DIY-friendly electronic components, such as the Arduino Pro Micro, which, combined with appropriate modifications in the code, contributed to positive results. I called the whole thing TapeXUM and I published all the files related to the project free of charge. Everyone can assemble and test the adapter with the cassette on their own. Currently, the device will only work in Windows 7 and 10 64-bit, and communication is carried out using tools in the command line.
- GitHub - r1me/TapeXUM: - Capture and write Commodore tapes via USB device. The project's home
- TapeXUM - Capture and write Commodore tapes via USB device - Share Project - PCBWay
- What's TapeXUM ?TapeXUM is a USB device that can read and write to cassettes of Commodore 16/64/VIC-20 (read and write) and ZX Spectrum (read only) format. It requires a Commodore datasette connected to it. This project is based on ZoomTape by Arnd Menge, a great idea and originally a part of OpenCBM package. TapeXUM uses Arduino Pro Micro and through hole components so it's a DIY friendly design.
- Explains a bit of the history aswell.
- ZoomTape daughterboard for the ZoomFloppy, when available? - Commodore 64 (C64) Forum
- ZoomFloppy - CBM 1530/1531 - Tape Drive Connection | jonnz.de
- This might of been an original concept but schematics were never released.
- It gives some screenshots of the software in use.
- Advises to use the Google Group here - https://googlegroups.com/group/zoomfloppy-users
- zoomtape.de.vu - This seems to be the same site. I have used Wayback Machine to get this site
- Zoom Floppy and Cassette | Google Groups
- This is the part of the discussion showing a schematic of a ZoomTape/TapeXUM
- RetroInnovations has made a schematic and mentions Arnd Menge has made an imroved version.
- CRX 2018 - Nate Lawson - ZoomFloppy | YouTube | Commodore Retro eXpo
- Presentation by Nate Lawson about the history of the ZoomFloppy and the latest update in the works.
- This is an excellent talk going ito some of the technical details on how the device and the various Commodore driver work
- ZoomTape Daughter board mentioned at this time - Arnd Menge designed the daughter board but does not seem to of released it.
Transfer Methods (Other)
TAP to WAV
see 1530USB
Manual Copy PRGs to Emulated Disk drive
- Setup a virtual Commodore Disk Drive on a PC (VC1541/viceEMU/etc...)
- Run manual BASIC commands or other PRG to copy files from the tape to the disk drive.
- What command did I use for King Size to Disk. asked here http://plus4world.powweb.com/forum/44433
- The emulated disk drive can be supplied from where ever but the VC1541 over the XE1541 cable is a good starting point.
- From tape to disk? - Commodore 64 (C64) Forum
- Just using BASIC commands to copy programs from Tape to Disk will not work.
- The reason is that when you use the SAVE command it will only copy the BASIC portion of the game.
- You must use a copier program which defeats the object of this method.
- Some tapes will use their own Turbo Loaders to load the game and this could cause issues.
- This might only be true if you use SAVE"FILENAME" / SAVE"FILENAME",1 / SAVE"FILENAME",1,0 / SAVE"FILENAME",8 / SAVE"FILENAME",8,0 as these statements only save the BASIC part.
- SAVE - C64-Wiki
- LOAD - C64-Wiki
- When a program autoruns it is because the code that has just been loaded has overwritten the 'Ready' prompt call so when the 'Ready' prompt is called after the program has been loaded, the PRGs code is executed instead of the 'Ready' prompt and thus the program runs.
I have used the following method to get games of the King Size Volume 1 & 2 tapes to a Disk. This will not work with games that have Turbo Loaders.
LOAD"FILENAME"       (Load as normal)
Press Run/Stop       (You must be able to stop the program with this key)

SAVE"FILENAME",8     (Save the file to disk as a BASIC program)
or
SAVE"FILENAME",8,1   (Save the file to disk as Machine Code, If above save does not work try this one)
- Just to state the obvious
- You do this procedure on a real Commodore computer whilst running VC1541 Disk emulator on your DOS PC and then the PRG saves will be on your PC.
- Check the Saves work
Creating TAP files from PC/PRG/Disk (not real tapes) - TAP to Tape
- Creating TAP files from Yape | YAPE - Info about how to create TAPs from the emulator itself.
- Novamaker | Easily convert PRG files to TAP files for your C16 or Plus/4 | YouTube
- I test out a really handy command line utility called NOVAMAKER that will convert Commodore 16 and Plus/4 .PRG (program) files to .TAP (tape) files using the Novaload turbo loader algorithm. Very handy if you don't have access to an SD2IEC or Pi1541!
Access real drives in emulators
- VICE - Connect Real Disk Drives
- VICE uses OpenCBM as a proxy to communicate with the real drives so it is only limited by this software.
- You need a compatible cable to connect your Disk Drive: XM1541, XA1541, XU1541, XUM1541 (a.k.a ZoomFloppy)
- The following addon cables are supported: XP1541 or XP1571
- OpenCBM - Supported Disk Drives
- VICE communicates with the drive, but the uses the CBM4WIN driver which only implements basic access to the drive.
- Also a lot of custom loaders used in games etc will simply fail when using Vice with a real drive. It's much better to use the XM1541-cable only for creating disk images and using those in VICE.
- OpenCBM - Supported Drives
- For saftey only connect your Commodore equiment when you PC is off. I have heard that connecting these devices while on can damage the Commodore kit.
- In VICE:
- Settings --> Peripheral devices --> Drive Type = the drive you are adding. I am not sure how important this is, but it cant harm to have this match.
- Settings --> Peripheral devices --> IEC-Device , enable and set 'Device type' to "Real device (OpenCBM)".
- YAPE (Parallel 1541 emulation)
- In YAPE
- Settings --> Drive X setup --> Drive Emulation = Parallel 1541 emulation [CPU level/compatibility mode]
- In YAPE
I have not found any support for directly using the 1530/1531 to Datassettes in any emulator. If anyone knows different please let me know.
Capture PET Tapes to Disk using a 1530/1531 Datassette attached to a C64
I got this from How can I get PET Tape programs onto disk? | Port Commodore
- I have not tried this and I don't fully understand this code but I wanted to add this to my site as well so it does not get lost.
- This involves using a Commodore 64 but with the code being BASIC it might work on a C16/Plus4
- I am guessing this changes the tape sample frequency.
You could load/save programs (which relocates the start address which you have to fix later) or you can use this program I discovered for the 64. This program will automatically LOAD each file off of tape and subsequently SAVE it to disk (device number 8) and continue until you stop it (or a disk error occurs when it attempts to save a file with the same name as one already on disk, disk full, or end of tape.)
Here is the listing (remember this is written for the Commodore 64):
5 rem tape2disk
10 for i=53181 to 53247:read a:poke i,a:next i
20 print "[clr][down][down][down]tape to disk transfer program!"
30 print"[down]insert formatted disk in drive 8."
40 print"[down]insert tape, rewind and then press play.[down]"
50 sys 53181
100 data 169,1,162,1,160,1,32,186,255,169,0,162,65,160,3,32,189,255
110 data 169,0,32,213,255,169,8,162,8,160,255,32,186,255,169,20,162
120 data 65,160,3,32,189,255,173,61,3,141,251,0,173,62,3,141,252,0
130 data 169,251,174,63,3,172,64,3,32,216,255,76,189,207
- Type this in, SAVE it (don't want to type it in again, right?),
- put a blank formatted disk in drive 8, type RUN.
- If everything is working the message will display and the computer will now ask you to press PLAY on tape, put in a cassette,
- rewind if necessary, and press PLAY.
- Let it run through the tape (this could take an hour or more if it is a long tape).
- Reset the computer and load the disk directory.
- You should now have the tape programs on the disk
- NB: that the filenames are all padded with extra spaces, you will need to use a disk or directory editor to “fix” the file names.
Notes
What Happens?
This is a table that will just let you know what happens when you sample tapes using a Datasette 1531 and various setups and tapes. This will help you identify what is normal behaviour and what sort of tape format you are sampling.
| Software / Hardware / MTAP Mode | Fullwave Tape (Number Builder) |
Halfwave Tape (Bridgehead +4) |
|
|
|
|
|
|
|
|
|
|
|
|
|
|
|
|
|
|
NB: replace %1 for output.tap or whatever you want your tape to be called.
X Series Adapters Types
XA1541 is the most advanced of the legacy X series adapters. ZoomFloppy/XUM1541 is now recommended for standard disk drive operations.
I have found some good explanations of the different cable types and I will put theme here for you to look through
- Way to transfer files from a PC to Commodore Computers? - Page 2 - Commodore 8-bit Computers - AtariAge Forums
- X1541 - The original cable, between PC LPT and floppy drive. It requires an SPP or PS/2 type parallel port found on 286, 386, 486. All wires, no other components.
- XE1541 - The extended cable, used on Pentium 1 and upwards running MS-DOS. It features four 1N5819 or BAT85 Schottky diodes to make some signals only go one way.
- XM1541 - The multitask cable, essentially the same as XE1541, but two wires swapped which makes it usable in Windows 9X/2000/XP etc and Linux.
- XA1541 - The active cable, which replaces the Schottky diodes with transistors and resistors. Intended for special PC motherboards with a so picky parallel port that the XE/XM cables don't work.
- XH1541/XH1571 - The hybrid cables, used together with the X1541 cable (not XE/XM/XA) and a modified floppy drive that lets you transfer data to the drive at a higher rate.
- XP1541/XP1571 - The parallel cables, used together with an X/XE/XM/XA1541 cable and a modified floppy drive that lets you transfer data from and to the drive at a higher rate.
- XU1541 - The original USB cable, so you don't need a parallel port any longer.
- XUM1541 - The extended USB cable that also supports parallel cables. The ZoomFloppy is an implementation of the XUM1541.
- XS1541 - The serial cable which connects to a PC serial port or USB, and supports both the IEC port and IEEE-488. It uses different software than all the above cables and acts more like a terminal. I don't know how widely it is supported.
- The Star Commander Documentation (Star Commander) - This explains in explicit details the differences of all interface cables and how they work. Read this and you will know the difference between all of them.
- The serial connection is done using the X1541 interface or its substitutes. If you only have an EPP or ECP port then you have to substitute the X1541 interface with the XE1541, XM1541 or XA1541 interface.
- The XE1541 extended cable is a substitution for the X1541 cable. Its advantage is that works in all modes of all parallel ports. Its drawbacks are that you need special diodes to build it and that only a few programs support it. Please, note that this cable has problems with motherboards that use the ALI 5 chipset and certain laptops. On these machines, use the XA1541 active cable instead
- The XA1541 active cable is similar to the XM1541 multitask cable but it uses transistors and resistors instead of diodes. This makes it the ultimate transfer cable because it works with all kinds of parallel ports, including the ones the XE1541 extended cable and the XM1541 multitask cable have problems with. Again, it is supported by only a few programs. This cable also works under Linux.
- I got a copy of the v0.82 instructions in a PDF from PC_Star Commander (eng).pdf (www.mypccollection.altervista.org)
- Cables and adapters (Star Commander) - A full list of all the various cables and adapters that are available and can be built. A wealth of information.
- The X1541-series interfaces (Star Commander) - The X1541-series interfaces explained again with lots of information which will help you decide which cable to use.
- Purchase or build the X-series cables | 64Copy Central - Links to build or buy XA1541, XM1541, XE1541, X1541
- X1541 family of cables question - Commodore 64 (C64) Forum - What is the difference between the X1541, XA1541, XE1541 and XM1541 cables for transferring files to and from the PC and the C-64? And which one should I get?
- If you are looking for USB: XU1541, XUM1541 (AKA ZoomFloppy)
- For a modern computer, get a ZoomFloppy. It is USB and works with newer versions of Windows
- X1541 - You probably don't want that... Only for really old PC
- XE1541 - For StarCommander or 64HDD under DOS
- XM1541 - For OpenCBM/CBMXFER/VICE under Win XP
- Which cable to prefer - XA1541 or XM1541? - Commodore 64 (C64) Forum
- The XE1541 extended cable is a substitution for the X1541 cable. Its advantage is that works in all modes of all parallel ports. Its drawbacks are that you need special diodes to build it and that only a few programs support it. Please, note that this cable has problems with motherboards that use the ALI 5 chipset and certain laptops. On these machines, use the XA1541 active cable instead.
- The XM1541 multitask cable differs from the XE1541 extended cable in two wires swapped at the Commodore end. This enables other transfer programs to use interrupts rather than polling for handshake with the external Commodore drive. Its drawbacks are similar to the XE1541 extended cable. It's supported by less programs than the XE1541 extended cable, however, it works under Linux, as well.
- The XA1541 active cable is similar to the XM1541 multitask cable but it uses transistors and resistors instead of diodes. This makes it the ultimate transfer cable because it works with all kinds of parallel ports, including the ones the XE1541 extended cable and the XM1541 multitask cable have problems with. Again, it is supported by only a few programs. This cable also works under Linux.
- X1541 - C64-Wiki - This article describes in detail all of the different X series cables.
- X1541 (Original)
- XE1541 (Extended)
- Building a XE1541 cable | Commodore Info Page
- Building the XE1541 serial cable - This is called an "extended serial" cable and it replaces the X1541 cable in that it is more compatible with present-day parallel ports and their various modes (ECP, EPP).
- XM1541 (Multitask)
- No specific iformation on this adapter at this time
- XA1541 (Advanced)
- The adapter has been tested with Star Commander in Ms-dos and CBMXfer (a GUI for cbm4win / OpenCBM) in Windows XP.
- You can also use QTCBM, another GUI.
- Not connecting to Commodore Drive
- XA1541 problems, says drive not present - Commodore 64 (C64) Forum
- Common problem actually - could be many things, but the easiest for me to remember is go into your PC's BIOS settings and change the parallel port type setting to ECP+EPP.
- The adapter is probably fine, they're just extremely tempermental devices. They just don't like some parallel ports. Laptops commonly cause problems from memory.
- XA1541 problems, says drive not present - Commodore 64 (C64) Forum
- My X Series Adapters (NKC Electronics)(for my reference)
- I cant remember where I bought these, maybe https://markus.brenner.de/ and these were a very early revision
- Electronical parts | markus.brenner.de - The following shops sell the electronical parts that are used in the cables and adaptors discussed on these pages.
- XA1541
- Commodore XA1541 Adapter - NKC Electronics (This is my revision)
- XE1541 + XM1541
- Commodore XE+XM1541 Adapter - NKC Electronics (This is my revision)
- File:NKC electronics XEM1541 V6 (Commodore XE+XM1541 Adapter) VIN-0100.jpg - Wikimedia Commons - This picture identifies the diodes used (Schottky BAT42W)
- Diode Repair - research and sites
- Standard and Form Factor descriptions etc..
- Diode Case Packages, DO-123 Style, SOD-123 surface mount package - Graphic of a SOD-123 Diode Package, surface mount package style Outline, SMD Dimensions and definition
- SMD Packages: Sizes Dimensions Details » Electronics Notes - SMT components, SMDs come in a variety of packages - there are several standard packages: 1206, 0805, 0603, 0403, 0201, SOT, SOIC, QFP, BGA, etc. . .
- SOD-123 Component Package | mbedded.ninja - SOD-123 Component Package descriptions
- SOD123 | diodes.com
- Category:Diode - ElectroDragon Wiki - A wiki article on diodes
- Small Outline Diode - Wikipedia - Small Outline Diode (SOD) is a designation for a group of semiconductor packages for surface mounted diodes. The standard includes multiple variants such as SOD-123, SOD-323, SOD-523 and SOD-923.[1] SOD-123 is the largest, SOD-923 is the smallest. Electronics Shop
- Digi-Key Electronics - Digi-Key is your authorized distributor with over a million in stock products from the world’s top suppliers. Rated #1 in content and design support!
- Package Outlines and Suggest Pad Layouts - Diodes Incorporated's product packaging: Product Carton and Product Label Specifications, Surface Mount (SMD) Packaging, Through-hole Packaging, etc
- Diode Package styles | interfacebus.com - Listing for Graphics of Semiconductor Diode Packages by package type including both through-hole and surface mount component packages, diode package name.
- SOD123, SOD323, SOD523, SOD723, SOD923, SMA, SMB, SMC - SOD_All.pdf | topline.tv
- SOD123.pdf | diodes.com
- SMD Dimension Selection Guide - SMDDimensionSelectionGuide.pdf | mccsemi.com
- Small Signal Schottky and Switching Diodes PDF | Vishay
- BAT42W
- BAT42WS (Schottky (Less than .5A)) - Diodes' selection of Schottky diodes less than .5A includes a wide selection ranging from Dual, Com., Anode, and Isolated Configurations.
- BAT42W Single 200 mA SMD/SMT SOD-123-2 Schottky Diodes 30 V Schottky Diodes & Rectifiers | mouser.co.uk
- BAT42W Schottky Diodes & Rectifiers | mouser.co.uk
- BAT42WS-7-F | mouser.co.uk
- bat42w diode - Buy bat42w diode with free shipping on AliExpress - Quality bat42w diode with free worldwide shipping on AliExpress
- 100PCS BAT42W S7 SOD123 SOD 123 1206 Schottky Diodes New Original|Diodes| - AliExpress - I Bought these
- Standard and Form Factor descriptions etc..
Imaging Tapes
- When imaging tapes
- When imaging tapes, keep a constant eye on the tape head, it will get covered in crap from the old taps.
- Pressing pay will expose the heads making them easier clean. regular cleaning when dealing with old tapes get consistent results
- I recommend getting a proper tape cassette cleaner
- If you find you transfers getting smaller or inconsistent and then the TAPs not working this is most likely becasue your tape player heads are dirty. This does not preclude the other basic stuff ie belts, motor and a knackered head. this is caused by tape player working and then it stops working because of use.
- If the tape keeps causing the play button to trigger (like when you get to the end of the tape) the fastfoward the tape and rewind it and this will loosen it off.
- The TAP file is created as the tape is played and the size is dependent on the length of the tape, the contents do not change the size.
- When you transfer a tape to TAP some times there will be a slight difference in the file sizes but this is normal. They should be around the same size.
- If you start getting a lot of tap grabs faiing using TTAPSERV.PRG then it could be the serial port on your Commodore failing or the serial interface.
- When using MTAP, if you find you start getting some bad results, try rebooting your DOS PC. I am sure MTAP is stable but it does not harm.
- If the tape does not read first time, keep trying and trying as it seems to clean crap off the tape.
- Clean the tape head regularly as tapes deposity crap on the heads, especially old ones.
- Try at a different part of the day i.e. cold in morning, warm in the afternoon might make data capture better (not 100% abut this one)
- Dont run your tape player too long (i.e. loads of tapes).
- These datassettes are old.
- Let them cool down between batches.
- When the motors are warm as they do not provide as much power/torque.
- Tapes that dont read properly on the first time more than likely will have deposited crap on the tape head so after a dogy read, inspect clean the head.
- I tend to do tapes in small baches of ten and then check/clean heads. i would rather have 10 failed tapes than 50.
- After imaging long tapes, check the head because it is like doing several small tapes
- On bad tapes always do A and B sides as one might work
- Some tapes have different stuff on side A and side B. I generally read the tape insert to assess this. If in doubt do both sides as they might be different anyway (i.e. Winter Games)
- If you image the tape the several times on the same side and the file size is the same then it is most likely to be a good digitisation.
- The same program on different sides of the tape can generate slightly different file sizes but should be within 1KB
- Some tapes are not recorded on both sides (this is rare)
- Dont leave TTAPSERV running when you are not imaging tapes because it keeps the tape player powered up and spinning (i.e. the capston)
- If your datassette jams
- The XE1541 LED will probably go off if running MTAP
- It will be permanently powered off for safety (i think)
- You must power cycle your Commodore to bring it back online
- Check on Plus4 World
- Always check on plus4world to see if your tape, inlay and any other information such as stickers are present and correct.
- Sometimes you might have a slightly different version.
- I would recommend to always image your tapes (in V2/halfwave) just incase this is not on plus4world.
- If your TAP files are very small (<1KB) when using TTAPSERV or TAPSERV
- The connection from your PC to the datasette is faulty.
- check you XEM1541 for blown diodes, i did and I found one had gone. Teseting them is outside the scope of this article. But it is not hard and just requires a multimeter.
- TAP doesn't work - When you check a TAP image it is not working, these are some reasons:
- Doesn't Work: potentially the tape is halfwave and you have not added the switch
- You can check against the same tape on Plus4world and see if it has the same number of parts/files
- Check it runs in VICE and then if not check in YAPE as some times it will run in one but not the other.
- Always make sure the all program runs. I also use a cheat when the game has mulitple parts on the tape that are loaded after you complete one section so I can check each part (i.e. Ye Are Kung fu).
- Getting garbled graphics on the screen
- Does not (always) mean the TAP image has failed.
- Some rare games will only play on a C16 (or Plus 4 with 16k ram)
- E.G. Rockman loads but graphics are garble on Yape and VICE. The Rockman TAP online at Plus4 World works fine.
- A .TAP you might be interested in... - Plus/4 World - A technical explanation of this bug.
- Does not like that does not like that particular emulator. Try the game in another emulator.
- Not all games work with LOAD"" - some need LOAD"",1,1 and some a SYS command. Instructions are usually found on the inlay if required.#
- Check for notes or loading instructions on plus4world, someone might have already found and fixed the issue
- The datasette needs cleaning.
- Set the Tape player Head Azimuth
- When using VICE use 'Attach/Load' the 'Autostart' does not always work. i.e. Space 2 Pilot will not load
- The tape has perished beyond recovery.
- VICE does display TAP file directory for halfwaves because the headers are stored in fullwave
- c64 use - TAPSERV or COPY 235 (disk and tape)
- Finaltap/CleanTAP will check tap image validity and give you loads of information on it - This only works on wholewave tapes (i.e. C64)
- is there a command to copy ech file on tape to the disk
- Tape Transfer | Commodore Info Page - A great overview of the process.
- Tapes usually have the game recorded on both sides of the tape.
- Commodore 16 tape imaging | offog.org - A real persons instructions on how he imaged his tapes.
- Archiving C64 Tapes Correctly – pagetable.com - A article how this guy on his journey figured out how to image C64 tapes. It does have some technical aspects to it but is an easy read.
- Accurately dump Commodore 64 tapes | PythonRepo - This includes a full process from research, to programming in Python and building a custom adapter. Diagrams and schematics are available.
- Commodore 64 C64S Tape Adapter | YouTube
- This homemade C64S Tape Adapter allows You to connect a C2N datasette to a PC running DOS and transfer data from or to Your C64 tape deck.
- This video shows the guy using this nice looking adapter to capture TAP images and using tapeio.exe to check head azimuth.
- I have tapeio.exe and although it is a C64 program it will allow you to set the head azimuth of your Commodore Datasette from a PC, see the video.
- Links to all the required software
- A great video.
- Best or easiest way to transfer from tape - Commodore 64 (C64) Forum - I based my instructions on this.
- RAW Audio and WAV
- Audio/WAV has mixed results because it is converting a digital signal into an analogue signal and so on.
- Making Commodore 64 Cassette Tapes - Part 1 | YouTube and Making Commodore 64 Cassette Tapes - Part 2 | YouTube
- This covers stripping a 1530 and focuses on tape capturing Tapes using RAW audio.
- GitHub - francescovannini/truetape64: - Accurately dump Commodore 64 tapes by building an inexpensive hardware adapter
- awsm — Build your own 1530 to C16,C116,Plus/4 adapter and make an C64 SD2IEC work on your 264 computer
- Build your own 1530 to C16,C116,Plus/4 adapter and make an C64 SD2IEC work on your 264 computer
Tape Formats
- VICE Manual - 17 The emulator file formats - Very technical and includes the frequencies at which the various Commodore computer tapes were recorded at.
- Tap file - Just Solve the File Format Problem - A basic description of a TAP file
- The C64 file formats list | ist.uwaterloo.ca - A lot of detailed information.
- How did the Cbm64/vic20 tapes work technically - Markus Brenner described the actually reading/writing process of Commodore tapes drives to help with the author of YAPE implement TAP support in his Plus/4 emulator.
- C64 RAW TAPE (.TAP) FILE FORMAT. - A simple breakdown.
- The DC2N Project Homepage - Technical information - The DC2N format and other technical data.
- zinc64/Analyzing C64 tape loaders.txt at master · binaryfields/zinc64 · GitHub
- This explains Turbo Loaders and other technical details about the tape process.
- A Turbo Loader is a piece of software that is loaded by the normal Commodore tape procedures and is then executed as any normal program. The function of the Turbo Loader is to read non-standard pulses on the tape which are put together a lot closer that normal tapes allowing them to be loaded up quicker and have a higher density of data on a tape.
- How Commodore tapes work | wav-prg
- Forget T64
- it's not really a tape archive but more something like a file container. If you want real backups of tapes then use the TAP format.
- TAP filesize depends on the amount of data not tape length, but it is a good indicator (longer tape, bigger TAP). Halfwave files are twice the size of a Wholewave tape.
- TAP files come in the following flavours:
- V0 - The intial format and is not used anymore.
- V1 - This revision only supports Wholewaves and it referred to as Wholewave mode.
- V2 - This supports Wholewaves and Halfwaves but is also referred to as Halfwave mode.
- VICE (C64) will not load TAP V2 files
- Rather than it being impossible it probably is a choice of the developers not to use TAP V2 for C64 as it is never needed.
- You cannot see filenames in the files either as it porbably doe snot know how to search for headers in them.
Halfwave / Wholewave
- There are 2 ways of recording tapes in the Commodore range and they vary how the signal is recorded on the tap.
- Wholewave
- All Commodore computers in the 264 range can read this format.
- Example Wholewave Games: Number Builder
- Halfwave
- This format is only compatible with the C16 and Plus4
- For the same tape, halfwaves files are twice as big
- halfwaves TAPs are twice the size for the same length (time) of tape.
- For the same length of tape, the halfwave files are twice as big
- Example Halfwave Games: Aardvark, ACE, ACE2, Airwolf2, Beach Head, Bongo, Bridgehead +4, Demolition, Finders Keepers, Frank Brunos Boxing, Ikari Warriors, Legionnaire, Molecule Man, Paper Boy, Pharaohs Tomb, Sea Strike, Sky Hawk, Space Pilot, Steve davis Snooker, Strip Poker, Strip Poker 2, Summer Events, Task Force, Thrust, Tomcat, Who Dares Wins 2 and Winter Events.
- Transfering C16 taps to real tapes - the horror, the pain... - Commodore 64 (C64) Forum
- PTAP does not support halfwaves
- PTAP options have vic20ntsc / vic20pal, but there's no option for c16, so i just used "ptap nameofthegame.tap"
- The C16 and Plus/4 can use either half or whole (C64) waves
- One can convert a half-wave TAP to a whole-wave TAP and record it at C16 frequency?
- Short answer is that "halfwaves" can not be converted to "wholewaves". It's because the C64 tape input is level-triggered whereas the plus/4's is edge-triggered.
- The long answer would be that some TAP images could indeed be converted to C64's native "wholewave" format (where an entire square wave pulse is encoded per TAP "unit"). Those loaders that do not invert (usually incidentally) the phase of the signal. This is depending on the actual loader: KERNAL and Novaload are generally fine, but later tape turbos will not work as wholewave TAP whatever we'd try. Most TAP images on Plus4world are in fact encoded in wholewaves, especially the old "classic" games, mostly because a lot of the archiving was already done when Markus figured that the plus/4 is just different in this respect.
- "Half-wave" means that by one TAP byte we measure the length of one half of a square wave pulse, and the initial phase is "low" (for the same C64 TAP you would store the sum of the two subsequenting bytes on one TAP byte). While the C64 tape input is edge triggered (IIRC) the plus/4 does not have this and many custom tape loaders invert the phase of the tape pulse (probably incidentally).
- Captured King Size Volume 1 and 2 tapes with MTAP and TAPSERV but the programs will not load - Plus/4 World
- My discovery on imaging tapes and finding out what Halfwaves were.
- Lots of information here and a good thread to read if you are stuck.
- The size difference for your Number Builder TAPs is normal. The reason for this is explained by the differences between the two TAP formats:
- The fullwave/wholewave TAP format is the original format, and was originally designed for C64 emulators. Each byte in the file represents the duration of a complete low-high wave, which is how the C64 responds to tape pulses.
- However, because the fullwave TAP format is designed to assume a low-high wave, it will not work for turbos which use inverted (high-low) waves. That's where the halfwave TAP format comes in. Each byte in a halfwave TAP file represents the duration of each half of each wave cycle independently.
- Basically, the halfwave TAP format is simply a more precise method of dumping tapes. Any tape that can be dumped as a fullwave TAP can also be dumped as a halfwave TAP, and there are some tapes that can only be dumped as a halfwave TAP.
- TAP -> WAV -> PC sound card -> cassette recorder -> datasette -> c16/+4 - Plus/4 World
- this discusses halwaves
- sampling from an audio sort
- Physically modifying your Plus4 to play loading sound from the tape player and potential using this sound to set the azimuth of the heads.
- Are turbo loaders required to use halfwave formats? = I think so.
- Is halwave a type of turbo? = no, halwave wave is how the signal is stored on the tape.
- How can I tell which tapes are using halfwaves? = Use 'Tape Wave Checher'
- Does TAPSERV.PRG handle halfwaves? = no
- Will TTAPSERV image C64 tapes, will it do PET tapes? = It will do C64 tapes, but might not do PET tapes
- Wholewave
- What is the default Tape wave format for the Plus4 - Forum (#44961) - Plus/4 World
- The normal kernal save routine is wholewave. Anything that does not use a Turbo is wholewave.
- Halfwave is only found with Turbo Loaders on C16/Plus4, but maybe only 75% of the Turbo Loaders out there actually use it.
- Novaload is a wholewave for example, but stuff from say Anco are ALL halfwave. Something like that commercial Kingsize Turbo saving program was halfwave.
- Halfwave was used to prevent copying or make it more difficult, but that just turned out to be puny. All halfwave did was make some prog's a bit more difficult to load if your tape deck was not aligned properly.
Hardware
- Datassette (1531/1530/C2N)
- Commodore Datasette - Wikipedia
- A detailed article on all the different versions of the tape drives.
- Explains how the Wholewave storage works.
- Datasette service manual model C2N/1530/1531, preliminary, Oct. 1984 PN-314002-02. - Schematics and technical information
- Commodore Datasette Collection | YouTube | Chuck Hutchins - All if not most, Commodore Datasettes are shown here
- Commodore C2N/1530/1531 Service Manual: Contents | devili.iki.fi
- Unlock Your Datasette - Modifying the 1530 Datassette (or get a 1530USB)
- You will be able to load games to your C64 using a PC, phone, tablet or MP3 player.
- You can backup your original cassette tapes to your PC.
- You can record games to blank cassette tapes.
- Commodore plus/4 Cassette Adapter | YouTube
- Building an adapter to connect a 1531 to a PET, or a C2N to a plus/4
- Commodore Datasette - Wikipedia
- General Tape Player Information
- Tape transport - Wikipedia
- This explains how a tape player works.
- What does a cassette capstan do and what causes tapes to play fast? | YouTube | ANT&TEC
- Short video explaining how a cassette tape capstan works in a cassette player.
- If you have a cassette player with a playback speed that is two fast, the cause is usually down to a bad capstan pinch roller.
- How To Clean And Demagnetize Your Tape Recorder | YouTube | Joe Collins
- Here is a 'how to' video about keeping your tape heads clean and demagnetized.
- Audiomover Tech - Fixing the Cassette Tape Pressure Pad | YouTube | AudioMover
- Hundreds of thousands of cassette tapes have moved through our studio.
- In our experience there is one problem with aging cassettes that is more common than all others.
- This video explains what it is and how to fix it.
- Leader tapes become detached from the reel | YouTube | AudioMover
- At AudioMover, we have digitized hundreds of thousands of cassettes. This is one of the most rare and interesting problems we see.
- INTERFACE Tips Tricks How To: Clean, Align and Demagnetize A Cassette Deck | YouTube | Scotty D
- JC show you hot to properly maintain you tape deck and get the top audio performance from it.
- Cleaning your tape player
- Capstan lubrication easy procedure | YouTube | Nacho Paches
- This is my dirty personal procedure to oil and lubricate capstans from tape decks.
- Capstan lubrication doesn't usually fail in decks, but when it does, it produces nasty speed variations that sometimes are not properly traced to this origin.
- Cassette Tape Player. How it works and how to repair. | YouTube | Steve's Electronic Repair Shop
- How Cassette player mechanisms work and how to repair and align them.
- The 'Pinch Roller' and it's Capston are responsible for pulling the tape through, NOT the reel/spindle motors. The motor on the receiving spindle is just for removing the slack in the tape and so they run slightly faster that the 'Pinch Roller' too prevent tapes getting chewed up by always keeping tension on the tape. The receiving spindle is also on a clutch system to allow for the speed differential during the progression of the tape and the changing of the tape spindle diameters.
- Tape transport - Wikipedia
- If you find no communications is happening over your parallel port adapter the try the following
- change the parallel port mode in the BIOS SPP/ECP/EPP/ECP+EPP
- Try another PC and its parallel port (i did and everything worked)
- Older PCs are better
- ECP is preferred mode.
- Test programs - http://sta.c64.org/scextprg.html#xctest
- Disk Drives
- Commodore Software - CBM Transfer v1.00
- A Commodore IEC drive (1541/1571 etc), OpenCBM, X-Cable or Zoom Floppy adapter.
- A Commodore IEEE drive (4040,8050 etc), OpenCBM, Zoom Floppy adapter with IEEE connector.
- A Commodore IEEE drive (4040,8050 etc), CBMLink, CBMLink cable or adapter, Commodore Computer
- Commodore 1541 Floppy Drive Repair - pt 1 | YouTube
- Commodore Software - CBM Transfer v1.00
Datassette Maintenance
You need to make sure your Datassette is running well so I will outline the things your should do.
- Issues
- If the tape no longer spins and the play button has not popped
- This means the pinch roller is slipping cause by one or more of the following reasons:
- pinch roller is dirty, too smooth or both
- The drive belt might be faulty
- This means the pinch roller is slipping cause by one or more of the following reasons:
- If the tape no longer spins and the play button has not popped
- Don't have a tight drive belt. With a tighter:
- It will make the tape run at the wrong speed with the increased tension.
- The motor will struggle and motors fail quite quickly when the belt is too tight.
- Clean Pinch Roller
- Clean it off with some isopropayl alcohol
- Play the tape unit while cleaning the roller with a lint free cleaning bud (you might have to remove the datasette cassette door)
- Roughend the roller with some very light sandpaper. You do this by holding the sandpaper against the roller while the unit is playing
- Clean the roller with isopropanol agai
- Press Stop and let the roller dry
- Head Alignment
- Head Alignment Without the Real C64 | Load64 - This is not easy, you will have to try a few times.
- Datassette Health Check | Load64
- Recorder Justage - Software Details - Plus/4 World - A head alignement tool - possibly C16 / Plus4
- [CSDb] - Recorder-Justage [german] by Empire (1985) For C64 Datassette head alignment Original in German)
- [CSDb] - Cassette Azimuth (2007) - English version of Recorder Justice - C64 only, but you can use an adapter and still do the X1531.
- [CSDb] - HeadAlign 1.1 by Onslaught (2010) - A tape head alignment utility, similar to Recorder Justice. c64 only.
- [CSDb] - Minimal Head Align by Onslaught (2007) - Datassette head align ment utilit - same as recorder justice
- TAPEIO
- TAPEIO for turbo tape to t64 transfer and head alignment
- The link is from the Wayback Machine
- This software runs on the PC, NOT the C64
- Commodore 64 C64S Tape Adapter | YouTube
- This video shows the guy using this nice looking adapter to capture TAP images and using tapeio.exe to check head azimuth.
- I have tapeio.exe and although it is a C64 program it will allow you to set the head azimuth of your Commodore Datasette from a PC.
- TAPEIO for turbo tape to t64 transfer and head alignment
- Commodore C2N 1530 datasette adjust azimuth angle and repair | YouTube | TechJump - Cleaning and repairing a commodore C2N 1530 datasette and loading a game. Im also adjusting the azimuth.
- Head azimuth software (C64) - Loadstar / Azimuth 3000 - Commodore Remix - Give the idea of making your own tap from a TAP on a known good device to help fixing a datasette out of alignment.
- Renew the Drive Belts
- Drive Belt: Square (75mm x 1.2mm)
- Counter Belt: Square (55mm x 1.2mm)
- Clean off any old belt residue with isopropyl alcohol.
- Do not use any type of grease or lubricant on the belts.
- Some other people have said, Drive Belt: Square (80mm x 1.2mm)
- Sellers of Belts
- Drive Belts | Dataserve - I have bought a set of 1531 drive belts from this chap:
- AUDIO/CASSETTE SQUARE SECTION DRIVE BELT. 80mm x 1.2mm (1 BELT) | eBay
- COMMODORE C64 VIC C2N 1530 1531 DATASETTE DRIVE RUBBER BELT REPAIR REPLACEMENT | eBay
- Stripping and Cleaning the the Datassette
- Commodore C2N Datasette Repair Attempt | YouTube | Jan Beta and Commodore C2N Datasette Repair Part 2 | YouTube | Jan Beta
- A full teardown of the C2N / 1530 Tape drive.
- Links for all the software in the descriptions.
- Commodore C2N Datasette Repair Attempt | YouTube | Jan Beta and Commodore C2N Datasette Repair Part 2 | YouTube | Jan Beta
- Related Forum threads - Some real life situations and what people did for reference
- 1530 Datasette Problem - Commodore 64 (C64) Forum
- Problems with 1530 datassette - Commodore 64 (C64) Forum
- Cassette player maintenance - stardot.org.uk
- Known Issues with the adapter (1530 from load64)
- Known Issues with the adapter, but some of the imfromation is relevant to cassette maintenance
- Two buyers reported that they had problems while backing up 45 and 60 minute tapes.
- Near the end of the tape,datasette slows down,struggles to rotate.
- First thing to do is change the drive belt and clean the heads+pinch roller.
- If there are screws on the tape,unscrew it little bit,it might be too tight inside.
Squeaking Tapes
- If your tape makes a squeaking noise, stop what you are doing and read this section
I swapped my belts in my commodore 1531 drive and on a few cassettes I get a squeaking noise, the tapes then either really slow down or the tape player just stops turning but the play button does not pop up. I have cleaned the pinch roller with isopropanol alcohol.
This is a common issue with older tapes, and it is usually the tapes that cause this. These instructions assume your Datassette is in perfect working order (i.e. clean heads, working drive belt).
Cause
- The tape inside the cassettes when they are made are impregnated with a lubricated (not visibly to naked eye etc..) to aid the tape running smoothly through tape players. Over time this lubricate dissipates and this lack of lubricant that causes the squeak.
- In particular, the squeak is caused by the tape on the donour reel creating too much friction preventing the 'Pinch Roller' from pulling the tape through smoothly. When this happens the 'Pinch Roller' slips on the tape creating the distinctive squeak.
- When a tape squeaks, where does the noise come actually from?
- The tape between the sponge and the head? = No.
- The pinch roller slipping on the tape? = Usually, as it’s trying to pull the tape through, but can’t get it off the reel.
- Other = Can also be the cassette drive belt slipping on the pulley / capstan.
Solutions
- Fast forward and rewind the tape a few times. This does not always work.
- Turn the cassette player so the receiving reel is towards the ground.
- This is not the same as turning the tape over.
- This changes the abient fall direction of the tape and might re-wrap it better ad/or make less friction.
- This will only make a small difference so don't expect miracles.
- Try a different drive. Sometimes a drive might have a slightly more powerful motor which is just enough.
- How to relubricate your stuck cassette tapes | YouTube | ANA[DIA]LOG
- This explains squeaky tapes and potentially how to fix them.
- In this video we learn how to restore the lubricant in audio cassette tapes and obtain perfect transportation free of wow and flutter issues and squeaky sounds!
- This is not really a permanent solution, it is more to allow you to recover the data on the tapes.
- Cassette tape cleaner - What, how & why? | YouTube | Techmoan - This video shows a tape cleaning machine. Perhaps build your own.
- (Thanks to Dave @ www.dataserve-retro.co.uk)
- Lubricate the tapes manually
- Me
- I swapped my belts in my commodore 1531 drive and on a few cassettes I get a squeaking noise, the tapes then either really slow down or the tape player just stops turning but the play button does not pop up. I have cleaned the pinch roller with isopropanol alcohol.
- Do you know what this could be?
- Dave
- That’s a very common problem.
- It’s not a Datassette issue, it’s the tapes themselves (unless you know for certain that they were OK before the belt change).
- For some reason, some tapes (a lot) tighten up with age to the point where cassette players struggle to pull the tape through and audibly complain.
- I have tried quite a few ways of sorting this out over the years, lubricating the cassettes, cleaning them with head cleaner and lubricating with silicone, WD40 and PTFE lubricant sprays.
- I did get some success with silicone lubricant which didn’t damage the tape and I thought all was well. However, after a few weeks on the shelf, I tested them again but they were tight again and wouldn’t load. It seems to be a terminal illness for them.
- Will this spray be good for fixing tapes (temporarily of course)
- Flomasta Silicone Spray 200ml (6699X) | ScreFix = Yes, should be OK.
- 31631-AB | Ambersil Lubricant Silicone 500 ml Silicone LUBRICANT | RS = Yes, should be OK.
- Me
- Use a tighter belt?
- Me
- I am still playing around the squeaking tapes. I think the squeak is the drive belt slipping probably caused by the tape and in particular the clamping of the tape by the head into the spring loaded sponge. I will let you know. I thought it might of been the pinch roller but I am not sure. I am also going to try a tighter belt as this will be able to generate more friction on the spools and see if that solves my issue. Fastforward and rewind work fine. My goal is to sample my tapes not really to keep them as a going concern.
- How tight should these rubber bands be on the tape player. I am just wondering if they are actually tight enough because if I hold one of the rollers (spinny things inside) with my finger and spin another, it is quite free. I am just wondering if I got a bum band or your suppliers are sending you some out of tolerance. Some on the internet say 80mm and another advert says 75mm band, maybe this is the issue. My tapes all fast forward and reverse with no issue.
- I am also going to try a tighter belt as this will be able to generate more friction on the spools and see if that solves my issue. Fastforward and rewind work fine.
- Dave
- Be careful with a tighter belt, it will make the tape run at the wrong speed with the increased tension, the motor will struggle and they fail quite quickly when too tight.
- Me
- Mould is a real problem on floppy disks, but not seen it very often on cassettes though.
- Lubricate the tapes manually
Drive Emulators
- Commodore 64 disk / tape emulation - Wikipedia - A big list of emulators of which most will work with the C16 and Plus4.
- Partial Emulators (Parallel Port)
- VC1541
- Can run with a X1541 or XE1541 cable
- Easy to setup
- supports read and write
- VC1541 disk drive not recognised/not found
- Start order: Power PC on to DOS, turn Commodore Computer on, run VC1541
- You might have to reboot both PC and the Commodore sometimes
- Check physical connections. unplug and re-plug them, especialy with old cables the connections might not be perfect
- If the XE adapter LED goes off upon accessing VC1541 with the Commodore computer
- There is probably a bad connection.
- I redid my solder joints on the adapter (cold joints) but also pay attention to the pin connections of the parallel port onto the board as these could be liable for failure.
- vice1541EMU
- Might need a special cable The 1541EMU cable (type 1) | Star Commander
- I think it can use a XE1541 cable??
- 1541EMU - C64-Wiki
- The 1541EMU software emulates the internal hardware of the Commodore 1541 disk drive on a PC connected to the C64 by a designated cable. Because the actual 1541 hardware is emulated, even fastloaders can be supported.[1]
- The 1541EMU software can run successfully only on PCs with real-time capability and single task operating systems. The requirements for emulating the 1541 disk drive are exceptionally hard. The software was developed on Pentium PCs, and timing can be an issue on newer computers.
- 1541EmU: Demo | YouTube | Electronics Tinkerer
- GitHub - ElectronicsTinkerer/1541EmU: Source code and eagle files for the 1541 Emulator
- With this software you can use your PC computer as a disk drive for those 8-bit Commodore home computers that are equipped with serial bus (this includes for example C-64, C-128, VIC-20, Plus/4 and C-16). Instead of recognizing just the stock serial bus protocol and some of the drive commands, 1541EMU completely emulates the internal hardware of the Commodore 1541 disk drive. This means that even fastloaders are supported.
- 64HDD
- A serial bus and disk drive emulator
- Will run with either X1541 or XE1541 cables
- CBM-HD
- CBM-HD is a project where a PC simulates one or more IEEE devices. If you are familiar with 64HDD, a PC simulating a 1541 drive, then you can consider CBM-HD as its IEEE equivalent.
- Emulates PET drives (IEEE): 3040, 4040, 8050, 8250
- This requires a special interface
- VC1541
- Hardware Drive Emulators
- Pi1541
- Pi1541 is a real-time, cycle exact, Commodore 1541 disk drive emulator that can run on a Raspberry Pi 3B, 3B+ or 3A+.
- A powerful setup but can be pricey.
- Can get them in mini 1541 drive cases
- Unlike SD2IEC, Pi1541 emulates a 6502 and the two 6522s. Any code it is asked to run is run in a cycle exact way.
- As Pi1541 can execute code on its emulated 6502 core it supports a vast range of fast loaders (games and demo scene) even copy protected originals.
- SD2IEC
- Very popular on eBay and you can get them in mini 1541 3D printed cases
- SD2IEC supports a limited set of fast loaders by attempting to guess the fast loader from the code sent to it. SD2IEC will not, and cannot, execute the code, it just simulates the communication protocols. As a consequence only a small amount of popular fast loaders are supported.
- Pi1541
Emulator
- VICE
- When you reset the emulator, the tape counter is reset, so to disable it:
- If using the older Win32 interface, it's in Settings -> Datasette settings -> uncheck 'Reset Datasette with CPU'
- If using the GTK interface, it's in Settings drop menu -> Settings -> I/O Extensions -> Tape port devices -> uncheck 'Reset datasette with CPU'
- When you reset the emulator, the tape counter is reset, so to disable it:
Tape Wave Checker (TAPE_WAVE_CHECKE.PRG) (a.k.a WAVECHECK)
- Download here
- Yes, there is an 'R' missing at the end because the filename exceeded the maximum number of allowd characters, which is 16.
- A VERY experimental program for checking the waveform of a tape.
- When you run it, you'll get a blank screen, and it will display flashing bars when reading the tape.
- If the bars are white, it means the waveform is undetermined, this normally happens on leader sections.
- If the bars are continuous green, then the waveform is normal (low-high).
- If the bars are red, then the waveform is inverted (high-low), and will need a halfwave TAP.
- If you get mixed white and coloured bars, or flashes of white bars, then it probably uses an asymmetric waveform (Darron Broad's turbo loader is an example of this). Again, this will need a halfwave TAP.
- Also, try not to start playing the tape in the middle of a leader section, as it may show the wrong colour happy.
How it works
This software listens to a tape when you play it and visually displays the type of wave being read. This software works just aswell in an emulator with a TAP file.
- The Start sceen
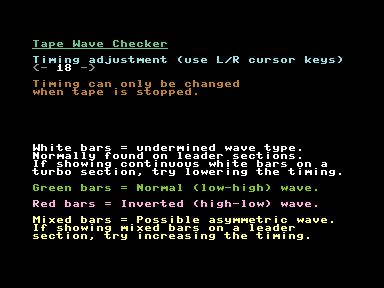
- If it shows a blank screen when the tape is being played then not data is being read.

- If the bars are white, it means it is an undetermined wave type, this normally happens on leader sections.

- If the bars are continuous green, then the wave type is a: Normal (low-high) wave

- If the bars are continuous red, then the wave type is an: Inverted (high-low) wave. This will need a halfwave TAP image.

- If you get mixed white and coloured bars, or flashes of white bars, then the wave type is probably an: Asymmetric wave. This will need a halfwave TAP image.


- Darron Broad's Turbo Loader uses an asymmetric waveform.
- Tomcat and Taskforce are Darron Broad's games.
- The Razorsoft games Mail Trail, Mega Zap, Raider and Sea Strike also use an asymmetric loader, as do their Paxman M199 rereleases.
- Also, try not to start playing the tape in the middle of a leader section, as it may show the wrong colour.
Software
- Tape Wave Checker (TAPE_WAVE_CHECKE.PRG) - See above
- MTAP
- not all PCs need CSWDPMI running. If when you run MTAP it does not ask for CSWDPMI then you don't need it. Same for VC1541
- http://markus.brenner.de/
- cable - http://markus.brenner.de/x1531/index.html
- never run MTAP under windows (as per the instructions)
- C64 Tape to PC (.TAP) - X1541 oldskool LongPlay | YouTube
- This is a slow video but shows you the guy firstly using Star Commander to put files on a disk including TAPSERV which he then saves to tape and after that loads it and uses MTAP to capture tapes.
- Commodore 64 data transfer with C64TPC, Star Commander and TAPSERV (MTAP / PTAP) - A great video on how to use MTAP and Star Commander.
- TAPDancer - Play TAPs from PC
- Chrome App - Dancer - Chrome Web Store - tapDancer Virtual Datasette: Plays back TAP/T64/PRG/P00 / TZX / CDT / UEF / CAS to audio output socket
- android app - can find this but there was one
- FinalTAP / TAPClean differences - Commodore 64 (C64) Forum
- Hello, I am the author of Final TAP (SubChrist), I worked on it between 2001-2006 and released the source in 2006, the sources were picked up and worked on further by a team of TAP experts/enthusiasts and their project is TAPclean.
- I honestly couldn't tell you exactly what the differences are as I havn't followed their developments too much but it's probably safe to assume they have added support for a few of the less common formats/loaders (this was their primary objective I think) + ironed out a few issues and ported it to other platforms.
- The difference between TAP v0 and TAP v1 is all about the pauses (silence) in TAP files, TAP v1 uses a kind of run-length compression rather than storing long sequences of zeroes in the file (TAP v0).
- ps. The preferred method of dumping cassette tapes to binaries is now through the use of the (Luigi di Fraia's) DC2N hardware which can create higher resolution dumps (not TAP files) than were previously possible with ie. the X1541 adaptor and ie. Marcus Brenner's MTAP software.
- These high res dump files (from the DC2N) should never be edited/cleaned but TAP files can be generated from them.
- Some other TAP information
- [CSDb] - TapEx V1.7 by SLC (2021) - A tool for analysing, verifying and cleaning Commodore 64 tape images (TAP V0, TAP V1 and DC2N RAW files (16, 24 & 32 bit).
- Commodore Software - Tape Utilities
- A great list of tools
- Categories: Tape Tester / Alignment Tools, Tape Transfer Tools, Tape Turbo Loaders
- Tree: Commodore 64 Software --> Utilities --> Tape Utilities
- Crossplatform Transfer Utilities | Zimmers.net - A wealth of software here but might not be the most upto date software.
Basic Commands I might use
To load and show directory
LOAD"$",8
LIST

To load a PRG and execute it
LOAD"TTAPSERV.PRG",8
RUN
- Commodore 64 BASIC v2 Disk Drive Commands – The WP Guru
- Commodore 64 commands - The Silicon Underground - A list of common or useful Commodore 64 commands, including disk drive commands.
- LOAD "$",8,1 – what it means - The Silicon Underground - This explains the ,8,1 switches
- LOAD"*",8 vs. LOAD"*",8,1 on the Commodore 64 | YouTube - What's the difference between LOAD"*",8,1 and LOAD"*",8 ? We take a look at several games which require these and other incantations to start, and explore the concept of the load address of Commodore PRG files.