My DiskGenius Notes
General
- Docs
- How to Use DiskGenius – Online User Guide
- This is detailed user guide for DiskGenius. Follow these tutorials and you'll know how to recover lost data, resize partition, backup data, wipe hard drive, etc.
- There is a large PDF manual you can download.
- Useful and Free Manuals of PartitionGuru – (DiskGenius has replaced this) - Free tutorial of PartitionGuru on how to recover lost data and partition, resize partition, clone hard drive, permanent file deletion, convert GPT to MBR, etc.
- How to Use DiskGenius – Online User Guide
- Misc
- When you mount a drive in Windows either using the GUI or diskpart, the image will be mounted as a physical drive.
- Windows and OSFMouint will mount an image whether is is a normal HDD style or a "Super Floppy" (FDD) style image.
- Windows will not fall back to a logical volume emulation if a VHD (Virtual Hard Disk) image file is corrupted—even slightly.
- can 7zip open VHD files?
- The partition table is not inherently protected—it's just stored in a specific location on the USB drive. While it can’t be easily changed by average users without intent or privilege, it can be accessed, overwritten, or corrupted by software that has sufficient access.
- All VHDs (and other image formats) created with DiskGenius, are fixed-size containers from the outset, made via sector-level cloning.
- The `Convert Boot Mode` options have moved here:
- Disk --> Convert Boot Mode -->
- Convert To USB-ZIP Bootable Mode
- Convert To USB-FDD Bootable Mode
- Convert To HDD mode
- Disk --> Convert Boot Mode -->
- If a Volume's `File System` type is display in Red

- This means it is set as the drive's active partition.
- It should also be accompanied by an `Attribute` of
A.
- When you format a USB disk, windows formats it in "Super "loppy format. These can can be booted by a legacy BIOS, but these are not a bootable hard drive.
- Making a USB drive "bootable" adds in an MBR which includes a partition table.
- Windows when loading a USB checks for both a partition table and then if this is not present searches for a partition (Super Floppy) allowing for both types of USB to load in Windows.
- License
- Q: The lifetime license, is this forever or is it linked to a major release of your software? Once licensed will the software work forever or is it time limited?
- A: After the license is activated, it is bound to the computer and hardware and is permanently activated.
- View SSD-nVME transfer mode
- Disk --> View S.M.A.R.T. Information --> Transfer Mode: PCIe 3.0 x4 | PCIe 4.0 x4
Make the DiskGenius Bootable WinPE USB
DiskGenius supports to making a bootable USB version based on Windows PE so that you can recover lost data, manage disk or backup data when system cannot boot.
- When you create your USB drive I think the build process uses your PC for the drivers and the WinPE files, so the resulting data size on the USB drive will change depending on your system (Win10 = 1GB, Win11 = 2GB)
- I don't know if the DiskGenius USB drives are tied to the PC they were created on.
Format the USB drive
Although DiskGenius can use a USB drive in either the "Supper Floppy" (FDD) or Hard drive mode (HDD) it is easier to work with a HDD version where it has an MBR and Partition table like a traditional hard drive.
When you format a USB drive in Windows the "Super Floppy" format is used by default. I am not sure what happens when you use Windows to format a USB drive taht has a partition table, perhaps ot leaves it alone.
- Format your USB in Rufus in MBR format
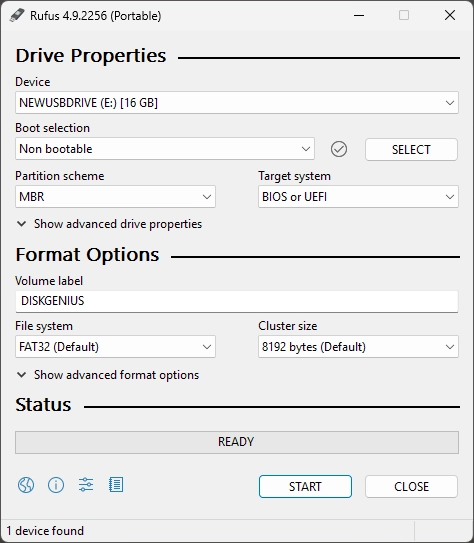
- Boot selection:
Non bootable - Partition scheme:
MBR - Target system:
BIOS or UEFI - Volume label:
DISKGENIUS(or whatever you want) - File system:
FAT32 - Cluster size:
Default(this might vary depending on the size of the USB drive)
- Boot selection:
- Set the partition active
- This is not required because DiskGenius does this when it makes the USB a WinPE drive.
Write the WinPE USB
This is non-destructive process, so if there were files on the USB before, they should still be there after the creation of the WinPE environment.
- Create WinPE Bootable USB Drive - DiskGenius
- Open DiskGenius
- Tools --> Create WinPE Bootable USB Drive of DiskGenius.
- Insert the USB you just formatted above if not still pugged in.
- Make sure the right USB drive is selected
- It is easier just to have one USB drive connected to prevent mistakes.
- Click OK button from the pop-up window.
- If you get a message about the drive is mounted, just let DiskGenius unmount the drive
- Wait for a couple of seconds and the bootable disk will be created.
- Click OK button after the bootable disk is created successfully.
- NB: The WinPE files and folders are hidden
Booting DiskGenius from Ventoy
- To boot DiskGenius from Ventoy, we need to generate the DiskGenius WinPE Bootable USB Drive and image it.
- Ventoy allows the use of several different image formats, all with their own strengths.
VHD/VHDX (Recommended)
Method 1 - Disk Image of the USB (Recommended)
- I would recommend getting a 2GB USB drive to keep the image size down and reduce the number of steps required.
- (Win10 WinPE = 550mb)
- (Win11 WinPe = 1GB+)
- The size difference between the images created by these formats is minimal.
- Only use VHDX
- Zero fill the USB drive (optional)
- Use
Alt-Zin Rufus to zero a physical drive.
- NB:
- If you have random data all over the disk, the fact that VHDX can compress data does not mean that its size will always be smaller than VHD.
- If you have long sections of zeroed data, VHDX will work wonders as a compressed disk image format, hence why Rufus labels it as such.
- Do not assume a brand new USB drive is empty for the purposes of imaging.
- After each use, you need to zero fill the drive again to return it to an optimal condition for the purposes of compression.
- If you do not zero fill the drive then the size of the image can be any size up to the capacity of the USB drive.
- Use
- Aquire the Image
- Connect the DiskGenius USB drive
- Image with Rufus to get an Fixed Disk Image (VHDX) of the USB drive
- Create a VHDX image, save it to your desktop and call it:
DiskGenius v6.0.1.1645.vhdx
- Create a VHDX image, save it to your desktop and call it:
- Disconnect the DiskGenius USB drive (optional)
- Prepare the Image
- Nothing to do
- Configure Ventoy
- Connect the Ventoy USB drive
- Copy
DiskGenius v6.0.1.1645.vhdxto your ventoy images partition. - Install the Ventoy Windows VHD Boot Plugin
- Plugin.WinVhdBoot . Ventoy
- Ventoy uses this plugin to boot VHD(x) files with Windows 7+ in it.
- Both Legacy BIOS and UEFI are supported. Both fixed and dynamic VHD(x) are supported.
- In UEFI mode, only 64 bit Windows is supported, 32 bit is NOT supported.
- Plugin.WinVhdBoot . Ventoy
- Done
- Boot from your Ventoy USB and check it loads.
Method 2 - Manually Create VHDX
- Create the VHDX (there are probably other ways)
- Open up `Disk Management`
- Run:
diskmgmt.msc
- Run:
- Action --> Create VHD
- Use these settings:
- Location:
C:\Users\quantunwarp\Desktop\DiskGenius v6.0.1.1645.vhdx - Virtual hard disk size:
2GB - Virtual hard disk format:
VHDX - Virtual hard disk type:
Dynamically expanding (Recommended)
- Location:
- Use these settings:
- Once created, the drive is automatically mounted but needs to be initialised like any new disk.
- In `Disk Mangement` Right click on the new drive and select
Initialise Disk - Use the
MBRpartition style
- In `Disk Mangement` Right click on the new drive and select
- Create a FAT32 partition
- Right click on the drive and select New Simple Volume and follow the wizard.
- Use these settings:
- File System:
FAT32 - Allocation unit size:
Default - Volume Label:
Disk Genius - Perform a quick format.
- File System:
- Set the partition active
- Use DiskGenius to set the partition active
- Open up `Disk Management`
- Prepare the Image
- Mount the VHDX disk image.
- Connect the DiskGenius USB drive.
- Show hidden files
- Copy all files on the USB drive to the VHDX volume.
- Hide all files again
- Unmount/Detach the Disk Image.
- Configure Ventoy
- Connect the Ventoy USB drive
- Copy
DiskGenius v6.0.1.1645.vhdxto your ventoy images partition. - Install the Ventoy Windows VHD Boot Plugin
- Plugin.WinVhdBoot . Ventoy
- Ventoy uses this plugin to boot VHD(x) files with Windows 7+ in it.
- Both Legacy BIOS and UEFI are supported. Both fixed and dynamic VHD(x) are supported.
- In UEFI mode, only 64 bit Windows is supported, 32 bit is NOT supported.
- Plugin.WinVhdBoot . Ventoy
- Done
- Boot from your Ventoy USB and check it loads.
WIM
- This only works when using EFI/UEFI boot environments.
- If you try and boot the WIM when using MBR/CSM/Legacy, it will start to load and then a black screen will overlay the Ventoy loader and it will crash.
- Aquire the Image
- Connect the DiskGenius USB drive.
- Show hidden files.
- Copy the following file to your desktop:
...\DiskGenius - Boot\boot.wim - Disconnect the DiskGenius USB drive (optional)
- Prepare the Image
- Rename
boot.wimto something human readable likeDiskGenius v6.0.1.1645.wim
- Rename
- Configure Ventoy
- Connect the Ventoy USB drive
- Copy
DiskGenius v6.0.1.1645.vhdxto your ventoy images partition. - Install the Ventoy Wimboot Plugin
- Plugin.wimboot . Ventoy
- Use this plugin to boot WIM files (Legacy BIOS + UEFI)
- Use Windows native bootloader (Legacy + UEFI): etfsboot.com + bootx64.efi directly extracted from Windows ISO file
- For Reference (not used)
- WIMBOOT Mode | Ventoy
- WIMBOOT mode is an alternative for booting official Windows ISO.
- Do I need to install the plugin? Is WIM support now native?
- WIMBOOT Mode | Ventoy
- Plugin.wimboot . Ventoy
- Done
- Boot from your Ventoy USB and check it loads.
ISO
- This is a very trick and time consuming option and is not really needed
- Try and find and ISO already done, and then use this.
method 1 get a windows disk and swap out the contents, keeping the boot sector
- Aquire the Image
- Connect the DiskGenius USB drive
- ..............
- Prepare the Image
- ...........
- Configure Ventoy
- Connect the Ventoy USB drive
- Copy
DiskGenius v6.0.1.1645.isoto your ventoy images partition.
- Done
- Boot from your Ventoy USB and check it loads.
Troubleshooting
How to check if your USB is configured as "Super Floppy" or a traditional Hard drive (HDD)
There are a couple of methods outlined below.
- diskpart
- Run the following commands (swap # for the number assigned to your USB disk):
diskpart
list disk
select disk #
detail disk
- This should give an output as follows:
Microsoft DiskPart version 10.0.26100.1150

Copyright (C) Microsoft Corporation.
On computer: WIN11PC

DISKPART> list disk

  Disk ###  Status         Size     Free     Dyn  Gpt
  --------  -------------  -------  -------  ---  ---
  Disk 0    Online         1863 GB  4096 KB        *
  Disk 1    Online         7651 MB      0 B

DISKPART> select disk 1

Disk 1 is now the selected disk.

DISKPART> detail disk

General USB Flash Disk USB Device
Disk ID: 6F20736B
Type   : USB
Status : Online
Path   : 0
Target : 0
LUN ID : 0
Location Path : UNAVAILABLE
Current Read-only State : No
Read-only  : No
Boot Disk  : No
Pagefile Disk  : No
Hibernation File Disk  : No
Crashdump Disk  : No
Clustered Disk  : No

  Volume ###  Ltr  Label        Fs     Type        Size     Status     Info
  ----------  ---  -----------  -----  ----------  -------  ---------  --------
  Volume 5     E   PICTURES     FAT32  Removable   7651 MB  Healthy

DISKPART> list partition

  Partition ###  Type              Size     Offset
  -------------  ----------------  -------  -------
* Partition 1    Primary             14 GB      0 B

DISKPART> select partition 1

There is no partition selected.

DISKPART>
- As you can see, Disk 1 (the USB):
- It is not a GPT based disk.
- Has no free space, meaning that all the space has been assigned to partitions.
- It is not a "Boot Disk".
- Has only 1 Volume/Partition, which is not bootable.
- When you try and select the partition, diskpart returns the error,
There is no partition selected., indicating it has an error accessing the partition table, which do not exist on "Super Floppy" USB drives.
- This is a "Super Floppy" USB drive, or the partition table is corrupted.
- Run the following commands (swap # for the number assigned to your USB disk):
- DiskGenius
- This images shows you a 16GB "Super Floppy" USB drive
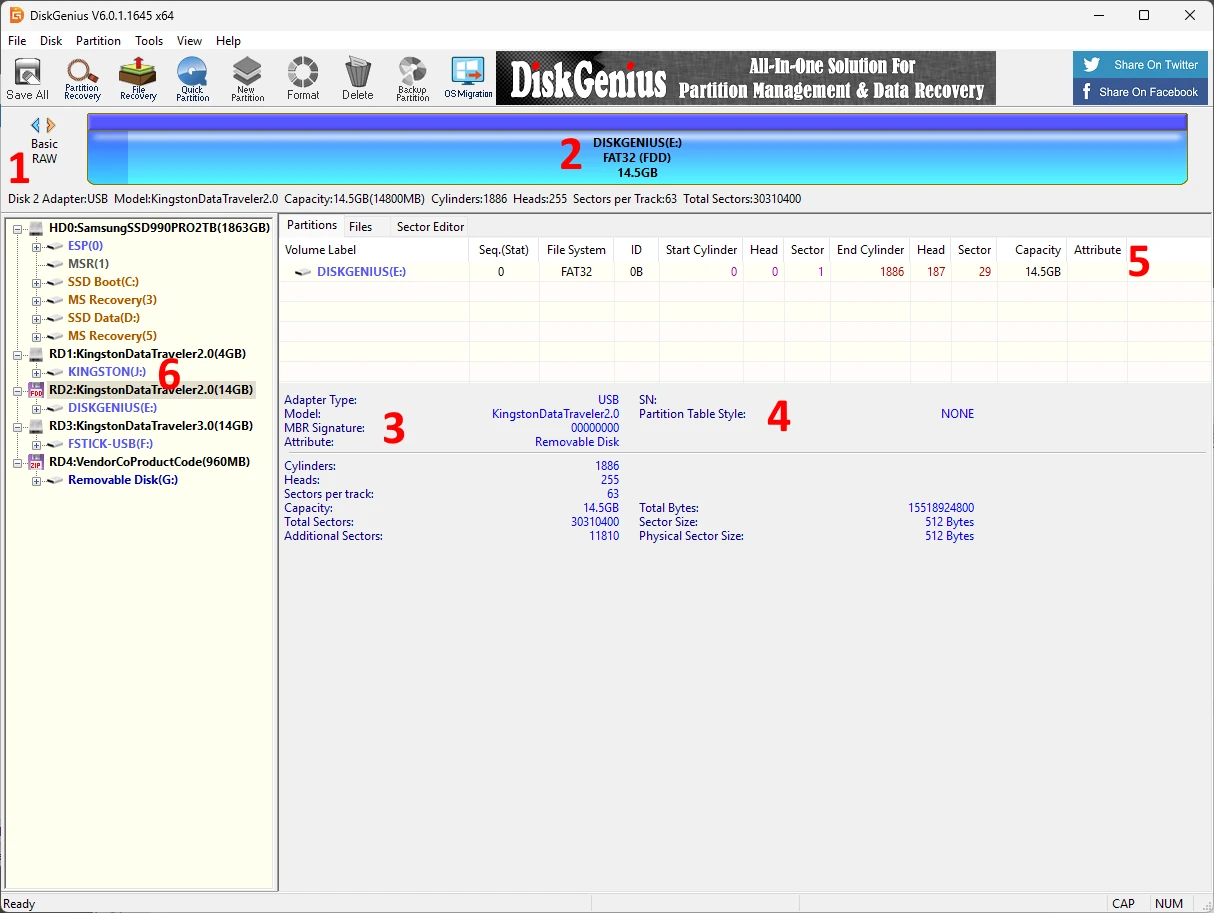
- Basic/RAW = This means there is no MBR or Partition Table.
- FAT32 (FDD) = This is a FAT32 partition, but has not been defined in a partition table.
- MBR Signature: 00000000 = No MBR is defined.
- Partition Table Style: NONE = No partition table.
- Volume/Partition is not marked as active.
- In the drive tree, there is a floppy icon instead of a HDD.
- This images shows you a 16GB "Super Floppy" USB drive
- OSFMount
- Does not show partitions in "Step 2 of 4" as shown below, and "Mount partitions as virtual disks" is greyed out.
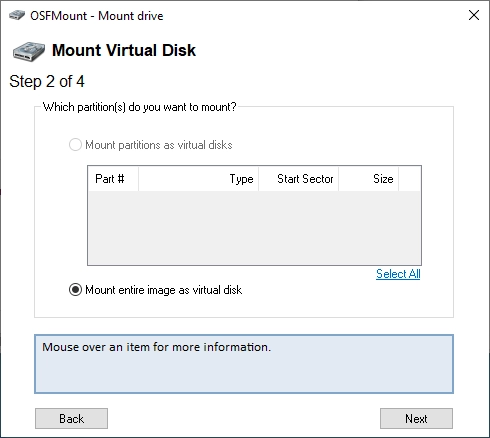
- This indicates a "Super Floppy" or corrupt disk image.
- There is no valid partition table for OSFMount to read.
- If the Volume gets mounted in windows then the Image is not corrupt and the drive image is that of a "Super Floppy".
- I have an image that when i mount as a physical disk shows not partitions in OSFMount but windows mounts a volume form this drive?
- This behavior can be confusing, but it usually comes down to how Windows interprets disk images versus how OSFMount handles physical vs logical mounting.
- Your Situation:
- You mount an image in OSFMount as a physical disk.
- OSFMount shows no partitions in its interface.
- Windows still assigns a drive letter and allows you to access a volume from that disk.
- Likely Explanation:
- Even though OSFMount is mounting the image as a physical drive, it may not parse or display the partitions correctly, especially if:
- The partition table is non-standard or corrupt.
- The image is just a raw partition, not a full disk with MBR/GPT.
- OSFMount has trouble recognizing certain filesystems or partition layouts.
- The image has a "superfloppy" format — a single partition image without an MBR (common in some forensic images or disk clones).
- Yet Windows is often more lenient:
- It scans all volumes and can mount a recognizable file system (e.g., NTFS or FAT32), even if the partition table is missing or broken.
- Windows may treat the image like a full partition, even though OSFMount expects a structured physical disk.
- Even though OSFMount is mounting the image as a physical drive, it may not parse or display the partitions correctly, especially if:
- What You Can Do:
- Try mounting the image as a logical drive instead of physical:
- In OSFMount, choose: Mount as drive letter (logical drive)
- Select the image file and choose offset 0 (or auto-detect).
- This usually works well if the image is a raw partition.
- Use disk utilities to inspect the structure:
- Tools like FTK Imager, WinHex, or HxD can help determine if the image has an MBR, GPT, or just a raw file system.
- You can also check in Disk Management (diskmgmt.msc) how Windows sees the mounted image (does it show a healthy volume or an unallocated disk?).
- Check the image format:
- If it’s from forensic software (like EnCase or dd), it might be a raw partition or use non-standard formatting.
- Try mounting the image as a logical drive instead of physical:
- Quick Test
- If you suspect it's a partition image (not a full disk), here’s a trick:
- Open it in OSFMount.
- Mount it as a logical drive with Offset = 0 and file system type = "Auto-detect".
- If it mounts and shows files, it’s just a partition, not a full disk with an MBR.
- If you suspect it's a partition image (not a full disk), here’s a trick:
- Does not show partitions in "Step 2 of 4" as shown below, and "Mount partitions as virtual disks" is greyed out.
When you Mount a DiskGenius USB Disk Image as a hard drive in Windows you get this error
- TL;DR this error is caused by the source USB formatted as a "Super Floppy"
- Starwind P2V does not support "Super Floppy" for live copying as it expects a partition table.
- A USB drive can be formatted as a traditional hard drive (HDD) or in a "Super Floppy" format akin to a traditional floppy disk (FDD).
- "Super Floppy" does not have a MBR or a Partition Table which is what Starwind is looking for when copying from the mounted Disk image.
- Starwind wiil not present/see Removable Media disks or their Volumes, only hard disks. This is intentianal by the software developers.
Scenario
- You used a large USB drive for your DiskGenius WinPE and as a consequence the image is very large even though most of the space is empty.
- You mounted the drive image using either Windows Native or OSFMount. (in this example we has used OSFMount)
- The drive has successfully mounted
- You open Starwind V2V to convert your large USB Fixed size disk image to a growable VHDX image which will create a much smaller image file
- After going through the wizard, you click on convert and almost immediately you get the following error.
Error
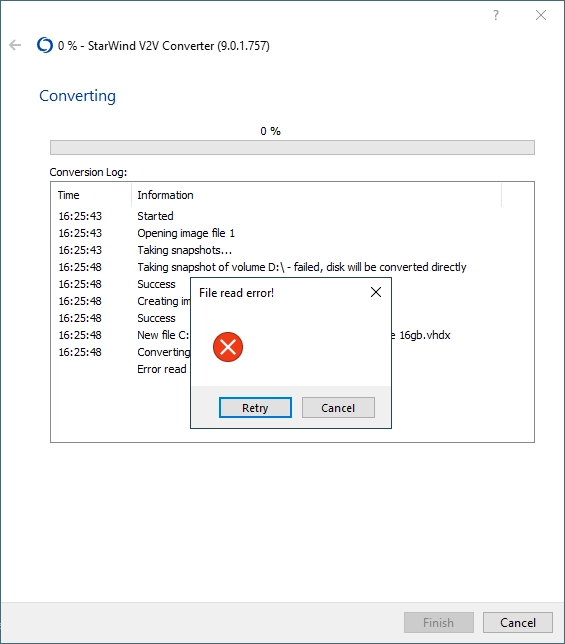
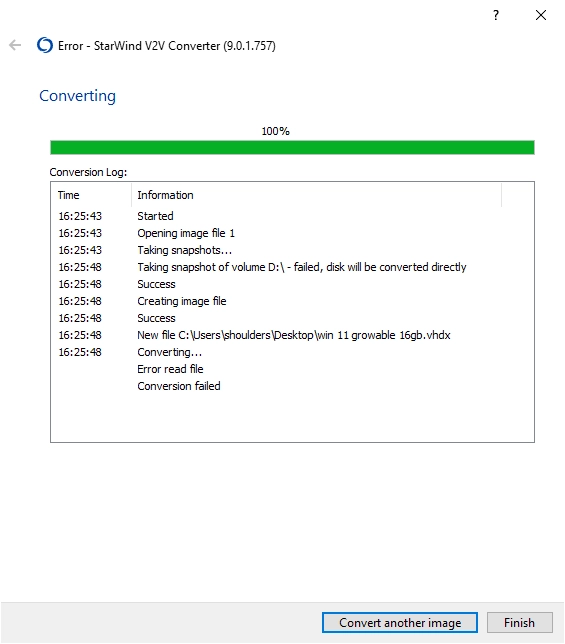
Log File
7/21 16:24:49.493 2b68 Facility ???INFO: CV2V_ConverterApp::InitInstance: SetDllDirectory: C:\Program Files\StarWind V2V Converter\lib
7/21 16:24:49.493 2b68 Facility ???INFO: CV2V_ConverterApp::InitInstance: File Version: 9.0.1.757
7/21 16:24:49.508 2b68 Facility ???INFO: CV2V_ConverterApp::InitInstance: Load language IDR_XML_ENGLISH
7/21 16:24:49.508 2b68 Facility ???INFO: CV2V_ConverterApp::InitInstance: Set current language English
7/21 16:24:49.508 2b68 Facility ???INFO: CPS_V2V_Converter::CPS_V2V_Converter: Version MajorVersion 10, MinorVersion 0, BuildNumber 19045
7/21 16:24:49.508 2b68 Facility ???INFO: WrapperHyperV::WrapperHyperV: LoadLibrary C:\Windows\system32\wbem\wmiutils.dll - 94cb0000
7/21 16:24:49.508 2b68 Facility ???INFO: WrapperHyperV::WrapperHyperV: LoadLibrary C:\Windows\system32\wbem\wmiutils.dll - 94cb0000
7/21 16:24:53.723 2b68 Facility ???INFO: ICPPage::OnWizardNext: SetActivePage - eSynchronization
7/21 16:24:57.926 2b68 Facility ???INFO: ICPPage::OnWizardNext: SetActivePage - eAzureConnectionTo
7/21 16:25:06.162 2b68 Facility ???INFO: ICPPage::OnWizardNext: SetActivePage - eLocationTo
7/21 16:25:09.053 2b68 Facility ???INFO: ICPPage::OnWizardNext: SetActivePage - eFormat
7/21 16:25:12.381 2b68 Facility ???INFO: ICPPage::OnWizardNext: SetActivePage - eOptionsHyperV
7/21 16:25:17.914 2b68 Facility ???INFO: ICPPage::OnWizardNext: SetActivePage - eConverting
7/21 16:25:43.043 2b68 Facility ???INFO: CPPOutputFile::onNext: Out path: C:\Users\quantumwarp\Desktop\DiskGenius-Dynamic.vhdx, Out format 11
7/21 16:25:43.043 2b68 Facility ???INFO: ICPPage::OnWizardNext: SetActivePage - eHYPERVConnectionTo
7/21 16:25:43.043 1788 Facility ???INFO: CPPConverting::Convert: InConvertType: 2, OutConvertType: 4
7/21 16:25:43.043 1788 Facility ???INFO: CPPConverting::ConvertDisks: pathInput: 1, pathOutput: C:\Users\quantumwarp\Desktop\DiskGenius-Dynamic.vhdx
7/21 16:25:43.043 1788 Facility ???INFO: P2V::CreateInputImage: path 1
7/21 16:25:43.043 1788 Facility ???INFO: P2V::CreateInputImage: Size 1 - 15518924800, BytesPerSector - 512
7/21 16:25:48.090 1788 Facility ???INFO: CPPConverting::ConvertDisks: CreateInputImage: 0
7/21 16:25:48.090 1788 Facility ???INFO: CPPConverting::ConvertDisks: CreateOutputImage: 0
7/21 16:25:48.090 1788 Facility ???ERROR: CPPConverting::ConvertImage: Read 3
7/21 16:32:00.054 1788 Facility ???ERROR: CPPConverting::ConvertDisks: ConvertImage - 2
7/21 16:32:00.054 1788 Facility ???ERROR: CPPConverting::Convert: FAILED
Log Explained
Here's what the log tells us:
- StarWind V2V Converter Version:
9.0.1.757- This is a relatively recent version, so it's unlikely to be a bug in an old release. - Conversion Type:
InConvertType: 2- This indicates a Physical Disk source.OutConvertType: 4- This indicates a Hyper-V (VHDX) destination.- This confirms that StarWind V2V Converter sees the OSFMounted IMG as a physical disk, which is good.
- Source Disk Identification:
pathInput: 1andSize 1 - 15518924800, BytesPerSector - 512pathInput: 1likely refers to the "Disk 1" as seen by Windows Disk Management. This corresponds to the virtual disk presented by OSFMount.- The size
15,518,924,800 bytes(approx 14.45 GB) andBytesPerSector - 512are correctly identified by the converter from the virtual disk.
- Failure Point:
CPPConverting::ConvertDisks: CreateInputImage: 0- This line means StarWind successfully initialized the connection to the source disk.CPPConverting::ConvertDisks: CreateOutputImage: 0- This line means StarWind successfully initialized the connection to the destination VHDX file.CPPConverting::ConvertImage: Read 3- This is the critical error. It happens immediately after the input and output images are created, right at the point where StarWind tries to read the actual data from the source disk. This confirms a low-level read error from the OSFMounted virtual disk.- The subsequent errors (
ConvertImage - 2, FAILED) are a direct consequence of this initial read failure.
- Conclusion from the log
- The log strongly indicates that the issue is not with StarWind V2V Converter itself, nor with the destination drive or VHDX creation. The problem lies squarely with StarWind's ability to read data from the virtual disk presented by OSFMount, which is derived from your disk image file created from your DiskGenius USB drive.
- Rufus can write raw ISO or DD images that may not have a typical partition table or disk signature that StarWind expects. This can cause problems when it tries to interpret sectors and fails.
- Additional
- This following error (not in the example above) shows an issue with the drive (VHD or physical) not being able to read sectors. If it is a physical drive then this indicates the drive is failing.
10/21 12:55:57.929 2764 Facility ???WARNING: P2V::getBuffer: ReadFile - 23. Data error (cyclic redundancy check).
10/21 12:55:57.929 2764 Facility ???ERROR: CPPConverting::ConvertImage: Read 3
10/21 13:03:16.650 2764 Facility ???ERROR: CPPConverting::Convert: FAILED
- This following error (not in the example above) shows an issue with the drive (VHD or physical) not being able to read sectors. If it is a physical drive then this indicates the drive is failing.
Cause
After in-depth research I can clarify the error is not cause by:
- Rufus or DiskImager: these apps just create a binary image of the disk and change nothing. Any errors or issues of the drive are blindly transferred to the disk image.
- Windows 10 or Windows 11: Apart from the size of the
boot.wimthere is no difference (Win10 = 550mb)(Win11 = 1GB). - Windows Native and OSFormat disk image mounting: These were mounting the disk image correctly and giving a 1:1 representation of the imaged USB drive.
- The disk image being mounted as "Read-Only": This does not interfer with the conversion as it is used as a source only.
- The size/capacity of the USB drive: None of the software has any size limits, certainly none that have been reached.
- Cluster Size / Allocation Unit Size: I tried both 4096 and 8192 and those made no difference. 8192 seems to be the default allocation size for 16GB USB drives.
- Trying different locations for the source and destination files made no difference.
- VHD, VHDX and IMG disk image formats all worked as expected.
- I got no Windows Defender errors, so in this case it was not the AV causing issues.
- Encryption on the drive can cause issues but these drive had none so can be ruled out.
What I have tried
- Zero filling the USB before reformatting = When I formatted with Windows, it just created a "Super Floppy" USB drive because this is how Windows formats them.
- I check the USB drive for errors by doing a full surface scan, it found no errors.
- I checked the FAT32 file system with chkdsk which found no errors.
Solutions
- Always use Dynamic/Growable disk image files where possible to keep space used down.
- Always use MBR/HDD style formatting on your USB drives where possible.
- Use a HDD/MBR Style USB drive to begin with or make one:
- Using Rufus, convert the USB drive into bootable USB, with a single FAT32 partition (HDD format), and of course the partiontion will be marked as `Active`.
- Then use DiskGenius to make it a WinPE.
- This way ensures the USB drive and any images created from it will work in Starwind P2V as there is a partition table present.
- This USB drive will is NOT a "Super Floppy".
- Use the original disk image as is.
- You can keep the image size down by using a smaller USB drive (Win10 = 1GB, Win11 = 2GB).
- Use DiskGenius Pro to make a direct VHD/VHDX image from the USB drive
- This is the same as using Rufus to create the disk image.
- All disk images created by DiskGenius are of the Fixed size type.
- Build your own VDH/VDHX image
- Manually create a VHD/VHDX image on your PC (MBR, Single 2GB FAT32 partition)
- Mount the VHD/VHDX drive image
- Set the partition as `Active`.
- Then manually copy all of the files from the USB drive into the new partition ion the drive image.
WinPE - Low Resolution
- TL;DR = UEFI GOP (Graphics Output Protocol) sets the screen resolution before WinPE when using EFI on my lenovo (resolution seems to be set at 800x600 and cannot be changed)
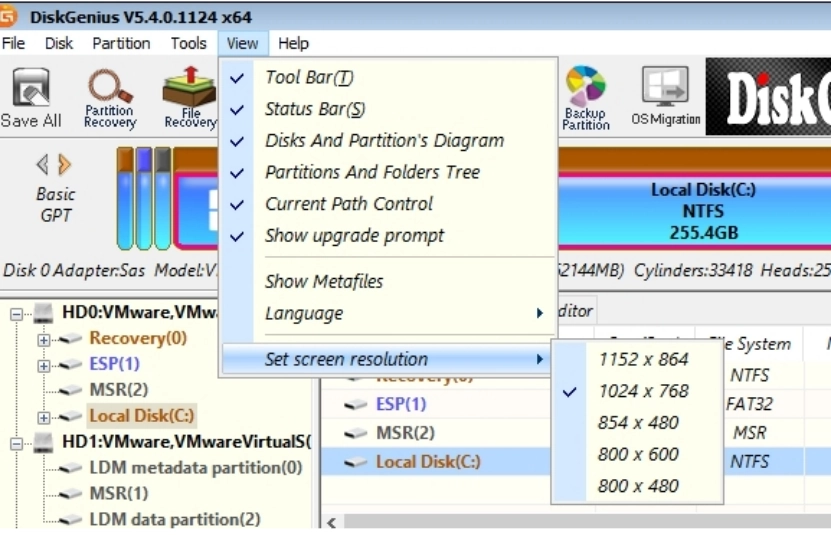
- Solution = Boot in legacy mode and then change the resolution in DiskGenius if needed: View --> Set screen resolution (Options: 1920x1080, 1024x768). This was on my Lenovo laptop.
- Notes
- Using a different boot loader like Grub which can be used to see what resolutions the GOP provides.
- My Lenovo on EFI returns a resolution of 800x600 but when I use CSM/Legacy I get 1024x768 and 1920x1080 which I can then swap between with the DiskGenius menu in the WinPE environment.
- For most users on modern UEFI systems — the hard limit is 1024x768.
- Some people say showing the boot logo helps increase screen resolution (not tested).
- DiskGenius resolution in the BCD is 1024x768
- Resolutions available will vary from PC to PC, Laptop to Laptop, and can also vary depending on the the boot method (Legacy BIOS / UEFI) used.
In DiskGenius
In the WinPE environment created by DiskGenius, you can change the screen resolution according to the following, if your hardware supports it.
Notes
When trying to change the resolution of my screen when using DiskGenius on my Lenonvo laptop.
- Various Options summary
- Legacy Boot = allows me to change res in WinPE
- setres = no
- qres = 2005, didnt work
- powershell = no powershell to use
- unattended.xml = doesn't work
- Modify the WinPE Image Before Boot (Recommended):
- This is the most reliable method for setting the desired resolution. You do this by customizing the boot.wim file that makes up your WinPE environment.
- You can create an unattend.xml file with display settings and place it in the root of your WinPE ISO or USB. This file will be processed during the WinPE startup phase.
- Here's an example of the unattend.xml snippet for setting resolution:
<?xml version="1.0" encoding="utf-8"?>
<unattend xmlns="urn:schemas-microsoft-com:unattend">
    <settings pass="windowsPE">
        <component name="Microsoft-Windows-Setup" processorArchitecture="amd64" publicKeyToken="31bf3856ad364e35" language="neutral" versionScope="nonSxS" xmlns:wcm="http://schemas.microsoft.com/WMIConfig/2002/State" xmlns:xsi="http://www.w3.org/2001/XMLSchema-instance">
            <Display>
                <ColorDepth>32</ColorDepth>
                <HorizontalResolution>1920</HorizontalResolution>
                <RefreshRate>60</RefreshRate>
                <VerticalResolution>1080</VerticalResolution>
            </Display>
        </component>
    </settings>
</unattend>
- Modify the WinPE Image Before Boot (Recommended):
- bcdedit / graphicsresolution
- I made sure I was working on the WinPE drive: X: eg:
X:\bcdedit /store D:\boot\BCD /set {globalsettings} graphicsresolution 1280x1024 - Works
bcdedit /store "d:\boot\BCD" /set {bootmgr} graphicsresolution "800x600" bcdedit /store "d:\boot\BCD" /set {bootmgr} graphicsresolution "1024x768" - Not Working
bcdedit /store "d:\boot\BCD" /set {bootmgr} graphicsresolution "1280x768" bcdedit /store "d:\boot\BCD" /set {bootmgr} graphicsresolution "1280x1024" - Reason
- Most UEFI firmware initializes the screen at 1024x768 or lower.
graphicsresolutionis backed by the boot graphics adapter using VESA BIOS Extensions (VBE) or UEFI GOP (Graphics Output Protocol).- Changing that during early boot (before Windows loads its display drivers) is not officially supported past that limit.
- For most users on modern UEFI systems — the hard limit is 1024x768.
- I made sure I was working on the WinPE drive: X: eg:
- Standards
- GOP - OSDev Wiki
- This is the new standard for UEFI that superseded VESA (BIOS) and UGA (EFI 1.0).
- It has basically the same functions as VESA, you can query the modes, set the modes.
- It also provides an efficient BitBlitter function, which you can't use from your OS unfortunately.
- GOP is an EFI Boot Time Service, meaning you can't access it after you call ExitBootServices(). However, the framebuffer provided by GOP persists, so you can continue to use it for graphics output in your OS.
- GOP - OSDev Wiki
- BCD
- BCDEdit Command-Line Options | Microsoft Learn - BCDEdit is a command-line tool for managing Boot Configuration Data (BCD).
- Other Testing
- WinPE Screen Resolution and DPI scaling on UEFI firmware | mistyprojects.co.uk
- This article is based on observations on screen resolution and DPI scaling in WinPE.
- Screen resolution can be changed from a running WinPE booted on BIOS firmware.
- Changing the screen resolution on UEFI firmware is not so simple. Settings in unnatend.xml appear to be ignored and the screen resolution is fixed. Based on available information screen resolution appears to be set based on Graphics Output Protocal (GOP) mode. Once WinPE is booted, the resolution cannot be changed.
- Setting the resolution in the BCD
bcdedit.exe /set {globalsettings} graphicsresolution 800x600 bcdedit.exe /set {globalsettings} graphicsresolution 1024x600 bcdedit.exe /set {globalsettings} graphicsresolution 1024x768 - Attempting to use an unsupported resolution (unsupported by bcdedit.exe - not the hardware) resulted in the following output:
C:\windows\system32>bcdedit.exe /set {globalsettings} graphicsresolution 1920x1080 The integer data is not valid as specified. Run "bcdedit /?" for command line assistance. The parameter is incorrect. - The highestmode option is also supported in bcdedit.exe. This option will enable boot applications to use the highest graphical mode detected by the firmware
bcdedit.exe /set {globalsettings} highestmode on - To find supported resolutions, use the
graphicsmode --infocommand on the GRUB4UEFI commandline.
- WinPE Screen Resolution and DPI scaling on UEFI firmware | mistyprojects.co.uk
- unattend.xml
- How to Change Screen Resolution in Windows PE 4 and 5 | Password Recovery
- To set screen resolution in WinPE, simply put an answer file named unattend.xml file in the root of the WinPE ISO image with the following content.
- This articel has an example file.
- How to Change Screen Resolution in Windows PE 4 and 5 | Password Recovery
- Ventoy
- [issue]: Low resolution gfx mode booting various ISOs · Issue #3019 · ventoy/Ventoy · GitHub
- Could be an issue with Secure Boot and Lenovos
- Check what resolutions are avaiable in UEFI and Legacy: F5 --> Resolution Configuration
- Rebuild your venoty USB from scratch can help get rid of this resolution issue.
- Can i set the GOP resolution with Ventoy?
- Yes, Ventoy offers options to influence the display resolution, including in UEFI mode, but it's important to understand the nuances, especially regarding GOP.
- Ventoy's approach to resolution:
- Ventoy Menu Resolution: Ventoy itself, at its boot menu, tries to set a resolution. You can typically access this by pressing F5 (Tools) --> Resolution Configuration from the Ventoy main menu. This allows you to choose from resolutions detected by your system's firmware.
- In UEFI mode, these options are often limited to the resolutions exposed by the GOP (Graphics Output Protocol) of your motherboard/graphics card. Common options might include 1024x768, 1280x1024, 1920x1080, and sometimes others, but it depends on your hardware's firmware.
- While Ventoy can request a specific resolution from the firmware, the ultimate support depends on what your system's GOP actually offers.
- ISO Boot Resolution (Post-Ventoy): This is where it gets tricky, especially with WinPE.
- Ventoy's role ends once it hands off control to the ISO: So, while Ventoy might display its menu at a certain resolution, the operating system (like WinPE or a Linux distro) inside the ISO will then take over display control.
- WinPE and UEFI GOP: As discussed before, WinPE in UEFI mode often defaults to a generic resolution (e.g., 800x600) because it relies on the basic GOP. It doesn't load full display drivers by default.
- Ventoy's "Secure Boot Support" and Resolution Issues: There have been reports (as seen in search results) that enabling "Secure Boot Support" in Ventoy, especially with certain Lenovo UEFI firmware, can lead to WinPE ISOs being stuck at a low 800x600 resolution in UEFI mode. Some users found success by disabling secure boot support in Ventoy's installation options, even if Secure Boot is still enabled in the BIOS itself. This suggests a potential conflict or a more restrictive GOP mode being enforced when Ventoy's secure boot components are active.
- Ventoy Menu Resolution: Ventoy itself, at its boot menu, tries to set a resolution. You can typically access this by pressing F5 (Tools) --> Resolution Configuration from the Ventoy main menu. This allows you to choose from resolutions detected by your system's firmware.
- How to try and set resolution with Ventoy in UEFI:
- During Ventoy Installation/Update:
- When you run Ventoy2Disk.exe (on Windows) to install or update Ventoy on your USB drive, go to Option and consider unchecking "Secure Boot Support." This has reportedly helped some users with low resolution issues for WinPE in UEFI.
- Backup your ISOs first, as clearing or reinstalling Ventoy will wipe the USB drive.
- From the Ventoy Boot Menu (before booting the ISO):
- Boot your Ventoy USB drive.
- When the Ventoy main menu appears, press F5 (Tools).
- Select Resolution Configuration.
- Choose the desired resolution from the list of available modes. Ventoy will attempt to set this resolution for its menu.
- Then, proceed to boot your DiskGenius WinPE ISO.
- During Ventoy Installation/Update:
- Important points to remember:
- This won't guarantee WinPE will stay at that resolution. Even if Ventoy's menu appears in a higher resolution, WinPE might revert to a lower one once it boots if it doesn't have the necessary display drivers loaded internally.
- Integrating drivers into WinPE is still the most robust solution for UEFI. While Ventoy can set the initial GOP mode, for WinPE to utilize higher resolutions and display options, it truly needs the proper display drivers embedded within its
boot.wimfile. - Check Ventoy's Official Documentation: Always refer to the official Ventoy documentation (ventoy.net) for the most up-to-date information and advanced configuration options (e.g.,
ventoy.jsonfor persistent settings).
- [issue]: Low resolution gfx mode booting various ISOs · Issue #3019 · ventoy/Ventoy · GitHub
- Software to change Resolution
- Articles
- Software
- Powershell
- QRes @ Sourceforge - QuickRes allows you to change color depth and screen resolution without restarting the machine.
QRes.exe /x:800 /y:600
- NirCmd - Windows command line tool - NirCmd is a small utility that allows you to do many useful tasks from command-line, including changing the dsplay resolution.
- NirCmd Command Reference - setdisplay - No meta description
nircmd.exe setdisplay 1024 768 24
- NirCmd Command Reference - setdisplay - No meta description
- SetRes - MajorGeeks - With SetRes you can set the screen resolution, colour depth and refresh rate from the command line or a shortcut.
- ChangeScreenResolution - Change your screen resolution from the command line in Windows
- Misc
- Problem with resolution of Windows Boot Manager - Microsoft Q&A - Is there anyone know that how to take the default resolution back to Windows Boot Manager?
- Low Resolution Boot Screen Issue & Suggested Fix | Windows 11 Forum
- This is simply an aesthetic bother but I can't stand when my 4K PC monitor boot screen looks like it's 480p
- Someone understood and offered this fix
- Yes you can:
bcdedit /deletevalue "{globalsettings}" highestmode reboot - That picture you posted has zero to do with Windows and everything to do with the BIOS/UEFI loading screen.
- If it was as simple as running the above command from within Windows to edit the BIOS loading screen (or any bios settings for that matter, then we would all be in a world of trouble and at the mercy of any and all nasties that managed infect Windows.
- When i boot of diskgenius WinPE bootable USB, the screen resolution is too low. The option to change screen resolution is missing
- When booting a DiskGenius WinPE bootable USB, experiencing low screen resolution and missing resolution options is a common issue. This often stems from WinPE's minimalistic nature, as it typically uses generic display drivers that might not fully support your display's native resolution or advanced graphics settings.
- Here's what you should consider:
- WinPE and Display Drivers: WinPE images generally do not include a full set of display drivers. They rely on basic drivers for compatibility across a wide range of hardware. This means advanced display features, including the ability to change resolution, might be limited or unavailable.
- UEFI vs. Legacy Boot: The behavior of WinPE regarding screen resolution can differ between UEFI and Legacy BIOS boot modes. In some UEFI environments, the screen resolution is determined by the Graphics Output Protocol (GOP) and might be fixed once WinPE boots.
- Integrating Drivers: For specific hardware, it might be possible to integrate display drivers into the WinPE image itself. This is an advanced process and typically involves using tools from the Windows Assessment and Deployment Kit (ADK) to customize the boot.wim file. However, even with integrated drivers, some users report issues.
- GOP
- Changing the Graphics Output Protocol (GOP) resolution directly in UEFI is a complex topic, and it's not something you typically "change" in the same way you would adjust display settings in a running operating system. Here's a breakdown of what GOP is and why it's so difficult to modify:
- What is GOP?
- The Graphics Output Protocol (GOP) is a core part of UEFI firmware. It's designed to replace the older Video BIOS (VBIOS) found in legacy BIOS systems. Essentially, GOP provides a standardized way for the UEFI firmware and early boot processes to display graphics on your screen before the operating system's full graphics drivers load.
- Key characteristics of GOP:
- Pre-OS Display: It's responsible for displaying the manufacturer's logo, BIOS/UEFI setup screens, and early boot messages.
- Driver Replacement: It replaces the need for a separate VBIOS by providing a protocol that UEFI applications can use to draw directly to a hardware frame buffer.
- Integrated into VBIOS/Firmware: The GOP driver itself is usually embedded within the graphics card's VBIOS (Video BIOS) or the motherboard's UEFI firmware.
- Why is it difficult to change GOP resolution?
- Firmware-Dependent: The available GOP resolutions are determined by your motherboard's UEFI firmware and your graphics card's VBIOS. These are often hardcoded and limited to a few standard resolutions (e.g., 800x600, 1024x768).
- Generic Drivers: WinPE, being a minimal environment, relies on these generic GOP modes. It doesn't load a full suite of display drivers that would allow for dynamic resolution changes.
- No User Interface: There's typically no user-friendly interface within the UEFI firmware itself to change the active GOP resolution directly. You might find a setting to switch between "UEFI" and "CSM" (Compatibility Support Module, which enables legacy BIOS features), but not to pick a specific GOP resolution.
- Security and Stability: Modifying the underlying firmware (VBIOS or motherboard UEFI) to force a different GOP resolution carries significant risks, including potentially bricking your hardware if done incorrectly.