These are my instructions to install LEDE on a Virtualbox virtual machine so i can play around with various setups and add-ons without breaking my router. I am a windows user, so these instructions are windows based but a lot should be the same. Through this guide I will use 'VB' which is instead of typing virtualbox virtual machine lots of times.
Download and install VirtualBox before anything else.
These instructions are a companion to LEDE Project: Run LEDE as a Virtualbox virtual machine which has some errors in it.
Which Image File
This is can be confusing so I will outline what the different types are below. The image files are also specific to certain chips or technology, so in this case these images are for x86/x64 archeitectures. The Stable Releases are also sorted by their release number, so make aure you always get teh latest version.
- Stable Release - These are the current stable production releases and also include LuCI (the GUI for LEDE)
- Snapshots - These are the bleeding edge release and are for development and testing. They do NOT contain LuCI.
- squashfs
- Images with this in title store all the primary system files in a compressed read only partition. Now I am not 100% how this works but the 2 scenarios but there are
- All changes to the system files are stored on the eread/write partition and override those on the read only partition
- The system files on first boot are copied into the read/write partion and it is those files that are used.
- These images allow the use of a factory reset because they can wipe the read/write partition and then restore data from the read only partition
- Images with this in title store all the primary system files in a compressed read only partition. Now I am not 100% how this works but the 2 scenarios but there are
- ext4 - Images with this in the title are = not sure yet, perhaps there is just 1 single ext4 partition
The 2 files to choose from will have filenames similiar to these which are from the 17.01.4 stable release folder.
I have chosen to use lede-17.01.4-x86-64-combined-ext4.img.gz because I can easily expand the ext4 storage partition.
Notes
- in Prerequisites on LEDE Project: Run LEDE as a Virtualbox virtual machine there is the following notice
- Download the lede-x86-64-combined-squashfs.img image, from snapshots/targets/x86/64/(On Linux, download the lede-x86-64-combined-ext4.img image)
- Update, I think the sentence should read:
- For embedded systems or systems with a small amount of storage then download lede-x86-64-combined-squashfs.img. If you are installing on a full x86-64 machine such as a PC or Virtual Machine then use lede-x86-64-combined-ext4.img.
- openwrt on x86-64 - lackof.org - groups - Crabgrass - This goes into details about the different types of image file.
- LEDE Project: Run LEDE as a Virtualbox virtual machine
- OpenWrt in virtualbox - YouTube
- OpenWrt in VirtualBox [OpenWrt Wiki]
- VBoxVmService download | SourceForge.net
Prepare the virtual hard drive Image file (lede-17.01.4-combined-ext4.img)
- This is the preferred image to use for Full systems, PCs and Virtual Machines.
- The ext4 partition can be easily extended for those who need more storage.
- You will also notice that this image file is full size when you extract it.
Make the VirtualBox VDI file
Run the following command in the directory you have your LEDE image file.
"C:\Program Files\VirtualBox\VBoxManage" convertfromraw --format VDI lede-17.01.4-combined-ext4.img lede-17.01.4-combined-ext4.vdi
Now skip to the section Make the Virtualbox Virtual Machine.
Prepare the virtual hard drive Image file (lede-17.01.4-combined-squashfs.img)
- This image is designed for embedded systems or systems with a small amount of storage.
- You can usually image this directly to a real machine but image file will not work out of the box because it needs to be prepared to use in a virtual machine.
- I have not been able to resize the storage partion for this image type and from what I read you are suppose to do this when you compile the image file. I am sure there is a work aroun but i cannot find it.
Make the VirtualBox VDI file
Run the following command in the directory you have your LEDE image file.
"C:\Program Files\VirtualBox\VBoxManage" convertfromraw --format VDI lede-17.01.4-x86-64-combined-squashfs.img lede-17.01.4-x86-64-combined-squashfs.vdi
Converting the img file to a VDI file fails with an error
When you try and convert an untouched lede-17.01.4-x86-64-combined-squashfs.img to a virtualbox VDI file using VboxManage you will always get an error similiar to the one below:
D:\>"C:\Program Files\VirtualBox\VBoxManage" convertfromraw --format VDI lede-17.01.4-x86-64-combined-squashfs.img lede-17.01.4-x86-64-combined-squashfs.vdi
Converting from raw image file="lede-17.01.4-x86-64-combined-squashfs.img" to file="lede-17.01.4-x86-64-combined-squashfs.vdi"...
Creating dynamic image with size 19852146 bytes (19MB)...
VBoxManage.exe: error: VD: The given disk size 19852146 is not aligned on a sector boundary (512 bytes)
VBoxManage.exe: error: Error code VERR_VD_INVALID_SIZE at F:\tinderbox\win-5.1\src\VBox\Storage\VD.cpp(7002) in function int __cdecl VDCreateBase(struct VBOXHDD *,const char *,const char *,unsigned __int64,unsigned int,const char *,const struct VDGEOMETRY *,const struct VDGEOMETRY *,const union RTUUID *,unsigned int,struct VDINTERFACE *,struct VDINTERFACE *)
VBoxManage.exe: error: Cannot create the disk image "lede-17.01.4-x86-64-combined-squashfs.vdi": VERR_VD_INVALID_SIZE

D:\>
Explanation
This simple to explain. The image file is only 19MB in size but represents a drive that is nearly 300mb in size (16mb + 256mb). VboxManage parses the img file and sees a 300mb file system so it expects a file that is 300mb long, but because the file is not 300mb long as expected VboxMan returns an error. This is basically an unexpected end of file error. VboxMan actually interprets the files system in the file which is stored at the beginning so this error is expected.
NB: the img file does not need to be 300mb in normal circumstances because if you image the file 'as-is' onto a large enough drive then you would not have this issue because the OS would just see the extra space dues tot he partition table being correct. This keeps the file size to the absolute minimum. We only change the image because we want to create a virtual drive from the img and this process like validate partions and files systems so it can convert them to its own format.
Research / Examples
Look at these 2 examples where I have padded the files with 100mb and 300mb respectively, converted them to a VDI image, loaded them in the LEDE virtual machine and then booted with Gparted to see what was going on with the disks.
The 100mb example has an error that come up before you even get the disk map.
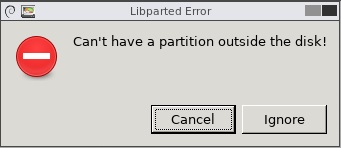
This error actually appears twice, I am guessing that is because there are 2 partitions.
Now as you know is not possible to fit the sda2 256mb partition onto a hard disk that is only 100mb in size. . The 100mb drive is likely to be corrupted or cause many issues.
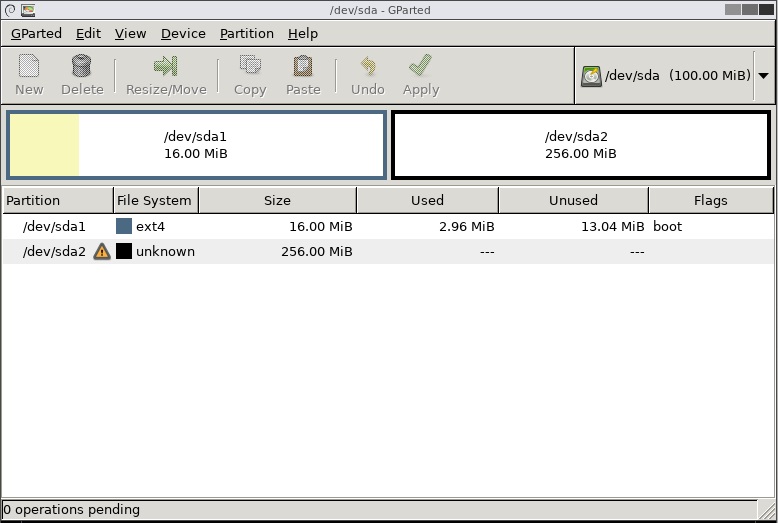
So I now move on to where I padded the image file with 300mb.
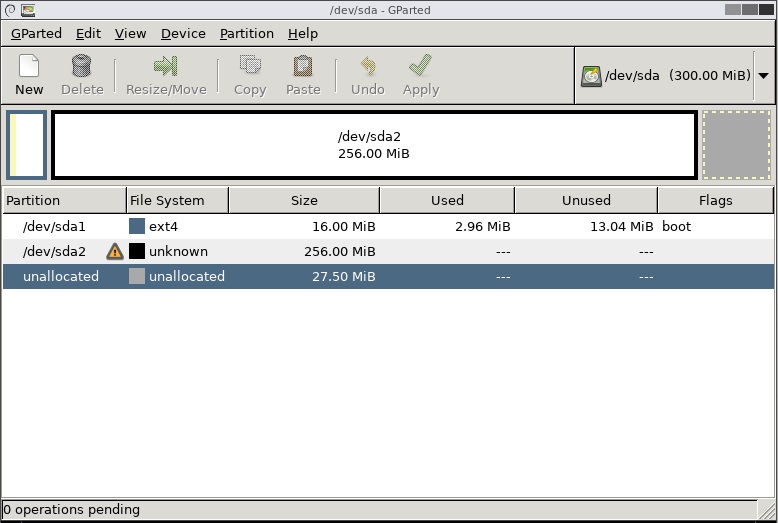
You can see the whole partition sda2 is within the drive boundries so will be healthy. VboxManage considers the whole file size when creating a VDI file. Both the 100mb and the 300mb VDI files were 9,216kb exactly so there must only be a slight difference in a setting controlling the virtual hard drive size.
NB: I do not know why the file system is unknown.
Padding the file
Now we know what the issue is we can fix it. We do this by making the file 300mb in size using the linux command dd. This allows us to extend the length of the file without affecting the contents that are already there.
You need a Linux system to be able to run the following commands. If you are on windows there is section below briefly telling you how to setup an Ubuntu virtual machine.
This command is wrong (from LEDE Project: Run LEDE as a Virtualbox virtual machine )
dd if=lede-17.01.4-x86-64-combined-squashfs.img of=lede.img bs=128000 conv=sync
- bs=128000 - this sets the block size that dd will work with and this is to small to wrk with a 300mb file so the secondary partion will get truncate but the primary system partition is still thre. This is why people will get a VB machine to boot but have no spare disk space to work with.
- The outputed file is xxxxxxxxMB in size.
Use this command
dd if=lede-17.01.4-x86-64-combined-squashfs.img of=padded-lede-17.01.4-x86-64-combined-squashfs.img bs=300M conv=sync
- This command makes an image that is 300mb which is more than enough to hold the whole file system.
- The names are slightly different but that is just to make managing the files easier.
- The outputed file is 300MB in size.
We now have a file that will convert
Run the following command in the directory you have your padded img file to create your virtual hard drive VDI file.
"C:\Program Files\VirtualBox\VBoxManage" convertfromraw --format VDI padded-lede-17.01.4-x86-64-combined-squashfs.img lede-17.01.4-x86-64-combined-squashfs.vdi
Notes
- Linux dd command help and examples
- 12 Linux dd command examples - The Linux Juggernaut
- VirtualBox - convert RAW image to VDI and otherwise
Create an Ubuntu Virtual Machine
This is a workaround for windows users to be able to use the dd command. There must be a windows equavalent but I don't know of one at the minute so here are my instructions to setup an Ubuntu virtual machine.
I used an Ubuntu 17.10 Artful (Final) Virtualbo prebuilt image from http://www.osboxes.org/ubuntu/
Credentials
- Username: osboxes
- Password:org
Create the VB Machine
- Extract the VDI file to your Vitual Machine images folder
- Create a VB machine in expert mode using the settings below
- Name: Ubuntu 64-bit
- Type: Linux
- Version: Ubuntun (64-bit)
- RAM: 2048mb
- Use an existing virtual hard disk file: point it to the VDI file you just extracted
- Click create
- Now run the machine
Configure the VB
Ubuntu is now running but we need to get the image files into the installation so there are a few settings that need to be configured to amke this an easy process.
- Open Settings
- Top right, click the drop down arrow
- Click on the screwdriver and spanner
- All settings can be managed here
- Set regional settings (optional)
- The keyboards is set to American , so needs changing to your locale.
- Check Time region aswell
- Update ubuntu
- this is required to be able to enable file sharing (for some reason, see 12.10 - Package 'samba' is virtual - Error when installing Samba - Ask Ubuntu) other wise you will get errors about missing services (sharing service is not install / package 'samba' is virtual / Could not find package 'libpam-smbpass' / Sharing service installation failed)
- verify you are connectedd to the internet
- Open up a terminal console and run sudo apt-get update
- Install any updates you are prompted for
- Reboot
- Enable file sharing
- Make sure the Ethernet is enabled in ubuntu (should be)
- Follow the instructions from Share Folders On Local Network Between Ubuntu And Windows
- share out desktop folder with ‘Allow others to create and delete files in this folder’ and ‘Guest access’ enabled
- allow any permissions that you are prompted for
Pad the file
You can now access your Ubuntu install by using \\osboxes
- Start the Ubuntu machine (if not already)
- on your windows PC run \\osboxes and you should now see the Ubuntu desktop
- copy the lede-17.01.4-x86-64-combined-squashfs.img to the Ubuntu desktop
- Open up a terminal console and type the following commands
- navigate to theDesktop folder by type the command cd Desktop
- now run the dd command shown above and this will pad the file as required.
- on your windows PC open \\osboxes and copy of the padded file
- shutdown your Ubuntu machine as it is not needed now. Dont delete the machine you might need a linux machine in the future.
- Carry on with the next section below.
Notes
- Share Folders On Local Network Between Ubuntu And Windows
- networking - Sharing Connection to other PCs (Via Wired Ethernet) - Ask Ubuntu
- 12.10 - Package 'samba' is virtual - Error when installing Samba - Ask Ubuntu
Make the Virtualbox Virtual Machine
Follow the instructions below
- Open the page LEDE Project: Run LEDE as a Virtualbox virtual machine
- Goto VM Setup in VirtualBox section
- Follow the VM Creation instructions
- I set my RAM to be 512MB (optional)
- Follow the VM setup/Virtualbox settings instructions
- ignore that fist paragraph of text
- the first network section deals with general Virtualbox network preferences and should all be setup.
- You might see VirtualBox Host-Only Network or VirtualBox Host-Only Network #2 and these can be used instead of vboxnet0 as they are just different names for the same thing.
Make the data partition larger (squashfs) (research only/not working)
I never got this to work (resizing sda2) but I did a lot of looking on the internet and here are the links I collected.
- Partitioning, Formatting and Mounting Storage Devices [OpenWrt Wiki]
- The OpenWrt Flash Layout [OpenWrt Wiki]
- Building a x86-based image and need more disk space in the image - For Developers - LEDE Project Forum
- How to Resize a Partition using fdisk - Red Hat Customer Portal
- Make a squashfs partition larger on a virtualbox virtual machine - Installing and Using LEDE - LEDE Project Forum - My thread I started.
- how to create a new partition in linux
- How to modify squashfs image
- Mountable, compressed full disk backup in Linux - MCbx - The biggest problem with compressed full-disk backups in Linux is "all or nothing" philosophy. If you make an image by streaming dd's output to GZip, making a ".img.gz" file, you will end with file which needs decompression before any processing.
- SquashFS HOWTO | tldp.org
Extroot
- LEDE Project: Extroot configuration
- More space for packages with extroot on your OpenWrt router | samhobbs.co.uk
Make the data partition larger (ext4 only) (optional)
The virtual hard disk is split into 2 partitions, 16mb system and a 256mb data partition. For most people this should be enough however if you want more space follow these instructions which are best done before you start playing with your LEDE install bu you can do this later if you want.
Increase the capacity of the virtual hard drive
- Unmount the VDI file from your virtual machine if attached
- Backup the VDI file (optional)
- Run the following command in the same folder as the image file to resize the virtual hard drive to 10GB
-
"C:\Program Files\VirtualBox\VBoxManage" modifymedium lede-17.01.4-combined-ext4.vdi --resize 10000
NB: For compatibility with earlier versions of VirtualBox, the "modifyvdi" and "modifyhd" commands are also supported and mapped internally to the "modifymedium" command. see Chapter 8. VBoxManage
Increase the partition size
Just by increasing the size of the hard drive will not increase the size of the Partitions so now we have to make the partition(s) bigger
- remount the new larger VDI file to your LEDE virtual machine
- Download Gparted
- Load the ISO into the DVD-ROM drive of your virtual machine
- Power on the LEDE Virtual machine and boot of the DVD Drive
- Gparted will now load after you have selected the appropriate settings
- Use Gparted to expand the required partition. (Dont forget to apply the changes)
- Power of the virtual machine and remove the Gparted ISO
- Power on and boot LEDE
Your sda2 partition will not have 10GB of free space.
Notes
Notes on partitions, their layouts and the process of making more space available to LEDE in a virtual machine.
- How to resize a virtualbox VDI disk under windows | derekmolloy.ie
- Resizing a VirtualBox 5.1.4 HDD vdi file - Red Stack Tech
- virtualbox - How to change fixed size VDI with modifyhd command in Windows? - Super User
- 8.23. VBoxManage modifymedium
- Building a x86-based image and need more disk space in the image - For Developers - LEDE Project Forum
- [VM] No network config? - Installing and Using LEDE - LEDE Project Forum
- How to know disk space occupied by packages in OpenWrt? - Unix & Linux Stack Exchange
- Typing df in the command line will list the partitions and their properties.
- LEDE Project: Extroot configuration
Configure LEDE
Quick Setup
LEDE will now boot but we will not be able to access it because the IP address is wrong. To fix that:
- Start the new Virtual machine
- Goto the virtual machine as we will be working in it now
- Press enter when br-lan message is display and LEDE console will appear
- Type the following commands in, each followed by pressing enter
- uci set network.lan.ipaddr='192.168.56.2'
- uci commit
- reboot
Because we used the stable release when LEDE is booted up you can access LuCI via you browser by using the address http://192.168.56.2/ .This means you can do a lot of editing in the GUI rather than the command line. If you used a snapshot you will need follow the Full Setup shown below and install LuCI manually.
Full Setup
There are many more settings that 'might' need to be done but I have not got that far yet.
- Open the page LEDE Project: Run LEDE as a Virtualbox virtual machine
- Goto VM Setup in VirtualBox section
- Follow all of the VM Settings section
You are all done now, enjoy!!!
Misc
These are some other things that do not fit into the guide above but might be useful for some people.
Upgrading
I do not know how to do this. I am guessing you just update the root/system/sda1 partition with either of these packages as appropriate:
I/O Errors
If you get I/O errors when using the uci command it is probably caused by lack of free space on the file system. Instructions below. Using VI will not fix these errors but will let you change the IP address in /etc/config/network so you can access LuCI for easier diagnosis.
Editing with VI editor
Just incase you cannot make any changes with the uci commands then here is a crash course on VI editor
- Insert = starts editing
- Escape = takes you to the VI command line
- :w = writes the changes
- :q = quits VI editor
Notes
- Editing files with vi — Guide to Linux for Beginners
- How to Open and Edit Text Files in Linux by Using Terminal
- linux - How to edit a text file in my terminal - Stack Overflow
Moving a VDI image
You really should disconnect a VDI image from Virtualbox via the 'Virtual Media Manger' before moving the VDI file but if you dont here is the quick way of fixing that issue.
- Goto the 'Virtual Media Manager'
- Release teh affect VDI image
- Delete the VDI image, but keep the file
- Goto the Virtual machine
- re-add the VDI while it is in it's new location
Notes
- How to move VirtualBox VMs from one drive to another - TechRepublic
- virtual machine - What's the recommended way to move a VirtualBox VM to another computer? - Super User - Most of these ideas are crazy.