DV tapes are now a legacy technology but because they are digital you can still get your videos back without data loss as long as the tapes and camera are in good working order. There are a couple of steps to go through to get these videos in a usable format.
FireWire is also known as iLINK or IEEE1394 depending on the brand, but they are all the same.
This article is a follow on to my other article Capture Analogue Video Cassette Tapes | QuantumWarp, there is a lot of cross over so you might find answer there aswell.
Prerequisites
- Windows 7 PC with a 1394 FireWire port
- WinDV
- WinDV is a small and easy to use Windows application for capturing videos from DV device (camcorder) into AVI-files and for recording AVI-files into DV device via FireWire (IEEE 1394) interface.
- Hover over the screenshots to get more information on the configuration options.
- WinDV 1.2.3 - VideoHelp - An alternative download page.
- MKVToolNix + GUI (gMKVExtractGUI or MKVCleaver)
- HandBrake
- VLC Media Player (optional)
- AviDemux
- MediaInfo
- A DV Camcorder (Video Camera)
- Firewire Cables
- Firewire Card
Setting Up Windows
- Make sure you have a FireWire device installed in your Windows 7 PC, obviously.
- Change to Legacy drivers
- This is done because Windows 7 removed the DV functionality from the drivers that were present in Vista, however they are still accessible if you want them. The legacy driver has been completely removed in Windows 10, hence why we are using Windows 7. Vista is far too old to be using.
- Go into the Device manager and locate your 1394 FireWire Drivers
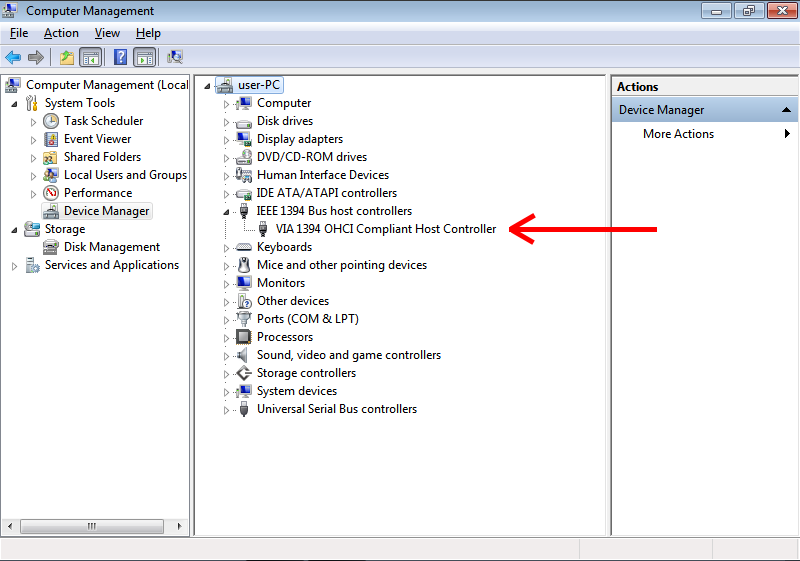
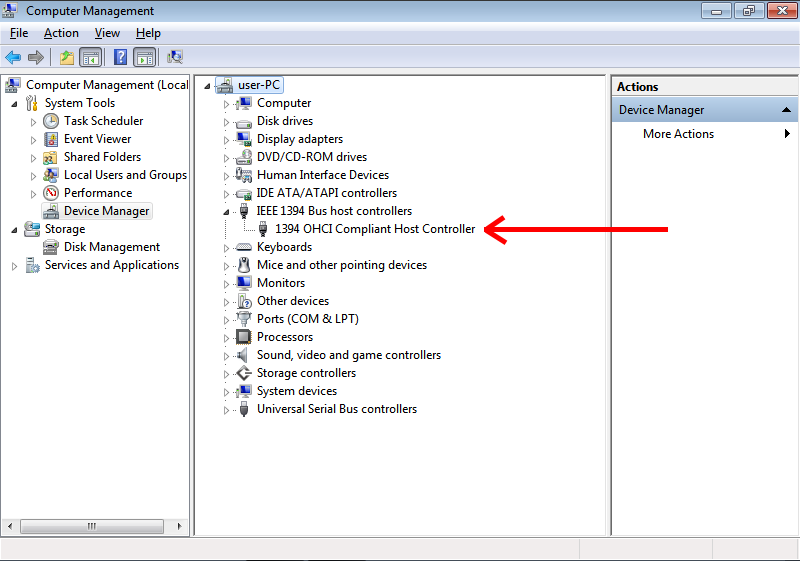
- Change this to the Legacy version
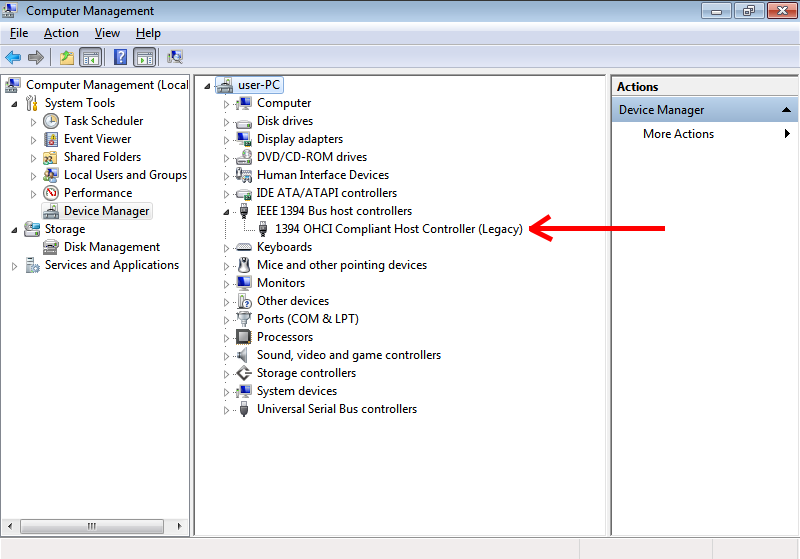
- A reboot is probably not needed but it does not harm to perform one here.
- Install all of the software above so it is ready when needed.
Notes
- Fixing FireWire (IEEE 1394) Problems in Windows 10 and 11. Legacy Firewire Driver, Microsoft Firewire OHCI Legacy Drive, Firewire PCI and PCI E cards and how to install them. David Knarr
- An in-depth tutorial and fixes for the various operating systems
- Windows 10 and earlier will not detect DV camera connected to firewire iLink ieee1394 port - a solution | Microsoft Community
- Windows 10 and IEEE 1394 FireWire Legacy Drivers (Unable to Install the 8.1 drivers) | Microsoft Community
- Installing the correct driver (Windows 7 only) - How to transfer DV or Digital8 videos to your PC | Sony UK
- Windows 7 comes with two i.LINK/IEEE 1394 drivers; a new one and a legacy one. For video capture, you will need to use the legacy driver. Simply follow these step-by-step instructions to make sure the right one is installed.
Capture the Videos (WinDV)
For the user of the camcorder (video camera) it was possible to hit a button on the camera that would put a marker on the video stream which was breakpoint (like a chapter). These breakpoints were also present when the user stopped and started the camcorder. WinDV captures the video stream but when it discovers one of these breakpoints it creates another file. Not all cameras add this marker. The files are labelled sequentially (by default) in time order.
- Go into the Device manager and Change the FireWire drivers to the 'Legacy' version.
- Connect your camera to the PC with the Firewire cable.
- Turn your camcorder on.
- Windows will find a new device and then new drivers for it are installed. It location indevice manage should be in `Imaging devices`:

- The camera should be turned to the correct mode for data transfer if not already.
- Windows will find a new device and then new drivers for it are installed. It location indevice manage should be in `Imaging devices`:
- Put a cassette in the Video Camera
- Now open WinDV
- i did use open as administrator, but i don't think it makes any difference)
- Open the config and set the following:

- Discontinuity treshold (sec): 1
- Every time a user has set a chapter, I want it as a separate file.
- Setting this value to anything other than 0 tells WinDV to automatically split the video into a new file whenever it detects a gap in the recording timestamp on the tape.
- AVI-Type: type-2 AVI (vids+auds)
- Type 2 is generally recommended for modern video editing software.
- Max AVI size (frames): 1000000
- This is the maximum number of frames per file.
- Changing this setting prevents WinDV chopping tapes automatically into chapters when there are none.
- DV format is 1500 frames a minute
- Default: 22500 (15 minutes / 900 seconds)
- Allowed Range: 10 --> 1000000 (666.667 minutes / 11.11 hours)
- Discontinuity treshold (sec): 1
- Enable DV Device Control

- Make sure the checkbox next to the
Configbutton has a tick in it. - This allows the DV-camcorder or VCR to be automatically controlled by WinDV.
- The "Error: No video device found" message is just because I did not have my camcorder plugged in when I did the screenshot.
- In WinDV, this checkbox is for the control of your camera to start and stop recording, when checked, this feature allows WinDV to communicate with your camera, providing you with the ability to send commands to the camera from the software.
- Checked:
- When the box is checked, WinDV will take control of your camcorder or other DV device. It can cue the tape, initiate play for pre-roll, and start/stop recording automatically. This is typically the standard setting for capturing footage.
- Unchecked:
- When the box is unchecked, WinDV does not control the tape transport. This is used for "live" capturing or with certain devices where external control is not needed or not supported, such as with an ADVC converter.
- Make sure the checkbox next to the
- Click Capture
- when you click capture on WinDV it waits until it gets a signal from the camera to start recording, and when the tape is done will stop capturing.
- Press play on the camcorder and the capture will begin
Notes
- You are more than likely to get many files create but this is normal.
- Windows 10 does not natively support DV Tapes anymore, it was removed. I think the last version that has it is windows 7
- In windows 7 + vista you still need to change the drivers to legacy drivers
- You can install the drivers in windows 10 by using some extracted (tutorials in my links)
- Firewire cards don't always work because of incompatibilities
- Using windows 7 or vista and WinDV is probably the easiest way to capture videos
- Some software allows you to control the DV camera from the PC (possibly virtual dub)
- WinDV - No audio on some scenes / Only 1 scene has no sound, the rest of the tape is fine.
- There can be a mix of working and non working scenes, it does not have to be just 1, this description just makes it easier to explain.
- Cause:
- This is caused by recording over another video with a different sound format (12/16bit) and there being no defined scene definition, so WinDV never changes is sample rate/type hence the lost audio.
- This is caused by the audio type changing while playback is occurring, and this is most likely because the user used the same tape in 2 different cameras and they had different settings. Changing the settings on a camera would also have the same effect.
- WindDV will does not recognise the change in the audio type so audio is no longer recorded because the codec it is using no longer understands the audio stream.
- This issue only occurs when you swap scenes and the 2 scenes have different audio encodings.
- Video is unaffected because the video format is always constant and if the bit rate changes it does not matter. there are also key frames at the begining of every scene.
- Solutions:
- You have to record the scenes before and after the audio change separately and then later bring them back together but this time using the same codec and audio settings. This will involve transcoding.
- Start capturing in the new section (to be sure, when audio of the new scene starts) so there is no failed format transition (Preferred)
- Use audio cable to capture audio the old fashion way
- Use another software (untested)
- Try WinDV Type1 capture (untested)
- Links
- no sound in DV captures - VideoHelp Forum
- Joining the discussion late, but starting the camera slightly before capturing is the solution I also found when I had a similar issue (no sound on some transferred DV). There's a known bug in WinDV that effects using the WinDV camera controls and not getting audio; confirmed by WinDV's developer.
- WinDV - help in transferring Type-II AVI - VideoHelp Forum
- No sound in winDV captures, DV-type 2 - VideoHelp Forum
- It's probably a mismatch between audio sample rates. (edit: as I see you are now noticing.) DV can record 4 channels @ 32khz or 2 channels @ 48. Once you have "taught" windv what you are using it ought to be ok. If your tape switches back and forth you will need to restart the capture at each break. 44.1 is very unusual though technically it is in the specs.
- [SOLVED] Strange problem with capturing MiniDV via firewire - missing audio - VideoHelp Forum
- sometimes tapes were re-used and the audio settings had been changed. if the very beginning of the tape was used in 16 bit mode and later recorded over at the 12 bit setting windv or other transfer software will start in 16 bit mode and stay there even if the recording goes to 12 bit mode.
- one way to get around it is to not start he capture on the computer until you hear audio from the recording you want. that way the software will start in the right mode.
- WinDV, Audio capture issue - VideoHelp Forum - WinDV captures and separates all the dv video as desired. However, 2 of the 12 files do not have any sound (2 video segments). The 2 files are at random places in the dv tape. The 10 other files are perfectly fine.
- WinDV - WinDV digital video capture program instructions
- no sound in DV captures - VideoHelp Forum
- No Sound at all
- Causes:
- Is the relevant codec on your PC missing?
- Does your TV support the relevant codec?
- Are your speakers on?
- Solutions:
- Try VLC player
- You could recapture the tape but it is unlikely to be this if other tapes sample fine
- Install missing codecs
- Try playing on another device
- Causes:
Correct DV Video Bitrates (AviDemux)
The video and audio formats must match otherwise errors will occur when we try and merge the videos with MKVToolNix. For the most part you will find your videos are all the same format but occasionally they might not be.
Checking the videos have the same format
Below are some options for checking if the video files are all in the same format:
- Examine the files with MediaInfo (preferred)
- Gives you complete readout of each files specifications and codecs it uses.
- The information provided here will be helpful if you need to converts a video file to a matching format, as you will need to know the new format.
- Use Windows explorer
- Open the folder with the files in
- Change to details view
- Enable the bitrate column
- Examine the results to see if all the bitrates match
- Test output resolution with VLC player
- You can test the output resolution by
- playing the video file in VLC Player
- Taking a Snapshot: (Video --> Take Snapshot) which will go into your "My Pictures" folder.
- Check the resolution of the Snapshot.
- You can test the output resolution by
- You can try merging the videos and see if you get an error.
- It will do this before proceeding to do any real work.
Changing the Audio Bitrate (When required)
These instructions are just for changing the audio because this is most likely going to be the only issue you have
- Open Avidemux
- Open the file with the incorrect bitrate (File --> Open)
- Under Audio Output
- Change 'Copy' to 'PCM'
- Click 'Filters'
- Click 'Resampling (Hz) and change to the relevant bitrate (i.e. 48000)
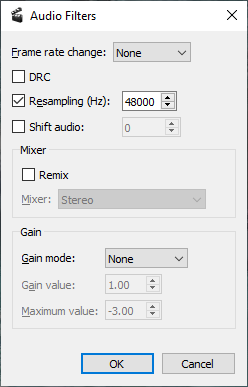
- Click 'OK'
- Under Output Format
- Select 'AVI Muxer'
- Click 'Save'
- You will be prompted to save the new video, select a name and location and click 'OK'
- Repeat this for each video segment you need to re-sample.
These new files can now be used along with your others in the next section because they will all match.
Notes
- How to Fix an Incorrect Audio/Video Sync Setting and Save it Permanently using 'Avidemux'
- How to get started with avidemux, edit and convert any video format - VideoHelp Forum
- Quick And Easy Video Editing Tutorial For Beginners. | YouTube
- How to Cut, Split, or Trim Videos with Avidemux | YouTube
Merging the video files while creating chapters (MKVToolNix)
The videos (and happy memories) have now been recovered into a digital format (corrected when needed) on your PC but are in a weird format which only VLC Player will play and they are still split in to multiple files, 1 for each chapter. If you only have 1 file then not all of this section will apply to you.
The files created by WinDV are labelled (by default) in time order so we can still use them to create chapters and this is one of the reasons for the multistep approach.
We will now use MKVToolNix to combine the video parts into one MKV file with chapters:
- In the input window add the first video fragment/file.
- Select the file you have just added in the input window and click 'Append Files'
- Select all of the other files/chapters you want to add
- Set the view to details to sort by date/time, so do they start oldest first
- Now select them all (excluding the first file which is already added)
- They can now be added in one go, instead of one by one (unless you want too !!)
- Set (Output Tab --> 'Generating chapters') = 'One chapter for each appended file'
- Set the output location and file.
- Now to run click on 'Start multiplexing'
- This software will now create a single MKV file with chapters using the original uncompressed codecs, hence the large size.
Links
- Joining Videos without Conversion using MKVToolNix - A guide on how to join compatible videos into one MKV file without conversion using MKVToolNix.
- Joining Videos without Conversion using Video to Video - A guide on how to join videos with conversion of the codecs using Video to Video, a free full-featured converter available on Windows.
Transcode to a Usable Codec (HandBrake)
The file we created in the previous section will play and have chapters in VLC Player but the codecs used are very old and not many Televisions or consumer kit will play the DV codec so we must now convert them into one they will use, however you just want to archive the files or play them on a PC you do not need to do this step as these files can be played with VLC player.
- Prevent crashing tips
- Do not control your transcoding over Remote Dsektop (RDP)
- Set Windows to the High Performance profile
- Disable screen being turned off
- Disable the screen saver
- Set Windows to never sleep
- Once encoding is started, leave your PC alone
- Limit the number of threads encoding can use. This is set in `Advanced Options` on the `Video Tab`.
- Other notes
- H.265 is not present on all new devices, but the number that support this improved codec is growing.
- Target File
- .MKV - This is a great choice because it supports chapters and is widely supported.
- Target Stream
- Progressive: We will be converting the source from an interlaced to a progressive format while retaining the original Storage Aspect Ratio (SAR) and Display Aspect Ratio (DAR).
- We are not permanently upscaling the stream becasue HandBrake does not upscale sources well.
- Target CODEC:
- Video: H264 - MPEG-4-AVC(part 10) (avc1) :: H.264 (x264)
- Audio: MPEG AAC Audio (mp4a) :: AAC (avcodec)
- These are modern CODECs that can be played on most, if not all modern TVs and PCs.
Instructions
In the panels below make sure your settings match what is shown and that you read each step's notes.
The instructions are for PAL so if you are working with NTSC you will need to change frame rates and resolutions to the relevant settings accordingly.
Source Selection
![]()
- Open your file that you want to transcode.
- Once you get the hang of things you can do batch conversions.
Summary Tab
![]()
- Select the H.264 MKV 720p30 preset
- Set you output location
Dimensions Tab
![]()
- Orientation and Cropping:
N/A- Cropping is not needed because our source files are already the correct size. Cropped would only be needed if you are removing the overscan area.
- The DV format does not have black bars or overscan, the whole resolution is used for the image.
- Resolution and Scaling:
Anamorphic- PAL and NTSC digital formats always rely on the frames being stored as one resolution (SAR), and then stretched to match the screen it is being displayed on (DAR) which is why we have the `Anamorphic` option which controls the display resolution (DAR).
- Option 1 - Anamorphic
- Leave `Anamorphic` on automatic as it always works as expected as you can see by the 4:3 Aspect Ratio. We are just changing the codec used and currently HandBrake only offers limited support for upscaling.
- Target Storage Resolutions
- PAL = 720 x 576 (SAR = 5:4)
- NTSC = 720 x 480 (SAR = 3:2)
- Target Display Resolutions
- PAL = 768 x 576 (DAR = 4:3)
- NTSC = 720 x 540 (DAR = 4:3)
- HandBrake Documentation — Anamorphic Guide
- Option 2 - Upscale
- Use this to set the Storage and Display resolutions to be the same.
- PAL = 768 x 576 (DAR = 4:3)
- NTSC = 720 x 540 (DAR = 4:3)
- Enable
Allow Upscaling - You might need to disable
Optimal Size - I am not sure how well HandBrake upscales
- How to Upscale and Enhance Video Quality with HandBrake
- As for upscaling, HandBrake does support it—but only to a limited extent.
- In versions 1.4.0 and later, a feature called "Allow upscaling" was introduced.
- When enabled, this option allows you to increase the resolution of your video beyond its original dimensions.
- However, the output will be a larger version of the original video, not necessarily a clearer or more detailed one.
- In most cases, upscaling with HandBrake simply stretches the pixels, without actually improving visual quality.
- HandBrake Documentation — Resizing Video
- While upscaling is NOT recommended, there are some instances where it is useful (i.e. uploading to YouTube). To enable this, check the “Allow upscaling” checkbox.
- NB: When upscaling gets better in HandBrake I would recommend using it.
- Use this to set the Storage and Display resolutions to be the same.
- Borders:
N/A- If you see black bars, these would of been cut of when played back as the CRT screens never showed the whole frame/image, but the image will always have a 4:3 ratio.
- This option allows you to add borders but unless you are wanting to retroactively create a legacy PAL or NTSC video file you will not need this.
Filters Tab
HandBrake Documentation — Summary of Filters - gives further information about these options.
- NTSC and Pal are recorded in Rec .601 but we are not bothered what they were, but what they will be stored as.
- These videos will only ever be played on a modern TV or monitor and are not for archival purposes, in which case it is a bit different.
- We will convert to BT.709, Progressive (i.e. non-interlaced). I have not upscaled becasue HandBrake is not great at it yet.
![]()
- Interlace Detection:
Off- All DV and VHS videos are interlaced, so detecting interlacing throughout the video file is pointless.
- Tooltip: Interlace Detection, when enabled, allows the Deinterlace filter to only process interlaced frames.
- Ocassionally you maight need to specify the field order and the instructions for that are below in the notes section.
- I want to completely deinterlace a few files, how do I enable 100% deinterlace detection? · HandBrake/HandBrake · Discussion #6098 · GitHub
- Disable the interlace detection filter, then the deinterlace filter will deinterlace everything.
- Interlace detection: how beneficial is it? · HandBrake/HandBrake · Discussion #5979 · GitHub
- Deinterlace without interlace detection will be somewhat faster
- Interlace detection can have a small number of false negatives which result in some visible combing where the deinterlacer should have been applied, but wasn't
- Interlaced video that is relatively still with little motion will be higher quality with interlaced detection enabled because the still scenes will not have the deinterlace filter applied (which degrades quality)
- If some of your video is interlaced and some not, interlace detection can be used in a "set it and forget it" preset that can be used on all your videos
- Deinterlace:
Yadif + Bob- Deinterlace (Filter)
- Yadif (Yet Another Deinterlacing Filter)
- I use this in OBS and the results are great.
- 11.288 yadif - FFmpeg Filters Documentation
- using:video_filter_yadif | Avidemux - Description and the settings are explained
- Decomb
- I have not used this
- Bwdif (Bob Weaver Deinterlacing Filter)
- I have not used this
- 11.19 bwdif - FFmpeg Filters Documentation - Motion adaptive deinterlacing based on yadif with the use of w3fdif and cubic interpolation algorithms.
- Yadif (Yet Another Deinterlacing Filter)
- Preset (Tunes)
- Default
- Default: Is well balanced for speed and quality.
- Skip Spatial Check:
- Lets Yadif skip correcting certain avoidable artifacts for a slight speed boost.
- EEDI2:
- Uses a slower, higher quality interpolation algorithm for Decomb. Useful for the most difficult sources.
- EEDI2 is the best, but very slow???
- Bob
- Attempts to better preserve motion for a slight penalty to perceived resolution.
- When you select this option, the deinterlacer will look at the previous and next frame to help it build the current frame.
- eg: If you select Yadif + Bob this is the same as Yadif 2x on OBS studio.
- The name Bob comes from the fact that the scanner bobs between the odd and even lines.
- https://forum.handbrake.fr/viewtopic.php?t=43050
- So bob will extract both fields and makes separate frames.
- If you don’t use a Bob, you throw away half of the Fields (and half your temporal resolution ) lead into a 30 frames per second output.
- Use Bob if doubling the frame rate
- Default
- Field Selection (Manual/Custom) (HandBrake)
- An interlaced source file has 2 fields per frame (Top field / Bottom Field), so when transcoding HandBrake will read the field order from the file's metadata. This is why there is no general option for selecting field order as it is not usually needed.
- For reference:
- VHS: Top Field first
- DVD: Top Field First
- DV: Bottom Field First
- Field order detection (Parity) - for Yadif and Bwdif and I think also for DeComb.
- The default value is auto. If the interlacing is unknown or the decoder does not export this information, top field first will be assumed.
- Field detection is automatic by default for most deinterlaces and specifically Yadif/bwdif
- When dealing with digital sources (i.e. DV) the file will have a value in it's metadata saying what field is first and this is read and used by HandBrake.
- You should never need to set a custom Deinterlace option for this.
- If the field order is wrong, the transcoded video will be horrid.
- Using Yadif or Bwdif, if you want to specify which field is first you need to specify the mode and then the field to be first as follows:
## Yadif/Bwdif format
mode=m;parity=p

## Yadif/Bwdif Bob with automatic selection
mode=7;parity=-1

## Yadif/Bwdif Bob with TFF
mode=7;parity=0

## Yadif/Bwdif Bob with BFF
mode=7;parity=1
- Decomb has different options to (Yadif and Bwdif)
- If You hover over the Custom input field it will show you the format.

- HandBrake/libhb/param.c - L173-L216 · HandBrake/HandBrake · GitHub - Shows the modes and presets in the code.
- Deinterlace looks great, but the frames are out of order | Reddit
- If you hover over a field, there is a tooltip (most of the time) that explains the options.
- For Yadif, if you select Custom as the preset, and hover over the box that appears, it tells you that Yadif has mode=m:parity=p options, so I then went into the activity log to see what option number I'd been using and plugged that in, then used 0 for one test and 1 for another test to see which would work on my video. From that one test I'm guessing that 1 is default, so try using parity=0 on the videos that weren't working for you.
- Edit: According to this thread on github, I have them reversed. TFF=0, BFF=1 and there's an auto mode, which I assume handbrake uses by default?
- = these match
bwdifinffmpegwhich is based onyadif
- = these match
- add frame order setting to filters when using deinterlace or decomp · Issue #1928 · HandBrake/HandBrake · GitHub
- This has a link to the presets values for the deinterlacers
- It would seem you want to set
mode=23:parity=pfor bob, with p set to -1 for auto, 0 for top field first, or 1 for bottom field first.
- The Deinterlace Library
- HandBrake/libhb/deinterlace.c at master · HandBrake/HandBrake · GitHub - HandBrake's development repository
/* Deinterlace Settings
 *  mode:parity
 *
 *  mode   - yadif deinterlace mode
 *  parity - field parity

 *
 *  Modes:
 *      1 = Enabled ("send_frame")
 *      2 = Spatial [Yadif only]
 *      4 = Bob ("send_field")
 *      8 = Selective
 *
 *  Parity:
 *      0  = Top Field First
 *      1  = Bottom Field First
 *      -1 = Automatic detection of field parity
 *
 */
- HandBrake/libhb/deinterlace.c at master · HandBrake/HandBrake · GitHub - HandBrake's development repository
- What is Deinterlacing?
- What is deinterlacing? The best method to deinterlace movies | 100fps.com
- A great part of this site deals with interlacing/deinterlacing which introduces some of the nastiest interlacing problems.
- Great example images and explanations of them.
- Explains Bob
- Bob = (Progressive scan)
- Deinterlacing - Wikipedia - Deinterlacing is the process of converting interlaced video into a non-interlaced or progressive form
- The Interlaced Video Problem - Computerphile - YouTube - Why do computers have such a hard time showing TV footage? Dr Steve Bagley unlaces the problem.
- Deinterlace Examples
- EEDI2 vs Yadif vs Bob Deinterlacing. Handbrake. - YouTube
- Practical side-by-side examples
- EEDI2 is the best looking one, but it's so painfully slow. Yadif looks the same as Decomb.
- To use EEDI2 would I still need to use the Bob version if doubling the frame rate as I have to with Yadif? I like to retain smooth motion and these are 50fps shows interlaced at 25fps. I might give EEDI2 a go if I don't lose the will to live before the encoder finishes.
- EEDI2 vs Yadif vs Bob Deinterlacing. Handbrake. - YouTube
- Tutorials
- How to Deinterlace Videos and Remove Jagged Artifacts
- How to deinterlace videos to non-interlaced and progressive files without jagged edge artifacts? Learn best ways to deinterlace videos to smooth motions with Handbrake, VLC, Premiere, etc.
- Deinterlace video using a combination of Yadif or Decomb using a preset bob, eedi2, or eedi2 bob.
- DeComb EEDI2 (without Bob) is the best image quality. Less aliasing and best missing lines reconstruction. The one which looks more like progressive footage. The problem is: it is very very slow, takes lots of time.
- DeComb Bob (without EEDI2) is the best quality/speed balance. It has a little more aliasing but not disturbing and it is much faster. Best option if you cannot wait longer.
- Most effective 2x deinterlacer? | Reddit
- They are two different algorithms for deinterlacing.
- I am a big fan of yadif. It is a much simpler deinterlacer, and much faster, and in motion, to me, everything looks as it would look on an actual TV. If it looks wrong in yadif, then it'll look wrong viewing it on an actual interlaced TV, IMHO.
- But, decomb is an attempt to improve on it further, and it can sometimes get a slightly better result in cases where yadif (and real interlaced TVs) struggle like near-horizontal lines or repeated patterns of fine horizontal lines. Also, decomb is a bit "smarter" in the sense that it can switch into different modes depending on context. Visually to me, though, occasionally this means it leaves a little bit of "combing effect" in the picture where it is only slight, which yadif by its nature never does. On the other hand, yadif by its nature can tend to have a bit of a "smoothing" effect which you may or may not like.
- Having performance/speed tested bwdif as implemented in the Handbrake nightlies, it's fast and/or parallelizes well with many cores, so it beats Decomb+EEDI2 by an order of magnitude or more. Hopefully, it ends up being the qualitatively superior option that some users are looking for, but that remains to be seen, I don't think I'm qualified to do that testing so I'll have to wait for somebody else to do it.
- Best Deinterlace Settings? | Reddit
- The safest bet if you don't know the source is Bob deinterlace, 2x frame rate (I prefer "yadif" to "decomb" but YMMV, decomb is much slower though) but you can do better with film source DVDs which will usually be telecined as 3:2 pulldown so you can do a detelecine first, in most cases auto will work, and then completely disable deinterlacing and it should be crisp.
- thanks for sharing your knowledge. I got great results for deinterlacing an old interlaced sitcom from dvd source, went with yadif + bob + 2x framerate (59.94) and the motion is so smooth, picture looks great (although a bit softer), and no visible combing. I always thought "decomb + default" was fine, but I apparently didn't know what I was missing :) It's fantastic.
- For me, I have found that decomb with the preset of EEDI2 Bob works great. Takes a long time though. I have interlaced detection at default and everything set to off.
- A Complete Guide to Deinterlace Video with HandBrake
- How to use HandBrake to deinterlace DVD or video? What's the difference of Yadif and Decomb? Is there a simpler tool than HandBrake to deinterlace video? All will be answered in this article.
- Yadif is a popular and fast deinterlacer.
- Decomb switches between multiple interpolation algorithms for speed and quality.
- Interlace Detection, when enabled, allows the Deinterlace filter to only process interlaced video frames.
- HandBrake deinterlacing settings? - digitalFAQ Forum
- Use Decomb, EEDI2Bob
- It's better than Yadif for AA (anti-alias), but still worse than QTGMC.
- Yadif leaves % of jaggies, not pleasant to watch.
- HandBrake deinterlacing settings | Reddit
- When you use 'bob' you have to set the framerate in the video tab accordingly.
- 50fps for PAL, 59.94 for NTSC, with 'constant framerate' selected
- Should come out nice and smooth like watching it on a CRT TV.
- Field order will be automatically detected.
- Handbrake settings for DVD Decomb/Deinterlace? | AVS Forum
- Custom Deinterlace options. These might be an old version.
- As long as your DVD only contains a single type of interlaced video, there is normally a clear best choice on which deinterlace filter to use in Handbrake:
- If each half frame shows a different point in time, you should use filter "Decomb → EEDI2 Bob". If that takes too long for you, "Yadif → Bob" is your next best option. Setting the framerate to "Same as source" results in the loss of half your frames. Instead, set the framerate to how many half frames per second your source has: PAL DVD: 50i → 50; NTSC DVD: 59.94i → 59.94. I recommend always using constant framerate. Footage interlaced in this way was normally taken with an interlace scan camera, commonly used in TV productions. You can use MediaInfo to get the framerate of your source, but know that it shows the number of full frames per second, and you want to encode one frame per half frame when using Bob-style deinterlacing; unless you need to encode to a specific target framerate of course.
- If each point in time is shared by two successive half frames it means they were created from a progressive source, film for example, and you can just interleave them again to regain the full height resolution by having all deinterlace and detelecine filters disabled. Commonly found on PAL DVDs. Framerate "Same as source" will select the correct framerate here. Again, go with constant framerate.
- For reverting the 3:2 pulldown that's used to make 23.976p material compatible with the 59.94i NTSC standard you need to use a detelecine filter, "Default" should do the job for the vast majority of movies on NTSC DVDs. Make sure to enforce a (constant) framerate of 23.976 fps when using this filter.
- Handbrake - Home-Recorded DVDs to MP4s - Best Deinterlace Settings - VideoHelp Forum
- I have only just realised that coverting a PAL DVD using Bob results in a 50fps file anyway - even when the framerate is left as "same as source". I really thought this produced a 25 fps file.
- Check your output files. Handbrake doesn't always double the frame rate when bob is selected and the output framerate is Same As Source. It depends on some other settings too. For example, using Deinterlace:decomb will not double the frame rate. Using Deinterlace:Yadif will.
- And routinely bobbing all your videos isn't the best for most film sources (most movies, TV shows, etc.). Every pair of frames will be identical, making them harder to play back smoothly, and wasting some bitrate.
- I've never use Decomb as I was told this was not the best method. So should I be using Yadif or Decomb? And also, what are the best Preset and Interlace Dection settings for the types of DVDs I'm encoding?
- Best De-interlacing to turn 50/60 fields per second to 50/60P | Reddit
- What is the best way to convert 50/60I to 50/60P? I am transcoding satellite feeds and want to keep the temporal resolution of 50/60fps
- The best option in Handbrake would be EEDI2 Bob but it's extremely intensive and will take a very long time to run. If time isn't an issue then it should be your best quality option then.
- I usually go with Decomb Bob or Yadif Bob. Decomb claims to switch between various algorithms but I haven't noticed any improvement between it and Yadif.
- Bob deinterlacing modes are the ones that retain the temporal resolution.
- Always make sure you change the output frame rate to exactly what you want it to be, if you leave it set to "same as source" it will come out at the standard halved "frame rate", ie 59.94Hz video will be 29.97p, even if you have Bob deinterlacing enabled.
- So make sure you pick 59.94 frames per second, or 50 frames per second for PAL stuff.
- Andrew's Tutorial Blog: Which deinterlacing algorithm is the best? Part 1 - HD interlaced footage
- How to Deinterlace Videos and Remove Jagged Artifacts
- Deinterlace (Filter)
- Denoise:
Off- Tutorials
- In-depth look at de-noising in Handbrake 0.9.9 (with image/video examples) | mattgadient.com - De-noising in Handbrake has historically been one of the tricker aspects to delve into. Here I delve away, giving examples of what different settings do.
- Tutorials
- Colourspace:
BT.709- BT 709 is the modern colour space and it makes sense to conver these at the same time. When dealing with digital you could leave them as is?
- BT 709 is the recommended colour space for H.264
- If this set to “Off” then HandBrake will keep the colorspace of the video.
- How to Choose the Right Video Color Space - How do you choose the right video color space for your project? I want to take you through a few basic color spaces and their applications.
- I just captured VHS with a Rec 709 colors space instead of Rec 601. - VideoHelp Forum - I used the wrong colors space for SD. I captured with a 709 color. How much does this matter? It doesn't look any different. Would I have problems down the road?
- Is 4:1:1 color space adequate for VHS rips? | Reddit
- VHS has color space that is much worse than 4:1:1, so no worries. VHS is probably 4:½:½ or worse! :-)
Video Tab
![]()
- Video Encoder:
H.264(x264)- Because DV, VHS and TV all use the same constant frame rate, this is what you should use.
- H.264(x264) is a software encoder
- By using a software encoder, encoding will probably will take longer but you will be using the latest version of the CODEC. Using a Hardware encoder is ok and if the kit is very new it should not be a problem.
- HandBrake Documentation — Video codecs
- Framerate (FPS):
50 / Constant Framerate (FPS)- PAL = 50 fps
NTSC = 59.94 fps
- PAL = 50 fps
- Color Range:
Limited- Options
- Same as source = Automatic
- Limited = Colors are limited to 16-240
- Full = Full Color Gamut 0-255
- Notes
- `Same as source` - I am not sure if the colour range is set in a DV header and if it is needed to be for correct auto detection, so why take the risk.
- Color range selection · Issue #5743 · HandBrake/HandBrake · GitHub
- Half of the players out there can't even display full range properly, so if your source is not full range it's better to keep it the limited range.
- Options
- Quality:
RF 22
- This is the default value
- This is what I use in OBS for VHS capture and is a good level for video sources where there can be some graininess.
- Constant Quality = CQP
- HandBrake Documentation — Adjusting quality - This gives the recommended RF settings for various media and why.
- Encoder Options
- Encoder Preset:
VerySlow- VerySlow is the best you should use. Placebo generates such large files for such little gain it is not worth using.
- This set the preset flag for the H.264 encoder.
- Each of the encoder's presets enable different preconfigured settings like those you can add in `Advanced Options`(such as look ahead and B frames) and inmost cases only selecting the best preset for you is all that is needed.
- The presets do not directly control compression but because as you go up the presets, more features are enabled which in turn increases compression of the video.
- HandBrake Documentation — x264 Presets and Tunes
- UltraFast - Very high speed encoding, but requires much higher bit-rates to maintain quality. This means you can expect much larger file sizes.
- Placebo - Extremely slow encoding but provides the best Quality and/or filesize for a given source. - This option is often considered a placebo because it offers diminishing returns in terms of quality and filesize.
- Typically, it’s recommended to use the Very Fast to Slow settings range for best results, or one of the slower options if you don’t mind the speed loss. Medium is a good balance and most of HandBrakes presets use this option.
- Encoder Tune:
None / Fast Decode = off- Maybe set this to `Film` to combat some graininess
- HandBrake Documentation — x264 Presets and Tunes
- Film - Real life footage, films etc may benefit. (Not Cartoons or Anime). Typically won’t do any harm to if left on for most content.
- Animation - Used for hand-drawn animated content.
- Grain - Typically used for very grainy or old content.
- Still Image - Can be used for Slideshows, Presentations etc where there is very little moving content.
- PSNR - Used for benchmarking quality. Should not be used for normal use.
- SSIM - Used for benchmarking quality. Should not be used for normal use.
- Fast Decode - Optimise for faster decoding. Useful for low power devices that struggle to decode the video.
- Preset Options — x265 documentation
- x265 has ten predefined
--presetoptions that optimize the trade-off between encoding speed (encoded frames per second) and compression efficiency (quality per bit in the bitstream). - Film Grain - This setting aims to encode grainy content with the best visual quality. The purpose of this option is neither to retain nor eliminate grain, but prevent noticeable artifacts caused by uneven distribution of grain.
- Fast Decode - disables encoder features which tend to be bottlenecks for the decoder. It is intended for use with 4K content at high bitrates which can cause decoders to struggle. It disables both HEVC loop filters, which tend to be process bottlenecks:
- x265 has ten predefined
- beandog's x264 preset reference - x264 is well documented, and I like using it, but sometimes I want to see all the flags that a preset is using, compared to the defaults. So, I put this little table together to work as a reference.
- Encoder Profile:
high- Auto = HandBrake will pick the best profile it thinks you setup will handle.
- Baseline = The most compatible with the weakest compression.
- High = Most CPU to compile, most CPU to decompress.
- I don't know what `high422` and `high444` are.
- HandBrake Documentation — Profiles and Levels
- Video Profiles - Define the features / capabilities that the encoder can use.
- HandBrake Documentation — x264 Profiles and Levels
- H.264 profiles - Define the features / capabilities that the encoder can use.
- H.264 Levels - The levels are another form of constraints that define things like maximum bitrates, framerates and resolution etc.
- Encoder Level:
4.1- This controls the maximum compression but also what devices can play this file as they need to be able to play this level of file.
- HandBrake Documentation — Profiles and Levels
- Levels - The levels are another form of constraints that define things like maximum bitrates, framerates and resolution etc.
- A “best settings” guide for Handbrake 0.9.9 and 0.10 | mattgadient.com
- Higher profiles & levels tend to get you better compression (so better quality in a given filesize). However, you’re going to be limited by the profile support of the hardware devices you’re planning to play your videos on.
- Currently, High Profile, Level 4.1 is the most popular profile on recent / cutting edge devices. Such a device will also play Baseline/Main, and any level between 1.0-4.0. The industry’s stagnated at Level 4.1 for a couple years, probably because it’s at the point where it’s “good enough” until H265 starts taking over.
- Levels - Advanced Video Coding (AVC) - Wikipedia
- As the term is used in the standard, a "level" is a specified set of constraints that indicate a degree of required decoder performance for a profile.
- For example, a level of support within a profile specifies the maximum picture resolution, frame rate, and bit rate that a decoder may use.
- A decoder that conforms to a given level must be able to decode all bitstreams encoded for that level and all lower levels.
- Advanced Options
- Nothing to add here because the `Encoder Preset` has done everything for us.
- Encoder Preset:
Audio Tab
![]()
- These audio settings are the highest quality the DV format can goto and are far better than VHS, so use these.
- Bitrate: 384kbps
- Mixdown: Stereo
- Samplerate: 48kHz
- Bit Depth: 16-bit (which I think it is)
Subtitles Tab
![]()
- Nothing to do here.
Chapters Tab
![]()
- Nothing to do be done here unless you want to name all of your chapters.
- The file/chapters can always be edited later without re-encoding.
- Leave chapter markers on.
Start Encode
- Click on the `Start Encode Button
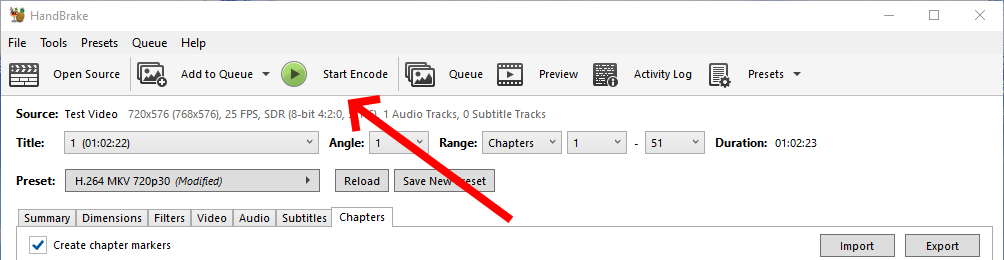
- HandBrake will now create a new MKV file, maintaining the chapters (if present).
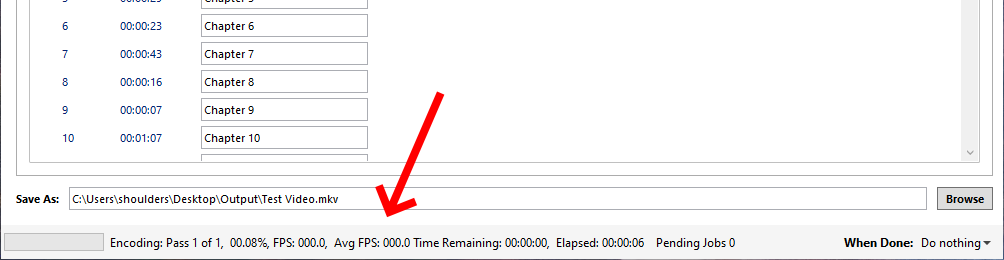
- This MKV will have a massively reduced filesize with the additional benefit that this file will play on most modern TVs and devices.
- For me a 1 Hour tape (13.3GB) was about 1GB in size when converted.
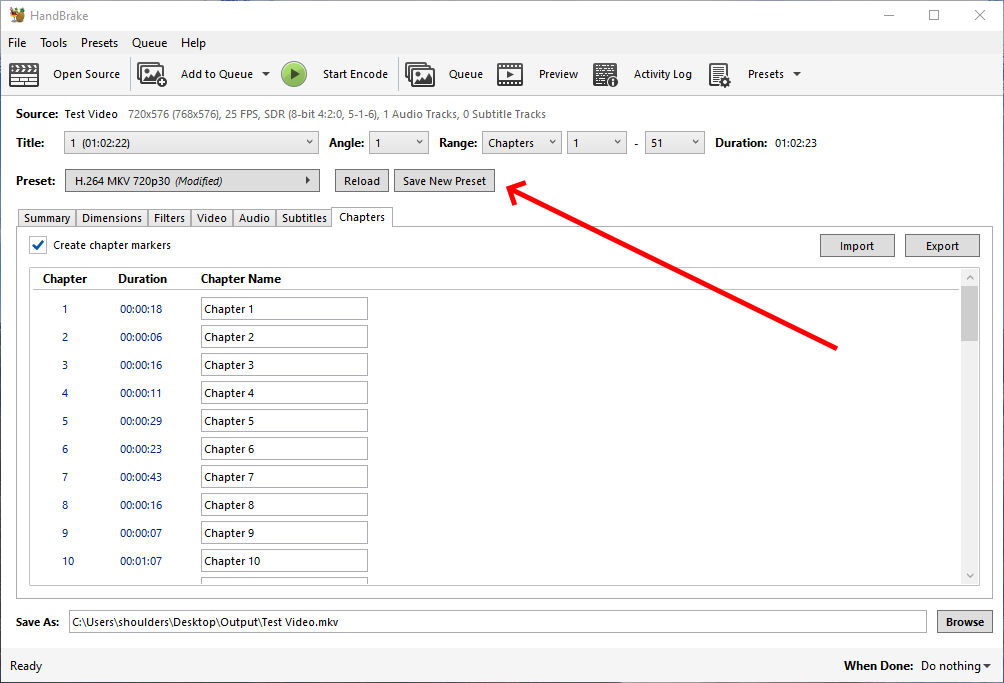
Save your Preset (optional)
Now that you have entered your settings you might as well save them for future use.
- Click on the `Save New Preset` button
- Fill in your presets basic information
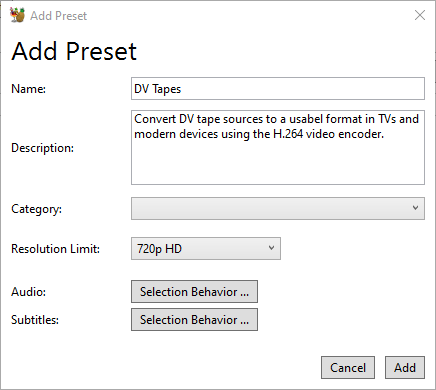
- Audio is not stored in the main part of the preset so for some reason has to be set independently here other wise the Audio will be left as default when you load your preset.

- Subtitles does not need anything changing.

Batch Convert
Make sure you have followed the instructions above at least once and you have saved the settings as a preset (e.g. 'DV Tapes').
- Optionally set your default output folder before starting.
- Open and HandBrake
- Set folder here: Tools --> Preferences --> Output Files --> Default Path
- The default folder is the `Videos` folder in your profile.
- Close HandBrake
- Open HandBrake
- Select all of your files either by dragging or selecting a folder.
- All of the files will be opened as titles.
- Select your 'DV Tapes' preset which will apply it's settings to all of the titles.
- However the output folder is not included and as such it will use the default output folder.
- The input filename is used as the output file name but with the extensions changed to MKV (in our case).
- Add to Queue --> Add all
- Start Encode
- Done, wait for the files to be transcoded.
Notes
General
- Remux
- Changing Container
- no transcoding (changing of codecs) occurs.
- Remuxing Files to MKV | Plex Support - Remuxing, in our context, refers to the process of changing the “container” format used for a given file. For example...
- Muxing
- Is the merging of multiple sources/files into one container file (i.e. MKV).
- Transcode
- Re-encoding the video/audio stream to another format
- Software Decoders
- Software decoders are much better at encoding as they are not limited to what the hardware will do and are not time limited. They can take much longer to encode the same video source but the output is generally better.
- Software can be updated to benefit from the latest Algorithm and codecs but hardware generally cannot.
- I only use hardware encoding in OBS because I need to encoded on the fly which is where hardware encoding is much better. When capturing from a video cassette, you cannot wait for the system to finish encoding a frame before it gets the next one. When transcoding a file there is no such time constraints.
- If your cpu is powerful enought you can use software encoding for analogue capture as there is nothing stopping you, but just make sure your system can keep up with sampling from analogues sources because of the aforementioned timing constraints.
- Hardware vs Software Encoding
- HandBrake – Convert Files with GPU/Nvenc Rather than CPU – Ryan and Debi & Toren - In this post, I’ll show how to use this feature in Handbrake and show some comparisons to illustrate the benefits and tradeoffs that result.
- Software Encoding is much better than hardware compression because:
- Always the latest algorithm available
- Not limited by input time, so can convert at it's own pace meaning there will be no dropped frames.
- can produce the best compression ratios
- More options available
- Hardware Encoding
- This is useful when your CPU cannot handle the amount of bandwidth coming from a live stream or analogue source.
- Very useful for on the fly compression
- Usually old algorithms.
- Limited options
- Compression not as good as software
- The encoded can not be upgraded because it is on the silicon
DV Format and Hardware
- General
- DV Specs
- The DV format does not have black bars or overscan, the whole resolution is used for the image.
- PAL
- Interlaced
- Storage Field Resolution: 720x288
- Storage Frame Resolution: 720×576
- Storage Aspect Ratio (SAR): 5:4
- Display Frame Resolution: 768x576
- Display Aspect Ratio (DAR): 4:3
- Audio: PCM
- NTSC
- Interlaced
- Storage Field Resolution: 720x240
- Storage Frame Resolution: 720x480
- Storage Aspect Ratio (SAR): 3:2
- Display Frame Resolution: 720×540
- Display Aspect Ratio (DAR): 4:3
- Audio: PCM
- DV - Wikipedia
- KB Corel: About DV (IEEE-1394) connections with Studio
- Has a picture of the port
- Possible labels:
- 1394
- iLink
- DV
- Firewire
- DV uses lossy compression of video while audio is stored uncompressed and should be transferred (as per this tutorial) and not captured via other means.
- DV Format Explained with Examples - Free Video Workshop - DV format facts. What are the different types of DV formats. How is DV compressed? Explore the different types of DV tapes and more.
- DV (from VHS/Hi8/miniDV) -> HD. Expand color/luma? Bad idea? - VideoHelp Forum
- HDV is similar to DV in that both use 4:2:0 (actually PAL DV uses 4:2:0 and NTSC DV uses 4:1:1 but the amount of information is the same).
- HDV and DV also have the same luma/chroma ranges (the 16-235 etc). So, the important part of your process is the quality of the upsampling from SD to HD. This is especially true for NTSC since it has to go from 4:1:1 to 4:2:0 (assuming that's what your final format uses).
- If your final format supports 4:2:2, it would be wise to test that option for NTSC DV source.
- DV Specs
- MiniDV
- MiniDV Wiki: All You Need to Know About mini-DV Tape Format - Free Video Workshop
- What is a mini-DV? Learn more about this digital video format which allowed the easily capturing of digital video to a computer via an IEEE 1394 connection.
- The mini-DV resolution is 720 x 480 pixels (NTSC) and 720×576 (PAL) with interlaced scanning.
- Audio is recorded at different sample rates with the best quality being 48 0000Hz at 16 bits.
- The horizontal resolution of mini-DV when viewed on television is around 500 lines, compared to VHS’s 240 lines and Hi-8’s and S-VHS’s 400 lines.
- MiniDV Wiki: All You Need to Know About mini-DV Tape Format - Free Video Workshop - What is a mini-DV? Learn more about this digital video format which allowed the easily capturing of digital video to a computer via an IEEE 1394 connection.
- Hi8 vs MiniDV : Difference Between Hi8 and MiniDV Video Formats - Hi8 vs MiniDV - main differences between the Hi8 and MiniDV tape formats. Tape width, video quality and compression ratio are covered.
- Digital8 vs mini DV : Difference Between Digital8 and mini DV Explained - YouTube - Digital8 vs mini DV : Learn the difference between Digital8 and mini DV.
- MiniDV Wiki: All You Need to Know About mini-DV Tape Format - Free Video Workshop
- DV vs HDV
- DV vs HDV: What’s the Difference and Related Hardware? - DV vs HDV capture format, what are the differences between them? Which one to choose? What device to use to record in the selected format?
- Variations Between DV and HDV: Examining Details | Coconut© - The DV and HDV video formats are revisited. Discover how they shaped video history and digital creation.
Codecs and Encoding Formats
- MKV
- Is a container.
- The data within can use different codecs for sound, audio
- This container can hold subtitles and other assets etc...
- .264 and .265
- Are not supported by medium to old TVs
- I am not sure what a modern Vestel TV (LG, JVC) supports.
- Vestel TVs
- Do not like ExFAT, they do like FAT and NTFS.
- AAC or AC3
- MKV, AAC Or AC3 - VideoHelp Forum
- With DVDs I usually convert to MP4 as the files are lower then 4gb. I try to keep the audio intact, if i can't then I use AAC.
- Use AC3 when you want 5.1 etc.. see link above
- HandBrake defaults to 'AAC (avcodec)
- MKV, AAC Or AC3 - VideoHelp Forum
- HandBrake default formats for MKV
Video: H264 - MPEG-4-AVC(part 10) (avc1) :: H.264 (x264)
Audio: MPEG AAC Audio (mp4a) :: AAC (avcodec) - MKV standard code
Video Mpeg4 AVC (x264)
AC3 (lav) - EEDI2
- EEDI2 - Avisynth wiki
- EEDI2 (Enhanced Edge Directed Interpolation) resizes an image by 2x in the vertical direction by copying the existing image to 2*y(n) and interpolating the missing field. It is intended for edge-directed interpolation for deinterlacing (i.e. not really made for resizing a normal image, but can do that as well).
- Links to various GitHub repositories
- GitHub - HandBrake's EEDI2 port with nicely commented source code: eedi2.c, eedi2.h
- EEDI2 - Avisynth wiki
Software
HandBrake
- Description
- is a transcoder
- maintains chapters
- lots of presets for different devices
- support most (if not all) video formats)
- has a batch mode
- Official Sites (HandBrake)
- HandBrake (Unofficial) | Reddit - This is the unofficial subreddit for the handbrake video conversion software (handbrake.fr), this sub is for information exchange and helping out, not affiliated with the developers.
- GitHub - HandBrake/HandBrake - HandBrake's main development repository.
- HandBrake Forum
- Official Documentation (HandBrake)
- When looking at the documentation be aware there is documentation for each version number and Google/Bing just pick one. So my advise is too make sure the version in the URL is `latest` and does not specify a number like 1.7.0 which you can just replace with the word `latest`.
- HandBrake Documentation - English documentation is currently available for the following HandBrake versions.
- HandBrake Documentation — CLI Guide - The following details all the available options in the command line interface.
- HandBrake Documentation — Summary of Filters
- Colorspace + tonemap filter. Can change/tonemap the colorspace of the video into one of the following:
- If this set to “Off” then HandBrake will keep the colorspace of the video.
- HandBrake Documentation — Custom Presets
- HandBrake comes with many built-in presets which cover the most common use case scenarios. However there are many scenarios and devices that many not be covered.
- Audio and Subtitle settings are special. The preset does not store selected audio and subtitle tracks from the main window. It uses rules to automatically select them for each new source or title that you selected. You can modify these rules by editing the settings on the relevant “selection behaviour” screen.
- Hardware Decoding
- HandBrake can make use of Hardware Decoders:
- Video Tab --> Video Encoder
- HandBrake Documentation — NVIDIA NVENC - Supported Hardware and Configurations
- HandBrake Documentation — AMD VCN - Supported Hardware and Configurations
- HandBrake Documentation — Intel Quick Sync Video - Supported Hardware and Configurations
- Tutorials
- Handbrake: Complete Step-by-step Guide (2024 Update) — RapidSeedbox - Learn all about Handbrake, a tool that easily converts video content recorded from almost any common device and converts it into common video formats.
- A “best settings” guide for Handbrake 0.9.9 and 0.10 | mattgadient.com
- Aimed at v0.9.9 but helpful for all versions of Handbrake, this guide is aimed at those who want to understand what each of the options actually do.
- This is where things can get a little tricky. Higher profiles & levels tend to get you better compression (so better quality in a given filesize). However, you’re going to be limited by the profile support of the hardware devices you’re planning to play your videos on. Here’s the order of things:
- Explains the different tune settings including level
- currently, High Profile, Level 4.1 is the most popular profile on recent / cutting edge devices.
- Almost every current-generation device supports High Profile, Level 4.1.
- Thus, you probably don’t want to exceed Level 4.1. If you go any higher, your video probably won’t play, or will play-with-glitches on any current smartphones, tablets, etc. Note that some slower computers which lack hardware playback support may also struggle to smoothly play back videos encoded at very high levels.
- Using Handbrake for H.264 encoding - YouTube - Handbrake is a free program that can make high quality H.264 and H.265 video. I use it to make all my tutorial videos as it can compress them to very small files and still look good. You can also use it to remake files which do not work properly in your editing program.
- Tips for Encoding Videos using HandBrake
- Tips for creating good video encodings or DVD/BluRay rips, specifically when using HandBrake.
- The tips give concrete instructions for the program HandBrake, which is a freely available, popular, and good tool for encoding videos—if you use it correctly.
- A very indepth tutorial and does not just apply to HandBrake.
- Yadif or Bwdif vs. decomb
- My advice is to only use either the ‘Off’ or ‘Bwdif/Yadif
- Does not mention EDDID
- Avoid decomb, unless you are dealing with the rare case of mixed interlaced and progressive material, because this is one of those dubious algorithms that attempts to only apply deinterlacing when it believes it to be appropriate.
- Regular deinterlace vs. ‘Bob’
- The first implementations of deinterlace methods only tried to produce one deinterlaced output frame per input frame. As I explained above, video may contain two unique fields per frame and in that case one would want two progressive deinterlaced frames per interlaced frame. In HandBrake the deinterlace filters have a ‘Bob’ preset (no idea where the name comes from). This is the one you need if you want to get both fields out of a single interlaced frame, and you must also set the output framerate to twice that of the interlaced input. Only enable this if the video really has two fields per frame, otherwise you'll just get each frame repeated twice.
- In HandBrake the deinterlace filters have a ‘Bob’ preset (no idea where the name comes from). This is the one you need if you want to get both fields out of a single interlaced frame, and you must also set the output framerate to twice that of the interlaced input. Only enable this if the video really has two fields per frame, otherwise you'll just get each frame repeated twice.
- = use bob + 50 for PAL and 59.94 (twice the frame rate, mtaches the field rate)
- = x2 option in OBS
- The lowest sensible RF value is widely considered to be 18 (beyond that, you're wasting bits on encoding invisible details).
- For high-definition movies, 22 is generally a good value, for DVD material it is better to stay around 20.
- A file encoded at RF 22 with the ‘slow’ preset will usually but not necessarily be smaller than one encoded with the ‘fast’ preset, but even when it isn't smaller, it will likely look better.
- Denoise
- In short: if you want to preserve film grain, you will need a very high bitrate. If you want a small file, apply denoising to get good image quality at a low bitrate. NLMeans works best.
- = use NLMeans + does loose some of the image
- = HQDN3D will inevitably degrade the entire image
- = denoise will reduce file size but you potentially will loose quality
- Modern codecs like H.264 are pretty good at keeping quality acceptable even at lower bitrates. However, although these codecs do have a kind of denoising effect at low bitrates, below a certain point this breaks down and the codec makes a mess of it. If you have a noisy video source (e.g., low-quality VHS tapes, a DVD of an old TV show, a film with a lot of ‘grain’), and you cannot afford encoding it at the extremely high bitrate that will correctly preserve all the noise, then it is a better idea to filter out as much of the noise as possible before the actual encoding starts. The codec will then have a much easier job at producing a good image at a low bitrate.
- In short: if you want to preserve film grain, you will need a very high bitrate. If you want a small file, apply denoising to get good image quality at a low bitrate. NLMeans works best.
- Recent versions of HandBrake have two types of denoise filters: the old HQDN3D (has nothing to do with Duke Nukem 3D by the way), and the new NLMeans.
- Easiest Best Optimal settings for Handbrake DVD to H264 Video Conversion on Mac, Windows and Linux 2022 - This is a simple easy guide on how to make the best encodes with the smallest file size in Handbrake using H.264 without having to know or understand all of the settings. Just copy my settings and you’re done!
- Tweaking4All.com - HandBrake - Optimizing Video Encoding (h264)
- For those who'd like to optimize the video encoder settings with HandBrake seeking to reach optimal results when it comes to file size and quality.
- Rule of thumb: DVD RF 20, BLU-RAY RF 22
- How to Compress Video Files without much Quality Loss using Handbrake - In this step by step tutorial you will get acquainted with Handbrake, and how to use it to compress large videos without much quality loss.
- Best Settings for Video Compression in Handbrake | NVENC / CPU - YouTube - NOTE: PASCAL GPUS, NVIDIA 1000 SERIES, has a very weak NVENC engine that does not have many features that allow for good compression of H264 and H265. Users who have these GPUs will see drastically worse compression results and should stick with CPU compression settings used in this video.
- Handbrake Complete Tutorial Part 1: How to Transcode & Compress Videos | OCFreaks!
- An in-depth guide cum tutorial showing how to properly transcode videos using handbrake, with all the settings explained in as simple and concise a manner as possible, without sacrificing the finer details.
- Covers de-interlacing
- Denoise: If you’ve got excess grain or blur in your video, you can use this option to reduce it, but at the expense of loss of finer details.
- Deblock: This filter can be used to remove visible sharp edges between adjacent macroblocks. Only use this option as a last resort.
- x264 Exclusive Settings:
- x264 Preset: By using this slider you can adjust the level of tradeoff between encoding speed and filesize and/or quality. The extreme left setting will finish encoding quicker but the filesize will be larger for the quality. The extreme right setting will take much longer to encode, but it will offer the lowest filesize for the quality.
- x264 Tune: Options of None, Film, Animation, Grain, Still Image, PSNR, SSIM, Fast Decode are provided. Choose any one of these options according to your requirements. (For example, Film if your source is a movie, Grain if you want to retain grain, etc. PSNR and SSIM will offer you maximum quality the way a computer will see it, and is not generally recommended to use.)
- H.264 Profile: Four profile options are provided: Main, Baseline, High, Auto.
- Main: Less CPU intensive, Fast Encode, Fast Decode (Playback), Large Filesize.
- Baseline: More CPU Intensive, Slower Encode, Slower Decode (Playback), Lower Filesize.
- High: Most CPU Intensive, Slowest Encode, Slowest Decode (Playback), Lowest Filesize.
- Auto: Selects the Profile most suited for your settings automatically.
- H.264 Level: Each H.264 level provides a set of constraints like max bit rate, frame size, etc for encoding. For the full list of constraints for each level, see: H.264 Levels
- Handbrake Tutorial Part 2: x264 Advanced Encoding & Compression Settings Guide | OCFreaks!
- An in-depth Guide/Tutorial explaining all the x264 intricacies and advanced settings offered in handbrake advanced tab. The settings in this tab are for those who like to tweak and fine tune the encoder's settings for the video.
- Very in-depth
- Shows how to access advanced tab
- HandBrake vs FFMpeg
- HandBrake Documentation — Supported source formats
- One of HandBrake’s strengths is its ability to open a wide variety of video formats. HandBrake uses FFmpeg libavformat and libavcodec libraries under the hood and generally can open whatever FFmpeg will, in addition to disc-based formats like DVD and Blu-ray.
- What the difference between ffmpeg and software like Handbrake? | Reddit
- Handbrake will do things to try and save the user from themselves. For example, if you resize the video to a size that is not within the original video’s aspect ratio, it will automatically correct and resize to a size that maintains aspect ratio. It may have updated to include a option to choose to not do this, but things like this are what make handbrake different. With Ffmpeg, you can see the automatic choices being made if you turn up its logging verbosity.
- Handbrake uses ffmpeg's libraries under the hood. It's essentially a GUI frontend for ffmpeg. As such, it simplifies a lot of operations for the user, meaning that it's both much easier to use for newcomers but also much more restricted in its functionality.
- Handbrake does have at least one feature advantage over FFmpeg. They have their own NLMeans filter which is multithreaded and therefore massively faster than FFmpeg's single-threaded one. They also have presets for the various filters they have, which I'd say counts as a feature advantage, I certainly could use such presets in FFmpeg.
- [FFmpeg vs HandBrake] What’s the Difference and Which One to Choose? - Aiming to help users understand what transcoding program they want, this article reviews two well-known open-source software FFmpeg and HandBrake, and makes a detailed comparison between them in an FFmpeg vs HandBrake guide.
- Handbrake vs ffmpeg | Reddit
- Handbrake (in most cases) uses the same encoders on back-end that ffmpeg uses. H264 is encoded using a software library called x264, and HEVC uses a software library called x265. Handbrake just gives you a nice GUI and hides some advanced options available in ffmpeg.
- HandBrake Documentation — Supported source formats
VLC Player
- How to transfer your old DV/Hi8 cassettes to modern hardware â THE FULL GUIDE w/ problem solving - YouTube | kleines Filmröllchen
- The most comprehensive 2021 tutorial on how to “digitize” DV and Hi8/Digital8 tapes with your old camcorders and modern hardware, almost for free. With lots of tricks and tips on how to avoid frequent mistakes and fix common errors.
- Uses VLC player to grab the DV stream.
- Find out Video Resolution and Frame Rate using VLC - Find out video resolution and frame rate, which contributes largely towards the quality of a video. Determine your video quality using this method.
- VLC Player can potential build MKV with chapters.
- How to quickly convert MKV to MP4 file using VLC? JVC camcorder stuck in 'safeguard' mode? - UK Vintage Radio Repair and Restoration Discussion Forum - JVC camcorder stuck in 'safeguard' mode? Vintage Television and Video
- I can use VLC player to convert MKv to MP4 or OBS Studio
Other DV Software (WinDV Alternatives)
- ScenalyzerLive 4.0 20060412 Free Download - VideoHelp - ScenalyzerLive (short: ScLive) makes capturing video and selecting useful scenes from your DV-tapes very easy, comfortable and FUN! Sclive is the "missing link" between the Camera and your editing-program.
- HDVSplit 0.77 beta Free Download - VideoHelp - HDVSplit is a utility for capturing HDV stream from your camcorder with scene splitting by timestamp.
- Adobe Premiere Pro 24.1 Free Download - VideoHelp - Adobe Premiere Pro software is a nonlinear video editing application. Powerful real-time video and audio editing tools give you precise control over virtually every aspect of your production.
- Stoik Video Capture 1.0 Free Download - VideoHelp - STOIK Capturer allows you to capture video from DV camcorder through FireWire interface or any analog video source such as TV tuner card, video card, webcam etc.
- Enosoft DV Processor 1.5.4 Free Download - VideoHelp - Enosoft DV Processor is primarily designed to perform real time processing on DV streams, either from an attached DV device or from existing DV AVI files.
- DVdate 8.3.7 Free Download - VideoHelp - DVdate is a nice utility for all video avi-files, but specially useful when dealing with DV video clips. Retrieve basic video information like the codec, image size, duration, audio format.
- GitHub - ddennedy/dvgrab: Command line FireWire DV and HDV capture tool for Linux - Command line FireWire DV and HDV capture tool for Linux
- dvgrab(1) - Linux man page - Capture DV or MPEG-2 Transport Stream (HDV) video and audio data from FireWire
Windows and Drivers
- Win8 and Win8.1 FireWire drivers
- legacy IEEE1394 OHCI drivers from Microsoft
- Extract the drivers by running
msiexec /a C:\full_path_to_1394_OHCI_LegacyDriver.msi /qb TARGETDIR=C:\full_path_to_1394_extract_dir
- Install with the right button or by updating the IEEE1394 driver and make sure it has a "(Legacy)" after the update. This will enable "Microsoft DV Camera and VCR", but that's it. Virtualdub, WinDV or any capture software are able to connect to your DV camera or device.
- FireWire port-based device does not work correctly in Windows 8.1 or Windows 8 - Microsoft Support - Fixes an issue in which legacy 1394 bus drivers (1394bus.sys and Ochi1394.sys) are lost in Windows 8.1 or Windows 8.
- FireWire card and Windows 10 - Encoding old MiniDV's
- I have a few older camcorders that use FireWire cables to connect to a PC. In the past, before Windows 10 and older versions of Vegas, I didn't have any issues connecting and encoding/transferring videos from older tapes. Windows 10 and new PC's don't play nice with FireWire cards, as I have learned from personal experience and posts on forums.
- So is there another way to connect an old camcorder with a FireWire cable to my brand new PC with Windows 10 so that I can import old tapes?
- DV capture with Windows 10 - VideoHelp Forum
- Between XP and Vista the support for DV capture was dropped and everything I've found over the internet is useless so far, from what I've discover is that you need to install the legacy IEEE1394 OHCI drivers from Microsoft.
- Windows 10 for DV is a useless piece of junk! With linux and dvgrab it works like a charm!
- Import mini DV tapes into Windows 10 Movie Maker - Microsoft Community | Microsoft Answers - Trying to import video from an old Panasonic Vid camera using mini DV tapes into Windows 10 Movie Maker (MM). When I click 'import video' in MM I get a message saying, 'the video device is currently in use. Close any other programs and try again'. The thing is, the video device is not in use. I've tried turning off and back on again but I have the same result. I'm getting nowhere, can anyone help please?
- Does Windows 11 support FireWire 1394? - Microsoft Community
- I trying to get some Digital8 video tapes from my Sony DCR TRV725E to my PC where i've installed a FireWire PCi interface.
- Windows 11 does support FireWire 1394. The issue you're experiencing with ClipChamp and Microsoft Teams may be specific to those applications. It's recommended to contact ClipChamp support for further assistance. Meanwhile, you can continue using WinDV or try alternative video capture software for your FireWire camera.
DV Capture Tutorials
- How to transfer DV to Laptop without having a Firewire port - YouTube - How to transfer DV to Laptop without having a Firewire port. We will be using Pinnacle MovieBox.
- Convert Old tapes to Digital with a Mini DV camcorder - YouTube - How to use a Sony DCR-HC96 to convert Video 8, Hi 8, and VCR tapes to Digital to store in computer.
- Dummy Question - How do I capture video from my mini DV tapes? - VideoHelp Forum
- MiniDV to PC - VideoHelp Forum
- Q:
- I've got a Panasonic NV-DS65 video camera and some old MiniDV tapes with some recordings that are pretty close to my heart and it would gut me to lose the footage. I've been looking into trying to put the footage onto my PC and it works. I can record the footage using recording software but I can't get the audio to be put along side the video. I know this is a question that has been asked here a lot and I have consulted the other posts first but I simply can't get the audio recording to work...
- A:
- If these tapes are truly important to you and installing an old OS isn't an option, my next suggestion would be to just install a Firewire card with your current OS, and to rent Adobe Premiere Pro for a month, ($60US, but be sure to cancel it before it auto-renews for another month,) assuming that you can't capture all of your tapes in the span of a week, which is how long Adobe's free trial lasts.
- The reason I suggest Adobe Premiere Pro for the capture is that Adobe's DV capture capabilities are some of the best available, and I know that it doesn't screw with the data that you're capturing in any way.
- Q:
- Fixing FireWire (IEEE 1394) Problems in Windows 10 and 11. Legacy Firewire Driver, Microsoft Firewire OHCI Legacy Drive, Firewire PCI and PCI E cards and how to install them. David Knarr | Studio1
- This article contains a lot of information for connecting Camcorders, Editing Deck, Scanners, Hard Drives and Audio equipment. Along with covering different Firewire ports, what Firewire cards work best and the Legacy Firewire Driver you will need. Please read the article first, then go back and follow the instructions to correct the problem.
- How to capture DV & HDV video tapes on a Windows 11 PC using FireWire to Thunderbolt 3/USB-C - YouTube
- In this video I show the best way to capture your old mini DV camcorder tapes using a PC running the latest version of Windows 11 (22H2) using the adapters required to go from FireWire (i.Link, IEEE 1394, etc) to Thunderbolt 3 or (USB-C plug). Below are time stamps and links to the hardware and software you'll need.
- Thunderbolt 3/4 --> Thunderbolt 1/2 --> FireWire 800 --> FireWire 400/600
- A lot of stuff you can skip.
- How to Transfer mini-DV tapes to Computer without a Camcorder - Free Video Workshop - Find out how to transfer mini-DV tapes to computer without a camcorder through this easy guide.
- Introduction to DV: Capture FAQ and Myth Guide – The Digital FAQ - Although some of this page is more like a rant than a guide, the information is important to know. When it comes to the DV format and equipment based on DV, the ignorance surrounding it the past decade has been thick enough to cut with a knife. Though this author’s current video configuration is proudly DV-free, I submit the following valuable information for your DV needs.
- Two Ways To Transfer Mini DV Tapes To Computer | vhsconverters.com
- How to Capture DV and HDV Tapes on Windows Without a Firewire Port | DVMP Pro 8 - How to Capture DV and HDV Video without Firewire
- How to Capture DV and HDV Tapes via USB ports | DVMP Pro 8 - How to Capture DV and HDV Video via USB ports
- DV capture with Windows 10 - VideoHelp Forum
- Between XP and Vista the support for DV capture was dropped.
- Win8 and Win8.1 FireWire drivers and install commands
- Some dvgrab commands