When you are given a complex Adobe Photoshop PSD with many layers, especially one without a proper naming convention, you will have issues identifying individual layers or objects so you can export them as PNG images for re-use in other projects.
These instructions will show you how to identify specific objects or layer, slect them and then export them as a PNG image file.
Single Object
This is the simplest method and is useful if you are struggling to identify the object to export.
- Click on the ‘Selection Tool’
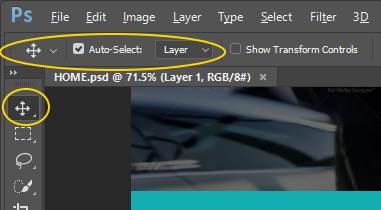
- In the ‘Selection Tool’ toolbar at the top directly underneath the menu you will see the contextual options for the ‘Selection Tool’
- Tick Auto-Select
- Select Layer
- Click on the object in the content/artboard that you want to export.
- The layer containing the object will become highlighted in the layers section.
- Sometimes selection does not work, in which case just try clicking around on different parts of the object until the layer gets selected
- Right click on the highlighted layer in the Layers list and select ‘Quick Export as PNG’
- Pick a location and save the image.
- Transparency will also be preserved.
Muiltple Objects (Export as one)
Use this method when you need to export a logo or image as 1 file, when it has been built up using several objects in Photoshop and they are still separate objects.
- Click on the ‘Selection Tool’
- In the ‘Selection Tool’ toolbar at the top directly underneath the menu you will see the contextual options for the ‘Selection Tool’
- Tick Auto-Select
- Select Layer
- Right Click on the first object in the content/artboard that you want to export and select ‘Isolate Layers’.
- The layer containing the object will become the only layer listed layers section.
- Sometimes selection does not work, in which case just try clicking around on different parts of the object until the layer gets selected
- Click on every other object you want adding to the exported image.
- These objects will maintain their relationship to each other as they appear on the screen
- Select all of the layers in the layers list
- Right click on any of the selected layers in the Layers list and select ‘Convert to Smart Object’
- Right click on the new ‘Smart Object’ and select ‘Quick Export as PNG’
- Pick a location and save the image. Transparency will also be preserved.
Notes
- Objects live on layers and usually there is one object per layer.
- These objects are also recognised as objects during export and not the whole layer with blank space.
- These instructions talk about objects but will probably work for layers as well.
Links
- Photoshop Quick Tip: Finding Layers Quickly - Go Media™ · Creativity at work! - This article was instrumental for me to figure out how to export objects from photoshop