Items filtered by date: December 2014
Silastic Thermal Glue
What is Silastic Thermal Glue?
This is a silicon based glue that is used among other things to glue electronic components to circuit boards which is addition to soldering the component. The purpose is to prevent the component from vibrating durin use or transport which can increase the life of the component. The glue used for electronics is electrically inert to prevent conduction and is also resistant to high temperatures.
Silastic Thermal Glue has many different types and different uses, not just electronics so it is important that you use the correct type for you application.
{add image of silastic glue on a motherboard)
Silastic Thermal Glue is not to be confused with Termal Paste although they probably share a heritage and there might be a crossover is the glue that is used to glue a heatsink to a CPU.
Notes
- Do not use normal silicon or glue this will be unsafe and can damage your electronics
- Be careful you select the right type of glue as there are glues for Heatsinks and that of components
- RTV = room temperature vulcanizing
Also Know as:
- Thermal Adhesive
- Electronic Grade Silicone
703 704 705 (chinese glue)
These glues are available on ebay and alibaba but i have managed to get the data sheet and an image with the different types of the glue on a piece of paper so you can see what they look like.

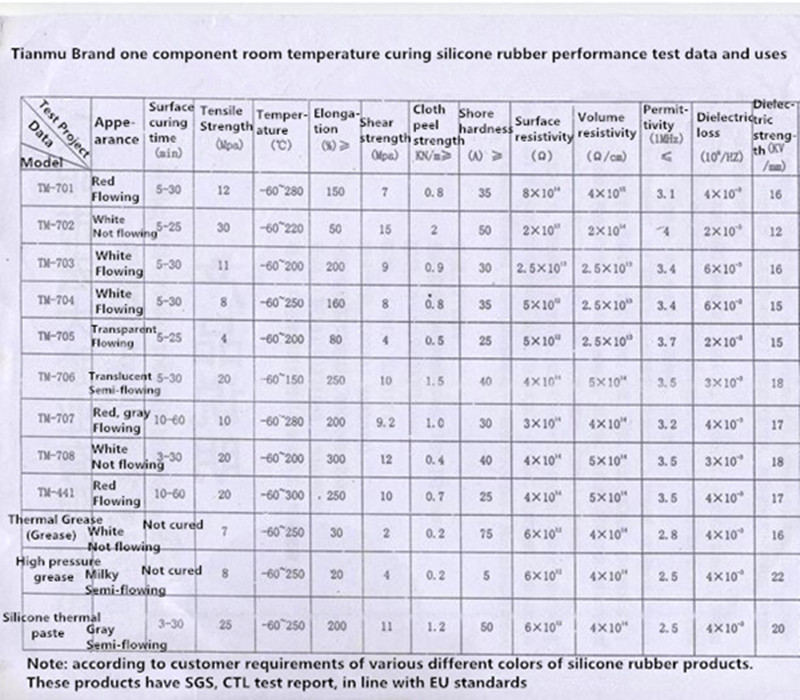
Notes about 703, 704 and 705
Hi,
Thanks for your communication.
There are some differences among 705, 704 and 703:
WH-703 silicone rubber :( white, black):
Properties and Uses:
Cold water resistance, good adhesion, better than the 704 silicone, but prone to yellow light, temperature -60 ℃ - + 150 ℃. Can be used underwater instrumentation moisture sealing, potting submarine cables, small motor magnetic tile adhesive, ignition coil, coated front sensor potting table, car chassis, sealed refrigerated equipment and so on.
Widely used in electronic components bonding, sealing, insulation; anti-leakage, corrosion and surface protection device management.
WH-704 silicone rubber :( white, black)
Properties and Uses:
Temperature good, intolerance blisters, adhesive force of less than 703 silicone, easy to break repair, not yellow after curing, temperature -60 ℃ - + 250 ℃. Widely used in electric heaters, electric control, instrumentation, analytical electrode, electric plugs, electric heaters bonding, sealing, insulation; corrosion and surface protection device management.
WH-705 silicone rubber :( transparent)
Properties and Uses:
Transparent, easy to overhaul, used the occasion to be optically transparent, and SCR, rectifier tube tops protection. Widely used as a transparent RTV, fast curing cement and water. Temperature -60 ℃ - + 200 ℃.
Widely used in electronics, instrumentation, chemical, light industry, machinery industry, bonding, sealing, insulation, potting; surface protection device management. Has excellent electrical insulation and arc resistance, moisture, shock.
Hope it can be helpful to you.
If you like it, welcome to purchase directly, then we will arrange the item for you ASAP.
Should you have any other questions,please feel free to contact us.
Have a nice day.
Best wishes.
Other Silastic Glues
- 703 / 704 / 705 - As described above - just search on eBay
- 703 New 1 Piece Hot Solidification Curing Silicone Rubber Adhesive Sealant Glue | eBay
- 704 High Temperature Electronic Devices Silicon Rubber Adhesive Sealant Glue 45g | eBay
- 705 RTV Silicone Rubber Adhesive Sealant Sticker CTL-29320 - Wholesale Supplier: TinyDeal
- TianMu Good insulation glue thermal conductivity silicone rubber Natural Cure Silicone Sealant, View Good insulation glue, TianMu Product Details from Xiamen Luduo Electronic Technology Co., Ltd. on Alibaba.com
- Tianmu 704 silicone rubber sealant white general potting silicone high-temperature insulation waterproof glue, View Silicone Rubber Sealant, TianMu Product Details from Xiamen Luduo Electronic Technology Co., Ltd. on Alibaba.com
- TianMu Good Silicone rubber Natural Cure Silicone Sealant 705 Silicone Rubber Sealant, View Silicone Rubber, TianMu Product Details from Xiamen Luduo Electronic Technology Co., Ltd. on Alibaba.com
- 10x Silicone Thermal Conductive Adhesive Silicone Glue PTC silicone rubber | eBay
- White Electronic Grade Silicone - 10.2 oz Cartridge | eBay
- GC Electronics
- GC ELECTRONICS 19-155 ADHESIVE, SILICONE, TUBE, 3FL.OZ.(US) - this i believe is safe for electronics but check (info here)
- Amazon.com: GC Electronic Grade Silicone Sealant / Adhesive (3oz.) : 19-155: Industrial & Scientific
- Dow Corning
- DOW CORNING - 1922181 - RTV SILICONE, 744, WHITE, 310ML | eBay
- Dow Corning® 744 Silicone Adhesive White 310ml | Rapid Online - Buy Dale Corning 744 Silicone Adhesive White 310ml – a high quality, one-part silicone adhesive and sealant, designed to provide long-term bonding and to protect against moisture, environmental attack, mechanical and thermal shock as well as vibration.
- DOW CORNING 744RTV WHITE 90ML TUBE | Sil-Mid - UK Company
- GE RTV162 electronic grade silicone.
- Momentive RTV 162 1-Part White Performance Electrical Adhesive Sealant - RTV160, RTV162 and RTV167 adhesive sealants from Momentive Performance Materials are one-component, ready-to-use electronic grade silicone sealants. RTV162 Datasheet
- Momentive RTV162 One Part Silicone Sealant, 2.8 Ounce Tube, White: Silicone Caulk: Amazon.com: Industrial & Scientific
- Momentive RTV 1035 Clear Non-Corrosive Paste - 85ML - RTV Silicones - MG Chemicals - Circuit Specialists
- Other
- thermal glue from DX - not checked
- 3M makes glues for electronics
Useful Links
- Silastic Thermal Protection Materials Research Progress | MC Silicone - A scientific article on Silastic materials
- Dow Corning 340 Heat Sink Compound Information
- Thermal Adhesive | eBay
- Looking for glue to keep capacitors on the PCB - EEVBlog Page 1
- What kind of glue should I use for PCB-mounted components to avoid vibrations? - Electrical Engineering Stack Exchange
- Adhesives for securing components - EEVBlog Page 1
- dow_744_tds information sheet | Krayden, Inc.
- Dow Corning 744 Adhesive/Sealant Product Information
- Practical Production uses of SMT Adhesives
CPU Glue
Also known as
- White Silicone Thermal Plaster/Glue/Adhesive/Paste (these terms are not precise and are for help in searching on eBay only)
- thermal glue
- heatsink plaster
Links
SEF URLs not working after upgrade
Problem
When i upgraded Prestashop 1.5 to 1.6.0.11 the product and category SEF / Friendly URLs do not work but the CMS pages do.
Cause
In my case i believe it was because i had custom Friendly URLs set so this solution might for everyone, in which case use the Useful Links.
Solution
- Go to your prestashop admin / Preferences / SEO & URLs page
- Navigate to the Schema of URLs section
- Click on Save.
- Disable Friendly URLs, click save in this section, then re-enable the Friendly URLs
- Test, You might get away with the steps so far.
- As a further step, copy the Schema of URLs from a fresh install of prestashop (same version) and then click save.
- Disable Friendly URLs, click save in this section, then re-enable the Friendly URLs
- Test
Other Things to Try
There are several tutorials out there that tell you to experiment by turning the apache multiviews on/off and the same with mod_security. After you change either of these you need to disable the freiendly urls and then re-enable them, this causes the .htaccess to be regenerated correctely. These methods will only help a few people and you really should not disable mod_security.
Useful Links
No carriers available after upgrade
Problem
When i upgraded Prestashop 1.5 to 1.6.0.11 there were no carriers available even though they were setup correctely in PS 1.5
Cause
This is caused by prestashop changing how they handled the shipping matrix. The matrices that are present after upgrade reflect he carriers that you had there before but the costing data and ranges have not be preserved.
Solution
Go into the shipping methods and repopulated the costing data into the ranges and add ranges as needed as if you were setting these up from fresh
temp mantis SVN environment setup instructions
This is what I did to get mantis to work with SourceSVN
- Create folder D:\Documents\Developer\
Install Subversion
- Install CollabNet Subversion Edge D:\Documents\Developer\SubversionEdge\
- Create a Normal User and assign it to the ‘Test’ repositories - shoulders
Install Xampp
- Install xampp - D:\Documents\Developer\xampp\
- Change xampp ports (optional)
To prevent issues with my other webservers I use for development. It is easier to reconfigure the one sever that is not going to get changed.
- Apache
- Httpd.conf
- Listen 80 –> 81
- ServerName localhost:80 -> :81
- Httpd.conf
- Httpd-ssl.conf
- Listen 443 –> 444
- <VirtualHost _default_:443> -> <VirtualHost _default_:444>
- Apache
- Mysql –my.ini
- [client] port = 3306 – 3307
- [mysqld] port=3306 - 3307
- Php.ini - if you do not change this you get a #2002 – connection actively reused error
- mysql.default_port=3306 – 3307
- mysqli.default_port=3306 - 3307
Install Mantis
- create a table in PHPMyadmin called mantis using utf8_general_ci collation
- set a username and password ; mantis : YFb5fNTtmXsFHpBP, grant all privileges on the mantis SQL table
- setup mantis, install with MySQLi – it is quicker of connecting
- Nb you need a MySQL root account to install. This might change in a newer version. Stupid, I had to use root and not password
- Default username/password: administrator / root
- Renamed default user to mantis-admin
- Delete the admin folder ( I renamed it just in case)
- Run mantis
- Create a normal user – if more than one user - shoulders
- Install Source Integration Plugin and SourceSVN
- Config settings I changed
- Bug Fixed Message Template – I added everything in ?
- API Key – added my random generated key here
- SVN: Path to binary - D:\Documents\Developer\SubversionEdge\bin also “D:\Documents\Developer\SubversionEdge\bin” might be valid when there are spaces in the path
- SVN: Trust All SSL Certs – ticked, allows me to use a self-signed cert whilst being secure
- SVN: Use Windows `start` - I believe you need this when using windows. ?
Create Repository
- Goto mantis/repositories
- Type in ‘test’ for name and select SVN for type
- Click create repository
- Fill in the following details, leave the rest
- Name – prefilled - Test
- URL – this is the front facing url for the repository
https://svn.exampleserver.com:18080/svn/ - SVN Username – don’t use the super admin, you might consider a repository specific username here
- SVN Password
- Standard Repository – tick
- Click ‘update repository’
- Click ‘import everything’
This is far as I got, more errors and bugs. Mantis is free but needs a serious GUI upgrade
My Redmine Notes
My notes on using and configuring Redmine.
Notes
- General
- you can have multiple repositories per project
- Redmine Tutorial - YouTube - A tutorial on using Redmine software project management suite.
- Security
- rename admin and set a decent password (ie redmine-admin) or shoulders. You cannot unmkae this account as an administrator
- make redmine to use https/SSL (this is not easy)
- create a new user, ie yourusername, you can then makes this user an administrator by clicking a box.
- it is better to keep the main admin and your username seperate. at some point in the future other people might start using redmine. als, it makes it easier to get back in if you forget your password.
- when setting these 2 users, hide your email address.
- Show smaller images in the editor
- How to resize an image in redmine so it will show up, properly resized, when a pdf is produced from the issue? - Stack Overflow
- Feature #38504: Display pasted images in appropriate size on HiDPI displays - Redmine
- I want to update the patch to specify the width of an image in the markup like GitHub, instead of using the "@2x" trick. This approach allows users to change or remove the width value if necessary.
Textile: !{width: 400px;}.clipboard-202402030959-abcde.png! CommonMark Markdown: <img src="/clipboard-202402030959-abcde.png" width="400"> Deprecated Redcarpet-based Markdown:  (size specifications are not supported)
- I want to update the patch to specify the width of an image in the markup like GitHub, instead of using the "@2x" trick. This approach allows users to change or remove the width value if necessary.
Configure Redmine Emails
- if emails is not setup you get the following message:
Email delivery is not configured, and notifications are disabled.
Configure your SMTP server in config/configuration.yml and restart the application to enable them.
configure redmine@quantumwarp.com as the system email
Create the email account
- create email account on your cPanel with 0mb mailbox and forwarding if required. this advoids another mail address to monitor.
configure email in configuration.xml, you must restart redmine to see the changes.
- http://www.redmine.org/projects/redmine/wiki/EmailConfiguration
- NB you will struggle to get it to work until you know the following editing the configuration file.
- when you edit the appropriate section you will notice 'email_delivery:' this is also at the top og the configuration file above all of the email configuratioins and obviously declaring this twice causes problemd so just rem this out at the top of the you email configuration section. it makes it neater doing it there than at the top of the file.
now go back to the emails settings in redmine app as they will be available.
- change the 'Emission email address' to redmine@quantumwarp.com
- send a test email, the button is at the bottom left.
- redmine@quantumwarp.com can be used for incoming stuff.
- under the 'General Tab' change 'Host name and path' to 'svn.quantumwarp.com:81/redmine'
Errors and Alerts
when you first run Redmine you are presented with the following message. You should load the default configuratioin.

Redmine Security and SSL
Security and SSL
If you are using this on a real website you might want to use SSL and make your installation secure. There are a few things you can do. For most people running on their local machine that do not want it on the internet do not require any of these settings, but it will not harm if they did. Following the instructions above you should already be using ProxyRequests Off
<Directory> / <Location>
- location acts upon the url only, directory works on the physical file path, so they basically do the same thing via the 2 declarative paths.
- however, directory is a little more secure because there can be multip-le urls poitning to the same file whereas when using directory there is only 1 file path so directory is better for security permissions etc ..
- directory and location directives can be used within a virtual host and will apply to that virtualhost only, if not it will be applied to the main/default website/name/localhost etc..
- using <directory> is better than <location>
SSL on non default port
- SSL on Webrick
- Defect #12102: Installed Redmine in a sub-URI: Links are generated not correctly - Redmine - This is where i got the proper subdirectory code that works and also has the code for SSL usage
- Listen Directive - Official Documentation
- How to configure WEBrick to serve Redmine over SSL using openSSL certificate | PI Media - Web Apps Development
The optional protocol argument is not required for most configurations. If not specified, https is the default for port 443 and http the default for all other ports. The protocol is used to determine which module should handle a request, and to apply protocol specific optimizations with the AcceptFilter directive.
You only need to set the protocol if you are running on non-standard ports. For example, running an https site on port 8443:
Listen 192.170.2.1:8443 https
Hooks
- Secure the commit path ie /sys/ folder - i read some where that you should protect the {redmine}/sys folder and was not sure why or where i have seen that. but the reaon is to protect where you send the post-commit.bat submissions ie. curl "http://<redmine url>/sys/fetch_changesets?key=<your service key>"
- use https cURL and https for submitting locations
- HowTo Automate repository creation - Redmine - Mentions Web Service and security
Secure Proxy
- ProxyRequests Off - prevent abuse of proxy
- Protect the subversion / REdmine installation with IP blocking in Apache
- HowTo Install Redmine on subdirectory (sub-URI) on Apache - Redmine - Tells of how you should restrict access when using apache proxy
apache httpd.conf
<Proxy *>
  Order Deny,Allow
  Deny from all
  Allow from 192.168.0
</Proxy>
Running Redmine Through Apache on Xampp
Some Notes Before We Start
When you have a webserver running you probably would like redmine through that server aswell to keep things easier, reducing port forwarding requirements and the number of addresses you hand out. You could just hand out the new address which usually looks like http://localhost:3000/ if you want, but why not do a proper integration.
These methods will allow you to run redmine from your normal webserver or localhost, http://localhost/ with no port number on the end (this assumes that your webserver does not have a port number, using port 80).
Tthere are 2 parts of this process to consider:
- Changing the folder from which redmine is server ie from http://localhost:3000/ to http://localhost:3000/redmine/
- Proxying / Redirecting redmine from the server where it is (ie http://localhost:3000/) to youer apache server http://localhost/
With the following instructions i will assume the following
- Redmine is located at http://localhost:3000/
- The target apache server http://localhost/redmine/ - might need to amend this rule
NB if you are just running your apache at http://localhost/ you can just use the following instead http://localhost/redmine/
If you just want the code, click here, this will take you to the bottom where you can just get the code for a quick start without any of the history.
Files
This section is not required reading but might help if you have issues or question later on.
During my research i cam across references to Redmine files where you could put code. I am going to list them here and what i think they do.
- {redmine}/config.ru - this is the intialization configuration file, i think
- {redmine}/config/enviroment.rb - This file controls additonal settings that will get applied to both development and production enviroments
- {redmine}/config/additional_enviroment.rb - This is only present in later version of Ruby/Rails/Redmine and probably needs creating. . This file controls additonal settings that will get applied to both development and production enviroments similiar enviroment.rb does. Not all commands in this file work in this file that would in enviroment.rb .
- {redmine}/config/application.rb - dont bother altering code in this
- {redmine}/config/development.rb - this files allows you to add additional commands/instructions to just the development enviroment
- {redmine}/config/production.rb - this files allows you to add additional commands/instructions to just the production enviroment
Move Redmine to a Sub-Folder
Method 1 - Using WebBrick
This techniques is the best an i have taken most of the information from Defect #12102: Installed Redmine in a sub-URI: Links are generated not correctly - Redmine
This method also utilises the inbuilt WebBrick Webserver, This is an excellent simple solution but if you are going to use this for a lot of users you should perhaps think about using Thin Server, this will require slightly different instructions and some more work. WebBrick is classed as a reference server and if you are going to server more than 20 people at a time there will be large performance issues. For the most of us WebBrick will be fine.
config.ru
# This file is used by Rack-based servers to start the application.

require ::File.expand_path('../config/environment',  __FILE__)
map '/redmine' do
  run RedmineApp::Application
end
Replace the contents of {redmine}/config.ru with this code. This also assumes you have not already made any alterations to this file.
This code does 2 things
- changes all links in the pages to /redmine/
- changes the actual served root. Files in the /public/ directory are now served as http://3000/redmine/ instead of http://localhost:3000/
The root folder effectively no longer exists, you get page not found supplied by the webserver if you browse to http://localhost:3000/ and this is normal.
Other Static Asset Commands
You can also change the dynamic urls by using the 2 following commands:
- RedmineApp::Application.routes.default_scope = { :path => '/redmine', :shallow_path => '/redmine'
- RedmineApp::Application.routes.default_scope = '/redmine'
which cause the following issues:
- the directory of the dynamic links changes but the root of the webserver stays the same. This means that the static files stay in the root directory (http://localhost/) while all of the dynamic links are in http://localhost:3000/redmine/
- it is very difficult to proxy these 2 folders because this will involve complex rewrite rules
enviroment.rb
ActionController::Base.relative_url_root = '/redmine'
Add this to the end of {redmine}config/enviroment.rb. I also think you can put this in either development.rb or production.rb, this change will then only occur in that particular enviroment.
This code alters the path of the links pointing to the static files such as javascripts and CSS. Currently all paths for these still point to the root http://localhost:3000/ but they actual ar now present at http://localhost:3000/redmine/ and even though we have added the code in config.ru these paths are not altered so we need this code to correct that.
NB:
- RedmineApp::Application.routes.default_scope = '/redmine' works but is not the prefered method. This must also be put before RedmineApp::Application.initialize!
- ActionController::AbstractRequest.relative_url_root = "/redmine" - Does not work, it was for older versions of Redmine
- config.action_controller.relative_url_root = '/redmine' - not sure about this
You now have moved your Redmine installation to a subfolder
Method 2 - Thin Server + Passenger Server
this will be for my Thin server notes when i do them, there is also the Passenger Webserver to consider. Each has there own method. Basically youo can run these servers with switches to perform the directory change, You can then proxy this over to your main webserver as in the instructions below. Check my General Links section for resources.
Proxying Redmine to Apache / Xampp
Redmine in Root Folder
This is the easiest of the methods to implement. You can simply proxy Remine to your apache server using the following code, this assumes redmine is at http://localhost:3000/
httpd.conf
LoadModule proxy_module modules/mod_proxy.so
LoadModule proxy_http_module modules/mod_proxy_http.so
Make sure these modules are enabled in httpd.conf, they are required.
ProxyRequests Off
ProxyPreserveHost On
ProxyPass / http://localhost:3000/
ProxyPassReverse / http://localhost:3000/
Add these lines to the end your apache httpd.conf , if you do this you will not be able to run any other stuff from your apache webserver because all requests will get forwarded to the Redmine server.
Or Alter the Redmine Server port directely
Simply run the Redmine server on port 80 by using the following switch which will give the same effect
-p 80
Redmine in Subfolder
Method 1 - Basic (also blunt and site wide)
These instructions will assume the subfolder on apache you want is http://localhost/redmine/
.htaccess file
# Redirects /redmine to /redmine/
RedirectMatch ^/redmine$ /redmine/
RedirectMatch ^/$ /redmine/
add this code to ..../htdocs/.htaccess in your apache server.
You can redirect the non-slashed version, but this is to make sure we have a correct URL. A directory is denoted by having a slash at the end of the URL (ie /redmine/ ) wheresas if you dont, it denotes a page (ie /redmine ).
What we are directing to is more akin to a directory/default index file like a normal webserver, http://www.example.com/ You dont often see http://www.example.com/index.html , but they are the same page. Notice the slash at the end, this is intentional.
httpd.conf
LoadModule proxy_module modules/mod_proxy.so
LoadModule proxy_http_module modules/mod_proxy_http.so
Make sure these modules are enabled in httpd.conf, they are required.
ProxyRequests Off
ProxyPreserveHost On
ProxyPass /redmine/ http://localhost:3000/redmine/
ProxyPassReverse /redmine/ http://localhost:3000/redmine/
This is code that actualy passes the information/request between Redmine Server and your Apache server.
- ProxyRequest - This function provides forward proxying services and is not required here. This will prevent abuse of your server.
php - Apache ProxyRequest - Server Fault - not required for reverse proxies, this must be off
ProxyRequests Off - not working and httpd being abused as forward proxy | Apache | Users - turns of forward proxy requests - ProxyPreserveHost - keeps header information in the request sent to the Redmine Server so things work nicely. If you want more information about this use google.
- ProxyPass and ProxyPassReverse - these handle the proxy mappings.
Can I make this Better
The commands above will work site wide so are a bit blunt, the following methods will allow you to apply these rules to a specific locations.
Method 2 - <Location>
<Location> works on the URLs presented to the server
httpd.conf
LoadModule proxy_module modules/mod_proxy.so
LoadModule proxy_http_module modules/mod_proxy_http.so
Make sure these modules are enabled in httpd.conf, they are required.
ProxyRequests Off
<Location /redmine/>
	RedirectMatch ^/redmine$ /redmine/
	RedirectMatch ^/$ /redmine/
	ProxyPreserveHost On
	ProxyPass http://localhost:3000/redmine/
	ProxyPassReverse http://localhost:3000/redmine/
</Location>
- ProxyRequests Off will not work in <Location>
- Notice that the proxy statements do not have a target in them, only the source
- The RedirectMatch commands will work outside of <Location>
- rules in <location> can be moved easier that <directory> because there are not absolut addresses
With this method you have to split the commands, ProxyRequests will not work in location so needs to be put in the normal flow of the httpd.conf (i.e. not in <location>)
Method 3 - <Directory>
Directory works on the physical path of the accessed files and is better to be used for security because several URLs can point to a single directory or file whereas the <Directory> command is very specific.
httpd.conf
LoadModule proxy_module modules/mod_proxy.so
LoadModule proxy_http_module modules/mod_proxy_http.so
Make sure these modules are enabled in httpd.conf, they are required.
ProxyRequests Off
<Directory "d:\Documents\Developer\xampp\htdocs\redmine\">
	RedirectMatch ^/redmine$ /redmine/
	RedirectMatch ^/$ /redmine/
	ProxyPreserveHost On
	ProxyPass http://localhost:3000/redmine/
	ProxyPassReverse http://localhost:3000/redmine/
</Directory>
- ProxyRequests Off will not work in <Location>
- Notice that the proxy statements do not have a target in them, only the source
- <Directory "D:/Documents/Developer/xampp/htdocs/redmine/"> is also valid
- this command acts on the Virtual Directory in the xampp public folder
- This should work even though the directory does not exist
- The RedirectMatch commands will work outside of <Directory>
Method 4 - VirtualHost
With Virtualhost you can run a another domain name on the 1 xampp/apache server. This is very useful. You can also just use it to apply rules to the server and keep the code neater, easier for copying and pasting.
httpd.conf
LoadModule proxy_module modules/mod_proxy.so
LoadModule proxy_http_module modules/mod_proxy_http.so
Make sure these modules are enabled in httpd.conf, they are required.
<VirtualHost *:80>

	## This is for setting a domain name
	ServerName rails.localhost.com
	DocumentRoot "D:\Documents\Developer\RubyRoot\redmine\public\"

	# Make sure there is a trailing slash in the root
	RedirectMatch ^/redmine$ /redmine/
	RedirectMatch ^/$ /redmine/

	# The proxying code
	ProxyRequests Off
	ProxyPreserveHost On
	ProxyPass /redmine/ http://localhost:3000/redmine/
	ProxyPassReverse /redmine/ http://localhost:3000/redmine/

</VirtualHost>
- If you want to run another domain on you local webserver you need to add a rule to your Hosts file, ie 127.0.0.1 rails.localhost.com
- All the code required is contained within <VirtualHost> tags
- This code be used on the whole server or just an individual domain (depends if you define ServerName)
Including the rules in the <VirtualHost> tags is not required but can make handling the code easier and if you do want apply this to a specific domain it is easy to enable it.
My Code
So you have arrived here at the code, just following the simple instructions and edit the files. Redmine will then run at http://localhost/redmine/ on you xampp installation. This does of course assume you have Redmine already running on your Windows PC.
Redmine - config.ru
# This file is used by Rack-based servers to start the application.

require ::File.expand_path('../config/environment',  __FILE__)
map '/redmine' do
  run RedmineApp::Application
end
Replace the contents of {redmine}/config.ru with this code. This also assumes you have not already made any alterations to this file.
Redmine - enviroment.rb
ActionController::Base.relative_url_root = '/redmine'
Add this to the end of {redmine}config/enviroment.rb. I also think you can put this in either development.rb or production.rb, this change will then only occur in that particular enviroment.
Apache / Xampp - httpd.conf
Edit your Apache / Xampp httpd.conf file
LoadModule proxy_module modules/mod_proxy.so
LoadModule proxy_http_module modules/mod_proxy_http.so
Make sure these modules are enabled in httpd.conf file, they are required.
#################################
# RUBY SETUP
#################################

	# Enforces a trailing slash for the /redmine/ directory
	RedirectMatch ^/redmine$ /redmine/
	RedirectMatch ^/$ /redmine/

	# The proxying code
	ProxyRequests Off
	ProxyPreserveHost On
	ProxyPass /redmine/ http://localhost:3000/redmine/
	ProxyPassReverse /redmine/ http://localhost:3000/redmine/

#################################
# RUBY SETUP
#################################
Add these lines at the bottom of the httpd.conf file.
Done
All the changes are now done, you will find that Redmine will be served from http://localhost/redmine/ and http://localhost:3000/redmine/ , this is normal.
If you had your servers running while making these changes you need to restart them both.
You should note that this setup is non-SSL version so is not secure.
General Links
These are the links i used for my research and might be of use.
Redmine / Ruby
- HowTo Install Redmine on subdirectory (sub-URI) on Apache - Redmine
- Defect #11881: FCGI mode does not support sub-URI - Redmine
- Defect #12102: Installed Redmine in a sub-URI: Links are generated not correctly - Redmine - This is where i got the proper subdirectory code that works and also has the code for SSL usage
- Subdirectory problem with Redmine 2.1.2 under Windows - Redmine - Run Redmine in a subfolder using the Thin Server
- HowTo Install Redmine in a sub-URI - Redmine - The official page to get Redmine in a sub-URI / Sub-directory. It is dated and uses the mongrel server to work
- HowTo Install Redmine in a sub-URI on Windows with Apache - Redmine - Again this uses Mongrel and the instructions are probably out of date
- HowTo have both development and production environment available from Apache with VirtualHost - Redmine
- Apache2 + passenger configuration - Redmine
- Redmine not working properly from a subdirectory - Redmine - An unsuccessful attempt to run Redmine in a sub directory but they did get some things right
- Thin - yet another web server - Homepage of the Thin Server
- How do I configure Apache 2.2 for Ruby on Rails in Windows? - Stack Overflow
- apache 2.2 - How to configure Apache2 for Redmine properly? - Server Fault - Useful setup info for redmine suing apssenger on Debian Linux
- apache 2.2 - Virtualhost setup for Ruby on Rails application (mod passenger) - Server Fault
- Apache configuration for installing Redmine in URL subdirectory - Stack Overflow - mentions Phusion Passenger and the appropriate configuration
- Changing the base URL for Rails 3 development - Stack Overflow - This also has the correct subfolder fix for Redmine
Reverse Proxy
- Running a Reverse Proxy with Apache
- Using mod_rewrite for Proxying - Apache HTTP Server Version 2.2
- Using mod_rewrite for Proxying - Apache HTTP Server Version 2.4
- mod_proxy_html - Apache HTTP Server Version 2.4
- Running a Reverse Proxy in Apache
- mod_proxy - Apache HTTP Server Version 2.2
- How to set up a proxy server with XAMPP on Windows
- Use mod_rewrite’s proxy flag with caution — statichtml.com
- reverse proxy - Setting Redmine path - Server Fault - uses ProxyHTMLMap command, not sure if this alters hyperkinks in the content
- apache - ProxyPreserveHost seems to do little for me - Stack Overflow explains a little about ProxyPreserveHost in simple terms
- apache - Can ProxyPass and ProxyPassReverse work in htaccess? - Stack Overflow - No you cant, and this tells you why
- xampp - How can I enable mod_proxy_http - Server Fault - mentions security when using Proxy
- Apache config and .htaccess - URL rewriting - Reverse Proxy
- Configuring Ruby On Rails App in a subdirectory under Apache - Stack Overflow
- mod rewrite - Apache rewriterule with proxyPass and proxyPassReverse - Stack Overflow
Apache
- VirtualHost Examples - Apache HTTP Server Version 2.2
- Difference between and Apache directives - Server Fault
- <Directory> Directive - Official Documentation
- <VirtualHost> Directive - Official Documentation
- <Location> Directive - Official Documentation
- Rewriting URLs in hyperlinks (Configure Apache as a reverse proxy) - This article discuss rewriting hyperlinks in the source before serving the code and how this can take a lot of processing
- Apache's features to manipulate URL's
- mod rewrite - Apache mod_rewrite internally to different port - Stack Overflow
- apache 2.2 - How to configure Apache2 for Redmine properly? - Server Fault - this mentions Passenger and RailsBaseURI
Upgrading Redmine
These are my instructions to upgrade your Redmine install on windows and also assumes you have used my instructions for installing redmine, however this is not mandatory but will explain where the filepaths come from.
I will be upgrading Redmine 2.6.1 to Redmine 3.0.0 but i am sure they will be almost the same for other version.
Notes
- These instructions are based on the official instructions from RedmineUpgrade - Official Instructions.
- Redmine 3.0.0 now uses mysql 6.1.5
- the gems are installed to the RubyInstallere and not Redmine
Instructions
Step 1 - Check Requirements
The first step to upgrading Redmine is to check that you meet the requirements for the version you're about to install.
You can easily check what version of Redmine, Ruby and Rails by browsing to Administration/Information and you will see the following information.
Environment:
  Redmine version                2.6.1.stable
  Ruby version                   2.1.5-p273 (2014-11-13) [i386-mingw32]
  Rails version                  3.2.21
  Environment                    production
  Database adapter               Mysql2
SCM:
  Subversion                     1.8.11
  Filesystem
Redmine plugins:
  no plugin installed
Redmine 3.0.0 requires, Ruby 1.9.3 or higher (and now supports ruby 2.2).
Step 2 - Backup
- Backup your redmine database via phpmyadmin (or any other method you prefer)
- make a full backup of your redmine directory (ie D:\Documents\Developer\RubyRoot\redmine\)
Step 3 - Perform the upgrade
- If Redmine is running, gracefully stop redmine, the redmine service if running and any related xampp installation (ie D:\Documents\Developer\xampp)
- Download the following software
- Redmine 3.0.0 - I chose the .zip to make it easier for extracting
- mysql-connector-c-6.1.5-win32.zip - this is the MySQL connector
- Rename
D:\Documents\Developer\RubyRoot\redmine\
to
D:\Documents\Developer\RubyRoot\old-redmine\ - Extract redmine-3.0.0.zip to D:\Documents\Developer\RubyRoot\redmine
- From the '.../old-redmine/' directory, copy the following files to the same location in the new redmine installation '.../redmine/'
- {redmine}/config/database.yml
- {redmine}config/configuration.yml
- {redmine}/files/ directory content (this directory contains all your uploaded files so you might not have any).
- The folders of your custom plugins from your plugins directory (or vendor/plugins directory if upgrading from a 1.x version) into new installation plugins directory. Make sure that you copy only plugins that are were not initially bundled with your previous Redmine setup. My installation does not have any plugins so this step is not needed.
- If you are running Redmine in a subfolder
- {redmine}/config/environment.rb (this might require merging rather than copying)
- {redmine}/config.ru (this might require merging rather than copying)
- If you have the redmine service copy the following files
- redmine_service_ctl.rb
- redmine_service.rb
- Open up a command prompt as an administrator and navigate to D:\Documents\Developer\RubyRoot\redmine
- Install the required gems by running the following command:
bundle install --without development test
- this installs all the required gems
- this brings up the following message about the new version of the MySQL connector that has been installed
================================================================================

  You've installed the binary version of mysql2.
  It was built using MySQL Connector/C version 6.1.5.
  It's recommended to use the exact same version to avoid potential issues.

  At the time of building this gem, the necessary DLL files were retrieved from:

  http://cdn.mysql.com/Downloads/Connector-C/mysql-connector-c-6.1.5-win32.zip

  This gem *includes* vendor/libmysql.dll with redistribution notice in vendor/README.

================================================================================
- You need to extract libmysql.dll from mysql-connector-c-6.1.5-win32.zip. The file is located in the archive at ...\mysql-connector-c-6.1.5-win32\bin
- Replace D:\Documents\Developer\RailsInstaller\mysql\lib\libmysql.dll with the new version of libmysql.dll
- you might need to reboot windows for the new version of libmysql.dll to be loaded
- Run the following command from your new Redmine root directory:
bundle exec rake generate_secret_token
- Check for any themes that you may have installed in the public/themes directory. You can copy them over but checking for updated version is ideal.
Step 4 - Update the database
- Start your xampp install apache and mysql
- This step is the one that could change the contents of your database. Go to your new redmine directory, then migrate your database:
bundle exec rake db:migrate RAILS_ENV=production
- If you have installed any plugins, you should also run their database migrations:
bundle exec rake redmine:plugins:migrate RAILS_ENV=production
Step 5 - Clean Up
- Clear the cache and the existing sessions:
bundle exec rake tmp:cache:clear tmp:sessions:clear RAILS_ENV=production
- Restart the application server (e.g. puma, thin, passenger)
- Finally go to "Admin -> Roles & permissions" to check/set permissions for the new features, if any.
Links
Further Redmine Settings
Changing the Logging Level
If you discover that your log file is filling up with lots of uneeded information you can change the logging level from the default.
in the {redmine}/config/additional_enviroment.rb file you can change the logging level. By either adding the line or un-remming one that is present. When you set the error loggin level to error you will only get errors logged to the log file. This will affect both enviroments.
- config.log_level = : debug
- config.log_level = : error
The log levels available are: :debug, :info, :warn, :error, :fatal, and :unknown, which correspond to the integers 0-5.
Logging Links
- ruby on rails - Turn off active record logging in production - Stack Overflow
- How do I turn off logging in Rails 3?Jason Noble's Technical Adventures | Jason Noble's Technical Adventures
- how to disable annoying asset-related log messages in rails - Übergeek UnLtd
- Turn off asset logging in your Rails application - Freelance software engineer - Michaël Rigart - uses Quiet_assets GEM
- Rails disable logging of asset pipeline messages : Max Ivak Personal Site
- How to disable logging of asset pipeline (sprockets) messages in Rails. - Codebeerstartups
- How to: How to disable logging of asset pipeline (sprockets) messages in Rails 3.1? | SevenNet
- RoR Guide & Solutions: Solution to turn off Rails asset pipeline log in Rails 4 development log file
- Logging configuration - Redmine Thread
- installation - how to enable redmine (ruby on rails) logging? - Server Fault
- Disable Rails 3.1 SQL logging - Stack Overflow
Integrate Subversion with Redmine
Installation of Subversion with redmine can be straight forward if you have some easy toread instructions, so here they are.
There are several levels of integration
Basic SVN Integration
- browse SVN Repositories
- close jobs via SVN commit messages
- compare revisions
Read the official Instructions - RedmineSettings - Repositories
According to the instructions this only works if Redmine and the Subversion Server are on the sam physical machine (this needs 100% clarifying but for now we will assume it is true).
This feature allows you to grab the commits from a predefined SVN Repository (most protocols are supported) and this repository is attached to a project, by doing this when you submit a commit to a repository with a message with correct issue reference syntax, redmine will close the related isse(s) in the project. Git , SVN and other SCM are available. This feature also allows you to perfomr comparisons of different revisions and you eben get the choice to see the changes side-by-side or on top of each other, this feature can be useful depending on how your code looks. There is also a repository browse feature built in to redmine. You can have multiple repositorys per project
Enable Fetch Commits Automatically
In Redmine Administration/Settings/Repositories make sure that Fetch Commits Automatically is ticked. If this option is activated, the application automatically retrieves the new revisions when a user consults the repository.
Official article here
Instructions to add a repository
make sure u use a network version for the repository so you can move it if you want.
- create a project
- In the project settings, make sure that the 'Repository' module is enabled and go to the 'Repository' tab.
- Select the SCM that corresponds to your repository and enter the path or URL of your repository.
- i used these settings, Redmine was able to download the changes from the repository
SCM Subversion
Main repository checked
identifier test-identifier (dont know what this is for, Repository Identifier)
URL https://svn.exampleserver.com:18080/svn/Test/
user svn-redmine
password xxwhateverxxxx
* when the repository is set you cannot change the details after you have created it except for the surname and password.I have read on the redmine official documentation that you should use a network location for you Subversion repository
- the first time you view the repository redmine will retrieve all of the changes and import the information
Now that you have configured these settings you can close jobs via a svn commit (see below for forming a correct message for closing jobs) but the draw back is that the changes/commits are only retrieved at certain times
- when you browse the SVN repository via Redmine
- if you set up a CRON job {add details here}
Allow SVN Commits to Close Jobs
In the step above you configured Redmine to interact with Subversion and to retrieve any changes/commits. Redmine currently parses the commit messages for keywords which reference issue, it does this so it can automatically change these keywords into links. These links are found by using a set of default rules and keywords which can be chamged in the admin panel but the default options should be fine for most people.
The one thing Redmine does not do by default is close issues. You need to specify the keywords that you want to be used as closing keywords and enable the option in the Redmine settings via the admin panel.
Links
- RedmineSettings -Referencing issues in commit messages - Official Article
- Community: T.C. Plomp's Blog: Automatically updating Redmine from Rhodecode - National Instruments
What Should i Do?
- Browse to Administration/Settings/Repositories/'Referencing and fixing issues in commit messages' Section
- Enable 'Allow issues of all the other projects to be referenced and fixed'
- Add the following into 'Fixing keywords'
fix,fixes,fixed,close,closed,patches,patched
If i get a better list i will add it here, but these keywords give you the gist. - Set 'Applied Status' to Closed
- Set '% Done' to 100%
- Click Save at the bottom left of the page to save all changes
- Done
You can configure whatever rule you want but at least this will get you going. Read the official Documentation for the syntax of closing statements you should use in your commit messages.
NB:
- I do not know if the keywords are case sensitive
Advanced Keywords
Better Issue Referencing
Redmine has a list of keywords it scans for to identify issues as follows:
refs,references,IssueID
I want to extend that to the following list
refs,references,IssueID,bug,bugs,defect,defects,feature,features,issue,issues,patch
I dont know about whether yoou can close multiple issues but i will add the plural version here anyway
Resolve Issue Keywords (optional)
These are different status and have different uses so require their own settings in the'Referencing and fixing issues in commit messages'.
If you want to have the resolved option set from commit messages you need to do the following:
- Browse to Administration/Settings/Repositories/'Referencing and fixing issues in commit messages' Section
- Add a new 'Fixing' rule
- Add the following into 'Fixing keywords'
resolve,resolves,resolved
- Set 'Applied Status' to Resolved
- Set '% Done' to 100%
- Click Save at the bottom left of the page to save all changes
- Done
Example Commit Message Syntax for Redmine
To reference and issue use a command using any of the issue referencing keywords as below:
issue #1234
To close a job use the following or similiar command with any of the other closing keywords
close #1234
The key thing with these is that that the command is in a certain format
{keyword}{a space}{a hash}{issue number}
Resolved Vs Closed Links
- What is the difference between closed and resolved status in GreenHopper? - Atlassian Answers
- Feature #11313: Automatic closing of resolved issues - Redmine
- Marking issue Resolved vs Closed - Redmine
Close Jobs Imediately Upon SVN Submit
To get jobs to close when you actually submit the commit further integration is required which is in the next section.
This is a very useful feature because in my opinion this is how everyone will think this integration works, when you submit a commit with closing statements in the message that issue will be immediately closed. In the 'Basic SVN Integration' this does not happen until you browse the repository or your cron job is fired so the commits get parsed and redmine closes the jobs so there could potentially be a gap between closing the jobs and this apopearing on the Redmine installation.
In this method you basically create a post-commit hook that polls the Redmine installation which then instructs Redmine that some changes have been made and that it should fetch them. It should be noted that this can cause a slight slow down in the commiting of the changes to the repository.
There are 2 types of polls you can use:
- Fetches changesets for all active projects
/sys/fetch_changesets?key=<your service key> - Fetches changesets from the repository of a specific project. This will be quicker that the previous method.
/sys/fetch_changesets?id=<project identifier>&key=<your service key>
And several delivery methods for the hook:
- Visual Basic (.vbs)
- wget
- cURL
- Ruby (via command line)
My Instructions
I will be using cURL for these instructions because it is the easiest solution.
Do this once
- Download the correct cURL Binary from here. Get the Generic Non-SSL version for your architecture (x86/x64), security will be addressed in a later article
- Copy the file to D:\Documents\developer\SubversionEdge\bin - this folder should be in your path from when you installed Collabnet Subversion Edge. You can put this file anywhere but if it is not in your path you need to use the full location of the executable or add that location to your path.
- Disable Fetch Commits Automatically - there is no point in fetching changes upon browsing the repository from within redmine if your changes are always upto date.
- You make this change by going to Administration/Settings/Repositories/ and untick this option.
- You make this change by going to Administration/Settings/Repositories/ and untick this option.
- Enable Enable WS for repository management - This allows the Webservice to be used for triggering refreshes.
- You make this change by going to Administration/Settings/Repositories/ and tick this option.
- 'Genereate a Key' for the WS Services
- Save Changes
Required For Each Repository
For each repository you need create add an exectuable post-commit hook with the commands in it to trigger Redmine in to checking for changes. I will use a Hook that updates only the repositories in that particular project. It will also be very easy to change to refresh all repositories.
post-commit.bat
@ECHO OFF

curl "http://<redmine url>/sys/fetch_changesets?id=<project identifier>&key=<your service key>"
This is the example code from Redmine's official instructions on calling a URL that will trigger Redmine to refresh all Repositories for that chosen Project.
Create the 'post-commit' Hook
I will assume
- you have created a test repository called 'Test' and it is physically located at D:\Documents\developer\SubversionEdge\data\repositories\Test
- Redmine is located at http://localhost/redmine/
- Your project in Redmine is called 'TestProject'
- Your WS Key that you generated earlier is 'Password123'
@ECHO OFF

curl "http://localhost/redmine/sys/fetch_changesets?id=TestProject&key=Password123"
- create a file called post-commit.bat
- edit this file and add the code above in to it and save.
NB: if the repository you are updating is in another project you will need to alter the project name accordingly, you cannot just copy the Hook file into another repository. - Move this file to D:\Documents\developer\SubversionEdge\data\repositories\Test\hooks
- Done
Upon a successful commit to your Subversion Repository, Redmine will check all of the Repositories that belong to the specified project for changes.
You might be asking why cannot i not just update only a specified repository in Redmine rather than all of the repositories that belong to a project. This is a requested feature but for some reason it has not been added yet. Considering things most people will not notice this and if you use the command that refreshes all repositories in Redmine upon a successful commit you will never need this. If you use the 'Refresh All' command you can just copy this to other repository hook folders without alteration.
Useful Links
- HowTo setup automatic refresh of repositories in Redmine on commit - Official instructions on Redmine.org
- Community: T.C. Plomp's Blog: Automatically updating Redmine from Rhodecode - National Instruments
- A Redmine hook for repo updates - Zane's Blog
- Matisse's Blog: Redmine - Fixed for Large SVN Repository
Automatically Create SVN Repositories
This is the final level of integration but it is not easy and seems to come with its own issues. You have to edit code and do this and that to get it to work. It is quicker to create the SVN Repository in Subversion Edge and then enter the details into redmine as in 'Basic SVN Integration'
I will not be implementing this aas i have easy control over my Subversion Server
See the official page for more information
- HowTo configure Redmine for advanced Subversion integration - Redmine
- HowTo Automate repository creation - Redmine
- Repositories access control with apache mod dav svn and mod perl - Redmine
- HowTo to handle SVN repositories creation and access control with Redmine (part 1)- Redmine
- HowTo to handle SVN repositories creation and access control with Redmine (part 2) - Redmine