Items filtered by date: December 2014
Configure Redmine as a Windows Service
Installing Redmine as a Service
This can be a tricky thing to get working if you have no knowledge of Ruby or assume that all the scripts you come across actually work. I have found a lot of information about getting Redmine to run as a windows service is quite old and ruby ahs changed a lot since they were written. This article hold all my research from googling around the internet which includes those key niggets of information to help me get the scripts working.
As ever you have come across another article saying how things should work but never just give you the code so you can get Redmine working and worry about other things. This article is diffrerent, i have included all my research so if there are any problems i have not seen or issues that come along later you will be able to fix them withou pulling your hair out and lastly this article has the working scripts. If you just want the scripts so you can get running please scroll to 'The Scripts' and follow the installations instructions and you will be running very quickly.
Notes
General
There are currently a few methods that I have found to create a service:
- Mongrel server – seems old way of doing it
- Creating a registry entry via a script and then a payload script with the service code
- Create the service utilising the windows resource kit by having another program run as a wrapper
- Simple – create the service by the command line pointing to your script
- Read this article on how to install redmine as a service. It is really easy to follow
http://www.redmine.org/projects/redmine/wiki/HowTo_run_Redmine_as_a_Windows_service_%28win32-service_+_taskill_approach%29 - Your Redmine directory is - D:\Documents\Developer\RubyRoot\redmine
- Your ruby directory - D:\Documents\Developer\RailsInstaller\Ruby2.1.0
- The command to create the service is:
sc create redmine binPath= "D:\Documents\Developer\RailsInstaller\Ruby2.1.0\bin\rubyw -C D:\Documents\Developer\RubyRoot\redmine\ service.rb"Notes
- You might need to run this as administrator
- This creates a service called redmine
- When created it is set as Manual, you need to change this to automatic - I think!
- sc delete redmine will delete the service
- creates a log file in {REDMIN_DIR}\log
- my code - sc create redmine binPath= "D:\Documents\Developer\RailsInstaller\Ruby2.1.0\bin\rubyw -C D:\Documents\Developer\RubyRoot\redmine\ service.rb"
- should there be a space at …..redmine\ service.rb
- these instructions will only set Redmine as a service not all the rails
- The script of stack overflow don’t forget to change the CONFIG statement, see thread
- Irb / IRb= iteractive ruby winapi - Ruby: gem win32-service: Create a service with Admin privileges - Stack Overflow
- notes for the win32-service.gem is in its gem folder under docs which ill give the syntax for using the gem
- most commands seem to want to run from the project directory - check steps and add reminders where needed.
- i think where you run the 'rails server' command denotes the root folder of the ruby server
- unless specified the current directory will be 'c:\windows\system32\'
- Ruby.exe is the base binary and rubyw.exe is a version that does not present a console which is better because it can run silently.
- task kill method works if you do not stop the service to early and i need to add the addition of server.pid delete statement
- unless you change it the default directoy is c:\windows\system32, you can change it on the service command line prompt with the -C option or in the script with the :chdir or Dir.chdir
- remember running scripts and things from the command prompt will give you more information
When happens when you run the Redmine service
When you start the service it can take up to 60 seconds to properly start and if you look in task manager it is normal to see to instances of ruby either ruby.exe or rubyw.exe
This is what happens:
- when you start the windows service this spawns 1 instance of rubyw.exe in windows
- the windows service loads the ruby script service.rb and executes it, this the causes antoher instance of rubyw.exe to appear in the windows service list
- the webrick server starts creates and populate the /tmp/pid/server.pid with its process id
- redmine starts it then replaces the number in server.pid with its own number
- servider.pid is created with redmines PID inside (server.pid is the default)
- you can see the rubyw.exe is running at about 5% CPU
- when the rubyw.exe (with no usage on redmine) drops to 0% the server is running and it is safe to stop the redmine server if required
Errors
When trying to configure redmine to run as a service you might come across some of the issues I am going to outline below but the good thing is I am going to tell you why they occur which will make fixing them stress free.
Error 1053
Windows could not start the redmine service on Local Computer.

Error 1053: The service did not respond to the start or control request in a timely fashion.
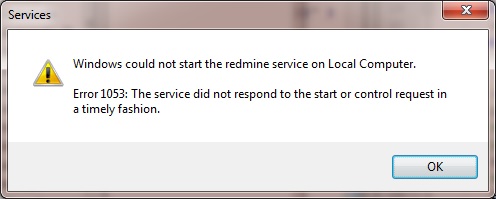
- This occurs when there are issues in the script or in particular the binary path definition in the windows service (ie the one you create with the 'sc create' command)
- When you start the service and it immediately fails it is most likely the binary path statement.
- If it fails a little way in it is most likely the spawn.process file path is wrong.
- not pointing to the ruby/rubyw binary correctly (ie full location)
- not pointing to the script correctely (ie full location)
- not changing to the script directory (ie -C or :chdir)
- faulty script, ie written wrong
- a previously run script has left a server.pid file in the /tmp/pid/ folder which prevents the daemon spawning
- possibly incompatible builds of win32-services gem
Error 1067
Windows could not stop the redmine service on Local Computer.

Error 1067: The process terminated unexpectedly.
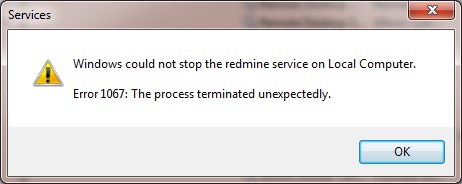
- This can be caused by trying to close the service too quickly after starting it.
- If you get this message after the service has started correctely and been running for a while and then you stop it the error occurs this is most likely to be you exit code is in correct, perhaps not terminating the correct pid.
Links
Normal Script
- how to configure a rails app (redmine) to run as a service on windows? - Stack Overflow - this is the DemoDaemon script and the basis of my script (and the task kill script from redmine.org)
- Create a Windows Service with Ruby - Part 1 - this is a very clear article on how to install a ruby app as a service (written 23/07/13). You can download his code from github. Even thought it is for a ruby app it is the same code for redmine (almost). This code has a main script code and some smaller ones for registering and unregistering the service. The service is configured to run under the 'network' user for running without a logged in user.
It mentions the use of:- run as 'network' user - to allow the service to run without a user being logged in
- chomp - The chomp method simply removes any leading or trailing whitespace
- 'echo %cd%' - displays the current directory
- -C - This option specifies that Ruby should set the working directory of the script to the directory where the script is located.
- win32 daemon error - Service_Main thread exited abnormally · Issue #4 · djberg96/win32-service · GitHub - this is the 1 file version of the DemoDaemon script
- Sinatra deployed as a windows service [updated] | tech.maynurd.com - a bit old and for something called Sinatra but gives some useful context
- Running a Ruby Program as a Windows Service? - Stack Overflow - this uses code from 'Create a Windows Service with Ruby - Part 1'
- winapi - Ruby: gem win32-service: Create a service with Admin privileges - Stack Overflow
- Win32::Daemon#mainloop method - win32-service (0.8.6) ruby gem documentation - Omniref - this shows you information about win32-service.gem
- winapi - Daemon creation not working using Win32Utils ruby gem - Stack Overflow - usesful insight into error 1053
- Rails Deployment Environment on Windows - Stack Overflow - also covers setting up running rails app/redmine through apache
- ubuntu - How to stop a Daemon Server in Rails? - Stack Overflow
- Stop and Restart Easily a Rails Server - Waiting for dev...
- Ruby on Windows: FAQ: "script.rb" versus "script.rbw" - whatr is the difference between ".rb" and ".rbw" files, (ruby.exe vs rubyw.exe)
- Kill process by name using Ruby on Windows | Nat On Testing - taskkill
- ruby - require 'rubygems' - Stack Overflow - why we need or dont need it
- how to configure a rails app (redmine) to run as a service on windows? - Stack Overflow - mentions DemoDaemon script
- File: README - Documentation for win32-service (0.8.6) - docs for the win32-service
- win32-service | RubyGems.org | your community gem host - the official gem page for win32-service
- Ruby's File.open gives "No such file or directory - text.txt (Errno::ENOENT)" error - Stack Overflow - useful insight into the error and how to output the current directory in ruby
Using Windows Resource Kit
- how to configure a rails app (redmine) to run as a service on windows? | Zachman Answers
- Running Redmine as a Windows Service | Learn First
- Running Any Executable As A Windows Service (Ruby / Sinatra) - Everything is a Ghetto
Mongrel
- Muhammad Naeem: How To Install Redmine on Windows with Apache - this article covers installing redmine from scratch on windows using the mogrel service
- How to install Ruby on Rails alongside WampServer? - Stack Overflow - also covers setting up redmine through apache
- Step-by-step quick installation of Redmine + SVN on Windows | Rahul Vaidya's Blog
Misc Relevant
- Method: File.expand_path - Documentation for core (1.9.2)Method: File.expand_path - Documentation for core (1.9.2)
- Files & Directories (Read Ruby 1.9)
- The Rails Command Line — Ruby on Rails Guides
- How to start rails server? - Stack Overflow
- Run console command in ruby, get PID of child process and kill it in some seconds - Stack Overflow
- Module: Process (Ruby 1.9.3) - covers process.spawn and process.wait commands
- ruby on rails 3 - ROR + A server is already running. Check .../tmp/pids/server.pid. Exiting - Stack Overflow - has examples of how to set a different server.pid file and set a different port
- How to run any Ruby Script as a Windows 7/2008/Vista/2003/XP Service Daemon | AlwaysUp | Start Ruby at boot/on schedule - this is a 3rd party Service software to allow the running of any Ruby Script
- File.expand_path() - the ctl file sends error messages to windows, the daemon file sends error message to the log file
The Scripts
Simple Script
The simple script is the absolute basic version of the script but does work as expected.
These are my notes on using the script found on redmine.org, HowTo run Redmine as a Windows service (win32-service + taskill approach) - Redmine. This script has issues with it so i have listed them below and then you will find my corrected version which does work.
- This script will only run once and then you will get an error (1053) everytime you try an run it afterwards - This is because when thescript finishes it does not delete {redmine_dir}/tmp/pids/servere.pid which prevents it from running when ruby does a check for running processes. To fix this i added a line of code at the end to remove the server.
- when running after correctely setting the details in the script i was still getting a 1053 error. - This is caused because the file location for the spawn.process event needs to be a full address
- it will give a 1063 error when exiting - This can be caused by the exit! command, so i commented it out
Instructions
- Install the win32-service Gem. This is done by opening a command prompt (possibly with admin privileges and the internet) and typing: ruby gem install win32-service
- create a file called redmine-service.rb putting in the script code below.
- Place this script the root folder of your redmine installation D:\Documents\Developer\RubyRoot\redmine\
- In the script update REDMINE_DIR path to fit your Redmine installation
- open up a command prompt with administrator priviledges and run the following command that will create the Windows Service. Edit the command where needed, D:\Documents\Developer\RubyRoot\redmine\ is the path of the directory where the service.rb file is located and D:\Documents\Developer\RailsInstaller\Ruby2.1.0\bin\rubyw your Ruby binary.
sc create redmine binPath= "D:\Documents\Developer\RailsInstaller\Ruby2.1.0\bin\rubyw -C D:\Documents\Developer\RubyRoot\redmine\ redmine-service.rb"
When you fill in the command make sure you leave the space inbetween ...\redmine\ redmine-service.rb , the reason for this is that ...\redmine\ beongs with the -C switch which is telling the code to change to the redmine directory before running the script. you can actually add a full path to redmine-service.rb if you wanted to make it easier to read.
- You can now start and stop the Redmine Service through services.msc or these should work sc start redmine and sc stop redmine
- If you want to delete the service you can use sc delete redmine
The Script
REDMINE_DIR = 'D:\Documents\Developer\RubyRoot\redmine'
LOG_FILE = "#{REDMINE_DIR}\\log\\redmine-service.log"

begin
  require 'win32/daemon'
  include Win32

  class RedmineService < Daemon

    def service_init
      File.open(LOG_FILE, 'a'){ |f| f.puts "Initializing service #{Time.now}" }
	  @server_pid = Process.spawn 'D:\Documents\Developer\RailsInstaller\Ruby2.1.0\bin\rubyw script/rails s -e production', :chdir => REDMINE_DIR, :err => [LOG_FILE, 'a']
    end

    def service_main
      File.open(LOG_FILE, 'a'){ |f| f.puts "Service is running #{Time.now} with pid #{@server_pid}" }
      while running?
        sleep 10
      end
    end

    def service_stop

		File.open(LOG_FILE, 'a'){ |f| f.puts "Stopping server thread #{Time.now} with pid #{@server_pid}" }
		system "taskkill /PID #{@server_pid} /T /F"
		Process.waitall
		File.open(LOG_FILE, 'a'){ |f| f.puts "Service stopped #{Time.now}" }
		pid_file = 'tmp/pids/server.pid'
		File.file?(pid_file) && File.delete(pid_file)
		#exit! # can cause a bad exit
    end

  end

  RedmineService.mainloop

rescue Exception => e
  File.open(LOG_FILE,'a+'){ |f| f.puts " ***Daemon failure #{Time.now} exception=#{e.inspect}\n#{e.backtrace.join($/)}" }
  raise
end
My Complex Script
This is my script that i have made from several scripts. This is a modern daemon code with logging and a controller file to make install/running/deleting the script as a service. The script will also populate most of the variables if your Ruby path is set and you run the redmine_service_ctl.rb from the root of your redmine installation.
My script might not handle paths with spaces in them correctely. This should be easily fixed by using quotes (") where needed. I might update the scripts if there is any interest.
Instructions
The script configures itself automatically.
- Install the win32-service Gem. This is done by opening a command prompt (possibly with admin privileges and the internet) and typing: ruby gem install win32-service
- redmine_service_ctl.rb file
- create a file called redmine_service_ctl.rb putting the in the Controller Script code below.
- Place this script the root folder of your redmine installation (eg: D:\Documents\Developer\RubyRoot\redmine\)
- Edit the file as required
- redmine_service.rb file
- create a file called redmine_service.rb putting the in the Daemon / Service Script code below.
- Place this script the root folder of your redmine installation (eg D:\Documents\Developer\RubyRoot\redmine\)
- Edit the file as required
- Install the service - Open up a command prompt with administrator priviledges and run the following command that will create the windows service.
ruby redmine_service_ctl.rb install
If the installation does not work as expected you might need to
- check your ruby path exists
- that you have run this script from your redmine root folder
- the script might automatically run only if your configured MySQL service is already running but this will not affect installtion of the service.
- Edit the Scripts to insert manuall variables instead of relying on the auto variable code.
Controller Script
This script should be called redmine_service_ctl.rb and this is the service management script, it is used to install/stop/start/delete the service from the command line.
############################################################################
#
# redmine_service_ctl.rb
#
# This is a command line script for installing and/or running a small
# Ruby program as a service, in this case it is Redmine.
#
# The service will run Redmine and will record certain events to a log file.
# If enabled, the service can also write a small bit of text
# to the log file every 20 seconds to show it is running.
# Some text will bve written to the log file during the initialization (service_init) step.
#
# It should take about 10 seconds to start, which is intentional - it's a test
# of the service_init hook, so don't be surprised if you see "one moment,
# start pending" about 10 times on the command line.
#
# The Log File is {redmine_dir}/log/test.log.  Feel free to delete it when finished.
#
# To run the service, you must install it first.
#
# Usage: ruby redmine_service_ctl.rb <option>
#
# Note that you *must* pass this program an option
#
# Options:
#    install    - Installs the service.  The service name is "RedmineService"
#                 and the display name is "Redmine Windows Service".
#    start      - Starts the service.  Make sure you stop it at some point or
#                 you will eventually fill up your filesystem!.
#    stop       - Stops the service.
#    pause      - Pauses the service.
#    resume     - Resumes the service.
#    uninstall  - Uninstalls the service.
#    delete     - Same as uninstall.
#
# You can also used the Windows Services GUI to start and stop the service.
#
# To get to the Windows Services GUI just follow:
#    Start -> Control Panel -> Administrative Tools -> Services
#
# by shoulders @ QuantumWarp.com
# used code from
# http://stackoverflow.com/questions/877943/how-to-configure-a-rails-app-redmine-to-run-as-a-service-on-windows
#
############################################################################

#---------------------------------------------------------------------------
# Includes
#---------------------------------------------------------------------------

	# require 'rubygems' # only for < ruby 1.9
	require 'win32/service'
	require 'rbconfig'
	include Win32
	include RbConfig

	# Make sure you're using the version you think you're using.
	puts 'VERSION: ' + Service::VERSION

	SERVICE_NAME 			= 'RedmineService'
	SERVICE_DISPLAY_NAME 	= 'Redmine Windows Service'
	SERVICE_DESCRIPTION		= 'This is my Windows Redmine Service'

#---------------------------------------------------------------------------
# Automatically Create Windows Service Binary Path
#---------------------------------------------------------------------------

	RUBY_BINARY = File.join(CONFIG['bindir'], 'rubyw').tr('/', '\\')
	PATH = ' -C ' + File.dirname(File.expand_path($0)).tr('/', '\\') + '\\ ' + 'redmine_service.rb'
	CMD = RUBY_BINARY + PATH
	# MANUAL OVERIDE
	# This builds the windows binaryPath ="" in the format:
	# CMD = 'D:\Documents\Developer\RailsInstaller\Ruby2.1.0\bin\rubyw -C D:\Documents\Developer\RubyRoot\redmine\ redmine_service.rb'
	# CMD = 'D:\Documents\Developer\RailsInstaller\Ruby2.1.0\bin\rubyw -C D:\Documents\Developer\RubyRoot\redmine\ D:\Documents\Developer\RubyRoot\redmine\redmine_service.rb'

	# if you want to uses spaces in your path you need to enclose in each path in quotes  ("")
	# possibly
	# CMD = '"D:\Documents\Developer\RailsInstaller\Ruby2.1.0\bin\rubyw" -C "D:\Documents\Developer\RubyRoot\redmine\ " "redmine_service.rb"'
	# CMD = '"D:\Documents\Developer\RailsInstaller\Ruby2.1.0\bin\rubyw" -C "D:\Documents\Developer\RubyRoot\redmine\" "D:\Documents\Developer\RubyRoot\redmine\redmine_service.rb"'

#---------------------------------------------------------------------------
# Perform Service Action Based on Argument supplied
#---------------------------------------------------------------------------

# You must provide at least one argument.
raise ArgumentError, 'No argument provided' unless ARGV[0]

# These are the actions performed for the various windows service tasks/functions
case ARGV[0].downcase

  when 'install'
	 Service.new(
		# These are the service configuration settings that are written to the registry
		# will run automatically without a user being logged in
		:service_name     => SERVICE_NAME,
		:display_name     => SERVICE_DISPLAY_NAME,
		:description      => SERVICE_DESCRIPTION,
		:start_type       => Service::AUTO_START,
		:service_type     => Service::WIN32_OWN_PROCESS,
		:load_order_group => 'Network',
		:dependencies     => nil,
		#:dependencies     => ['Developer-Apache2.4','Developer-MySQL'],
		#:error_control    => Service::ERROR_NORMAL,
		#:service_start_name => 'SomeDomain\\User',
		#:password         => 'XXXXXXX',
		:binary_path_name => CMD,
	 )
	 puts CMD
	 puts 'Service ' + SERVICE_NAME + ' installed'

  # One of following code sections, which all match to their corresponding 'Windows Service Function' is
  # triggered depending on what argument is supplied in the oommand line.

  when 'start'
	 if Service.status(SERVICE_NAME).current_state != 'running'
		Service.start(SERVICE_NAME, nil, 'hello', 'world')
		while Service.status(SERVICE_NAME).current_state != 'running'
		   puts 'One moment...' + Service.status(SERVICE_NAME).current_state
		   sleep 1
		end
		puts 'Service ' + SERVICE_NAME + ' started'
	 else
		puts 'Already running'
	 end


  when 'stop'
	 if Service.status(SERVICE_NAME).current_state != 'stopped'
		Service.stop(SERVICE_NAME)
		while Service.status(SERVICE_NAME).current_state != 'stopped'
		   puts 'One moment...' + Service.status(SERVICE_NAME).current_state
		   sleep 1
		end
		puts 'Service ' + SERVICE_NAME + ' stopped'
	 else
		puts 'Already stopped'
	 end


  when 'uninstall', 'delete'
	 if Service.status(SERVICE_NAME).current_state != 'stopped'
		Service.stop(SERVICE_NAME)
	 end
	 while Service.status(SERVICE_NAME).current_state != 'stopped'
		puts 'One moment...' + Service.status(SERVICE_NAME).current_state
		sleep 1
	 end
	 Service.delete(SERVICE_NAME)
	 puts 'Service ' + SERVICE_NAME + ' deleted'


  when 'pause'
	 if Service.status(SERVICE_NAME).current_state != 'paused'
		Service.pause(SERVICE_NAME)
		while Service.status(SERVICE_NAME).current_state != 'paused'
		   puts 'One moment...' + Service.status(SERVICE_NAME).current_state
		   sleep 1
		end
		puts 'Service ' + SERVICE_NAME + ' paused'
	 else
		puts 'Already paused'
	 end


  when 'resume'
	 if Service.status(SERVICE_NAME).current_state != 'running'
		Service.resume(SERVICE_NAME)
		while Service.status(SERVICE_NAME).current_state != 'running'
		   puts 'One moment...' + Service.status(SERVICE_NAME).current_state
		   sleep 1
		end
		puts 'Service ' + SERVICE_NAME + ' resumed'
	 else
		puts 'Already running'
	 end


  else
	 raise ArgumentError, 'unknown option: ' + ARGV[0]
end
Daemon / Service Script (the actual service)
This should be called redmine_service.rb
############################################################################
#
# redmine_service.rb
#
# This script should automatically configure itself.
#
# The only thing you might need to alter are the RUBY_BINARY_ARGUMENTS.
# -e is the enviroment and the options are development/production
# -p is the port number to run Redmine on
#
# by shoulders @ QuantumWarp.com
# used code from
# http://stackoverflow.com/questions/877943/how-to-configure-a-rails-app-redmine-to-run-as-a-service-on-windows
#
############################################################################

#---------------------------------------------------------------------------
# Includes
#---------------------------------------------------------------------------

	include RbConfig

#---------------------------------------------------------------------------
# Automatically Create File Paths
#---------------------------------------------------------------------------

	RUBY_BINARY = File.join(CONFIG['bindir'], 'rubyw').tr('/', '\\')
	#RUBY_BINARY = 'D:\Documents\Developer\RailsInstaller\Ruby2.1.0\bin\rubyw'

	# Redmine 2.x
	#RUBY_BINARY_ARGUMENTS = ' ' + 'script/rails s -e production -p 3000'
	#RUBY_BINARY_ARGUMENTS = ' script/rails s -e production -p 3000'

	# Redmine 3.x
	RUBY_BINARY_ARGUMENTS = ' ' + 'bin/rails s -e production -p 3000'
	#RUBY_BINARY_ARGUMENTS = ' bin/rails s -e production -p 3000'

	REDMINE_DIR = File.dirname(File.expand_path($0)).tr('/', '\\')
	#REDMINE_DIR = 'D:\Documents\Developer\RubyRoot\redmine'

	LOG_FILE = "#{REDMINE_DIR}\\log\\redmine-service.log"
	#LOG_FILE = 'D:\Documents\Developer\RubyRoot\redmine\log\redmine-service.log'

#---------------------------------------------------------------------------
# The Actual Service
#---------------------------------------------------------------------------

begin

    require 'win32/daemon'
    include Win32

    class RedmineDaemon < Daemon
        # This method fires off before the +service_main+ mainloop is entered.
        # Any pre-setup code you need to run before your service's mainloop
        # starts should be put here. Otherwise the service might fail with a
        # timeout error when you try to start it.
        #
        def service_init

			File.open(LOG_FILE, 'a'){ |f| f.puts "Initializing service #{Time.now.to_s}" }

			@server_pid = Process.spawn RUBY_BINARY + RUBY_BINARY_ARGUMENTS, :chdir => REDMINE_DIR, :err => [LOG_FILE, 'a']

			# MANUAL COMMANDS
			# Redmine 2.x
			#@server_pid = Process.spawn 'D:\Documents\Developer\RailsInstaller\Ruby2.1.0\bin\rubyw script/rails s -e production -p 3000', :chdir => REDMINE_DIR, :err => [LOG_FILE, 'a']
			# Redmine 3.0
			#@server_pid = Process.spawn 'D:\Documents\Developer\RailsInstaller\Ruby2.1.0\bin\rubyw bin/rails s -e production -p 3000', :chdir => REDMINE_DIR, :err => [LOG_FILE, 'a']

        end

        # This is the daemon's mainloop. In other words, whatever runs here
        # is the code that runs while your service is running. Note that the
        # loop is not implicit.
        #
        # You must setup a loop as I've done here with the 'while running?'
        # code, or setup your own loop. Otherwise your service will exit and
        # won't be especially useful.
        #
        # In this particular case, I've setup a loop to append a short message
        # and timestamp to the log file every 20 seconds. Remove the logging
        # when you are using this as a real service otherwise you logfile will
        # become large quickly.
		#
		# not sure what the (*args) means
        def service_main(*args)

			File.open(LOG_FILE, 'a'){ |f| f.puts "Service is running #{Time.now} with pid #{@server_pid}" }
			msg = 'application started at: ' + Time.now.to_s

			File.open(LOG_FILE, 'a'){ |f|
				f.puts msg
				f.puts "Args: " + args.join(',')
			}

            # While the daemon is running
            while running?
                if state == RUNNING
                    sleep 20

					# write constantly to log file while running for diagnostics only
                    #msg = 'Service is running as of: ' + Time.now.to_s
                    #File.open(LOG_FILE, 'a'){ |f| f.puts msg }

                else # PAUSED or IDLE
                    sleep 0.5
                end
            end

            # We've left the loop, the daemon is about to exit.

            File.open(LOG_FILE, 'a'){ |f| f.puts "STATE: #{state}" }
            msg = 'service_main left at: ' + Time.now.to_s
            File.open(LOG_FILE, 'a'){ |f| f.puts msg }

        end

        # This event triggers when the service receives a signal to stop. I've
        # added an explicit "exit!" here to ensure that the Ruby interpreter exits
        # properly. I use 'exit!' instead of 'exit' because otherwise Ruby will
        # raise a SystemExitError, which I don't want.
        #
        def service_stop

			msg = 'Received stop signal at: ' + Time.now.to_s
			File.open(LOG_FILE, 'a'){ |f| f.puts msg }

			pid_file = 'tmp/pids/server.pid'

			File.open(LOG_FILE, 'a'){ |f| f.puts "Stopping server thread #{Time.now.to_s} with pid #{@server_pid}" }
			system "taskkill /PID #{@server_pid} /T /F"
			Process.waitall

			File.open(LOG_FILE, 'a'){ |f| f.puts "Service stopped #{Time.now.to_s}" }
			File.file?(pid_file) && File.delete(pid_file)
			# exit! - what is this exit for? there was a reason, this seems to cause a bad exit with redmine but might be needed for other scripts
		end

        # This event triggers when the service receives a signal to pause.
        #
        def service_pause
            msg = 'Received pause signal at: ' + Time.now.to_s
            File.open(LOG_FILE, 'a'){ |f| f.puts msg }
        end

        # This event triggers when the service receives a signal to resume
        # from a paused state.
        #
        def service_resume
            msg = 'Received resume signal at: ' + Time.now.to_s
            File.open(LOG_FILE, 'a'){ |f| f.puts msg }
        end
    end

    # Create an instance of the Daemon and put it into a loop. I borrowed the
    # method name 'mainloop' from Tk, btw.
    #
    RedmineDaemon.mainloop

#---------------------------------------------------------------------------
# Service Failure Logging
#---------------------------------------------------------------------------

rescue Exception => err
  File.open(LOG_FILE, 'a'){ |fh| fh.puts 'Daemon failure: ' + err + '\n'} # this one line  is from the 1 page script based on demo
  File.open(LOG_FILE,'a+'){ |f| f.puts " ***Daemon failure #{Time.now.to_s} exception=#{err.inspect}\n#{err.backtrace.join($/)}" }
  raise
end
Notes
- the ctl file, once run has nothing to do with the daemon. It is just a configurator., the daemon is how indows interacts with ruby
- this script is written for Redmine 2.x but needs to be slightly amended to run Redmine 3.x . If you dont make the following change, the redmine service will fail to run and you will get the following error in the redmine-service.log file.
script/rails no longer exists, please use bin/rails instead.
To fix this you basically need to make the change as told in this error. You will see in the redmine-service.rb i have added Redmine 3.x versions, the lines you need to change from Redmine 2.x to 3.x are line 30 - line 36, the rest should be obvious.
Making Xampp a Dependency for the Redmine Service
If you are using xampp as the donour for the MySQL service you must make sure that this is running when the Redmine service is started otherwise it will fail and not start. To fix this you can make the xampp MySQL (and Apache if required) service as a dependency which means that when you start your redmine service it will start these dependant services first to make sur ethey are running.
Currently the scripts above are not enabled to call Xampp Apache and MySQL services as dependants, the code is there though. There are a couple of steps required to get this working if you want, otherwise you must manually start at least the MySQL service or already have it runnign before you start the redmine service
This feature requires 2 things to be done
- Change Xampp Apache and MySQL Service names (Optional)
- Edit the Redmine Service Script (we will be using 'My Complex Script')
NB:
- When the redmine service starts either the Xampp Apache or MySQL then you cannot stop and start these services through the xampp control panel, it just doesnt work and perhaps will get fixed in later versions. These reason is that windows knows that redmine started these services and it should be the redmine service that should stop them which it does when you stop and start it.
- If you go into windows and stop and start the Apache or MySQL service via services.msc windows is intelligent and knows the redmine service started these services so propmpt you that it will also stop the redmine service if you continue which it will close correctely.
- If the Apache and MySQL services are already started when you start the redmine service, they will not be classed as dependendant services and can be stoppped and started throught the xampp control panel
- I find it useful just to run only the MySQL service as a dependant when playing with the httpd.conf file so i can easily stop and start the apache server in xampp.
- Redmine only require the requires the MySQL service to be running.
Change Xampp Service Names
If you want to run more than 1 Xampp installation, or even if you dont, i recommend that you should change the default service name for the Xampp Apache and MySQL services on you Developer Xampp instance. The reason for this is that if like me you use Xampp for developing websites on your Windows PC, the Xampp installationscheck by service name, to see if the Apache and MySQL services are running. This means that if you setup your Developer site with the default service names, when you then open up another instance of Xampp it will think that it is running as a service even if you have not installed that instance as a service.
So by giving different names to these services we will be using for the redmine development xampp it can function independantly to any other xampp instances. This how most people would expect this to work. I also want this seperate installation of xampp because when i am poking around with code or messing databases for my regular web development i do not risk my development enviroment.
Changing the service names is optionals for those budding coders but i definately still recommend it for the reasons outlined above)
Instructions
To change the service names of Apache and MySQL is very easy and requires you to use the xampp control panel.
Apache Service
- Open Xampp control panel as an administrator
- Make sure the service is not running
- If the service has already been installed, uninstall the service
- click config (top right)
- click 'Service and Port Settings'
- click 'Apache' Tab
- change the service name
Apache2.4 ----> Developer-Apache2.4 - Install the service
- Done
MySQL Service
- Open Xampp control panel as an administrator
- Make sure the service is not running
- If the service has already been installed, uninstall the service
- Click config (top right)
- Click 'Service and Port Settings'
- Click 'MySQL' tab
- Change the service name
mysql ----> Developer-MySQL - Install the service
- Done
Edit the Redmine Service Script
This stage is also an easy one and involves editing the redmine_service_ctl.rb from 'My Complex Script' .
- Open up a command prompt as an administrator
- Navigate to you redmine root directory (should be D:\Documents\developer\RubyRoot\redmine )
- If you have installed 'My Complex Script' you need to uninstalled it, run the following command
ruby redmine_service_ctl.rb uninstall - If you have not installed 'My Complex Script' you need to create the 2 files redmine_service_ctl.rb and redmine_service.rb in your redmine root folder using the appropriate code from above
- Open the file redmine_service_ctl.rb in a text editor
- Look at line 88 - 89 and edit the file as follows:
:dependencies     => nil,
#:dependencies     => ['Developer-Apache2.4','Developer-MySQL'],
You can see that there is a declaration of no dependencies. The line below it defines some depnedecies but is remmed out. Change the lines around so the service has dependencies. The new code should look like the code below, basically you have just changed the poistion of the Hash '#'
#:dependencies     => nil,
:dependencies     => ['Developer-Apache2.4','Developer-MySQL'],
As you can see the service names match those i set earler but can be anything as long as they match the appropriate service.
- Save the file
- Install the redmine service via the command line now that it has dependencies configured. You should still have the command line open in your redmine root directory and running as an administrator
ruby redmine_service_ctl.rb install - Done
Now start the redmine service and you will find it will start the Xampp apache and MySQL Services automatically.
Redmine as a Windows Service Final Thoughts
This is a robust way of having redmine running on your Windows PC and once configured you can practically forget about it and just use Redmine for what you wanted to use it for in the first place, software development. There are no more settings to do, you are ready to rock and roll.
Install Redmine on Windows
There are 2 different methods to install Redmine on windows and each has their benefits
| Bitnami Redmine Stack | Seperate Services: Redmine, Edge Subversion and Xampp | |
|---|---|---|
| Comparison of Redmine Installation Methods | ||
| Pros |
|
|
| Cons |
|
|
Bitnami Redmine Stack
This by far the easiet method of installing Redmine with subversion integration. You literally only need to click install, select your install location (i would recommend without spaces to be on the safe side), run the installer and then make sure you are happy with the port numbers. Done.
Upgrading the Binami Stack is possible and there are instructions but do require a little bit of planning and as always make sure you have a backup first.
Bitnami also does a Virtual Machine already configured using Linux that will work on all flavours of VMWare and Virtualbox. The homepage is here
Installation Guide For installing Redmine on Windows with Xampp
I searched the internet and did not find that many instructions on how to install Redmine on windows which i found strange. Most of the instructions were complicated and assumed you already had knowledge on how to install Redmine. eventually i cam across the instructions from NBL Creations, but alas, they did not work either. These instructions were set set out in a very straight forward mannor and were writtin in 2010, so i assumed they were correct then but things have changed since then. I proceeded to go through the instructions from NLB and as i cam across issues i found a solutions. This is basically (for now) how my instructions have beend laid out. Where there are issues with the step i have made clear notes on what to do. This is a very easy installation and gives you the benefits of a Xammp installtion with such things as PhpMyadmin.
This is my prefered method of installing Redmine because i can use the installed Ruby services for other development, i get the added benefits of the CollabNet Subversion Edge Server featuers including ViewVC which is an excellent difference viewer. The server identifications are easily changed in the webbased admin which is great when you are playing with the settings to see what you want. It does have its downside that it requires a lot more configuration. It is not all bad becaus ei will also use the xampp server for developing my apps that require a webserver to run.
I would recommend that you read the instructions through once before starting as this process can be quite lenghty.
Software Versions Used
- Rails Installer 3.1.0 (it is 32bit) (ruby version 2.1.5)
- ImageMagick-6.7.9-9-Q16-windows-dll.exe (this is 32bit)
- Redmine 2.6.1
- mysql-connector-c-noinstall-6.0.2-win32
My Folder Locations I have used (might not be the same in the original instructions)
- Xampp - D:\Documents\Developer\xampp
- Railsinstaller - D:\Documents\Developer\Railsinstaller
- Redmine - D:\Documents\Developer\RubyRoot\redmine
- Mysql connector - D:\Documents\Developer\Railsinstaller\MySQL
- Image Magick - D:\Documents\Developer\ImageMagick
Instructions Begin Here
Instructions based on this article - Installing Ruby on Rails and Redmine with XAMPP on Windows 7 - NLB Creations NLB Creations
This takes 2:00hrs to install
- These instructions assume that you are running an Xampp webserver on you computer.
- The mysql service needs to be running for Redmine to come up and work
- do not use spaces in your path to redmine and xampp. There might be ways around this but is not covered here.
I like Xampp. It sets up a full Apache/MySQL/PHP development environment with very little hassle, which means it’s installed on just about every computer I use on a regular basis. I recently had a need to look into Ruby on Rails (specifically so that I could use the Redmine project management web app) and figured it would be easy to integrate it into my existing dev environment.
It kind of… wasn’t.
This is how I finally managed (after two days of ripping my hair out) to do it.
1) Download and install XAMPP.
2) Download RailsInstaller for Windows.
3) Install RailsInstaller to the D:\Documents\Developer\RailsInstaller directory.
- check ‘Install Git (recommended)
- check “Add executables for Ruby, DevKit and Git (if checked above) to the PATH”
– Check “Configure git and ssh when installation has completed” at the end of the install.
– Enter the requested info in the Rails Environment Configuration screen.
- the git thing ask you for your name and email for something to do with GIT / GIT hub. i dont know why you need these, but creates a file in C:\Users\{username}\.gitconfig with these details
- this seems part of the Ruby setup
- if you already have Git information set in the file above, the setup will use that
- restart PC after installing Rails installer (might not be needed)
4) Create a new Ruby on Rails project:
a) Open a cmd window
b) Type: rails new D:/Documents/Developer/RubyRoot/redmine/
- this copies the rails scaffolding/template files into the specified directory.
- Installation might fail because of SSL issues and that files are downloaded on request by this software. There is an updated SSL certificate that was not put in some versions of Ruby. The solution is to manually download the new SSL cert and place in the correct folder before running this command.
ruby on rails - Can't access RubyGems - possibly due to SSL? - Stack Overflow
Download: AddTrustExternalCARoot-2048.pem
put it in the folder - D:\Documents\Developer\RailsInstaller\Ruby2.1.0\lib\ruby\2.1.0\rubygems\ssl_certs
- you might be prompted with
<config/secrets.yml? (enter "h" for help) [Ynaqdh] - i entered 'Y'
5) Add the following to the end of the D:\Documents\Developer\xampp\config\httpd.conf file:
- i could not get this to forward redmine to xampp/apache
# Listen 3000
# LoadModule rewrite_module modules/mod_rewrite.so
#################################
# RUBY SETUP
#################################
<VirtualHost *:3000>
ServerName rails
DocumentRoot "D:/Documents/Developer/RubyRoot/redmine/public/"
<Directory "D:/Documents/Developer/RubyRoot/redmine/">
Options ExecCGI FollowSymLinks
AllowOverride all
Allow from all
Order allow,deny
AddHandler cgi-script .cgi
AddHandler fastcgi-script .fcgi
</Directory>
</VirtualHost>
#################################
# RUBY SETUP
#################################
Side Note: Make sure you try to start/restart Apache from the Xampp control panel after you save the httpd.conf file. If Apache won’t run, try removing the “Listen 3000″ line.
- Just comment out (as in my version) Listen 3000 and LoadModule rewrite_module modules/mod_rewrite.so because if you have apache running on port 3000 the ruby server cannot start and LoadModule rewrite_module modules/mod_rewrite.so is already uncommented in http.conf so is pointless. Might be worth a quick check.
- you need to add 'rails 127.0.0.1' in to your host file
- i also think that <VirtualHost *:3000> should be <VirtualHost *:80> / <VirtualHost *> / <VirtualHost *:81> or whatever your prot number is
- i can't get this to work, it does not seem to do anything except make the http://rails/ domain valid on 127.0.0.1 and this xampp install
- I don’t know if this is needed to be done for httpd-ssl.conf (if you want SSL)
6) Back in the cmd window, navigate to the directory of your project and start the Rails server with the following commands:
cd D:/Documents/Developer/RubyRoot/redmine
rails server
- can take a moment to start. The batch file will display information when started
7) In your browser, navigate to http://localhost:3000 where you should see the RoR welcome screen. Once you’ve verified RoR is working, Ctrl-C in the cmd window to shut down the server.
- rails server stops working when you disable the command prompt window
8) Download Redmine and extract the .zip file. Replace the files generated in D:\Documents\Developer\RubyRoot\redmine\ with the files from the .zip file replacing any files when prompted
9) Create your Redmine database. Start Apache and MySql from the Xampp control panel, and in your browser, go to http://localhost/phpmyadmin to access the MySQL interface.
Click the SQL tab and run the following:
create database redmine character set utf8;
create user 'redmineUser'@'localhost' identified by 'myPassword';
grant all privileges on redmine.* to 'redmineUser'@'localhost';
10) Configure Redmine in the redmine/conf/database.yml file by adding your newly created database, username, and password in the appropriate locations.
- the /conf/ folder is now /config/ to redmine/config/database.yml
it should only contain the following
production:
adapter: mysql2
database: redmine
host: localhost
username: root
password: ""
encoding: utf8
- if like me you are running MySQL on another port you also need to add another setting
Info from here - Redmine Wiki - Redmine Install
production:
adapter: mysql2
database: redmine
host: localhost
port: 3307
username: root
password: ""
encoding: utf8
11) In the cmd window, make sure you are still in your Redmine project’s directory, and run the following command:
bundle install
- my install ‘failed’ here and actually failed quite quickly
- I got the error
DL is deprecated, please use Fiddle
Fetching gem metadata from https://rubygems.org/.........
Resolving dependencies...
You have requested:
i18n ~> 0.6.11
The bundle currently has i18n locked at 0.7.0.
Try running `bundle update i18n`
- So I typed ‘bundle update i18n’
- I then got the error
DL is deprecated, please use Fiddle
Fetching gem metadata from https://rubygems.org/.........
Resolving dependencies...
Bundler could not find compatible versions for gem "actionpack":
In snapshot (Gemfile.lock):
actionpack (4.1.8)
In Gemfile:
rails (= 3.2.21) x86-mingw32 depends on
actionpack (= 3.2.21) x86-mingw32
Running `bundle update` will rebuild your snapshot from scratch, using only
the gems in your Gemfile, which may resolve the conflict.
- I then typed ‘bundle update’
12) In all likelihood, it will fail epically when it gets to the rmagick gem (if not, lucky you). Go to http://rubyforge.org/projects/rmagick/ and download the file called rmagick-win32.
a) Install the Ruby Installer DevKit: https://github.com/oneclick/rubyinstaller/wiki/Development-Kit
- the devkit is part of the Railsinstaller so does not need to be downloaded
D:\Documents\Developer\RailsInstaller\DevKit
proceed to next step (b) if DevKit is Present
the configured config.yml contains the following line only: (keep the dash)
- D:/Documents/Developer/RailsInstaller/Ruby2.1.0
- RubyGems.org Replaces RubyForge as Gem Host - tells you to download gems on RubyGems.org
- HowTo install rmagick gem on Windows - Redmine - this tells of which check boxes to tick
- Installing on Windows · rmagick/rmagick Wiki · GitHub - another rmagik install on windows article and tells the maximum version that works is 6.7.9.9
- Installing RMagick on Windows 7 | Coding with Bunnies - excellent article
- http://rubyinstaller.org/downloads/ - download the devkit here
- if the configuration file will not auto generate you can just edit it manually (see above for setting).
- the configuration file is autogenerated when the command ruby dk.rb init
- Can't get Ruby DevKit configuration file autogenerated properly - Stack Overflow
- Ruby on rails devkit windows - Stack Overflow
- Install Ruby DevKit on Windows 7
- Install Ruby and the Ruby DevKit
- the dev kit needs to match the x32 or x64 of ruby - run 'ruby - v' to see what version
- ruby.rb init - this finds ruby installs and edits the config.yml , this does not always work. if this does not work you need to manuall add the entry
note the dash, it is important, installation of the devkit means, just extract it somewhere
- D:\Documents\Developer\Ruby\DevKit
- if for some reason you need to manuall install the Devkit, when you extract the devkit to the specified folder, you must not change that folder or name. the 7zip has magic in it and hardcodes the install directory
b) Download Imagemagick (check the box to install headers in the installer) : http://www.imagemagick.org/script/binary-releases.php#windows
- make sure that the following are both checked.
“Add Application directory to your system path”
“Install development headers and libraries for C and C++”
- download only the 32-Bit version, installs with x64 will not compile, it will give errors
- the latest version of ImageMagick that will work with rails is 6.7.9.9
- I don’t know the difference netween static or dynamic
- the exact file that I used and worked is ImageMagick-6.7.9-9-Q16-windows-dll.exe
- if 6.7.9.9 will not work another recommendation is 6.7.9.9
- you can get old binaries here: ftp://ftp.sunet.se/pub/multimedia/graphics/ImageMagick/binaries/ImageMagick-6.7.9-9-Q16-windows-x64-dll.exe
c) Install ImageMagick to a location that does NOT contain any spaces in the directory names (like C:\ImageMagick)
- I did D:\Documents\Developer\ImageMagick
d) In the cmd window, run the following:
gem install rmagick --platform=ruby -- --with-opt-lib=c:/ImageMagick/lib --with-opt-include=c:/ImageMagick/include
- is this process creating a GEM (possibly this is compiling the code)
- when installing make sure the 3 following items are checked
- I did gem install rmagick --platform=ruby -- --with-opt-lib=d:/Documents/Developer/ImageMagick/lib --with-opt-include=d:/Documents/Developer/ImageMagick/include
e) Wait. This seems to take an ungodly amount of time, for some reason.
- about 10 – 15 mins on new PC
- it will finish with a “1 gem installed” message
13) Run “bundle install” again.
- my install failed here and actually failed quite quickly
- I got the error
DL is deprecated, please use Fiddle
Fetching gem metadata from https://rubygems.org/.........
Resolving dependencies...
You have requested:
i18n ~> 0.6.11
The bundle currently has i18n locked at 0.7.0.
Try running `bundle update i18n`
- So I typed ‘bundle update i18n’
- I then got the error
DL is deprecated, please use Fiddle
Fetching gem metadata from https://rubygems.org/.........
Resolving dependencies...
Bundler could not find compatible versions for gem "actionpack":
In snapshot (Gemfile.lock):
actionpack (4.1.8)
In Gemfile:
rails (= 3.2.21) x86-mingw32 depends on
actionpack (= 3.2.21) x86-mingw32
Running `bundle update` will rebuild your snapshot from scratch, using only
the gems in your Gemfile, which may resolve the conflict.
- I then typed ‘bundle update’
- I then get the error:
Gem files will remain installed in D:/Documents/Developer/RailsInstaller/Ruby2.1.0/lib/ruby/gems/2.1.0/gems/mysql2-0.3.17 for inspection.
Results logged to D:/Documents/Developer/RailsInstaller/Ruby2.1.0/lib/ruby/gems/2.1.0/extensions/x86-mingw32/2.1.0/mysql2-0.3.17/gem_make.out
An error occurred while installing mysql2 (0.3.17), and Bundler cannot continue.
Make sure that `gem install mysql2 -v '0.3.17'` succeeds before bundling.
14) Manually install the mysql2 gem. For some reason, bundle install doesn’t know how to do this right on Windows.
- Download MySQL Connector from mysql.com
- Extract the .zip file to D:\Documents\Developer\Railsinstaller\MySQL
- Run the following in the cmd window:
- this command does not work
gem install mysql2 -- '--with-mysql-lib="D:/Documents/Developer/RailsInstaller/mysql/bin" --with-mysql-include="D:/Documents/Developer/RailsInstaller/mysql/include"'
- I get the following error
Gem files will remain installed in D:/Documents/Developer/RailsInstaller/Ruby2.1.0/lib/ruby/gems/2.1.0/gems/mysql2-0.3.17 for inspection.
Results logged to D:/Documents/Developer/RailsInstaller/Ruby2.1.0/lib/ruby/gems/2.1.0/extensions/x86-mingw32/2.1.0/mysql2-0.3.17/gem_make.out
- I get this error because the command is wrong. You should use the following command and run it from the redmine project directory
gem install mysql2 --no-ri --no-rdoc -- --with-mysql-dir=D:\Documents\Developer\RailsInstaller\MySQL
watch this video(mysql connector) How to install Ruby on Rails on Windows 7 - Part 3, MySQL connector - YouTube
- use this file
mysql-connector-c-noinstall-6.0.2-win32.zip
Windows (x86, 32-bit), ZIP Archive
from - http://dev.mysql.com/downloads/connector/c/ - Copy libmysql.dll from D:\Documents\Developer\RailsInstaller\mysql\lib to D:\Documents\Developer\RailsInstaller\Ruby2.1.0\bin
15) In the cmd window, execute the following commands:
Make sure that your MySQL server is running before continuing
set RAILS_ENV=production
rake generate_secret_token
rake db:migrate
rake redmine:load_default_data
* That last line is optional. It installs the demo data
- after I run rake generate_secret_token I get an error:
Could not find gem 'selenium-webdriver (>= 0) x86-mingw32' in the gems available on this machine.
Run `bundle install` to install missing gems.
- so I ran ‘bundle install’
- then ‘bundle update i18n’
- then bundle update (perhaps I should of run this in the beginning)
- then re-run rake generate_secret_token
if you still get error messages after successfully installing the the MySQL Connector then you should make sure you have copied the libmysql.dll file to the correct directory and then reboot your computer before continuing.
- back to rake db:migrate (this correctely creates the tables)
16) Start the rails server. In the cmd window, navigate to D:\Documents\Developer\RubyRoot\redmine and execute the following:
rails server
17) In your browser, navigate to http://localhost:3000 where you should now see the Redmine homepage.
18) If you’re still sane, enjoy your new Redmine install.
** It’s also worth noting that Redmine won’t actually be RUNNING on XAMPP’s Apache server. It will be running on the Rails server. This just makes it play nice with a new or existing XAMPP install.
-
- I need to get redmine to run through apache via the virtual host as it does not work
- A section – get redmine to run as service automatically
- A section – configure redmine
- A section – integrate redmine with subversion ie create repositories and hooks etc.. (can use bitnami for help with files as it is already integrated in the package)
Post Redmine Installation
Once you have completed your Redmine installation there are a few things you might come across or need to do.
- when you run a new installation of redmine and you go to the settings you will be prompted to lod the default values, you should go ahead and do this unless you know otherwise.
- if redmine fails to run check D:\Documents\Developer\RubyRoot\redmine\log\production.log
- The MySQL service by xampp when it starts runs between 400mb and 500mb which is very high. The following links will tell you of a simple fix to drop the footprint to below 100mb.
General Installation Links
- How to install Ruby on Rails on Windows 7 – excellent tutorial, slightly different method but easy to follow – multipart - How to install Ruby on Rails on Windows 7 - Part 1, Initial setup - YouTube
- Rails on Windows, June 2014 - Part ½ - Rails on Windows, June 2014 - Part 1/2 - YouTube– another tutorial from John Macdonald
- Task and issue tracking with Redmine on a Windows server | mookid on code - a decent tutorial but uses mongrel to install redmine as a service
Gems
Gems are like plugins for ruby and like a lot of linux systems are downloaded from the internet upon demand rather than being present in your system from the start.
A useful thing is that you can get the different version/revision names from https://rubygems.org/ . If you search this site for your Gem it will give yoou all the previous revisions and actually gives you the install command for that particular version.
Example: gem install win32-service -v 0.8.5
From: https://rubygems.org/gems/win32-service
A good article on Gems, Installing and Uninstalling, RubyMine 7.0.2 Web Help
Installing and uninstalling Gems
This process is failry easy.
To install a gem
Gem uninstall <gem_name>
You can install specific version fof a gem and this can be handy whent here are incompatabilities between vearious gems and software in your install.
If you run the install command with no version number, the latest version of the gem will be installed.
To uninstall a gem
Gem uninstall <gem_name>
When you run uninstall a gem with this command, if there are multiple versions of it, the uninstaller will give you the options of which one to uninstall or all of them.
Integrate Subversion with Mantis
These are my indepth instructions on integrating Mantis with subversion. This came about because i had a website but no subversion server and the easiest way of getting one of those is to install it on my local PC. I then wanted to integrate Subversion with Mantis so when i closed a job it did it automatically. I thought ther would be an easy way of doing this, there is if both the Subversion and Mantis are installed on the same physical machine. I coveer all the integration types here and hopefully fill in a few blanks. I did find the documentation for this whole process lacking. I have scanned the web, categorised these links and figured out the integration for both remote and local integration.
There are a few ways of integrating Matis with a Subversion server and i will outline them below. My instructions will more than likely concentrate on integrating with CollabNet Subversion Edge but i will add some notes on VisualSVN aswell.
- checking.php - Mantis Native
- Source (Source Control Integration) with SourceSVN plugin
- Source with SourceWebSVN
- Custom Direct Integrations
For those who want it working and are not to bothered how, if you click this link it will take you straight to my instructions on what i did, no fluff, just 1.2.3...
General Links
- Mantis Code Deployment Process
- Creating and Configuring Your Repository Chapter 5. Repository Administration - Subversion Book - CollabNet Community
- Subversion Edge Repository Hook Scripts API | Official Wiki
- Mantis Bug TrackerSource Control Integration - Google Slides - a slide presentation by John Reese who makes the SourceSVN plugins
- cURL Homepage - download the windows binaries from here
Hook Links
- post-commit Repository Hooks - Subversion Book - CollabNet Community
- How do I implement the Post Commit Hook with Trac & SVN in a Windows Environment? - Stack Overflow
- Creating and Configuring Your Repository - Implementing Repository Hooks | SVNBook
- Configuring Subversion on Windows to Tweet on Commit - use a post-commit hook to send a tweet
- Making the Most of Commit Hooks with Subversion | Linux Magazine
- TeamForge : View Wiki Page: CommitMailerOnWin32 - An Example hook on a windows system for using the mailer
- An Introduction to Subversion Hook Scripts on Windows - WANdisco Blog - an indepth article about hooks on a windows PC. One small point that it misses about the hook files names is that they need to be renames from post-commit.tmpl to post-commit.bat / post-commit.cmd / post-commit.exe because these are executable by windows. It is the name that is the important thing for subversion not the extension. This article gives an excellent work through example on how to return error messages through TortoiseSVN via its console. This is a good place to start to see how the hooks work and what a hook written for windows should look like.
- Subversion pre-commit hook in Perl | Signature Labs - this articleuses perl and a windows subversion server
- repository - SVN hooks for Windows - Stack Overflow - a thread some qustions and answers but is useful to see some examples
- Errors in pre-commit hooks are not processes properly [Issue 713] Errors in pre-commit hooks are not processes properly - windows subversion hooks, Errors in pre-commit hooks are not processes properly
- svn - svnperms.py does not work on windows with Collabnet Subversion Edge - Stack Overflow - windows based hook thread
- Changing the svn:author in an SVN Commit Hook script | Will the last developer out please turn off the lights? - with a post-commit script code and uses a VisualSVN windows server as the repository.
Text Notes / Questions
- what are the 'Enabled Features' in sourceSVN setting?
- when you submit to a sVN their are hooks that are fired and can run code.
- in particular there is one called 'post-commit' this code can read the submission notes and act on it if it finds for instance a regexex match
- curl can then be fired to report this to a bug tracker system which in turn can then read it, and sign of the bug if needed. (CURL might not be used any more)
- hook folders are in the individual repositoriesand these do not appear until you create the repository/project in SVN admin.
- check out all regexs for the best one as there a lot of different ones
- $g_source_control_fixed_regexp = '/\b(?:fixed|fixes|resolved)\s+(?:bug|issue|error)?\s*[#](\d+)\b/i';
- ?:bug|issue|error|task)(?:feature|bug|issue)
- can use WebSVn for browsing and integration - but this software is old and might not last long
- to fully integrate mantis it needs to run on the same server/PC? - check this
- visualsvn has templates for scripts see this article
- issues numbers are not linear per project, they are linear over the whole of mantis.
- remote checkin.php might be possible by SSH
- The latest version of the hooks are always available in a freshly created repository. These files always have a complete list of what variables are available.
1 - checkin.php - Mantis Native (Local / Remote)
This is the native basic inbuilt script in Mantis for integrating a Subversion server on the same machine. However with some modification can be used for closing issues from a remote SVN Server.
How Does it work?
The script /mantis/scripts/checkin.php is native to Mantis and 'Provides source control (SCM) integration for closing bugs upon commits'.
This script is used to post infromation about a commit to a remote Subversion Repository. The basic mechanisim is outlined below and assumes the integration is configured correctely.
- a user submits a commit to a SVN Repository. With in the commit notes are key notificatsion
add comment examples here - once the files are commited, the post-commit hook/script of the SVN is triggered and posts the comment to mantis/scripts/checkin.php
NB: Hooks are specific to individual repositories and not the SVN server - the post is then processed by Mantis with regex rules that have been configured.
- if there are any matches Mantis then uses the information to perform actions such as 'close' job (possibly with commit references) as appropriate
This method requires the SVN post-commit hook to have a script on it to run when it is triggered to POST the commit notes to Mantis. Also in mantis you need to add certain settings to the config_inc.php, these settings includes the REGEX settings.
Now a legacy!!
This is now a legacy method of connection your svn server to mantis because it is:
- old and hard configure with not many options.
- It requires your Mantis install and Subversion to be on the same server.
- You must access the script by the command line (cli) because this is how it is written.
- checkin.php is getting phased out for the plugin SourceSVN which is easier tocnfigure and has more options.
- SourceSVN, the replacement, can also be used from remote servers as is. SourceSVN also utilises plugins
It should be noted that are some work arounds to allow you to use a remote subversion server with checkin.php and i will make a note of them here to complete my research so you guys dont have to go the hard way to figure all of this out.
Old Read These
- 0011732: Remove built-in source code integration support - MantisBT
- Forums - Mantis Bug Tracker • View topic - Integrating Mantis with a remote SVN host - also has some hook code in this thread
Solutions
As mention above there are a couple of ways to get checkin.php to work so i will outline these here.
- Standard Method (Local) - Installing the Subversion Server and Mantis on the same server. The following instructions are mainly for linux/unix, but the hook scripts can be easily altered to work in windows and interactions between Xampp and another apache stack is possible
- Integrating Mantis and Subversion | alt-tag - the goto article
- SVN for Dreamweaver (Windows and Mac) / Working with Mantis and SVN - Software development - GraFX Software Solutions - this is the most clear article on how to set up integration. it has used the goto article as a base and improved on it ****Good**** It used the Alt-Tag article for the base
The standard code of Mantis does not allow for web access of the checking script for one reason or another. I have come across 2 unique and clever solutions
- PHP Gateway Wrapper (Remote)
- Bug tracking and SVN hooks for Mantis - LinLog - this guy used the idea of a gateway wrapper php file. this is where you communicate with one php file which in turn then access the checkin.php via the CLI, nice!! This article is quite thorough and actually utilises a windows based subversion which communicates with his Mantis install on the internet. This method also utilises Powershell. I would use the cURL binary here instead of wget. Now read SVN for Dreamweaver (Windows and Mac) / Working with Mantis and SVN - Software development - GraFX Software Solutions for easier instructions on the standard part rather than the Alt Tag Article.
- Alter Mantis Code (Remote) - as mentioned already mantis checkin.php can only be accessed from the command line, this however is easy to overcome by rewriting the file and once you know this it is a simple procedure.
- 0008847: Revamp SVN and CVS integration - MantisBT - this gives code to replace checkin.php with their own checkincurl.php
Research Links:
Generic Subversion
- svn - Have you integrated Mantis and Subversion? - Stack Overflow - this thread tells of how subversion and mantis are on different servers and that he uses cURL to connect the 2. This method is not standard but still in the end uses the checkin.php - this is an old thread so things might of changes since then
- Forums - Mantis Bug Tracker • View topic - Integrating Mantis with a remote SVN host
- Integrating Subversion with Mantis - seems to have good instuctions but the website is not wide making it difficult to read but does have example code
- Communicating Mantis and Subversion on Windows | *Le sigh*
- Forums - Mantis Bug Tracker • View topic - Integrating Mantis and Subversion - forum thread
- A Subversion post commit hook to integrate with Mantis - a post-commit.cmd code on github for windows
- [1.1.0] remote SVN server - a forum thread on matis.org
- mantisbt-plugins/source-integration · GitHub - plugin files on GitHub
- MantisBT Recipies - Manits Wiki with some useful links
- php - Why do I get this error: post-commit hook failed (exit code 255) with no output - Stack Overflow - example code
- Integrating Subversion, Mantis and Eclipse | uk-dave.com - a quite in depth tutorial
- svn server post-commit script in php. insert info into mantis system. - a clear example
- integrate mantis with SVN using subversion post commit hook | Knaddison.com - short example in BASH i think
VisualSVN / Windows
- VisualSVN (Subversion) and Mantis Integration | GuruCE
- SVN and Mantis Bug Tracker integration | MPfm Blog - Ramblings from a mad developer - .net script
- svn - VisualSVN Server doesn't trigger post-commit hook - Server Fault - has example code
- Hooks for windows pre-commit and post-commit - a forum thread with some examples
- Why do I get the error: post-commit hook failed (exit code 255) with no output. - an example
2 - Source Control Integration Plugin (Local / Remote)
The Source Plugin provides a flexible framework for fully integrating any sort of Version Control System (VCS) with Mantis, including support for multiple repositories, changesets or revisions, and file path tracking. It has many features already, such as importing repository history and optional support for remote check-ins or imports, and utilizes a class-based API to access objects in the database.
Source require you to install the Source Core and then an appropriate plugin. There are several plugins and they are available from here... and support several plaforms. Only WebSVN currently has support toa loow to run your own server remotely, the rest are either online services or require Mantis and your Subversion Server to be on the same machine. Beacuse this is a plugin all of the configuration options are handled within the Mantis Plugin Panel, so no code is required to be altered.
The Process Overview
All plugins require a post-commit hook to be configured in the Subversion repository to post information to Mantis.
The checkin / issue close process is simliar to the checkin.php but all the regex settings are configured in the plugin installed in Mantis, the POST URL is different, and the POST only informs Mantis Source that a changes has been made and where to find it, which it then does to aquire all the information whereas the checkin.php method sends all the information in one go to Mantis.
- make a change to a file or files
- use TortoiseSVN or other client to submit your changes to your Subversion Repository
- You start a commit and add your comments including fixes #0000001 and what ever else you want to add to your comment (#0000001 is a phrase that is searched for by manits)
- you submit your commit
- the post-commit hook is triggered and this hook POSTs that a Revision has occured to Mantis including the REV number and location
- Mantis then locally reads the related Subversion Revision
- Mantis then pastes the comments in to a note on the related issue.
- if the trigger code was a close code ie Fixes #0000001 it will then close the issue, if it was just a reference link ie issue #0000001 it will just post the comment . In both these case, Souce, will do some internal link in Mantis to all the changesets and Diff link - Check this
Different Post Locations for Source
These are some alternative SourceSVN POST URLs that do slightly different things but are not well documented.
http://<your mantis server>/mantis/plugin.php?page=Source/import&id=all&api_key=<your api key>
http://<your mantis server>/mantis/plugin.php?page=Source/import&id=all
http://<your mantis server>/mantis/plugin.php?page=Source/repo_import_latest&id=XX
http://<your mantis server>/mantis/plugin.php?page=Source/index
http://<your mantis server>/mantis/plugin.php?page=Source/checkin
Some of these should have variables with them, via POST or GET (is possibly valid)
Install Source Control Integration Plugin Core
Files can be download here (download the files by clicking 'download zip' on the right). You will also find some simple instructions for installing the plugins.
To get Source to work you need to install its core and then the additional plugin for the platform for you choice. But for now we will just deal with the Source Core
Official Instructions Here (scroll down)
Installation Notes
- Mantis is required to be on the same machine as the Subversion Server. If like me you are running CollabNet Subversion Edge on your windows PC (if not i recommend it) you will need to run your Mantis install on your PC. The quickest way to do this is to install XAMPP and run it as a service. Make sure you also run it on another port, ie. not 80 or 8080 you will need these for running XAMPP for website development. Using these ports might cause issues with other installed software on your computer.
- Generate API Key
- where it says "run openssl rand -hex 12" for us running on windows the binary/exe is here: D:\Documents\Developer\SubversionEdge\bin\openssl.exe
- open a command prompt and run D:\Documents\Developer\SubversionEdge\bin\openssl.exe rand -hex 12 and copy the results (right click on cmd window, press enter, paste contents into notepad)
Configuration
Most of the options are preconfigured and dont need touching but i will describe what the options are becaus ei have not found descriptions elsewhere. If you need to set any they will be listed at the end.
- View Threshold -
- Update Threshold -
- Manage Threshold -
- Set Username Threshold -
- Main Menu Links - show thes link in the Mantis Main Menu
- Enabled Features -
- Bug Link Regex Pass 1 - the regex that scans for issue number comments (i.e. issue #0000001)
- Bug Link Regex Pass 2 - the follow up regex that extracts the actual issue number (i.e. 0000001)
- Bug Fixed Regex Pass 1 - the regex that scans for fixed issue commnets (i.e. fixed #0000001)
- Bug Fixed Regex Pass 2 - the follow up regex that extracts the actual issue number (i.e. 0000001)
- Bug Fixed Status - what status to set when a comment says fixed
- Bug Fixed Resolution - what outcome to state when issue is fixed
- Bug Fixed Message Template -
- Bug Fixed Message View State - should the comment be set as Private or Public
- Bug Fixed Assign To Committer - the SVN Commiter will be registered as the author of the comment/Issue close
- API Key - the secret key required for POSTing informatioin to Mantis. It adds a bit of security
- Allow Remote Check-In (Deprecated) -
- Allowed Addresses - Allowed addresses for Allow Remote Check-In
- Allow Remote Imports (Deprecated)
- Allowed Addresses - Allowed addresses for Allowed Addresses
- SVN: Path to binary - the physical path to your Subversion Binary. Both windows(c:\csvn\) and Linux paths (/usr/path/bin/) are suitable here.
- SVN: Command arguments -
- SVN: Trust All SSL Certs (Requires Subversion 1.6 or newer) - allow to use self-signed certificates and certificates that dont match but are presented.
- SVN: Use Windows `start` (Requires a configured path to binary) - Is required when using windows
Source Control Integration with SourceSVN Plugin (Local)
This plugin is used to allow direct integration with a local Subversion server (ie on same PC / Machine). It must have direct access to the binaries but can run on either windows or Linux.
Installation
- From your downloaded package from GitHub, upload the plugin /SourceSVN/ to your {your Mantis}plugins/ folder
- No Configuration required
Subversion Server Hook
You need to configure a batch file to be run when a commit is made on the Subversion Server. This trigger is called a hook. When you have created your repository there will be a folder inside called Hooks. Each repository gets its own Hooks folder so this process will need to be repeated for each repository.
My instructions are based on me running a CollabNet Subversion Edge Locally on my PC.
- navigate to your repository hooks folder (D:\Documents\Developer\SubversionEdge\data\repositories\Test\Hooks\)
- create a file called post-commit.bat
- paste the contents below from the 'Windows post-commit.bat'
- edit the details as needed
- done
Linux / Unix post-commit.tmpl
This is an example post-commit script that is found in plugin, /SourceSVN/post-commit.tmpl . It is clearly written for Linux, so will not run on windows.
#!/bin/sh

# Copyright (c) 2012 John Reese
# Licensed under the MIT license

REV="$2"

URL="http://localhost/mantisbt/plugin.php?page=Source/checkin"
PROJECT="Repository Name"
API_KEY="xxxxxxxxxxxxxxxxxxxxxxxxxxx"

LOG_FILE=`mktemp /tmp/svn_${PROJECT}_${REV}_log.XXX`

CURL=/usr/bin/curl

${CURL} -d "repo_name=${PROJECT}" -d "data=${REV}" -d "api_key=${API_KEY}" ${URL} >> ${LOG_FILE}
Windows post-commit.bat
@ECHO OFF

SET REV=%2

SET URL="http://localhost/mantisbt/plugin.php?page=Source/checkin"
SET PROJECT="Repository Name - exactly the same as set in mantis ?"
SET API_KEY="xxxxxxxxxxxxxxxxxxxxxxxxxxx"

LOG_FILE="%PROJECT%_%REV%_log.XXX"

D:\Documents\Developer\SubversionEdge\curl.exe -d "repo_name=%PROJECT%" -d "data=%REV%}" -d "api_key=%API_KEY%" %URL% >> %LOG_FILE%

rem this is better. logging is optional
rem D:\Documents\Developer\SubversionEdge\curl.exe -d "repo_name=%PROJECT%" -d "data=%REV%}" -d "api_key=%API_KEY%" %URL% >> %PROJECT%_%REV%.log
You will need to download the correct version of CURL to allow POSTs from the command line. You can also use wget via Cygwin.
Research Links
These links will include all the basic POST information as well as setup information becasue they are all required for further plugins relating to Subversion on a Local PC.
Generic Subversion
- svn - Best practice for integrating Mantis and Subversion - Stack Overflow - Simple instructions to set this method up. this also includes a step-by-step on how the transaction takes place and an example post URL.
- Integrating SVN with mantis | Game - clear and easy to follow instructions
- Mantis SVN Integration : Adding extra info to the Note » Crazy's Blog - this article tells you how to alter the source.api to get more information from the commit
- MantisBT Source Integration - John Reese - homepage of the sourceSVN plugins for mantis
- Source Integration API Keys - John Reese - create an api key
VisualSVN / Windows
- Forums - Mantis Bug Tracker • View topic - SVN post-commit with windows - cURL examples - this is the best thread to use for post-commit hook
- WebSVN and post-commit hook - doesn mention WebSVN but is about hooks
- Mantis Bug Tracker Help Mailing List - some hook code samples for both normal and windows
- post-commit hook for windows - Has a code example here and mentions powershell
3 - Source Control Integration with SourceSVN Plugin extended by SourceWebSVN Plugin (Local)
WebSVN allows you to show File / Revision differences by using a web browser and this plugin integrates WebSVN. This is an extension to Source Integration and requires the SourceSVN plugin to be installed.
You should install Source Integration Core and SourceSVN and SourceWebSVN. These should already be done from the steps above.
As WebSVN doesnt seem to be developed anymore, there is a replacement Web Based Fifference View called ViewVC. This come preconfigured in CollabNet Subversion Edge. Perhaps the developr could look at making this a plugin and while he is at it consider making it possibly to remotely ccess a Subversion server and which case CollabNet Subversion Edge will be perfect as it has a REST API just for this sort of thing.
Installation Instuctions
- Install WebSVN and link it to your Subversion Server
- Install the WebSVN plugin by uploading it to {mantis}/plugins/ folder
- configure the WebSVN plugin. Use the links below for a more indepth tutorial
Research Links
Generic Subversion
- Integrating Git and SVN with the Mantis Bug Tracker - John Reese
- Subversion (SVN) Repository Integration with Mantis Bug Tracker | U-notez - It’s not necessary for WebSVN to reside on the web server where MantisBT is installed or the server where your Subversion repository resides, Technically, WebSVN is optional: the Source Integration plugin will pull in your Subversion history using the command-line binaries alone. However, without WebSVN, links to browse the repository and view files or diffs from within MantisBT won’t work. Uses John Reese's Instructions, the guy that writes the sourceSVN plugins for mantis
- Mantis: SVN integration in 1.2.x » Crazy's Blog - clear instructions - includes some update Regex for Source Integration
- WebSVN - Online subversion repository browser home page
VisualSVN / Windows
4 - Custom Direct Integrations
This section for for custom integrations such as direct database accessing
Research Links
Generic Subversion
VisualSVN / Windows
- A nameless soldier...: Integrate Mantis+Subversion on Windows - this tutorial goes through setting up each aspect of the stack using indivdual stack packages and then the guy has used a custom python script to interegate the Mantis SQL database directely. This might be useful on setting up individual stack items in windows
What I Did
This are the real bare bone instructions of what i did to get the particular methods to work. litterately just what you should to do to get things working. If you want more you should read the rest of the article but i do know people either just want a quick fix or find it easier to process things when it is working.
I have covered the 2 distinct methods of Remote checkin.php via Gateway PHP script (Not fully working) and Remote checkin.php via Altered checkin.php to accept $_POST
Method 1 - Remote checkin.php via Gateway PHP script (Not fully working)
NB: all of this code where appropriate, has logging enabled to help you get this setup, but it is not required for operation
Basics
- install Mantis on your Web Server
- install CollabNet Subversion Edge on your windows PC locally. This assumes you have setup the server as per my CollabNet Subversion Server Setup Instructions
Create the Gateway Script
- Create this script, /mantis/scripts/do_checkin.php
<?php
// For testing if your data is getting POSTed
echo "\r\n";
echo "This is the POSTed data at checkin.php";
echo "\r\n";
echo 'Secret:  ';
echo $_POST['secret'];
echo "\r\n";
echo "\r\n";
echo 'Message:';
echo "\r\n";
echo $_POST['message'];
echo "\r\n";
//exit;

// For diagnostics only
echo 'Connection Made'; echo "\r\n";

// Very cheap security measure, simply so that not just *anybody* can post issues.
if ($_POST['secret'] !== 'somePasswordHere') {
	echo 'You are not Authorised'; echo "\r\n"; // for diagnostics only
	exit;
}

// For diagnostics only
echo 'Authorised, I will now process the Data'; echo "\r\n";

$cmd = 'php checkin.php <<< ' . escapeshellarg($_POST['message']);
system($cmd);

// For diagnostics only
echo 'Data POSTed'; echo "\r\n";

// To prevent infinite looping
exit;
Notes
- system($cmd); in do_checkin.php i had to put an exit; command after it as it seems to keep re-running do_checkin.php. the POST variables seem not to be passed back from checkin.php. Perhaps using exec() which does not return a result but just executes the command. Not adding the exit; command causes the script to keep re-running and kills my shared server.
- This needs testing on my local server because you can murder a webserver. It is the looping that does it. try tommorow with exec and see if theyou are not authorised is caused. ie does exec() not loop where as system() loops because it is sending stuff back to the do_plugin.php. either way it is the looping that kills the server and the authorization if statements stops the looping.
- <<< means it is passing a single string into the file via STDIN/STDOUT , page 404 of the 'The Linux Command Line' PDF/Book
Enable CLi (Command Line) on Web Server
some webservers will has the command line (CLi) disabled. to fix this we need to enabled system(); This is done by the following:
- you need to do a dump of the systems php.ini (i assume you can do this) and put it in the php.ini /mantis/scripts/ folder
- now in /mantis/scripts/, you need to create a .htaccess file and add the following command in to it:
SetEnv PHPRC /home/myaccount/public_html/sp/mantis/scripts/php.ini
NB: you should alter the above location to match your own physical path
NB: PHPRC does not apply php.ini recusively - now edit the php.ini file
- search for disable_functions.
- remove system from the disabled functions
- save changes
You have now enable CLi for this folder only. if this is a little insecure for you because people will know where to look. You can create a completely random folder any where on your website with a whacky URL and put the do_checkin.php file in there and just alter the file locations appropriately. Then this will also hide this gateway to the regular internet.
Create Subversion post-commit Hook
This hook methods relies on a post-commit.bat being triggered by Subversion which in turn triggers a powershell script which allows us to grab more information about the revision/commit to send this to mantis. Such as real author, time and comments.
post-commit.bat
- create a post-commit.bat in D:\Documents\Developer\SubversionEdge\data\repositories\Test\hooks\ . You should use the script below and edit as needed
@ECHO OFF

rem For live Subversion Server
rem SET REPOS=%1
rem SET REV=%2

rem For local testing by directly setting variables to use with directely running post-commit.bat
rem saves having to make a change for each submit and the process with that
SET REV="1"
SET REPOS="D:\Documents\Developer\SubversionEdge\data\repositories\Test"

CD %REPOS%\hooks
C:\Windows\System32\WindowsPowerShell\v1.0\powershell.exe -ExecutionPolicy ByPass -File %REPOS%\hooks\post-commit.ps1 "%REPOS%" "%REV%"
This file is what Subversion executes and is where you can change it from live to test. And by Live and Test i mean where you load the variables from. To use in the live mode while testing can be a pain because you have to change a file and submit it with TortoiseSVN everytime you want to use it. Instead i have added the Test mode where you can set the variables REPOS & REV with some arbitrary data allowing you to manually execute post-commit.bat from the command line on your window PC allowing for rapid testing and deployment.
The file above is already configured to be in Test modes, to change it to use the real variables from the Subversion Server (assumes you use a real SVN commit) you need too:
Rem out these Lines
- SET REV="1"
- SET REPOS="D:\Documents\Developer\SubversionEdge\data\repositories\Test"
UnRem these Lines
- rem SET REPOS=%1
- rem SET REV=%2
Done, you have now changed the mode. Both these methods will communicate with your website so just bear this in mind.
Powershell Script - post-commit.ps1
- create a post-commit.ps1 in D:\Documents\Developer\SubversionEdge\data\repositories\Test\hooks\ (one not L). You should use the script below and edit as needed
[System.Reflection.Assembly]::LoadWithPartialName("System.Web") | Out-Null

# output this to send a newline operation to the log file
$newline = "`r`n"

## --------------------------------------------------
## get environmental variables set by Subversion
## --------------------------------------------------

$REPOS = $args[0]
$REV = $args[1]

"$REPOS $REV"

## --------------------------------------------------
## Manually load information from Subversion
## Commit/Rev Author, Date, Time, Comment, Changed Files(s)
## --------------------------------------------------

$svnlook = 'D:\Documents\Developer\SubversionEdge\bin\svnlook.exe'

$auth = & $svnlook author -r $REV $REPOS
$dt = & $svnlook date -r $REV $REPOS
$changed = & $svnlook changed -r $REV $REPOS
$changed = $changed -join "`n"
$log = & $svnlook log -r $REV $REPOS
$log = $log -join "`n"
$data = "Changeset [${REV}] by $auth, $dt
$log
$changed"

## --------------------------------------------------
## POSTing information to checkin.php
## --------------------------------------------------

$postData = "secret=somePasswordHere&message="
$postData += [System.Web.HttpUtility]::UrlEncode($data)

# outputs the post to the logfile (appends)(for diagnostics only)
Write-Output "This is the data POSTed to checkin.php" >> checkin-response.log
$postData >> checkin-response.log

# POSTing using wget and cywin (creates/replaces log with response)
#D:\cygwin64\bin\wget.exe -O checkin-response.log --post-data=$postData http://exampleserver.com/sp/mantis/scripts/do_checkin.php

# POSTing with CURL (exactly the same as wget above)(creates/replaces log with response)(seems slightly slower than wget)
#D:\Documents\Developer\SubversionEdge\curl.exe -d $postData http://exampleserver.com/sp/mantis/scripts/do_checkin.php > checkin-response.log

# POSTing with CURL (same as wget above, but appends log with response)(seems slightly slower than wget)
D:\Documents\Developer\SubversionEdge\curl.exe -d $postData http://exampleserver.com/sp/mantis/scripts/do_checkin.php >> checkin-response.log

## --------------------------------------------------
## POSTing with CURL (alternate syntax)
## --------------------------------------------------

# you must disable $postData and other POSTing method above befor using this
#$secret = 'somePasswordHere'
#$postData = [System.Web.HttpUtility]::UrlEncode($data)

# my prefered CURL call (append output to log file)
#D:\Documents\Developer\SubversionEdge\curl.exe -d secret=$secret -d message=$postData http://exampleserver.com/sp/mantis/scripts/do_checkin.php >> checking-response.log

## CURL Syntax
# Posting variables: 			-d secret=$secret, -d "secret=$secret", -d secret=somePasswordHere, -d $postData,  -d "$postData", -d "message=$postData", -d message=$postData
# Append to log (add at end): 	>> checkin-response.log, >> D:\checkin-response.log
# Replace log (add at end): 	| Out-File checkin-response.log, > checkin-response.log

## --------------------------------------------------

# start a newline in the log file - useful when appending to log file
$newline >> checkin-response.log

# Delete checkin-response.log
#rm checkin-response.log
In this file you will see a lot of code that is not used. I have left this code in there so people, including me, can check syntaxes should they ever wish to make changes because unless you have come across these commands before you could spend quite a lot of time just reseaching the basics.
This file is a Windows Poweshell Script and until i did this project i have never used Powershell. It allows us, via the command line, to use svnlook and get extra information formt he Subversion server that is not passed in the variables we have to work with. We will use this data to populate the close message in the Mantis issue with some more data other than closed. It makes the integration a little tighter.
Errors You might get when running this powershell script (seen best when you manually run post-commit.bat from the command line)
Whilst trying to get the script to work i got these error message, which means more than likely you guys will at some point. So i ahve pasted the errors and their solutions. Simple as that.
D:\Documents\Developer\SubversionEdge\data\repositories\Test\hooks>post-commit.bat
The term 'D:\Documents\Developer\SubversionEdge\data\repositories\Test\hooks\post-commit.ps1 D:\
Documents\edgeSVN\data\repositories\Test ' is not recognized as the name of a c
mdlet, function, script file, or operable program. Check the spelling of the na
me, or if a path was included, verify that the path is correct and try again.
At line:1 char:115
+ D:\Documents\Developer\SubversionEdge\data\repositories\Test"\hooks\post-commit.ps1 "D:\Docume
nts\edgeSVN\data\repositories\Test" " <<<<
    + CategoryInfo          : ObjectNotFound: (D:\Documents\ed...ositories\Tes
   t :String) [], CommandNotFoundException
    + FullyQualifiedErrorId : CommandNotFoundException
most likely the file path or name is wrong
D:\Documents\Developer\SubversionEdge\data\repositories\Test\hooks>post-commit.bat
File D:\Documents\Developer\SubversionEdge\data\repositories\Test\hooks\post-commit.ps1 cannot b
e loaded because the execution of scripts is disabled on this system. Please se
e "get-help about_signing" for more details.
At line:1 char:66
+ D:\Documents\Developer\SubversionEdge\data\repositories\Test\hooks\post-commit.ps1 <<<<  D:\Do
cuments\edgeSVN\data\repositories\Test
    + CategoryInfo          : NotSpecified: (:) [], PSSecurityException
    + FullyQualifiedErrorId : RuntimeException
because i am on windows x64, by default it will not run unsigned code so i added -ExecutionPolicy ByPass -File into the command for powershell
Mantis
These are all of the Mantis related changes you need to do.
Edit Mantis Config File
For some unknown reason you need to add these variables into the config file. They are put there because they become globally available, but i think they should of been there in the first place. These variables are used to match issue number in your comments so it know which issue to close. These can be altered if you know regex to match prefered words ie fixed issue #500.
- edit config_inc.php and add this code at the bottom.
# Array of allowed SVN hosts that can close issues via curlcheckin.php
$g_source_control_server = '127.0.0.1';


# Account to be used by the source control script.  The account must be enabled
# and must have the appropriate access level to add notes to all issues even
# private ones (DEVELOPER access recommended).
$g_source_control_account = 'svn';

# Checks for 'Issue' references in the comment - used so the comment can be assigned to the correct issue
# Regular expression used to detect issue ids within checkin comments.
# see preg_match_all() documentation at (detect bug or issue in comment)
$g_source_control_regexp = '/(?:bugs?|issues?|reports?)+\s*:?\s+(?:#(?:\d+)[,\.\s]*)+/i';

# Check for 'Fixed Issue' references in the comment - used to id issues that need closing
# Regular expression used to detect the fact that an issue is fixed and extracts
# its issue id.  If there is a match to this regular expression, then the issue
# will be marked as resolved and the resolution will be set to fixed.
$g_source_control_fixed_regexp = '/(?:fixe?d?s?|resolved?s?)+\s*:?\s+(?:#(?:\d+)[,\.\s]*)+/i';


# For open source projects it is expected that the notes be public VS_PUBLIC, however,
# for non-open source it will probably be VS_PRIVATE.
$g_source_control_notes_view_status = VS_PRIVATE;


# If set to a status, then after a checkin with a log message that matches the regular expression in
# $g_source_control_fixed_regexp, the issue status is set to the specified status.  If set to OFF, the
# issue status is not changed. Use CLOSED if you prefer.
$g_source_control_set_status_to = RESOLVED;


# Whenever an issue status is set to $g_source_control_set_status_to, the issue resolution is set to
# the value specified for this configuration.
$g_source_control_set_resolution_to = FIXED;
- You should note this code is not the same as the code in the articles as the regex was wrong and i made the order more logical. I took the regex code from Source Plugin. There is also furthe regex in the checkincurl.php to take the issue number out of the matches.
- $g_source_control_server - this feature allows you to set which ip address are allowed to connect. i have this disabled in my curlcheckin.php script because it will only work with dedicated address.
- $g_source_control_notes_view_status - this requires further codeing (see here) and allows you to set the status of the comment added to the related issue whether you want it private or public.
Configure Mantis
There are some basic settings and obvious stuff to be done in matis.
- create a user called 'SVN' or whatever you want with 'Developer Access' . This will be the account that is used to post issue closes.
- create your project. for purposes of this we will call it 'Test'
- give 'SVN' user permissions to the 'Test' repository if it does not already have
Install CURL / WGET
Obviously you need to install one of these at least to be able to perfomr the POSt from the command line. You dont need both unless you want to play.
- CURL (easier)
- download the non SSL version of the package for your system here
- extract CURL.exe to D:\Documents\Developer\SubversionEdge\
- when everything is working i would recommend making it SSL. I think all you have to do is swap the binary for one that is SSL (not done it so cant say)
- wget
- download the appropriate installer from here
- install the package to D:\cygwin64\
- when it mentions about a place to put the downlaoded files it just means where can it create a local download repository because not all packages are installed
- during the install it will ask you what packages you want
- search for wget
- select wget
- click next
- done
Make You First Commit
Now this is where things get tricky. I have not been able to make a successful issue close on mantis yet and i believe that is because of the securoty on my web server. If any one manages to get this working i would like to here how.
What i have managed to do is get the Subversion post-commit to POST all the required data to my do_checkin.php successfully.
Below are some responses i get in the log files:
Test Mode set in post-commit.bat
This is the data POSTed to checkin.php
secret=somePasswordHere&message=Changeset+%5b1%5d+by+SYSTEM%2c+2015-01-09+18%3a01%3a24+%2b0000+(Fri%2c+09+Jan+2015)%0d%0aCreating_initial_branch_structure%0d%0aA+++branches%2f%0aA+++tags%2f%0aA+++trunk%2f

This is the POSTed data at checkin.php
Secret:  somePasswordHere

Message:
Changeset [1] by SYSTEM, 2015-01-09 18:01:24 +0000 (Fri, 09 Jan 2015)
Creating_initial_branch_structure
A   branches/
A   tags/
A   trunk/
Connection Made
Authorised, I will now process the Data
Content-type: text/html


This is the POSTed data at checkin.php
Secret:

Message:

Connection Made
You are not Authorised
Data POSTed
How To Run
- Just open cmd
- navigate to your post-commit.bat
- and run it
see the A lines, this is because no information matches a Revision and so it gets an invalid lookup
Live Mode set in post-commit.bat
This is the data POSTed to checkin.php
secret=somePasswordHere&message=Changeset+%5b54%5d+by+admin%2c+2015-01-17+17%3a14%3a04+%2b0000+(Sat%2c+17+Jan+2015)%0d%0aWe+have+fixed+issue+%230000001+and+solved+some+things+etc.+This+is+a+test+commit%0d%0aU+++trunk%2fchangelog.txt

This is the POSTed data at checkin.php
Secret:  somePasswordHere

Message:
Changeset [54] by admin, 2015-01-17 17:14:04 +0000 (Sat, 17 Jan 2015)
We have fixed issue #0000001 and solved some things etc. This is a test commit
U   trunk/changelog.txt
Connection Made
Authorised, I will now process the Data
Content-type: text/html


This is the POSTed data at checkin.php
Secret:

Message:

Connection Made
You are not Authorised
Data POSTed
How To Run
- Configure TortoiseSVN and checkout your 'Test' repository. Search for my article if i have written it. If not, figure it out.
- make a change to a file in your checkedout repositroy, or create a file
- right click on the local folder you have used to check out files from you SVN Repository select 'SVN Commit'
- TortoiseSVN will open and you should enter a commit message, for now i would recommend
We have fixed issue #0000001 and solved some things etc. This is a test commit - click submit
Final Thoughts
So this is where i am at. I (with help from alt-tag, GraFX, LinLog) have got all the information to the Mantis checkin.php but cannot get that part of the process to work. All is not lost because with the work i have do here someone else might be able to finish.
If you have a private server or even a server on a local network (seperate mantis and subversion servers) this method might work as is.
Method 2 - Remote checkin.php via Altered checkin.php to accept $_POST
In this method i have rewritten the checkin.php to accept information via $_POST and will not require CLI access which eludes me, i have also renamed it curlcheckin.php so no core code is hacked.
For further information read the appropriate sections from Remote checkin.php via Gateway PHP script - What i did (Not fully working), this prevents me from duplicating the instructions and having to maintain the text twice.
NB: some of this code where appropriate, has logging enabled to help you get this setup, but it is not required for operation
Basics
- install Mantis on your Web Server
- install CollabNet Subversion Edge on your windows PC locally. This assumes you have setup the server as per my CollabNet Subversion Server Setup Instructions
Create Subversion post-commit Hook
use the instructions above for extra information
- create a post-commit.bat in D:\Documents\Developer\SubversionEdge\data\repositories\Test\hooks\ . You should use the script below and edit as needed - see notes above
- create a post-commit.ps1 in D:\Documents\Developer\SubversionEdge\data\repositories\Test\hooks\ (one not L). You should use the script below and edit as needed - see notes above but change do_checkin to curlcheckin.php as we will not be using a gateway file.
Create a new checkin.php to accept $_POST
- create the following file {mantis}/scripts/curlcheckin.php using this code
<?php
# MantisBT - a php based bugtracking system
# Copyright (C) 2000 - 2002  Kenzaburo Ito - kenito@300baud.org
# Copyright (C) 2002 - 2014  MantisBT Team - mantisbt-dev@lists.sourceforge.net
# MantisBT is free software: you can redistribute it and/or modify
# it under the terms of the GNU General Public License as published by
# the Free Software Foundation, either version 2 of the License, or
# (at your option) any later version.
#
# MantisBT is distributed in the hope that it will be useful,
# but WITHOUT ANY WARRANTY; without even the implied warranty of
# MERCHANTABILITY or FITNESS FOR A PARTICULAR PURPOSE.  See the
# GNU General Public License for more details.
#
# You should have received a copy of the GNU General Public License
# along with MantisBT.  If not, see <http://www.gnu.org/licenses/>.
# See the README and LICENSE files for details

	# --------------------------------------------------------
	# $Id: checkin.php,v 1.5.2.1 2007-10-13 22:35:16 giallu Exp $
	# from https://www.mantisbt.org/bugs/view.php?id=8847
	# Updated 17-01-2015 shoulders @ exampleserver.com
	# --------------------------------------------------------

global $g_bypass_headers;
$g_bypass_headers = 1;
require_once( dirname( dirname( __FILE__ ) ) . DIRECTORY_SEPARATOR . 'core.php' );

// Very cheap security measure, simply so that not just *anybody* can post issues.
if ($_POST['secret'] !== 'somePasswordHere') {
    echo 'You are not Authorised'; echo "\r\n"; // for diagnostics only
    exit;
}

/*# check if we are called from the right IP ( @todo might wanna use a array here )
# Only works for dedicated IP addresses
$t_source_control_server = config_get( 'source_control_server' );
if($_SERVER['REMOTE_ADDR'] != $t_source_control_server )
{
	echo "Not allowed from this IP !!\n";
	exit(0);
}*/

# Check that the username is set and exists
$t_username = config_get( 'source_control_account' );
if( is_blank( $t_username ) || ( user_get_id_by_name( $t_username ) === false ) ) {
	echo "Invalid source control account ('$t_username').\n";
	exit( 1 );
}

# Detect references to issues + concat all lines to have the comment log.
$t_commit_regexp = config_get( 'source_control_regexp' );
$t_commit_fixed_regexp = config_get( 'source_control_fixed_regexp' );

# make sure both the regex scanner and final output gets the full message
$t_line = $_POST['message'];
$t_comment = $_POST['message'];
echo $message;

# Regex Scanning of Comment
$t_issues = array();
$t_fixed_issues = array();

if( preg_match_all( $t_commit_regexp, $t_line, $t_matches ) ) {
	$t_count = count( $t_matches[0] );
	for( $i = 0;$i < $t_count;++$i ) {
		$t_issues[] = $t_matches[0][$i];
	}
}

if( preg_match_all( $t_commit_fixed_regexp, $t_line, $t_matches ) ) {
	$t_count = count( $t_matches[0] );
	for( $i = 0;$i < $t_count;++$i ) {
		$t_fixed_issues[] = $t_matches[0][$i];
	}
}

# If no issues found, then no work to do.
if ( ( count( $t_issues ) == 0 ) && ( count( $t_fixed_issues ) == 0 ) ) {
	echo "Comment does not reference any issues.\n";
	exit(0);
}

# If no issues found, then no work to do.
if(( count( $t_issues ) == 0 ) && ( count( $t_fixed_issues ) == 0 ) ) {
	echo "Comment does not reference any issues.\n";
	exit( 0 );
}

# Login as source control user
if( !auth_attempt_script_login( $t_username ) ) {
	echo "Unable to login\n";
	exit( 1 );
}

/*
// not implemented needs additonal coding and $_POST['user'] configuring in the post-commit.bat
# first we try to figure out if we can login with the source control/Subversion username.
# Usernames on Subversion and Mantis should match
$temp_username = user_get_name_by_source_control_id( $_POST['user'] );
if( !auth_attempt_script_login( $temp_username ) ) {
	# Login as source control user
	if ( !auth_attempt_script_login( $t_username ) ) {
		echo "Unable to login\n";
		exit( 1 );
	}
}
*/

# history parameters are reserved for future use.
$t_history_old_value = '';
$t_history_new_value = '';

# add note to each bug only once
$t_issues = array_unique( $t_issues );
$t_fixed_issues = array_unique( $t_fixed_issues );

# Call the custom function to register the checkin on each issue.
foreach( $t_issues as $t_issue_id ) {
	if( !in_array( $t_issue_id, $t_fixed_issues ) ) {
		$matches = Null;
		preg_match('/#?(\\d+)/', $t_issue_id, $matches);
		$t_issue_id  = $matches[1];
		helper_call_custom_function( 'checkin', array( $t_issue_id, $t_comment, $t_history_old_value, $t_history_new_value, false ) );
	}
}
foreach( $t_fixed_issues as $t_issue_id ) {
		$matches = Null;
		preg_match('/#?(\\d+)/', $t_issue_id, $matches);
		$t_issue_id  = $matches[1];
		helper_call_custom_function( 'checkin', array( $t_issue_id, $t_comment, $t_history_old_value, $t_history_new_value, true ) );
}

exit( 0 );
- This file is a rewrite of checkin.php but i have made it accept $_POST and then corrected the regex accordingly.
- There are lots of different refgex out there but i have used the defaults from Source Integration Plugin because they work.
- SVN post-commit with windows - Mantis - In source integration you cannot solve muliple jobs, this i a regex fix, also some very good Regex for bug detection. I used this to fix multiple issues not getting processed in checkin.php
Mantis
Follow the instructions above.
Install CURL / WGET
Follow the instructions above.
Make You First Commit
Follow the instructions above.
Final Thoughts
This method is fully working with extended comments and to be honest should of been like from the beginning also native to Mantis. It appears that in the next version of mantis that this methods has been removed. I am sure it will be very easy to add back in and from what i can see it only utilises an inbuilt fuction helper_call_custom_function() to post the comments to the issue and process the issue status.
Although Mantis is moving towards using Source Integration Plugin as its primary integrator, which is good, for those of us who do not have their Subversion Server and mantis on the same server this removal will cause problems.
One way around this is for Mantis / John Reese to add Remote Subversion support by utilising CollabNet Subversion Edge's REST API whilst also adding support for ViewVC which is an excellent Web based Difference viewer that comes preconfigured in this package. It should be noted that ViewVC is availabe as a seperate package.
Most techies that i know use PCs and some have websites. This is probably a large group of people that have PCs and basic websites where they could host Mantis but not a Subversion Server and that is where CollabNet Subversion Edge comes in handy as this setup would be the first suitable arrangement they come across, Mantis on website, Subversion on their own PC.
CollabNet ViewVC - An Exception Has Occurred
You might come across the following error or one similiar
An Exception Has Occurred
Python Traceback

Traceback (most recent call last):
  File "D:\Documents\Developer\SubversionEdge\lib\viewvc\viewvc.py", line 5068, in main
    request.run_viewvc()
  File "D:\Documents\Developer\SubversionEdge\lib\viewvc\viewvc.py", line 462, in run_viewvc
    self.view_func(self)
  File "D:\Documents\Developer\SubversionEdge\lib\viewvc\viewvc.py", line 2382, in view_roots
    expand_root_parents(request.cfg)
  File "D:\Documents\Developer\SubversionEdge\lib\viewvc\viewvc.py", line 4941, in expand_root_parents
    roots = vclib.svn.expand_root_parent(pp)
  File "D:\Documents\Developer\SubversionEdge\lib\viewvc\vclib\svn\__init__.py", line 76, in expand_root_parent
    roots[rootname] = canonicalize_rootpath(rootpath)
  File "D:\Documents\Developer\SubversionEdge\lib\viewvc\vclib\svn\__init__.py", line 39, in canonicalize_rootpath
    rootpath = _canonicalize_path(rootpath)
  File "D:\Documents\Developer\SubversionEdge\lib\viewvc\vclib\svn\__init__.py", line 23, in _canonicalize_path
    import svn.core
  File "D:\Documents\Developer\SubversionEdge\lib\svn-python\svn\core.py", line 26, in <module>
    from libsvn.core import *
  File "D:\Documents\Developer\SubversionEdge\lib\svn-python\libsvn\core.py", line 25, in <module>
    _core = swig_import_helper()
  File "D:\Documents\Developer\SubversionEdge\lib\svn-python\libsvn\core.py", line 21, in swig_import_helper
    _mod = imp.load_module('_core', fp, pathname, description)
ImportError: DLL load failed: The operating system cannot run %1.
To Fix this you should try the following things (and probably in order)
- Stop/Start CollabNet Subversion from within its Web Admin
- Reboot your PC
- According to several forum threads the presense of files from other installations of programs that require Python, OpenSSL and other things might of lieft files that are causing conflicts in the system
- libeay32.dll
- ssleay32.dll
- py*.dll
- Also there could be an issue with enviromental variables incorrectely set or not present
Links
- Exception with svnadmin over WebInterface - recommends rebooting the PC or issue with system PATH
- Subversion Edge error: ViewVC Exception Re: Subversion Edge error: ViewVC Exception - mentions system PATH and conflicting files
- ViewVC - Python Traceback Error - mentions OpenSSL file conflicts
- How to re-integrate SVN after server Re: How to re-integrate SVN after server - mentions the files toscan for
My Using Subversion Notes
Notes
- when you submit to a sVN their are hooks that are fired and can run code.
- in particular there is one called 'post-commit'that is triggered after a successful commit to the subversion server
- cURL / wget is used to pass the information via a POST to mantis/redmine
- hook folder in subversion repository will not appear until you create the repository.
- revision number is the revisions of the whole project and not just dile/files you have worked on
Links
- How To Set Up An SVN Repository In 7 Simple Steps | CivicActions - Install SVN on Linux
- Version Control with Subversion - Free Book, Windows Subversion Guide
- Getting started with subversion | Peter van Ooijen - really basic (and short) tutorial on using TortoiseSVN and subversion
- Useful SVN Commands - GreenstoneWiki
Client Software
SVN Clients
- SlikSVN - Windows Command line client
- VisualSVN - Command Line Tool
- Win32Svn - Command Line Tool
- TortoiseSVN - A popular windows shell extension implementation for SVN
- CollabNet - possibly has a client
- SmartSVN (WANdisco) - A JAVA based Graphical SVN Client
- ViewVC: Repository Browsing - Graphical browse SVN Repositories (CollabNet)
- SVNManager | SourceForge.net - Web based SVN Manager
Plugins for Programs / IDE
- VisualSVN - Visual Studio add-in for SVN
- Subclipse - subversion plugin for Eclipse (by CollabNet)
- AnkhSVN - Visual Studio Plugin (by CollabNet)
Binary Repository Listing Commands
- svn list --xml "https://<url>"@HEAD --non-interactive --username "some" --password "some_pass" --no-auth-cache --non-interactive --trust-server-cert
- svn list --xml "https://svn.quantumwarp.com:18080/svn/MyITCRM"@HEAD --non-interactive --username "shoulders" --password "xxxxxxxxxxxxxx" --no-auth-cache --non-interactive --trust-server-cert
- svn list --xml "https://svn.quantumwarp.com:18080/svn/MyITCRM"@HEAD --no-auth-cache --trust-server-cert --non-interactive
Setting up a Windows based Subversion (SVN) Repository
SVN is short for Subversion
This article will deal with the problem of running your own Windows Based SVN Tracker on your own Pc so you controll your files and do not have to pay a subscription.
There are a few free to use SVN Repositories on the net but have stipulations such as your project must be OpenSource
Server Software
Free Windows Based SVN Servers
| Collabnet Subversion Edge | VisualSVN Server | XAMPP Based | TortoiseSVN | |
|---|---|---|---|---|
| Free Windows Based SVN Servers | ||||
| Info |
|
|
||
| Pros |
|
|
|
|
| Cons |
|
|
|
|
Binaries Only
This is the most difficult of all windows setup options, you basically are install another stack and have to configure the settings mainly through the command line. These are most definately installed as seperate software and are not portable. Unless you have any particular reason for installing binaries i would consider using Xammp as a abaase and install the SVN into that, you can then easily backup all of your work and configuration. I personally prefere the AIO packages where there is a central management of the SVN and stack.
- CollabNet Subversion - with auto/manual update feature
- WANdisco
- Win32Svn
- Slik SVN
Free Online SVN, GIT and Mecurial Repositories
- Free source code hosting for Git and Mercurial by Bitbucket - Is Bitbucket free for small teams? Yes! Sign up for the 5 users free plan and you can have unlimited public and private repositories.
- http://beanstalkapp.com/ – Secure, private and reliable Git and Subversion hosting. View activity, browse files, compare revisions. Great user interface. Integrates with a bunch of popular services, including Twitter! From $15 a month
- http://unfuddle.com/ – popular subversion and git hosting and hosted project management solution for software development teams. Comes with a handy Widget for Mac OS – you can monitor account activity across all of your projects from one simple interface. Free with 2 people, with 1 project for up to 200MB storage
- http://www.sliksvn.com/ – another option for free hosting, but not as good as unfuddle, subscriptions are competitive. Free with 1 person, with 1 project for up to 100MB storage
- http://xp-dev.com – Subversion, GIT and Mercurial hosting. A decent feature set and represent excellent value for money. From $5 a month with unlimited projects, users and up to 2GB of storage
- CodePlex - Open Source Project Hosting - free, and uses Subversion (through the TFS hook), as well as giving you forums, documentation areas, etc.:
- Google Code - Project Hosting on Google Code provides a free collaborative development environment for open source projects.
- GitHub - Unlimited Collaborators and Repositoriesbut you must pay for provate ones. GitHub is greate for opensource projects.
- DreamHost - Shared Web Hosting - Although not free, this accounts offers 'Ruby On Rails' and a Subversion Repository included in the price.
Tutorials / Useful
- Hosting my own SVN repositories - Webmasters Stack Exchange - Information on some free online repositories
- SVN, Git, Mercurial - Comparison of Version Control Software
- Apache Subversion Binary Packages - Including Windows (suggests other windows SVN for windows)
- Install subversion repositories in my GoDaddy Shared hosting account - Stack Overflow - other online suggestions
- Comparison of Subversion servers (VisualSVN, CollabNet, uberSVN, etc.)? - Stack Overflow - discussion about VisualSVN and Subversion Edge
- CollabNet SVN Server or VisualSVN? - Stack Overflow - outlines the different protocols you can use http/https or svn
- Taking CollabNet Subversion Edge for a test drive | Will the last developer out please turn off the lights?
Binaries' Installation Docs
- Subversion & TortoiseSVN: Installed and started on Windows 2003 server and local machines - CodeProject - Binaries installation instructions with pictures
- Windows Subversion Server Guide | SVN Server Downloads and Tutorials - Binaries installation instructions using CollabNet Installer for Windows, Subversion Project Installer for Windows and SilkSVN
- Subversion for Windows with Apache server HOWTO - a long tutorial with no pictures for installing binaries
Which One Should I Install?
currently if you are using windows you can select either VisualSVN Server or CollabNet Subversion Edge (i need to try both). If you are running linux you really only have the choice of CollabNet if you want an AIO Package. I have not examined the Xampp setups yet, but these are more hands on for people to set up.
CollabNet Subversion Edge - Most feature, is free, opensource and actively developed by the founders of Subversion (CollabNet)
CollabNet Subversion Installation
Security Settings
- change the admin username and password to something complex especially if you are going online with this.
- it is not currently possible to change the 'admin' username
Make Server Available from a FQDN
Setting up the online presences of your windows subversion server so you can access it from the internet.
At the moment your subversion server is currently only available to your local network, so neither you or other people working on projects can access the server. The following instruictions will bridge the final gap to having your own SVN server running under your control with no montly fees and where you can keep your files private.
Theses instructions assume you have a cpanel account
- create a dynamic-IP account (i used NOIP because they are free and my router supports them)
- configure your router or PC client (as appropriate) to correctely update your IP to your dynamic-IP provider
- create a dynamic domain. I use a random domain to prevent hackers scanning the free domains for potential targest ie. drguosdh334lkkjsad34.ddns.net
- setup a CNAME in you cPanel svn.mydomain.com pointing to drguosdh334lkkjsad34.ddns.net with a TTL of 64 seconds (Read This on TTL)
- give your PC/Sever a static IP address
- when you set up your SVN server you set the repository to be on a port, ie 18080, you need to port forward this port in the router and point it to your PC/Server
- allow this port to be used in your firewall
- if you want the remote admin panel to be available remotely aswell you need to port forward one of those aswell. (CollabNet insecure - http://localhost:3343/csvn, secure - https://localhost:4434/csvn/, you only need to forward the one you want, i would recommend only use secure, if secure is selected but you go to the in-secure a meta refresh is performed to re-direct you to the secure version)
You can now access you SVN server from the outside world using drguosdh334lkkjsad34.ddns.net (FQDN) but you cannot use your FQDN locally. To fix that do the following
- edit your 'hosts' file as administrator
- add the following line
127.0.0.1 drguosdh334lkkjsad34.ddns.net
Done, you now have a fully working Subversion server online via http://svn.mydomain.com/. you might be wondering why i have added an extra domain step to the instructions above. I have used a random domain name that should be hard for hackers to find and then use that to probe my netwrok, because using NOIP i basically give a domain name to my IP. I can use http://svn.mydomain.com/ to make my life easier to configure Matis and any other required software such as TortoiseSVN but while maintaining some extra security.
- If the domain drguosdh334lkkjsad34.ddns.net becomes comprimised i can change the Dynamic-IP withou having to reconfigure my Subversion software.
- If you wanted you do not need to add the cPanel DNS step in, you could use a sensible domain from a Dynamic-IP provider and use that domain to configure all of your software directely.
- You will have to allow any SSL Certificate prompts that appear because you will be using effectively a different domain than localhost
Hostname (in WebAdmin)
- in server setting it might be advantageous to change the Hostname to match your new domain, svn.mydomain.com , I do not know if this is absolutely required but keeps things the same.
- You might might want to edit your shortcut to be http://svn.mydomain.com:3343/csvn :3343/csvn , again this is not mandator
Notes
- 18080 - alternate port suggestion
- From the Web Admin i could not get either of the following to work:
orRepository parent: https://Mypc:18080/svn/Solutions:Browse repositories: https://Mypc:18080/viewvc/- i had VisualSVN installed aswell, i had to do a full uninstall of VisualSVN and edgeSVN and re-install of edgeSVN
- when it was not working it had an IP as the FQDN (The fully qualified Hostname), when the edgeSVN works it put in my computer name as the FQDN ie Mypc
- If on a Dynamic IP make sure when you restart the server/windows PC that you have the same IP address and that subversion is not bound to another IP. Using the computers name or 127.0.0.1 would resolve dynamic IP adddress issues, or just use static IP address.
- help files for viewvc are only from within the program itself
NB:
- no other configuration was required to get SVN or ViewVC to work
- also browser adblockers might affect functionality
SVN / Subversion General Notes
- You cannot put repositories in subfolders. According to the rules all repositories should be in the root folder
CollabNet Subversion Edge Installation Notes
Edge Webadmin Service does not install and run during setup
When you install collabnet all goes well and you get to the webpage at the end saying that it is waiting for the service to start. It eventually times out and point you towards their help page.
The server does not start because according to the CollabNet official wikie there is something wrong with the Java Path. Whether it is missing or pointing to the wrong version, either way this prevents the service getting installed properely.
The remedy suggested, is to run there installservice.bat (located in {subversioin}/scwrapper/bat/), which does indeed install the missing WebAdmin service. When you then start the WebAdmin service you get the following error:
Causes
- The 503 error is caused by incompatible Java (JRE) version.
- You get this error because the Java based Service/WebAdmin cannot start properely.
- This can be caused by installing another piece of software (ie netbeans) that installs a different version of java (ie JRE 8) which alters the path accordingly to its installation procedure. It is possible to install several version of java, but the path to java that is left in the enviromental variable is usually points to the last installed version of java.
NB You should note that the Apache Subversion Service will not start because it does not have a httpd.conf yet. You use the Web Admin to make this file on the intial setup of Subversion Edge so dont worry about the subversion service yet. When you get this service running you can save your settings which will fix the Subversion service.
Solution to these issues can be one of the following
- Uninstall the latest version of java (ie jre 8) making sure you have jre7 left installed, run the deleteservice.bat and then run installservice.bat to re-install the service but with the correct bin path
- Edit the service bin path to reflect JRE 7 in the registry, see the example below.
"C:\Program Files\Java\jre7/bin/java.exe" "-classpath" "D:\Documents\Developer\SubversionEdge\svcwrapper\wrapper.jar" "-Xrs" "-Dwrapper.service=true" "-Dwrapper.working.dir=D:\Documents\Developer\SubversionEdge\svcwrapper\..\appserver" "-Dwrapper.config=D:\Documents\Developer\SubversionEdge\svcwrapper\conf\wrapper.conf" "-Dwrapper.additional.1x=-Xrs" "org.rzo.yajsw.boot.WrapperServiceBooter"
Notice that it points to java 7
Cannot run SFC - there is a system repair pending which requires reboot to complete
when running SFC you get the following error
There is a system repair pending which requires reboot to complete. Restart windows and run SFC again.
Solutions
This is caused by an update that has not been completed and can be fix in several ways:
- You can remove/rename the file C:\windows\winsxs\pending.xml - This file is what contains the instructions for windows too process the pending updates and while this exist SFC will not run
- You can clean up/remove/revert the updates and this can be done offline - dism.exe /image:C:\ /cleanup-image /revertpendingactions
This is supposed to revert all pended updates, however if System Restore is not working, then there may be other issues as well
Links
- How to removing a pending update that is preventing a successful boot (Network Steve Forum)
- command line - How do I recover from "repair pending" error in SFC? - Super User
- Lexington Computer Repair Blog » SOLVED: SFC says “There is a system repair pending…”
- Force SFC to Run in Windows 7 - renaming the pending.xml
Windows 7 BSOD 0x0000007B - Cannot Boot Windows
When you load windows you get a blue screen with the BSOD 0x0000007B error. This is generally caused by the 'Mass Storage Drivers' not loading for one reason or another such as
- they have been corrupted
- updated and the new version does not work
- somehow they have been deleted
- their start status has been incorrectely changed
- the SATA controller type has been changed in the BIOS
- You have changed motherboard or PC whilst using the same windows installation
Below are some tested fixes for this issue in windows 7. You might find that some of these fixes work for ohter versions of windows and not every solution will fix the 0x0000007B error.
Last Known Good Configuration (advanced)
Select the last known Good Configuration and see if your windows boots. It either will or it wont. If it does i would create a system restore point.
Startup Repair
Let windows try a Startup Repair. When your PC fails to boot it will ask you if you want to repair windows (Black and White Screen), select 'Repair Windows' and see if that fixes the boot issue
Incorrect SATA Type in the BIOS
This is a very common issue especially when you move your windows installtion to a new PC.
Windows is configured to use IDE or AHCI (or possibly a type of RAID) to boot windows and if the setting in your BIOS does not match this.
Solution
Enter the BIOS and cycle through the the different types of AHCI/SATA controller settings and see if you can boot windows on any of them.
fix_7hdc.vbs script - Adjust mass storage controller driver at offline system - Recommended
Basically this is a script that can handle the automatic installation of the correct driver by matching the installed hardware IDs to a driver, either those that are already install or from a specified folder which is handy when you have forgot to install them before moving changing your hardware. This script can be run from a windows DVD/Repair Console
This is an easy fix to try if you have the correct instructions. The instructions for running this script are not the best, so after trial and error i have written some.
The script utilises DISM utility to install the drivers.
Usage: cscript Fix_7hdc.vbs [options]
| Options: | ||
|---|---|---|
| /enable | enable, installed but disabled MassStorage drivers (or 'Enable existing Mass Storage drivers in system) | |
| /target:<drive> | target Win7 drive | |
| /install:<folder> | Path to the folder that will be the top of the Plug & Play folder tree. | |
| /search:<file> | search flag file to find target Win7_drive (default: \windows\system32\winload.exe) |
|
| /restore | restore registry system file | |
| /log:<file> | (Optional) Location of the output file | |
| Remmed out in code but might still be valid | ||
| /class:<class> | (Optional) Filter the output by device Class | |
| /provider:<vendor> | (Optional) Filter the output by driver Provider | |
| /excludeclass | (Optional) Filtering excludes Class filtered items from output. Default filtering in inclusive (only the filtered items are output). |
|
| /excludeprovider | (Optional) Filtering excludes Provider filtered items from output. Default filtering in inclusive (only the filtered items are output) |
|
| End of Remmed Items | ||
| /q | (Optional) Suppresses all data output to the console. | |
| /? | (Optional) Displays this help text. | |
Examples:
cscript Fix_7hdc.vbs /enable /search
cscript Fix_7hdc.vbs /enable /search:\users
cscript Fix_7hdc.vbs /enable /install:F:\x86 /search
cscript Fix_7hdc.vbs /install:D:\amd64 /target:C:
cscript Fix_7hdc.vbs /install /search:\label.txt
cscript Fix_7hdc.vbs /restore /target:C:
My Notes
- cscript , in windows 7 seems optional. if you add it, everything runs in a command line and no GUI or prompts.
ie the following 2 commands are valid but how they run is slightly different but does not affect the outcome unless you do not add required information such as GUI prompt boxes dont always work
Fix_7hdc.vbs /enable /search
cscript Fix_7hdc.vbs /enable /search - http://www.911cd.net/forums//index.php?showtopic=24245 = homepage
- based on = http://technet.microsoft.com/en-us/magazine/2006.05.utilityspotlight.aspx
- using /install without enable will install the new drive without enable all other drivers
If you run
Fix_7hdc.vbs
Fix_7hdc.vbs /search
(either implies Fix_7hdc.vbs /enable /search )
This is what it does
- searches for the live windows installation
- loads that registry and searches the registry
- Finding all matching 'Mass Storage Drivers' and sets their start DWORD to 0 (ie enabled)
there is a prompt box for each mass storage driver, so there can be a few (unless you use cscript)
What i Would Type
cscript fix_7hdc.vbs /enable /search /install:g:\ahci
Because you use cscript there are no prompts but instead outputs to the console
- This will automatically search for the windows installation
- it will enable existing mass storage drivers in system
- it will then install (and enable i guess) any matching 'Mass Storage' hardware with drivers from g:\ahci (recursive search occurs on the /ahci/ folder)
- The driver(s) are then installed using dism using a simliar command as below
dism.exe /Image:C:\ /Add-Driver /Driver:"G:\AHCI\W64A\amdsata.ing" /LogLevel:4 /LogPath:G:\hdc\dism.offline.log
Links
- Fix_7hdc - Boot PE and fix offline Windows - The CD Forum - Homepage fo the script
- tinyapps.org / blog / Resolving BSOD (STOP: 0x0000007B) after a motherboard swap - simple instructions on how to use fix_7hdc.vbs
- Unbootable Win 7 | Tethis's Blog - usage instructions for fix_7hdc.vbs
- Tech News: Change Mainboard in Windows 7 without formatting. - simple usage and mirros for the script
Other Notes
- if you change the controller type and run 'Fix_7hdc.vbs' it will detect the new type of controller
- when not using cscript prefix, use /q to suppress messages
Manually Changing SATA Mode in Windows
sometimes windows gets mixed up with which SATA mode to work. This can be changed easily in the windows registry. As long as you can access the windows registry you can do it either online (proactively) or after the fact by mounting the offline registry.
- How to: Change SATA Modes After Windows Installation - An easy to follow article/forum thread with the commands to run
- How to Change SATA Hard Disk Mode from IDE to AHCI / RAID in BIOS after Installing Windows? - AskVG - an article with pictures
- The blog of Manjeet Singh: How to fix BSOD 0x0000007B on Win7 and Enable Ide, Ahci, Raid mode without re-installing. - This article sepcifies quite a few registry settings and is not that easy to follow
- How to Enable AHCI After Installing Windows 7/Vista - Techneek TV - YouTube - This is an easy way to swap windows SATA mode but only works if you can boot windows. This option is useful if you want to increase the performance of your SATA by changing modes
- How to load SATA drivers to offline Windows xp system - Windows 2K/XP/2003 - reboot.pro - I have not used this method
DSIM - Manual Driver Injection
This is a new method that new versions of microsoft windows natively supports. It allows you to inject drivers to offline windows installs on normal harddrives or VHD (Virtual Harddisk). This is particulary handy if you have forgotten to install required SATA Drivers or you are creating a deployable image.
When using this command you must make sure your drive letters are correct. ie when you boot of the harddrive into the console your windows install drive will be C:\ , but when you load of a seperate WinPE disk it will most likely be D:\.
Examples
Dism /image:C:\windows /Add-Driver /driver:D:\64-bit /recurse
All sub folders from D:\64-bit are queried for drivers to add to the offline windows install @ C:\windows
Dism /image:C:\windows /Add-Driver /driver:D:\64-bit\
The drivers in the folder D:\64-bit\ will be installed to the offline windows install @ C:\windows
Links
- Easily add drivers and updates to images with GUI DISM - Deployment Ninj@ - A GUI for DSIM, does require a running windows install
- Christian Hofstädtler - Using DISM to install Storage Drivers - a very clear article showing different syntaxes for using DSIM
- How to use Windows 7 DISM by Muiz. - Lists most of the DSIM commands with descriptions but /Recurse is missing
- Add and Remove Drivers to an Offline Windows Image - By Microsoft Technet, the basic commands and switches to add or remove drivers
- Driver Servicing Command-Line Options - By Microsoft Technet, DSIM command line options with examples
- Deployment Image Servicing and Management Technical Reference - By Microsoft Technet, this is the full documentation on DSIM
- Installing drivers on a Windows system using WinPE Preinstallation Environment - Server Fault - Simple Question, Simple Answer. Also has offline and online examples
- boot - Booting Windows 7 from different SATA controller - Super User - Simple Question, Simple Answer
- HowTo: Repair Windows 7 Install After Replacing Motherboard - Dowd and Associates - An article on how to use DSIM including how to identify the required drivers and then insert them
- Using Dism.exe - Windows 7 Tutorial - an easy to follow text based article
- How to Switch Mobos w/o reinstalling Win 7 - Using DISM - Processors, Motherboards and Memory - OverclockersClub Forums - real world problem and the command he used to fix it
- DISM walkthrough - observations from my first ever attempt | DriverPacks.net - might be of use to read
- FIX_HDC needs TXTSETUP.SIF for Win7x64 DP_MassStorage_wnt6-x64 (Page 1) - Windows 7 Discussion - DriverPacks.net Forum - some uses of DSIM and also mentions sysprep
Other Things to Try
- Repair Corrupt BCD (Boot Record) - this is not likely cause but it can be
Solution: STOP Error 0x0000007b (0xfffff880009a98e8 0xffffffffc000000d 0x0000000000000000…) | Triple-S Computers Blog – Louisville, KY computer repair specialist - some instructions on manually repairing the BCD - sysprep - This is only good whilst your windows is working before your move - not tested yet and could take a lot of time for little gain
- chkdsk - this is an oldy but a goody
- check for Virus
- replace the registry manually
- run windows 'Startup Repair'
- 0x0000007B (INACCESSIBLE BOOT DEVICE): Fix for Windows XP, Vista, 7, 8, 8.1 - some things to try from neosmart.net
- Easy Recovery Essentials | Windows Recovery and Repair CDs - From neosmart.net , I have not tried these and they are not free
- How To Fix STOP 0x0000007B Errors (INACCESSIBLE_BOOT_DEVICE) - a general article with few things you can try
- Run chkdsk
- Rebuild MBR
- Finally windows 7 repair install - 0x00007b can be caused by other stuff
- Use system restore or known good configuration to see if you can boot
- If no system restore points available, look in c:\windows\system32\config for old backups
- Run sfc in console ie see article
- try manually disablling all other mass storage driveers if you still cannot get it to boot - see that list
- You might be able to only get the mass storage driver to work in IDE/Compatability mode, in which case if you get booted into windows you can then use the trick outlined in the youtube video to swap to AHCI mode again to get performance back
Driver Installation / Recovery Software
- BooZet Freeware | Double Driver - backup and restore installed drivers - Online and Offline Windows installs
- DriverBackup! | SourceForge.net - Online and Offline Windows installs
My Other Notes
- DWORD start types, 0 = enabled (possibly core load), 1 = ? , 3 = disabled
- 0x000007b errors are definately caused by a fault in SYSTEM hive
-
I got a 0x000007b after installing windows updates, i think this is because it upgraded some driver files that had been interfered with by driver updating software
Which Bug Tracker should i use?
This is quite a popular question to which i needed an answer, so i have listed the relevant pros and cons for the most popular Bug Trackers below.
| Redmine | Bugzilla | Mantis | |
|---|---|---|---|
| Comparison of Bug Trackers | |||
| Pros |
|
|
|
| Cons |
|
|
|
Research Links
- Defect Tracking Tools | On Bug Hunting
- project management - Trac vs. Redmine vs. JIRA vs. FogBugz for one-man shop? - Stack Overflow
- project management - Trac vs. Redmine - Stack Overflow
- Comparison of issue-tracking systems - Wikipedia, the free encyclopedia
- Top 3 Bug Tracking Systems - Nenu Tech
- Project management and issue tracking; Bugzilla vs Redmine | Wikipedia | Wikitech
- Top 10 Open Source Defect Tracking Systems - QAInsights
- Open Source Issue Tracking | OpenDemo.org
- A Quick Look of the Top 10 Bug Tracking Tools for the Year 2014 - MonsterPost
- Top 10 Open Source Bug Tracking System
Conclusion
Redmine is a more indepth Bug Tracker, it takes more to setup but seems to have more features, including the roadmap. The downside to Redmine is that you most likely need a VPS or dedicated server to run it and in which cas you probaly already have SVN setup so i would use this. I now use Redmine on my windows PC using Xampp and other free software packages. Search my website for Redmine installation Instructions.
If you want some thing easy to setup and use i would choose Mantis. It will work on most hosting packages and is easily setup. The roadmap feature for me is a must, which this has so i can concentrate on programming rather than setting a Bug Tracker up. The softaculous install feature will also allow easy 1 touch upgrading.
Bugzilla sits in between the other two Bug Trackers because it has a lot of features making it more complicated to use but for some reason it does not have a roadmap feature. Bugzilla is definately aimed at collaborative works rather than just one person.The other Bug Trackers will handle multiple users bug Bugzilla seems to have a lot of Project Management aspects built in to it.
Scrape information and email address from your Outlook Emails
Why would i want to do this?
Do you want to start a marketing campaign and send it to all of the people you have ever had contact with, where better to start than the peopel you have had email correspondance with. These peopel will all have either sent you and email or recieved one from you. These emails will all be in outlook.
PHP Method
You can configure the script to scan for any variable you want so with a little bit of programming you can scan the emails to see if a customer was interested in certain type og motor bike or wheather he selected certain answers in a survey.
What You Need
- My PHP EML Scraping Script
- XAMPP Web Server
- Outlook Freeware - Export Messages to EML Files (Free registration required)
- Outlook (dohh!!) - (not required for full dump direct from a .pst)
- a full .pst .eml dumper - if you want to dump all emails not just selected one (Optional)
Instructions
These are my instructions on how to scrape emails, Sender Names and other information from emails in your outlook.
My process has a couple of steps and can be configured to grab what information you want.
Overview
- Dump selected emails with outlookfreeware as EML/ Dump all emails as EMLs with {full dumper} in to a folder. This folder should be in the webserver htdocs
- Setup XAMPP webserver
- Increase php timeouts (Optional)
- Create a MySQL database
- Configure my script
- Run My script
- Export data as a .CSV via PHPMyAdmin
Dump Selected Emails
Outlook Export
Unknown to me at the time, outlook has an export feature where you can export selected emails (or folders) to an excel spreadsheet and once there you can perform data manipulation as required.
The location of the Export function varies with each version of office so you need to do a quick google search for Exporting Outlook Emails.
Useful
I would recommend to use ASAP Utilities to perform data manipulation on your Excel Spreadsheets.