Using Windows XP
(© 2008 Lancastrian IT)
The Desktop:

- Desktop – This is your main work area, it is where you access your computer’s function, i.e. running programs, moving files or changing your screen saver.
- Icons – These are pictures that can be moved or placed where the user wants them and if they are double clicked (tapping the left mouse button twice with the cursor over the icon) they will run/open programs that are assigned to them.
- Recycle Bin – This icon opens the recycle bin; this is a hidden folder that contains deleted files. When you delete a file it is put here just in case you deleted it by accident.
- Taskbar – This is the bar normally at the bottom of the screen. When you have more than one program open at the same time the Taskbar will show you what is open. Also, it contains the Start Button and System Tray.
- System Tray – This is a part of the Taskbar where some programs that are running in the background are represented by icons (these cannot be moved) so you can get easy access to change their settings.
- Start Button –When the cursor is moved over the button and the left mouse button is clicked it will reveal a hidden menu consisting of icons relating to programs and computer functions, the Start Menu.
- Start Menu – This is accessed when the Start Button is pressed (clicking the mouse over the button).
- Email – This icon, if clicked will run Outlook Express, your program for sending and receiving email (only single click is required in the Start Menu).
- All Programs – This is another hidden menu but it is within the Start Menu, if clicked on it will show another list of icons, the rest of your computers installed programs, please note that some in the list will have hidden icons, this is shown by a little black arrow and if the cursor is moved over the icon the hidden icons will be displayed.
- Turn Off – This if clicked once will present you with some options; 1-Standby, 2-Turn Off, 3-Restart. Only 2 and 3 should be used, Turn off, if clicked will close all open programs and turn the computer off, the third option (Restart) will also close all open programs and the computer will start to load again as if you had just turned the computer on. For technical reasons, occasionally this is necessary as with Turn Off just click once.
Sending and Receiving Email:
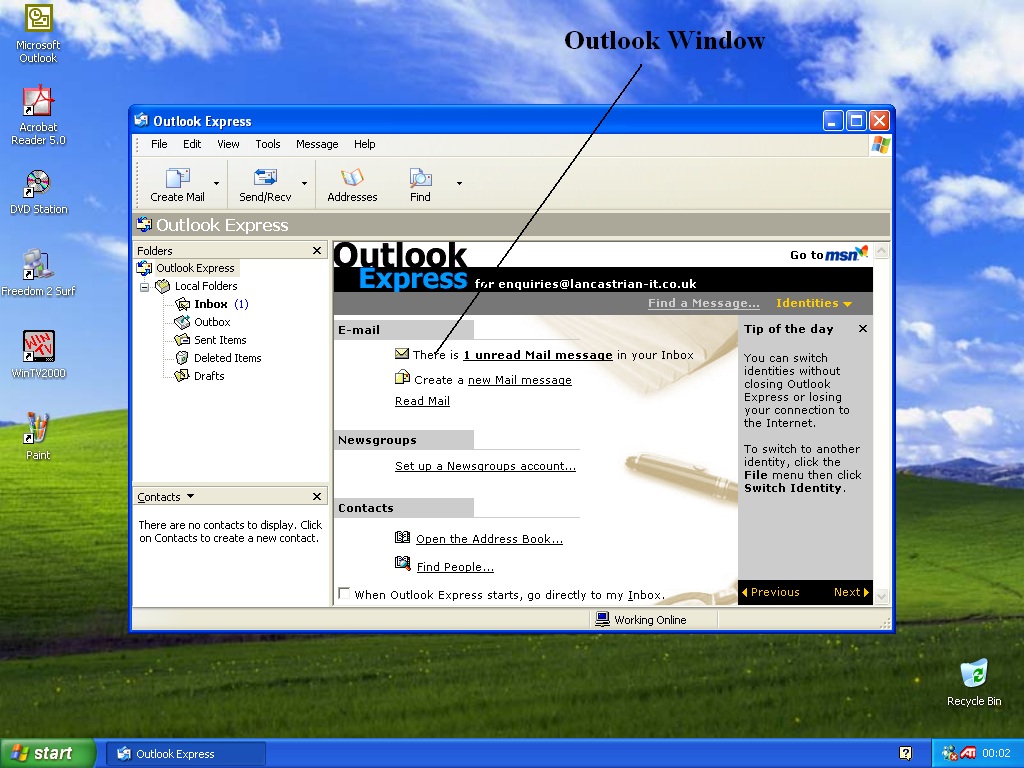
Starting from the Desktop, click on the Start Button.When the Start Menu pops up click on the Email icon. This will make Outlook Express load and you will see the following window, shown below.

- To Explain a Window if you think of the computer’s Desktop as an actual desk and the windows as different pieces of paper with different information, you can put the papers on top of each other without losing any information and you can put them in any order or anywhere on the desk or desktop. This is the same in XP, by using windows on the desktop you can put the windows anywhere on the desktop and on top of each other without losing information, however instead of hand writing the windows contain different programs. This allows you to use more powerful aspects of the computer and make work or play easier.
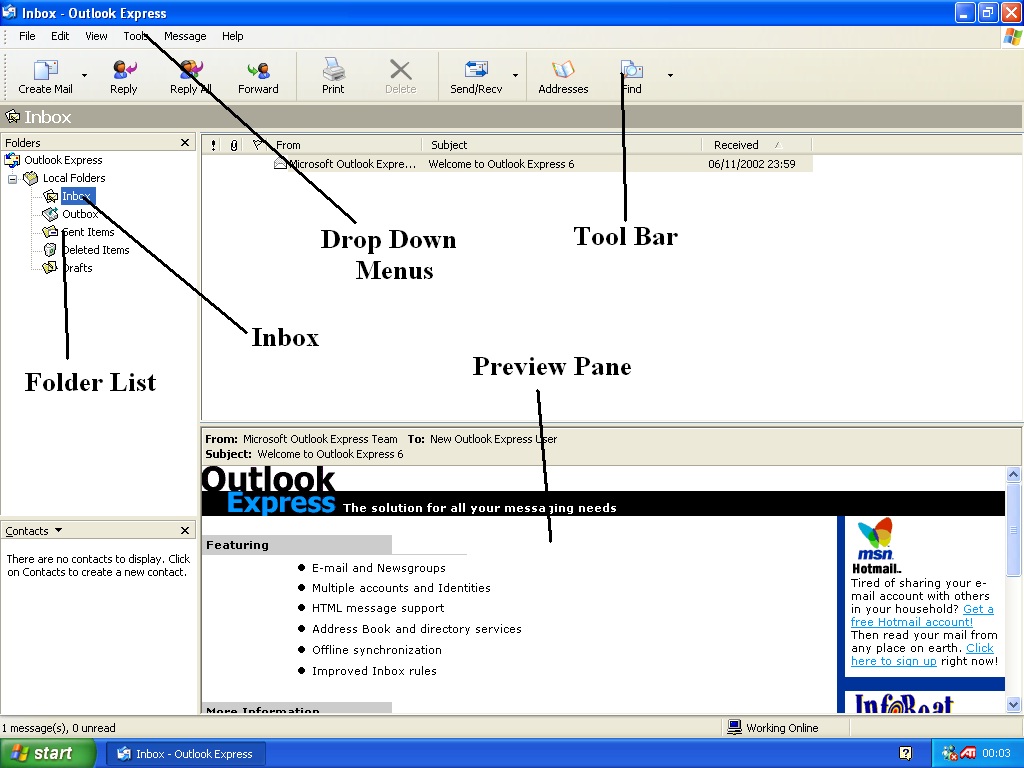
Once Outlook Express is open it will either appear in a small window as above or as a full screen window, below, where you can only see that program. The other windows will still be there but they will be underneath the full screen window.

- Folder List – This is where you can swap between sent and received emails by clicking on the name i.e. Inbox – all received emails, Outbox emails waiting to be sent, Sent Items copies of emails that you have sent, Deleted Items – emails that you have deleted (similar to Recycle Bin but for emails) and Drafts – emails that you are writing or have not finished.
- Inbox –This as mentioned holds your mail that you have received and can be selected by clicking the cursor over the writing ‘Inbox’ with the left mouse button (same for the other categories) and to the right of the folder list will appear all the received emails that you have. Unread emails will appear in bold.
- Drop Down Menus – These are hidden menus that drop down to shown extra and advanced functions for this particular program. To get them to drop down just click (left click once) on the menu name.
- Tool Bar – The Tool Bar gives you quick and easy access to some, not all of the programs functions. Usually frequently used actions like sending and receiving emails. The Tool Bar is made up of buttons, like icons but they perform actions within the program rather than running a program and they only require one click. If in doubt of a button’s function if you just move the cursor of the button but do not click it a yellow box will appear with a description of the button.
- Preview Pane – This shows a quick view of the email that is selected. Good for browsing a lot of emails.
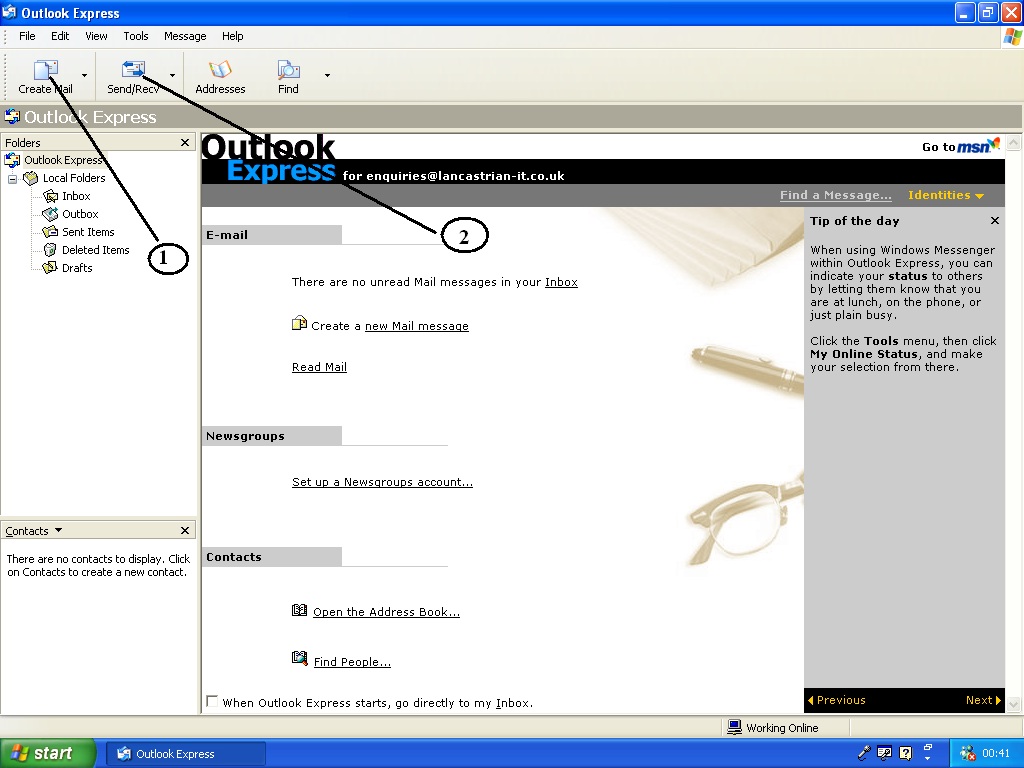
To send an email you first have to write it, to do this click on Create Email button shown below (Number 1).

- Note the Send/Receive button labelled number 2.
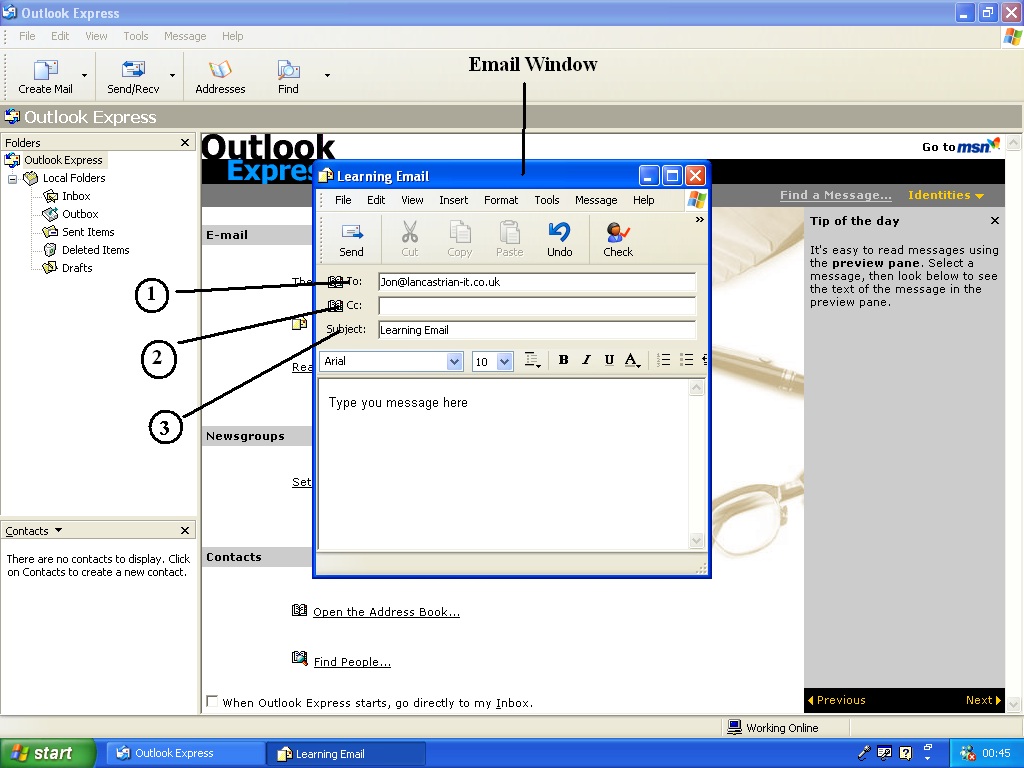
After clicking the Create email button a further window will appear to write your email with, as shown below.

- 1. To -- This is where you type the email address you want to sendthe message too.
- 2. CC – Carbon copy. You can send a copy of the email toanotherrecipient without resending the email, to do this just type theiremail address in the CC box.
- 3. Subject – What it says, the subject of the email i.e. holidays plans for the weekend. Its purpose is to enable the recipient to sort his email quicker.
So type your email message and enter the recipient’s address, then you are ready to send your first email.
Click the send button at the top left of the Email Window, which will now disappear. This will put the email in to the outbox ready to send over the Internet when a connection is available. This allows you to compose emails without being connected through your telephone line to the Internet when it is not necessary.
Once you have finished composing your emails you need to click on the Send/Receive button, which you will find in the toolbar of the main window of Outlook Express. The computer will now start to send and receive your emails. If you are prompted for a response by a new window, just click ok. When you have sent your emails and the computer has finished doing this task, check and make sure that you are no longer connected to the internet by checking in the bottom right of the desktop to see if two ‘flashing TVs’ are present as shown below.

If the TVs are present, you are still connected to the Internet. If this is the case, too disconnect from the Internet right click on the TVs icon and a hidden menu will appear. One of the options is ‘Disconnect’ left click this and you will turn your Internet connection off.
And that’s it, you have now moved round the XP desktop and sent emails. Keep this handout nearby so if you get stuck you can reference too it easily and make using your computer enjoyable rather than a chore.
