These are a collection of notes to help me use my Citizen CLP-521 Thermal Printer
The first label printed after power on is always corrupt
This issue has been plaguing me for a while and is shown in the image below:

Whenever I turn the printer on, the first label I print is always corrupt and has cost me a fair few labels.
Cause
- Using Windows 10 and the USB connection on the printer
- It most likely is a speed issue of the USB driver.
- This printer might only like USB 1.1
- The reason the first label gets corrupted, is the data is sent to quick over USB 2.0, but the subsequent communications over USB are clocked down to USB 1.1
- It could be an issue with the Seagull driver itself, but this is a legacy printer so this issue is unlikely to get fixed in the driver.
Notes
- You could try a better USB cable
Solution
- Make sure your Windows OS is up to date.
- Download and install the latest drivers for your printer (completely uninstalling might be better)
- Optionally, factory reset your printer and recalibrate you label sensor
- Factory reset did not seem to make any difference for me, but will definitely get rid of bad settings.
- Connect you printer via one of the following methods
- Parallel Port network print server such as the HP JetDirect Ex Plus (J2591A) Print Server. Configuration instructions can be found here and I have used this particular print server with the CLP-521 so I know it works.
- A real Parallel port
- COM port - I have not tested this, but I would guess it will be very slow.
Bartender prints first label blank after power down on Citizen CLP521
These solutions have only be tested using standard labels with the transparency sensor
Solution 1 - Correctly position the label before the sensor
Before powering on the printer, load the labels as shown below. You are going to position the head of the first label just before the paper sensor, but not over the sensor. This allows the printer to find the front of the first label. If you have too much space on the roll before the first label, this method will not work and the first label will probably be discarded. If the label is actually over the sensor, this will cause the first label to be discarded.
![]()
![]()
![]()
Solution 2 - Run a dummy single label through first
This was my first solution I figured out but might have relevance for further fixes.
Keep a single label on its backing paper. This backing paper should be long enough to be loaded into the printer with the label being towards the end of the paper and can be positioned before the paper sensor.
- Load the single label into the printer before the sensor.
- Hit the feed button
- The label should be loaded into the correct position.
- Print your label and one of 2 things will now happen:
- The label will print
- A blank label will print
- The label was expelled out the front and the feed continued until the backing paper was out as-well
- A beep and print error was showing indicating paper out
- Put your single label paper to one side. You might need to use this in the future as printer power downs.
- Load your main roll of labels so the first label is behind the label sensor
- Press STOP to cancel beeping
- Press FEED to load the label or just hit print
- The will feed the label correctly and your labels will now print as normal.
Notes
- Bartender prints first label blank after power down on Citizen CLP521 – BarTender Support Portal
- Hello, on Citizen CLP521 Bartender prints first label blank after power down. As I understand the printer checks where the start of the label is, but can't this be turned off if I never remove / change paper ?
- I believe that will be the printer itself trying to find the correct start of print position. Not sure on the Citizen but on some devices you can disable this via a front panel option but then this can cause the first label to be printed incorrectly as it starts part way through the label and only looks for the gap/mark after it has printed the first label.
- I would suggest when you power up or reload the paper that you feed a label first to make sure the device is in the correct position to start printing.
- Dirty paper sensor - This might causes issues
- Do i need set on the printer the label size? Can this be causing an issue?
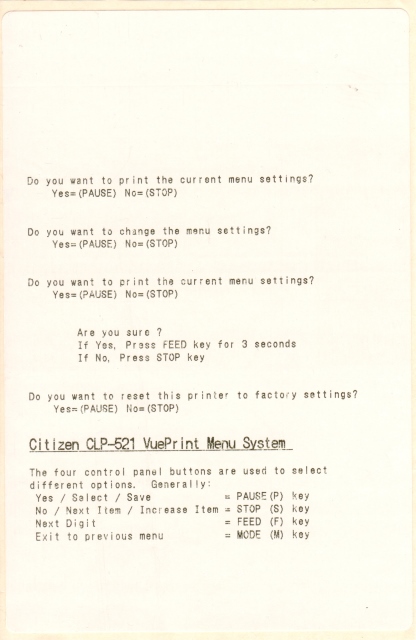
Reset Printer to factory defaults
When following these steps, messages will be printed so make sure you have paper in the printer.
- When turning the printer on press and hold the MODE/REPEAT button.
- Press PAUSE
- Press and hold the FEED button for 3 secs.
- Press STOP
- Press STOP
- Press STOP
This is an image of the printed messages you should expect:
You will now need to calibrate your label sensor.
Sensor Adjustment
This process allows you to swap between the reflective and transparency sensors. This process is covered in the manual (Page 34) for both types of mode but we will configure for standard sticky labels (i.e. transparency mode)
- Enter sensor adjustment mode 3 buttons
- Turn on the power while pushing the PAUSE key, FEED key and STOP key simultaneously.
- Set the sensor mode (Transparent <--> Reflective)
- For this we will enable the transparent sensor
- Transparent sensor is the default
- See page 34
- To switch from transparent to reflective sensor, ensure the CONDITION LED is lit then hold down the MODE/REPEAT key and then press the STOP key.
- Each time you press the STOP key, you switch back and forth between the two sensor types.
- If the transparent sensor is selected, the PRINT LED lights up and the buzzer sounds once. If the reflective sensor is selected, the PRINT LED flashes slowly and the buzzer sounds twice.
- Make sure top and bottom sensors align
- Install the label paper roll but with the with the labels removed at the beginning so the print sensor can see through the paper. It cannot see through labels.
- Hold down MODE/REPEAT and press PAUSE and release
- If successful, the PRINT LED and CONDITION LED return to their original status.
- Press STOP to exit out of this sensor adjustment mode.
LabelPrinterUtility
If I could get this utility to work with the CLP-521 then I could configure everything from a proper Windows computer instead of using printouts and wasting a lot of paper.
- This use to be called BarcodePrinterUtility.
- Also the last version of this named utility (barcodeprinterutility1202.exe) worked just the same, so this older version made no difference to compatibility.
- Use the Printer Model: CL-S5xx
- This does not fully work with my printer in Windows 10. It might work better in Windows 7.
- Only the Receive 'INFORMATION' option seems to work
- This is good for setting up the label sensor, has pictures as-well
Label Settings
These are some examples of the wheel settings for some label types
- Small White
- Thickness (Vertical Wheel): 1
- Width (Horizontal Wheel): 5
- Settings in Seagull Driver
- Name: Small Labels
- Type: Die-Cut Labels
- Label Size: Width:73.0mm, Height:51.0mm
- Exposed Liner Widths: Left:2.0mm, Right:2.0mm
- This label Manufacturer said they were 76mmx50mm Direct Thermal Labels and the same size as Datamax 420069. (2" x 3")
- This label is almost the same as the Datamax 420069, but the label is a bit smaller on the width. The label backing is 3" across.
- The Datamax Labels has been renamed to the Datamax-O'Neil Labels.
- This actual label is 2" x 2.87"
- 6x4
- Thickness (Vertical Wheel): 1
- Width (Horizontal Wheel): 9
- Media thickness from the manual (page 42)
Media Thickness
Dial Position          Suggested media type
0                      Direct thermal media (thin media)
1                      Standard Label media, Direct thermal media
3-5                    Thicker backing paper labels
6-9                    Cards, tags, thicker media stock.

* These values are guidelines. The exact media being used must be matched with the correct media thickness adjustment position.

- When shipped from the factory, it is set at dial 1.
- The offset adjustment varies according to the thickness and the hardness of the media.
NB: The closes the head is to the labels the more wear is likely and the life of the head is reduced.
Misc
- Downloads
- Downloads for the Citizen CLP-521 | CITIZEN SYSTEMS JAPAN CO.,LTD. - Here, you can download Official User's Manuals, Drivers, Utilities, SDKs and more. The driver here is an old Seagull one.
- Citizen CLP-521 Printer Drivers by Seagull Scientific
- Citizen CLP-521 Windows printer drivers by Seagull Scientific make it easy to print labels, cards and more from any Windows program, including our BarTender software.
- These will always be the latest drivers
- Download Utility | CITIZEN SYSTEMS JAPAN CO.,LTD. - Download LabelPrinterUtility and other utilities here. I have used a cached version so the downloads will appear.
- barcodeprinterutility1202.exe File Download & Fix For All Windows OS | pconlife.com - This is an old version of LabelPrinterUtility and is here for reference only.
- Citizen CLP-521 : Printer User Manual | Manual Shelf - Find and download user guides and product manuals
- Citizen CL-S521 User Manual | ManualsLib - Alternative download location for the manual.
- Settings
- Setting the following will make graphics better (Printing Preferences --> Graphics --> Dithering: Ordered)
- Replacement Guide
- CLP-521 --> CLS-521
- CL-S521 | Citizen Systems - The successor of the CLP-521
- Errors
- How To Diagnose Configuration Issues with Citizen label printers | citizensystems | YouTube
- Producing a diagnostic self-test from and configuration print from our label printers including CL-S521, 621, CL-S700, CL-E720, CL-S6621 and CL-S400.
- how to do a self test print.
- When trying to print, the CONDITION and ERROR lights keep coming on.
- When trying to print and condiition and error lights keep coming on | fixya
- When trying to print, CONDITION and ERROR lights keep coming on. also when pressing feed it feeds through more than one label and then shows the condition and error lights.
- Most common cause for this is sensors not positioned correctly. Make sure that the white arrow on the top sensor is aligned with the bottom sensor. See you user manual.
- Also check that the sensor used is the correct one for the media (i.e. black mark or transmissive).
- How To Diagnose Configuration Issues with Citizen label printers | citizensystems | YouTube
- Maintenance and usage
- How to change the media sensor for a Citizen CLP521 | BOXwise | YouTube - How do I adjust the Threshold Setting? By following the simple procedure outlined in this video.
- cls521 labels | Doug Morton | YouTube - Citizen cl-s521 label loading and sensor placement.
- Media Width and Thickness Adjustment for Citizen CL-S521/621 and CL-E720 Label Printers | citizensystems | YouTube
- Using the media adjustment dials or ‘wheels’ to set correct media width and media thickness on the CL-S521, CL-S621, CL-S631, CL-E720 and CL-E730 models as well as earlier CLP ranges
- Blue Wheels
- CL-S521-CBI printer Instructions | Alicia O'Neill | YouTube - Citizen CL-S521-CBI thermal printer - How to load label and armband media.
- Media Width and Thickness Adjustment for Citizen CL-S521/621 and CL-E720 Label Printers | citizensystems | YouTube - Using the media adjustment dials or ‘wheels’ to set correct media width and media thickness on the CL-S521, CL-S621, CL-S631, CL-E720 and CL-E730 models as well as earlier CLP ranges
- Most Common Thermal Printer Faults and How to Resolve Them | Latest News - Thermal printers are a popular choice for businesses who want to create high quality, durable labels while saving valuable time and money.
- When feeding labels, you must remember the label that is hanging out might have already past the print point so it is the label behind it will be the first to be printed on. Obviously this depends on label length.
this is not true
- PRN files
- These files are just copies of the information sent to the printer, not error logs.
- What's a PRN file, why do I need it and how do a make one? - NeuraLabel Blog - A PRN file is simply a printer file that is created for a specific printer in a language that the printer understands. Therefore PRN files are printer model specific and will not work with other types of printers.