Why Convert from MBR to GPT hard drive type?
The reason for these instructions is that at some point if you might need to change your windows system disk from a legacy MBR hard disk type to the new style GPT format without loosing data to take advantage of the following features.
- Hard drives larger than 2.2TiB
- UEFI
- Secure Boot (allows only signed drivers to be loaded by the OS)
MBR and GPT default partition layouts
It might be helpful to see what the default layout on a Windows 10 installation for both disk types so I installed Windows 10 on the same Corsair 120GB SSD under both disk types and took images of their various partition settings in both the Windows Disk Management and the Paragon Disk Manager.
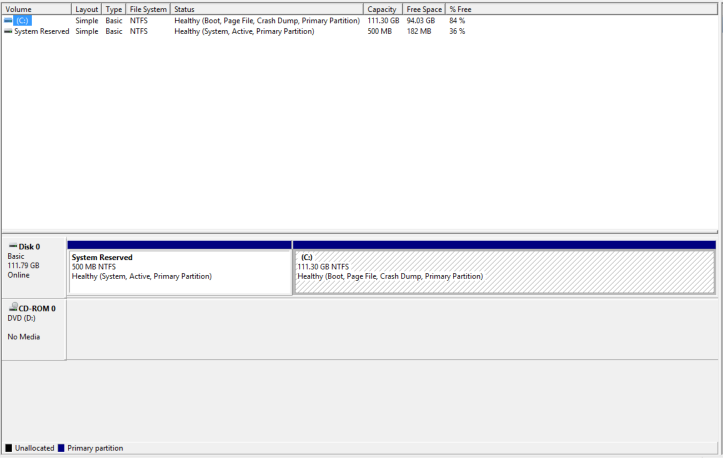
MBR
Windows Disk Management
Paragon Hard Disk Manager


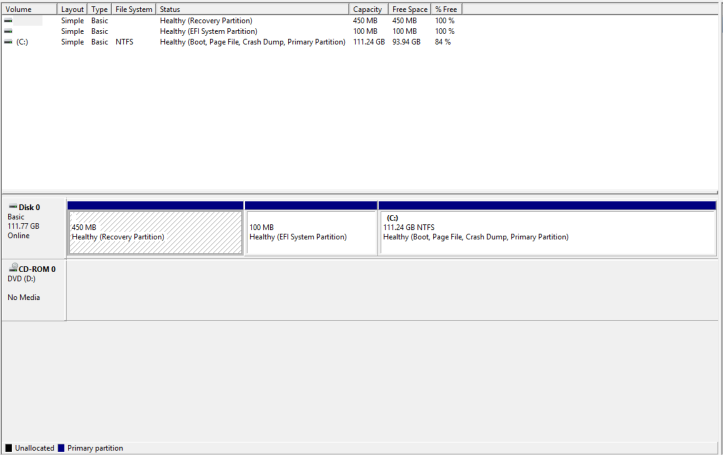
GPT
Partition Names
- Recovery
- System (EFI)
- Reserved (MSR)
- Primary (Windows System)
Windows Disk Management
Paragon Hard Disk Manager


The Instructions
Before continuing
BACKUP your whole drive !!!!
These instructions preserve the recovery partition and the default partition layout exactly like they would be on a fresh default installation of windows 10 on a GPT/UEFI installations. There is a reason for windows having a default layout so without knowing I prefer mine to be the same.
Your files and settings will be preserved.
Absolute Minimum steps required (To convert from MBR to GPT)
These 4 steps are only to remind the advanced user or those messing about.
- Convert drive to GPT
- Create an EFI partition
- Run bcdboot command to repair the boot config
- A 64-bit UEFI PC with it enabled in the BIOS
Notes
- When I refer to the Paragon Boot Disk I am using the WinPe version and I always goto the full manager
- If paragon asks about processing a RAW partition just click ok.
- All of these instructions referrer to Windows 10 x64
Prerequsites
- Your live PC with its data and HDD
- A spare HDD
- An external USB HDD
- Paragon Disk Manager 15 Premium
- Windows 10 boot disk
- Reprofiler - for correcting broken Windows User Profiles
- Windows Repair v3.8.4 Released - To repair permissions
Stage 1 – Make GPT/UEFI Windows Image
We need to make an image file for a fresh installation of Windows 10 using the UEFI /GPT system.
- Install the spare hard drive in to your computer as the sole hard drive (removing your current live HDD)
- Make sure the computer is configured to boot via UEFI
- Boot from the Paragon boot disk
- Make sure that the new hard drive is configured as a GPT hard drive, if not, delete everything on the HDD and make it in to a GPT hard drive (right click on the drive etc…) but do not create any partitions
- Save the changes and power down the PC
- Boot of your Windows 10 boot disk and install windows 10 64bit
- Once windows 10 is installed power down the PC
- Attach your USB hard drive and boot of your Paragon boot disk
- Image the whole hard disk holding the windows 10 installation to an image file located on your external USB HDD
- You now have a suitable windows 10 image file for the next stage. You could also have used the hard drive directly but it can make things a bit messy. My way has fewer issues as you always know which drive is which.
Stage 2 – Configure New Partitions and Disk Type on your Live Drive
- Re-install you original disk back into your PC removing the spare HDD
- Keep your external USD HDD attached
- Configure the PC BIOS to boot legacy/MBR mode
- Boot of the Paragon boot disk.
- Working on the PCs internal HDD.
NB: all disk operations can be queued and applied in 1 go but if you find gaps in-between your partitions consider doing each step separately:- convert to GPT (Right click on the internal/live HDD)
- Delete the ‘Recovery’ partition
- Resize the C: partition 120mb smaller and have the free space appear before it
- In to the free space I want you to restore the following partitions, in order, from the image file we made earlier. Do not add drive letters
- Recovery (450mb)
- NO NAME /EFI (100mb)
- MSR (16mb)
- If there is space between the C: partition and the MSR partition (the last one just added), resize the C: partition again to remove the gap.
- Apply all changes.
- Turn the PC off
- Disconnect the USB hard drive
Stage 3 – Correct the Boot Record on your Live Drive
The disk is now converted and all the partitions are in place but Windows will still not boot. You now need to correct booting information in a process similar to repairing a MBR or BCD.
- Configure the Bios to boot from UEFI
- Boot off the Windows 10 boot disk.
- Load the command prompt (shortcut = Alt + F10)
- Run diskpart
- Type: select disk 0
- Type: list volume
- The volume list is now shown
DISKPART> list volume

  Volume ###  Ltr  Label        Fs     Type        Size     Status     Info
  ----------  ---  -----------  -----  ----------  -------  ---------  --------
  Volume 0     D   ESD-ISO      UDF    DVD-ROM     5605 MB  Healthy
  Volume 1     C                NTFS   Partition    111 GB  Healthy
  Volume 2         Recovery     NTFS   Partition    450 MB  Healthy    Hidden
  Volume 3                      FAT32  Partition    100 MB  Healthy    Hidden
- Your windows system disk should have the drive letter C:, if not set it to C:
- Type: select volume 1
- Type: assign letter=c
- We need to give the EFI partition a drive letter S:. The EFI partition is 100mb and in this example volume 3 so:
- Type: select volume 3
- Type: assign letter=s
- We have now finished with diskpart
- Type: exit
- Type: bcdboot c:\windows /s s: /f UEFI
- Type: exit
- Turn your PC off.
- Make sure your bios is set to boot UEFI Secure Boot
- Reboot the computer making sure you have removed the windows 10 boot disk
- Your windows installation should now load
Full diskpart command routine
Microsoft Windows [Version 10.0.10586]


X:\Sources>diskpart

Microsoft DiskPart version 10.0.10586

Copyright (C) 1999-2013 Microsoft Corporation.
On computer: MININT-5HVULE8

DISKPART> list disk

  Disk ###  Status         Size     Free     Dyn  Gpt
  --------  -------------  -------  -------  ---  ---
  Disk 0    Online          111 GB  6144 KB        *

DISKPART> select disk 0

Disk 0 is now the selected disk.

DISKPART> list partition

  Partition ###  Type              Size     Offset
  -------------  ----------------  -------  -------
  Partition 1    Recovery           450 MB  1024 KB
  Partition 2    System             100 MB   452 MB
  Partition 3    Reserved            16 MB   552 MB
  Partition 4    Primary            111 GB   572 MB

DISKPART> list volume

  Volume ###  Ltr  Label        Fs     Type        Size     Status     Info
  ----------  ---  -----------  -----  ----------  -------  ---------  --------
  Volume 0     D   ESD-ISO      UDF    DVD-ROM     5605 MB  Healthy
  Volume 1     C                NTFS   Partition    111 GB  Healthy
  Volume 2         Recovery     NTFS   Partition    450 MB  Healthy    Hidden
  Volume 3                      FAT32  Partition    100 MB  Healthy    Hidden

DISKPART> select volume 3

Volume 3 is the selected volume.

DISKPART> assign letter=s

DiskPart successfully assigned the drive letter or mount point.

DISKPART> exit

Leaving DiskPart...

X:\Sources>bcdboot c:\windows /s s: /f UEFI
Boot files successfully created.

X:\Sources> exit
Stage 4 – Correct User Profile Issues (optional)
If when your windows 10 for the 1st time it is asking you to create a profile before continuing, this is because there as some permission issues with the user profiles so to continue:
- At the user creation form/prompt, create a profile called uefi and don’t give it a password
- You have now logged on using the new account.
You need to do the following to fix it to re-establish the link between the user accounts and their profiles and correct the relevant permissions:
This fix might be useful to run even if you don’t appear to have problems (I have not verified this).
- Enable the administrator account via an administrator level command prompt
net user administrator /active:yes
- Log off the uefi user and login in to the administrator account
- Download the reprofiler program
- Run reprofiler and reattach the user accounts to their correct profile location as per the instructions on the reprofiler website
- Reboot your computer and make sure your old accounts work as they should
- Now disable the administrator account via an administrator level command prompt
net user administrator /active:no
- Delete the uefi user if it is no longer needed
- Your profiles are now fixed
Stage 5 – Things are not quite right (optional)
Are there services that are not running or things seem to be missing, then it is likely to be permissions across the windows install that is wrong. This however is easily fixed
- Download windows AIO repair from tweaking.com
- Boot into safe mode
- Run the software and repair
- Service Permissions
- File Permissions
- Registry Permissions
Stage 6 – Multiple boot options appear
When you load windows you keep getting prompted which install your want to use. To remove this you need to delete the unwanted OS reference.
- From the run menu load MSCONFIG
- Goto the Boot tab
- Delete the rogue entry and save the changes
Links
MBR --> GPT Conversion
- Converting Windows BIOS installation to UEFI - TechNet Articles - United States (English) - TechNet Wiki - Nehal J Wani based his work on this original solution and I have also taken the boot correction aspect from here.
- How to Convert Windows 7/8/8.1/10 Installation from Legacy to UEFI Without Data Loss! - YouTube - A video on how to convert MBR to GPT without data loss - Nehal J Wani
- Convert Windows 7/8/10 Installation from Legacy to UEFI Without Data Loss (Simpler Method) - YouTube - A video on how to convert MBR to GPT without data loss - Nehal J Wani
- Convert MBR to GPT using Macrium Reflect. See description for the steps. - YouTube - How to move you windows installation to a GPT Hard disk and boot it, no conversion method
- How to Convert MBR to GPT Disk in Windows 10 / 8 / 7
- Convert Disk between MBR and GPT in Windows 10 without Data Loss
- Converting MBR to GPT for EFI boot? - Windows 10 Forums
- Installing Windows 7 on UEFI based computer | Ask the Core Team - This shows different sizez for the EFI and MSR partitions for Windows 7. You should use the sizez for Windows 10.
Diskpart
- How to Use the Diskpart Utility to Assign and Remove Drive Letters | How To Geek
- Assign, change, or remove a drive letter with Diskpart | TechNet
Other