Items filtered by date: December 2014
Using IMAP on iPhones
Using IMAP on iPhones is notoriously difficult because each version of iOS has a different way of handling a standard IMAP mailbox. The differences are subtle but enough to cause end users issues. In this article I hope to try and put some of that right.
- when deleting an email the user gets an error message that it could not be moved to trash
- not emptying trash
- when trash is emptied on iphone trash, the emails are not marked for deleteion (i.e. purge) and are not actually deleted.
- the iphone might be utilising a local trash store and not the one on the server
Notes
- Different versions of office and iphone IOS might have different default ways of handling imap email deletion, ie some purge but do not delete. Outlook 2010 when mail is deleted sends it to trash, when deleted from trash actaully deletes it in the IMAP mailbox.
- iPhones have the option to delete/prune emails from the Deleted messages folder after a set period, it was mentioned somewhere that this could be set to never.
http://www.fixedbyvonnie.com/2015/02/cant-delete-emails-ios-8-iphone/ - The purge thing is a stupid thing, an item can be marked for deleteion and as such gets a strike through appearances (not all platforms), these files by definition in the IMAP protocol are not deleted until the deleted emails are purged. However different OS and software handles this differently and can appear not to use the purge feature because they delete the email and then purge it immediately, or that there is a setting to hide emails flagged for deleteion.
- purging does not usually happen until you navigate to another folder (unless the software is set different or possibly when a sync is done)
Sent to a client
The issues you have been having are related to how different version of outlook and aplle iOS handle IMAP protocol (your email), every setup is slightly different.
Here are some links to help with your iPhones not deleting emails and general information:
- How to fix iPhone IMAP error “unable to move message to trash”
- Fix - The Message Could Not be Moved to the Mailbox Trash iPhone
- Why do my deleted messages have a ‘strikethrough’ in IMAP on Outlook?
- Purge IMAP items marked for deletion (Outlook 2007)
- How to Empty the IMAP trash folder
- How to Delete All Email from Mail Inbox on iPhone & iPad
- Why can’t I delete emails from my iOS 8 iPhone? This is quite a good article
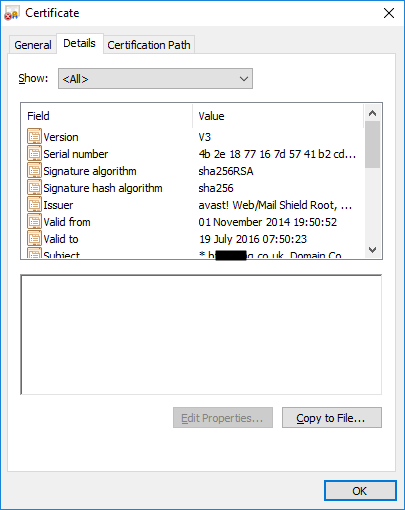
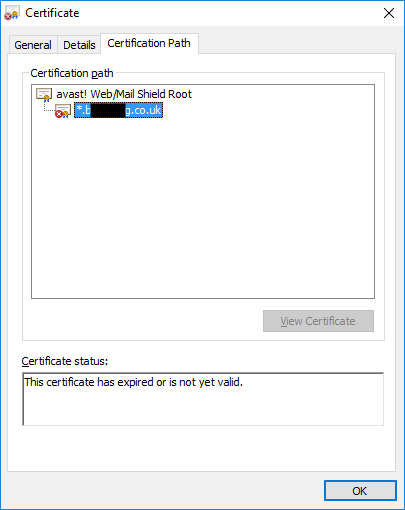
Avast failed SSL Certificate when using Outlook
When you use Avast Antivirus it installs an invisible proxy SSL Certificate Authority that allows it to scan SSL/TLS traffic with its antivirus engine. The downside to this is that all certificates appear to be signed by avast! Web/Mail Shield Root and can make things confusing at first glance when a SSL certificate is out of date.
When using Outlook you can also see this error:

Now if you examine the certificate:
This certificate has expired or is not yet valid
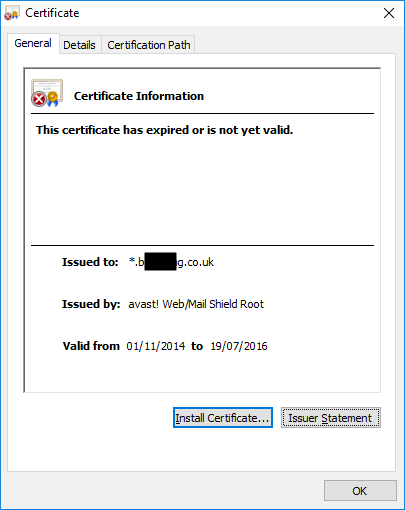
I had this issue with an SSL certificate that I thought was correct at the remote server and that Avast Antivirus had then flagged as out of date. As it happens the certificate at the other end was out of date and Avast mints new certificates on the fly so there is no cache to worry about. The instructions below are what helped me come to that conclusion.
Things I tried:
- re-installing the mail component does not fix this (including a reboot)
- i cannot find the certificate for bfhosting.co.uk in my ssl store
- it is avast issuing a certificate from its system on the fly
- when you click install it is never installed permanetly (only if it is expired?)
- is the pm certificate still faulty
- adding the account and re-adding it in outlook did not work
- disable the SSL scanning and then recheck the ssl certificate is correct
- you can also check the certificate details in outlook if it is faulty. you will get the warning message on load up
OpenSSL Commands
If using on windows you will need to get the binary file openssl.exe
openssl s_client -connect host:port -showcerts

or

openssl s_client -connect quantumwarp.com:995 -showcerts
My Wordpress Notes
These are collection of my WordPress notes.
WordPress Platform
- PHP
- WordPress PHP Versions: Best PHP for WordPress in 2023 - Technocript.com - Choosing the best WordPress PHP version is crucial to make sure that the software is secure and free of bugs. Find out more in this article.
- Where are WordPress Users and Permissions Stored in the Database? - PublishPress - This is an introduction to WordPress permissions and where they are stored in the WordPress database: wp_user_roles, wp_capabilities and more.
- WP-CLI
- Installing – WP-CLI – WordPress.org - WP-CLI is the official command line tool for interacting with and managing your WordPress sites.
- The WP-CLI | WP-CLI - WP-CLI is the command-line interface for WordPress. You can update plugins, configure multisite installations and much more, without using a web browser.
Security
- Block xmlrc.php with htaccess (WordFence will do this for you)
<Files xmlrpc.php>
  ErrorDocument 403 default
  order deny,allow
  deny from all
</Files>
- Disable all of the search features with a plugin.
Finding Bottlenecks
- Finding Bottlenecks in WordPress Code - In this article I want to demonstrate a few ways in which you can identify potential performance issues in your codebase, which will hopefully allow you to fix them before they become real issues.
- How to Fix Common Bottlenecks that Slow Down WordPress Sites - There can be many reasons that slow down WordPress. In this article, we’ll cover the most common bottlenecks and solutions for them.
- How to do WordPress plugin performance analysis - Super Speedy Plugins
- In the video below, I show an example of performance analysis of a WordPress plugin. Performance optimisation is firstly performance analysis – you need to find out where your performance bottlenecks are.
- Performance bottlenecks in WordPress are most commonly found in the database, so a plugin tool like Query Monitor can help a great deal. If you want to do performance analysis and optimisation properly however, break out the big-boy tools.
- Dismantle WordPress Performance Bottlenecks Seminar - YouTube | Seravo - The host of the webinar is Otto Kekäläinen, the code-loving CEO of Seravo. He is joined by Benjamin Eberlei, the founder of Tideways.
Performance Issues
- How to Diagnose High Admin-Ajax Usage on Your WordPress Site - Learn how to diagnose high admin-ajax.php usage in WordPress sites and fix it for good. Tame the WordPress Heartbeat API and speed up.
Debugging
- Use profiling plugins to
- get metrics like load time
- show which plugin is causing the slowness
- which SQL commands are executed and show the slow ones.
- which crons running
- Tutorials
- Turn Visual Studio Code into the Ultimate Editor for WordPress Development - Learn how to set up VS Code for WordPress development including installing necessary extensions, setting up PHP and JS debugging, git integration, and more.
- Debugging in WordPress – Advanced Administration Handbook | Developer.WordPress.org
- This page describes the various debugging tools in WordPress and how to be more productive in your coding as well as increasing the overall quality and interoperability of your code.
- Here is TL;DR of the functions:
// Enable WordPress debugging mode
define( 'WP_DEBUG', true );

// Enable Debug logging
define( 'WP_DEBUG_LOG', true );                    // to the default log file `/wp-content/debug.log`
//define( 'WP_DEBUG_LOG', '/tmp/wp-errors.log' );  // to a specified log file

// Disable display of errors and warnings
define( 'WP_DEBUG_DISPLAY', false );
@ini_set( 'display_errors', 1 );

// Use dev versions of core JS and CSS files rather than the minified production versions
define( 'SCRIPT_DEBUG', true );

// Should debug messages be shown inside the HTML of pages or not
define( 'WP_DEBUG_DISPLAY', true );

// Saves database queries to an array, which can then be displayed to help analyze those queries
define( 'SAVEQUERIES', true );
- Using Your Browser to Diagnose JavaScript Errors – Advanced Administration Handbook | Developer.WordPress.org
- If you’re experiencing issues with your interactive functionality this may be due to JavaScript errors or conflicts.
- This guide will show you how to diagnose JavaScript issues in different browsers.
- How to Find and Access WordPress Error Logs (Step by Step) - Need to enable debug mode in WordPress? Here's how to set up WordPress error logs with a plugin or wp-config so you can track errors and troubleshoot your site.
- How to Enable WordPress Debug Mode and Get the Debug.Log File - YouTube | WP STAGING - Find out how to enable the WordPress debug mode and how to let WordPress generate the "debug.log" file. The debug mode can help you a lot if your WordPress site experiences a fatal error like a server error 500 or a blank white page and you want to fix your WordPress website.
- A Quick Guide to Debugging in WordPress (3 Methods) - ManageWP - As a WordPress user, running into occasional issues with your website is inevitable. No code is perfect, and eventually, you might find yourself having to deal with debugging in WordPress. The good news is that doing so is a relatively quick and straightforward process.
- Enable debugging via a URL variable
- This can be very useful if you want to switch between Dev and Production quickly without having to maintain 2 sites.
// Enable debugging via an URL GET variable
if ($_GET['debug'] ?: null) {
    define( 'WP_DEBUG', true );
    define( 'SCRIPT_DEBUG', true );
}
- This can be very useful if you want to switch between Dev and Production quickly without having to maintain 2 sites.
- WSOD (White Screen of Death)
- Debugging and Fixing the WordPress "White Screen of Death" - SpinupWP - Is your WordPress site showing a blank white screen? Learn how to investigate & fix issues that could cause the infamous White Screen of Death.
- The link you followed has expired
- How To Fix "The Link You Followed Has Expired" Error in WordPress - Are you seeing 'The link you followed has expired' error in WordPress?
- The quickest way to fix ‘The link you followed has expired’ is by increasing the file upload size, PHP memory, and execution time limits for your WordPress website.
- How to Fix "The Link You Followed Has Expired" WordPress Error
- Encountering the "the link you followed has expired" error on your WordPress site? Inside, you will learn how to remove the error for good.
- Fixing the "The link you followed has expired" WordPress error doesn't have to be a headache. We offer 4 solutions right here.
- How To Fix "The Link You Followed Has Expired" Error in WordPress - Are you seeing 'The link you followed has expired' error in WordPress?
Performance
- Caching
- Caching in SpinupWP - SpinupWP - SpinupWP implements multiple caching layers: browser caching, page caching and object caching. Read this to learn more about how SpinupWP handles caching.
- WordPress Caching: All You Need To Know - SpinupWP - We cover what caching is and why it’s important. We also go over each caching layer and the role it plays in WordPress optimization.
- By default, any POST requests or URLs containing query string parameters bypass the page cache.
- What Is Redis Object Caching? (And How To Use It for Your WordPress Site) - 20i - We all know the importance of fast-loading web pages. When you implement this form of server-side caching, you’ll be able to store database query results to deliver content as quickly as possible.
- Redis vs Memcached
- Both are open-source, in-memory data stores. However, Memcached is designed for simplicity, and doesn’t support some of the advanced data structures that you’ll find in Redis.
- The Home of Redis Developers | The Home of Redis Developers - Learn all the best practices to get up and running with Redis in no time. Get started and discover the power of Redis, whether on your local machines or in the cloud.
- WP Super Cache – WordPress plugin | WordPress.org - A very fast caching engine for WordPress that produces static html files.
- TTFB
- Improve your WordPress website's TTFB – 20i Support Database - Time To First Byte (TTFB) is the time it takes for your browser to receive the first byte of page content from the server. Reducing TTFB plays an important role in ensuring your site is performant and responsive for its users.
Plugins
- Divi has it's own page at QW.
- Total Cache - Control iframe embedding
- If the 'self' flag is not set, Divi will not work on quantumwarp.com because it uses iframes.
- I manually set the Header set Content-Security-Policy in the .htaccess file but it kept getting changed (As below) whenever i load this plugin in the admin area, it alters the .htaccess to match it's current configuration. As youo can see the 'self' statement gets removed which can cause issues.
Header set Content-Security-Policy "frame-ancestors 'self' *.quantumwarp.com"

-->

Header set Content-Security-Policy "frame-ancestors *.quantumwarp.com"
- The solution is to add this extra statement in Total Cache's configuration but it is hard to find.
- Performance --> Browser Cache --> Security Headers --> frame-ancestors: 'self' *.quantumwarp.com
- Wordfence - Blocking iframes
- WF Firewall Blocking Header iframe | WordPress.org
- As for your issue, it sounds like Learning Mode will be your friend here. From the Wordfence Dashboard click on Manage WAF. Then you will see Basic Firewall Options --> Web Application Firewall Status. Change the option to Learning Mode. Now perform the actions that were causing issues, such as visiting the page(s) containing the iframe code. This will help Wordfence learn that these actions are normal and it will allow them in the future. After you have finished performing the actions, switch the WAF from Learning Mode back to Enabled and Protecting. Now test to see if your iframe works correctly.
- Firewall Learning Mode - Wordfence - "Learning Mode" allows the firewall to be adjusted to your site. is an amazing resource for learning more about the WAF and learning mode.
- Disabling WordFence will fix this issue, but is not ideal and should only be briefly done to verify WordFence is the issue.
- Blocking xmlrc.php
- with htaccess - This is done on the server level.
- If you use WordFence this will be done at the php level but allows more control rather than a blanket ban.
- WF Firewall Blocking Header iframe | WordPress.org
- WordFence
- To make your site as secure as possible, the Wordfence Web Application Firewall is designed to run via a PHP setting called auto_prepend_file, which ensures it runs before any potentially vulnerable code runs. This PHP function add the define file on the beginning of every file that is requested by a browser.
- Check the WordFence logs and see what URL it is blocking, then you can add an exception.
Articles / Things
A collection of solutions for problems I found while using WordPress. I might move these to their own articles.
...
Manually Upgrade WHMCS
In WHMCS 7 you can use automatic update but in version 6 you till have to do this manually, including v6.x to v7.x , which is shown below:
- Backup
- Rename live folder with pre-fix old-
- Extract the new package on the desktop
- Rename the admin directory on the PC version
- Copy the configuration.php from the live version to the desktop version
- Upload the desktop version to the /hosting/ folder on the live site
- Login and run/trigger the upgrade
- Delete the install directory
- Check the CRONs are setup properly
- Configure the update feature (Utilities/Update WHMCS/Configure Update Settings)
- Select an update channel and set a temporary directory for the update (/tmp)
Ecommerce Product Page SEO (Magento Based)
This article uses a Magento product page as an example to try and make the perfect product page but a lot of the information can be translated to a product page of any e-commerce platform.
General
When writing a product page
- The closer words are to the beginning, the more valuable they are
- The first 7 words are the most valuable
- We must have some keywords in mind to focus on
- The copy must be clearly and naturally written
- Spaces count as 1 character
- google recommends less 75 links on a page, ecommerces have a lot. Guideline only. excessive links deplete your page rank
- set the max category depth to 1 for the main menu to reduce links, because we will have on the left an internal nav box (layered navigtion)
- do not use manufacturer imported data for product descriptions as this will be seen as duplicate content
Keywords
When writing a product page we have to consider the product. Keywords help/show google what the page is about and whether it is a real page and not spam content created by a computer, Google can now tell. Most dodgy techniques no longer work.
We have to write article naturally but there are still methods we can consider when writing content that help SEO. There is no harm in helping google to see your product though and through the correct placement of keywords we can do that
The following should be used at minimum for its keywords
- Product Title
- SKU
- Brand
Locations for Keywords
SEOmoz identified the following keyword factors as having most influence on Google's ranking algorithm (the method by which the search engine orders results), for example:Keyword Use in title tag
- Keyword use in body text
- Relationship of body text content to keywords (topic analysis)
- Keyword use in H1 Tag
- Keyword use in domain name
- Keyword use in page URL
- Keyword use in H2, H3, H(x) Tags
- Keyword use in ALT Tags and Image Titles
- Keyword use in Bold/Strong tags
- Keyword use in Meta tag description.
Magento Product Page SEO
I will now go over the different sections of the magento product page. I will try to explain what the different bits are and then at the end of each section I will just bullet point what the aims for that section should be. There are some rules that might not be able to be implemented so do not worry if you cannot do everything.
To get an idea of what you should be doing, watch this video:
On Page Optimisation with Magento 1.4 - YouTube
It uses a Firefox plugin called SearchStatus
Name / Page Title
This will be the products name and by proxy the main keyword for the page. This is slightly different to a normal page where this can be put in artificially. Because you are using this on an ecommerce site the products name is usually enough
- This sets the Page Title
- Use Product name
- Changing the product name will change the products URL (i.e. http://www.pmtuning.co.uk/bundle-pm59 )
- Product/Title/URL is very important
- Title cannot be the SKU code, this is really bad
- Order of the words in the title can be important
- Title Length should not be excessive (recommend 60 – 64 characters). This is not always possible with product titles because they are what they are
Product Description
The descriptions should be written to be easily read by humans and if they are google will like them. But there are a few things we can do to help google rankings
- Always use the WYSIWYG
- to edit descriptions
- Use of benefit statements - Web SEO copy tips - How to write a killer product page
Short Product Description
Short description is specific to this design package. This description will display at the top of the product page, and in category listings in List view. Magento User Guide, this is used in the local site search and sometimes can be picked up by google (probably if the meta description is not filled in)
- Should be 1 or 2 paragraph(s) or so selling the item
- why does someone want to buy this? (Benefit Statement)
- what areas is main features i.e. comes in many colour
- ie this exhaust will increase your bikes performance in the mid-range
- ie This will make you bike stand out in the crowd
- don’t use <h1> – <h6> tags in the short description
Long Product Description
The product‘s description. It will display in the main section of the product page. This section is where you would put in a full description of the product in detail. Magento User Guide
- 300+ words , the product description needs to be at least this long for google ideally. If the product is something like a clip this is not possibly.
- Paragraphs – try add use paragraphs
- Bullet points / Lists – try and use bullet points
- Use H1 – H2 tags (h1 is already used for the product title) – these are heading levels
- Try to use keywords throughout the description. Ie. Use the product name once or twice (no more).
URL Key
This is the last part of the URL
- http://quantumwarp.com/akr0001
- http://quantumwarp.com/pm-tuning-gilera-runner-italjet-dragster-125cc-180cc-center-exit-x-tech-chrome-expansion-chamber
the first one is using the sku code for the title, this needs to be the actual name of the product so google know what the page is about.
So delete the SKU code out of the URL key and paste the items title in. Magento should then create a correct ‘URL Key’ upon saving.
Meta Information
Meta Description
Meta description is most likely to be used by google for its snippets in the search results. You can have a max of 255 characters including spaces but SEO recommends 140 – 160 so the results look nice on a google search result.
- 156 characters max
- This should be a full description of the product; you will rehash some of the point’s mentions in the short description. This is because when moving to prestashop you will not see the short description on the product page. the short description is used in OS for search results and probably google
- Use of bullet points, bolding and italics are useful. Does not keyword stuff?
- don’t forget branding, start the paragraph with your main key word (perhaps in this case the product name)
Meta Keywords
Although keywords are not used for search results by the search engines they can be used heavily for search results from the sites own search and sometimes for categorising and filtering products. Normally you would not use these as they would give your competition your keyword research however in the context of ecommerce and the extra functionality you should use them
Meta keywords is a list of keywords for this page or product:
- Max 20 keywords
- Keywords can be phrases as well not just single words ie ‘Racing Crank’
- Keywords/keyphrases should be separated with a comma
ie. ‘Racing Crank, Scooters, Mopeds - The keywords at the beginning are the most important (assuming they are used)
Images
The images have labels that google reads. Images cannot be read by google so we need to add simple labels
Examples are when you have more than one colour of a product; put the colour at the end
- PM59 Muffler – Blue
- PM59 Muffler – Red
- PM Muffler – Green
These are bad examples
- Blue Muffler
- Blue Muffler – PM59
- Muffler
Summary
- Name – make sure is a decent name and not a SKU
- Short Product Description – this is a short bit of text selling the product, why is it good for the customer (benefit statement)
- Long Product Description – This is where we give a full read out of the product using nice formatting and paragraphs
- URL Key – make sure this is the product title and not the SKU
- Meta Description – short description for google (maybe can be the same as short description)
- Meta Keywords – 20 max that relate to the product
- Images – they need some basic labelling
Check List
Aspects of a product that need checking
General Tab
- Name
- Description
- Short Description
- URL Key
- Volumetric Data (not for SEO)
Meta Information Tab
- Meta Title
- Meta Keywords (not used)
- Meta Description
Images Tab
- Label (for all images)
Emulate Joomla template.css in Gantry Templates
The reason for this is that WYSIWYG editors on Joomla by default look for template.css and some will only look for this. When editors can use this file they can apply the default template styling into the WYSIWYG editor window making things look the same as they will display for the end user.
Currently Gantry does not have a template.css and as such WYSIWYG editors have no styling.
Not all WYSIWYG editors have an option to use custom CSS files and indeed other extensions (which I cant think of at the minute) could have the same issue.
For completeness I will outline both ways I can get JCE editor to have the gantry styling in the editor itself just in-case someone mentions that you can use custom CSS files as this feature request is for more than JCE editor.
Option 1 - template.css
This is the template.css emulation method I would like to see.
create the file /g5_helium/css/template.css and add the following into it:
@import "../custom/css-compiled/helium_13.css";
@import "../../../media/gantry5/engines/nucleus/css-compiled/joomla.css";
@import "../custom/css-compiled/helium-joomla_13.css";
@import "../custom/css-compiled/custom_13.css";
This effectively loads the gantry styling into the template.css which the WYSIWYG editor can use without affecting any gantry code
Option 2 - in JCE Editor
In the JCE editor component you can specify the custom css files with the following lines. This method might be a little bit quicker than using the template.css method.
templates/$template/custom/css-compiled/helium_13.css,
../../../media/gantry5/engines/nucleus/css-compiled/joomla.css;
templates/$template/custom/css-compiled/helium-joomla_13.css,
templates/$template/custom/css-compiled/custom_13.css
This also works, $template is changed for the active template name
templates/g5_helium/custom/css-compiled/helium_13.css,
../../../media/gantry5/engines/nucleus/css-compiled/joomla.css;
templates/g5_helium/custom/css-compiled/helium-joomla_13.css,
templates/g5_helium/custom/css-compiled/custom_13.css
Other Notes
This is a full collection of the Gantry Template files loaded in the frontend of Joomla.
@import "../../../media/gantry5/engines/nucleus/css-compiled/nucleus.css";
@import "../custom/css-compiled/helium_13.css";
@import "../../../media/gantry5/assets/css/bootstrap-gantry.css";
@import "../../../media/gantry5/engines/nucleus/css-compiled/joomla.css";
@import "../custom/css-compiled/helium-joomla_13.css";
@import "../custom/css-compiled/custom_13.css";
these are not needed for the WYSIWYG
- nucleus.css - this is to do with g-content and layout and a css reset sheet
- bootstrap-gantry.css - modified gantry code but as bootstrap is not running in the browser it is not needed
Joomla Page Builders
This is one of the last areas wehere wordprss is beating Joomla, but not for long. Page Builders allow a novice to build pages how they wnat them to look without needing to know complex HTML.
Page builders concentrate on building content where as most new template frameworks concentrate on layout such as modules positions. There is some overlap between these two areas. Somethings can be done both in your template framework or within a page builder.
I have gone through all of the Page Builders so I could find to see what they were like and which one I wanted to use. During my research I found there was quite a range of quality and methods for page builders.
Overview
These are my assessments of the page builders adn are in order of preference.
- SP Page Builder 2 - Easy to use, frontend editing, lots of youtube videos, prebuilt templates cheap to buy for single site. They have an online demo you can try. You can edit within articles and K2 articles by using an plugin but this is not native to SP.Looks polished and the more mature of the page builders. Free version is crippled and the Page builder is not native to WYSIWYG areas.
- JSN PageBuilder v2 - Fully in WYSIWYG editor and this is the future, frontend editing, just been released so needs some improving with layout and functionality but has massive potential. Cheaper than SP for 12 month unlimited sites, but more expensive for single site and is only for 6 months. This editor was built from the beggining to replace the WYSIWYG and as a consequence is the most versitile of the Page Builders. Needs more useful elements, it does not have a lot and interface needs some work.
- JA Builder - I like the idea of blocks which are more completely designed areas rather than elements, very colourful, frontend editing. A block can be restrive but makes building a site very easy, front-end editing, still in alpha but great. This is free and the quality so far is excellent. This is a work in progress and the resizing of elements such as images needs fixing. More generic content blocks are requireed, a lot of them are just for technology style companies. The fourm is active for bug reporting
- Gridbox - The pricing structure is pretty goods as the top version is only $59 but it does not tell you whether this is for 12 months or forever. The interface does take getting use to but this might be improved over time. This software is easy enough to use but the admin is a bit bland making it hard to follow stuff. This Page Builder does not have as many elements as the othes but I am sure more will follow.
- RSPageBuilder - Only just release and some nice features, Very easy to use but no front-end editing or live editing (would be nice). This is free and the quality so far is excellent. The end user has definately be thought about and how to make the whole process easy. This comes with free template althought it is not required to use the page builder. There is no support for this extension unless you purchase a club membership but you should not need documentation with this. Tricky to do pages with no live editor. The free template (optional), RSVario, that is sort of bundled with the Page Builder requires paid extensions to get it to look like the demo, but it is not a show stopper.
- Quix - The free version is crippled and is not worth trying. The Regular (paid) version for $39 give you lifetime updates but limits the support to a usual 12 month term and one website so is good value for money. the only issue is there is no live editing feature and you cannot edit from the front-end. They also do an agency version for $199 unlimited websites and unlimited updated, 12 months support.
Cannot recommend or give an opinion.
- Azura - The information about this product is sketchy and the documentation does not help and there is no direct line to support because it is sold on codecanyon so everything is done through the comments
- Page Builder CK - very basic, might get better in the future and you have to buy the addons pack for $19 for it to be of any use, so class the free version as crippled. It is $19 for the addon pack and six months of updates. SP is much better value for money.
- JMZ Easy PageBuilder - this seems to use K2 as the base for its articles which is very dangerous as K2 is not really updated anymore. PAge Builders should be seperate from other extensions and not depend on them. There is no free version so I could not test this product.
- YOOtheme Pro - Paid for with subscription so not tested. It also seems to be tied to a particular template like Divi for wordpress and definately is not as advanced as SP PageBuilder 2 or JSN PageBuilder
- JoomlaForce - not released yet. There will be Lite and Pro version
Comparison
- My Joomla Page Builder Comparison Spreadsheet
- https://www.smartaddons.com/blog/6-fantastic-shortcode-and-page-builder-plugins-for-joomla
- https://joomlead.com/joomla-tutorials/3-best-drag-drop-pagebuilder-joomla/
Joomla Extensions
- Look in content construction on extensions.joomla.org
Raw Research
These are my more indepth notes i made while assign the various page builders.
- JSN PageBuilder v2
- https://extensions.joomla.org/extensions/extension/authoring-a-content/content-construction/jsn-pagebuilder-pro
- https://www.joomlashine.com/joomla-extensions/jsn-pagebuilder-2-joomla-page-builder-extension.html
- Notes
- You cannot just resize columns
- you have to use fixed dividers
- the contrast between the different areas is not good
- still requires a lot of user input to style different elements
- for layout the pagebuilder is ok and the predone elements help with layout
- V2 is still new frontpage editing is the same as the backend so is good. 1 fault is the sidebar is covering the content area. Possibly because lack of content but might need reporting.
- You can see the page as it should be while you build it, no need for preview
- Selects and uploads images via normal joomla media browser
- Not 37 elements to choose from as some are layouts so 31
- Resizing can be a bit bitty
- Can be used anywhere tinymce is
- Live Edit (no need for preview)
- Import and export
- RS Page builder
- https://www.rsjoomla.com/joomla-extensions/free-joomla-page-builder.html
- Notes
- Nice layout
- Preview option
- Youtube background video element – very nice
- Bootstrap v2 and v3 support
- High contrast between the areas
- Easy to use, GUI is colourful and easy to follow
- No front-end editing
- Selects and uploads images via normal joomla media browser
- Resizes elements well. It seems just to have 2 modes. The desktop and single column
- Looks like divi 2.0 style or gantry
- Only does pages
- SP Page Builder 2
- https://www.joomshaper.com/page-builder
- https://extensions.joomla.org/extensions/extension/authoring-a-content/content-construction/sp-page-builder
- notes
- online demo you can try
- all GUI driven
- many good quality elements
- one of the cheaper prices for 1 website license
- prebuilt templates with the elements prefilled
- tricky to see how rows and columns are separated because there are no outlines
- documentiation is all on one page and does not cover all things like elements and thesettings
- can use it in articles
- integrated media manager
- works with any template
- lots of youtube videos
- clean layout
- V2 add the ability to edit in joomla and K2 articles by use of addons
- Helix 3 template might be good to use with this but not required as it is from the same people.
- Can set access levels on elements
- JA Builder
- https://www.joomlart.com/ja-builder
- Notes
- Very new, seems to be still in alpha
- Optional JA Builder Template
- Long video to watch and shows you a lot of stuff – wortha watch
- Has defined sections of header, content and footer.
- A lot of predeveloped blocks (seem more developed than elements)
- Live edit (no need to preview)
- Images are selected and uploaded and JA Buiilder seems to store them in the media folder in it’s area
- After you add the blocks it is very visual
- Only does pages
- I suspect the free template has a lot of stying in it
- Works with all standard joomla layouts such as category and blog layouts
- Definitely gone for blocks rather than elements. Makes it much quicker to build a site
- The JA Builder template will only allow the use of JA Builder pages
- You must enable the ‘JoomlArt Universal Builder’ system plugin. Until you do this the Component does not show
- I would also recommend installing the
- You are not able to defined
- Can add modules or positions
- Adding a menu is tricky as there are no instructions and the module names are just numbers and you cannot change these that I have found
- Styling notes – basically header and footer are site wide
- Header - Content blocks added to the header section are displayed in pages that is assigned to same template style
- Top - Content blocks added to the Top section are displayed in pages that use same layout
- Content - Content blocks added to the "content" section are displayed in the page only.
- Bottom - Content blocks added to the "content" section are displayed in the page only.
- Footer - Content blocks added to the "footer" section are displayed in pages that is assigned to same template style.
- Top and Bottom are missing and these only appear when you have created a menu item pointing to something (ie mosets tree or other menu itm). You then edit the page from there to create it
- There are 2 ways of creating a page
- Not sure about login/logout
- Dependant on a compatible template
- To install a menu select where it should be, content-type should be position/module (as needed) then match up the menu. You cannot create you own position names.
- You can only add modules as modules if they have no position assignment
- Some of the block’s elements need to configurable but hey are not. Such as lists
- Adding elements is an arse, you can olny do this by cloning. Some if you completely delte you cannot add anything back in.
- Cannot just add your own modules easily. No module block/element
- Still buggy but massive potential
- The fact you need a specific template is a bad thing and goes againt the pagebuilder ethos
- If you do not use the template from JA then the content you have built will be display, not the headers and footers. You also cannot edit from the page
- Ideal for small websites with not much content
- YOOtheme Pro (Wordpress and Joomla Version)
- http://yootheme.com/pro/
- Notes
- is tied to a template
- seems empty and not as complete as the other products
- Live edit (no need to preview)
- Gridbox
- https://extensions.joomla.org/extensions/extension/authoring-a-content/content-construction/gridbox
- http://www.balbooa.com/gridbox
- Notes
- Live edit (no need to preview)
- Gridbox comes with a pre-installed and professionally designed themes.Choose your favorite theme and in one click importtheme pages and settings.
- No close button
- Can add modules not positions
- I have no idea how to add a content block
- Can upload plugins – not working at min
- Import and export
- This can potentially be quite powerful.
- You can set layouts ie 3x3x3x3 or 4x4x4 very easily
- Everything is drag and drop
- It has a search and smart search plugin? What for
- When you edit from the admin area if forces you to the frontend and you have to login there
- Free version is un-useable
- Quix (ThemeXpert)
- https://extensions.joomla.org/extensions/extension/authoring-a-content/content-construction/quix
- https://www.themexpert.com/quix-pagebuilder/
- https://stackideas.com/blog/quix-the-most-advanced-page-builder-for-joomla-is-here
- notes
- a lot of files in the package for quix
- cannot test because the installation package is faulty
- there are buttons everywhere and because most of the interface is styled in white and grey it is hard to focus on things. The close and action buttons are on the left side of boxes which is wiered as they should be on the top of an area.
- You will need to play around with this page builder for a while before getting the hang of it
- It has the feel of gantry but not as polished
- You can drag and drop everything so that is not limited
- The elements are not styled so will need styling if you want to make a nice looking site.
- The free version has features you can try such as resizing a block but then you get a notification that this feature is only available in pro. The free version is that crippled I would not recommend trying this product.
- It has potential but needs a little work on the GUI/UX experience to make it more user friendly
- This does have sections/rows and columns which elements can fit into
- Can be used inside a joomla article, not sure how shortcode or full editor
- Azura – Responsive Joomla Page builder
- https://codecanyon.net/item/azura-responsive-joomla-page-builder/8658367
- Notes
- Only available through code canyon
- Can’t really find out the features from the terrible demo and code canyon page
- Really tricky to get a feel about his as there is no documentation, no dedicated website or demos and the support looks cobbled together
- Cannot test because no free version
- Page Builder CK
- https://extensions.joomla.org/extensions/extension/authoring-a-content/content-construction/page-builder-ck
- https://www.joomlack.fr/en/joomla-extensions/page-builder-ck
- Notes
- Can add pages to articles with a tag
- The basic program is free but some needed elements are paid for via the ‘Page Builder CK Params’. It could be classed as crippled without these
- The interface is very dated and simple. It needs a lot more styling
- I was not able to save anything I did
- You are able to use CK to build pages, articles and modules but these are stored within the Page Builder CK component
- JMZ Easy PageBuilder
- https://extensions.joomla.org/extensions/extension/authoring-a-content/content-construction/jmz-easy-pagebuilder
- http://jumazi.com/joomla-extensions/jmz-easy-pagebuilder
- Notes
- Does not use the joomla updater
- There is a quickstarter version at 39.71mb wtf?
- This might be using K2 as a base
- Items are not really style when you add them and there is a lot of work to make a page with this sytem
- Cannot test as no free version
- JoomlaForce
DKIM and SPF
These are my notes on DKIM (Domain Keys) and SPF DNS records. These help prevent sending of spam from your server and allows the remote end to verify that the email you sent is from you. There is also DMARC to help prevent spam.
DKIM and SPF
- DKIM (this says this is the authoritative domain) and SPF (rules which says who can send emails form this domain) – you should enable these to prevent emails being sent from outlook being lists as spam. It is not manadatory. I fyou have this enabled then you really should add a rule in for outlook.com (details to follow)
- Enabling DKIM and SPF should reduce the number of failed delivery notifications you receive when spammers forge messages from your domain(s). These features also work to prevent spammers from forging messages that claim to be from your domain(s).
From http://webx.net/dkim-spf-email-authentication-cpanel/
DKIM
- DKIM (DomainKeys Identified Mail) is a means of verifying incoming email. It ensures that incoming messages are unmodified and from the sender from whom they claim to be. Technically DKIM provides a method for validating a domain name identity that is associated with a message through cryptographic authentication. For more information please visit http://www.dkim.org
From http://webx.net/dkim-spf-email-authentication-cpanel/
SPF
- SPF (Sender Policy Framework) system allows you to specify servers and IP addresses that are authorized to send mail from your domain(s). This feature works to prevent outgoing spam messages using your domain from other computers and servers. If someone tries to send emails spoofing your domain in their email address, the receiving servers will check if you authorized them to send email – failing which such spam will be rejected.
From http://webx.net/dkim-spf-email-authentication-cpanel/ - Needed to help prevent emails getting tagged as spam
- oThere is a possibility if you set your spf to be restrictive you cannot send emails from outlook.com I think it is check-auth@verifier.port25.com that does not like to many emails in a short period rather that outlook checking spf before sending
- Port25.com also caches the DNS response so it is not great for quick updates.
- The failed error messages do not come from outlook when sending via an alias but from your own server.
- ~ALL
- This setting allows emails to soft fail a spam test and some servers allow these sorts of email through because even thought it has not come from a explicitly name server or IP it will let it through. Not sure of the use of this.
- Allows emails to be sent from outlook.com (not sure about this).
- –ALL
- This setting ensures that only authorised domainds or IPs are allowed to send your emails.
- Prevents emails to be sent from outlook.com (not sure about this).
- on my server if you do not have spf.mfilter.dimenoc.com added into ‘Include List (INCLUDE) and the –ALL setting on SPF validation will fail (check this). the ~ALL will do a softfail which is not as bad
- my current SPF record is below and set to use hardfail for best results.
v=spf1 +a +mx +ip4:185.38.45.194 +include:spf.mfilter.dimenoc.com -all
- Outlook.com
- v=spf1 include:spf.protection.outlook.com –all / spf.protection.outlook.com - not tried yet
- When sending emails from a 3rd party email address from outlook.com (ie.e you own server) outlook.com uses your own server to send emails, does not act as a spoofing proxy your SPF records should be setup as normal on your server.
Blank screen on old Dell
This laptop was an old Dell but had 64-bit processor and 4gb RAM so i upgraded it to windows 10. If you send it to sleep and then wake it up, the screen appears. This is obvously a driver issue.
These are my notes on what I tried using the offcial driver:
- Bios auto memory size causes black screen. Set video memory to 32mb manual (Did not work for me)
- Change bios settings + set windows to auto load
- Also the official driver from windows update is not compatible. Force the driver not to download
- Send to sleep, wake up with ctrl + del will always display the screen
Solution
This do not give you all the acceleration of the graphics card but it does not suffer from the blacked out screen issue.
- Windows basic video driver will always work without issue
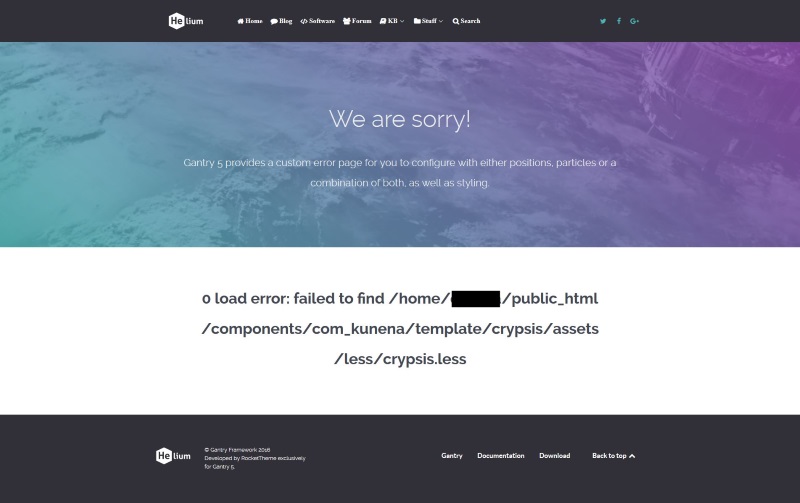
Kunena - Failed to Load
The following error usually occurs sometimes when you move your website with kunena or you change templates.
0 load error: failed to find /home/xxxxxx/public_html/components/com_kunena/template/crypsis/assets/less/crypsis.less
Solutions
- Empty Joomla Cache (which should include Kunena)
or - https://www.kunena.org/forum/k-3-0-fatal-errors/128655-500-error-after-moving-website