Items filtered by date: December 2015
My Xampp Performance Notes
Update (22-01-17) - The following settings work
The main cause for slow xampp on windows is the MySQL service and the slow access times slow the whole page loading process.
i used the MySQL ini file my-huge.ini and these settings from the drupal site both the PHP and innodb. Other settings might of been applied at testing but I dont think so.
INNODB SPECIFIC

innodb_buffer_pool_size = 384M
innodb_additional_mem_pool_size = 20M
innodb_log_file_size = 10M
innodb_log_buffer_size = 64M
innodb_flush_log_at_trx_commit = 1
innodb_lock_wait_timeout = 180
- Speed up page loading time on localhost | Drupal.org (USE THESE)
- Drupal 8 slow in Windows 10 (Xampp) | Drupal.org - (USE THESE) guy says he has had success
- MySQL: "Warning: MySQL server has gone away" | Drupal.org - tells you more about the MySQL settings
- XAMPP Slow on Windows 10 » Nutt.net - this also points towards the MySQL service being slow and gives a suggestion
Primary Document
Preface
The document covers how to improve speed in Xampp as I have found it struggles to most basic tasks quickly.
Xampp is easily configurable and that is why I have persevered with it and created this document in which my research has been successful.
I will cover all of the tips and settings that I discovered along the way. Some are of use whilst others were and some definitely not.
There are 2 main areas where xampp can be slow.
- http daemon – rendering of the html
- MySQL Daemon – the actual retrieval of the data
General
- “Win32DisableAcceptEx”, "EnableMMAP Off" and "EnableSendfile Off" ? – I dont know what these are but they keep getting mentioned.
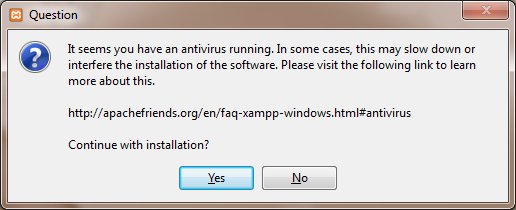
- Exclude xampp files from antivirus scanning
- Firewall – perhaps needs xampp files excluding
- Firewall – perhaps needs localhost and/or 127.0.0.1 excluding
- Uninstalling Anti Virus can help by speeding up the computer
- "setup_xampp.bat" and type "5" to toggle between IPv6 and IPv4. -(cant do this on newer versions)
When to diagnose xampp speed
- firefox / ie cache dont let this fool you. there are also several types of FF cache
- dont forget webserver cache ie htaccess
- turn all caching off when diagnosing xampp speed
Research:
- How to make XAMPP (Apache; lookups) faster on Windows 7? (mentions “Win32DisableAcceptEx”, "EnableMMAP Off" and "EnableSendfile Off" + other mentioned solutions)
- XAMPP on Win7 too slow – this forum thread covers the solutions of: localhost, AV, disabling and xdebug.
- XAMPP / WAMP / whatever it is: Apache is running super slow [closed] – mentions; EnableMMAP, EnableSendfile, innodb_flush_log_at_trx_commit = 2, localhost solutions, realpath_cache_size
Localhost
Below are various lines that should be added or commented out in the hosts file to increase the speed a page loads. I have seen various combinations of these.
These localhost settings try them on there own to see if you get any improvements. Most likely on windows 7+ and the latest version of xampp you will see no difference but on old setups (which need updating) you might see some benefit.
127.0.0.1 127.0.0.1
- Add to localhost
- this one is probably bollocks because of an infinite loop or pointless lookup
127.0.0.1 locahost
- comment out
- if this is commented out, localhost will not be resolved
- Win7 ultimate x64 this is commented out by default. Xampp MySQL resolution will not work without this statement (tested on v1.8.3.0)
::1
- comment out
- possible use to have some effect in vista where the IPV6 method was not implemented correctely, it certainly does stop the IPV6 lookup happening before the IPV4 so will save a little time there and any possible issues with IPV6 from xampp. Do not permanently change this unless you see a marked difference. In windows 7+ these issues are probably resolved and also in later version of xampp where the network stack is a lot better and compiled with newer more compatable binaries.
- NB: If you comment out ::1 when you ping localhost locally you will receive a ping back from 127.0.0.1, if you do not comment it out you receive a ping back from ::1 (or whatever)
not massive improvements, if any
Research:
Network
- Disable IPV6 - Simple Way to Disable IPv6 in Windows Vista
- Disable redundant connections (ie. VMWare so no additinal wait responses for best route is triggersd)
- installing an ipv4 to ipv6 service - XAMPP very slow on Windows Vista
- disable TCP/IP v6 protocol of your network interface
add v6tov4 listenport=80 connectport=80
localhost (xampp) very slow on Vista for some reason
Browser
- network.dns.disableIPv6 (FireFox, IPV6 service)
http://kb.mozillazine.org/Network.dns.disableIPv6 - network.http.keep-alive - toggle it to false (default/integer/115) ? (FireFox)
- Use browser with no addons
- Accessing the website via the IP i.e. 127.0.0.01 can be quicker because there are no DNS lookups
PHP
- Increase memory_limit from (i.e. 64mb to 256mb), read this
- disable xebug - http://stackoverflow.com/questions/1891031/xampp-on-win7-too-slow
- eAccelerator – this will speed things up but not the underlying system which is what I am addressing in this document.
uncomment zend_extension = "C:\xampp\php\ext\php_eaccelerator_ts.dll" - http://stackoverflow.com/questions/1891031/xampp-on-win7-too-slow
eAccelerator is a free open-source PHP accelerator & optimizer. It increases the performance of PHP scripts by caching them in their compiled state, so that the overhead of compiling is almost completely eliminated. It also optimizes scripts to speed up their execution. eAccelerator typically reduces server load and increases the speed of your PHP code by 1-10 times.
MySQL
- innodb_flush_log_at_trx_commit = 2 (some say option 1 can be quicker) (already set to 1, does not seem to make that much difference)
- realpath_cache_size = 24mb (small increase so far)
- MyISLAM vs INNODB
- MySQL to use MyISAM
- MySQL caching (query cache)
- MySQL settings
- Innodb settings all described in “my-innodb-heavy-4G.ini”
- Address individual settings + add links
- innodb_buffer_pool_size ?
- innodb_flush_log_at_trx_commit = 2 (definately quicker)
Example 1 – from here
The query side of things is not 100% needed because it will not effectively affect the base line speed.
#----------------------------------------------------
#          !!!! Query Cache Config !!!!
#----------------------------------------------------

query-cache-size = 524288000
query-cache-limit = 5242880
query-cache-type = 1

#----------------------------------------------------
#          !!!! InnoDB Buffer Config !!!!
#----------------------------------------------------

innodb-buffer-pool-size = 1000M
innodb-additional-mem-pool-size = 200M
innodb-log-files-in-group = 2
innodb-log-buffer-size = 10M
innodb-file-per-table = 1
Example 2 – from here
innodb_buffer_pool_size = 1G
innodb_flush_log_at_trx_commit = 2
innodb_thread_concurrency=8
transaction-isolation=READ-COMMITTED
Research:
people have said moving back to myislam over innodb make a massive difference.
here is why.
all the data from all the databases in xampp is stored in 1 files but has table referecnes for compatability only. so what this means if you have one nasty database it will slow them all down because you have to parse the whole database. by switching back to myislam they all have their own separate files and so will not affect each other.
This article includes discussion on the following from running slow on localhost
- realpath_cache_size = 24mb
- MySQL to use MyISAM
- innodb_buffer_pool_size ?
- innodb_flush_log_at_trx_commit = 2
- innodb-file-per-table = 1 (this setting create 1 file per database instead of all in one)
This article includes discussion on the following from localhost (xampp) very slow on Vista for some reason
- call the apache web server address not by hostname but ip address. On a local computer it is 127.0.0.1
- the other solution is to disable TCP/IP v6 protocol of your network interface
add v6tov4 listenport=80 connectport=80
General Links:
- Innodb Performance Optimization Basicsthis describes the innodb settings quite well and has some examples
- MySQL queries extremely slow in fresh XAMPP installation [closed]
- MySQL > YourSQL – An article on optimizing your MySQL settings
- See in the xampp mysql folder at the file ‘my-innodb-heavy-4G.ini’ for a good description of mysql innodb settings and a decent setup for innodb.
- Slow InnoDB, slow Drupal. What can I do?
- MySQL 5.1 Reference Manual :: 14.6.2 InnoDB Startup Options and System Variables
- How to set the default storage engine to InnoDB in XAMPP
- How to change the database engine of a MySQL database table?
Conclusion
There might be specific issues on certain systems but the majority of the lag is with the MySQL engine, the database settings, especially since xampp is now using INNODB instead of the old MyISLAM.
Stay with INNODB as it has better data protection. It is best to tweak the settings to get the best out of INNODB rather than migrate to MyISLAM.
Current at (29-06-13) and (WIP)
innodb_buffer_pool_size = 1G  (has biggest effect)
innodb_additional_mem_pool_size = 200M
innodb_flush_log_at_trx_commit = 2
innodb_thread_concurrency = 8
transaction-isolation = READ-COMMITTED
these are commented out in hosts but probably make no difference on modern systems
#             127.0.0.1 127.0.0.1
#             ::1       localhost
NB:
- A faster computer with more RAM and faster disk will always make xampp run quicker.
- This was in some of my notes and might need changing,
## Set .._log_file_size to 25 % of buffer pool size
innodb_log_file_size = 256M
Real Life Example - httpd performance and Conclusion
On A fresh Windows 7 Installation
- i do not need to add '127.0.0.1 localhost' rule in hosts file. it works as is.
- httpd.exe also works a lot quicker
- httpd.exe still maxes out but for 1/10 of the time, therefore indocating something on the tcp/ip stack is interfereing
- firefox and ie on the faulty system do not have smooth browsing experiences and can crash frequently
- xampp should works without a modicifaction to the host file indicating an issue with the microsoft dns service
- when zone alarm was installed the ping response form 127.0.0.1 would get slower and slower whereas a ping to ::1 would always be <1ms
Load times on the fresh copy windows 7, using a large website with xampp and on a 5400rpm drive:
Page		afterdispatch (no internet)	afterdispatch ( with internet)

home		546ms				210ms
portfolio	327ms				176ms
Causes of Slowness:
- dodgy 3rd party program still installed that integrate/interfere witht the tcp/ip stack
- dodgy registry entry
- corrupt windows system files (not likely as sfc found no errors)
- remanents of a program left installed that integrate/interfere witht the tcp/ip stack
Solution Options
- find the offending software (not easy and have already tried)
- fresh install of windows 7 (when installing new software monitor with a set benchmark, ie a slow website in xampp)
What Did I Do ?
I reformatted my pc in the end because there was something affecting the tcp/ip stack
How do i know it was the TCP/IP stack
- xampp would not work unless i put in a host file entry localhost 127.0.0.1
- when zone alarm was installed over time the ipv4 ping got slower whilst the ipv6 stayed the same
- browsing could be jerky. on a fast internet connection it still did not seem as fast as other peoples
- i ran a copy of large website on a fresh windows 7 install on a 5400rpm drive and a page after dispatch came in about 300ms where as my dodgy wiondows could be as long as 3000ms just for the dispatch
- all my speed modifications never made that much difference to xampp performance (perhaps the innodb settings and php memory increase, ipv4 default showed promise but that might be because of the underlying tcp/ip stack issue i had)
Performance Notes (to be sorted)
Worked
- disabled ZA antivirus and firewall - makes a big difference
- I just changed the server name from localhost to 127.0.0.1 in database connection configuration and it worked light speed.
(http://stackoverflow.com/questions/13248260/localhost-taking-too-long-what-to-do ) - add xampp to AV/malware realtime scanner exclusions
- disabling malware bytes definately makes a performance increase, you can hear the HDD access is a lot more vigourous.
- malware bytes and comodo AV might not like each others realtime scanner running at the sametime
- make sure any xammp log file is not more that a couple of megs big
- comodo AV pipes up when you do a page refesh in a browser of an xammp server site (very heavy cpu usage)
- with hips/firewall/av all disabled 'internet sercurity helper' (comodo) service still runs at high CPU. xammp a little quicker
- increasing PHP Memory can improve performance (but this is an indirect affect because it makes PHP run better not xampp)
- in a multicore processor, enabling the CPU to run as a single processor as xampp is not multicore aware
Didn’t Work
- revert using 127.0.0.1 in joomla databse connection - makes no difference
- re-enable ipv6 on my wifi card - (seems to make no difference)
- xdebug - already disabled so no difference here.
- zend_extension = "C:\xampp\php\ext\php_eaccelerator_ts.dll" - already disabled
- changing port 8080 (prevents conflicts)
- DefaultReceiveWindow = (10000 * 1024) / 8 = 1280000
DefaultSendWindow = (10000 * 1024) / 8 = 1280000
no real difference or worse (need removing) - run as administrator
Try
- http://www.techunboxed.com/2012/08/how-to-disable-ipv6-in-windows-8.html (also for windows 7)
- dont foget to make sure FF is not hogging the memwory when testing
- Disable ipv4 to IPv6 and disable ipV6 as unticking in network card does not do what is expected
- bind mysql to 127.0.0.1 not localhost
- running xampp as services
- use the latest version
- on laptop make sure computer is set to high performance
- run xampp in safe mode
My Case where My Stack was faulty
- if using the default hosts file for windows 7 x64, the mysql database might not connect. you must uncomment. The following line allows a IPv4 lookup with out going through the windows IPv6 to IPv4 converter.
# 127.0.0.1 localhost
Certain versions fo mysql binaries do not support IPv6 and how they lookup localhost can cause issues. if you uncomment the following line in the host file, this prevents mysql connection because it forces ‘localhost’ lookup on IPv6
# ::1 localhost
- mysql 5 does not handle IPv6 - http://bobstrand.com/totm/2010/04/hey-dude-wheres-my-localhost/
- I applied fixit that prefers IPv4 over IPv6, rebooted - definitely better, but i need to test longer
xampp mysql/mysql in general cannot handle ipv6
xampp mysql/mysql in general cannot handle ipv6. if it resolves localhost and gets ::1 , the mysql cannot resolve the address and thus does not work
solutions:
- add to host file, localhost 127.0.0.1 (this on its own will fix the resolution but not the speed issue)
- make ipv4 prefered protocol (this on its own will fix the resolution but maybe not the speed issue as overtime ipv4 ping to localhost etc.. gets longer. but at the beginning there is a definate speed improvement)
- disable ipv6 completely (this on its own will fix the resolution and probably the speed issue permanently)
unchecked:
- bind mysql to 127.0.0.1 (this on its own will fix the resolution but maybe not the speed issue)
- it must be it does not like ::1 return instead of 127.0.0.1
Links
- xampp ipv6 links - http://superuser.com/questions/414050/why-is-there-a-difference-between-ping-localhost-and-ping-local-ip-address
- http://www.techunboxed.com/2012/08/how-to-disable-ipv6-in-windows-8.html
- http://support.microsoft.com/?id=929852
- this fixit method does disabled the ipv6
- tcp/ip v6 is still present in the adapter properties (expected behaviour see 929852 link)
- testing is required to see how it gets on
- ms fixit page - http://support.microsoft.com/kb/929852
- how to disable ipv6 in registry | Technet
- Disabledcomponents ipv6 resets to ff when I reboot | Microsoft
- Disabling IPv6 on windows 7 64bit
- How to disable IPv6 in windows 7 - says = 0
- Disable and turn off IPv6 support in vista
- Disable IPv6 on loopback address localhost computer name
- Fast Drupal Server Running on Localhost: The Solution to WAMP and XAMPP Slow Execution Times
- How to Fix a Slow XAMPP or DesktopServer on Windows 8 | Devin Walker - Power Settings
Useful
Ping Batch File
This batch file will allows you to ping the different types of network hosts. Run this and view all of the ping responses on the screen at the same time. I would then monitor them over time. I ran a test for 32 hours to make sure I could see any differences easily.
start ping localhost -t
start ping 127.0.0.1 -t
start ping 192.168.1.100 -t
start ping ::1 –t
IP Performance Notes
- stopping the IP Helper service did not affect the ping tests at all
- stopping the TCP/IP NetBIOS Helper service did not affect the ping tests at all
- stopping the DNS Client Helper service did not affect the ping tests at all
- Windows 2000 and later have a "DNS Client" service which is enabled by default.
- This service caches DNS lookups for the local computer only. This potentially saves a bit of bandwidth and makes DNS lookups a bit faster by preventing DNS lookups from being sent over the Internet connection if the same data has recently been requested on this same computer.
http://support.simpledns.com/KB/a61/disabling-the-windows-dns-client-service.aspx - 10 plus windows 7 services you may not need
- Windows XP – restart network without reboot
- how to disable you loopback adapter
- isatap adapter
Microsoft IP Fixits
These are useful for helping with IPv4 and IPv6 issues
- MicrosoftFixit50267 - restore default hosts file.msi
- MicrosoftFixit50409 - disable IPv6.msi
- MicrosoftFixit50410 - Prefer IPv4 over IPv6 .msi
Why is my CPU load for Apache almost 99%?
This just something that i have picked up but not checked.
There is one of two scenarios at play here. Either your CPU is maxing out, or you can browser connect to the server, but not see anything (the system is trying unsucessfully to load the page). In either case you can find the following message in the Apache log file:
Child: Encountered too many AcceptEx faults accepting client connections. winnt_mpm: falling back to 'AcceptFilter none'.
The MPM falls back to a safer implementation, but some client requests were not processed correctly. In order to avoid this error, use "AcceptFilter" with accept filter "none" in the "\xampp\apache\conf\extra\httpd-mpm.conf" file.
PC Performance Improvement for Windows 7
This document covers improving performance on Windows 7 but will most likely apply to most windows operating systems (XP/Win7/Win8)
I have windows 7 x64 ultimate and it is running really slow it freezes and almost locks up like the CPU is overheating but never does. This is why I am writing this guide
This the 26-06-13 version.
Contents
- Items that Affect Performance
- Failing Hardware
- System running hot (Fans Blocked/Failing Fan/etc..)
- Harddrive (failing/slow/Full)
- BIOS settings
- RAM (slow/failing/wrong type/not enough)
- Drivers
- Display Drivers
- Correct Chipset Drivers
- Network
- Filesystem (damaged/requiring maintenance/fragmented/Full)
- 3rd party software (faulty/buggy/not required/service/update services/remnants)
- Out of Date Software
- Antivirus Software
- Anti Malware (especially realtime scanners)
- 3rd Firewall Software (manufacturers performance varies)
- Conflicting Realtime scanners
- Malware
- Outlook
- Firefox Add-ons (including firebug sub-addons)
- Shell Extensions (ie right click options)
- Too Many Icons on Desktop
- Too Many Windows Favourites
- Delete temporary files
- Empty the recycle bin
- Registry (error/health/fragmentation)
- Startup Items
- Services
- Damon Tools Service
- System Restore
- Swap / Page File
- Task Scheduler
- Screen Saver
- Disk and Load issues
- ensure your computer is operating in AHCI mode
- Windows Files Indexing / Drive Indexing
- Disable Drive Defragmentation Schedule
- Disable Prefetch and Superfetch
- Disable Superfetch service
- Disable Windows Search Service
- Enable Faster Boot by Disabling the Splash Screen
- power settings
- Disabling Readyboot (not ReadyBoost)
- Optimise for SSD
- Windows 7 Optimization Guides
- Makes Small improvement (but not worth it)
- Makes No Difference
- UAC
- Unknown if makes a difference
- Diagnostics / Research
- Misc
- Monitor and remove obvious
- RAM Links
- RAMMAP
- RAM Usage
- Standby RAM
- Meta RAM
- Memory usage diagnostics:
- Worked Example
- Additional Notes - sort
- Other Notes
Items that Affect Performance
The following section gives you a list of things you can do to reolve issues outlined above to increase your PCs performance.
Failing Hardware
Failing hardware can have a real effect on a systems performance.
The following hardware issues can effect a systems performance:
- PSU is getting too hot
- PSU is not powerful enough
- Various Hard drive issues (dealt with in its own section)
- Various RAM issues (dealt with in its own section)
- Failing Optical Drive (not reading disks/not writing disks/not opening/making noises etc..)
- Optical Drive is IDE
Improvements:
- Clean PSU out (not recommended for noobies) if it does not cooldown after this, replace the PSU
- If not enough power is supplied to a system the computer can not run at its full speed. It is similar to tyring to concentrate on something when you are hungry. Use a power calculator online and then replace the systems PSU with one powerful enough. Having more than you need allows for further upgrades.
- Hard drive issues have been dealt with in its own section
- RAM issues have been dealt with in its own section
- If an optical drive is not reading or writing a disk properely this can cause multiple reads for 1 piece of information and this can slow the system down.You can resolve this by cleaning the laser with the correct cleaning equipment. If this does not resolve the issues then it is best to replace the drive.
If the Optical drive is not opening or making noises then you should replace the drive. They are cheap enough. - If the Optical drive is IDE then upgrading it to a SATA drive will increase performance
System running hot (Fans Blocked/Failing Fan/etc..)
I see these sort of issues time and time again, not a lot of people understand that the hardware aswell as the software needs looking after, granted not as much. When a computer runs hot its efficienciy and its ‘Top Speed’ is reduced. Also when you are running a computer in the upper end of its thermal operating range you run the risk of killing the hardware.
A System can run hot and cause performance degredation if:
- The CPU Fan is blocked with dust and feg
- The CPU fan is not spinning quick enough, RPM to low
- The CPU fan is not spinning at all
- The GPU Fan is blocked with dust and feg
- The GPU fan is not spinning quick enough, RPM to low
- The GPU fan is not spinning at all
- The Chipset Fan is blocked with dust and feg
- The Chipset fan is not spinning quick enough, RPM to low
- The Chipset fan is not spinning at all
- The case fan has failed (RPM/ Not spinning)
- A substandard fan has been used
- No thermal paste has been used on the CPU
- The Systems airholes (desktop and laptop) are blocked
- The system needs a case Fan but has none
Improvements:
- Clean all fans CPU/GPU/Chipset/Case
- If a fan is not spinning quickly enough after cleaning. Ie system still running too hot or you are getting BIOS warnings, replacement of the fan is required.
- If the fan is not the correct fan for the system, replace it
- Always use new thermal paste when replacing a fan on to a chip no matter what type (except laptop where they have thos sponges in place)
- Clean the systems case free from all dust and muck (laptop and desktop)
- Install a case fan if the system needs one (ie several extra harddrives have been installed in a PC case)
Harddrive (failing/slow/Full)
The hardrive will be degrading performance if:
- the hard drive is faulty.
- The hard drive is IDE
- the hard drive is too slow or below manufacturers specs (ie failing slowly/worn out)
- 3+ years old (guide line only, referrer to above)
- Capacity has been reached/ Not enough spare space for windows operations
- Drive is not aligned when it is a AF (advanced format drive)
To test the hard drive do the following:
- SMART test (needs to be 100%)
- Full surface test (needs 100% pass)
- Mechanical test (with PC Check)
- Drive align test
Improvements:
- Swap hard drive for a SSD
- Install a new faster and bigger hard drive
- Run drive aliging software
- If IDE you can upgrade a 40 pin cable to an 80pin cable (or replace with a new sata drive)
BIOS settings
BIOS settings control every aspect of a computer and as you can appreciate you can change the performance of a system by tweaking the settings. Some changes are not as profound but still can make a difference ie RAM and HDD settings
BIOS settings can degrade performance if:
- When the PC is not setup no-one checks the settings
- They are not configured correctely
- Not the latest firmware version
- CMOS battery has run out
Improvements:
- When you get a PC give the BIOS settings a once over
- Make sure all settings in the BIOS are set correctely
- Always update to the latest firmware
- If the CMOS battery has run out, replace it. This doe not have a direct effect on performace but stops optimum settings that you have configured from being kept
BIOS settings to note:
- Basic Settings / 1.44mb FDD – is enable but no FDD drive exists
- Change HDD mode to AHCI (assuming the OS and the attached hardware supports it)
Add more settings here
RAM (slow/failing/wrong type/not enough)
The system RAM in your system can be the cheapest way to improve your overall system speed
The RAM will degrade performance if it is:
- Faulty
- Slow speed (ie not the maximum speed of the board, or wromg speed for the CPU causing a bottleneck)
- The RAM is cheap
- Pairs are not matched
- There is not enough (ie Win7 mimimum 2GB, recommend 4GB)
Improvements:
- If the RAM is faulty swap it for good RAM
- Make sure the RAM is the maximum the board will take or at the very least does not cause the CPU to clock down or have mismatched Bus speeds
- Buy branded RAM where possible
- Always run RAM in dual channel mode where possible
- Always match pairs or RAM. This insure RAM runs in Double Chanel Mode
- Always buy the maximum amount of RAM you can afford or Max the board out. Vista+ are memory hungary OS, realistically nowadays 4GB is the mimimu but 8GB is recommend for the best performance. Most people will not have the need for any more. 16GB would be nice but by then you will need a more powerful system to make any use of it.
Drivers
Drivers are an integral part of windows and as a consequence can have a large impact of the performance of the system, especially chipset and graphics drivers
Drivers can degrade performance if:
- They are faulty
- They are old/out of date
- Not required
- Using generic Microsoft drivers
Improvements:
- Update the drivers or uninstall and re-install
- Update the drivers to the latest version
- Uninstall the drivers – un required drivers take up resources even when they are not needed. i.e. they form part of the Kernel when windows is loaded
- go through drivers as many drivers are left in place even when you uninstall the software. AnVir task manager is useful here
- vendor specifig drivers probably have a smaller footprint
Display Drivers
diplay drivers – these get a special mention like the chipset drivers as they are a main part of your windows system. Display drivers affect how quickly windows respone and do a lot of visual offloading for window (from windows xp upwards, even more so with windows 7)
(because of specific windows visual offload etc..) make sure nvidia or ati etc.. not basic windows ones
remove nvidia or ati drivers with speciliased removal tool - (then install latest)
using the generic microft supplied drivers you will not get all the features from your card, no advanced 3D acceleration, Aero theme wont work, some display mpodes might be missing, the card will not provide all the windows graphics offloading reducing performcance
there are 2 reasons that you should use a vendor specifi drivers for your graphics card
- Extra functionalitly
- The drivers will be configured for your card baetter
- vendor specifig drivers probably have a smaller footprint
Improvements:
Remove and re-installed graphics drivers
- remove nividia drivesr with a cleaner utility (nasty file remover is a specialised remover), then re-install after a full reboot. ATI drivers might also suffer this issue. Nvidia drivers when uninstalled can leave old files that cause conflicts in your system and thgey need to be removed by a removal tool.
- I removed all nvidia stuff from the programs and features, for the fuller removal use 'Your Uninstaller' on super setting.
- I then rebooted, checked with 'Your Uninstaller' and removed any nvidia software left.
- I then used 'Nasty File Remover' and removed all remaining nvidia files. After this I rebooted.
- I now installed the latest graphics drivers for my Nvidia card.
- This process also works for ATI cards.
Correct Chipset Drivers
Thease are absolutely essential for achieving the best performance on your computer. So many time people/users just rely on the drivers windows installs for most of the equipment, now while this is an amazing feit of software engineering and can make an end user life much easier they will not get the best performance out of your hardware because the drivers used are generic and usually only provode the most basic of functions
When you use chipset specific drivers fron the vendor of the chips (ie intel) you have to assume they know their hardware the best and are likely to get the most out of it. This is the basic reason for installing your vendors chipset driver.
Install the correct chipset drivers – if you do not the windows drivers will work but will not work as well as the manufacturer supplied opnes and can also be a cause of constant disk access, an especially problem in vista
I have 2 x compatable chipset drivers, which is better for my computer. (Ie select driver from list.), Use the newest one unless you know it is wrong. You can always benchmark here to see if there is any difference.
vendor specifig drivers probably have a lower footprint
This post also indicates if you do not have the correct chipset drivers that this in itself can cause constant harddrive activity - Windows 7 Slow. Constant Hard Drive Activity.
Network
This section is not fully explored yet but these are a good start
- disable ipv4 to ipv6 adapter
- disable uneeded network connections (ie vmware virtual networks) as they add time to DNS lookups etc while the computer tries to find the best route
- disable ipv6 if not required, in some circumstances (old revisions and partial/incompaticable hardware) - what happens is it ries v6 and then falls back to v4 and this takes time
- network hardware - make sure you have your network card set atits fill speed and full duplex
- buy decent kit. not all network cards run at their advertised speed etc..
- wifi cards can be a bottle neck if they are wearing out or are slow
- Set DNS servers in the network card settings. This prevents DNS lookup relaying by your router, notonly that but custom DNS servers such as OpenDNS will run quicker than the ones supplied by your ISP, usually.
Filesystem (damaged/requiring maintenance/fragmented/Full)
The files sytem will be degrading performance if:
- It has errors/is damaged
- It is FAT32
- The System partition has reached capacity
- It is fragmented
- The partitions are not aligned properely (if drive is AF format)
- MFT is fragmented
- Reduce the number of files on the disk (especially system partition)
- Cluster size
Improvements:
- Run Chkdsk to fix file system errors
- Convert FAT32 drives into NTFS
- Make sure there is at least 25% free on the system drive for decent performance
- Get a bigger and faster hard drive (SSD preferably)
- Defragment all partitions, system partition at the least. Use Defraggler for better results (ie. Set large files to go to the end of the drive, 1.0gb should suffice)
- Align the partitions/hard drive if the drive is an ‘AF format’ drive. Paragon drive alignment tool should work. if not copy the partitions off to an image, create a new partition using windows vista+ and then copy the image back on to the partitions. It is only Vista and above that are aware of the AF format. There are many utilities to check if a drive is aligned but you should use Disk Aligment Test as it is easy to use.
- Defragging the MFT (Master File Table) is not often done but can yield good results. It works on the same principle as defragging but works specifically on the file that contains all the files references on the hard drive.
- Reducing the number of files on the hard drive can reduce system cost in the sense of a smaller MFT, less fragments to look after, and less time on load up spent on scanning files. This is especially true for the system partition and only half applies to other partitions used for storage upon accessing files on them
- Cluster size most definitely can affect performance. Smaller clusters are useful when you store a lot of small files on your partition. The benefits to the smaller cluster size is less wasted space in incomplete clusters but does have the down size of lower performance due to the increased number of clusters and that more clusters are needed to assign to a certain file. If you use a larger cluster size you will get increasd performance because there are less clusters to look up and you get more information per cluster lookup, however the downside to a larger cluster is more dead space in incomplete clusters which gibe less efficient storage but better performance. Cluster sizes nowadays have to be bigger because of all the large files we use. A good example of this is that new Hard drives are using a hardware 16kb cluster size lookup and only emulates a 4kb cluster size lookup (cover in hard drives section). Even 16kb is not very big.
- use treesize to find large uneeded files and then delete them
3rd party software (faulty/buggy/not required/service/update services/remnants)
3rd party software is the biggest section of all. People always blame windows for causing the system to run slow but generally this is not true. Consider the billions of dollars that Microsoft invests in Windows compared to smaller companies whose budgets are very small. That being said I will address all the issues relating to 3rd Party software here.
The 3rd party software will degrade performance if it is:
- Faulty
- Buggy
- Out of Date
- Dormant on your PC
- Installs services
- Installs it’s own update service
- Upon uninstalling it leaves remnants behind (program files/registry enteries)
- A program can have buggy/fauty addons (i.e. firefox)
- when you uninstall or install a program this will trigger system restore for a while which will hit disk activity higher for a short period
- incompatible softare (ie win 95)
Improvements:
- If the software stops working, remove it, and then reinstall if required
- Sometimes software is buggy by its nature, possibly because it is new or is an opensource projects (I only refere to the small guys). Bugs can get resolved more often than not by updating to the latest release. The most common presentation of a bug, is something called a ‘Memory Leak’. This is where a program continually consumes ever increasing amount of RAM but does not do anything with it except not release it back to the system.
- If software is out of date it sometime (other than having bugs) can stop functioning correctly because it has not kept up with standards for instance. To solve this, update to the latest version of the software.
- Some programs install a service (1 or more) in to the windows OS to provide certain functions. The difference between a service and a program is that the service is genrally running all the time whereas a program only runs and consumes resources when it is executed. So 3rd party programs that install services can reduce system performance just by being installed. The solution to this is don’t install programs with services or at least very sparingly. It must be noted some programs install services in a ‘Don’t start unless needed’ mode and these are better. I have known services to reduce system speed signinifcately especially on an already crowded machine.
- 3rd party update services are the bain of my life. They all use their own service installed in windows to check for updates which consumes resources. A better solution which a lot of 3rd party programs use, is not a service, but just a simple check when the program is run.
Another solution, but also encompasses programs without an update service or check, is to use filehippo.com update utility or Secunia PSI 2.0.
File hippo is nice and clean and can be set to run when windows loads (not recommend, as every time you load windows a startup entery cause filehippo to check all programs and can slow the machine down a lot), however it is great to run as a program when you want (ie not busy with the PC and at elast once a month). The filehippo utility update will check all programs installed on your computer and suppy update information if it has it in its database along with an easy to use link.
Secunia PSI 2.0 is more a security based version. It installs a service and scan you PC wevery time you turn it on. You can disable the autoscan feature but not he service. PSI also has an added benefit where it can automatically upgrade a lot of the software it detects rather that requiring user in put. I recommend using PSI everybow and again, install it, run it, update all the software, uninstall it. It does seem to be quirte a resourece hog, especially Disk wise.
Some software also lets you just disable the update service, in these case I would also consider this, but make sure it truly does disable it not just the action.
There are always exceptions to a rule and with this one the following software should be left to autoupdate itself because of the high security risks associated.
- Java
- Flash
- Adobe Reader
- Firefox
- Chrome
- Internet Explorer
- Windows Updates (if not obvious + not 3rd party)
- go through the program directory and look for programs that have been uninstalled or some that you dont need and then uninstall them (if all have correcely names folders this should be easy)
- When you uninstall a program sometimes it leaves behind remnants. These remnant more often than not do no harm because they are not active or called, but sometimes for instance, you could uninstall a program and it leaves its update service behind and running.
some programs leave files in ‘program files/program files (x86). Sometimes but not always you can just delete these
To prevent this, uninstall a program using a specialist utility such as ‘Your Uninstaller’ which will remove every trace.
If you find this issue after you have uninstalled via the normal channels the best way to fix the problem is to re-install the troubled program and then re-uninstall using ‘Your Uninstaller’. I would also recommend that you reboot at least once inbetween.
Also running a registry cleaner can help with this issue - It is not always the 3rd party utility that is at fault, it can also be an addon that you have installed in to that program that is causing the issue. The most obvious candidate is the FireFox browser which a lot of people use and then install an addon. These addons are not always written by Mozilla with a lot of error checking. The best way to keep on top of addons is install them one by one or in small batches which you keep records of and see how your PC performs. IT its performance significately drops then you know it might be one of the Firefox addons. With firefox it is also worth noting that its addons can run when firefox is not. Ie the Memory addon that release memory for FireFox but seems to run all the time (AFOM.exe)
- Uninstalling and re-installing a program rather than upgrading can help sometimes
ie. corrupt antivirs can cause issues. Uninistall your anti virus program, reboot twice, then re-install it. This can help a lot some times. These sort of issues are usually caused by the upgrade tree/method they use, it is not always perfect and errors can build up over time. So what this does is instead of an old program being patched to death you ge the l;atest version of the software with less disk and CPU overheads. - Some old software you might have, ie win95 stuff, might run on your windows 7 PC but also might degrade your system. So either uninstall it or use a dedicated virtual machine setup to avoid conflicts
Out of Date Software
Out of date software, either by function or age is easy to identify and fix.
If software is out of date it can degrade PC performance. Software is out of date if:
- End of Life has passed
- The software was not designed natively for the OS you are using
- Has major security holes
- The software does not have latest service pack or patches applied
Improvements:
- If ‘end of life’ has been reached, upgrade the software to its successor or uninstall it and find a replacement
- Upgrade to a version of the software that works on your OS natively (ie most windows XP programs will run on Vista and Win7 but a newer native version will run better)
- IF it has security holes the software will not run very well if it gets attacked. To solve this upgrade to the latest version of the software.
- If the software does not have the latest service pack installed or patches applied, install them
- Make sure the program is as upto date as you can get it. Not only does this stop security issues but you will find, in general, the software will run better
Antivirus Software
Most people would not understand how fundamental an antivirus software integrates into windows. It attaches at the base level to prevent any infections or attacks getting sent up the chain where it can access a User’s data etc…
Issues with Antivirus:
- Some AV sets onload (windows) and scheduled scans)
- Performance varies from AV software to AV software ie different manufacturers / brands
- Performance can deteriate or get better as the software is redesigned and then updated
- Can conflict with other realtime scannerws
- Comodo CIS
- Comodo CIS does a mandatory 'Quick Scan' on load up
- By default on a thursday 11:59 comdo is sceduled to run a full scan. If this is missed it will run it the next time you turn your computer on making it very slow. Disable the sceduled full scan and run it yourself every now an then.
- Comodo HIPS does make a huge difference to run speed.
Improvements:
When you find your computer running slow a prime candidate is the antivirus software.
- Disabled automatic scans and run them manually at a time of your choosing
- Try uninstalling it and then reinstalling
- Check AV Test website for the latest AV product performance stats and then Try another brand of AV. Please note that AV is about security and that you should never runa PC without it.
- If you discover a conflict, remove the other realtime scanner. Your choosen antivirus should take priority unless you need or want to change it.
Research:
22-06-13
- Currently Microsoft security essentials causes my PC to be very laggy
- I installed bitdefender on my system and it now runs great except that there are no scheduled scans you can control
Anti Malware (especially realtime scanners)
Antimalware scanners are very similar to AntiVirus products in their approach. Some Antivirus programs now boast about how they scan for malware aswell. I personnaly think they are all virus’(please don’t write in, I know) and should all be scanned for by 1 program not multiple programs. Spybot is know to cause issues with antivirus software.
The anti-malware software will degrade performance if it is:
- Conflicts with another realtime scanner (ie AV)
- Has scheduled scans running
Improvements:
- If you discover a conflict, remove the other realtime scanner unless it is your antivirus. Your choosen antivirus should take priority unless you need or want to change it.
- Disabled scheduled scans and run them at a time of your choosing
Research:
- article on M$ running with another AV causes it to slow down. it also points out this is the case for any 2 antivirus or malware solutions, Microsoft Security Essentials Needs to Fly Solo
3rd Firewall Software (manufacturers performance varies)
Issue:
- This is a relatively easy problem to solve. 3rd party firewall software is usually a lot better than the firewall supplied by Microsoft. With all security software there is a trade-off between performance and security, I prefer the latter.
- Performance varies from Firewall software to Firewall software ie different manufacturers / brands
Improvements:
- You can not do more than try out the different brands of firewall and see which you prefer. Some will perform better than others on your system and as with the Anti Virus Keeping a check on their relative performance and effectiveness is a must. Gone are the days where you can keep using the same security sweet and believe it still is the best one.
- On systems that do not require a firwall (not recommend) you can uninstall a 3rd aprty firewall to get that little more performance from your PC.
Conflicting Realtime scanners
This issue has been dealt with in the following sections.
- antivirus software (manufacturers performance varies)
- anti malware (espcecially realtime scanners)
Research:
FF and IE tabs freezing issue
Everytime i open a new tab my internet freezes [Solved] – this thread blames kaspersky AV and Java Plug-In 2 SSV Helper
This forum thread, Win-XP Browsers Hang on page load - (waiting for…), says the following:
Be careful not to install multiple anti-malware/anti-spyware packages. They'll sometimes all try to get the webpage - before it displays - to check it for malware, and then they'll lock each other, depending on which process fired first.
When I uninstalled spybot running along side Microsoft security essentials this issue got better but some tabs still loaded slowly and I still got some lockup. I then around the same time swapped my antivirus to Bitdefender and since then I have had no slow tabs or lockups in either FF or IE. Swapping the antivirus here was the biggest change.
In fairness to the above, since i swapped my antivirus from M$ av to bitdefender i have not had anymore page load speeds issues. this issue is highly dependant on realtime scanners as both of these articles point to.
Malware
This section definitely does cause performance issues. Without doubt one of the cheapest ways of improving your system (assuming it is infected).
Most PCs that are attached to the internet get infected with malware at some point, this is either down to the stupidity of the end user or clever attackers, either way the end result is the same.
Attackers do not care how efficient their programs are as long as they get on to your PC and do something. Their purposes have quite a spred so I will only cover the basic issues malware causes
Malware can degrade performance by:
- Being a resource hog
- Getting a PC to perform an Altera motive ie. Transmit spam to other PCs
- Not being well written so the system waits for the malware to finish its processing cyles before continuing normal operations. This then shows as a slow performing PC
Improvements:
- Fully Malware scan and service the PC
Outlook
Outlook can affect the whole system when it is running. If it is not running I don’t think it makes much difference.
Outlook can degrade a systems performance when:
- A Microsoft outlook .PST file can become fragmented and bloated causing a big performance hit from a large .PST file. The .PST is bigger to search and can be full of errors. This because instead of the system doing system things it is having to service outlook more than normal
Improvements:
- Run compress outlook PST operation. This removes bloat and compresses the file and defragments it
- Scanpst will repair errors (unsure how much effect this has over and above ‘compress PST)
Firefox Add-ons (including firebug sub-addons)
Now firefox and indeed other programs with addons can affect PC performance but as I really only have experience of firefox addons I will give firefox addons their own section
Due to the nature of firefox addons they are running all the time, sometime there is partially usage of a disabled addon (need to check this). These addons can interact with windows at a low level and are not restricted to the browser hence why they can affect windows even when firefox is not running (needs checking)
FireFox addons can degrade performance if:
- It is memory intensive
- Badly written
- Written for an older version of Firefox and not native
- Their function is quite intrusive
- Sub Add-ons, The Add-on has Add-ons (eg Firebug Add-ons)
- Have a memory leak
Improvements:
- Disable any plugins that are not required at the moment
- Uninstall any plugins that are not needed
- Make sure all addons are the latest version (turn on autoupdate)
- Make sure theaddons are suitable for the version of Firefox you are running
- Disable or uninstall intrusive addons (unless needed)
- Sub Add-ons can also affect performance. There is not magic rule. If when you enable a Sub Add-on it slows your PC or browsing experience down, then disable it etc.. (eg firebug)
- diagnose firefox memroy leaks – these can be quite challenging but are usually caused by 3rd party addons. The only solution is to update or remove them
Add-ons that degrade performance:
- Firebug – with all its functionality, link scanning, header responses etc.. it is no wonder that this Add-on can slow stuff down. Disabling this when not needed seems sufficient
- CodeBurner
- Fire IE
- Memory Fox 7.4 (need rechecking)
Shell Extensions (ie right click options)
This can make quite a profound difference to a system even thought it’s apparent footprint is very small. When you install programs some of them ask you if you want to install context menus (shell Ext). This extra functionality is not to be sniffed at as it can be very useful, however it can come at a price.
Every Shell Ext/Context Menu item takes up resources because windows has to load files from the software and then perfom functions, in contect, on whatever has been clicked. The more Shell Ext/Context menus the longer it takes to load/select the item.
Shell Extensions/Context Menus can degrade performance if:
- there are too many installed
- Shell Ext conflict with another one
- A Shell Ext is present but the software it links to has been removed
- The software it links to is badly written
Improvements:
- Only install Shell Extensions/Context Menus that you will use
- Be aware if you get anyproblems straight after installing a Shell Extension/Context Menu and then remove it if there are any problems. This takes in to account those that you already have installed you would like to keep and it is far easier to remove the new boy that the already established ones.
- If you have a Shell Ext/Context Menu installed with no attached software you can either reinstall thesoftware and contuniue to use it or use a Shell Extension/Context Menu manager to remove it
- Remove unwanted Shell Extensions/Context Menus with a manager utility
Too Many Icons on Desktop
While windows is loading I have monitored the files accessed via the ‘Resource Monitor’.
Issues:
- when windows loads it caches all the files on the desktop (ie thumbnails and propertied) so the more you have on the desktop the longer windows takes to load and the slower it will run.
- At the same time the antivirus and realtime scanners will scan the files aswell also increasing windows load time.
Improvement:
- Sort you desktop files in to folders that are of the desktop
Too Many Windows Favourites
While windows is loading I have monitored the files accessed via the ‘Resource Monitor’.
Issues:
- when windows loads it caches all the favourites (ie thumbnails and propertied) so the more you have on the desktop the longer windows takes to load and the slower it will run.
- At the same time the antivirus and realtime scanners will scan the files aswell also increasing windows load time.
Improvement:
- People use favourites all the time so you cannot have less than you need but you could consider having a sort out
Delete temporary files
If you have a lot of temporiy files your system will spend prescious resources scanning them with your antivirus system, caching them for the various programs. All of this functions causes the harddrive to access the file slowing things dowm.
The solution is to delete temporay files on a regular basis. This saves disk space, accessing, prevents your file system becoming fragmented
Empty the recycle bin
If your recycline bin hass stuff in it, these files are taking up space and antivirus software will scan them on load up. I do not believe windows caches these though. Some people let there recycle bin get completely full and now on systems with 1TB harddrves even 10% is a lot of files.
This is one of the most easiest solutions. Empty the recycle bin
Registry (error/health/fragmentation)
The registry just like the file system need to have maintenance. It suffers from fragmentation, useless registry keys bloating the size and also the obligatory errors that come with any complex system. Registry issues most definitely affects performance of the system.
A degraded Registry will degrade performance if it is:
- Full of errors
- bloated with unneeded keys
- Fragmented
Improvements:
- run a registry software (ie registry mechanic) that removes errors, removes uneeded keys and defrags the registry
- emptying recycle bin helps speed indirectely by reducing the number of files to scan on loadup etc..
Startup Items
in windows startup items you can find loads of programs starting up that you never use that run services and eat up memory – you can selectively disable all of the ones you do not need. I have discovered that startup items can be the cause for slow performance as they just keep loading stuff in to standby memory. Removing these can massively increase your systems performace. If not rtry disabling ones that you need and see if your computer runs any better. Definitely disable all of those update agents that you dont need.
If you disable something from startup it does not nessasarily mean it will not turn on when you want it. This is because a lot of programs will start services when they need them, they are only inb the startup to try and make the software run quicker but this is no good if all these services that are started to make you computer run quicker add up to making it run slower. I am of the opinion that a service should only run at startup if absoulutely nessasrary and programns should start their servcioes only when required.
Improvements:
Disable uneeded or unwanted startup enteries. If there are issues you can enable them again later
- Use anvir task manager to disable all startup enteries you 'do not use'. (remove if you want)
- Reboot and check for performance increase
- Use anvir task manager to disable startup items you 'do use' and see if you get any performance increase.
- Reboot and check for performance increase, Once assesed for obvious reasons turn them back on
Services
This is quite a simple section but difficult to find a perfect setup. Some people go to the extremes of disabling absolutely every service they can get away with for extra performace under the basic premise that ‘every service has a performance hit’. This by its very nature is true but for every service you delete, you remove functionality. The trick is only to remove the functionality you will never use. There are some service a home user will never use, but I am sure the performance increase is not noticeable to them anyway.
For the unitiated I would just stick with altering the non-microsoft services as these are most likely to give visible performance increase and with the possiblilty of no loss of functionality
Windows Services can degrade performance if:
- It is uneeded and does nothing except take up resources
- It is faultry
- It is badly written
- Performs a service that is not required (ie 3rd party autoupdate service)
Improvements:
- Uninstall the program associated with the service
- If it is a Windows Service and there is no program, just disable it. Just disabling services is a good way to see what will happen when it is uninstalled but is a less permanent method.
- Upgrade the program associated with the service to the latest version
- Disable the functionality in the associated software that controls the service. Ie diable autoupdate in the software should cause the update service to disable itself (not always the case though)
- Make sure all software is up to date and thus ensures the latest version of any associated services
- delete services that have missing files (should speed loading)
Damon Tools Service
remove daemon tools and the sptd driver it installs - SPTD can have a big effect on optical drive performance and possibly the harddrive aswell. This has been noted on some forums.
The SPTD driver is only required for some of the DVD emulators higher fuinctions.
System Restore
DISABLING SYSTEM RESTORE WILL INCREASE PERFORMANCE BUT DO NOT DO IT !!!
This might help those of you wondering what your hard drive is doing after you leave your computer/close your lid/etc.
While trying to figure this out myself I was looking at ProcessMonitor output. (My HDD is pretty quiet but I really need total silence to sleep, and all that activity kept me up). I noticed a lot of this:
C:\Windows\system32\rundll32.exe /d srrstr.dll,ExecuteScheduledSPPCreation
Turns out that by default, Windows 7 schedules System Restore to create restore points every night at 12am, but only after the system has been idle for 10 minutes. So if you go to bed at 2am, it'll start building the restore point just about the time you're drifting off to sleep. Bad for us light sleepers.
There are many processes that could take advantage of idle processor time, but assuming you've eliminated other possibilities like scheduled virus scans, defrags, windows indexer, superfetcher, etc., this is probably the issue.
To modify this behavior, go to Start Menu -> Administrative Tools (may need to enable this in start menu properties if you don't see it) -> Task Scheduler ->
In the Task Scheduler tree on the left, expand Task Scheduler Library -> Microsoft -> Windows -> SystemRestore. In the middle pane, click the "Triggers" tab.
By default you'll see two entries here, both enabled: One "Daily, At 12am every day" and one "At startup". To make changes to these, click the "Properties" link in the RIGHT pane of the Task Scheduler window.
Go to the "Triggers" tab and double-click the "Daily - 12am" trigger, then uncheck "Enabled" at the bottom. Obviously you can alternatively edit the trigger settings, or the conditions, to set parameters that won't end up disturbing you.
Just learned this and thought I'd share. Hope it helps.
PS, Task Scheduler is a good place to look when you're investigating mysterious automated Windows activity. It's a much more complex and integral part of Windows than it used to be (ie. in Win XP), and Windows 7 makes much use of it to run processes. Several things are set to run regularly there in a default Windows installation. In my research into these issues on the forums, I've found that people aren't really all that aware of this yet. Especially after you've eliminated all third-party software possibilities, this is the place to look next.
More info: http://equazcion.wordpress.com/2010/...steryactivity/
Swap / Page File
- Disabling the swap file can improve performance if you have enough RAM and you will not needed to dynamically extend your RAM requirements.
- if you put this file on another physical disk to the main system disk your PC will run quicker
Task Scheduler
This is a good place to look to see if there are any tasks running that you don’t know about
Read this article - Unexplained hard drive or processor activity in Windows 7: Meet the New Task Scheduler (2.0!)
Screen Saver
choose your screen saver wisely. if you get a grpahic intense screen saver it will run your CPU hotter and slow your PC down over certain periods (screen saver recovery time). this might be a minimal saving but is still there. select 'Blank' screen saver to negate this
Disk and Load issues
Do these recommended optimizations below on your computer, not all of them will be appropriate. They are from :
http://thessdreview.com/ssd-guides/optimization-guides/the-ssd-optimization-guide-2/
ensure your computer is operating in AHCI mode
if your PC is not running in AHCI it might be running in a lesser state than it is capable. AHCI is the latest iteration of the SATA standard and allows larger throughputs of data but does required it to be enabled.
Sometimes AHCI is not enabled by default, perhaps
- the wrongs drivers
- the default microsoft ones don’t support AHCI
- you have just swapped hardware and not changed the drivers
- the drivers need updating to support AHCI
Improvements:
because I am already running intel software I am already in AHCI mode
download a program called AS SSD Benchmark, you will use this to verify whether ACHI mode is on or not.
Load AS SSD Benchmark and look at the following picture.
If you see msachi, this means you are running in ACHI mode.
iastor.sys means you MUST be in AHCI (via Intel driver)since if you were not, it would be pciide.sys...
msahci.sys, or iastor.sys = AHCI or RAID (which uses AHCI for each drive)
pciide.sys = legacy "IDE" mode
Also If you have the Intel Rapid Storage Technology utility running (This utility is not needed for the driver but just lets you look at the settings. You can probably uninstall afterwards.) Goto the utility, the ;Manage' Tab and click on advanced, you will see a setting called 'Native command queing', if this displays yes you are using AHCI via intels own driver.
Native command queing = yes is a sign it is running in AHCI mode. I found this in my intel utility
'Native Command Queing' is the major difference between SATA and SATA AHCI mode.
This registry setting makes no difference to the SATA mode if you are running through intels IaStor.sys. Does not harm to have it set to AHCI though.
If you are not running in AHCI make sure that your computer supports AHCI by checking in the BIOS before making any changes. If it does, boot back in to windows, make the registry changes as outlined in the article, restart your computer, enter the BIOS and change the SATA mode to AHCI. When windows loads it will change opertions to AHCI mode and use that driver, can then verify using the AS SSD utility to check.
When you first install windows, if you installed with standard drivers it is most likely that windows installed with the normal SATA drivers. Windows disables the SATA drivers it does not use during an install. Sometimne windows does not correctely discover the AHCI capable chipset, and again disables the AHCI driver.
0 = AHCI and 3 = IDE
The Msahci driver in Windows 7 is disabled if the original install was made with the BIOS set to native IDE. The Msahci driver must be enabled before you change the SATA/RAID mode of the boot drive.
Dummies Thread Here
Windows Files Indexing / Drive Indexing
- windows file indexing – this does not work anyway because I had to install effective search to restore the direct folder search we all had got used to on windows xp
- so I can just disable this as I never use it and I have so many files it probably slows my computer down considerably by storing the information and discovering the files in the first place
- I think if the windows Search service is disabled indexing might not occur (to be checked, this is a guess)
Improvements:
- Right click on a drive and select properties
- Untick ‘Allow Files on this drive to have contents indexed in addition to file properties’
- Click OK
- Do this on each drive you have
Research:
when I disabled 'Allow files to have contents indexed in addition to file properties' on C: and D: the windows search service started spiking and coming on regular bais, his might be it rebuilding its index after I removed the tag as above.
So, if you disabled index contents of files, when you reboot this causes the Windows Search Service to start using large disk usage, this might be because it is re-indexing files with the new properties or it might be because there is a fault with it. So either disable it with 'index contents' option or leave it on and see if it does indeed re-index everything and then stop whirring away
- indexing, maybe doing that click boc., index files contents , makes nor difference
- leaving search service runnign all night made no difference, it still spikes
- you can configure the indows indexing service, go to run and type indexing
- when you remove the C: and D: 'index files contents' you might still have to rebuild the index to purge the old results
- C:\ProgramData\Microsoft\Search\Data\Applications\Windows\Windows.edb is windows search indexed file
so in summary, if you remove 'Allow files on this drive to have contents in addition to file properties' disable , the following is true
There is an 'Index Otions' in windows/control panel
- previous scanned properties and content with be maintained in the index for a time
- previous content and properties can be purged by rebuilding the index
- disabling this setting will reduced load as a files content is not scanned
- disabling this option does not stop windows indexing the files and their properties
- this does seem to remove C: and D: drives from 'indexed locations'
- windows search could be left on for outlook, but can be turned off for that little extra performance
- windows search is shit, it doesnt work, but it is ok in windows outlook
- indexing service can be paused for 15 minutes
- rebuilding the index, deletes all files in C:\ProgramData\Microsoft\Search\Data\Applications\Windows\
- if you disable the Windows Search service (SearchIndexer) the index will not be maintained or used.
This is a useful article, Fine tune the Windows 7 Search Index for better performance and covers all of the configurable settings.
Carried on next page
where to get the settings for the windows index (not the right click on drive)
- in an Explorer Window - Tools / Folder Options / Search Tab
- Right click on drive properties / 'Allow files on this drive to have contents indexed in addition to file properties
- Control Panel / Indexing Options
The image Below shows the default settings for option 1
The image below shows the settings I was running with for a while. This relates to option 1.
Disable Drive Defragmentation Schedule
should be disabled if you install diskeepr or 3rd party defrag program
my defrag schedule has already been disabled
Disable Prefetch and Superfetch
when windows loads it does something called prefetch and super prefetch, what this is , is where windows loads up files it thinks you will want before you need them and puts them, in to your physical ram, this section of ram is called standby ram. Not only does it causes large disk load on first boot but eats a chunbk of memory. The experts say that this memory used to cache these files does not effect the use of memory because if it is needed windows will just empty it. The thinking behind this is that you might as well use the memory for something instead of it just being sat their. I personnally dont 100% believe this, for one you have to thwrap your harddrive to fill the ram in the first place and it extends the load time of windows massively
- should reduce standby RAM usage and disk access
- disabling SuperFetch here also disables ReadyBoost
- disabling prefetch and superfetch, this reduces the amount of files loaded in to standby ram (initially)
- disabling superfect, windows search and index contents might have speed detriment if turned off due to the profiling and caching function of these services
- if items are not cached in memory they will take longer to load on first call but overall the system will run better in the short term because it is not hogging memory and CPU time with files and services not required at that time and is not hammering the hard disk to load these files in to memroy
Improvements
Option 1 – Partially disable
Change the Superfetch parameters to operate on "boot only" and your thrashing will stop. Some will argue against this, but for me, I get no more thrashing, my boot times are fast, and the OS is plenty fast without Superfetch doing it's strange things.
Follow these instructions and set both EnableSuperfetch and EnablePrefetcher to "2". Then enjoy your PC without constant disk thrashing.
Change SuperFetch to Only Cache System Boot Files in Vista - the How-To Geek
Option 2
disable prefetch and super prefetch to prevent 'Files Mappings to the standby RAM (prefetched/Super Prefetched/Cached) (see rammap notes), or in simple terms loading files in to the standby RAM
these instructions taken from here
- Type Regedit into the Start Menu box;
- Select the file path:
“HKEY_LOCAL_MACHINE\SYSTEM\CurrentControlSet
\Control\SessionManager\Memory Management\PrefetchParameters” - Right click on both EnablePrefetcher and EnableSuperfetch;
- Select modify on each of these to change the value from 1(or 3) to 0; and
- Restart.
Research:
When I disabled the prefetch and superprefetch,
the windows load up seemed to take about the same amount of time to ge to the windows desktop but was fully loaded sooner,
hardly any disk access and windows is very responsive
Disable Superfetch service
This disabled superfetch service
Improvements:
- Press Winkey + ‘R’ for Run Dialogue;
- Type “services.msc” and press Enter;
- Scroll to Superfetch, right click and select Properties;
- In the drop down menu select Disabled and select Ok;
- Scroll down further to find Windows Search, right click and select Properties;
- Click the Stop box then use the drop down menu to Disable select Ok.
High disk activity (System Volume Information) – this article is further evidence of the disk activity this process creates
Disable Windows Search Service
This disables the windows search feature
Improvements:
Disable Service
- 1.Press Winkey + ‘R’ for Run Dialogue;
- 2.Type “services.msc” and press Enter;
- 3.Scroll down further to find Windows Search, right click and select Properties;
- 4.Click the Stop box then use the drop down menu to Disable select Ok.
Uninstall Service
You can uninstall windows search by going to the following location and unticking the box
Control Panel / Programs and Features / Add or Remove Features/ Windows Search
Research:
disabling index file contents and windows search service did not seem to give me a performance increase but a possible performance decrease, especially when I cannot use outlook instant search. This one would need testing over time. If the computer was just a file server it definitely would help as it reduces disk load, not nessarily gives a system perfomance increase
disabling this service disable outlook instant search. You can possible have this service on with disk indexing disabled to allow you to have good search functionality in outlook whilst reducing disk thrashing to get a poor file search service.
Use effective search for a decent file search (and contect based) facility
when i re-installed windows search i left he pc on overnight and the windows.edb was constantly accessed. I left my laptop on all night. The following the morning harddrive activity had settled down. Search indexer is running now and again.
Enable Faster Boot by Disabling the Splash Screen
Research:
It doe smka eload slightly quicker but I would leave this on and then you can see windows is actually Loading
Power settings
make sure performace is set to high
(End of SSD Tweaks page)
Disabling Readyboot (not ReadyBoost)
ReadyBoot is related to ReadyBoost in that it involves "prefetching" of files.
ReadyBoot uses the ReadyBoost services to tackle one particular problem -- speeding up the processes of booting the system and recovering from hibernation. It keeps track of the files most often needed when the system boots and builds a temporary cache -- sort of a "Boot-Up's Greatest Hits" -- when the system starts. It can use flash wherever it finds it in either external flash devices or H-HHDs.
Windows 7 - Disk Thrashing - disable ReadyBoot (not ReadyBoost) forum thread - see here
This article describes in detail what Readyboot. Readyboot and Prefetch Folder
Disk Thrashing - disable ReadyBoot (not ReadyBoost)
When you disable this service you reduce the amount of disk access on load up which makes the load longer. However when the system is loaded there is no difference (this needs checking. There should also be less disk access during use as well because no extra calculations or caching is required for this disabled service.
Permanently disable ReadyBoost forum – might only be beneficial when using an SSD
How to disable Readyboot in Windows 7 ? – this describes the pros and cons of this disabling Readyboot
Improvements:
- Disable Readyboot (might only be beneficial when using an SSD)
Research:
in my Performance Monitor I can see ReadyBoot.etl logfile is thrashing my disk like crazy on startup.
I just checked on mine and the only time I can even find/see ReadyBoot.etl is during startup, and it disappears about 90 seconds later.
- hardware: 13mb
- in use: 2141mb
- modified: 163mb
- standyby: 1535mb
- free: 4342mb
after disabling Readyboot, memory report:
- hardware: 13mb
- in use: 2000mb
- modified: 142mb
- standyby: 1239mb
- free: 4800mb
slight reduction in main RAM use (150mb), slight reduction in standby ram being used (300mb)
boot loading takes slightly longer, if not the same. Certainly not 20 seconds more. (The RAM difference might not be a permanent gain, could be within statistical boundaris)
Optimise for SSD
this section will cover some items that have already been mentioned in this article, however as the title suggests these are aimed at users of SSDs but because their aim is to reduce disk access they can be used to increase the performance of a PC with a regular HDD in, please not that not all the tweaks and inmprovement will be useful.
Most of these optimizations will reduced the use of the Disk because SSDs are so fast a lot of things do not have to be done and some options are better when they are turned off.
I have just included the link to The SSD Optimization Guide Redesigned by ‘The SSD Review’ website as it is easy to read, is a central source that gets updated when required and is easy to read.
This another tutorial for SSD optimization and might be of use - Can You Get More Space Or Speed From Your SSD?
This is a possible SSD tuning guide but I need an account first – click here
Windows 7 Optimization Guides
Windows 7 Optimization Guide
This is such a good guide covering some of the same items I have found and applied above, but also has others I have not covered so I am just including the link and pointing you guys to have aread of it when you have finished my optimizations.
The windows 7 Optimization Guide from ‘The SSD Review’ website.
My Computer and Windows 7 Optimization Guide
This is a really good guide and should be read for those extra ideas
My Computer and Windows 7 Optimization Guide
Makes Small improvement (but not worth it)
Makes No Difference
UAC
Some people say disabling UAC makes no difference, apart from the physical time it takes to click on the prompt I cant see how it makes any difference but can cause issues with permissions.
Research:
- diasbling uac does not disable it but just drops the prompts and no upwards authorisation occurs ?
http://en.wikipedia.org/wiki/User_Account_Control (features) - Disable Admin Approval Mode (UAC prompts for administrators) entirely; note that, while this disables the UAC confirmation dialogs, it does not disable Windows' built-in LUA feature, which means that users, even those marked as administrators, they are still limited users with no true administrative access.
Unknown if makes a difference
- is the divx plugin causing issue , cross browesr, always present?
- Firefox AFOM memory manager
- NtfsMemoryUsage=2 Tweak – makes no difference, also read the following thread
- Disable File System Cache on Win 7 or Server 2008
http://social.technet.microsoft.com/Forums/windowsserver/en-US/09c80df1-4bd4-4400-bcaf-cec892a0626a/disable-file-system-cache-on-win-7-or-server-2008-
- Disable File System Cache on Win 7 or Server 2008
Diagnostics / Research
Misc
- use vmmap to analyse individual program/process high memory usage
VMMap - A Peek Inside Virtual Memory - monitor programs and services with anvir task manager – this allows advance control of services and processes
- Checking lookups happening with fiddler2
- Monitoring harddrive disk a access
- use this article to also diagnose which file is going mental
http://ask-leo.com/how_do_i_stop_this_constant_disk_activity.html - utilise resource monitor in task managers and look at 'Total' disk activity
C:\ProgramData\Microsoft\Search\Data\Applications\Windows\windows.ebd
when my pc was getting hammererd windows.ebd file was to blame. this is windows indexing service.
Windows Search Service' - PAL v2.3.2_x64 - Performance Analysis of Logs - Tool that analyses performance counter logs
- AnVir Task manager is an advanced task manager with lots of features useful to diagnosing speed and resource issues on a PC. Also very good for seeing disk load
- Monitor CPU process, identfy and remove programs with high CPU usage
- Monitor memory, identfy and remove programs with high RAM usage
- utilise windows performance monitor / resource monitor
- GOD mode can be helpful in accessing all the functions in the cpanel quickly
- How do I stop this constant disk activity? – from Ask Leo
- firefox, use taskmanager/resource monitor/network to see what network connections FF has and see what htey are doing
- use fiddler to monitor what the browser gets up to also
- process tamer utility
- Process Tamer - dynamic process priority changer utility, useful for altering process priorities to keep a system from locking up while doing a process
Monitor and remove obvious
- Benchmark your computer so you know how quick, or not, it is so you have something to compare against but I am guessing if you are reading this you know how slow it is running
- once you have installed anvir task manager you can use it to see what is causing disk load, ie which program is hammering you hard disk. It does not show all system level hard drive access but it is a good indicator for everything else. Leave anvir open for a while and just watch to see what spikes disk load. The issue might not show all the time. Certainly let your computer fully load up before you try any diagnosing
- uninstall any program that you find is causing high disk load, even if you do not think it is related uninstall it, you never know and it can always be put back on
- check your processes for programs that look out of place and disable/kill them
RAM Links
- Where has all my Physical RAM gone?
- Having a problem with Excessive "modified" memory usage in Win7 x64, upwards of 3.6GB, any suggestions?
- Windows 7: Minimalist RAM Usage? – prefetch and superfetch
- JSKYs - Vista's Prefetch or SuperFetch – description of what they are
- Change SuperFetch to Only Cache System Boot Files in Vista :: the How-To Geek
RAMMAP
If you read this article for the rammap application it will explain the different types of memory and I will let you mnake your own mind up. But if you are reading this and I have wrote it you have to wonder who is wright, the experst working in a lab or me with a fast running computer.
Read this article: Introduction to the new Sysinternals tool: RAMMap
Download RAMMAP here
--
- this forum shows you how to empty standby RAM files via rammap
http://www.techpowerup.com/forums/showthread.php?t=129069 - this forum thread tell of how there is no OS level way of disabling the 'system file cache'
http://social.msdn.microsoft.com/Forums/en-US/wptk_v4/thread/dd7e78d6-32ea-45b7-9988-3da16d187cd7
for me this registry setting is already disabled, yours might not be
RAM Usage
This section deals with an indirect consequence of stuff on the system. It covers some diagnostic methods of finding out what software is using what RAM and can help with increasing system resources available.
Standby RAM
use rammap64.exe from sysinternals to look at what is using up physical RAM
- standby ram is not evil according to rammap instructions, but it probably is when you have 8gb ram and your hardrive keeps on getting accessed to fill the standby ram
- please note, the reason my pc takes so long to load up it is most likely loading files in to standby see rammap and 'File Summary' tab
- on the main page of rammap you can see a value called Metafile, this is your NTFS MFT loaded into ram. This can be useful to seee if it has got to big for you computer to handle correctely
- my drivers section of the RAM is 13mb, so this section should not be excessive in size
Meta RAM
It is confirmed that the MFT/Meta file refered to in rammap is that of files in RAM only
my ntfs metafile is 400mb, this is split between standby 330mb and 63mb active. reducing ntfs file fragments and files would - nb: reduce this, possibly changing the cluster size would help.
This file could be the file table just for the file locations in ram, not the NTFS MFT, in which case only by having less files cached in to RAM would this be reduced.
- Use diskeeper or some other defragmenter program to perform a MFT defragmentation, this is different to a normal defrag. This will help reduce RAM usage, not by a lot but every litlle helps. This operation is performed before windows loads
- reduce the number of files on your harddrive
- possible try a different cluster size to reduce the number of clusters and therefore the NTFS MFT. The lager the cluster the lower the size of the MFT.
Memory usage diagnostics:
on the rammap 'File Summary' Tab you can see all the files the computer has loaded in to ram (can be lots), you will notice in particular the following groups
- items on the desktop – I dont believe it searches sub folders
- lots of rapport files (if installed)
- startup menu items
- recycle bin items - recycle bin gets scanned by av on load up
- files in c:\program files (x86 x64) – not all of them but a lot
- all installed fonts
- stuff in inf
- prefetch
- system32 files – all of them
- system profile
- drivers
- all your internet explorer favourites
- some recently opened programs
- go thourgh this list and see if there are any particular programs taking up excessive amounts of standby RAM. Most of these files will have been loaded by prefetch.
- Sort by path
- check to see if any program has a massive amount of files cached
- remove this program if it is not needed
- then
- sort by standby RAM used
- see if there are any high memory using programs
- remove or disable these programs
- reboot check for performance improvement if you made some changes
Worked Example
This is already added into the notes above and is not really required but for reference (23-06-13). So delete if not needed.
I have windows 7 x64 ultimate and it is running really slow. I have done the following but it still freezes and almost locks up like the CPU is overheating but never does.
- Defrag
- registry error check
- registry defrag
- full virus scan
- malware scan with, ad-aware, malwarebytes, spybot
- updated windows completely
- updated all drivers to the latest
- installed correct chipset drivers
- tested hard drive – full surface and smart test – passed
- tested ram – passed
- upgraded my ram from 4GB to 8GB – made no difference except the sise of the standby ram
My computer is still running slow so it must be something else. So I decided to start looking at what was using my RAM and what was causing the random disk activity spikes. For no reason at all my computers hard disk would start going mental, even with nothing open, this would of cousre slow my whole computer down.
If you go into task manager and load the resource monitor and go tot he memory tab you will see the ram split up into several sections. On my computer the standby ram section keeps getting bigger at the expense of the free ram until it is all eaten up and then does not get released, at this point my computer is running noticably bad, let alone my disk access issues and then I have to reboot.
The experst say that it is fine for the standby to get bigger and bigger and this is by design, but I am not ahppy about that
If you read this article for the rammap applicatio it will explain the different types of memory and I will let you mnake your own mind up. But if you are reading this and I have wrote it you have to wonder who is wright, the experst working in a lab or me with a fast running computer.
Read this article: Introduction to the new Sysinternals tool: RAMMap
My resource monitor memory specs at this poiunt are:
memory report:
- hardware: 13mb
- in use: 2600mb
- modified: 200mb
- standyby: 5365mb
- free: 14mb
Prerequsites
- To Start install AnVir Task Manager – this will allow advanced control of services and process
- get sysinternals rammap for monitoring your memory usage
Causes
- when windows loads it does something called prefetch and super prefetch, what this is , is where windows loads up files it thinks you will want before you need them and puts them, in to your physical ram, this section of ram is called standby ram. Not only does it causes large disk load on first boot but eats a chunbk of memory. The experts say that this memory used to cache these files does not effect the use of memory because if it is needed windows will just empty it. The thinking behind this is that you might as well use the memory for something instead of it just being sat their. I personnally dont 100% believe this, for one you have to thwrap your harddrive to fill the ram in the first place and it extends the load time of windows massively
- Install the correct chipset drivers – if you do not the windows drivers will work but will not work as well as the manufacturer supplied opnes and can also be a cause of constant disk access, an especially problem in vista
I have 2 x compatable chipset drivers, which is better for my computer. (Ie select driver from list.), Use the newest one unless you know it is wrong. You can always benchmark here to see if there is any difference. - system restore – when this sets of it can increase disk access massively. System restore is set off by installing programs etcc but also is set on a schedule in windows 7 so this could be disabled. But do not disable system restore as that is stupid
- Poor quality or faulty software – these types of software can just keep eating ram
- startup items – in startup you can find loads of programs starting up that you never use that run services and eat up memory – you can selectively disable all of the ones you do not need. I have discovered that startup items can be the cause for slow performance as they just keep loading stuff in to standby memory. Removing these can massively increase your systems performace. If not rtry disabling ones that you need and see if your computer runs any better. Definitely disable all of those update agents that you dont need.
- Services – some service can eat up ram – disabled or remove all uneeded services
- lots of favourites in internet explorer – prefetch loads all of your favourites into standby memeory – this causes long first boot for windows and eats physical ram
- lots of desktop items – prefetch load these items into standby memeory so eats ram and increase first boot load time
- incompatible softwares – some people have issues between realtime scanning softwares. This can be a common issue. Definitely on have one antivirus and dont have multiple malware scanners at the same time, perhaps one of each. Also try remocing them to see if they are the cause of high ram or diak usage
- old software – update all your software to latest version because old ones might have had memory leaks in them
- not enough ram, or faulty ram
- not enough disk space
- faulty or dying harddrive
- fragged hard drive
- fragmented ntfs MFT
- large NTFS MFT – this is loaded into ram
- a huge amount of files – the more files or fragments the large the NTFS MFT and the greater the likely hood of the MFT fragmenting
- old drivers – of any description
- diplay drivers – these get a special mention like the chipset drivers as they are a main part of your windows system. Display drivers affect how quickly windows respone and do a lot of visual offloading for window (from windows xp upwards, even more so with windows 7)
- fragmented registry
- corruptions or errors in the registry – definitely can affect performance
- windows file indexing – this does not work anyway because I had to install effective search to restore the direct folder search we all had got used to on windows xp, so I can just disable this as I never use it and I have that many files it probably slows my computeer down considerably by storing the information and also discovering the files in the first place
Solutions
a normal computer service should have been performed before following these steps ie malware scans, regisrty repair, defragging etc....
Round 1 – monitor and remove obvious
- Benchmark your computer so you know how quick, or not, it is so you have something to compare against but I am guessing if you are reading this you know how slow it is running
- once you have installed anvir task manager you can use it to see what is causing disk load, ie which program is hammering you hard disk. It does not show all system level hard drive access but it is a good indicator for everything else. Leave anvir open for a while and just watch to see what spikes disk load. The issue might not show all the time. Certainly let your computer fully load up before you try any diagnosing
- uninstall any program that you find is causing high disk load, even if you do not think it is related uninstall it, you never know and it can always be put back on
- check your processes for programs that look out of place and disable/kill them
I did the following:
- removed old anvir free
- removed real player (was spiking to 45,000kb disk use)
- removed diskeeper – disk defragmentor that caused disk spikes when it was defragging
- killed hpmonitor.exe task – an errouneous program running (this never reappeared)
- rebooted
system is running well with no massive harddrive issues, no high cpu,
...... big improvement, maintained some free memory over time
the disk defragg software must have been the cause of the disk access when it was defragging, especially noticable on a laptop. Also diskeeper must have been preloading loads of files in to ram, this could be a fault with the old version I had on or normall operation
A massive performace increase as there has been no more sticking when I am doing stuff, I would still prefer it to be a bit more punchy, but at least there is no more random disk access periods.
This disk access could also of been cause by cached ram being dumped to the page file.
memory report:
- hardware: 13mb
- in use: 2413mb
- modified: 200mb
- standyby: 3176mb
- free: 2369mb
Round 2 – disable startup items
- Use anvir task manager to disable all startup enteries you 'do not use'. (remove if you want)
- Reboot and check for performance increase
- Use anvir task manager to disable startup items you 'do use' and see if you get any performance increase.
- Reboot and check for performance increase, Once assesed for obvious reasons turn them back on
here is my list of startup items I disabled and then got a massive performance increase. If you disable something from startup it does not nessasarily mean it will not turn on when you want it. This is because a lot of programs will start services when they need them, they are only inb the startup to try and make the software run quicker but this is no good if all these services that are started to make you computer run quicker add up to making it run slower. I am of the opinion that a service should only run at startup if absoulutely nessasrary and programns should start their servcioes only when required.
- seagull drivers – label printer driver?
- KiesPDLR – samsung phone driver thing
- Acrobat Assistant 8.0
- Adobe Acrobat Speed Launcher – does anyone use this
- Adobe ARM
- AdobeAMMUpdater-1.0
- AdobeCS5.5ServiceManager
- DellControlPoint
- Google Update – I will update this when I want
- IAStoeIcon – part of intels sata monitoring software, I dont need it
- Intel(r) Rapid Storage Technology
- Intuit SyncManager
- KiesHelper – samsung phone software
- Malwarebytes' Anti-Malware
- Malwarebytes' Anti-Malware (reboot) – dont know what this is
- NBAgent – nero backitup agent – you dont need this running
- SSDMonitor – I do not know if this is a microsoft thing but I do not have a SSD
- SwitchBoard – and adobe thing
- USCService – Dell fingerprint reader service
- nwiz – nvidia thing, I am not sure what this does but my computer is still working
- BCSSync - a microsoft office thing
- Apoint – dell trackpad software – dont use it, this only adds the little extras on, the track pad still works fine. You might not just get the trackpad icon and working scroll areas
- Broadcom Wioreless Manager UI – I always use the windows wifi stuff
- Google Update Service (gupdate) – yet another google update service I dont use. I can always press check for updates
- MBAMservice – I disabled this as I thought that the microsoft securoty essentials and this were fighting each other
- QuickBooks Update Agent – yet another update agent, most people will click on the check for updates option
- SunJavaUpdateSched – another update agent, when you run java I think it checks for updates then, this is just incase you never use it.
Now I have disabled the above the above I got a bit more or a performance increase, windows now pop straight up, apart from the boot load there is not much harddrive activity.
As you can see my memory situation is even better, a big chuck of free RAM and the standyby ram does not keep on increasing until there is no free ram
I would like to decrease the amount of ram the base system uses (in use)
memory report so far:
- hardware: 13mb
- in use: 1985mb
- modified: 193mb
- standyby: 2210mb
- free: 3801mb
Round 3 – RAM usage
Standby RAM
use rammap64.exe from sysinternals to look at what is using up physical RAM
- standby ram is not evil according to rammap instructions, but it probably is when you have 8gb ram and your hardrive keeps on getting accessed to fill the standby ram
- please note, the reason my pc takes so long to load up it is most likely loading files in to standby see rammap and 'File Summary' tab
- on the main page of rammap you can see a value called Metafile, this is your NTFS MFT loaded into ram. This can be useful to seee if it has got to big for you computer to handle correctely
- my drivers section of the RAM is 13mb, so this section should not be excessive in size
diagnosis memory usage:
on the rammap 'File Summary' Tab you can see all the files the computer has loaded in to ram (can be lots), you will notice in particular the following groups
- items on the desktop – I dont believe it searches sub folders
- lots of rapport files (if installed)
- startup menu items
- recycle bin items - recycle bin gets scanned by av on load up
- files in c:\program files (x86 x64) – not all of them but a lot
- all installed fonts
- stuff in inf
- prefetch
- system32 files – all of them
- system profile
- drivers
- all your internet explorer favourites
- some recently opened programs
- go thourgh this list and see if there are any particular programs taking up excessive amounts of standby RAM. Most of these files will have been loaded by prefetch.
- Sort by path
- check to see if any program has a massive amount of files cached
- remove this program if it is not needed
- then
- sort by standby RAM used
- see if there are any high memory using programs
- remove or disable these programs
- reboot check for performance improvement if you made some changes
Meta RAM
It is confirmed that the MFT/Meta file refered to in rammap is that of files in RAM only
my ntfs metafile is 400mb, this is split between standby 330mb and 63mb active. reducing ntfs file fragments and files would - nb: reduce this, possibly changing the cluster size would help.
This file could be the file table just for the file locations in ram, not the NTFS MFT, in which case only by having less files cached in to RAM would this be reduced.
- Use diskeeper or some other defragmenter program to perform a MFT defragmentation, this is different to a normal defrag. This will help reduce RAM usage, not by a lot but every litlle helps. This operation is performed before windows loads
- reduce the number of files on your harddrive
- possible try a different cluster size to reduce the number of clusters and therefore the NTFS MFT. The lager the cluster the lower the size of the MFT.
Other RAM Tweaks
other things you can do to reduce RAM usage
- reduce the number of favourites or use firefox
- all rapport program temp files are loaded into standby, try reinstall of this (lots off them and rapport files) – remove (not recommend for permanent) and then re-install after checking performance, could just be a faulty install.
- remove/uninstall unessassary programs to prevent them getting precached or loaded in to normal RAM
- empty recyle bin
Prefetch and SuperPrefetch
or, disable prefetch and super prefetch to prevent 'Files Mappings to the standby RAM (prefetched/Super Prefetched/Cached) (see rammap notes), or in simple terms loading files in to the standby RAM
these instructions taken from here
- Type Regedit into the Start Menu box;
- Select the file path:
“HKEY_LOCAL_MACHINE\SYSTEM\CurrentControlSet
\Control\SessionManager\Memory Management\PrefetchParameters” - Right click on both EnablePrefetcher and EnableSuperfetch;
- Select modify on each of these to change the value from 1(or 3) to 0; and
- Restart.
Round 4 – Disk and Load issues
Do these recommended optimizations below on your computer, not all of them will be appropriate. They are from :
http://thessdreview.com/ssd-guides/optimization-guides/the-ssd-optimization-guide-2/
- ensure your computer is operating in AHCI mode
because I am already running intel software I am already in AHCI mode
download a program called AS SSD Benchmark, you will use this to verify whether ACHI mode is on or not.
Load AS SSD Benchmark and look at the following picture.
If you see msachi, this means you are running in ACHI mode.
iastor.sys means you MUST be in AHCI (via Intel driver)since if you were not, it would be pciide.sys...
msahci.sys, or iastor.sys = AHCI or RAID (which uses AHCI for each drive)
pciide.sys = legacy "IDE" mode
Also If you have the Intel Rapid Storage Technology utility running (This utility is not needed for the driver but just lets you look at the settings. You can probably uninstall afterwards.) Goto the utility, the ;Manage' Tab and click on advanced, you will see a setting called 'Native command queing', if this displays yes you are using AHCI via intels own driver.
Native command queing = yes is a sign it is running in AHCI mode. I found this in my intel utility
'Native Command Queing' is the major difference between SATA and SATA AHCI mode.
This registry setting makes no difference to the SATA mode if you are running through intels IaStor.sys. Does not harm to have it set to AHCI though.
If you are not running in AHCI make sure that your computer supports AHCI by checking in the BIOS before making any changes. If it does, boot back in to windows, make the registry changes as outlined in the article, restart your computer, enter the BIOS and change the SATA mode to AHCI. When windows loads it will change opertions to AHCI mode and use that driver, can then verify using the AS SSD utility to check.
When you first install windows, if you installed with standard drivers it is most likely that windows installed with the normal SATA drivers. Windows disables the SATA drivers it does not use during an install. Sometimne windows does not correctely discover the AHCI capable chipset, and again disables the AHCI driver.
0 = AHCI and 3 = IDE
The Msahci driver in Windows 7 is disabled if the original install was made with the BIOS set to native IDE. The Msahci driver must be enabled before you change the SATA/RAID mode of the boot drive.
Dummies Thread Here - Disable drive indexing
when I disabled 'Allow files to have contents indexed in addition to file properties' on C: and D: the windows search service started spiking and coming on regular bais, his might be it rebuilding its index after I removed the tag as above.
So, if you disabled index contents of files, when you reboot this causes the Windows Search Service to start using large disk usage, this might be because it is re-indexing files with the new properties or it might be because there is a fault with it. So either disable it with 'index contents' option or leave it on and see if it does indeed re-index everything and then stop whirring away
- disable drive defragmentation schedule – should be disabled if you install diskeepr or 3rd party defrag program
my defrag schedule has already been disabled - Disable Prefetch and Superfetch – should reduce standby RAM usage and disk access
When I disabled the prefetch and superprefetch,
the windows load up seemed to take about the same amount of time to ge to the windows desktop but was fully loaded sooner,
hardly any disk access and windows is very responsive
I will add the memory usage stats here once I have used it a bit, but roughtly standby ram is down by 1gb, but favourites, desktop, programs files are still cached in ram - Disable windows search and Superfetch
disabling index file contents and windows search service did not seem to give me a performance incrase but a possible performance decrease, especially when I cannot use outlook instant search. This one would need testing over time. If the computer was just a file server it definitely would help as it reduces disk load, not nessarily gives a system perfomance increase
disabling SuperFetch here also disables ReadyBoost - enable faster boot by disabling the splash screen
It doe smka eload slightly quicker but I would leave this on and then you can see windows is actually Loading - power settings – make sure performace is set to high
(End of SSD Tweaks page)
Disabling Readyboot (not ReadyBoost)
Windows 7 - Disk Thrashing - disable ReadyBoot (not ReadyBoost) - see here + 2 other linked
pages
before disabling Readyboot, memory report:
- hardware: 13mb
- in use: 2141mb
- modified: 163mb
- standyby: 1535mb
- free: 4342mb
after disabling Readyboot, memory report:
- hardware: 13mb
- in use: 2000mb
- modified: 142mb
- standyby: 1239mb
- free: 4800mb
slight reduction in main RAM use (150mb), slight reduction in standby ram being used (300mb)
boot loading takes slightly longer, if not the same. Certainly not 20 seconds more.
First time in this process my Active RAM is below 2.0GB
Round 5 – Uninstall unwanted or uneeded software
This section is easy, just go through you programs list and uninstall software you do not use or do not need. You might want to refer to the following to give you an idea of what to remove to gain performance:
- applications causing high disk load
- rammap – loaded files for applications you do not use placing files in standby RAM
- startup enteries
- check services – but do not delete or disable, that is for the next section
'Your Uninstaller' will do a more complete job of removing applications.
I have removed
- Abby Fine Reader – lots of liscense files were getting loaded, services running
- adobe dreamweaver cs3
- ediamax powerline
- epson copy utility 3 – not win7 compatable
- free ip tools
- intel control center
- intel network connections – reinstalled lan driver
- intel pro set wifi software – I use broadcom
- intel rapid storage technology – this is software and driver, driver left in place after uninstall
- internet explorer developer toolbar – very old, it is now inbuilt
- lancastrian it toolbar – besttoolbar
- microsoft web platform installer 3.0
- secunia PSI beta 2.0 – did not want to be uninstalled without issue
- style master 4.6 demo
- system requierments lab for intel - ?
memory report so far:
- hardware: 13mb
- in use: 1549mb
- modified: 117mb
- standyby: 1073mb
- free: 5442mb
still to do,
- desktop items
- favourites + why do they still load into ram
- reduce programs that are using active ram
- enabling prefetch, and superprefetch can actually increase performace. See links in FF
- http://social.technet.microsoft.com/Forums/en-US/winservergen/thread/09c80df1-4bd4-4400-bcaf-cec892a0626a/
- the above might be the thing I was looking for in reguards to not loading files in to mememroy as cache
- this forum shows you how to empty standby RAM files via rammap
http://www.techpowerup.com/forums/showthread.php?t=129069 - this forum thread tell of how there is no OS level way of disabling the 'system file cache'
http://social.msdn.microsoft.com/Forums/en-US/wptk_v4/thread/dd7e78d6-32ea-45b7-9988-3da16d187cd7 - this registry setting is already disabled
if you have not already don so, uninstall all uneeded prograsm, if you have, double check your installed programs.
Also hacked programs can cause issues, even though they seem to be running well
corrupt antivirs can cause issues. Uninistall your anti virus program, reboot twice, then re-install it. This can help a lot some times. These sort of issues are usually caused by the upgrade tree/method they use, it is not always perfect and errors can build up over time. So what this does is instead of an old program being patched to death you ge the l;atest version of the software with less disk and CPU overheads.
round 6 – services
delete services that have files missing as this cant be good for performance
I disabled the following services
- Andrea ST Filters
- NVIDIA Update Service Daemon
- Adobe Acrobat Update Service
- Acronis OS Selector Reinstall Service – on demand
- Netgate Data Backup Service – On Demand
- pc tools startup and shutdown monitor service is registry mechanic – on demand
Round 7 – Miscallaneous perfomances tweaks
- monitor cpu use time and see which is the biggest user
- remove nividia drivesr with a cleaner utility (nasty file remover is a specialised remover), then re-install after a full reboot. ATI drivers might also suffer this issue. Nvidia drivers when uninstalled can leave old files that cause conflicts in your system and thgey need to be removed by a removal tool.
I removed all nvidia stuff from the programs and features, for the fuller removal use 'Your Uninstaller' on super setting.
I then rebooted, checked with 'Your Uninstaller' and removed any nvidia software left.
I then used 'Nasty File Remover' and removed all remaining nvidia files. After this I rebooted.
I now installed the latest graphics drivers for my Nvidia card.
This process also works for ATI cards. - mse removal (see links about mse and system restore and large disk use) – try a different antivirus. Note that microsoft security essentials is probably only scanning everyfile on load up because they are being loaded in to standby RAM
- disable antivirus and malware scans on loadup for extra speed but is definitely less secure
- malwarebytes and mse do a lot of disk access on startup, this is possibly due to files being prefetched. Also if you do not have malwarebytes realtime scanner running this might help
- remove malwarebytes - large disk use on load up and can possibly be interfereing or not playing well with antivirus software. Not likely but worth checking
- run registry cleaner and fix all issues – Registry Mechanic is good for this
- defrag registry- registry mechanic
- monitor process for accumulated cpu time and see if a program in particulart is using a lot of cpu time
- check a slow pc for disk and cpu load on startup and use with anvir task manager and see if there is anything to write home about
- check other running shit for removal, if you dont need it remove/uninstall it. They can always be reinstalled
- also make note that when you do a fresh boot of windows with microsoft windows, if microsoft security essentials is installed it will check for virus definitions if it has not done in the last 24 hours. This is a slow process and can cause harddrive thrashing. If you put your computer in to hibernate it does not notices and the 24 hour counter is paused. Hence why it is quicker from hibernate, or at least one reason. It might also be doing and on load quick scan as well as scanning when windows prefetches files
- remove windows rapport again - this cause browser freezing issues
- clear/clean your desktop
- what is C:\Program Files\Common Files\PC Tools\sMonitor\SSDMonitor.exe etc...
- why are favourites still getting loaded into memory when prefetch is off
- utilise windows perfomancemonitor
- utilise windows resource monitor
- removing rapport is worth 100mb - 150mb of Main RAM
- note, when you uninstall or install a program this will trigger system restore for a while which will hit disk activity higher for a short period
- disabling superfect, windows search and index contents might have speed detriment if turned off, this needs examining at a further date
- if items are not cached in memory they will take longer to load but overall the system will run better because it is not hogging memory and CPU time with files and services not required at that time.
- Installing less programs reduces RAM usage
- go through drivers as many drivers are left in place even when you uninstall the software. AnVir task manager is useful here
Additional Notes - sort
- readyboot slows intial booting/loading of windows
- main things that improved speed
- removing diskeeper, prevents disk access
- remove rapport, this causes my browser to crap out
- disabling prefetch and superfetch, this reduces the amount of files loaded in to standby ram
- disable superfetch server and windows search option
- disabling indexing on drives could be a good thing, but now when i enable the windows search service (search indexer) it spikes - this is pending
- what is windows.edb file
- remove daemon tools and the sptd driver it installs - SPTD can have a big effect on optical drive performance and possibly the harddrive aswell. worth testing
- if i cannot disable system level file cache then perhaps turning on the superfetch and prefetch to intelligently slect what to load might be better, it will icrease windows load time but has benefits when loaded
- indexing, maybe doing that click boc., index files contents , makes nor difference
- leaving search service runnign all night made no difference, it still spikes
- you can configure the indows indexing service, go to run and type indexing
- when you remove the C: and D: 'index files contents' you might still have to rebuild the index to purge the old results
C:\ProgramData\Microsoft\Search\Data\Applications\Windows\Windows.edb is windows search indexed file
- so in summary, if you remove 'Allow files on this drive to have contents in addition to file properties' disable , the following is true
- There is an 'Index Otions' in windows/control panel
- previous scanned properties and content with be maintained in the index for a time
- previous content and properties can be purged by rebuilding the index
- disabling this setting will reduced load as a files content is not scanned
- disabling this option does not stop windows indexing the files and their properties
- this does seem to remove C: and D: drives from 'indexed locations'
- windows search could be left on for outlook, but can be turned off for that little extra performance
- windows search is shit, it doesnt work, but it is ok in windows outlook
- indexing service can be paused for 15 minutes
- rebuilding the index, deletes all files in C:\ProgramData\Microsoft\Search\Data\Applications\Windows\
- if you disable the Windows Search service (SearchIndexer) the index will not be maintained or used.
Other Notes
- you can pause indexing
- you can configure excatly what locations are indexed (ie remove xammp locations)
- windows search feature is dependant on the indexing
- windows search on its owndoes not take up a lot of resources or disk usage (i am not sure about this now) because to un-pause the indexing service you should restart the windows search service
- rapport does have constant disk access wheather browsers are open or not. see notes on email
- after PC loads up from start completely, log off and then log back on. Really makes a dfifference (double check this, the affects might be temparary)
- on itial load up a lot of stuff is still getting loaded into standby RAM with prefetch off etc...
- on load up it loads a lot of programs that aare not even used. it just seems to go through 'program files' and 'program files (x86)' and loads shit. details from RAMMap
- get an application that finds dead program files and gives you the option of deleteing them (ie remannts in program files)
- registry cleaner ie ccleaner
- temp files, clean with ccleaner
- explorer.exe seems to prevent a lot of programs installing because it is interfering somehow with the install. ie 7zip
- free space - having free space is essentail, juggler metafore (usually used for ram)
- configure indexing options - configuring indexing to only really index what you want. ie outlook. most of the stuff search does not find anyway
- when pc starts locking up, log out and log back in really helps.
- DNS client service can run at a high CPU usage, this can be caused by having a large host file. ie spybot enteries
- remove old printers drivers - see HP trick ?
- remove unwanted drivers - ie some of those anvir task manager identifies or services
- could .net frameworks be a casue of slowness ie culamative patching rather than a straight install - soloution: uninstall all frameworks and do a fresh install)
- XP PIO mode issue - ie delete ide drivers etc...
- check scheduled tasks and delete the shit
- when you install a different av than microsoft security essentials, it might not disable windows defender.
- to disable windows defender: http://windows.microsoft.com/en-gb/windows-vista/turn-windows-defender-on-or-off
- windows defender is also: svchost (secsvcs) in taskmanager
- allocation size of clusters when formatting a drive can alter performance - http://www.howtogeek.com/136078/what-should-i-set-the-allocation-unit-size-to-when-formatting/
- disabled java 'default java for browsers' - Mozilla family
- try wiping firewall rules
- reducing the number of indexed files in the index options, ie exclude websites, which reduces the number of indexed files from 250,00 to 120,00.
- this reduces scanning
- reduces the size of the ebd file
- increase search time (possibly)
- reduces resources dedicated to this, ram, disk load and CPU cycles
- possibly usefull technique
- open task manager (show processes from all users)
- open up resources monitor on the disk tab
- hibernate PC
- turn on PC
- monitor disk activity on load
- if system restore is to small is that why it is always getting access. Apparently windows will wipe system restore points on a renboot (most likely becaus eit has run out of space)
- increase the systme restore if you have a big system. - the system restore size is set in GB when you first install windows. if after this you increase your hard disk via ghost etc.. the system restore will not increase with it caussin less and less system restore points the bigger your syste gets. this can also have a performance hit is it is constatantly delteign a system restore point so as to write the new one.
- use nirsoft driver explorer - and check what drivers are installed and running. disable them and then when you are sure delete them
- bleeping computer has a startup entery database, use this to check
- Configure power management - laptops will not be on the best performance profile by default
- look into task scheduler, some of these could cause disk access
- disable WinSAT (Microsoft > Windows > Maintenance) - what is this
- cleanup unused dll files - http://www.analogx.com/contents/download/system.htm - utility on this site somewhere to start with
- make sure codecs are up to date. ie shark007 codec pack has not bee updated since 2011 and could cause issues (codec should be metioned separately because they are not full programs so might not be checkeed by filehippo)
- check programs are up to date needs adding
- reduce the number of files on a disk. smaller MFT footprint, less scanning required
- use a largr cluster size - less clusters, less disk operation and quicker file reads
- reduce the number of small files you have on a disk - less mess
- defragment often and use a 3rd party defragger that performs file placement optimizations
- empty recycle bin - reduces files on the disk
- do not have a lot of shortcuts, programs and files on the desktop - AV and realtime scanners will forever be accessing them. Evene putting them in a folder will help as they might only get scanned once on load up
- examine browser BHO objects etc (glarysoft/hijack this) - part of malware scan?
- get rid of empty folders - with glary utilities
- disable uneeded tasks - Windows Task Folder (C:\Windows\Tasks)
UseFul Links
- http://windows.microsoft.com/en-gb/windows-vista/improve-windows-searches-using-the-index-frequently-asked-questions
- interestingthing about the hdd autopark
- http://www.dslreports.com/forum/r28064330-hard-drive-new-Win7-build-constant-drive-access-when-idle
- http://forums.whirlpool.net.au/archive/1367904
- http://disablehddapm.blogspot.co.uk/2011/12/disabling-hard-disk-drive-advanced.html
- http://gbatemp.net/threads/people-with-westerndigital-hdd-sleep-problem.318273/ (util + instructions)
- http://wdc.custhelp.com/app/answers/detail/a_id/295/~/how-to-disable-power-management-for-wd-internal-drives
- useful disk activity thread - http://www.wilderssecurity.com/showthread.php?t=296519
My PC Security Notes
This document assumes you have completely cleaned your PC following the information in my malware/service document or just have a clean PC, this document complements it.
I have also included security informations for other areas of security in this document to make it easier to get a more secure enviroment. If any sections over time get to big to be included here i will move them and refence the subsequent articls.
General
- strong password (add generator links)
- Rotate passwords?
- 2 factor authentication
- When asked how to best protect ourselves right now, Snowden said to “use full disk encryption to protect your computer and devices,” and to also use “network encryption” like SSL. He also suggested using the browser add-ons NoScript and Ghostery as well as using TOR. If you encrypt your hardware and your network, then you are “far, far more hardened than the average user,” he said.
Local PC
- safe search toolbars etc.. (with the ticks etc avg safe search + link scanner)
- antivirus software
- firewall (best, ie comodo, zone alarm)
- antimalware (should be part of av)
- id protectino
- password vault software ie keepass lastpass
- latest software and patches
- auto updates
- Rapport
- keylogger blocker etc..
- additional online scanners
- grc.com shields up
- encyrpted drive (pros and cons)
- java/flash/adobe reader upate to latest if need or uninstall completely. Also remove old java version.
- Malwarebytes realtime scanner (possible in malwae section)
- Pendrive autorun (not needed on win7 +)
- Link scanners
- Eula analyser
- MRU-Blaster is a program made to do one large task - detect and clean MRU (most recently used) lists on your computer.
- Zero filling + file shredding
- run stuff in a sandbox (ie comodo kiosk / sandboxie (http://www.sandboxie.com/))
- keyscrambler – this will scrambler keyboard output in the kernel
- uninstall all unwanted programs
- uninstall all unwanted services less security holes
- USB Autoplay protection
- use a virtual pc to web browse
- antispam software in your client
Software to try
- web of trust/macfee/norton one/ avg link scanner
- http://www.ilovefreesoftware.com/28/featured/6-free-link-scanners-to-scan-urls-in-browser.html
- http://www.pcworld.com/article/248963/how_to_tell_if_a_link_is_safe_without_clicking_on_it.html
- Pop up blockers
- LastPass / KeePass
- panda usb
Browser / Browsing
- firefox use the 'no script' plugin, also prevents java from other websites from loading (xss – cross scripting).
- Remove unknown or unwanted search plugins (possible make part of antimalware notes)
- No script for FF (prevent scripts running and xss whilst letting some run)
- add do not track
- using a vmware machine to browse
- Flash
- this utility allows you to read them - http://www.nirsoft.net/utils/flash_cookies_view.html
- these are a type of cookie and can be deleted and should be every so often
http://helpx.adobe.com/flash-player/kb/disable-local-shared-objects-flash.html - right click on the picture at the top to quickly access flash settings
http://www.macromedia.com/support/documentation/en/flashplayer/help/settings_manager07.html
- http://blog.ickydime.com/2008/12/how-to-delete-flash-shared-objects.html
Finance
- add a note to paypal for them never to give out my credit card numbers ie the last 4 digit
Network Level
- Public DNS servers
- Opendns - dns monitoring
- router
- router firewall SPI etc.
- router DDOS settings to on
- dmz rule to dead ip
- block uneeded ports (stealth/blocked/etc see grc.com)
- TOR network
- VPN tunnel
- Google Public DNS is a free, global Domain Name System (DNS) resolution service, that you can use as an alternative to your current DNS provider. Google Public DNS
- respond to ICMP ping set to off
- disable upnp on router
Data Transport (on the internet)
- PGP to internal encypt email messages
- not all SSL smtp traffic is secure ie if the serv other end does not accept SSL (2 settings 'advantages' = if remote server supports ssl it will use that or default back to non ssl. required = remote server requires SSL smtp to accept email
Webserver
- https always on
- webserver https beast attack
- web server section
- penertration testing
- testlabs.. SSL testing website
- use secure php.ini in the sub root folder ie /home/lancast/ see example php.ini
- redefine php.ini global location with htaccess (suphp and setenv)
- turn php error displays off as this is a security thing
- block Russia and china by IP
Research
- BeEf is a penertration testing platform also used for hackers
- security test GFI languard - http://www.gfi.com/pages/vulnerability-management.asp?adv=13734&loc=27&kwd=4
- security website that might be of some use - http://www.matousec.com/
- firewall reviews - http://www.techsupportalert.com/content/matousec-personal-firewall-tests-analyzed.htm
- http://www.techsupportalert.com/content/how-install-comodo-firewall.htm
- http://www.wilderssecurity.com/ - good security forum
- http://www.neustar.biz/enterprise/dns-services/free-recursive-dns#.UdHr021p20Y
- Norton dns - https://dns.norton.com/dnsweb/homePage.do
- https://www.grc.com/dns/benchmark.htm
- Grc.com and ‘Security Now’ podcast
- Passwords section ?
- Good passwords =
- Password generator sites
- Hxxtp header (prevents iframe thing)
- Email, junk email and settings
Which Programming Language Should I Learn?
Languages
- Objective C
- This is the language used by aplle/IOS for the mobile platform
- This will get replaced by swift
- It is an apple only language
- It is C underneath with extras added on
- Ie the cocoa API thing
- C
- Most languages are based of this, it is 40 years old
- It is a low level language
- Mainly used for OS and embedded systems
- It is a procedural language
- C++
- This is based on C
- It has classes
- It is a low level language
- It is a OOP language (+ other paradimes)
- VB (visual basic)
- This is Microsoft basic scripting language
- Its functionality is similar to C#
- C#
- This is a more indepth language
- I think this is a low level language
- It is limited to Microsoft products
- This can do all VB can and more
- Most popular language ?
- C.Net
- Not sure if this is C# rebranded
- Python
- This is a scripting language
- Is easy to learn
- A very visual language
- Php
- This is required if you want to do web development
- 85% of the worlds rendered html is done my PHP
- Is a good language to learn programming basics whilst getting something out of it. Ie. Most people start with websites
- Java
- This is a low level language
- Is difficult to learn
- Is platform independent
- Version 8 will be a massive change in how it works
- Write once, multiple platforms
- Ruby
- It seems very popular for web development
- Perl
- A low level language?
- Server based
- Javascript
- Useful for webdevelopment
- Client based scripting languages (ie runs the code on the html loaded into the browser on your PC, not at the server)
Analysis of Languages
Most hardcore programmers probably use C or C++ as a base and also know java, for web devlopers HTML, PHP, Java, ruby on rails (optional) and javascript.
I believe as hardware gets better that C++ will be used more that C, currently C++ is used for gaming and high end software. Firefox is written in C++ and so is the search engine GigaBlast.
Because C is aimed at OS, linux and embedded systems even though you can right other stuff with C, I recommend learning C++ first. This is because you learn the basic of C whilst learning C++ (I know people will tell you they are different languages, they are right and wrong. Read my in depth article on the differences between them) and as C++ can do more of the stuff you are most likely to want to do like games and apps, c++ is the way. Another thing about C++ is that JAVA is based on C++ so by learning C++ you get a really good start on JAVA.
JAVA is used for design most android apps amongt some online applets and games for PCs(you don’t see them as much now). You can now develop apps and games for androis using C and C++ (and some others) which is useful.
If you are ultimately going to learn JAVA it will not harm you to do a short courcse on C++ before learning java. I am raeding a book called ‘C++ for dummies 5th edition’ and then I will see about how I feel about java. You must remember that C++ is a low level programming language and you can get at all the hardware of your computer which allos some fun.
I was debating about doing a short course on C with the book ‘C for Dummies Volume 1’ before C++ and the JAVa, a bit like history and felt like a natural progression. However I felt that asa I did not want to do OS level stuff like drivers or Linux programs (a lot of their stuff is C) but more games and apps and that I liked the OOP paradigm (the sharing of code) I elected to go for C++ which has the best of C (or all 1991 C) and OOP it would be eaiser to grasp and easier then to progress on to JAVA.
If I ever what to go and learn C once I have mastered the other 2 languages at least I will know why I want to learn it because at the minute I do not have a need. I will also find it easier to learn as these languages are all realated they will have similarities. if you get your head around programming logic it is really just the syntax that changes. Most languages today are based on C at some point in their history ie Apples Objective-C, this is C with Apples custom library added on, C++ is obviously from C, and as mentions JAVA is from C++. I could go through other languages and show you how they are based or derived from C but you get the idea.
The only exception to the order of learning stuff is if you definitely what to program Apple stuff, then I would learn C and then Objective-C.
You must know at least one of the following to be classed as a real programmer, all 3 would make you an excellent programmer.
- C
- C++
- JAVA
Learn C++ to do all the hardcore stuff and JAVA for easy cross platform apps (ie mobile phones). C++ can design weapon systems
Descision Path Chart
These languages are in the order you should learn them for the selected specialism you pick.
| General | Web | Windows | Apple | Embedded |
|
HTML CSS PHP - C++ Java |
HTML CSS PHP - ASP (optional) Javascript Ruby On Rails JQuery AJAX Java (optional) |
HTML CSS PHP - ASP (optional) C# VB ( the different versions) |
HTML CSS PHP - C Objective-C The new apple language Java ? |
HTML CSS PHP - C C++ (optional) |
HTML/CSS/PHP are an excellent base for further learning in any discipline and also because they are so widely used throughout the web. Another reason is that they are likely to be required in a great deal of your projects at some point.
Research Links
- Should you learn C++?? | Prime Reacts - YouTube - You should learn C++ as it will teach you how to program and how computers work.
- Should I learn C before learning C++? - Stack Overflow
- There is no need to learn C before learning C++.
- They are different languages. It is a common misconception that C++ is in some way dependent on C and not a fully specified language on its own.
- Just because C++ shares a lot of the same syntax and a lot of the same semantics, does not mean you need to learn C first.
- If you learn C++ you will eventually learn most of C with some differences between the languages that you will learn over time. In fact its a very hard thing to write proper C++ because intermediate C++ programmers tend to write C/C++.That is true whether or not you started with C or started with C++.
- If you know C first, then that is good plus to learning C++. You will start with knowing a chunk of the language. If you do not know C first then there is no point focusing on a different language. There are plenty of good books and tutorials available that start you from knowing nothing and will cover anything you would learn from C which applies to C++ as well.
- Is it true that there is no need to learn C because C++ contains everything? - Stack Overflow
- It is almost true that C++ is a superset of C, and your professor is correct in that there is no need to learn C separately.
- C++ adds the whole object oriented aspect, generic programming aspect, as well as having less strict rules (like variables needing to be declared at the top of each function). C++ does change the definition of some terms in C such as structs, although still in a superset way.
Change Default MySQL Collation
In phpMyAdmin:
- Make sure you are on the home page of phpMyAdmin
- click on the Variables Tab
- navigate to {character....} - i need to check which one
- change the setting from latin1 to utf8 to get ut8_general_ci as default collation
ADSL Test Accounts
These accounts are used to verify connection to the physical network/router supplied by BT OpenReach. The reason this works is that BT supply the physical equipment and then the various companies then supply the network out of the exchange. It should be noted that these accounts might not work for all suppliers.
I dont think it matters what the password is except that there is one.
bt_test@startup_domain
adsl
also
bt_test@startup_domain
password
These might also be valid.
bt_test_user@demonhome.dslaccess.co.uk
password

bt_test_user@talktalk.net
password
StartSSL SSL certificate creation and installation
When i first started using StartSSL for my SSL certificates i found the process very hard and the instruction were not clear so i have gone through the whole process of creating a SSL certificate with StartSSL. These instructions assume that you know how to create a CSR on your platform. I have not dealt with this heare because is should be a failry simply procedure and unique to your platform
- read http://www.martfox.com/customer/knowledgebase/112/How-to-generate-a-CSR-and-install-a-SSL-certificate-in-cPanel.html
- common name seems to be the same whichever domain you use (ie www, non-www)
Generate your CSR
- generate private key for www.example.com in 2048bits (private key ties into the domain)
- generate CSR using the host www.example.com as this is the domain startSSL using the details below.
- As long as the key does not change, the details below will all be valid for the same private key
I used these for my CSR
country - GB  (http://www.digicert.com/ssl-certificate-country-codes.htm)
state - Yorkshire
City - Manchester
Company - Building Company
Company Division - Online
email - webmaster@example.com
Pass Phrase - Password123   (just incase there are issues with the private key)
- now i go to StartSSL
- validate the domain, example.com
- run the certificates wizard following the instructions below
Certificates Wizard
NB: make sure you select the correct encyrption level ie 2048-bit
Select Certificate Purpose
- select 'Web Server SSL/TLS Certificate
- Click Continue
Generate Private Key
- I click 'skip this step' because i have a CSR
Submit Certificate Request (CSR) - (page name)
- paste the certificate request in
- click continue
Certificate Request Received - (page name)
- The following details appear
- You submitted your certificate signing request successfully!.
- All content of the certificate signing request is ignored except its public key.
- You may proceed to the next step now.
- click continue
Add Domains - (page name)
- The following details appear
- Select the top target domain name for your certificate.
- Note: Only domain names which were validated within the last 30 days are eligible for selection.
- select your TLD, there should only be one ie example.com
- click continue
Add Domains - still
- you then get the following where you select a subdomain
- You must add one sub domain to this certificate.
- The base domain example.com will be included by default in the Alt Name section.
- Note: In order to add multiple domains and sub domains, your Identity must be at least Class 2 validated. Check your status at the "Identity Card".
- select your subdomain ie. www - i select www.example.com as this seems the best. you will then get the www and non-www version of ssl
- click continue
Ready Processing Certificate - (Page)
- The following details appear
- We have gathered enough information in order to sign your certificate now.
- The common name of this certificate will be set to www.example.com.
- The certificate will have the following host names supported:
- example.com
- www.example.com
- Please click on Continue in order to process the certificate.
- Click continue
Save Certificate - (Page)
- The following details appear
- In the textbox below is your PEM encoded certificate.
- Copy and paste the content into a file and save it as ssl.crt.
- Make sure, that you do not alter the content and you did not add any spaces! Save it in ASCII format (plain text).
- Below the certificate on this page
- Save also the intermediate and root CA certificates for the installation at your server (Save As...).
- itermediate url -
- root rul -
NB: the last page auto refreshed so the page titles here need to be checked
cPanel SSL Installation
- install the certificate in cPanel, it does not create any RSA keys
- when you install the certificate created by the CSR of www.example.com , it autodetects that there is also the example.com domain that is valid in the certificate and adds that as a selectable domain in the activate SSL section.
- The CSR details can probably be ignored by the issuing authority except for the reference to the private key.
Notes
- StartSSL recommend the common name should be the non-www version ie.e quantumwarp.com and if you also want the www.quantumwarp.com you should still use non-www domain name (quantumwarp.com) as the common name
- cPanel now supports SNI which allows multiple SSL Certificates to be used on 1 IP address. It however has limitations. You can install a SSL with as many subdomains as you want and this domains can be used as valid domains under SSL but cPanel will on ever show you content from the primary domain. This is because of how it uses virtual hosts. SNI for email uses the primary domain ie.e quantumwarp.com only, you cannot set mail.quantumwarp.com and use that. There are changes coming that will change this but for now you are basically limited to using primary domain non-www (quantumwarp.com) and the www version (www.quantumwarp.com) for your website and the non-www (quantumwarp.com) for your secure email.
- If you make a mistake you can just create a new SSL, you do not need to revoke the old one. To revoke a certificate will cost money.
How To Transfer Domains Using WHMCS
This article is written to give you clear instructions on how to transfer domains covering the main types of transfer, the lco.uk with IPS Tag and then the EPP code based transfers such as .com
Unless otherwise specified you should assume these instructions are using WHMCS.
- Register = Register a new domain
- Transfer = Transfer In a domain
Transfer in a .CO.UK
IPS Tag Change Method (Default)
- Customer
- The customer needs to verify their contact details on their domain. This is important so the domain is not lost in limbo.
- Our End (Via WHMCS)
- Do a new order filling in the domain details
- Select Transfer
- Submit
- Confirm the order etc.
- ENOM will now be ready to accept the transfer
- Check in ENOM for this message showing the transfer has started (Domains --> Transfer Domains --> My Transfers)
exampledomain.co.uk Transfer Pending - Awaiting Release by Current Registrar
- Customer
- Customer now needs to change their IPS Tag at their current provider to the following
ENOM
- The customer might now get a series of emails with authorisation links which they need to click on to authorise the transfer.
- Customer now needs to change their IPS Tag at their current provider to the following
EPP Code Method
- Customer
- The customer needs to verify their contact details on their domain. This is important so the domain is not lost in limbo.
- Needs to contact their current provider and get them to supply us with the EPP code for the domain
- Our End (Via WHMCS)
- Do a new order filling in the domain details
- Select Transfer
- Fill in the EPP code.
- Submit
- Confirm the order etc.
- ENOM will now be ready to accept the transfer.
- Check in ENOM for this message showing the transfer has started (Domains --> Transfer Domains --> My Transfers)
exampledomain.co.uk Transfer Pending - Awaiting Release by Current Registrar
- Customer
- The customer might now get a series of emails with authorisation links which they need to click on to authorise the transfer.
Transfer out a .co.uk
- Customer
- create a 'transfer in' request at their new registrar
- tell us to change their IPS tag in writing (email preferred) and supply their new tag
- supply us with a contact email (if needed) so we can update the domain contact details for the process of a safe transfer.
- Our End
- ENOM
- Goto ENOM control panel
- Either click change IPS tag or contact support. (not checked what the options are)
- NB: The ENOM module in WHMCS does not support the changing of the IPS Tag. If the domain is with ENOM you must change the IPS tag via the eNom control panel.
- ResellerClub (Via WHMCS)
- Goto the customers account in WHMCS
- Goto the domains tab and select the correct domain
- Verify you have the correct domain selected as this process cannot be reversed once started.
- It is also advisable to check the contact details on the domain, although this is no longer our problem it is good customer services and if there are any issues we should advise the customer
- select 'Release Domain'
- enter the new IPS Tag
- ENOM
- Customer
- The customer might now get a series of emails with authorisation links which they need to click on to authorise the transfer.
Transfer in a .com
- Customer
- needs to verify their contact details on their domain. This is important so the domain is not lost in limbo.
- needs to contact their current provider and get them to supply the EPP code for the domain / create an EPP code (via a transfer out request) at their registrar
- supply us with the generated EPP code
- Our End (Via WHMCS)
- Do a new order
- Select transfer
- Fill in the EPP code (supplied by customer)
- Submit
- Confirm the order etc..
- ENOM will now be ready to accept the transfer.
- Check in ENOM for this message showing the transfer has started (Domains --> Transfer Domains --> My Transfers)
exampledomain.co.uk Transfer Pending - Awaiting Release by Current Registrar
- Customer
- The customer might now get a series of emails with authorisation links which they need to click on to authorise the transfer.
Transfer out a .com
- Customer
- The customer needs to tell us to transfer out the domain in writing (email prefered)
- Our End - Get EPP Code
- Via WHMCS
- Go to the domain
- Verify the contact details on the domain. This is important so the domain is not lost in limbo.
- Click on 'Get EPP Code'.

- The code is now automatically sent to registered contact/administrative email addresses on the domain
- Via ENOM
- From the DOMAINS menu option, click my domains
- Click on the specific domain name that you wish to work (clicking on the domain name will take you to the domain control panel)
- Click General Settings.
- Be sure to disable the Registrar-Lock for the domain if enabled.
- Click the "Email Auth Code to Registrant" link. An email will now be sent to the domain's registrant contact.
- Via WHMCS
- Customer
- They need to supply the EPP code to their new provider.
- The customer will now get a series of emails and emails in with authorisation links.
- The customer needs to authorise the transfer by clicking on the links.
Reattempt Registration or Transfer
If you have done an order for a new registration or transfer of a domain and it has failed then you can read this article on what to do. But extensively it is split into a two options
- Use the Registrar command button (Register/Transfer as appropriate) to restart the process without having to redo the order.
- For transfers enter a valid EPP code i f required.
- Cancel the order and start again.
Notes
- Reattempt Registration or Transfer - WHMCS - Manually try to register or transfer a domain again after resolving an error or other failure that occurred during the last attempt.
Registrar Commands Buttons
Below are explanations of the Registrar Commands buttons and some potential uses. Not all buttons will be present for all registrars and some will only appear when they can be used. Most of these functions will be multiple steps and require confirmation.

- Register
- This will initiate a "domain registration" process of a domain at your registrar.
- This button should be used:
- The initial registration process has failed.
- Transfer
- This will initiate a "transfer in" process of a domain at your registrar.
- The nameservers presented on the second screen will be ignored and the client's current domain nameservers will be preserved.
- However this is correct for Enom, but might be different for other registrars.
- This button should be used:
- Where the initial transfer process failed for reasons such as, the allowed time period for the transfer has expired.
- During the initial order creation, the EPP code was not entered.
- The client has already changed the domain's IPS tag to your registrar but this domain has not been brought into your particular account. This will allow the process to complete (usually in 15-20mins).
- Renew
- Manually renew/add years to a domain.
- Modify Contact Details
- This will allow you to edit the registered contact details of the domain, or can just be used to check them.
- Get EPP code
- This will generate an EPP code which you will supply to the client so they can transfer the domain to their new registry/provider.
- The EPP code might be supplied onscreen or sent to the registered contact email for the domain
- Enable ID Protection
- Enable ID protection at your registrar for this domain.
- There is usually a cost for this feature at the registrar.
- Request Delete
- This enables you to explicitly delete a domain if your client no longer needs it. The deletion process will begin immediately and will not wait for the domain to expire.
- Some registrars will refund the domain fee if the domain is deleted within so many days/hours of being created.
- Use with caution
- Release Domain
- This allows you to change the IPS tag of a domain and therefore release it.
- Resend Transfer Approval Email
- Cancel Domain Transfer
- This allows for cancelling an initiated Domain Transfer.
- This is helpful in case there's something wrong with the Transfer Request (e.g. wrong nameserver data or contact data) or if the transfer got initiated by mistake, fraud, etc..
Notes
- Transfer in process, there are extra buttons
- When you have initiated a transfer in of a domain in WHMCS you will notice extra buttons in the 'Registrar Commands' section on the domain page in the clients account for the domain you are transferring in at it is normal for them only to appear when you are in the process of transferring a domain.

- When you have initiated a transfer in of a domain in WHMCS you will notice extra buttons in the 'Registrar Commands' section on the domain page in the clients account for the domain you are transferring in at it is normal for them only to appear when you are in the process of transferring a domain.
- WHMCS - Available Registrar Module Features & Addons – CentralNic Reseller - This company has implement all of the registrar module features and has excellent descriptions of them including the buttons.
- release a .co.uk using whmcs - states there is no tag release function in the eNom whmcs module
- Enom - WHMCS - The Enom module allows you to register and manage domains with Enom.
- Function Index - WHMCS Developer Documentation - The following is an index of all prescribed supported functions for a registrar module.
General Notes
- WHMCS
- When transferring or registering a domain, WHMCS is aware of the domain ending ie .co.uk .com. ie. presence or lack of the WHOIS opt out
- WHMCS did not prompt for an EPP code when using the Shopping cart
- WHMCS EPP Code | Web Hosting Talk
- Q:
- Today i tried my first domain transfer from Godaddy to our resellerclub account, but the WHMCS shopping cart never prompted for the EPP code. I had to login to admin area and manually enter in for client. How do I setup so when a user tries to transfer a domain to us, WHMCS will prompt for EPP code?
- A:
- You will need to tick the "EPP Code" box in the (Setup --> Domain Pricing) area of WHMCS for the relevant TLD in order to have WHMCS request users to enter their EPP codes when ordering transfers and be able to retrieve EPP codes for their existing domains.
- ResellerClub
- .co.uk is different client initiates the transfer at the current registrar and transfers the tag to PDR-IN , i will then receive a Security Key. The secret key is to be used like an EPP code, in fact it is used in the EPP code box. i believe ResellerClub add this for extra security so they do not get blamed for stuff
- .com client needs to request an EPP code from their registrar, then enter this in the transfer page, if the code is faulty i can redo it in the backend by clicking on the transfer button belonging to the domain, then enter the correct code and hit submit/transfer
- .eu just transfer, no EPP code required
- then the owners email get a link, click the link, enter the captcha and authorise the transfer
- Domains
- EPP domains: (.com, .net, .org, .info, .biz, .us, .cn, .com.cn, .net.cn, .org.cn, .cn, .tw, and .in)
- With .co.uk domain transfers you can start the process at either end but if you set up the receiving registrar first this prevents domain loss to another ENOM account, for instance as any issues with the receiving registrar will get flagged before the transfer.
- Authorization (EPP) keys are a security code required by the registry for domain transfer, thus are unique to every domain name. No two EPP/authorization keys are the same, thus if you are transferring more than one EPP domain, you will need to obtain each domain’s specific code separately for security reasons.
- Enom
- Transfers can only be performed with a renewal period of 1 year. Additional years need to be added separately and it is required to have one year as this allows the registrar to offset some costs, however you do get the additional year added to the domains expiry date.
Bulk Emailing Software
This is my list of bulk emailing software
- Groupmail - Free version is heavily limited to a 100 emails a group, i think
- Sendblaster - Free version is heavily limited
- Big Mass Mailer - Fre and opensource but has not been updated in a while
- OpenEMM - e-mail & marketing automation - I think this is a full emailing systems for marketing and is opensource
- Free Bulk Email Software Download - Not Tried this but there is also a 'Bulk Email Verifier'
- Bulk Mailer - Free Bulk Email Software Download - Not tried this
Display All PHP Server Environment Variables
This simple script will loop through all PHP enviromental variables and then display them on screen. This is useful to find out what variables exist for reference, and the actual values they return for diagnostics or programming.
Instructions
- Just simply create a php file with this code
- place this file on your webserver
- run the file
NB: When yo have finished make sure you remove this file as it can be a security risk.
<!DOCTYPE html PUBLIC "-//W3C//DTD XHTML 1.0 Transitional//EN" "http://www.w3.org/TR/xhtml1/DTD/xhtml1-transitional.dtd">
<html xmlns="http://www.w3.org/1999/xhtml">
<head>
<meta http-equiv="Content-Type" content="text/html; charset=utf-8" />
<title>Untitled Document</title>
</head>

<body>
this is quantumwarp.com<br />
<?php
   while (list($var,$value) = each ($_SERVER)) {
      echo "$var => $value <br />";
   }
?>
</body>
</html>