Items filtered by date: December 2015
Comodo Backup - Log file locations
There are a couple of places the log files can be located and logs might possibly be in 1 or more location.
- %TEMP%\ComodoLogsFolder
- \Windows\Temp\ComodoLogsFolder
- The target location of the backup
- A user specified location (but you should know where this is because you set it)
My Backup Up Notes
I currently have not fully explorer this topic but i am going to start by adding a list of programs i have either found or have been recommend to me.
- Macrium Reflect Free
- Comodo Backup - Not been updated for a while but one should be coming out soon. This is the software i use and is very user-friendly
- Todo Backup | EaseUS
- RoboCopy - Built into windows and has a command line
- UrBackup - Client/Server Open Source Network Backup for Windows and Linux
Lists of Backup software
Articles
adobe reader X very slow to open some PDF under windows 7 64-bit
It takes 2 minutes to open a one-page PDF. When double clicking on the PDF, Adobe reader opens but the PDF content doesn't display. It says 'Not responding' for about 2 minutes before it can display the content of the PDF. The PDF is just a one page file. It can be opened by other versions of adobe reader instantly. It can also be opened instantly on another PC which is also W7 64 and Adobe reader X.
These are the various methods for resolving the slow opening and browsing of PDF documents using Adobe Reader:
- Use an alternative reader such as nitroPDF/FoxIt Reader/Firefox Browser
- Uninstall/Re-install
- Go to Edit / preferences / general - the uncheck box "Enable protected mode at startup" This got rid of the lag in opening adobe docs.
The setting is now under the Security (Enhanced) Selection. Just uncheck the Protected mode and that will fix the SLOW ISSUE! - Go to Edit / Preferences / 3D & Multimedia - then uncheck box "Enable hardware rendering for legacy video cards" This got rid of the lag in opening adobe docs.
- Closing the Tools Pane sped it up immensely!
Taken from adobe reader X very slow to open some PDF under windows 7 64-bit - Windows 7 Help Forums
ExecuteCode Test
This has nothing to do with balloons.
Standard <pre> Tag
<style type="text/css">
.living-code{
	background-color: green;
	border: yellow dotted 5px;
	font-weight: bold;
	color: yellow !important;
	text-align: center;
</style>
<p class="living-code">This Code is Alive !!!</p>
Missing Key
Missing Security Key
Wrong Key
Wrong Security Key
Correct Key
This Code is Alive !!!
Hot Air Balloon
What is this?
This is my Hot Air Balloon code which adds a Bouncing Hot Air Balloon to any Joomla page to add that little bit extra character to your site. You can add this to any page by using a module or embed the code into the page itself like I have done here. I got the original code from Joomlashine.
If you are using a Joomlashine template, it is is best to published the balloon to one of the Sticky Positions.
You will also find useful links and resources at the bottom of this page to make your own Bouncing Hot Air Balloon.
Features
- Bounces up and down
- Uses CSS and JS
- A close button that stores the click/decision in a cookie, so once the balloon has been closed it stays off.
- The Balloon is clickable
- A small message on the basket.
The Code Blocks
Live Code - You can't see this


CSS
<style type="text/css">

.qw-air-balloon {
    position: relative;
    padding-bottom: 100px;
    -webkit-animation: balloon 6s ease-in-out infinite;
    -moz-animation: balloon 6s ease-in-out infinite;
    -o-animation: balloon 6s ease-in-out infinite;
    animation: balloon 6s ease-in-out infinite;
}
.qw-air-balloon a {
    display: block;
}
.qw-air-balloon a span {
    z-index: 999;
    text-align: center;
    line-height: 54px;
    position: absolute;
    bottom: 100px;
    left: 50%;
    margin-left: -42.5px;
    width: 85px;
    height: 54px;
    border-radius: 0 0 16px 16px;
    font-family: 'Roboto Slab', serif;
    font-size: 16px;
    color: #fff;
    text-transform: uppercase;
    text-decoration: none !important;
    transition: 0.6s;
    -moz-transition: 0.6s;
    -webkit-transition: 0.6s;
}
.qw-air-balloon a:hover span {
    color: #ffca14;
}
.qw-air-balloon img {
    width: 100%;
}
.qw-air-balloon .ab-close {
    width: 30px;
    position: absolute;
    top: 25px;
    right: 40px;
    cursor: pointer;
    -ms-filter: "progid:DXImageTransform.Microsoft.Alpha(Opacity="0")";
    filter: alpha(opacity= 0);
    opacity: 0;
    transition: 0.3s;
    -moz-transition: 0.3s;
    -webkit-transition: 0.3s;
}
/*.qw-air-balloon .ab-close:hover {
    -webkit-transform: scale(1.1);
    -moz-transform: scale(1.1);
    -ms-transform: scale(1.1);
    -o-transform: scale(1.1);
    transform: scale(1.1);
}
*/
.qw-air-balloon:hover .ab-close {
    -ms-filter: "progid:DXImageTransform.Microsoft.Alpha(Opacity="100")";
    filter: alpha(opacity= 100);
    opacity: 1;
}
@-webkit-keyframes balloon {
    0%, 100%{ -webkit-transform:translateY(0);}
    30%{ -webkit-transform:translateY(-100px);}
    40%{ -webkit-transform:translateY(-95px);}
    50%{ -webkit-transform:translateY(-100px);}
    60%{ -webkit-transform:translateY(-95px);}
    70%{ -webkit-transform:translateY(-100px);}
    80%{ -webkit-transform:translateY(-95px);}
}
@-moz-keyframes balloon {
    0%, 100%{ -moz-transform:translateY(0);}
    30%{ -moz-transform:translateY(-100px);}
    40%{ -moz-transform:translateY(-95px);}
    50%{ -moz-transform:translateY(-100px);}
    60%{ -moz-transform:translateY(-95px);}
    70%{ -moz-transform:translateY(-100px);}
    80%{ -moz-transform:translateY(-95px);}
}
@-o-keyframes balloon {
    0%, 100%{ -o-transform:translateY(0);}
    30%{ -o-transform:translateY(-100px);}
    40%{ -o-transform:translateY(-95px);}
    50%{ -o-transform:translateY(-100px);}
    60%{ -o-transform:translateY(-95px);}
    70%{ -o-transform:translateY(-100px);}
    80%{ -o-transform:translateY(-95px);}
}
@keyframes balloon {
    0%, 100%{ transform:translateY(0);}
    30%{ transform:translateY(-100px);}
    40%{ transform:translateY(-95px);}
    50%{ transform:translateY(-100px);}
    60%{ transform:translateY(-95px);}
    70%{ transform:translateY(-100px);}
    80%{ transform:translateY(-95px);}
}


@media screen and (max-width: 1950px){

    .qw-air-balloon {
        max-width: 230px;
    }
    .qw-air-balloon a span {
        margin-left: -30.5px;
        width: 60px;
        height: 38px;
        line-height: 38px;
        border-radius: 0 0 10px 10px;
        font-size: 12px;
    }
    .qw-air-balloon .ab-close {
        width: 24px;
        top: 15px;
        right: 30px;
    }

}

@media screen and (max-width: 1280px){

    .qw-air-balloon .ab-close {
        -ms-filter: "progid:DXImageTransform.Microsoft.Alpha(Opacity="100")";
        filter: alpha(opacity= 100);
        opacity: 1;
    }
    .qw-air-balloon .ab-close {
        width: 20px;
        top: 18px;
    }
}

@media screen and (max-width: 1024px){

    .qw-air-balloon {
        max-width: 200px;
    }
    .qw-air-balloon a span {
        margin-left: -26.5px;
        width: 52px;
        height: 33px;
        line-height: 33px;
        border-radius: 0 0 10px 10px;
        font-size: 11px;
    }
    .qw-air-balloon .ab-close {
        top: 10px;
    }
}

</style>
JS
<script src="/images/kb/2015/580/jquery.cookie.js"></script>

<script type="text/javascript">

    jQuery(document).ready(function(){

        jQuery(".qw-air-balloon-1 > .ab-close").click(function () {
            jQuery.cookie('ck-hide-bl-1', '1');
            jQuery(this).parent(".qw-air-balloon-1").hide();
        });

        if (jQuery.cookie('ck-hide-bl-1') != 1) {
            jQuery(".qw-air-balloon-1").removeClass("hide");
        }

    });

</script>
HTML
<div class="qw-air-balloon qw-air-balloon-1 hide">
    <a href="http://www.bbc.co.uk/" target="_blank">
        <img src="/images/kb/2015/580/hot-air-balloon.png" alt="" />
        <span>join us</span>
    </a>
    <div class="ab-close">
        <img src="/images/kb/2015/580/close.png" alt="" />
    </div>
</div>
<div class="clearbreak"></div>
What I used
- HTML/CSS/JS Code = The code on this page
- Cookie Support = jquery.cookie.js - You can probably get a newer version of this from the usual sources, but you can click on the filename and download from it from this apge.
- Balloon = Hot Air Balloon | Pixabay and my version cropped with the background removed Modified Pixabay Balloon
- Close Button = close Icons | Iconshock - from the Shine7 General set - This icon is not free to use for commercial projects.
Links
Balloon Tutorials
- A trip in the sky with CSS3 animations (and z-index) | Web is Love - web & design stuff
- HTML5 Canvas Tutorial: 2D animations - flight of hot air balloon | Vivax Solutions
- Hot Air Balloon-Intro to Animation Practice | Computer programming | Khan Academy
- Premium Tutorial: Hot Air Balloon | - Illustrator Tutorials & Tips
- Create a Flat Hot Air Balloon in Adobe Illustrator - with video | Vectorgraphit
Single Balloons
- Hot Air Balloon | Pixabay - Really professionally, background will need removing.
- Hot air balloon in the sky vector Vector | FreePik - Requires Attribution
- Colorful Hot Air Balloon | openclipart
- Red/Orange/Yellow Balloon | WPClipart
- Clipart - Hot Air Balloon | WPClipart
- Orange and White Hot Air Balloon | Pixabay
Lists of Balloons
- Hot Air Balloon Vectors, Photos and PSD files | FreePik
- Free Balloon Vector Art - (3197 Free Downloads) | Vecteezy
- Balloons | WPClipart
- Hot Air Balloons | Pixabay
- balloon Icons | Iconshock - For commercial use you will need to purchase a license.
Configuring Free domains on WHMCS
When using WHMCS i have found that configuring the software to handle free domains can be confusing especially when you do not know what all of the setting do. In this article i will go through the various settings that can affect free domains and then i will give the ideal setup.
All the following answers are from WHMCS staff members through the support system.
Settings
CRON Jobs
There are 2 CRON that need to be considered.
- The basic CRON that WHMCS uses to send out invoices, emails, suspensions, teminations and other functions. This must be setup for WHMCS to run properly. (Setup/Automation). DO NOT enable auto termination unless you really know what you are doing. If enables, untick that box.
- The domainsync.php CRON job allows you to poll your registrar's API to automatically sync all of your domain expiry dates.
- http://docs.whmcs.com/Domains_Tab#Domain_Sync_Enabled - explains about this CRON job and gives the settings
- your registrar needs to support this and be enabled correctly in the WHMCS settings. (Setup/"Products/Services"/Domain Registrars)
Auto Renew on Payment
Automatically renew domains which are set to a supported registrar when they are paid for.
This allows automation of the domains (does not mean that the hosting service will go off, but the client not paying and the domain could get lost). It means the ouness is on the customer and me checking every other date to see if i need to renew.
Auto Renew Requires Product
http://docs.whmcs.com/Domains_Tab#Auto_Renew_Requires_Product
Only auto renew free domains that have a corresponding active product/service for the same domain
- This option purely gets WHMCS to do a Boolean check to see if there is an active product/service for this domain when processing a domain for a renewal. Dates are ignored.
- If there is no active product/service for this domain an email is sent out to the WHMCS admin with a "Free Domain Renewal Manual Action Required" error message so that the admin can manually go to WHMCS and renew the domain (an accept/approve link in the email would be easier and a nice feature). Dates are ignored.
- As a small followup, if the domain and service renewal dates match, an auto renewal would not occur until the customer had paid and "Auto Renew on Payment" was turned on.
These answers are confirmed by a WHMCS staff member
Domain Sync Enabled
Tick this box to enable automated domain syncing with supported registrars via cron
When this option is enabled WHMCS will poll your registrar for expiration dates for all of your domains and then update the records in WHMCS to match. This prevents errors happening from human error
Sync Next Due Date
- Enable
- Number of Days to Set Due Date in Advance of Expiry: XX
This option allows you to set the billing due date for the domain to match the expiration date of the domain. You also have the ability to set the billing due date XX number of days before the domain expiry. This can possibly be useful for customer so they dont forget to renew their domain but can cause other issues.
Questions
Free Domains and Preventing Auto Renewal
Scenario
I currently have annual hosting services with free domains packages on my whmcs. Some of these accounts have domains that expire years in the future so when the hosting service is renewed they do no need their free domains renewed at a cost to me that i do not need to pay for.
Is it possible to set a hosting package with a free domain that will only renew that domain at hosting renewal if that the doamin expiry is less than 1 year (or xxx years).
Question
This is for a domain transferring in with extra years (lets say 5) to a hosting service with a free domain (this will be the one transfered in)
1. No matter what the settings are, because the domain is set to free and matches the hosting services it will get renewed every year adding additional years on.
2. The CRON job changes the expiration date and next due date for the domain in WHMCS to match the domain's real expiration date. This breaks the shared invoice with the hosting service, but the domain is not renewed until it's expiration date thus i do not end up paying for the extra years, this is what i want. so to clarify with this option, if a domain is transfered in with extra years those years are used up before the domain is renewed at the register irrespective of whether it is free or not.
Answer
Both of the scenarios that you've provided can be correct.
- If you do not have Domain Sync and Sync Next Due Date enabled then Scenario 1 is correct.
- If you have Domain Sync and Sync Next Due Date enabled then Scenario 2 is correct.
Further Notes - Free Domains and Preventing Auto Renewal
WHMCS will attempt to automatically renew the domain name when the Expiry Date that it has stored comes up.
If this date does not match the date with the registrar then this could cause the domains to be renewed early or late.
If you haven't done so already I would recommend going to Setup > General Settings > Domains and enabling Domain Sync, after doing so you'll want to set up a cron job to run the domainsync.php script. This will allow WHMCS to contact your registrar, find out the expiry dates for your domains, and then update this information in WHMCS.
You can read more about this at http://docs.whmcs.com/Domains_Tab#Domain_Sync_Enabled
When a hosting service is renewed it seems to renew the domain as well because it is attached to the hosting service.
That's kind of what happens. It's a bit more complicated than that though.
When you use the Free Domain option with a Product/Service it will offer the client a free domain name which will be renewed as long as the associated service is active. This free domain will always have a billing cycle of 1 year regardless of what the customer selects.
Example: http://screencast.com/t/iaJEmwUNq
So, there are two things to address to clarify how this all works.
- How do the domain and service get invoiced together?
This works because the domain name and the service share a Next Due Date. WHMCS groups invoices together entirely based on the due date. - How is the domain name free?
If you go to the domain name page you'll see that the domain name has a recurring amount of "0.00". Anything that is "0.00" is automatically marked as paid by WHMCS.
It's not free because it's attached to the service. It's free because it was purchased along with the service. It's still an individual entity that has its own due date and its own recurring value. If, for some reason, the domain has been registered for longer than 1 year or the expiration date has changed with the registrar then WHMCS has no way of knowing that unless you have domain sync enabled.
Domains and hosting are seperate items and it is just by their invoice date that they appear on the same invoice
So if a customer transfers in with let say 10 years on their domain i obviously dont want to keep renewing that domain and wasting money or a domain might of got extended automatically along the transfer line, ie enom automatically renews a domain for a year if there is not many days left on the domain when transferring.
So (still with free domain)
when the domain is transferred in, the hosting services configured etc.. I can then manually change the due date on the domain next due date for some time in the future and the domain will stay free because it has 0.00 set.
The domain would then not get renewed until the time i have set in the future, thus saving me renewal fees on a domain with extra years.
the domain and hosting services only appear on the same invoice because of the invoicing date but they are both quite seperate.
The domain would then not get renewed until the time i have set in the future, thus saving me renewal fees on a domain with extra years.
Yeah, that's correct. WHMCS won't attempt to renew the domain until the Next Due Date for that domain name.
So, if you had Domain Sync enabled then WHMCS would automatically check with your registrar to see what the expiration date was; it would then update the Expiration Date and Next Due Date in WHMCS to match that date.
why would the CRON job alter the 'invoice due date'. (ps i have date syncing enabled).
The domainsync.php file does not alter the "Invoice Due Date". If you have the "Sync Next Due Date" option enabled at Setup > General Settings > Domain then it will alter the domain's Next Due Date in addition to the Expiration Date.
If what you said is true above, then all my domains would not get renewed or purchased until their expiry date meaning that i would never have to pay for extra years when i did not need to which is the opposite of what i was told earlier.
WHMCS will only attempt to generate a renewal invoice around the time of the Next Due Date for the domain name. If you have 'Domain Sync' enabled, with 'Sync Next Due Date' also enabled, then WHMCS will automatically update the Expiration Date and Next Due Date of the domain name for you.
What happens with renewals of a serivce with a free domain with premature domain renewal?
Scenario
- Domain Sync and Sync Next Due Date are enabled
- i have CRON enabled
- i am computer literate etc....
Question
can you answer/confirm the 2 following questions:
- if you create a new service with a new domain which is free, payment period 1 year, the domain will get renewed when the service is paid for in 1 years time?
- if you create a new service with a new domain which is free, payment period 1 year, and "Enable - Number of Days to Set Due Date in Advance of Expiry: 14 days". How does this work because the Free domain would be out of sync with the service. 1 of 2 things i can see would happen here:
- WHMCS will only send an invoice for the domain, and the domain will get automatically renewed for free seperate to the hosting service
- WHMCS is clever and will send the service + domain renewal on the same invoice 14 days before expiry
The reason i ask these questions is i dont want a domain name to get renewed automatically if a client does not renew their hosting with a free domain name.
Answer
Thanks for contacting technical support. To address your points:
- Provided the Next Due Date and Payment Method of the domain and the product were exactly the same; yes.
- In this situation, scenario (i) will occur.
You can enable the Setup > General Settings > Domains tab > Auto Renew Requires Product option, which means that the domain will only be renewed if the service is still active at the time the domain comes up for renewal.
NB if using the Advanced Date, the logic will be run for that date not the expiry date of the domain. In this situation the domain would still be renewed for free separate from the product of the same name. It is for this reason we recommend that when offering domains which renew for free to disable the Sync Due Date option: http://docs.whmcs.com/Common_Promotions#Notes
Follow-up Question
As a follow up to the option "Only auto renew free domains that have a corresponding active product/service for the same domain"
How would this apply to my situation (option 2) if i set the domain to be renewed 14 days before. From what i can see the domain will still get renewed automatically because there is an active service and then, if in 14 days my client decides not to renew his hosting i will of renewed his domain when not required costing me money.
Follow-up Answer
In that situation the domain would still be renewed for free separate from the product of the same name. It is for this reason we recommend that when offering domains which renew for free to disable the Sync Due Date option: http://docs.whmcs.com/Common_Promotions#Notes
Conclusion
If you set premature renewals of domains, WHMCS will check on that date which is 14 days before the domain's expiration date wheather the domain has an active service which has a matching domain name. If there is, the domain will be renewed. This does allow the oppurtunity for the customer to get a free renewal if they dont renew within the next 14 days.
So this is a bit of a pointless setting. There should be an option for this to only apply to non-free domains.
What I did and why
What I have configured
- CRON jobs - both the main WHMCS CRON and the domainsync.php CRON job
- Auto Renew on Payment - Enabled
- Auto Renew Requires Product - (optional) (i have selected "off" because i have multiple domains on one service)
- Off= all free domains will be renewed reguardless of whether there is a product/service for that domain.
- On = only domains with a matching product/service will auto renew, the rest will trigger and email to the WHMCS admin to manually renew that domain
- Domain Sync Enabled = On
- Sync Next Due Date = On (with no Advanced billing)
My setup above has the following results
- Domains will renew for the number of years set in their admin panel in WHMCS. Free auto renewed domains might only renew for 1 year (check both these)
- I have the main CRON job enabled because WHMCS will not work correctly without it
- i have enabled the domainsync.php CRON to allow WHMCS to get the expiry dates of the domains from the registrars and keep them synced with the WHMCS records.
- Domain expiry dates always match those stored at the domain registrar
- This prevents customers domains from expiring in error
- allows WHMCS to use this date for renewing the domain
- Domain expiry dates are synced to the domains invoice due date. This allows WHMCS to only renew the domain when it is going to expire which prevents additional years being added to that domain when they are not required, saving the company money. consider:
- not all customers signup for a new domain and hosting with your company.
- not all customers signup for a new domain and hosting with your company at the same time.
- some customers transfer in their domain which has multiple years left so do not need any extra years being added on until the domain renewal date. All of their extra extra years will get used up before i pay for anymore
- if a free domain and it's matching service have the same renewal dates, when the single invoice that WHMCS sends out is paid, the domain and service are auto renewed
- If a free domain and it's corresponding service renewal dates do not match, the free domain will be marked as paid and WHMCS will renew it automatically or send out an email to the WHMCS admin for manual renewal.
- This depends on the Auto Renew Requires Product setting. The domain will be renewed as a seperate item to the service because it is only the renewal dates that link the domain and service.
- The domain will get renewed for free automatically without payment during their 1 year subscription, but only once. This means i am still no worse of because i would still have to renew their domain at least once in a yearly billing cycle.
Free Upgrade to Windows 10 - The Rules
Update
You can use the Windows Accessibility route. Search www.howtogeek.com for instructions
Computer Scenario 1
- When you upgrade to win 10 over a “daz” special Windows 7, you get a new win 10 key.
- When I tried the same key on a completely new unit, it accepted it , but would not activate.
- When I did an upgrade on a second laptop it activated ok and gave me the same key as the first .
- When I wiped the second laptop completely and did a fresh install from the ground up using the same key …the mofo activated fine…
Conclusion
So it would appear the key that is administered is the same across the board for the free upgrade (possible Win10 Pro and Win10 Home are different).
The license for the Free Upgrade is directly linked to the hardware, thus enabling you to activate throughout the lifespan of the PC ( assuming no major hardware changes take place) and it has been activated at least once throught the Free Upgrade process.
Computer Scenario 2
- When you install win7 or win8 with no key, Win10 will ask for a key to be entered at the start of install. This was pretty much expected.
- So your current version of windows must have a key and be activated to upgrade to Win10 with the Free Upgrade method.
- When I upgraded 2 acer laptops that had daz loader installed I was given a Win10 pro key ending....3v66t.
- I have just installed for a third time onto another completely different PC using a genuine Win7 Pro licence, It has also issued the same key ending ...3v66t.
- Now I have wiped this 3rd PC and done a flat install of Win10 Pro using the same license issued on all 3 units. It installed and activated quite happily, so it would seem the same key is being used for everyone who upgrades ..
- However if you try to use this key for a flat install on a system that has never been activated / upgraded.....It will not work.
Conclusion
The free license key will work for a flat install as long as the unit has been upgraded to Win10 at some point in its life, looking like the hardware Id is linked to the activation. This also assumes you are using the correcct key for Win10 Pro/Home.
Notes
- The upgrade makes a windows.old folder upon upgrade and keeps it for 30 days just incase you want to roll back
- Not all Windows 7 Machines will give you an activated Windows 10. I think it can depend on the source of the previous windows.
1511 version
- you can now do a fresh install witout upgrading first to get a free winows license within the following rules
- windows 10 will read the product key straight out of the bios and use that to install the relevant windows 10 version automatically. You are not prompted for the serial or which version you wnat to install. (this assumes you are using the x86/x64 combined disk)
- you can now use any qualifying product key to do a fresh install without upgrading first
- BIOS hacked windows 7 install now no longer will qualify for a free upgrade
- you can use the Nirsoft utility (firmwaretablesview) to read the serial out of a bios.
Windows 10 Default Product Keys for Free Upgrade
- Windows 10 Home -- YTMG3-N6DKC-DKB77-7M9GH-8HVX7
- Windows 10 Pro -- VK7JG-NPHTM-C97JM-9MPGT-3V66T
Links
- Windows 10 Upgrade Media - en-gb - download the windows 10 install media
- Windows 10 Upgrade Media - en-us - download the windows 10 install media
- Windows 10 ISO Download - Windows 10 Forums - If you need to install or reinstall Windows 10, you can use the Media Creation Tool from Microsoft to download a Windows 10 ISO file that you can use to create your own installation media using either a USB flash drive or a DVD.
- Windows 10 Free Download ISO 32 Bit 64 Bit
- Windows 10 Specifications & System Requirements – Microsoft - There is a table of what verion of Windows 10 you will get when you update an older verion of windows that qualifies for a free upgrade.
- How to force Windows 10 to update right now - How-To - PC Advisor - Microsoft has made it easy to get your free copy of Windows 10, but sometimes it won't download. Here's how to force the Windows 10 update and get it downloading and installing on your PC or laptop
Sync Outlook with Google Android
Most people who have android phones have windows PCs, some of those people have microsoft office and use it for their emails and calendars. Android does not have native support for syncing the calendars and emails on the phone.
When you have a samsung phone with a stock ROM it has support for syncing via the KIES software, but as soon as you install a non-stock ROM the kies software service on the phone is no longer present. This might be true for other manufacturers and their stock ROM solutions for outlook.
Contacts / Calendar / Phone Logs / SMS
I have found it frustrating syncing my Outlook contacts and calendar between outlook and my android phone. Outlook will always be my primary calendar and contacts.
I found this topic particularly difficult, i know what i wanted to do but i had loads of questions such as if i deleted the item on outlook how would it get deleted on the android phone. So i decided to work through the pain and write some instructions on how i synced my details and the different types of sync there is.
You can choose either to sync to your android phone (only/local store) or to your google account. It is important that you know about these 2 places to store contacts and calendar details. If you use the local store option gogole cannot see your contacts adn calendar events.
General Notes
- There are different ways of setting up syncing.
- Do I want to sync with google or not?
- There is a local calendar and a google calander in android phones
- When you do too many deletions of either contacts or calendar items android (possibly Google) moans about it. I experiences this in MyPhoneExplorer but might be an issue on other software syncing with a Google Account.
- Where can I force to store contacts local on the phone? I have not found an aswer to this. This come into play when you create new contacts on your phone.
- Google contacts can take some to reflect the changes from Google Servers --> Android Phone or vice versa
- Changes might be caused by Google adding extra info to contacts such as contact images
- How to Import / Export Contacts Between Outlook and Gmail - This is a manual method to import and export contacts between Outlook and your Gmail account.
Software
There are 2 programs that are capable of performing sysncing with outlook and various endpointd (to be investgated) for both contacts and calendar
MyPhoneExplorer
FJ Software Development - Home of MtPhoneExplorer
This is my preffered option and works with most android phones.
MyPhoneExplorer has the ability to sync your:
- Outlook Contacts
- Outlook Calendar
- Outlook notes
- Call Log (to MyPhoneExplorer)
- SMS Messages (to MyPhoneExplorer)
MyPhoneExplorer also has the following features:
- Sync with either your Google Account or just the android phone's local store
- Allows syncing over USB / WIFI / Bluetooth
- Automatic Syncing
- Syncing that allows you to control each sync item
- Monitor some settings of the phone such as CPU Temperature / Voltage
- Storage Usage
- Push Notifications to the windows desktop such as incoming SMS messages
- Dial the phone from you PC
- File Explorer
- And more ......
Using Default settings, the following happens
You might find the follow useful so you know what will happen with default settings and to make sure you have them set as you require before you run the MyPhoneExplorer sync for the first time. I assume you have installed the app on the android phone and the windows app as per instructions. I also used a USB for these tests.
Created a Contact in Google Contacts (webpage)
- If I create a contact on Google Contacts (webpage) it will appear on my phone after androids syncs the google account (or i manually start the sync). After this happens, i ran MyPhoneExplorer sync and the contact was synced to my Outlook contacts.
- If I then delete this contact in Outlook and run a sync with MyPhoneExplorer, it deletes the contact from Google contacts on the phone. When the my android phone syncs the Google Account with Google, the contact will be removed from from my Google Contacts
Created Calendar item in Google Calendar (webpage)
- I created the item in google calcnder (webpage) and it appeared on my phone. I then ran phonexplorer and it synced that entery to my outlook
- I deleted the entery in outlook and the entery was deleted on my phone and on google calendars webpage after a sync
Created Contact in Outlook
- If I create a contact in outlook. Myphoneexplorer will sync it to my android phone. So far it seems to only sync it to my android phone local store/contacts. This means that new contacts are created in the phones local contacts store and cannot be accessed by Google.
Created Calendar item in Outlook
- If I create an event/calendar item/appointment contact in outlook. MyPhoneExplorer will sync it to my android phone local store/calendar. This means that new contacts are created in the phones local calendar and cannot be accessed by Google.
What I would do
I am going to use my Google Account rather than the Phone's Local Store. You can always change this later but would require a bit of effort. My Outlook will always be my primary store for contacts and calendar events.
- install and configure the App on the phone:
- set new contacts to be created in your Google Account (this is set in the android app - settings / 'Add new contacts to')
- set new calendar/events to be created in Google calendars (this is set in the android app - settings / 'Add new events to')
- set your the only contacts store to be synced to your Google Account (this is set in the android app - settings / 'Contact-accounts to sync') - if you dont things can get messy
- set your Google Calendar to be the only calendar to be synced (this is set in the android app - settings / 'Contact-accounts to sync') - if you dont things can get messy
- set the address format to a UK version, set this to Street, City, Region Zip code, County (this is set in the android app - settings / 'Address Format') (optional)
- disable standby mode which kills Bluetooth connections and you have to restart the PC and phone to get things working again. Set too (Settings / Standby mode on active connection / Avoid Standby-Mode)
- set the phone app to launch automatically
- install the software on windows and:
- Configure the Sync settings (File / Settings / Sync ) to point to Outlook.
- The default settings will sync the data from the phone only with MyPhoneExplorer's internal datastore
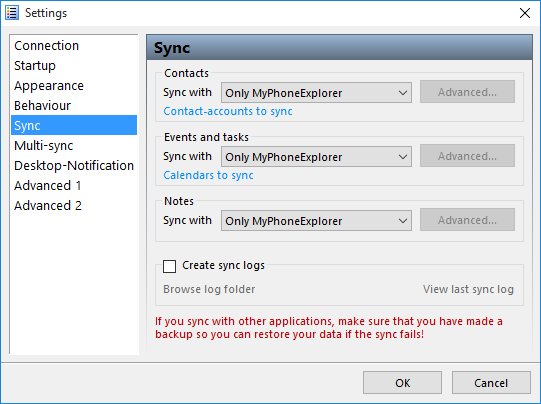
- When set to sync with Outlook, MyPhoneExplorer will sync data from Outlook to it's internal data store and then to the android phone. Changes coming from the phone will follow the reverse path. This will leave you with a copy of your data in your Outlook and a copy in MyPhoneExplorer.
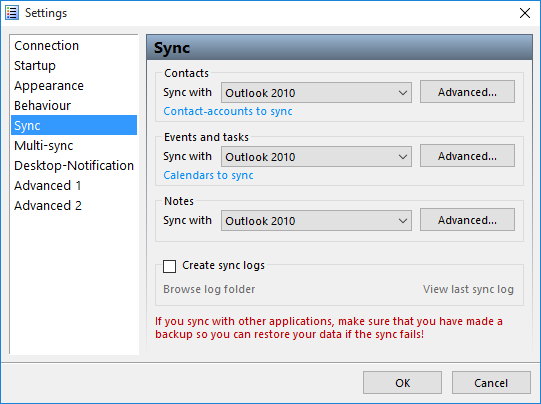
- The default settings will sync the data from the phone only with MyPhoneExplorer's internal datastore
- configure MyPhoneExplorer to prompt you when changes are discovered. This is only temporary whilst you check things works properly with the syncing. (File / Settings / Sync / Advanced )
- Select connection method
- Bluetooth
- pair the phone via bluetooth with your PC
- configure the connection method to be Bluetooth (File / Connection ) (see help file)
- Wifi
- USB
- Bluetooth
- set the windows app to run automatically (optional)
- set Multi-sync to run when a sync is run automatically (File / Settings / Mulit-Sync) (optional)
- Configure the Sync settings (File / Settings / Sync ) to point to Outlook.
- make sure all syncing works correctly
- Done
MyPhoneExplorer Notes
- You can decide in which contacts store (Phone only or Google Account) MyPhoneExplorer creates new contacts (this is set in the android app - settings / 'Add new contacts to')
- You can decide in which calendar store (Phone only or Google Account) MyPhoneExplorer creates new items (this is set in the android app - settings / 'Add new events to')
- MyPhoneExplorer by default reads the items out of both Local and Google Account for syncing with Outlooks (this is set in the android app - settings / 'Contact-accounts to sync')
- MyPhoneExplorer by default reads the items out of both Local and Google Account calendars for syncing with Outlooks (this is set in the android app - settings / 'Calendars to sync')
- Once you have everything setup how you like and you now it works well, set everything to automatic to make things easy
- It might be worth only having sync on only for 1 calendar and contacts store to keeps things simple
- If the item (calendar or contact) was created in the Google Account, then it will be deleted from the Google Account when deleted from Outlook. Basically this means that an item only exists in either the Google Account or the Local phone store and upon editing or deletion in Outlook this change is reflected in the item in its relevant store.
- when you hit the blue sync button at the top in the windows app, it will only sync the contents of that tab. ie if you are on contacts it will only sync contacts etc.... There is a multi-sync option that you can run from the menu that will sync all items.
- The items you see in the Windows Application are what you can see in your phone at the monent of syncing (need to 100% check this)
- I am not sure what would happen if you have the exact same contact in your Google Account as you do in your Phone's Local Store
- You can set the sync button to perform a multi sync by setting the following option and what features are synced with the Multi-sync (File / Settings / Mulit-Sync)
- Contact Profile images do not always sync with outlook. Not having the images on my phone or in out look is not a desperate thing. I could always use that go mod app
- How to use MyPhoneExplorer with an Android Device - FJ Software
- MyPhoneExplorer - YouTube - An overview and simple instructions.
Delete Local Contacts and move them all to your Google Account
You can delete all contacts on the phone in one go by using the windows application. This example deletes the phones local store, and then uploads all your outlook contacts to your Google Account. You can also do the same instructions for your Calendar. As ever just make sure you have backups of you Outlook PST and your Android Phone's Contacts and Calendar just incase you have some issues.
- Run a sync so you have the most upto date contacts in Outlook
- open the windows app
- make sure in the app you only have the contact stores synced that you want to delete contacts out of. ie. if you want to remove all the Phone's Local Store contacts only have that store enabled for syncning in the android app. If you have the Google Account selected aswell, those contacts could be deleted.
- connect the phone, wait for it to be found
- selecting all of the contacts and hit delete
- Click the 'run the sync' button Only
- The records should now be deleted out of the Phone's Local Store, so click 'Abort Sync'
- You can re-enable the Local Contact Stores again if you want
- make sure in the app, you have it set to create new contacts in your Google Account (settings / 'Add new contacts to')
- run the sync again, but select 'Force Outlook --> phone'
- All you local contacts are now removed and are present in your Google Account
NB: When you run the script again it might have a few records that need updating/syncing this might be because of slight inconsistencies with how the records were stored.
Syncing Profile Photos (Google -> Phone -> MyPhoneExplorer -> Outlook)
this feature is not perfect, but not absolutely required. The mechanisms in MyPhoneExplorer do exist but not always aas you expect. If you had no contacts in outlook and everyone of your google account contacts had a profile image they would all transfer to outlook withou issue. The problems come in when you have contacts in different locations.
- If you edit a Google contact on your phone, the contact image stored at Google will be synced to the phone and then outlook via your MyPhoneExplorer
- If you edit the contact at Google Contacts (webpage) this does not seem to push the contact image to your phone – not 100% verified
- If you edit a contact on outlook, this will not cause the google account contact image to be download to the contact on the phone and then to outlook via MyPhoneExplorer (could not get this to work)
-
Basically if you sync both directions you will probably not get the images updated as myphonexplorer does not use image change as a trigger point. You need to force Phone to outlook.
-
MyPhoneExplorer can only download the phone logs, you cannot push the losg back to the phone
-
There should be an app that syncs the profile images. This should allow only those contacts at Google's Servers that have a profile image to updated the local cached version of these Google Contacts on your phone.
GO Contact Sync Mod
GO Contact Sync Mod - at SourceForge.net
This is a very simple piece of software that allows you to sync your outlook Contacts and Calendar directely with your Google Account and then by proxy, with your Android Mobile Phone because that syncs with your account. You can sync your contacts and calendar even if you do not have an android mobile phone. This software can be set to run automatically and sync automatically.
Easy to use and Easy to run. If you do not want all of the extra features of MyPhoneExplorer and do not want to use the Phones Local Store this would be for you.
Notes
- When you first run this software it might prompt you what to do when it finds 2 matching contacts but this is straight forward and will only happen if you already have contacts in your Google Account.
- GO Contact Sync Mod links a contact (and calendar events i think) by some sort of relationship it creates. I do not know if you remove this program whether this link is destroyed. You can always replace all of your Google Account Contacts with your Outlook ones if you get in to difficuly assuming you already have them synced
- How to Automatically Sync Contacts Between Outlook and Gmail - This is a tutorial on how to use Go Contact Sync mod
Clear Phone Contacts Data
A common problem with Google Contacts is tha the profile images stored on Google's Servers do not always repliacte down to your android phone. These are a couple of methods to fix (sort of) the problem.
Method 1
- Find a contact that has a picture that is not synchronizing.
- Edit this contact
- This will cause Android to re-sync the contact with Google's servers.
Method 2
This option seems to be really popular on the internet and does seem to be successful boot has some caveats. This method will delete your recent call history, call logs and contact Favourites, possible more.... This method is taken from this article, Android: How to Delete All Contacts
- navigate to (settings / apps / ‘contacts storage’)
- Clear data
- re-sync your Google account via (settings / Accounts / Google)
Some images were updated, some might still be downloading when i checked. Favorites were missing and recently called people. It did not cause all contacts to be updated, some had to be merged/updated (my choice) when i re-synced with MyPhoneExplorer. One of the accounts that I merge updated its contact photo. You should make note that it was updated because I merged the account changes and did not use the outlook contact only, I could of also just used the phone account which probably would have a similiar effect because my accounts were mostly in-sync. If there were already images on the outlook account I assume it would not get replaced. This method did delete call logs from the phone, recent calls, missed calls etc..
This method does work a little but does not seem able to 100% download all of the images, this could possibly i have not left it long enough or there is a sync limit which has been reached so you have to wait for a reset.
This is a video of a smiliar method but it uses 'contacts' not 'contacts storage'. I tried this but could not get it to work. Android Contact List Images Photos Missing - YouTube
Other Contacts and Calendar Syncing Software
Below i am going to list a few pieces of software i have found for syncing outlook with your android phone. Some are free and some are paid for.
- GO Contact Sync Mod - this is a new kid on the block, a windows application that directly syncs outlook contacts/calendar/possibly notes to your Google account
- CompanionLink - Sync Outlook with Android Contacts, Calendar, Tasks, Notes, Journal, and Categories
- How To: Sync Android With Microsoft Outlook | PCMag.com - article
- SyncRoid - Outlook Sync Lite - Android Apps on Google Play
- SyncRoid - Outlook Sync - Android Apps on Google Play
- Outlook-Android Sync - Android Apps on Google Play
- MyPhoneExplorer Client - Android Apps on Google Play
- SyncRoid
- Sync Android/Droid with Outlook/Exchange - Forum and table showing loads of different software and their functions.
- SyncDroid: Sync Android to PC, free Android Backup, free Android Restore
Syncing Links
- How to Sync Google and Outlook Calendars - How-To - PC Advisor - Google recently pulled the plug on its Outlook calendar sync utility, so what is the alternative? Here are a few suggestions on how to sync your Google and Outlook calendars.
Syncing Email
IMAP
If you are using IMAP then there is a chance you have all your contacts and emails stored with your email provider, even your calendar if Google.
POP3
This is not strictly achievable when using POP3 but i have a really good work around.
- configure your pop settings in your outlook to leave emails in the mailbox for 14days
- install K9 email app on your android phone
- configure your email account as IMAP
what this does is allow your main PC to download the emails as it does normally but leaves 2 weeks worth of emails in the mailbox so your phone has upto 2 weeks to download these emails. But because the phone is setup as IMAP you get immediate emails via PUSH notifications. I think K9 caches the emails it downloads so it possibly is keeping emails for longer than 2 weeks, if it doesnt having 2 weeks worth of emails on your phone is more than enough.
If you find that your mailbox is getting too full you can either increase the size of the mailbox or reduce the number of days that outlook keeps emails in the mailbox.
The PC with outlook on will always be the master.
MS-Exchange
I have not tried this but i am sure there is full Microsoft Echange support available if you use one of these corporate systems in which case you email, contacts and calendar will be synced.
How to Fix the Automatic Repair / Boot Loop in Windows 8
This has got to be one of the most annoying issues with Windows 8, and also one of the most unfixed issues. Below i will show you what i did to fix my issues and then expand on what i think the causes are etc..
There is UEFI (EFI) and non-UEFI versions of boot loader. I think this is the difference between secure and non-secure booting.
What I did to fix the Boot Loop?
Listed in order.
Stage 1
When you get this issue it always loads the choice screen where you can try to load windows again or try to repair your Windows installation. This menu never gives you any indication of what the error is, it just keeps looping.

In this Repair menu i tried all of the following options, non of which worked to reapir the boot loop.
- Safe Mode - I followed the instructions to load safe mode and also the other restricted types of startup (accessed via the Advanced Tools)
- system restore - would not run because it could not find any system restore points
- chkdsk c: /r - this did not find any issues
- sfc /scannow - did not run
- bcdedit - options, add here copy, backup, rebuild - this could not find any windows installations and c:\boot did not exist
Stage 2
I now followed the instructions from this webpage with a few modifications because i relised that i was using a UEFI and that this might cause other issues. However the things i tried above are valid for Windows 8.
http://woshub.com/how-to-repair-uefi-bootloader-in-windows-8/
The matter is that the BCD loader configuration in Windows 8 installed in UEFI mode is stored on a separate hidden EFI volume (100 MB in size on FAT32 file system). Bcdedit can not see it and, therefore, manage the loader configuration on it.
NB: my bcdedit could see the BCD i think it was because the appropriate partition had a drive letter
My Modifications
- My partition with the EFI folder on was J: and already had the drive letter assigned
- My J: partition was 500mb
The commands i actually ran from the Windows 8 Boot Disk (DVD):
- cd /d j:\efi\microsoft\boot\ (/D : change the current DRIVE in addition to changing folder.)
- bcdboot C:\Windows /l en-us /s j: /f ALL
from here on i get the following error screen which actually shows you an error
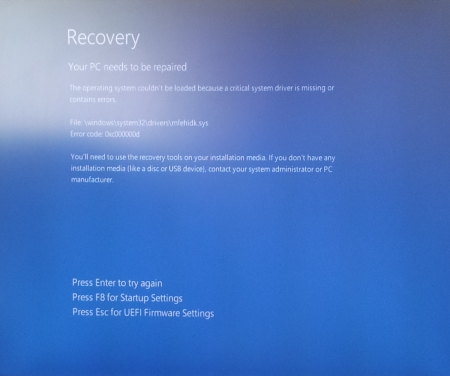
The operating system couldn’t be loaded because a critical system driver is missing or contains errors.
File: \windows\system32\drivers\mfehidk.sys
Error code: 0x000000d
The file mentioned above, Mfehidk.sys is a system process that runs in the computer background and maintains the host intrusion detection system for McAfee Antivirus. Mfehidk.sys will not be the cause of everyones boot loop or the faulting file shown.
http://h20565.www2.hp.com/hpsc/doc/public/display?sp4ts.oid=4132189&docId=mmr_kc-0110048&docLocale=en_US - says what Mfehidk.sys is for.
Stage 3
The boot loop has now gone but I could no longer use the 'Auto Repair Menu' on the hard disk so i had to revert to using a Windows 8 Boot Disk with Dart Utilities.
When the disk had loaded i navigated to the Advanced Tools via the Troubleshooting menu and ran the following (you will be prompted to login)
- Startup Repair - once this had completed it says it could not repair the startup and gave me the option of shutting down or reloading the utlities. One other piece of information it gave was the location to its Logfile.
C:\windows\System32\Logfiles\Srt\SrtTrail.txt
I rebooted the PC and Windows still did not load and went to the same blue screen with the error message on it. - SFC via Dart - This application ran and completed successfully but without finding any errors or corrupt files. Obviously windows did not load.
Logfile
So i decided i would go and have a look at this file and what the logfiles say. You can read the SRT log to see what issues are hyappening.
- boot of the windows DVD
- open the file explorer
- navigate to and open
C:\windows\System32\Logfiles\Srt\SrtTrail.txt
- read the log file and see if this tells you what is causing the startup error.
{insert my log file here} -
In my log file i was drawn to the lines
Root cause found:
---------------------------
Boot critical file c:\windows\system32\drivers\mfehidk.sys is corrupt.

Repair action: File repair
Result: Failed. Error code =  0x2
Time taken = 2781 ms

Repair action: System files integrity check and repair
Result: Failed. Error code =  0x490
Time taken = 870141 ms
- i then navigated to this file on the disk because i know that windows was now loading because it shows c:\windows\ as part of the file path and the logfile probably is right that this file is the cause.
- when i examined the file i found the file to be 0 Bytes and no wonder that windows see the file as corrupt. Because this file is not a windows system file this is why it is not fixed with SFC. There were also other similiarly named files that were most likely part of mcafee anti-virus.
- I created a temp folder and moved all the 0 Byte files into that folder.
- I now rebooted the computer
- Windows now loads, Fixed
Stage 4
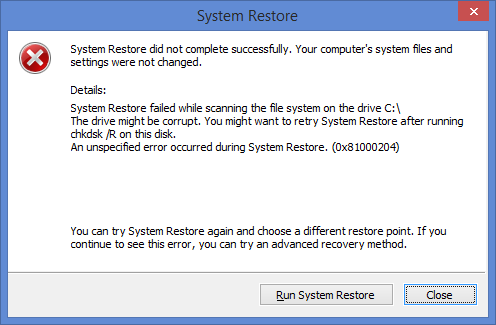
Just as a followup, when windows loaded it prompted me with a system restore error. This could of been caused by some of the work i did or that my client had been messing before the failure, even though he told me he had not. I just cancelled the notification and all was well.
Causes of the boot loop
The cause for this boot loop was undoubtably the 0 Byte files that windows was trying to load as drivers, and inparticular because it was a low level antivirus file, this was why the loop happened so quickly.
even though i tried loading windows without low level malwaredrivers i think this file was either not a low level antivirus file or when it is parsed because it is 0 Bytes long caused a hard crash of the kerenl which always flaggs the last boot as dirty, hence the loop.
The files could of been made 0 Bytes by anti-virus cleaning the file because it thinks it is a virus or perhaps when Mcaffe updated itself it did not correctely delete these files.
What should you do?
above was a worked example of what i did to fix the boot loop but here is the order of things you should do. Try rebooting your PC after each section to see if that fixed your computer.
- boot of a windows DVD and examine the log file to see if you can fix any identified issues
C:\windows\System32\Logfiles\Srt\SrtTrail.txt
- check the following folder for 0 Byte size files and remove them.
C:\windows\System32\drivers\
- Run the 'Startup Repair' tool from the windows boot disk
- Run system restore from either the windows boot disk or the onboard 'Automatic repair menu'
- Check the harddrive for issues
- chkdsk c: /r
- SMART
- full surface scan
- Try all the fixes bcdedit from
- Try the EFI repairs from - How to repair UEFI Bootloader in Windows 8 | Windows OS Hub
You should have a working PC by now, if not try going through them again to see if you have missed anything. After this the next step is to back all your stuff up and perfomr a refresh, reset or fresh install of windows.
Links
- How to repair UEFI Bootloader in Windows 8 | Windows OS Hub - I used this article as the basis for my succsessful repair
- HP Support document - HP Support Center - this article tells you what Mfehidk.sys does
- How to Fix the Automatic Repair Loop in Windows 8.1 - Microsoft Community - This is the goto article from Microsoft. You should read all of the thread.
- Automatic Repair Loop on Windows 8.1 - Microsoft Community - Tells you what bootrec commands to run
- How to repair the EFI Bootloader in Windows 8 - fixedByVonnie - a good article on how to fix this issue with pictures
- Fixing a Corrupted UEFI Partition in Windows 8 or 8.1 - A short article with the bootrec commands to run
- Total identified Windows installations: 0 - Microsoft Community - might have relevance when yoou read it
404 - The entry or revision was not found in the repository
Scenario
You have trired adding your SVN repository into your Redmine project and you get the follwing error when you try browsing the repository.
404 The entry or revision was not found in the repository

- You have set up your SVN repository in your subversion server and verified it works
- You are running your Subversion server using the https:// protocol
- You have clarified all of the settings in Redmine and all appears correct.
- Redmine is running as a windows service
- These instructions also assume that your Redmine/Subversion/NetBeans setup has been installed using my tutorials. It is not mandatory but they might make more sense with file paths.
Causes
Althought my instructions are geared towards my own setup of Redmine, Subversion and Netbeans all running on windows these solutions might work for other setups including remote Subversion servers.
If you are getting an "404 - the entry or revision was not found in the repository" error, it may be due to an invalid certificate. When we use svn (via https) in small businesses, we tend to use self-signed certificates but subversion client doesn't trust those by default. So you have to add exceptions to the ones you trust.
- Invalid SSL Certificate
- Expired SSL Certificate
- Untrusted or Self-Signed SSL Certificate
- Permissions on the Redmine service are no good
- Incorrect username and password entered in to Redmine
- There are no entries or revisions in the repository to show
Solutions
Run Redmine from the Command Console
If you run redmine from the command line (not as administrator), this runs Redmine as the currently logged in user and because of that, uses that user's Subversion SSL store and correctely handles the 'non-verified' SSL certificate if that certificate is in the current user's Subversion SSL Store
- open a command prompt (not as administrator)
- navigate to your redmine directory
- run redmine by running the following command
rails server -e production
You should find that you can now browse your reopsitory through redmine. If this works it also proves that the permissions are wrong in the redmine windows service. Although it does not directly fix the issue when running Redmine as a windows service it is a quick work around and a useful tool for testing.
Change the Redmine Windows Service Credentials
This solution worked for me.
My instructions when setting up 'Redmine as a Windows Service' configure the service to use the windows system account. This causes problems with Untrusted SSL Certificates (non-verified) because the windows system account does not have a Subversion SSL store to hold an exception and when the untrusted SSL is used this causes the Subversion binary to fail.
The solution is very easy. You need to edit the Windows Redmine Service and change the 'Log On' User. I would not use an admin account for security reasons.
- Right click on 'My Computer'
- Goto Services
- Right Click on 'Redmine Windows Service' and select properties
- Goto the 'Log On' Tab
- Select 'Log on as:'/'This Account'
- Enter your current user account details.
- You can use browse to find your user account
- If your user account does not have a password you will need to add one before you can go any further
- It should look like this when you are done

- Click apply and make sure the changes are applied
- Click OK
If you Redmine Windows Service is running, you need to stop and start it for these changes to be applied. I am also not sure if this will cause any issues with not running aas the system account.
Invalid, Expired, Untrusted or Self-Signed Certificate (non-verified)
Redmine utilises the Subversion Client Binary. This binary will not work correctly if called by Redmine when it comes across a 'non-verified' SSL certificate and no exceptions have been made for this SSL certificate.. The connection will fail and you will get the error above. So to fix this we need to add the 'non-verified' SSL to our Subversion SSL store.
- open a command prompt (not as administrator)
- enter the following command to access your repository
svn list --xml "https://svn.quantumwarp.com:18080/svn/MyITCRM"@HEAD
This will access your Subversion repository in an interactive mode and prompt you with questions if required - If the target repository's SSL certificate is 'non-verified' SSL you will get prompted with the following:
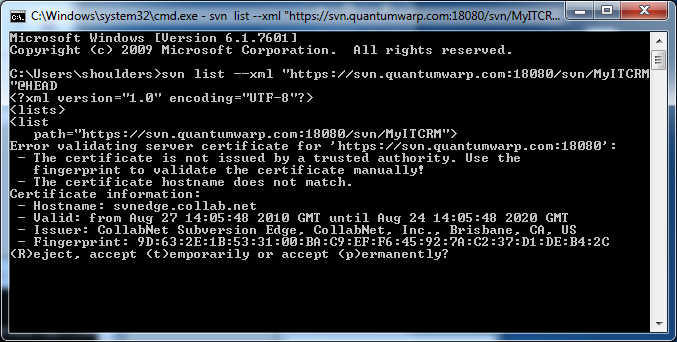
- Press 'P' for permanent and then click enter
- The binary will add the certificate to your Subversion SSL store to allow an exception to be made.
A file with a Hash for a name will be created in the folder below (assuming Windows 7)
C:\Users\shoulders\AppData\Roaming\Subversion\auth\svn.ssl.server - After the certificate and connection has been establish you might be prompted for a username and password. These are the username and password for the repository. You can enter them and allow the repository to be listed for you or you can cancell out as it is not needed to fix this issue.
Or
Another solution is just to use a Trusted SSL certificate.
Other Solutions
These solutions might not work and could be out of date. They are here so you know about them if the solutions above do not work.
- adding --trust-server-cert into <redmine root="">/lib/redmine/scm/adapters/subversion_adapter.rb
- issuing new certificate with Common Name (CN) equal to server name. (click here)
- change SVN_BIN = "svn" into SVN_BIN = "svn --trust-server-cert --tolerant-ssl --non-interactive --config-dir /tmp" - In "lib/redmine/scm/adapters/subversion_adapter.rb"
Notes
General
- Don’t forget that if you have(‘administration/settings/repositories/’Fetch commits automatically’) unticked (i.e. off), Redmine will not automatically bring up the revisions etc.. until you run a commit with a functioning hook that calls Redmine. (you could manually run the URL triggers to run the update). This setting is mainly for when you are testing and setting up the SCM interaction
SSL Stores
Netbeans, Subversion and SubversionEdge all have their own SSL stores as shown below.
- C:\Users\shoulders\AppData\Roaming\Subversion\auth\svn.ssl.server
- C:\Users\shoulders\AppData\Roaming\NetBeans\8.0.2\config\svn\config\auth\svn.ssl.server
- D:\Documents\Developer\SubversionEdge\data\svn_client_config\auth\svn.ssl.server
If you open a command prompt elevated to an administrator and run the Subversion binary, when you accept the certificate permanently the certificates will be stored in that accounts Subversion SSL store and not your currently logged in user's Subversion SSL store.
- The certificate names are the hash of the SSL
- Deleting the appropriate file from the SSL Store will remove the trusted status for that SSL certificate for that piece of software
- You can possibly move the files from one folder to another to have the same affect as accepting them permanently as they seem the same file in both of the subversion and netbeans folders.
- Having the certificate present in
C:\Users\shoulders\AppData\Roaming\Subversion\auth\svn.ssl.server
does not on its own fix the connection issue in redmine. The cert file is only created in here when you accept the fix permanently. - only the webserver process user is finally the user for the remote svn access.
http://www.redmine.org/boards/2/topics/28422?r=32903#message-32903 - The Redmine servers(Thin for versions > 2.0] by default run under the System account and this does not work wrong SSL certificate for SVN server. The solution is to change the process account for a service user with logon privilege, connect to SVN and accept permanently the certificate for that user. Don't forget to change the user for the two Thin or Mongrel services running in load balancing.
https://www.redmine.org/projects/redmine/wiki/Error_parsing_svn_output
I think what is saying don’t run the service under a system account but use a proper logon details - This issue can be is caused by running redmine under the system account and this does not use your certificate store of the logged in account.
Links
- Fixing svn module 404 error in Redmine « INFLIGHT MAGAZINE - This is a heavily referenced artilc eon how to fix this issue
- Redmine Repo 404 Error - Bitnami Community - adding --trust-server-cert
- command line - SVN - Server SSL certificate untrusted from post-commit hook - Stack Overflow - I have fixed this by issuing new certificate with Common Name (CN) equal to server name
- SVN: The entry or revision was not found in the repository. - Redmine
- FAQ - Redmine
- Defect #787: Subversion: Handle failed certificate verification - Redmine - gives svn listing command , Doesn’t work, unfortunately --trust-server-cert is only available in Subversion 1.6
- visualsvn - svn command line error "Server certificate verification failed: issuer is not trusted" how can i resolve this error? - Stack Overflow
- HakNick / Redmine + SVN (Subversion) + Certificate issue + Ubuntu - A cleanly written article
- How do you accept an SSL certificate through the SVN command line? - Server Fault
- Error parsing svn output: # - Redmine - mentions --trust-server-cert
- terminal - Why won't Subversion remember certificates? - Ask Different
- svn Error validating server certificate - Stack Overflow