
Items filtered by date: December 2015
Convert mht into html
Method 1
- use MHTML-Converter, this strips out all the files and dumps them in to a folder. the html it creates is shit.
- open the htm file in a web browser, i used internet explorer. select all, not the source, and then paste in to the design page of a fresh html file in adobe Dreamweaver CS3.
- All the pictures might need to be re referenced, but should be easy enough.
- If using for joomla dont forget you don not need all the header info or body tags etc..
Nb if you have the word version save as web filtered html
Method 2
You can change the file extension on the file from ".mht" to read ".uue".
You can then open the ".uue" file up in a zip program such as WinZip.
You can then extract one or all the files contained in the renamed .mht file
using the WinZip program interface.
Of course, you will have to change the file extensions on the extracted
files because the extracted .html file will have a .txt file extension when
extracted. For instance, when you are viewing the .uue file in WinZip the
.html file will have the name 0001.txt and will also have that name and
extension when it's extracted. So once it's extracted just change the name
of the file from 0001.txt to myfile.html for example. Likewise, image
files contained in the .uue file will contain extensions such as .001, 002,
etc... and will have to be renamed with thier proper extension once they've
been extracted.
Cannot delete file - Zero Bytes
I have a file on my computer that will not delete.
- The file size is 0 bytes.
- Theproperties security tab says "The requested security information is
either unavailable or cannot be displayed" - The attributes info is "A"
- I can move the desktop icon around the screen but I cannot trash it by any means found online
- When I try to throw it in the trash, the error message says "Could not find this item". Under this message it reads "This is no longer located in C:\...\Desktop\Fitzgerald -. Verify the item's location and try again."
Method 1
- Open a Command Prompt
- Navigate to the directory where your zero-byte file is
- Dir to see a list of all the files and folders there, including your mystery file
- Dir /os to "order" them by size; any zero-byte file should be at the top. (If the list is too long, you can use Dir /o-s to put the zero-byte file at the bottom of the listing.)
- Dir /x to produce the list with an extra column before the filenames. See if your zero-byte file has a name that includes characters that are not allowed in an 8.3 filename. If so, use that "short" filename with the Del command to delete that file.
Method 2
- create a new folder and move everything EXCEPT the zero-balance file to the new folder.
- Then use the RD (Remove Directory) command with the /s switch to remove that entire directory tree, including all the files and folders left in it
- there should be only the one file that you want to delete
- You can now rename your new folder to the original name
increase Outlook 2010 attachment limit
Attachment size exceeds the allowable limit" error when you add a large attachment to an email message in Outlook 2010
Internet email account (POP3, IMAP, HTTP)
To modify the default attachment limit size in Outlook 2010 for an Internet email account, follow these steps:
- Exit Outlook.
- Start Registry Editor.
- Locate and then select one of the following registry subkeys:
HKEY_CURRENT_USER\Software\Microsoft\Office\14.0\Outlook\PreferencesHKEY_CURRENT_USER\Software\Policies\Microsoft\Office\14.0\Outlook\PreferencesNote Manually create the path in the registry if it does not currently exist.
- Add the following registry data under this subkey:
Value type: DWORDValue name: MaximumAttachmentSizeValue data: An integer that specifies the total maximum allowable attachment size. For example, specify 30720 (Decimal) to configure a 30-MB limit.Notes- Specify a value of zero (0) if you want to configure no limit for attachments.
- Specify a value that is less than 20 MB if you want to configure a limit that is less than the default 20 MB.
- Exit Registry Editor
- Start Outlook.
Original Article Here
How to completely disable Firefox cache
Here’s how to disable FireFox’s browser cache completely.
- Fire up FireFox
- Type about:config in your address bar
- Type ‘cache’ in the search bar, and look for
network.http.use-cache,and double click it to set it tofalse. Double clicking it again will set it totrueand re-enable the cache
…and then you’re done.
To forcibly reload a page and all its dependencies, direct from source, ignoring local and proxy caches hold the shift key and hit reload. This applies not only to FireFox but also IE6/7 and Safari (maybe others too). I have a feeling this may be a ratified standard.
This has also been suggested
I set browser.cache.disk.enable and browser.cache.memory.enable both to false.
That was all I had to do to disable caching.
Product Key is not valid
Windows Setup gives an error message that the Product Key is not valid (invalid) if you attempt an upgrade or repair Microsoft Windows XP Media Center Edition with Microsoft Windows XP Home Edition or with Microsoft Windows XP Professional.
Javascript Input Box Key Restrictors
Programmable Key Restrictor
This script blocks the input of characters by using a Javascript function attached an input box which is called with the event onkeydown="" . This allows me to prevent input issues with end users because they cannot enter the wrong charcters in the first place. This script is standalone but works well with HTML5 input box validation rules.
I wrote this after I could not get any scripts I found online to work reliable across browsers. I also wanted to be able to make it programmable to account for different types of key restriction I wanted to do. I have use the onkeydown="" event because I believe the the onkeypress="" event only handles printable characters.
The following validators are basically the same with different options and can be programmed for any type of character validation you want including special characters. This script is using the new standard of event.key which with a few tweaks is usable across all of the different browsers. event.key outputs the character that is pressed on the keyboard and not some charcode which varies from browser to browser and platform to platform. event.key is the recommended way of getting key presses in browsers.
As you can see I have used feeder functions to supply the event, you do not need to use them you can create your own and the process is very straight forward. Allowed Characters and whether space is allowed. This prevents a lot of duplicate code as the common function is quite long. You could use the function as a stndalone is you remove the feeder functions and replace them with variables as needed.
Function Call in HTML
<input class="olotd5" value="123456" name="zip" type="text" onkeydown="return onlyAlphaNumeric(event);"/>
The Script
/** Key Input Restrictions - Using event.key **/

// Allows Only Letters
function onlyAlpha(e) {
    return keyRestriction(e, "abcdefghijklmnopqrstuvwxyzABCDEFGHIJKLMNOPQRSTUVWXYZ", true);
}

// Allow Only Numbers and Letters
function onlyAlphaNumeric(e) {
    return keyRestriction(e, "abcdefghijklmnopqrstuvwxyzABCDEFGHIJKLMNOPQRSTUVWXYZ0123456789", true);
}

// Allow Only Numbers and Letters - Including Comma, Backslash, Minus, Single Quote
function onlyAlphaNumericExtra(e) {
   return keyRestriction(e, "abcdefghijklmnopqrstuvwxyzABCDEFGHIJKLMNOPQRSTUVWXYZ0123456789,/-'", true);
}

// Allows Only Numbers
function onlyNumbers(e) {
    return keyRestriction(e, "0123456789", false);
}

// Allows Only Numbers and Period
function onlyNumbersPeriod(e) {
    return keyRestriction(e, "0123456789.", false);
}

// Allow Only Phone Numbers - Including Period, Brackets, Plus, Minus
function onlyPhoneNumber(e) {
    return keyRestriction(e, "0123456789.()-+", true);
}

// Allow Only valid characters for URL
function onlyURL(e) {
   return keyRestriction(e, "abcdefghijklmnopqrstuvwxyzABCDEFGHIJKLMNOPQRSTUVWXYZ0123456789-._~:/?#[]@!$&'()*+,;=`%", false);
}

// Allow Only valid characters for Email
function onlyEmail(e) {
   return keyRestriction(e, "abcdefghijklmnopqrstuvwxyzABCDEFGHIJKLMNOPQRSTUVWXYZ0123456789-._@", false);
}

// Common Function for Key Input Restriction
function keyRestriction(e, allowedCharacters, spacesAllowed) {

    // Grab the character from the pressed key
    var key = e.key;

    // Are Spaces Allowed?
    if (key === ' ' && spacesAllowed === true)
        return true;

    // Are Spaces Allowed (IE fix)
    if (key === 'Spacebar' && spacesAllowed === true)
        return true;

    // Control Keys (Backspace, End, Home, Left Arrow, Up Arrow, Right Arrow, Down Arrow, Delete)
    if (key === 'Backspace' || key === 'End' || key === 'Home' || key === 'ArrowLeft' || key === 'ArrowUp' || key === 'ArrowRight' || key === 'ArrowDown' || key === 'Delete')
        return true;

    // Control Keys (IE and Edge fix)
    if (key === 'Left' || key === 'Up' || key === 'Right' || key === 'Down' || key === 'Del')
        return true;

    // Allowed Characters
    else if (allowedCharacters.indexOf(key) > -1)
        return true;
    else
        return false;

}
Notes
- Control Keys - This is where you can allow keys by using charCodes. This is ideal for special keys and non-printable characters like delete.
- Allowed Characters - Add any characters you want to be allowed into the group. It is case sensitive.
Tools
- Javascript Char Codes (Key Codes) - Cambia Research - This tool allows you to press a button and get the charCode of that key. There is also a list of charCodes
- KeyboardEvent Value (keyCodes, metaKey, etc) | CSS-Tricks - A list of charCodes and a link to a tool for getting charCodes. The tool is special key aware i.e. presing a key with Alt or Shift.
- Pen event.keyCode tester - by Chris Coyier (@chriscoyier) on CodePen. - This tester is modifier key aware i.e. Shift and Alt keys.
- Keyboard Event Viewer - Gary Kačmarčík has put together a fantastic demo for visualizing all the attributes associated with KeyboardEvents: Load your browser of choices and press some buttons. All the corresponding events will be shown in a chart as they happen. This is great for seeing browser incompatibilities or differences so you can fix your scripts.
Libraries
- hotkeys - A robust Javascript library for capturing keyboard input and key combinations entered. It has no dependencies.
- keysight | GitHub - A translator for javascript keyboard events to and from consistent and familiar character and key representations. Take your keydown, keypress, and keyup events and reliably translate them into keyboard keys and characters. Its lightweight at 1.06KB minified and gzipped.
onkeypress vs onkeydown vs onkeyup
These javascript events have different roles and can have different outcomes with different browsers. In newer browsers the behavious seems a lot more standard.
- onlyAlphaNumeric() does not work in Firefox so you have to use onlyAlphaNumeric(event)
- onkeypress="" is case sensitive
- causes a lot of special Keys to return a value of 0. This is very flacky and a known bug.
- onkeydown="" is case insensitive
- onKeydown="" has information about the TshiftState and OnKeyPress doesn't, Whether I want to take action for example, if the A key is pressed, depends on whether ssCtrl or ssAlt are combined with it,
- These codes are used to try and get scripts cross browser compliant.
- var key = e.which || e.keyCode; // Use either which or keyCode, depending on browser support
- var charCode = (evt.charCode) ? evt.which : event.keyCode
The notes sayYou should change e.keyCode to e.charCode. --> String.fromCharCode(e.charCode) , I have not verified this. - var charCode = (evt.charCode) ? evt.charCode : ((evt.keyCode) ? evt.keyCode : ((evt.which) ? evt.which : 0));
- KeyCode is 0 - This is caused by browser incompatibility with that particular function. It is also caused by a not printable character being called via onkeypress
- KeyBoardEvents.key - seems to be the same as event.key
- Mottie (CSS-TRICKS) says The charCode, keyCode and which are being deprecated. They will soon be replaced by event.key which will return named keys. This post inspired me to write my script using event.key
- keypress (CSS-TRICKS) does not contain values for special characters. This might of changed in newer browsers but could still be true.
- This fixed a big problem - I changed all onkeypress to onkeydown and this caused Google Chrome to work. This implies a bug if you have both onkeypress and onkeydown events on a page. Quirk? This fixed event.key, so do not use these on the same page. This fixes the issue for both chrome and firefox.
- To get the event passed properly in FireFox you must pass with the function triggered in the HTML by using the varible 'event' giving onlyAlphaNumeric(event) otherwise the script will only work in Chrome.
Links
- What’s New with KeyboardEvents? Keys and Codes! | Web | Google Developers - A well written article on this subject. It also includes references to the execellent tool 'Keyboard Event Viewer'
- KeyboardEvent keyCode Property - A simple description from w3schools including referencing cross browser support code
- UI Events | W3C Working Draft - This draft explains various javascript functions and their upcoming changes but in particular it says "The keydown and keyup events are traditionally associated with detecting any key, not just those which produce a character value."
- Converting keystrokes gathered by onkeydown into characters in JavaScript - Stack Overflow - A nice description about keypress, keydown, keyup events.
- KeyboardEvent.key - Web APIs | MDN - The information sheet from Mozilla on the function KeyboardEvent.key
- Key Values - Web APIs | MDN - The text values for KeyBoardEvents.key
- onKeyPress vs OnKeyDown vs OnKeyUp | The ASP.NET Forums - A very clear table of the differences between the events and what you should use them for.
- javascript - onKeyPress Vs. onKeyUp and onKeyDown - Stack Overflow - A discussion on the subject.
- KeyboardEvent.keyCode - Web APIs | MDN - this information page from mozilla tells you that the function .keyCode is deprecated and that this function should not use this when handling printable cahracters using keydown or keyup.
Legacy Key Restrictors
These are some basic key restrictors that some people use but they are not very cross browser compatible. According to Mottie (CSS-TRICKS) e.which and e.keycode are getting discontinued. I have included these here for reference to see how it was done in the past.
Function Call in HTML
<input class="olotd5" value="123456" name="zip" type="text" onkeydown="return onlyAlphaNumeric(event);"/>
Allows Only Uppercase and Lowercase Letters to be entered - Including Space
// Allows Only Uppercase and Lowercase Letters to be entered - Including Space
function onlyAlpha(e) {

    var charCode = e.which || e.keyCode;

    if ((charCode === 32 || charCode >= 65 && charCode <= 90) || (charCode >= 97 && charCode <= 122)){
        return true;
    }
    return false;
}
Allows Only Numbers to be entered - Including Backspace and some other keys
// Allows Only Numbers to be entered - Including Backspace and some other keys
function onlyNumbers(e) {

    var charCode = e.which || e.keyCode;

    if (charCode > 31 && (charCode < 48 || charCode > 57)){
        return false;
    }
    return true;
}
Links
Single Quotes vs Double Quotes in PHP
use single quotes unless escaping characters
Article 1
I don’t write about PHP very often — this is the first time since the launch one year ago. However, I do quite a lot of work with PHP and relational databases such as MySQL. Almost every single time I review someone else’s work a common error related to using strings in PHP is made. Misunderstanding the way of defining strings in PHP is often the cause of many hours of debugging as well. If you are relatively new to programming and PHP you’ll most likely recognize this situation.
PHP lets you define strings using single quote, double quotes or heredoc. There’s a crucial difference between the first two and for some reason many people new to PHP start using double quotes. Hopefully the following explanation will save a couple of hours debugging for the starters among us.
The most important difference between the two is that a string enclosed in double quotes is parsed by PHP. This means that any variable in it will be expanded.
echo $var; // Results in the value of $var being printed

echo  '$var'; // Results in the word '$var'

echo "$var"; // Results in the value of  $var being printed
This means that concatenating strings can be done in two different ways as well.
$var = 'Ipsum';


echo 'Lorem ' . $var; // Results in 'Lorem  Ipsum'

echo "Lorem $var"; // Results in 'Lorem Ipsum'
This possibly isn’t anything new to you, but if you are working with HTML you can output valid markup while keeping your code readable. Using double quotes in a string enclosed with single quotes requires no escaping and vica versa. Using a double quote in a string enclosed in double quotes (idem for single quotes) does require escaping, which —in my opinion— degrades readability tremendously.
$text = 'Lorem Ipsum';

$uri = 'http://www.lipsum.com';


echo  '<a href="' . $uri . '">' . $text . '</a>';

echo "<a  href=\"$uri\">$text</a>";
Personally, I always stick to using single quotes and the dot syntax to concatenate strings, unless I need special characters such as new lines. Whatever you use is up to you, but hopefully this heads-up cleared a lot of confusion and puts an end to unreadible code and markup using single quotes.
Not to mention... using " " where not needed, is just wasting processing, potentially even slowing down your website, if it's as big as say deviantART =P, since PHP has to try to parse something that does not need parsing...
Using single quotes where possible results in nominally faster execution, but we're talking fractions of milliseconds.
As with double quotes, you can escape single quotes in a string enclosed in single quotes as well. I agree that backlashes make it unreadable, but in a rare occassion I use it.
echo 'Hi, how are you? I\'m fine.'; // Single quotes

echo "Hi, how  are you? I'm fine."; // Double quotes
Depending on the situation I might deviate and opt to use double quotes instead.
Article 2
The advantage to using single quotes is that you don't need to escape any double quotes in your code, which makes it neater.
However, using double quotes would allow you to place variables inside without having to escape them.
$variable = 'moo';
// This will work.
echo "Double Quotes. $variable";
// This wont.
echo 'Single Quotes. $variable';
I prefer using single quotes, as it makes echo'd HTML (the php code) look neater. My opinion, of course. :P
$var = $_POST['name'];
is 7 times faster than
$var = $_POST[name];
Which method you choose is entirely personal, but I use 'apostrophes' to mark my strings instead of "quotes". The downside is that I must break my string in order to include a variable in it.
I do this for two reason. First, my code editor makes variables inserted in a string bold only if I break the string around them. This makes them easier to spot when I'm troubleshooting or testing. Secondly, it allows me to paste properly validated HTML into my echos and prints without having to escape all of the quotations.
You face a small inconvenience either way, but with my method, they are fewer in number.
Single quotes versus double quotes is a huge issue in PHP. Nobody seems to understand what sort of problems they run in to using double-quotes when they arn't needed.
When you use double quotes, you are asking PHP to parse through the string and search for possible variable matches and escaping characters (like \n).
This is obviously a slow process. Do you think it'd be faster to read a book looking for a secret clue in every 4 words, or to simply read it straight through? Same difference.
If you arn't using escaping characters, it is pointless to use double quotes unless your goal is to make your application slower. Here are a few examples to demonstrate:
$wtf = 'is';
$output = "My name $wtf monokrome"; // This is SLOW.
$output = 'My name ' . $wtf . ' monokrome'; // This is much more efficient.

$wtf = 'google';
  // This is the only sort of time where you ever really need double quoted strings.
$output = '<a href="http://google.com">' . $wtf . "</a>\n"; // Notice the newline(\n)?
As for the array keys being used as $_POST[name], of course that's slow. When you do that, PHP is trying to determine name as a keyword. Since that keyword doesn't exist, it automatically assumes that you are wanting 'name'. Obviously it's faster to not make PHP make that assumption.
Generally, for most scripts, you aren't going to see the script running slower with double quotes. However, when you get to the point where your code is getting more advanced and doing more things, or if you're deploying the script in a real world environment, that is when you need to cut back on double quotes.
Personally I use single quotes everywhere. Using single quotes plus concatenation is faster than double quotes every time.
enabling phpMyAdmin once you change root password or permission or privileges on mysql database
This applies to xampp-1.5.3a:
(don’t know about other versions since I only have this one. It works also for xampplite)
Yes, after a fresh install of a xampp program you are welcomed with a xampp pseudo website which is located in <path of xampp installation>/htdocs/xampp/. Clicking security you are given some important points to secure your website. That includes changing the root password. But alas, after changing it you’ll not be given a chance to use the ever-friendly phpMyAdmin.
Find <path of xampp installation>/htdocs/xampp/phpmyadmin/config.inc.php
$cfg['Servers'][$i]['password'] = ”; // MySQL password
Change this so that it’ll reflect your current mysql password.
$cfg['Servers'][$i]['password'] = ‘your_password_here‘; // MySQL password
Don’t forget to save it aight?!
Page breaks in HTML
Page breaks in HTML
Date created: ~1999
There are several strategies you can use to insert page breaks within an HTML document, thus ensuring that the printed document does not break over lines, graphics, etc. There are limitations, however, and these are listed below.
Limitations
- The page-break styles work with the following block elements: BLOCKQUOTE, BODY, CENTER, DD, DIR, DIV, DL, DT, FIELDSET, FORM, Hn, LI, LISTING, MARQUEE, MENU, OL, P, PLAINTEXT, PRE, UL, XMP.
- Only applicable to Cascading Style Sheets 2 specification
- Only applicable to Internet Explorer 4.x and later at this stage - adding page breaks will not cause any ill effects on other browsers.
- Do NOT try and use within a table - they won't work! See Strategy 6 (below) for breaking a table when printing.
TinyMCE
When you paste from Microsoft Word 2010 page break are represented by
<br style="page-break-before: always;" />
Strategy 1
<style>
.break { page-break-before: always; }
</style>
<body>
content on page 1...
<h1 class="break">text of Heading 1 on page 2</h1>
content on page 2...
<h1 class="break">text of Heading 1 on page 3</h1>
content on page 3...
<p class="break">content on top of page 4</p>
content on page 4...
</body>
Notes about Strategy 1
This example can be part of an external (CSS) or internal style.
Using a class such as .break and not prefacing it with any form of formatting, means that you can add the information wherever you want a page break to occur - including the middle of the text.
Examples:
- If you want the page break to occur before each heading 1, you'd add <h1 class="break"> instead of <h1>. Note that the first <h1>, likely to be on the first page, should probably remain as <h1> and only subsequent <h1>'s need the class attribute.
- If you want to insert a page break part way through the text, then insert <p class= "break">instead of the standard <p> for the text you want to be printed on a new page.
Strategy 2
<style>
h6 {page-break-before: always;}
</style>
Notes about Strategy 2
The reason I used H6 here is that it is a little-used heading for most web pages. By emulating a H1 in font, font size, etc., then adding this code to H6 in addition to the page break information, you can substitute H6 for H1 wherever you want a page break to occur. You can still keep H1 for sections where you don't want to force a page break. Naturally if you want to force a page break at EVERY H1, then you would include the page break information within the H1 style. This strategy can be used with both CSS and internal styles.
Strategy 3
<div style="page-break-before: always">blah blah</div>
Notes about Strategy 3
Make sure you include some text between the <div> opening and closing tags, otherwise this may not work.
Strategy 4
<p style="page-break-before: always">blah blah</p>
Strategy 5
<style>
p.page { page-break-after: always; }
</style>
<body>
content on page 1
<p class="page"></p>
content on page 2
</body>
Notes about Strategy 5
This example can be part of an external (CSS) or internal style.
Strategy 6
......
</tr>
</table>
</center>
</div>

<p class="break"><!--Appendix 2 (continued)--></p>

<div align="center"><center>

[start next table here...]
Notes about Strategy 6
Tables need to be broken in order to force a page break.
In the code in this example, the table has been "chopped" where the break is to occur, a <p> tag inserted with the class attribute added, then the table restarted.
A comment has also been added to alert anybody dealing with the code at a later date that the table is continued.
Links
Retrospect Restore Procedure
How To restore Backup Up Data to the Office Laptop
- prepare laptop
- transfer files
- rebuild catalog file for retrospect
- extract files
- run sage and payroll to verify data
1. Prepare Laptop
- On the laptop delete all files, if present in the folder 'Backup Transfer' which is on the desktop
- On the laptop any files and folders present in c:\shared Files
- Empty the recycle bin
2. Transfer Files
- Get the appropriate external drive and attach it to the laptop
- browse to the external hard drive, retrospect folder and arrange all files by date
similar to this location F:\Retrospect\Backup Set D\1-Backup Set D
- currently there is more than 1 file per backup, so select all the files belong to the latest date (currently about 9.1gb). This is done by sorting by ‘Date Modified’ and then copy all the files from the latest date (or one date required) these files to the 'Backup Transfer' folder on the laptop’s desktop.
- once copied, unplug the external hdd and power it down and return it back to the top of the cupboard
3. Rebuild Catalogue File for Retrospect
All the files required are now on the laptop but they require a new catalog file to be able to extract them, this is like an index file. Please follow the instructions below.
Tutorial to rebuild Retrospect Catalog file|
This tutorial will walk you through the process of completely rebuilding your Retrospect Catalog File |
|
|
||||
|
|
||||||
|
|
||||||
|
Figure 1a: Retrospect Navigation Bar – Tools |
|
|
||||
|
|
||||||
|
|
||||||
|
Figure 1b: Tools Overview |
|
|
||||
|
Step 2 of 7: Select a Catalog Repair Function |
|
|
||||
|
|
||||||
|
|
||||||
|
Figure 2: Catalog Repair Selection |
|
|
||||
|
|
|
|
||||
|
|
||||||
|
|
||||||
|
Figure 3a: Media Selection |
|
|
||||
|
|
|
|
||||
|
|
||||||
|
|
||||||
|
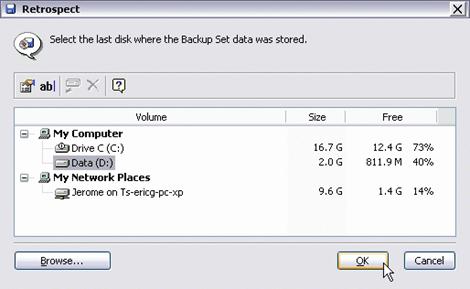
Figure 3b: The Storage Media |
|
|
||||
|
Choose the hard disk (storage media) where the data from your backup was stored and click OK (Figure 3b). When browsing select the ‘Backup Transfer’ Folder and click open. If you try and select the files in the folder it will not work. |
|
|
||||
|
|
||||||
|
|
||||||
|
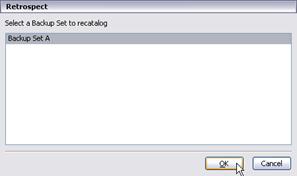
Figure 3c: Select a Backup Set |
|
|
||||
|
|
|
|
||||
|
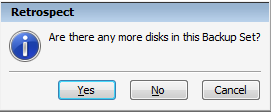
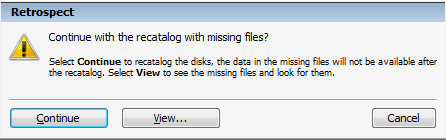
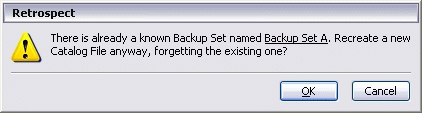
Select No There might be occasions where Retrospect believes there are missing files, in actuality it is the rest of the backup set we have not copied over.
Click Continue Figure 3d: Forget |
|
|
||||
|
|
||||||
|
|
||||||
|
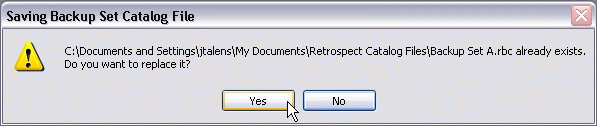
Figure 4a: Save Catalog Window |
|
|
||||
|
|
|
|
||||
|
|
||||||
|
|
||||||
|
Figure 4b: Replace Catalog Window |
|
|
||||
|
Step 5 of 7: The Catalog Rebuild Starts |
|
|
||||
|
|
||||||
|
|
||||||
|
Figure 5: Building Catalog |
|
|
||||
|
This might not be applicable at the moment |
|
|
||||
|
|
||||||
|
|
||||||
|
Figure 6: More Members Window |
|
|
||||
|
|
|
|
||||
|
|
||||||
|
|
||||||
|
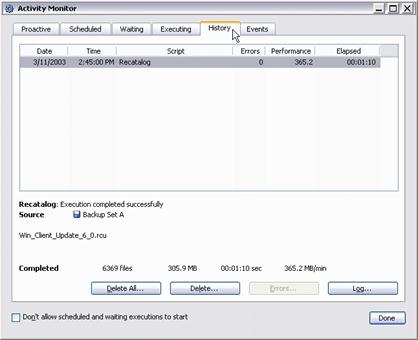
Figure 7: Recatalog Finished |
|
|
||||
|
|
||||||





4. Extract / Restore Files
- Open retrospect on the laptop
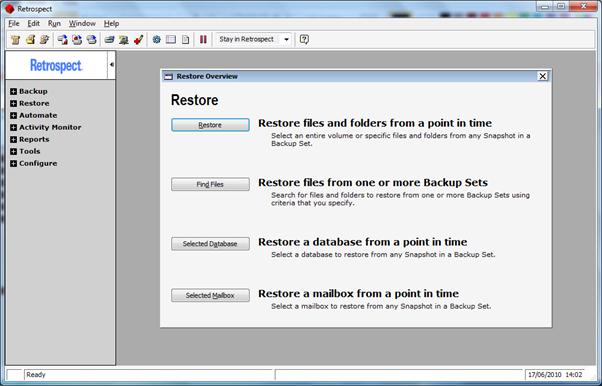
- Click on the restore menu item and then
Restore files and folders from a point in time
- Click next on the wizard
- Select the backup set you have just created. There should only be one anyway.
- Select the snapshot to restore and click next. There should only be one anyway.
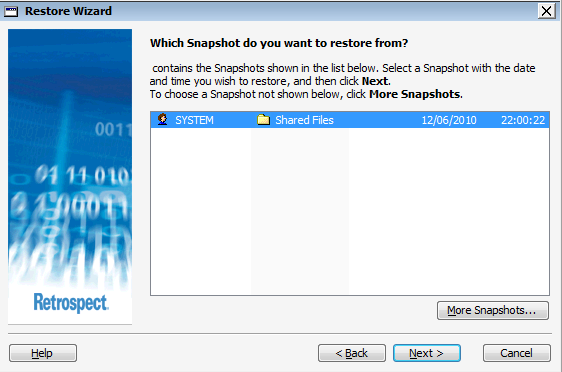
- On the next page you can select original location or select a new location. If you select original location the files will be restores to c:\Shared Files. Sometimes retrospect will create a ‘Shared Files’ folder within ‘Shared Files’ and so will need to be moved.
- If Original location option is greyed out you can select another location using the following method.
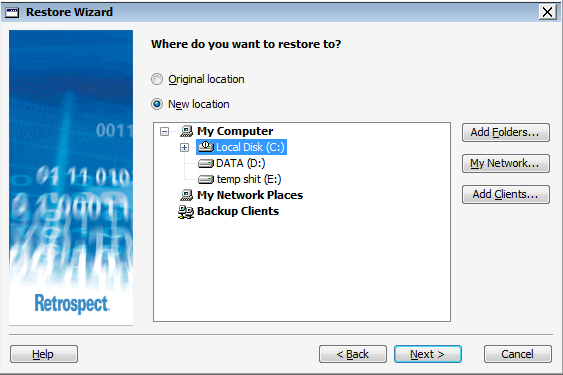 -
-
- Make sure c:\Shared Files folder exists using My computer etc.. if it does not exist create it
- Click Add folders
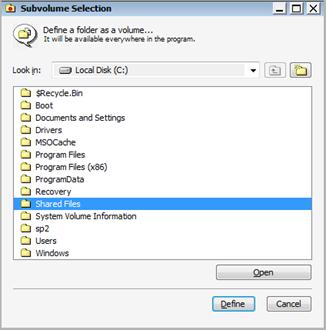
- A new window called Subvolume Selection comes up, this is a confusing name, just select c:\Shared Files and then click define
- You will now return to the previous window which will now look like
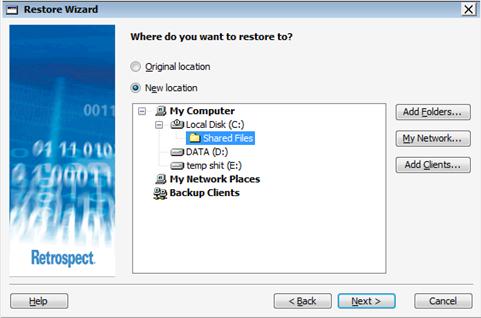
- Make sure you have select ‘Shared Files’ and then click next
- With either option, Original location or new location the following window now appears
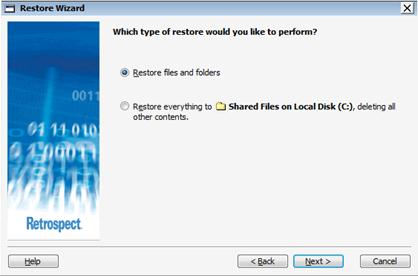
It is important to leave the top option selected and click next, for obvious reasons.
- Click on select files
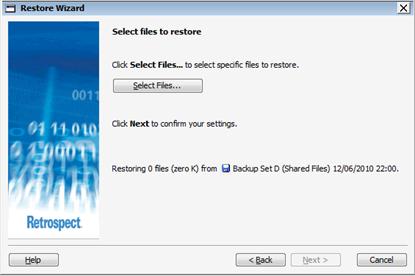
- The following window now appears

click on the empty box next to shared files, this should now select all files in the backup to be restored and should look like
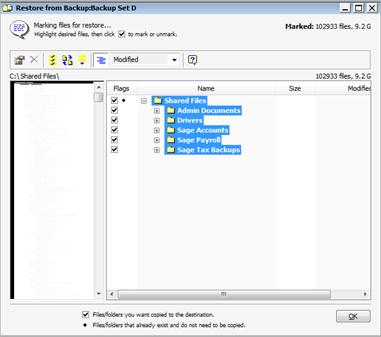
click OK
- You should no have returned to the ‘Select Files To Restore’ window. Click next
- The following prompt box appears
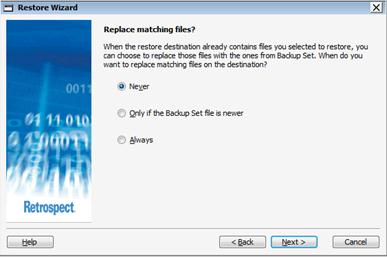
If you select never, files will not be replace if they exist already. In our case becase the laptop has already been prepared this can be left selected. If you select always it will replace files already on the disk. Unless needed leave this setting as it is.
Click Next
- The restore summary will be now shown.
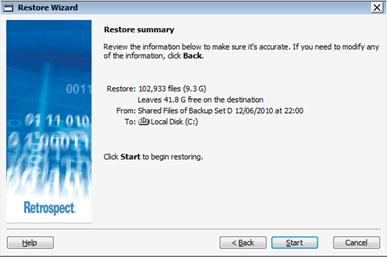
Click Start and the files will now be restored to the selected location, c:\Shared Files
- The following windows should now be shown.
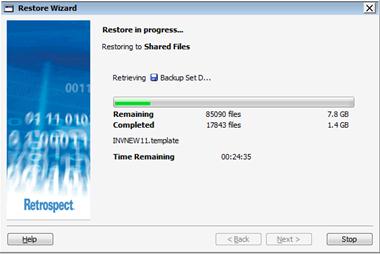
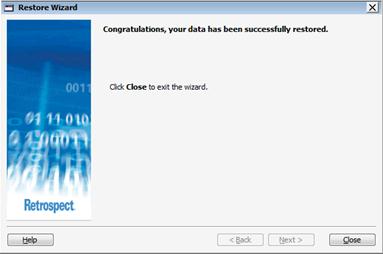
- Click Close. The restore is now complete
- Exit Retrospect
5. Run Sage and Verify Files
- The Files have been restored to where the Sage programs expect the company data so no additional steps are required such as import. Only new companies added since the last restore will have to be added in the normal manor through Sage.
- This is the simplest section, just open Sage Accounts and pick a few random or specific companies to have a look at their data and verify they are correct for that date. Repeat this for Sage Payroll and if needed look at some of the other shared files.
- If a few companies are correct it is highly likely that the rest are. I would recommend that you check different companies every month or whenever you restore a backup.