Items filtered by date: December 2015
Outlook/Live/Hotmail/Hosted Exchange SPAM Blacklist removal and Feedback loop
When sending an email to a Outlook.com / Live / Hotmail / Hosted Exchange email address you get the following or similiar email error message.
This message was created automatically by mail delivery software.

A message that you sent could not be delivered to one or more of its recipients. This is a permanent error. The following address(es) failed:

  example-account@outlook.com
    host mx4.hotmail.com [65.55.33.135]
    SMTP error from remote mail server after MAIL FROM:<example@quantumwarp.com> SIZE=5281:
    550 SC-001 (COL004-MC6F21) Unfortunately, messages from 192.168.1.1 weren't sent. Please contact your Internet service provider since part of their network is on our block list. You can also refer your provider to http://mail.live.com/mail/troubleshooting.aspx#errors.
Microsoft do not use a public Blacklist to block IPs so there is no public website where you can assertain the status of your server's standing with them. You are only likely to notice an issue when you get bounce backs from any Outlook.com / Live / Hotmail / Hosted Exchange email addresses. Outlook will block you from sending to any of their addresses when you are on their block list.
If you are on a shared host, it is your provider that will be able to resolve this for you. However if you are running on private server whether it is a VPS or a Dedicated server it is up to you to resolve this blacklisting. I will outline the steps for the latter group to remove themselves from the blacklisting.
Microsoft do offer the abillity to investigate the blacklisting and too eventually remove the listing. The information is a little fragmented so i will clear that up here and give defined steps on what to do.
Outline of the Process and Technology
When you run your own mailserver which is part of any VPS or dedicated server, that server's IP will resolve to a domain. That domain is the reverse DNS entry of the IP (rDNS) and it is this domain that has authoritive control over all email that server sends out. Microsoft will block the IP of a server if it thinks it is sending out spam consequently blocking all email traffic from your server to them, it does not care about indvidual domains.
To investigate or resolve issues with microsoft you need to register for a outlook/live account and prove that you have control of the authoritive domain. Once you have done this you are able to see the Blacklist status of your server and request it s removal. Once this is done you can then start sending emails to outlook/live email accounts from all your client accounts.
Further to this microsoft allows you to set something up called a Feedback Loop service. A Feedback Loop service is where outlook (or other providers) will send a copy of the SPAM complaint to a specified email address such as abuse@mydomain.co.uk . This allows yoou as a server admin to see who and where the SPAM is coming from so that you can resolve the infringment. This Feedback Loop service when set up will run whether you are on Microsoft blacklist or not which is incredible useful for preventing your server from becoming blacklisted in the first place.
Configuring a Feedback Loop with Microsoft is not mandatory for removal but is highly recommend. The reason for this is that just removing yourself from the blacklist will not necessarily resolve the sending of the SPAM and you could end up straight back on the blocklist. If your IP keeps getting triggered it will get hard to remove yourself from the list as it is likely that the wait time for removal will become longer.
So as you can see Microsoft would like you proactively stop SPAM and gives you the tools to do this aswell as a process for removing yourself from the blacklist.
The Process of Registering your Server and Blacklist Removal
Prerequsites
- Microsoft account - This is just a standard outlook/live/msn/hotmail account
- An email at the parent domain as defined by rDNS (This is the domain that is resolved when you perform a rDNS on the mail server's IP)
- Administrative control of the rDNS domain
Valid email addresses that Microsoft allows for authoritive control verification - do i need this section
These some examples of the valid emails Microsoft allows to verify your authority of the mail server. These addresses come from rDNS and will be different between server setups. Dont take this list as verbatim as when you go through the process Microsoft will show yoou the valid email addresses they will accept for your server.
- abuse@mus.mydomain.co.uk
- abuse@mydomain.co.uk
- abuse@unifiedlayer.com
- netops@unifiedlayer.com
- postmaster@mus.mydomain.co.uk
- postmaster@mydomain.co.uk
As you can see there are some non-mydomain.co.uk addresses in the list. These additional emails belong to your infrastructure providers as they must have some control over your server aswell. Not everyone will have these additional addresses as it depends on how you are connected to the internet.
Registering your Server with Microsoft
You must create an account with Microsoft and prove you have ownership of the server before you can do anything else.
- Create a Microsoft account at Outlook.com that you will use for your business if you do not already have one. I would avoid using a personal account here.
- Go to this link and sign in with your Microsoft account - Smart Network Data Services. This is the registration site for all Microsoft SPAM servers to you.
- Register your Domain/Server authority with Microsoft
- Click on request Access and submit your mail server's IP
- You will now be prompted with the following message and a list of valid email adresses for this process:
We've determined that the following email addresses are associated with the specified network in an appropriately authoritative way. Please choose one that you can receive mail at and we will send instructions for completing the signup process to that address. If you have questions about why the addresses below were chosen, please see the FAQ.
- Make sure you have access to one of these email addresses and if none of them exist you need to create one.
- Fill in the rest of the form and submit it.
- The email address you have supply will get a verification link you need to click on to verify that you have access to the is account.
If successful Microsoft will now associate you authoritive control of the server's IP to you Microsoft account allowing you to see the Blacklist status of your server. You might have to wait a small period of time before you can see the dat in your account.
You can also register multiple servers in the same account.
View Your Blacklist Status
In the Smart Network Data Services the View IP Status will show you the server's Blacklist status. If your server is blacklisted it will be quite obvious and if everything is ok you will see the following message.
All of the specified IPs have normal status.
Setting Up a Feedback Service with Microsoft (Junk Mail Reporting Program)
The Junk Mail Reporting Program (JMRP) is a service provided for email senders by Outlook.com. It lets you set up a feedback loop, so you can receive copies of messages Outlook.com users mark as junk.
You can access the JMRP through Smart Network Data Services or directly access the page at Junk Mail Reporting Program
The Steps
- You must already have an Authorized IP address from earlier when you registered you mail server's IP, if not go ahead and do that now.
- Fill in the following data and leave everthing else as default
- Company Name
- Contact email address - This is general contact email address where Microsoft will send you account updates like 'Your Server is now Blacklisted'
- Complaint feedback email address - This is where you want copies of the SPAM emails to go to, so dont make your main email address. I would set an account up just for this.
- Make sure your server's IP is ticked
- Click on 'Begin SetUp' and follow the steps outline.
You will now receive appropriate reports to you 'Contact email address' and copies of all the SPAM emails will go to the 'Complain feedback email address'. You can change these email addresses later so dont panic if you ever want to change them again.
Monitor the accounts to see if there are any SPAM activities happening on your server before proceeding to the next step.
Blacklist removal steps
Now that you are happy that your server is no longer sending out SPAM it is time to remove it of the Microsoft Block list.
Microsoft never tell you what is wrong, but if you cannot get unblocked after following these instructions the best thing is to join the SNDS and the JMRP. I did not get mitigation until Microsoft has accepted my application/document that i signed. They must use this as a big qualifier for mitigation.
I am not sure if you can remove the server from within Smart Network Data Services because i cannot remember.
Failed email Form method
- Get a bounced back email from outlook.com which should contain the failed messages
- If you send an email straight to to an outlook.com address you will receive no bounce back email
- To get a bounce back email you need to send an email from an outlook address and then reply to it. Microsoft replies to you with an error message rather than sending to a black hole.
- Navigate to this form - Sender Information for Outlook.com Delivery
- I filled in the form using the bounced back email and the other required details
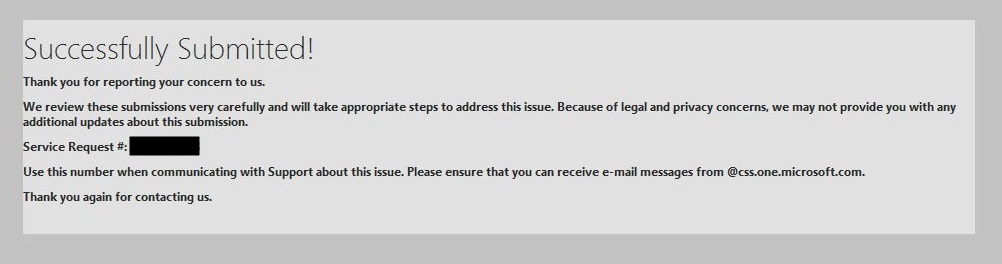
- I then received the following message on screen
Successfully Submitted!

Thank you for reporting your concern to us.

We review these submissions very carefully and will take appropriate steps to address this issue. Because of legal and privacy concerns, we may not provide you with any additional updates about this submission.

Service Request #: xxxxxxxxxx

Use this number when communicating with Support about this issue. Please ensure that you can receive e-mail messages from @css.one.microsoft.com.

Thank you again for contacting us.
Remove the IP from the blocklist via Smart Network Data Services
This process might not exist and the emails belong to the form submission method. I will update this next time my server is blocked.
- I can't remember exactly what I did but i received the following emails.
- I received The following email almost instantly
Dear xxxxxx

Please note that your ticket number is in the subject line of this mail.

X.X.X.X

Note: Errors are unlikely, however, if an error is indicated, please resubmit the specific IP or IP range.

Thank you,

Outlook.com Deliverability Support

Please do not reply to this message as it is from an unattended mailbox. Any replies to this email will not be responded to or forwarded. This service is used for outgoing emails only and cannot respond to inquiries.
- 15 minutes later I received the following email
Dear xxxxxx

We have completed reviewing the IP(s) you submitted. The following table contains the results of our investigation.

Conditionally mitigated
X.X.X.X
Our investigation has determined that the above IP(s) qualify for conditional mitigation. These IP(s) have been unblocked, but may be subject to low daily email limits until they have established a good reputation.

Please note that mitigating this issue does not guarantee that your email will be delivered to a user’s inbox.

Ongoing complaints from users will result in removal of the mitigation.

Mitigation may take 24 - 48 hours to replicate completely throughout our system.

If you feel your issue is not yet resolved, please reply to this email and one of our support team members will contact you for further investigation.

Regardless of the deliverability status, Outlook.com recommends that all senders join two free programs that provide visibility into the Outlook.com traffic on your sending IP(s), the sending IP reputation with Outlook.com and the Outlook.com user complaint rates.

Junk Email Reporting program (JMRP) When an Outlook.com user marks an email as "junk", senders enrolled in this program get a copy of the mail forwarded to the email address of their choice. It allows senders to see which mails are being marked as junk and to identify mail traffic you did not intend to send. To join, please visit http://support.msn.com/eform.aspx?productKey=edfsjmrpp&page=support_home_options_form_byemail&ct=eformts.

Smart Network Data Services program (SNDS). This program allows you to monitor the ‘health’ and reputation of your registered IPs by providing data about traffic such as mail volume and complaint rates seen originating from your IPs. To register, please visit http://postmaster.live.com/snds/.

There is no silver bullet to maintaining or improving good IP reputation, but these programs help you proactively manage your email eco-system to help better ensure deliverability to Outlook.com users.

Thank you,

Outlook.com Deliverability Support
- The server is no longer blocked even though the status is not updated in Smart Network Data Services / View IP Status.
- The whole process took about 30 - 45 minutes
Relevant Sites
- https://postmaster.live.com/snds/ipStatus.aspx - This page can also confirm the status of the server
Links
- How to Remove Your IP from the Hotmail Blacklist - Below, I share the process we use in our Hotmail blacklist removal services. Using this process, we have near 100% removal success rate using this process. Excellent article.
- How to Check Microsoft Email Blacklist for Hosted Exchange | pinpointe - Microsoft Blacklist Check and removal. Explains how to tell if your emails are being blocked by Microsoft Exchange and how to get removed. Excellent article with example fail messages. Covers the other services aswell.
- SOLVED AND SOLVED AGAIN! How to remove a server IP from your black - Microsoft Community
- How to Remove (delist) your mail server IP from Hotmail, Live.com and MSN mail server blacklist | ☩ Walking in Light with Christ - Faith, Computing, Diary
- How to Remove Server IP Address from MSN Hotmail Block Blacklist « My Digital Life
- blocked using Blocklist 1; To request removal from this list please forward this message to delist@messaging.microsoft.com
- MxToolbox Forums • View topic - Include Microsoft Blacklist to tool? [RESOLVED]
- Delist new Blacklisted IP in delist@messaging.microsoft.com - Argh !!! - LowEndTalk
- SOLVED AND SOLVED AGAIN! How to remove a server IP from your black - Microsoft Community
- Outlook.com mailservers blacklisted - Microsoft Community
- Hotmail blacklist removal | Hosting Fixes
Cannot Send email with POP3 with outlook in Windows 10
This seems to be an issue when you upgrade to windows 10 that you cannot send emails with a POP3 account. The recommend solution is to run the following command as an administrator and the reboot your computer. Make sure Outlook is not running when you run the command
sfc /scannow
This fixes the majority of peoples setups.
Outlook 2013
I have a client who could not send from a POP3 account at all but then has performed the above command. He still cannot send emails from a POP3 account normally but when he exits and restarts Outlook as an administrator, those POP3 emails will send.
Notes
- There was an PDF addon causing issues/conflicts in outlook but this made no real difference
Client's setup:
- Windows 10 (pre 1511)
- Outlook 2013
- Single Profile
- Main account account is a Hosted Exchange account
- Secondary Account is a standard POP3 account
Things not Tried so far
- Delete whole profile and re-create
- Run pop3 and exchange accounts in different profiles
- Remove office ecommpletely and re-create
- Make sure all windows and office updates are applied, including the major windows update that has just come out
- Update to the new Windows 10
- Apply all office 2013 updates
- Change outlook version
.htaccess Proxy Examples
There might be occasional times you want to supply content from another site but appear under another domain so you can keep control of these assets. Using .htaccess for this is not supported on all servers because Hosting companies can turn this off. I cannot remember why i have different version, but option 1 does work.
1
RewriteEngine  on
RewriteRule    ^(.*)$  http://demo.lancastrian-it.co.uk/$1  [P]
ProxyPassReverse / http://demo.lancastrian-it.co.uk/
2
This method rewrites the urls and asset paths on the fly. The [PT] possibly could be [P,T]
RewriteEngine On
RewriteCond %{HTTP_HOST} ^www\.sitewithcontent\.eu$ [NC]
RewriteRule ^(.*)$ http://www.targetsite.co.uk/$1 [PT]
3
RewriteRule ^.*$ http://www.google.co.uk/$0 [L,P]
4
RewriteRule ^/redmine/.*$ http://localhost:3000/$0 [L,P]
Remove black box
The black box is called the Artboard (equvalent to the page or the bit that will be outputted)
To Remove
- View > Hide Artboards
Bounding Box
A Bounding Box is the grouped slector for an object. it is not the artboard (ie the blackbox denoting the page)
Remove Bounding Box
- View > Hide Bounding Box. (toggle on and off)
Bounding Box Links
Remove white background
When you first start using Adobe Illustrator you will come across the annoying white background.
This background is not part of the image and is possibly called the 'Art Board'.
To remove it there are several options outlined below:
- export as a psd (from ai). This also has the side effect of correctely cropping the image id the background is mismatch for the image/logo. The PSd has layers and seem to match up well with the objects. You can then do what you want including "save for web" which allows you to save it as a PNG with transparency
- "save for web" - this is the simplisted method but does not crop the image if mismatched to the background
- shift+CTRL+D - How to Make Adobe Illustrator Background Transparent | BudgetVideo4BIZ Blog
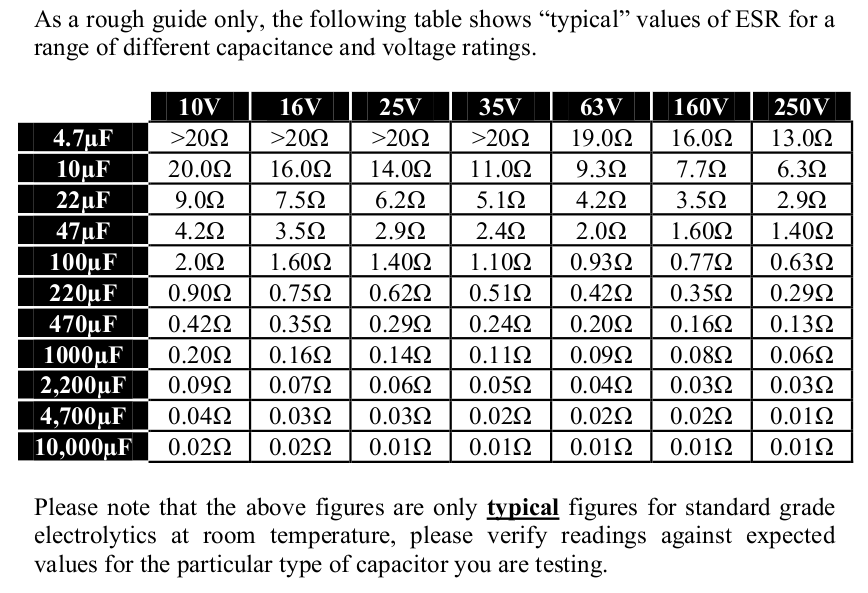
ESR Chart
This is a quick chart for getting average ESR values for capacitors. It is only a guideline and should not be used for an accurate record.
Login to the Rasberry Pi GUI
When you are loaded at the command prompt you want to login to the GUI.
- Type startx
The Default Username and Password are:
- user: pi
- Password: raspberry
Move a Magento Installation
To move a magento installation you cannot just move the files, you need to make changes in the database aswell as the database connection settings.
Domain Configuration
Search for these in the database, Table core_config_data has rows and change them:
web/unsecure/base_url       http://[you_domain_here]/
web/secure/base_url         https://[your_secure_domain_here]/
Then clear the cache by deleting the files in the following directories
/var/cache
/var/session
Database Settings
The database config settings of magento are stored in the file below. I cannot remember if you need to change anything elese here other that the database connection settings.
/app/etc/local.xml
Do not leave old XML files in this directory (ie rename old-local.xml) because magento will try and parse these files aswell.
.htaccess
Dont forget to change any domain specific rules such as a canonical redirects.
Browser
- Clear your browser cache
- restart your browser
Links
3 Red Circles
These animated icons can be used for almost anything and are very easy to change. They can add something different to your page.
Design.
We design and build responsive, functional web solutions for clients all across the UK. Working closely with you to ensure that you get the best possible product.
Develop.
We believe in maintaining our design and code standards. We do not cut corners. The result is fantastic bespoke websites completely tailored to your business.
Support.
Our support team are ready to help with any queries you may have. From email support, queries regarding your website to sales and upgrades.
CSS
/* Red Circle's Animation and styling Code */
.service-circle, .service-box, .service-icon {
	margin:auto;
	-webkit-transition-timing-function: cubic-bezier(0.13, 0.71, 0.30, 0.94);
	-moz-transition-timing-function: cubic-bezier(0.13, 0.71, 0.30, 0.94);
	-o-transition-timing-function: cubic-bezier(0.13, 0.71, 0.30, 0.94);
	transition-timing-function: cubic-bezier(0.13, 0.71, 0.30, 0.94);
	-webkit-transition-duration: 0.5s;
	-moz-transition-duration: 0.5s;
	-o-transition-duration: 0.5s;
	transition-duration: 0.5s;
}

.service-circle{
	position: relative;
	display: block;
	width: 125px;
	height: 125px;
	text-align: center;
	border-radius: 108px;
	margin-bottom: 30px;
	overflow: hidden;
}

.service-circle {
	-webkit-box-shadow: inset #B02B2C 0 0 0 3px;
	-moz-box-shadow: inset #b02b2c 0 0 0 3px;
	box-shadow: inset #B02B2C 0 0 0 3px;
}

.service-circle .fa {
	display: block;
	position: absolute;
	top: 0;
	left: 0;
	width: 125px;
	height: 125px;
	font-size: 50px;
	line-height: 125px;
	color: #B02B2C;
}

.service-circle .circle {
	background: #B02B2C;
}

.service-circle .circle {
	display: block;
	position: absolute;
	top: 12px;
	left: 12px;
	width: 101px;
	height: 101px;
	border-radius: 96px;
}

.service-circle .circle {
	-webkit-transition-timing-function: cubic-bezier(0.13, 0.71, 0.30, 0.94);
	-moz-transition-timing-function: cubic-bezier(0.13, 0.71, 0.30, 0.94);
	-o-transition-timing-function: cubic-bezier(0.13, 0.71, 0.30, 0.94);
	transition-timing-function: cubic-bezier(0.13, 0.71, 0.30, 0.94);
	-webkit-transition-duration: 0.5s;
	-moz-transition-duration: 0.5s;
	-o-transition-duration: 0.5s;
	transition-duration: 0.5s;
	-webkit-transform: scale(0);
	-moz-transform: scale(0);
	-o-transform: scale(0);
	-ms-transform: scale(0);
	transform: scale(0);
}

.service:hover .service-circle {
	-webkit-box-shadow: inset #B02B2C 0 0 0 10px;
	-moz-box-shadow: inset #b02b2c 0 0 0 10px;
	box-shadow: inset #B02B2C 0 0 0 10px;
}

.service:hover .service-circle .circle {
	-webkit-transform: scale(1);
	-moz-transform: scale(1);
	-o-transform: scale(1);
	-ms-transform: scale(1);
	transform: scale(1);
}

.service:hover .service-circle .fa {
	color: #FFF;
}

.service-circle .fa {
	-webkit-transition-timing-function: cubic-bezier(0.13, 0.71, 0.30, 0.94);
	-moz-transition-timing-function: cubic-bezier(0.13, 0.71, 0.30, 0.94);
	-o-transition-timing-function: cubic-bezier(0.13, 0.71, 0.30, 0.94);
	transition-timing-function: cubic-bezier(0.13, 0.71, 0.30, 0.94);
	-webkit-transition-duration: 0.5s;
	-moz-transition-duration: 0.5s;
	-o-transition-duration: 0.5s;
	transition-duration: 0.5s;
}

.service-circle, .service-box, .service-icon {
	-webkit-transition-timing-function: cubic-bezier(0.13, 0.71, 0.30, 0.94);
	-moz-transition-timing-function: cubic-bezier(0.13, 0.71, 0.30, 0.94);
	-o-transition-timing-function: cubic-bezier(0.13, 0.71, 0.30, 0.94);
	transition-timing-function: cubic-bezier(0.13, 0.71, 0.30, 0.94);
	-webkit-transition-duration: 0.5s;
	-moz-transition-duration: 0.5s;
	-o-transition-duration: 0.5s;
	transition-duration: 0.5s;
}
HTML
<div>

	<div class="service" style="float: left; width: 30%; min-width: 180px; margin: 5px;">
		<div class="service-circle">
			<div class="circle"></div>
			<i class="link-icon fa fa-car"></i>
		</div>
		<h2>Design.</h2>
		<p>
		We design and build responsive, functional web solutions for clients all across the UK. Working closely with you to ensure that you get the best possible product.
		</p>
	</div>

	<div class="service" style="float: left; width: 30%; min-width: 180px; margin: 5px;">
		<div class="service-circle">
			<div class="circle"></div>
			<span class="link-icon fa fa-phone"></span>
		</div>
		<h2>Develop.</h2>
		<p>
		We believe in maintaining our design and code standards. We do not cut corners. The result is fantastic bespoke websites completely tailored to your business.
		</p>
	</div>

	<div class="service" style="float: left; width: 30%; min-width: 180px; margin: 5px;">
		<div class="service-circle">
			<div class="circle"></div>
			<i class="link-icon fa fa-user"></i>
		</div>
		<h2>Support.</h2>
		<p>
		Our support team are ready to help with any queries you may have. From email support, queries regarding your website to sales and upgrades.
		</p>
	</div>

</div>
Changes
Make Circles Larger
/* Make Circles Larger */
.service-circle{
    width: 216px;
    height: 216px;
}

.service-circle .fa {
    width: 216px;
    height: 216px;
    font-size: 100px;
    line-height: 216px;
}

.service-circle .circle {
    width: 192px;
    height: 192px;
}
Change Colour
/* Change Colour */
.service-circle {
    -webkit-box-shadow: inset #B02B2C 0 0 0 3px;
    -moz-box-shadow: inset #b02b2c 0 0 0 3px;
    box-shadow: inset #B02B2C 0 0 0 3px;
}

.service-circle .fa {
    color: #B02B2C;
}

.service-circle .circle {
    background: #B02B2C;
}

.service:hover .service-circle {
    -webkit-box-shadow: inset #B02B2C 0 0 0 10px;
    -moz-box-shadow: inset #b02b2c 0 0 0 10px;
    box-shadow: inset #B02B2C 0 0 0 10px;
}
Notes
- Depending on you implementation of Font Awesome your code for the icon can be slightly different. You might need to play around with the syntax.
Original code from www.web-easy-sites.co.uk
<i class="fa icon-line-speech-bubble"></i>

JSN Time
<i class="link-icon fa fa-car"></i>

NS Font Awesome
<i class="fa fa-bar-chart-o fa-4"></i>
** the fa-4 is a preset size and does not need to be used
- You can probably use other vector icons instead.
Image Frames and Styling
This is a collection of Image Frames and various styles that I come across. You can also use these to style modules by simply adding the relevant code and class.
Simple Rounded Images
These images are created by simply using border-radius. 50% and seem to be the max you can apply, after this nothing happens.
200px x 200px border-radius: 50%

HTML
<img src="/images/kb/2015/621/cat-whiskers-kitty-tabby-200x200.jpg" alt="cat whiskers kitty tabby 200x200" style="border-radius: 50%;" />
This is a square image (200px x 200px) that has rounded corners and with this particular setting the image is a perfect circle.
200px x 200px border-radius: 20%
HTML
<img src="/images/kb/2015/621/cat-whiskers-kitty-tabby-200x200.jpg" alt="cat whiskers kitty tabby 200x200" style="border-radius: 20%;" />
This is a square image (200px x 200px) that has rounded corners.
200px x 300px border-radius: 50%

HTML
<img src="/images/kb/2015/621/cat-whiskers-kitty-tabby-300x200.jpg" alt="cat whiskers kitty tabby 300x200" style="border-radius: 50%;" />
This is a rectangle image (300px x 200px) and as you can see the shape is now an oval.
200px x 300px border-radius: 20%
HTML
<img src="/images/kb/2015/621/cat-whiskers-kitty-tabby-300x200.jpg" alt="cat whiskers kitty tabby 300x200" style="border-radius: 50%;" />
This is a rectangle image (300px x 200px) and as you can see the shape is still a rectangle but has rounded corners.
.frame-1 - Grey Border and 3D Shadow
CSS
/* Grey Border and 3D Shadow */
.frame-1 {
    -moz-transition: all 300ms ease-out 0s;
    -moz-border-bottom-colors: none;
    -moz-border-image: none;
    -moz-border-left-colors: none;
    -moz-border-right-colors: none;
    -moz-border-top-colors: none;
    background: -moz-linear-gradient(center top , #FAFAFA, #DDDDDD) repeat scroll 0 0 transparent;
    background: -webkit-gradient(linear, left top, left bottom, color-stop(0%,#FFFFFF), color-stop(99%,#E7E8EB)); /* Chrome,Safari4+ */
    background: -webkit-linear-gradient(top, #FFFFFF 0%,#E7E8EB 99%); /* Chrome10+,Safari5.1+ */
    background: -o-linear-gradient(top, #FFFFFF 0%,#E7E8EB 99%); /* Opera11.10+ */
    background: -ms-linear-gradient(top, #FFFFFF 0%,#E7E8EB 99%); /* IE10+ */
    filter: progid:DXImageTransform.Microsoft.gradient( startColorstr='#FFFFFF', endColorstr='#E7E8EB',GradientType=0 ); /* IE6-9 */
    border-color: #C9CBCD;
    border-radius: 0px;
    border-style: solid;
    border-width: 1px 1px 2px;
    -webkit-box-shadow: 0 8px 6px -6px black;
    -moz-box-shadow: 0 8px 6px -6px black;
    box-shadow: 0 8px 6px -6px black;
    display: inline-block;
    outline: medium none;
    padding: 4px;
}
.frame-1a - Double Grey Border and 3D Shadow
CSS
/* Double Grey Border and 3D Shadow */
.frame-1a {
    -moz-border-bottom-colors: none;
    -moz-border-left-colors: none;
    -moz-border-right-colors: none;
    -moz-border-top-colors: none;
    background: transparent -moz-linear-gradient(center top , #fafafa, #dddddd) repeat scroll 0 0;
    border-color: #c9cbcd;
    border-image: none;
    border-radius: 0;
    border-style: solid;
    border-width: 1px 1px 2px;
    box-shadow: 0 8px 6px -6px black;
    display: inline-block;
    outline: medium none;
    padding: 4px;
    transition: all 300ms ease-out 0s;
}
This is a simple grey image frame with a bit of a 3D effect
Double .frame-1a - Polaroid Style
A nice polaroid style, great for modules
HTML
<p class"frame-1a">.
<img src="/images/kb/2015/621/cat-whiskers-kitty-tabby-300x200.jpg" alt="cat whiskers kitty tabby 300x200" class="frame-1a" />
<br /> A nice polaroid style, great for modules</p>
<p>This is a nice effect of layering the image frames for a module or image.</p>
This is a nice effect of layering the image frames for a module or image. As you can see in the code the image and it's parent container has the .frame-1a class applied. This can be translated easily into a module by putting the class in to the modules class suffix and either a manully created container in the module or on an image. You can also mix and match other template classes with the method to see what you get.
.frame-2 - Black Border and 3D Shadow
CSS
/* Black Border and 3D Shadow */
.frame-2 {
    -moz-border-bottom-colors: none;
    -moz-border-image: none;
    -moz-border-left-colors: none;
    -moz-border-right-colors: none;
    -moz-border-top-colors: none;
    background: -moz-linear-gradient(center top , #201b1a, #141111) repeat scroll 0 0 transparent;
    background: -webkit-gradient(linear, left top, left bottom, color-stop(0%,#666), color-stop(99%,#444)); /* Chrome,Safari4+ */
    background: -webkit-linear-gradient(top, #666 0%,#444 99%); /* Chrome10+,Safari5.1+ */
    background: -o-linear-gradient(top, #666 0%,#444 99%); /* Opera11.10+ */
    background: -ms-linear-gradient(top, #666 0%,#444 99%); /* IE10+ */
    filter: progid:DXImageTransform.Microsoft.gradient( startColorstr='#666', endColorstr='#444',GradientType=0 ); /* IE6-9 */
    border-color: #555;
    border-radius: 0px;
    border-style: solid;
    border-width: 1px 1px 2px;
    -webkit-box-shadow: 0 8px 6px -6px black;
    -moz-box-shadow: 0 8px 6px -6px black;
    box-shadow: 0 8px 6px -6px black;
    display: inline-block;
    outline: medium none;
    padding: 4px;
}
.circle-1 - Round Images with Double Grey Border (with horizontally stretch if needed)
CSS
/* Round Images with Double Grey Border (with horizontally stretch if needed) */
.circle-1 {
    -moz-transition: all 300ms ease-out 0s;
    -moz-border-bottom-colors: none;
    -moz-border-image: none;
    -moz-border-left-colors: none;
    -moz-border-right-colors: none;
    -moz-border-top-colors: none;
    background: -moz-linear-gradient(center top , #FFFFFF, #E7E8EB) repeat scroll 0 0 transparent;
    background: -webkit-gradient(linear, left top, left bottom, color-stop(0%,#FFFFFF), color-stop(99%,#E7E8EB)); /* Chrome,Safari4+ */
    background: -webkit-linear-gradient(top, #FFFFFF 0%,#E7E8EB 99%); /* Chrome10+,Safari5.1+ */
    background: -o-linear-gradient(top, #FFFFFF 0%,#E7E8EB 99%); /* Opera11.10+ */
    background: -ms-linear-gradient(top, #FFFFFF 0%,#E7E8EB 99%); /* IE10+ */
    filter: progid:DXImageTransform.Microsoft.gradient( startColorstr='#FFFFFF', endColorstr='#E7E8EB',GradientType=0 ); /* IE6-9 */
    border-color: #C9CBCD;
    border-radius: 800px;
    border-style: solid;
    border-width: 1px 1px 2px;
    display: inline-block;
    outline: medium none;
    padding: 8px;
}
.circle-1a - Round Images with Double Grey Border (with horizontally stretch if needed)
CSS
/* Round Images with Double Grey Border (with horizontally stretch if needed) */
.circle-1a {
    -moz-border-bottom-colors: none;
    -moz-border-left-colors: none;
    -moz-border-right-colors: none;
    -moz-border-top-colors: none;
    background: transparent -moz-linear-gradient(center top , #ffffff, #e7e8eb) repeat scroll 0 0;
    border-color: #c9cbcd;
    border-image: none;
    border-radius: 800px;
    border-style: solid;
    border-width: 1px 1px 2px;
    display: inline-block;
    outline: medium none;
    padding: 8px;
    transition: all 300ms ease-out 0s;
}
There might be no difference between .circle-1 and circle-1a .
Simple Image Gallery Polaroid Code
I have put this here for when I do my own Polaroid Frame Article, either here or possible a separate article.
CSS
/**
 * @version		3.0.x
 * @package		Simple Image Gallery Pro
 * @author		JoomlaWorks - http://www.joomlaworks.net
 * @copyright	Copyright (c) 2006 - 2014 JoomlaWorks Ltd. All rights reserved.
 * @license		http://www.joomlaworks.net/license
 */

/* --- Generic Styling --- */
a:active,a:focus { outline:0; }
table.contentpaneopen { width:100%; }
li.sigProClear { clear:both; float:none!important; height:0!important; line-height:0!important; border:none!important; background:none!important; width:auto; margin:0!important; padding:0!important; }

/* Container */
ul.sigProPolaroids { margin:20px!important; padding:40px 60px!important; list-style:none; clear:both; overflow:hidden; }
	ul.sigProPolaroids.singleThumbGallery { margin:0!important; padding:8px 36px 8px 16px!important; list-style:none!important; float:left; }

/* Thumbnail: use e.g. width:33%; to force 3 columns */
ul.sigProPolaroids li.sigProThumb { display:block; float:left; background:#fff!important; list-style:none!important; margin:20px 0 27px 30px; padding:10px; text-align:center; text-decoration:none; color:#333; font-family:'Indie Flower', cursive; font-size:18px;
    -moz-box-shadow: 0px 3px 6px rgba(0,0,0,.25);
 -webkit-box-shadow: 0px 3px 6px rgba(0,0,0,.25);
         box-shadow: 0px 3px 6px rgba(0,0,0,.25);

    -moz-transition: 0 0.15s linear;
      -o-transition: 0 0.15s linear;
 -webkit-transition: 0 0.15s linear;
     -ms-transition: 0 0.15s linear;
         transition: 0 0.15s linear;

		 -moz-transform: rotate(-2deg);
       -o-transform: rotate(-2deg);
  -webkit-transform: rotate(-2deg);
      -ms-transform: rotate(-2deg);
          transform: rotate(-2deg);
             filter: progid:DXImageTransform.Microsoft.Matrix(M11=0.9993908270190958, M12=0.03489949670250097, M21=-0.03489949670250097, M22=0.9993908270190958, sizingMethod='auto expand');
               zoom: 1;
}
ul.sigProPolaroids li.sigProThumb:nth-child(even) {
     -moz-transform: rotate(2deg);
       -o-transform: rotate(2deg);
  -webkit-transform: rotate(2deg);
      -ms-transform: rotate(2deg);
          transform: rotate(2deg);
             filter: progid:DXImageTransform.Microsoft.Matrix(M11=0.9993908270190958, M12=-0.03489949670250097, M21=0.03489949670250097, M22=0.9993908270190958, sizingMethod='auto expand');
               zoom: 1;

}
ul.sigProPolaroids li.sigProThumb:nth-child(3n) { position:relative; top:-5px;
     -moz-transform: rotate(0deg);
       -o-transform: rotate(0deg);
  -webkit-transform: rotate(0deg);
      -ms-transform: rotate(0deg);
          transform: rotate(0deg);
             filter: progid:DXImageTransform.Microsoft.Matrix(M11=1, M12=0, M21=0, M22=1, sizingMethod='auto expand');
               zoom: 1;
}
ul.sigProPolaroids li.sigProThumb:nth-child(5n) { position:relative; right:5px;
     -moz-transform: rotate(5deg);
       -o-transform: rotate(5deg);
  -webkit-transform: rotate(5deg);
      -ms-transform: rotate(5deg);
          transform: rotate(5deg);
             filter: progid:DXImageTransform.Microsoft.Matrix(M11=0.9961946980917455, M12=-0.08715574274765817, M21=0.08715574274765817, M22=0.9961946980917455, sizingMethod='auto expand');
               zoom: 1;
}
ul.sigProPolaroids li.sigProThumb:nth-child(8n) { position:relative; right:5px; top:8px; }
ul.sigProPolaroids li.sigProThumb:nth-child(11n) { position:relative; left:-5px; top:3px; }

ul.sigProPolaroids li.sigProThumb:hover { position:relative;
 -webkit-transform:scale(1.2);
    -moz-transform:scale(1.2);
      -o-transform:scale(1.2);

   -moz-box-shadow: 0px 3px 6px rgba(0,0,0,.5);
-webkit-box-shadow: 0px 3px 6px rgba(0,0,0,.5);
        box-shadow: 0px 3px 6px rgba(0,0,0,.5);
}

ul.sigProPolaroids li.sigProThumb a.sigProLink { color:#333; text-decoration:none; overflow:hidden; }
ul.sigProPolaroids li.sigProThumb a.sigProLink img.sigProImg { display:block; width:100%; margin-bottom:8px; background-repeat:no-repeat; background-position:50% 50%;}

/* Caption */
ul.sigProPolaroids span.sigProPseudoCaption,ul.sigProPolaroids span.sigProCaption { display:block; text-align:center; font-family:'Indie Flower', cursive; font-size:22px; font-weight:bold; }

/* Popup */
span.sigProPopupCaption { font-weight:bold; color:#C63C13; font-size:13px; font-family:Georgia, "Times New Roman", Times, serif; }
a.sigProDownloadLink,
a.sigProDownloadLink:hover { background:url(../images/disk.png) no-repeat left center; padding:4px 0 4px 20px; }
div.sigProModulePosition { text-align:center; border-top:1px solid #ccc; border-bottom:1px solid #ccc; padding:4px; margin:8px 0; background:#ffffdd; }

/* IE specific styling: Use "body.sigProIsIEX element {}" - where X is 6, 7 or 8 - to target elements for these browser versions only */
body.sigProIsIE6 ul.sigProPolaroids li.sigProThumb,
body.sigProIsIE7 ul.sigProPolaroids li.sigProThumb,
body.sigProIsIE8 ul.sigProPolaroids li.sigProThumb {border:1px solid #ccc;border-right:2px solid #ccc;border-bottom:2px solid #ccc;}
body.sigProIsIE6 ul.sigProPolaroids li.sigProThumb span.sigProCaption,
body.sigProIsIE7 ul.sigProPolaroids li.sigProThumb span.sigProCaption,
body.sigProIsIE8 ul.sigProPolaroids li.sigProThumb span.sigProCaption {}
body.sigProIsIE7 ul.sigProPolaroids li.sigProThumb {float:none;display:inline;}
body.sigProIsIE6 ul.sigProPolaroids li.sigProThumb a.sigProLink:hover,
body.sigProIsIE7 ul.sigProPolaroids li.sigProThumb a.sigProLink:hover,
body.sigProIsIE8 ul.sigProPolaroids li.sigProThumb a.sigProLink:hover {color:#125BAE;}
body.sigProIsIE6 ul.sigProPolaroids li.sigProThumb a.sigProLink img.sigProImg,
body.sigProIsIE7 ul.sigProPolaroids li.sigProThumb a.sigProLink img.sigProImg {width:auto;}

/* Flickr Set link */
a.sigProFlickrSetLink {display:block;clear:left;padding:2px 8px;font-size:10px;text-align:center;}

/* Print message */
.sigProPrintMessage {display:none;}