
Items filtered by date: December 2014
Debugging with Netbeans, Xdebug and Xampp in Windows
Getting Xdebug, Xampp and Netbeans to work together in Windows can be a tricky thing and I want to address that here. These instructions will get debugging working all on the same PC and IP.
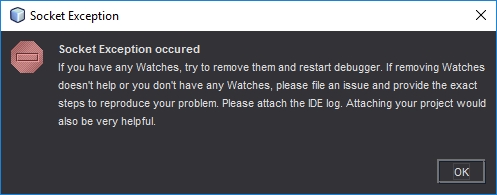
A symptom of a PC that is not setup correctly is this Netbeans Socket Exception error. You get this error when Netbeans cannot communicate with Xdebug and is usually because you are running them both on the same computer and therefore IP so the traffic routing is getting mixed up. It could also because something else is running on the debug port you have selected.
Tutorials
- How to Install NetBeans for Java Programming on Windows, macOS and Ubuntu - Basic @@@@@@ Tutorial for the beginners
Troubleshooting
- Truncated Values
- debugging - Shortened value in Netbeans PHP debugger - Stack Overflow
xdebug.var_display_max_data=16384

// Source - https://stackoverflow.com/a/40608738
// Posted by matt
// Retrieved 2026-05-06, License - CC BY-SA 3.0

netbeans_default_options="-J-client -J-Xss2m -J-Xms32m -J-Dapple.laf.useScreenMenuBar=true -J-Dapple.awt.graphics.UseQuartz=true -J-Dsun.java2d.noddraw=true -J-Dsun.java2d.dpiaware=true -J-Dsun.zip.disableMemoryMapping=true -J-Dnb.php.debugger.full.values=true"
- php - How to view value of long strings using NetBeans and x-debug? - Stack Overflow
- For this goto to
Options -> PHP -> Debuggingtab in netbeans and setMaximum Data Lengthto a large number like 100000 (I think -1 should also work here). - Setting
xdebug.var_display_max_data to -1seems to have fixed the problem. Hope this helps someone else.
- For this goto to
- debugging - Shortened value in Netbeans PHP debugger - Stack Overflow
These Settings Work
These settings are what I am using now and work well.
Windows
- You need to set a static IP on your ethernet adapter (or wifi)
php.ini
- Use your static IP to set xdebug.remote_host. Setting a static IP seems to fix most connecion issues. xdebug does not like 127.0.0.1 it works sometimes but can be problematic.
- Swapping xdebug.remote_port to 9001 helped when xdebug just stopped working. The default is 9000.
- Disable output_buffering in your php.ini by altering/uncommenting the following line
output_buffering = Off
- Add the following code to the end of your php.ini file.
[XDebug]

zend_extension="D:\websites\php\ext\php_xdebug.dll"
;zend_extension="D:\websites\php\ext\php_xdebug-2.5.4-5.6-vc11.dll"
xdebug.idekey = netbeans-xdebug
xdebug.profiler_append = 0
xdebug.profiler_enable = 0
xdebug.profiler_enable_trigger = 0
xdebug.profiler_output_dir = "d:\websites\tmp\xdebug"
xdebug.profiler_output_name = "cachegrind.out.%t-%s"
xdebug.remote_enable = 1
xdebug.remote_autostart = 0
xdebug.remote_connect_back = 0
xdebug.remote_host = "192.168.1.160"
xdebug.remote_port = 9001
xdebug.remote_handler = "dbgp"
xdebug.remote_mode = req
xdebug.remote_log = "d:\websites\tmp\xdebug\xdebug_remote.log"
xdebug.show_local_vars = 9
xdebug.trace_output_dir = "d:\websites\tmp"

;xdebug.show_exception_trace = 1
Minimum working settings
These are the minimum settings I have found to work but are here only for reference.
[XDebug]

;zend_extension="D:\websites\php\ext\php_xdebug.dll"
zend_extension="D:\websites\php\ext\php_xdebug-2.5.4-5.6-vc11.dll"
xdebug.remote_enable=1
xdebug.remote_handler=dbgp
xdebug.remote_mode=req
xdebug.remote_host=192.168.1.160
xdebug.remote_port=9001
xdebug.idekey=netbeans-xdebug
Netbeans
(Tools --> Options --> PHP --> Debugging)
- Debugger Port: 9001
- Session ID: netbeans-xdebug
- Maximum Data Length: 2048 - I think this is the default
- Stop at First Line: off
- Watches and Balloon Evaluation: All off
- Show Requested URLs: off
- Show Debugger Console: On
Browser
You need to send a trigger to Xdebug via your browser to trigger the debugger. You can send the trigger via GET/POST but you need a plugin for this.
- Firefox
- The easiest Xdebug – Add-ons for Firefox
- There are many others....
- Google
- Xdebug helper - Chrome Web Store
- There are many others....
Getting debugger to work
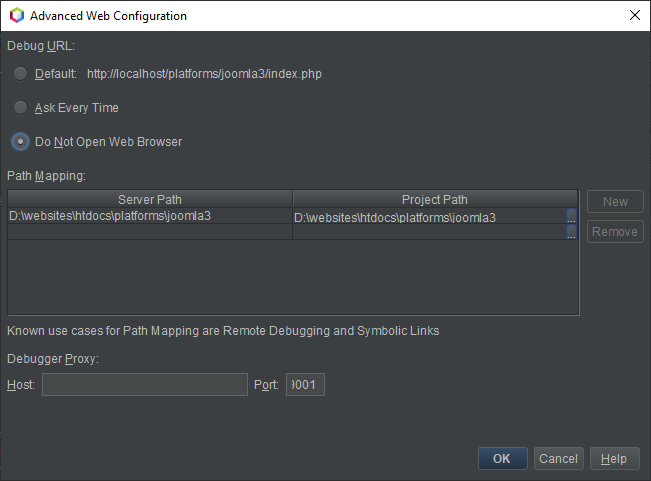
- Project Properties --> Run Configuration --> Advanced --> Do Not Open Web Browser (not needed to enable debugging but it prevent the browser opening everytime you start debug)
- Project Properties --> Run Configuration --> Advanced --> Path Mapping (not sure what this does, but if debugging does not work then this needs adding)
### Example
Server Path: D:\websites\htdocs\platforms\Joomla4
Project Path: D:\websites\htdocs\platforms\Joomla4
- use a browser extension to add the required POST variable. Adding GET variable is messy. (you can use special xdebug calls in your code, see xdebug website for details)
- the xdebug settings in the php.ini file
- use your real local IP i.e. 192.168.1.15 , NOT `localhost` or 127.0.0.1 - these do not always route correctly on my Windows 10 PC with Xampp
{add my example ini file}
Test Debugger is working
Now you have configured your system as above you need to test it before you can rely on it.
- Set a breakpoint in Netbeans on the index.php (or a PHP file that is parsed) in your software project, preferably one before the content is displayed. (or you can enable the ‘Stop at First Line’ option in the Netbeans config
- Start debugging in Netbeans
- Open your project in a chrome browser with the xdebug helper plugin enabled
- If the browser and Netbeans stop at the breakpoint, everything is working
Diagnostics / Troubleshooting
If xdebug will not stop at breakpoints, try
- try putting breakpoints on different items. Xdebug might not always be able to stop on certain items. Add them in your self if needed ie $chimp = 13;
- a different version of xdebug DLL, (ie different VC).
- debugging some other code. i.e. QWcrm works but Joomla did not. I then retried joomla and debugging joomla worked (however i did it after doing the item below)
- remove all other xdebug entry defintions in php.ini so you just have the one in that you think should work, save, restart and retry.
Things that Might help
If xdebug does not work straight away then trying these things might help.
- could disabling ipv6 in the network adapter help? because xampp has issues with ipv6
- xdebug might fail if you have multiple version of xampp running
- Localhost is mapping to ::1 and not 127.0.0.1
- Not all lines can act as breakpoints, these are displayed as cracked breakpoint markers in Netbeans. These breakpoints will not work because Netbeans does not like them. To fix this yoou should choose another breakpoint.
- Run the Xdebug on another server which has another IP
- Get the latest dll from xdebug site (i.e. php_xdebug-2.5.4-5.6-vc11.dll)
- Comment out any zend extensions
- Some people use port 9001 when they have issues with 9000.
Test the port is not already in use - dbgtest.php
This code is taken from 21.4.2 How to Set Up XDebug | Oracle
<?php
$address = '127.0.0.1';
$port = '9000';
$sock = socket_create(AF_INET, SOCK_STREAM, 0);
socket_bind($sock, $address, $port) or die();
socket_listen($sock);
$client = socket_accept($sock);
echo "Connection established: $client";
socket_close($client);
socket_close($sock);
?>
However I found this slightly better version from dbgtest.php · GitHub
<?php
// adapted from https://blogs.oracle.com/netbeansphp/entry/howto_check_xdebug_installation
$address = $argv[1] ?: '127.0.0.1';
$port = '9000';
$sock = socket_create(AF_INET, SOCK_STREAM, 0);
socket_bind($sock, $address, $port) or die();
echo "Listening to $address:$port\n";
socket_listen($sock);
$client = socket_accept($sock);
echo "Connection established: $client\n";
socket_close($client);
socket_close($sock);
- Create a php file with the code above called dbgtest.php and put it in the htdocs folder of your xampp server
- Change the port to 9001 if that is the port number you are using/diagnosing
- Enable sockets - extension=php_sockets.dll
- only be need for the test script
- You enable this by uncommenting the appropriate line in the php.ini
- if you do not enable this you will get this error
Call to undefined function socket_create()
- Close Netbeans if that is running.
- Restart Xampp
- Run the script
If there is something running on this socket you will get an error as shown below. This shows that some other process is using the port 9000.
Warning: socket_bind(): unable to bind address [10048]: Only one usage of each socket address (protocol/network address/port) is normally permitted. in D:\websites\htdocs\dbgtest.php on line 5
Workarounds
These are a few workarounds I tried and might work for you. These are not designed to be a permanent fix.
Method 1
- Make sure netbeans and xampp are not running
- Put the basic xdebug settings in php.ini
- Enable extension=php_sockets.dll in php.ini
- Run xampp
- Put a copy of the oracle script in your Webroot and run it. This causes xampp to open socket on 9000
- Now open and run NetBeans debugging
* I am not sure if you need to do the IP fix aswell for this to work. It is all caused by routing issues on the loopback system of the PC. Or sockets might be needed.
Method 2
- Turn of netbeans debugging (leave netbeans open)
- Run the dbgtest.php to allow xampp/xdebug to grab the port
- Now start netbeans debugging
Method 3 - (if working and then stops for no reason)
- Close Netbeans, Xampp and browsers
- Restart them all
Clickable Links for Xdebug Trace Errors
This is so when you get parsing errors and Xdebug shows those errors in the browser, you can click on the link to open up Netbeans at the appropriate file and line number.
Files
These files are required to make this function work.
netbeans.bat
:: Useful Sites
:: https://quantumwarp.com/kb/articles/72-xampp/928-debugging-with-netbeans-xdebug-and-xampp-in-windows
:: https://xdebug.org/docs/all_settings#file_link_format

:: Disable onscreen text
@echo off

:: This allows variable replacements
:: Cause each variable to be expanded at execution time rather than at parse time.
:: https://quantumwarp.com/kb/articles/10-windows-family/988-replace-a-text-string-in-a-windows-batch-file
:: https://learn.microsoft.com/en-us/windows-server/administration/windows-commands/setlocal
setlocal EnableExtensions EnableDelayedExpansion

:: Replace netbeans:// with the full program path
set NETBEANS=%1

:: This holds the open command defined in xdebug/xampp
set FILE=%~2

:: Convert '%5C' --> '\'
:: This requires EnableDelayedExpansion
:: We use the !! because of the % special character
:: Cycles once but does not parse variables and only removes one of the percent signs
:: You can use ENDLOCAL to stop this looping, but we dont need to
SET FILE=!FILE:%%5C=\!

:: the ~19 appends the page number on. This just assumes there are 18 or less other variables
%NETBEANS% --nosplash --console suppress --open "%FILE:~19%"

:: `nircmd` is a utility that does various computer related commands
:: nircmd win activate process netbeans.exe

:: Dont Close the Window after running - useful for debugging
:: cmd /k
- This batch file accepts the link from the stack traces and parses the variables.
netbeans_protocol.reg
Windows Registry Editor Version 5.00

[HKEY_CLASSES_ROOT\netbeans]
"URL Protocol"=""
@="URL:Netbeans Protocol"

[HKEY_CLASSES_ROOT\netbeans\DefaultIcon]
@="\"C:\\Program Files\\NetBeans-12.6\\netbeans\\bin\\netbeans64.exe,1\""

[HKEY_CLASSES_ROOT\netbeans\shell]

[HKEY_CLASSES_ROOT\netbeans\shell\open]

[HKEY_CLASSES_ROOT\netbeans\shell\open\command]
@="\"C:\\Windows\\netbeans.bat\" \"C:\\Program Files\\NetBeans-12.6\\netbeans\\bin\\netbeans64.exe\" \"%1\""
- This registry file causes
netbeans.batto open Netbeans. - It configures the shell command and path to be run when
netbeans.batis executed.
Instructions
- Place the
netbeans.batbatch file inC:\Windows- I put it here because I know this folder is in my
PATH.
- I put it here because I know this folder is in my
- Update the
netbeans_protocol.regto your current version of Netbeans and make sure you select the correct 32/64-bit executable.ie: "C:\Program Files\NetBeans-12.6\netbeans\bin\netbeans64.exe"
- Run
netbeans_protocol.regto apply to the registry - In
php.ini, configure or set the following:xdebug.file_link_format = "netbeans://open/?f=%f:%l"
when xdebug wiil not debug inside a large file
- Issue
- xdebug is working but when you get to a large class, Xdebug stops and this is caused by Netbeans not opening a large file
- Set a breakpoint just before it calls the class
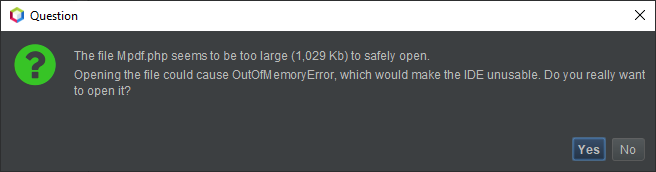
- an you can manually advanced into the class and when you do you get a warning from Netbeans that opening the file is so large it will cause stability issues
- but you click yes and it is fine after clicking yes to open it.
- Diagnostics
- Once in the file, advance manually until you break it. This will help find what is causing the issue. You can also add breakpoints at various parts in the afflicted file to advnce quicker
- Solutions
- Reduce your class size
- Find the setting in Netbeans where you can allow files over a certain size to open, make this bigger
- If you couldn't reduce your class size try to add this in your
\NetBeans\harness\etc\app.confdefault_options="-J-Xms24m -J-Xmx1024m"
- I have increased the -J-Xmx memory parameter to 1G both in netbeans.config as well as in the project properties file.
- If you couldn't reduce your class size try to add this in your
- Pre open the file
- Start Netbeans with command line switches that allow larger files
Links
- java - NetBeans is Showing Error file could cause outofmemoryerror netbeans - Stack Overflow
opening this file could cause outofmemoryerror netbeans
default_options="-J-Xms24m -J-Xmx1024m"
- NetBeans Tuning JVM switches for performance - netbeans.org | WayBackMachine - JVMs offer a variety of standard and non-standard switches that tune memory allocation and garbage collection behavior. Some of these settings can benefit NetBeans' performance.
- Conf file locations
C:\Program Files\NetBeans-11.1\netbeans\etc\netbeans.conf
C:\Program Files\NetBeans-11.1\netbeans\harness\etc\app.conf
app.confandnetbeans.confseem to be the same. I would recommend editing the netbeans.conf as this is where there are some default options already set
- java - increasing heap size in netbeans.conf file - Stack Overflow
- JVM command line switvchs (those that start with J- are commandline switches for thdirectly to the JVM)
- FaqStartupParameters - NetBeans Wiki | WayBackMachine
-J-Xss2m
- making this larger seems to let netbeans open a lot quicker
- it makes no difference to the messaage prompt
- java | Oracle documentation - This document contains reference information for the tools that are installed with Java Development Kit (JDK).
- Configuring the Default JVM and Java Arguments - Oracle Fusion Middleware Installation Guide for Oracle Unified Directory - This guide describes the installation process for Oracle Unified Directory and the components that are required to manage it.
- JVM command-line options | setgetweb.com
- Use these options to configure your JVM. The options prefixed with -X are nonstandard.
-XssSet the maximum stack size for Java threads.
- Options --> Debugging --> maxium data length: 2048000 = about 2gb = changes nothing
File too big warning
- Background
- Bug 98701 - Allow to open very big files? | ASF Bugzilla
- 'The user can choose' to ignore the warning and open the document in Full editor mode at their own risk (Thankfully we can already achieve this by setting a system property '-J-Dorg.openide.text.big.file.size=25', Personally I currently use 25mb to reduce the occurrence of this issue).
- Bug 98701 - Allow to open very big files? | ASF Bugzilla
- Cause
- The 'big file size' is hardcoded in netbeans to 1MB.
- This is handled in the file D:\netbeans-master\platform\openide.loaders\src\org\openide\text\DataEditorSupport.java : Line 849 - 870
- Solution
- it is now possible to override this size with the option "org.openide.text.big.file.size". This is an integer and is MB.
'-J-Dorg.openide.text.big.file.size=5'--> will set the large file size to 5MB - This is a system property. should not matter beginning or end, but does work at end- add this to C:\Program Files\NetBeans-11.1\netbeans\etc\netbeans.conf (this will affect all projects)
- Additional
warnedFiles- Holds the files the user has already accepted, where is this list? add this to my article, someone might answer. i cant.- is it stored in the project but as a binary thing, maybw a hash
- 1,029KB is the size of the mpdf.php file
XDebug session stuck on curl_exec call
- Issue
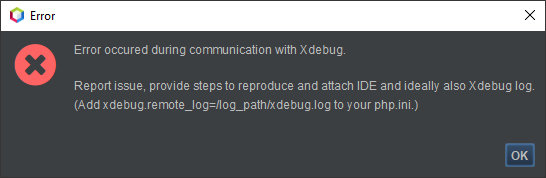
- When debugging, your xdebug craps out when you hits curl_exec($ch)
- Cause
- You have
xdebug.remote_autostart = On
- You have
- Solution
- Set to
xdebug.remote_autostart = Off
- Set to
- Links
Links
array_walk() - Working with an anonymous function
This code is incredibly useful for going through an array and applying changes to the individual values without having to create a specific loop to perfom this action. In this example all apostrophes are escaped.
// Walk through the array and escape all apostophes (anonymous function)
array_walk($merged_config, function(&$value, &$key) {
    $value = str_replace("'", "\\'", $value);
});
this also works, without the &$key
// Walk through the array and escape all apostophes (anonymous function)
array_walk($merged_config, function(&$value) {
    $value = str_replace("'", "\\'", $value);
});
keep the '&' it is important. This creates a reference to the object in memory.
Change a browsers language, locale and HTTP_ACCEPT_LANGUAGE header
When testing the translation system on QWcrm I needed to try different locales (languages) to see if the software actually worked how it should. The following are ways to change the HTTP_ACCEPT_LANGUAGE header that the browser sends to the webhost with its request.
FireFox
This will also fix the issue where Firefox was sending en-US instead of en-GB
Option 1 - Change the browser system settings
- Goto (Tools menu --> Settings --> Content --> Languages)
- Add English/United Kingdom [en-gb]
- (optional) remove the other version of english. I do not know if this would cause issues so i have left them
Option 2 - re install
You can also just install Firefox with the correct locale.
Option 3 - Plugins
Using a plugin will allow you to easily change the settings on a temporary basis.
Chrome
Option 1 - Change the browser system settings
- In the address bar type chrome://settings/ or click the 3 balls button-->settings
- Open advanced section at the bottom
- Goto languages
- Install 'English (United Kingdom)' language
- with 'English (United Kingdom)':
- move to the top so it is first in the order of preference
- set 'Display Google Chrome in this language'
- set it as the language for spell checking
- (optional) remove the other version of english. I do not know if this would cause issues so i have left them
Links
Disable and re-enable PHP error reporting within a function
This is useful when you want to control the errors outputted tot he screen or is a class or some other code is not behaving as expected, such as the ADOdb error class.
The following code will preserve the current error reporting level so once your code has finished running the system's error reporting will be returned to its normal state.
// Get current PHP error reporting level
$reporting_level = error_reporting();

// Disable PHP error reporting (works globally)
error_reporting(0);

// Add you code here

// Re-Enable PHP error reporting
error_reporting($reporting_level);
My Composer Notes
What is Composer?
This needs to be cleared up for us newbies. and to start with you will come across the following statements which are both true.
- Composer is not a package manager
- Composer is a dependency manager
Composer is not a package manager because you are not downloading complete software packages but dependencies/libraries for your own software package.
Composer is a cross-platform software package that can is used to manage libraries for your PHP software project allowing you to install, update and remove libraries/dependencies from a single point reducing the need to manually update all of the dependecies individually which reduces time and makes it easier to keep things upto date. composer calls on its own library to get the latest updates of the various depencies. A vendor of software can make their software available from this library for others to use.
It is composer of the program mentioned above to manage your dependecies and also a small library to control autoloading of classes and other things.
Composer is useful because some packages use mulitple dependancies to get them to work and composer allows you to always get the latest version of all of the packages, or specify package numbers for your project. This process also correctly sets up all the required includes up as needed. This can reduce the time needed to update all of the packages.
The Wonderful World of Composer - YouTube - This is brilliant video that will explain Composer completely.
How does it Work?
- Installing Windows Composer does the following
- Installs Composer
- Puts the Composer binary into path
- autodetects your php.exe and allows you to choose which if you have more than one.
- Files
- Composer installs all of the libraries usually to a folder called /vendor/ and is controlled by a single JSON text file which is parsed by the particular version of Composer you are using.
- Each package that is downloaded is registered with the Composer framework.
- There is sha-1 string for both the whole 'Composer vendor library' and for the inidividual dependencies which are stored in the composer.lock file. this allows the tracking of the various assets to see if they have been updated or just to compare against packages withing the Packagist repository.
- composer.json - Is the control files used for the composer packages used within your project. This file allows multiple packages to be downloaded and combined
- The standard folder to use is /vendor/
- All dependecies will be installed into the vendor folder. they all have a unique name so collisions will not be an issue.
- Commands
- Run the command composer install in the folder where you want you dependencies to be installed and if the composer.json file is present it will use it for instruction.
- I can install motranslator by navigating to where i want it and typing composer require phpmyadmin/motranslator as you can see this has the require command in the string.
- This gets the latest stable version of the called software, in the case motranslator - composer require phpmyadmin/motranslator
- composer require phpmyadmin/motranslator from the Windows commandline will add this dependency to your Composer library, or build a new library if there is not one already there.
- You only need to include the autoload.php once in your software project and composer will load all dependancies. This is all you need in your PHP project to get Composer.
require vendor/autoload.php
mPDF - Renders tables and fonts smaller than in the supplied template
When using mPDF to generate a PDF from a template it renders one or more tables and the fonts within them smaller than what they are in the template.
Cause
Look at the code below:
<!-- Invoice details -->
<td valign="top" align="right" width="200">
    <table border="0" cellpadding="3" cellspacing="0" style="border-collapse: collapse;">
        <tr>
            <td valign="top" width="90%" align="right"></td>
            <td align="top" class="olotd5" width="200">
                <table width="180" border="1" cellpadding="0" cellspacing="0" style="border-collapse: collapse;">
                    <tr>
                        <td>
                            <b>{t}Invoice ID{/t} - </b>{$invoice_details.invoice_id}<br>
                            <b>{t}Status{/t} - </b>{$workorder_details.status}<br>
                            <b>{t}Date{/t} - </b>{$invoice_details.date|date_format:$date_format} <br>
                            <b>{t}Due Date{/t} - </b>{$invoice_details.due_date|date_format:$date_format}<br>
                            <b>{t}Work Order{/t} - </b>{$invoice_details.workorder_id}<br>
                            <b>{t}Technician{/t} - </b>{$employee_details.display_name}<br>
                            <b>{t}Credit Terms{/t} - </b>{$customer_details.credit_terms}<br>
                        </td>
                    </tr>
                </table>
            </td>
        </tr>
    </table>
</td>
and you can see this line.
<td valign="top" width="90%" align="right"></td>
mPDF cannot handle this empty cells with sizing statements.
Solution
I removed this line and then the template was rendered correctly.
My dhtmlxCombo Notes
These are some notes I made while integrating dhtmlxCombo into QWcrm.
- in the package the code you want is ../codebase/
- this codebase is prefilled with the dhxcombo_material skin
- you don't need ../codebase/dhtmlxcombo_deprecated.js
- you dont need ../codebase/fonts/ ? - doesnt seem to be called for what i use
- fontawesome, dunno what this is for, again, something else
- to add a new skin goto ../skins/ and into the folder of the skin you want. copy these files to ../codebase/ - the css will be overwritten
- for QWcrm I use skyblue
- only these JS and CSS are needed
<script src="/{$theme_js_dir}dhtmlxcombo/dhtmlxcombo.js"></script> <link rel="stylesheet" href="/{$theme_js_dir}dhtmlxcombo/fonts/font_roboto/roboto.css"/> <link rel="stylesheet" href="/{$theme_js_dir}dhtmlxcombo/dhtmlxcombo.css"> - roboto.css is for foreign characters, it might be used - cant be sure. i have not needed it yet
- If existing select object was defined as parent - dhtmlxCombo will take all data from it (list of options, sizes, tabindex, name)
Example code I used in QWcrm
// This Call Transforms the Select Element by ID to a real Combo Box
var combo = dhtmlXComboFromSelect('description['+ iteration+']');

// This Call Transforms the Select Element by ID to a real Combo Box
 var combo = dhtmlXComboFromSelect('rate['+ iteration+']');
- The code above auto resizes the combobox
- var combo = can be removed unless you want to add options
var combo = dhtmlXComboFromSelect('rate['+ iteration+']');
combo.setSize(90);             // This sets the width of the combo box and drop down options width
//combo.setOptionWidth(200);    // this sets the width of the options drop down ONLY
Links
- dhtmlxCombo Documentation | dhtmlx.com
- Starting notes | dhtmlx.com
- How to select an option in dhtmlxCombo without trigerring on - Uncategorized discussions - DHTMLX
- I have a combo box with onChange event attached. I want to be able to programmatically select an option and not trigger the onChange event.
- javascript - How to set dhtmlXCombo option by value - Stack Overflow
My Keep a Changelog Notes
These are my note for Keep a Changelog
Version Number Links
The links on the version number [1.0.0] will not work unless they have the corresponding link below i.e.
[Unreleased]: https://github.com/olivierlacan/keep-a-changelog/compare/v1.0.0...HEAD
[1.0.0]: https://github.com/olivierlacan/keep-a-changelog/compare/v0.3.0...v1.0.0
[0.3.0]: https://github.com/olivierlacan/keep-a-changelog/compare/v0.2.0...v0.3.0
Blockquote
Centered Blockquotes
Option 1
This is an example blockquote.
<div style="text-align: center;">
    <blockquote style="display: inline-block; width: 200px;">This is an example blockquote.</blockquote>
</div>
Option 2
This is an example blockquote.
<div style="text-align: center;">
    <blockquote style="display: inline-block; max-width: 450px;">
        <p>This is an example blockquote.</p>
    </blockquote>
</div>
Option 3
This is an example blockquote.
<blockquote style="display: table; max-width: 450px; margin: 0 auto;">This is an example blockquote.</blockquote>
Notes
These width settings work aswell:
- width: 50%
- max-width: 450px;