Items filtered by date: December 2015
Configure an Outlook.com account to use a 3rd party email address
There are different ways you can set this up and I will show you the best way of setting this combination up whilst still being able to use your 3rd party email address from your Outlook.com account.
I will cover using webmail, Outlook.com, Webmail and mobile phones and the different setups there.
The setup I am going to outline will remove the need to ever access your email via your 3rd party server, but obviously does require it to keep running.
The reason you would want to set this up is:
- Exchange functionality (for free)
- Out of office replies
- Email rules
- Calendar
- Etc.....
- 50GB mailbox
- Limited mailbox size at your 3rd party supplier
Instructions
Obviously for this to work you will need a Outlook.com email address that has been upgraded to the new version of Outlook.com account which supports Exchange (live and Hotmail email accounts will be ok) and Outlook 2013+ if you want to setup email in Outlook the software client.
Configuration Options
You need to configure each item in the list below for your selected configuration. The instructions for the different options are after this section. You basically just mix and match as per the menu below to get your preferred option. I have done this way because I am not 100% which way I am going to set things up yet but at least you can figure out the best configuration for you.
- Webmail Only – suitable for most clients
- Outlook Webmail
- Send and receive 3rd party email from Outlook Webmail
- Set 3rd party email address to be default from Outlook Webmail
- No Outlook client software
- Outlook Webmail
- Minimal – This setup is for people who want to use Outlook client software
- Outlook Webmail
- Send and receive 3rd party email from Outlook Webmail
- Set 3rd party email address to be default from Outlook Webmail
- Outlook Software Client Exchange setup
- 3rd Party emails are received via Outlook.com to your Exchange account
- Local 3rd party email send only (SMTP)
- Set 3rd party email address to be default from Outlook client Software
- Outlook Webmail
- Full – This setup is for people who want to use Outlook client software and get there emails as quick as possible.
- Outlook Webmail
- Send and receive 3rd party email from Outlook Webmail
- Set 3rd party email address to be default from Outlook Webmail
- Outlook Software Client Exchange setup
- 3rd Party emails are received via Outlook.com to your exchange account
- Local 3rd party email send and receive (SMTP and POP3)
(would this cause issues with outlook.com and outlook software sending and receiving) – definitely quicker for receiving emails - Set 3rd party email address to be default from Outlook client Software
- Outlook Webmail
- Outlook Software Client Only – This setup is for people who want to use Outlook client software and getting their emails as quick as possible but only have the 3rd party emails sent and received from their Outlook client software. This could be useful if you have lots of email accounts or specific needs. You will still be able to read all of your emails via Outlook.com but not send from those 3rd Party email addresses. You would also probably need to leave your PC on to get the benefit of this setup.
- Outlook Webmail
- Outlook software Client Exchange setup
- Local 3rd party email send and receive (SMTP and POP3)
- 3rd Party emails are uploaded to Outlook.com via your Exchange account
- Set 3rd party email address to be default from Outlook client Software
Configuration Items
Outlook Webmail
Obviously for this to work you will need an Outlook.com email address that has been upgraded to the new version of Outlook.com account which supports Exchange (live and Hotmail email accounts will be ok).
This item just requires you to create an Outlook.com account with an Outlook.com email address unless you already have one.
Send and receive 3rd party email from Outlook Webmail
Outlook.com uses your own server for sending email rather than sending from Microsoft servers so there will be no issue of address spoofing or your emails going into SPAM folders. To this end we need to give the email account details to Outlook.com.
- Login to outlook.com

- Click on the settings cog (top right)
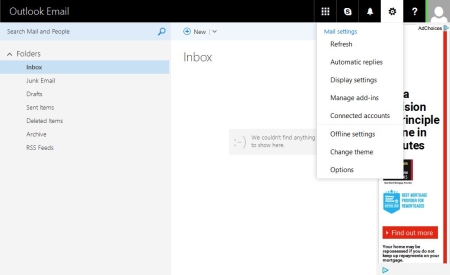
- Connected Accounts
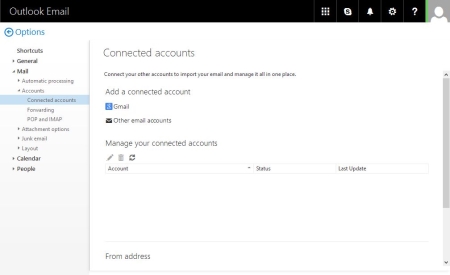
- Add a connected account Selecting ‘Other email accounts’
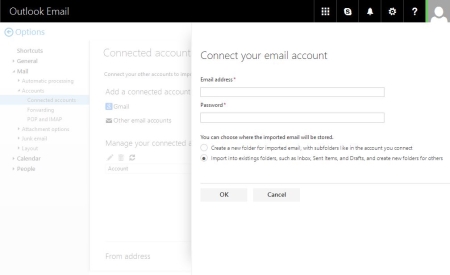
- Follow the setup procedure for the account
- Connect your email account – importing into existing folders is my preferred option because I can setup email rules later
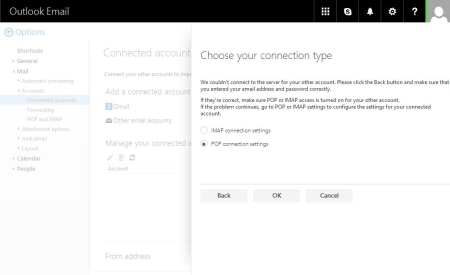
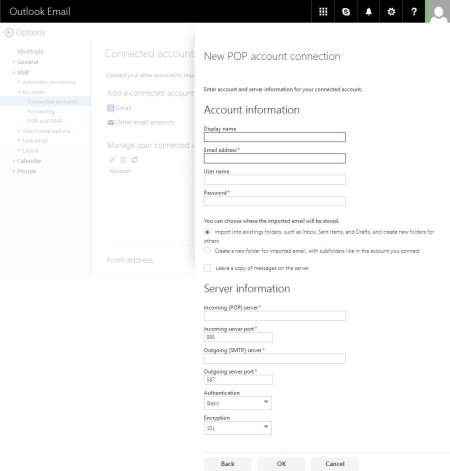
- Choose your connection type – Outlook.com will try and connect your account automatically but will almost certainly fail and then will prompt you to select your account type, select POP.
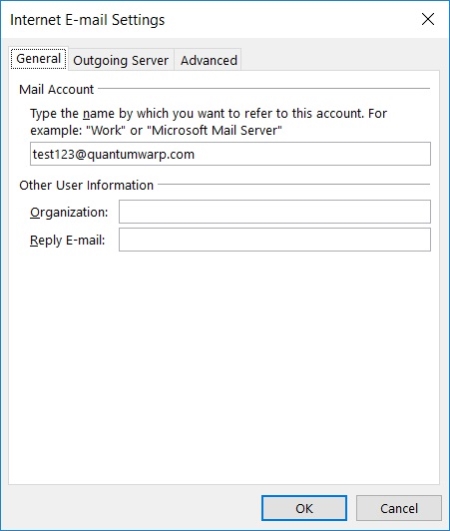
- New POP account connection – Fill in your details here. Select to import into existing folders but untick ‘Leave a copy of messages on the server’, this will make sure the 3rd party mailbox is always kept empty to prevent mixed up emails. SSL settings are more secure.
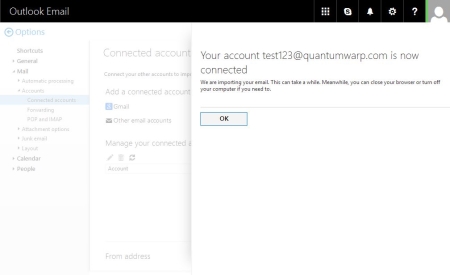
- Your account test123@quantumwarp.com is now connected
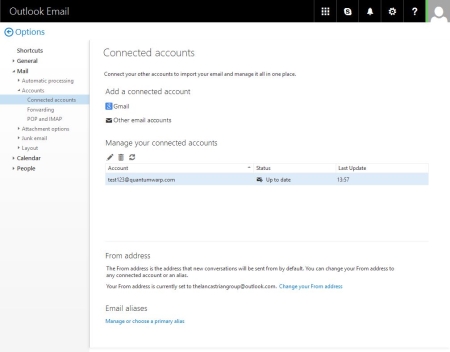
- Connected Accounts now showing your newly connected account
- Click back and return to your inbox
- Depending on whether you selected to import into current folders or create news ones, your inbox will look slightly different.
Merge / Import into current folders then there will be no change for either IMAP or POP
If you selected new folders (POP3) you will get this layout.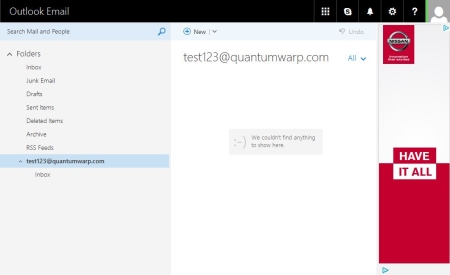
Just for completeness, IMAP with seperate folders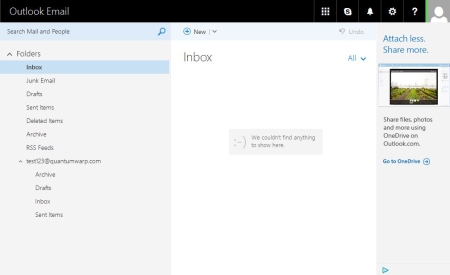
- You have now configured Outlook.com to grab your emails.
Your emails will only be fetched every 10 – 15mins from 3rd Party servers, this cannot be changed. If you use IMAP the emails are not received instantly either.
Set 3rd party email address to be default from Outlook Webmail
- Click on the settings cog (top right)
- Select Connected accounts
- If you scroll to the bottom of the screen you will see the From Address option
- Click on “Change your From Address” and select your 3rd party email address. This will now become the default email address in your Outlook.com Account.
Outlook Software Client Exchange setup
Recently Microsoft upgraded all Live/Hotmail/Outlook.com to support full Exchange features with a 50GB mailbox which allows Outlook client software to take full advantage of this such as the calendar which will sync to your calendar on Outlook.com, emails rules and out of office replies
Configuring Outlook Software Client
You need to have Office 2013 or later to be able to recognise Outlook.com as an Exchange server.
For these instructions I am using Outlook 2016
To Add the Exchange Account
- Go to File --> Account Settings --> Account Settings and click on new
There are different ways to get to the next step to add new email accounts and these methods are ok as well.
- The auto Account Setup dialog box will now appear.
- Fill in your details and click next
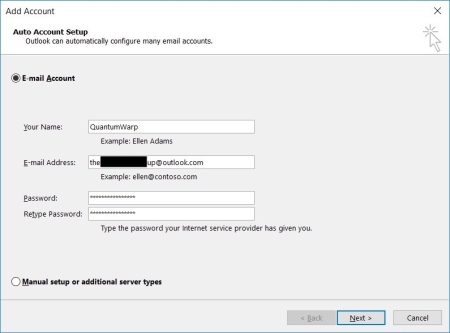
- Outlook will now auto-discover all of the required settings Outlook.com and configure your exchange account.
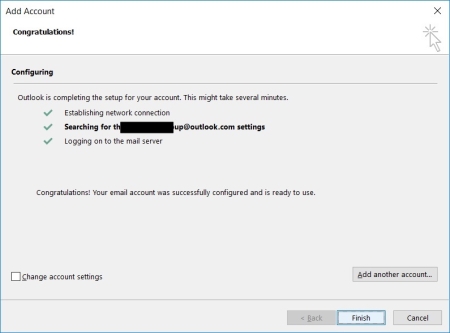
- Click Finish and restart Outlook if prompted
Local 3rd party email send and receive (SMTP and POP3)
Now we need to add your 3rd party email account into exchange. The difference is that we will have the delivery location be the Exchange .OST file. When emails are delivered to the .OST via Outlook client software it is synced up to Outlook.com and therefore all of your other devices. Emails will be sent from your 3rd party email account as normal via the Outlook client software.
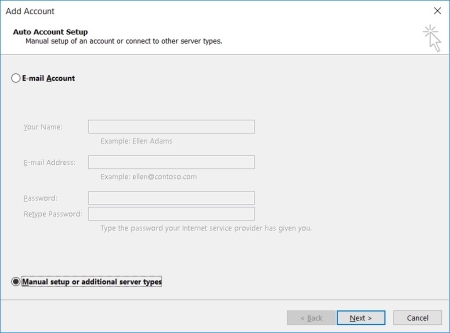
- Select ‘Manual setup or additional server types’ Click next (Auto setup does not always work but you can try it if you want)
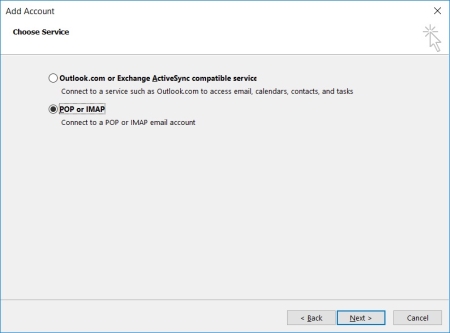
- Select POP or IMAP
- The POP and IMAP Account Settings dialogue will appear
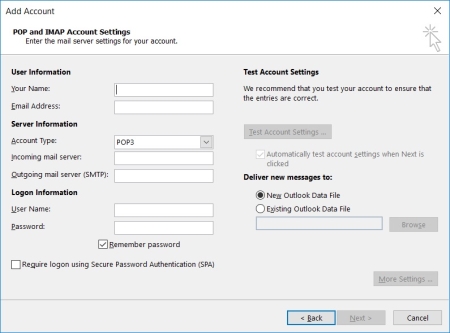
- Fill in User Information/Server Information/Logon Information
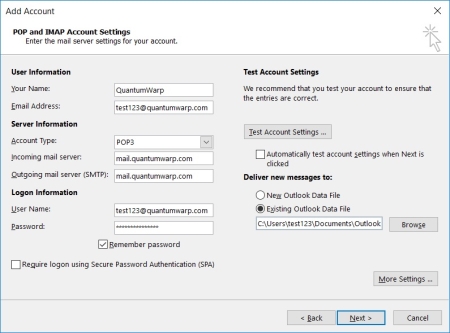
- Untick ‘Automatically test account settings when Next is clicked’
- We now need to set the delivery location of the 3rd party email to your Exchange account/.OST file
- Under Deliver new message to: select ‘Existing Outlook Data File’
- Select your Exchange .OST file.
If you are using default locations, the Exchange .OST should be listed in the browse windows as soon as it opens. If it does not you need to browse to where you Exchange .OST file sis and select it. The default location in Outlook 2016 is
"C:\Users\{windows account}\AppData\Local\Microsoft\Outlook\"
- Click on more settings
- General Tab
- Configure as required
- Outgoing Server Tab
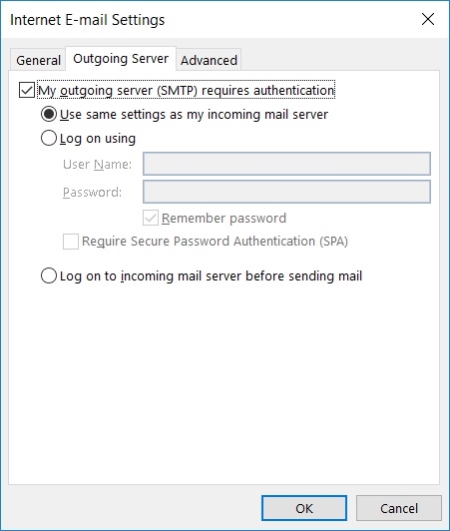
- Configure your Outgoing Server as required. In my case I just have to turn on ‘My outgoing server (SMTP) requires authentication’
- Advanced Tab
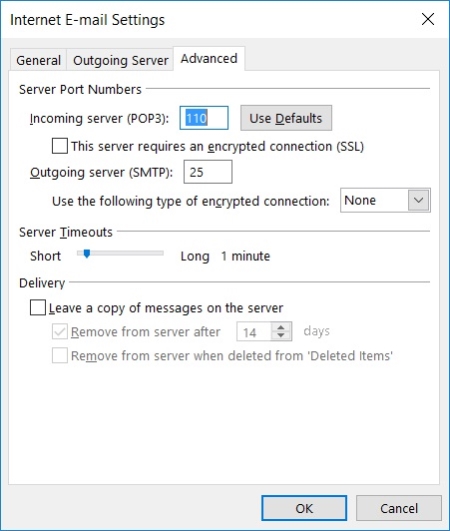
- Configure the ‘Server Port Numbers’ as required, SSL and TLS is preferable.
- Delivery – In this configuration you do not want to leave any emails on your 3rd party server because your Outlook.com Account will be your primary account. This will also prevent emails getting doubled up when Outlook.com interrogates your email server.
- Click OK to return to the POP and IMAP Account Settings
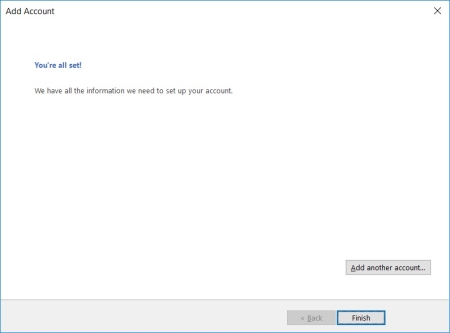
- Click Next
- You are all set now will appear, click finish
- You are returned to the E-mail Accounts page where you can see both accounts
- Check the 3rd party email delivery location ion the E-Mail tab. If you have accidentally created a new .PST file you need to change the delivery location and remove the unneeded .PST file.
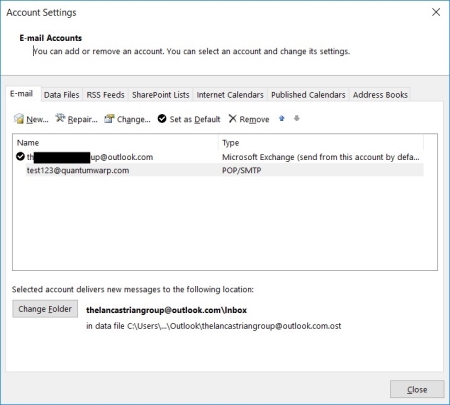
- Click on the 3rd party email address
- At the bottom a Change Folder button will appear, click this
- Select the inbox folder of the Exchange Account in the tree and click Ok
- Now delete the unwanted .PST file form the Data Files tab. If this fails, restart the Outlook client software and then retry the .PST deletion process.
- Click close
- Click Close
You can now send and receive emails from your 3rd party email account and those emails, both sent and receive will be saved in to your Outlook.com Exchange account and synced to all of your devices. The 3rd Party email address has been set as the default email address so you might not even notice you are using an Outlook.com Exchange Account.
Local 3rd party email send only (SMTP)
This option would be suitable if you just want Outlook.com to manage your email grabbing or if issues arising from both Outlook.com and Outlook client software polling your email server.
We are basically going to remove the 3rd party email account from the send/receive group preventing POP3 integration.
Do the same as above section ”Local 3rd party email send and receive (SMTP and POP3)” but make sure the internet is turned off first and then do the following.
- Go to the Send / Receive Tab
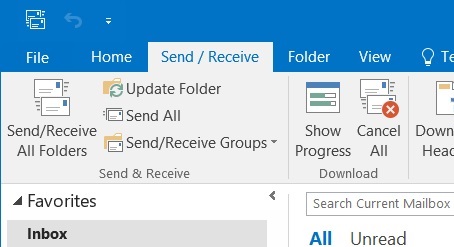
- Click on “Send/Receive Groups” drop down menu
- Select “Define Send/Receive Groups”
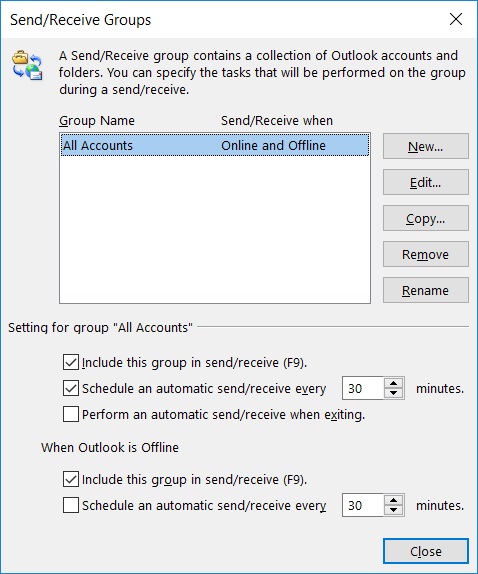
- Edit “All Accounts”
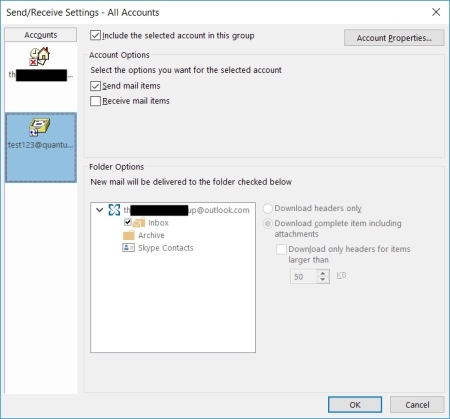
- Select the 3rd party email account on the left
- Untick “Receive mail items”
- Click OK
- Click Close
- Re-Enable the internet
You have now disables your 3rd party email account from receiving email so the POP3 server will never be polled by you Outlook client software but you can still send emails
Set 3rd party email address to be default from Outlook client software
The Exchange account should still be the default account. Simply set the 3rd party email account as the default.
- Open up the E-Mail Accounts page
- Highlight your 3rd party email account
- Click “Set as Default”
- Done
Mobile phone / outlook.com app
This section needs updating when there is a method to use an alias in the Microsoft Outlook App.
- You cannot send emails via and alias in the Ooutlokk App but you can see all emails that have been received in the main account.
- You can only add 3rd part IMAP accounts. This probably would allow you to send emails but things would get messy
Notes
Outlook.com Webmail
- The emails will not show up immediately in your inbox
- Frequency of email collection is every 10 – 15 mins and cannot be changed
- Logging in and out of your outlook account does not trigger your emails to be polled from your connected account
- The emails will appear automatically in your outlook.com inbox and you do not need to refresh your webpage
- Outlook.com might not immediately start downloading your emails when you add the connector. You have to wait for the cron job as it were
- When I added the connector back on to use separate folders using the same email address (i.e. folders already there) I had to wait for emails to be brought in.
- When I then added the same email address again but to use the primary folder structure they were downloaded immediately.
- You can set outlook.com to remove the messages or leave them on the remote server
- You can set the new account to be merged with the primary account folder structure or use its own.
- Outlook uses your own server to send emails when using connected so you should set any SPF or DKIM settings on your own server as normal.
- You can set your 3rd party email to be the default email account in Outlook Webmail
- can connect to the outlook.com via POP or IMAP (if you enable it)
- Rules created on outlook.com are translated down to outlook(software) and I guess vice versa
- If you have already created the connected account with separate details (i.e. under a folder with the email name) when you recreated the connector account to use separate folders it just re-uses the same folder and does not recreate another folder set. (pop3 checked)
- The pop3 method with When I added the connector back on to use separate folders using the same email address (i.e. folders already there) I had to wait for emails to be brought in.
- The connection in pop3 seems to be duplicate content aware after I did some experimentation but only to the prescribed delivery location i.e. main inbox or separate folder structure. It seems to check the configured delivery location for duplicate emails., not both
- When you send items from outlook.com or outlook when using pop3 the emails go in the sent folder
- If you struggle to delete a previous IMAP/POP3 folder group from prior connected accounts then use outlook client software once connected via exchange and delete the folders from and empty the recycle bin and the folder will be gone for good.
- Office 2013+ is required to use outlook.com email accounts for full exchange support.
- If you recieve the following error "This message can't be sent right now. Please try again later" it is most likely because you are trying to send with your 3rd party email address and the SMTP settings are wrong.

IMAP
- when you connect an IMAP account and ask for separate folders you get the following layout
- test123@quantumwarp.com
- Sent
- Archive
- Drafts
- INBOX
- The email delivery is not instant either, seems to be 10 -15mins
- Does not give you the option of removing the emails from the remote source when using IMAP.
- When you delete in outlook.com it does not delete in the remote IMAP so is a bit pointless. It literally works like pop but without being able to remove the email
- test123@quantumwarp.com
Set a background image or texture behind module positions and content
This code allows you to set a background image or texture behind the content areas of a Joomlashine template. This will not work for all templates and might need some further work but it is a great starting point.
/*-- Set a background image or texture behind module positions and content --*/

/* Set Background Image - add to wiki */
#jsn-page {
	background: url("../custom/images/background.jpg") repeat scroll 0 0;
}

/* Make backgrounds transparent */
#jsn-topheader,
#jsn-header,
#jsn-body {
	background-color: transparent;
}

/* Remove large padding in reta content block */
#jsn-content {
	padding: 0;
}

/* Restore white to certain regions */
#jsn-topheader-inner,
#jsn-header-inner,
#jsn-content_inner {
	background-color: white;
}
Dark Footer Background Image
There are 2 ways of making a Dark Footer Background Image:
- Manipulate the image directly, then add as a background
- Use a combination of a dark background and a semi-transparent image allowing the darkness to show through
Suggested footer image sizes
- 1900 x 856
- 192 x 600
Method 1: Manipulate the image directly, then add as a background
This is by far the easiest way of making a footer background image.
- Open the image in your favourite image editor (mine is Paint.NET)
- Edit Hue/Saturation/Lightness and Brightness/Contrast as needed
- Save the image
- Upload the image to the appropriate folder
- Alter the background image using the code below
Basic
This is the absolute code required to change the footer background.
CSS
#jsn-footer::before {
	background: url("../custom/images/footer-background.jpg");
}

#jsn-footer {
	background: url("../custom/images/footer-background.jpg");
}
Reference Code
Joomlashine has also used the following code for setting a footer background.
CSS
/* Required for the positioning of the background */
#jsn-footer {
	position: relative;
	font-size: 13px;
	line-height: 22px;
	color: #acacac;
	padding: 55px 0;
	/* margin-top: 30px; */
}

/* This displays the background image in relation to its parent #jsn-footer */
#jsn-footer::before {
	content: '';
	position: absolute;
	top: 0;
	left: 0;
	width: 100%;
	height: 100%;
	background: url("../images/backgrounds/ft1.jpg");
	background-position: 50% 0;
	background-repeat: repeat;
	background-size: cover !important;
}
HTML
<div class="jsn-footer">
	<!-- Footer Content Here -->
</div>
Method 2: Semi-Transparent Image on Dark background
The #jsn-footer <div> background is black so when the image is semi-transparent the black comes through making the image darker and give a sort of watermark effect.
Not all the code is required but I have put it here for reference. Different Joomlashine Templates might have slightly different versions of this code but the the rules shoud be very similiar.
CSS
/* Required for the positioning of the background and sets it to be dark */
#jsn-footer {
	position: relative;
	font-size: 12px;
	line-height: 20px;
	color: #fff;
	padding: 35px 0px 0;
	background: #171c26;
}

/* This displays the background image in relation to its parent #jsn-footer and makes the background image semi-transparent */
#jsn-footer .img-ft-bg {
	position: absolute;
	top: 0;
	left: 0;
	width: 100%;
	height: 100%;
	background: url("../images/backgrounds/footer.jpg");
	-ms-filter: "progid:DXImageTransform.Microsoft.Alpha(Opacity="15")";
	filter: alpha(opacity= 15);
	-moz-opacity: 0.015;
	-khtml-opacity: 0.015;
	opacity: 0.015;
	background-position: 50% 0;
	background-attachment: fixed !important;
	background-repeat: repeat;
	background-size: cover !important;
}
HTML
<div class="jsn-footer">
	<div class="img-ft-bg></div>
</div>
Notes
- Demo here - It is a little hidden, possible they have made it to dark. it is on the politics page
- This code keeps the backgound image fixed in place.
- If you think the background has a layer it is fixed to the bottom of the page.
- So when you scroll it appears as if the footer is a window and is moving over the background image.
- This is created by absoulte positiong of the .img-ft-bg within the relative positioned footer DIV
- changing the following helps with positioning the picture in the background
- background-position: 50% 0;
- background-attachment: fixed !important; --> background-attachment: local !important;
Reduce Image File Size but keep the same resolution
When making footer images they have to be quite wide and have resolutions such as 1920 x 1080 but this causes the images to be of a large file size. The solution is simple though.
This technique massively reduces its file size and allows you to use large resolution images with small footprints.
- Save the image as a JPG @ 60% quality
When you save this lower quality image, you will find it normal to the human eye and as such it looks fine, but the image file size is massively reduced.
Add a 'Link Title Attribute' to a Joomla Menu 'Text Seperator'
In Joomla occasionally you might want to a SubText Message underneath the menu item (Link Title Attribute), but Joomla does not support this feature currently (Joomla 3.51).
Solution
To add a 'Link Title Attribute' to a 'Text Seperator' you need to edit the database directly, preferably using PHPMyAdmin.
Get a working copy of a menu item with a 'Link Title Attribute' to look at
- Configure a menu with a 'Link Title Attribute'
- Goto the Joomla Database via phpmyadmin
- Goto #___menu table
- Find the menu item you are looking for, here it is 'Home'
- Edit params
This is a normal menu item configured with a sub text and css styling
{"show_title":"","link_titles":"","show_intro":"","info_block_position":"","show_category":"","link_category":"","show_parent_category":"","link_parent_category":"","show_author":"","link_author":"","show_create_date":"","show_modify_date":"","show_publish_date":"","show_item_navigation":"","show_vote":"","show_icons":"","show_print_icon":"","show_email_icon":"","show_hits":"","show_tags":"","show_noauth":"","urls_position":"","menu-anchor_title":"Life Coaching","menu-anchor_css":"teststyle","menu_image":"","menu_text":1,"menu_show":1,"page_title":"","show_page_heading":"","page_heading":"Stuart Downing : Professional Life Coach","pageclass_sfx":"","menu-meta_description":"","menu-meta_keywords":"","robots":"","secure":0}
Edit your 'Text Separator' and add a 'Link Title Attribute'
NB: if you have just created your menu item, it will be at the end of the table.
- Goto the Joomla Databse via phpmyadmin
- Goto #___menu table
- Find the menu item you are looking for
- In the item's parameters you will see
{"menu-anchor_css":"","menu_image":"","menu_text":1,"menu_show":1} - Add/Edit the menu item with the following parameters. You only need to add what you want. if the tag is already there just edit it
,"menu-anchor_title":"Life Coaching","menu-anchor_css":"teststyle",
Alternative Solution not using a 'Text Sperator'
Although this is not exactly what the article is about, this solution will give you the same effect.
- use External URL instead of a 'Text Seperator'
- Edit the 'Link Title Attribute' in the menu item as normal and as required.
- Use # as the link/Target URL
Links
- Text Separator Menu Item add CSS class - Joomla!
- Text Separator Menu Item add Link CSS Style – Customer Feedback for Joomla! - Add your vote to Joomla Ideas to get this feature added.
Where have the VirtualBox Drivers gone?
When you first setup a VirtualBox PC you might find the drivers are missing. These are not easy to find unless you know where they are.
Where are the drivers?
- The windows Files are on a iso file which might not be present until you install "Guest Additions"
- C:\Program files\Oracle\VirtualBox\VBoxGuestAdditions.iso
- So you mount this image which has the drivers.
- see https://www.virtualbox.org/manual/ch04.html
- I have also found that the drivers that are supplied do not cover all operating systems.
** Notes of the CD **
Oracle VM VirtualBox Guest Additions
- Where have the Windows drivers gone?
The Windows Guest Additions drivers were removed from this directory to save space on your hard drive. To get the files you have to extract them from the Windows Guest Additions installers: - To extract the 32-bit drivers to "C:\Drivers", do the following:
VBoxWindowsAdditions-x86 /extract /D=C:\Drivers - For the 64-bit drivers:
VBoxWindowsAdditions-amd64 /extract /D=C:\Drivers - Note: The extraction routine will create an additional sub directory with the selected architecture (x86 or amd64) to prevent mixing up the drivers.
- To get further help with the command line parameters of the installer,
type: VBoxWindowsAdditions-<arch> /?
Notes
- The video drivers are present but the network card is not. The link below suggest changing the network card hardware type until you find one that works.
- http://ubuntuforums.org/showthread.php?t=1106684
- "In the Virtualbox Control Panel thing (where you can specify your machines hardware configuration), you click on the network adapter category and then change the interface type. There are four to select from. Simply try a different interface type until one works. I didn't need to give windows any drivers for the PCnet-PCI II device (the screenshot shows the PCnew-FAST III device, and that's what I use on my home computer... this other persons computer...well, it probably would have worked too, but the I picked the PCI device out of the list of four available and it work with no issues or prompts to install any drivers). "
- Try "PCnet-PCI II device"
- Intel Pro/1000 MT (82540EM)
Remove the Yellow Triangle on the Samsung S2
This article is not complete yet.
There are 2 basic ways to remove the counter:
- Use the USB Jig - A little piece of hardware that would reset the counter and get rid of the yellow traingle when plugged into the USB socket.
- Software - I am not 100% sure how this works, needless to say it is software that alters the counter but this has a small chance of bricking your phone.
Links
My recommended Cyanogenmod Android settings
I have made a list of the settings I like to set when am setting up a Cyanogenmod Android phoen for th first time. I makes things a lot easier because if you only use a setting once you might not remember where it is and spend ages trying to find it again, I know I have.
Android Settings
- You can search settings
- NB select to update the cyanogenmod recovery - Settings --> Developer options --> Update Cyanogenmod recovery
- disable home button waking phone up - settings --> buttons --> Home Button --> Wake up device
- change vertical app list to horizontal –
- change home screen time out - settings --> Display & Lights --> Screen --> Sleep (i set to 10 mins)
- enable developers mode - settings --> about --> tap 7 times on the build number
- force app close when holding the back button --> settings --> Developer options --> Kill app back button
- Kill app on leaving - Settings --> Developer options --> Apps --> Don't keep activities = destroy all related tasks when you leave app
- Extended shutdown with recovery option - Settings --> Developer options --> Apps --> Advanced reboot
- format SDCARD in android - Settings --> Storage & USB --> {select the drive ie sdcard0} --> 3 button menu --> Settings --> format -- you cannot wipe system drive here and also i would recommend not having root on whilst you do it.
- enable usb drive mounting via usb
- http://en.code-bude.net/2013/03/05/how-to-activate-usb-mass-storage-and-developer-options-on-cyanogenmod-10-1/
- http://android.stackexchange.com/questions/93168/android-5-0-lollipop-device-not-detected-via-usb
- NB when you connect the usb a notification appears. if you click this you can change the transfer option/mode
- old location
- If you go to Settings -> Storage, then hit the menu button, you'll find an item called USB computer connection.
- http://android.stackexchange.com/questions/70225/disabling-mtp-ptp-all-usb-stuff-except-charging
- **Note also that PTP must be ticked for tethering to be offered, either via USB or Bluetooth.
- Cyanogenmod location - Settings --> Developer options --> Select USB Configuration --> (MTP is default, try PTP, NB when in charging mode it will not diplay files? It seems to still charge when you change modes to MTP).
- With Root disabled and in MTP mode you can only see the SDCard in explorer
Cannot format Internal SD Card on Samsung S2 running Cyanogenmod CM13
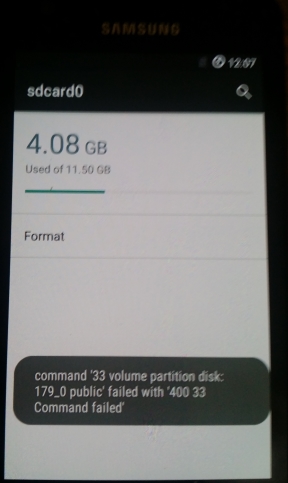
You receive the following error when trying to format your Samsung S2 Internal SD drive in Cyanogenmod CM13 (Android 6.0.1):
Command ’33 volume partition disk:
179_0 public’ failed with ‘400 33
Command failed’
Possible Causes
- Corrupt PIT
- The kernel/Bootloader was not IsoRec compatible
- Corrupt partition format
- The ROM is faulty
Solution (does not work)
After I had updated the bootloader/Recovery with TWRP 3.0 and performed a REPIT The drive seems to work ok. This basic will fix any of the errors outlined above. Obviously unless you need to re-partition you Samsung I would just try updating the Bootloader/Kernel/Recovery first.
I still cannot reformat the drive in CM13
Notes
- https://forum.cyanogenmod.org/topic/124100-sd-card0-showing-as-corrupt-why/
- My problem has been resolved by starting afresh from a stock Rom and stepping up slowly. Therefore this topic is now closed.
- http://forum.xda-developers.com/galaxy-s2/help/sdcard0-corrupt-cm-13-0-20160304-t3332269
- could be a rom issue with 13 so i will now flash an older version, on guy said he went back to stock an built up slowly
- http://android.stackexchange.com/questions/48524/how-to-restore-damaged-internal-sd-card-partition-layout-tried-everything
- possibly requires to be flashed by odin to reflect a new PIT (partition layout)
- i dropped to cm-11-20150614-NIGHTLY-i9100 (last version 11) and then formatted the SD drive in android, this worked with no error. 12 might of worked.
- you cannot format whilst the usb cable is connected. CM v11 still has clockword mod by default.
- I have the usb cable connected when I tried wiping in cm13
- so i will now upgrade 11 --> 12 --> 13
This could just be a bug in the current revision of CM13.x so another excellent solution is to see if updating to the latest verion of CM13 works.
Slow Samsung Evo 850 SSD
These are my reseach notes for trying to find out why my new Samsung Evo 850 SSD was not running at advertised speeds in my Dell E6540 Laptop.
Settings I tried and the results:
- Chipset drivers set as IRRT but running in ACHI mode in bios (No Change)
- using a standard ahci drive from microsoft 2006 causing issues (No Change)
- use intel RST technology but make sure this is the driver being used (No Change)
- c state setting in bios (No Change)
- Disable the samsung RAPID Mode as it is only a RAM disk
- Intel speed step disabled (a bit better)
- Single core rather than multi (slower IOPS read if i restrict to 1 core because not proper 1 CPU emulation, 1 core giving half speed and thus maxing the core out.)
- UEFI / Legacy MBR (No Change)
Other Settings Not tried or are not applicable:
- I can bump those 4K random read/writes up by disabling C1e and c-states in my BIOS
- Other power settings in bios
So the Specific Settings I have available in my Dell E6540 are:
- System Status
- SATA Operation = AHCI
- Performance
- Multi Core Support
- Intel SpeedStep
- C-States Control
- Intial Turboboost
None of these made any difference.
Other things to try that have been suggested:
- Try safe mode
- Try running prime 59 whilst running the Performance program because the CPU is kicked in fully
- Window has power management features that could throttle the CPU
- See if the drive is faulty by trying it in a Desktop PC with a powerful SATA chipset.
Conclusion
It is my chipset that has a limitation. Not all laptops were designed to handle SSD speeds because when these laptops were getting designed, SSDs were not main stream yet.
Links
Flying Form
This code creates a form using a UniForm, that will slide in from the center for that extra effect to whichever module position you select In this case, Stick Leftbottom [stick-leftbottom] position.
This code is designed for Uniform but can be adapted to slide in any module.
CSS
/* Container */

.flying-form {
	padding-left: 10px;
}

.flying-form .popup-form {
	position: relative;
	margin-bottom: 50px;
	width: 320px;
	min-height: 142px;
}

/* Animation */

.flying-form .animated {
	-webkit-animation-duration: 1s;
	animation-duration: 1s;
	-webkit-animation-fill-mode: both;
	animation-fill-mode: both;
}

@-webkit-keyframes slideInRight {
	0% {
		-webkit-transform: translate3d(100%, 0, 0);
		transform: translate3d(100%, 0, 0);
		visibility: visible;
	}
	100% {
		-webkit-transform: translate3d(0, 0, 0);
		transform: translate3d(0, 0, 0);
	}
}

@keyframes slideInRight {
	0% {
		-webkit-transform: translate3d(100%, 0, 0);
		transform: translate3d(100%, 0, 0);
		visibility: visible;
	}
	100% {
		-webkit-transform: translate3d(0, 0, 0);
		transform: translate3d(0, 0, 0);
	}
}

.flying-form .slideInRight {
	-webkit-animation-name: slideInRight;
	animation-name: slideInRight;
}

/* Styling */

.flying-form .popup-form {
	position: relative;
	margin-bottom: 50px;
	width: 290px;
	background-color: #fff;
	padding: 15px 15px 0;
	box-shadow: 0 0 4px #666!important;
	border-radius: 3px 0 0 3px !important;
}

.flying-form .popup-form h2.popup-title {
	text-transform: none;
	margin: 10px 0 0 10px;
	font-size: 16px;
	line-height: 1.3;
	font-weight: bold;
}

.flying-form .popup-form .jsn-bootstrap .jsn-form-content .control-group {
	padding: 0 !important;
}

.flying-form .popup-form .jsn-form-content .control-group .control-label .required,
.jsn-uniform.jsn-master .popup-form .jsn-form-content .control-group .control-label i {
	display: none;
}

.flying-form .popup-form .jsn-form-content .control-group.ui-state-highlight {
	background-color: transparent !important;
	border-color: transparent !important;
}

.flying-form .popup-form .jsn-column-item.jsn-uniform-others textarea.jsn-value-Others {
	width: 255px !important;
	height: 20px;
}

.flying-form .popup-form .form-actions {
	padding: 0;
	padding-top: 10px;
	margin-top: 5px;
	margin-bottom: 5px;
	background: transparent;
}

.flying-form .popup-form .form-actions .btn-toolbar {
	margin-top: 0;
}

.flying-form .popup-form .form-actions .btn-toolbar .jsn-form-submit {
	width: 270px;
	background: #2baaff;
	border: none;
	box-shadow: none;
	text-shadow: none;
	margin-left: 0;
	/*margin: -20px 0 20px 10px;*/
	margin: 0px 0 20px 10px;
	padding: 10px 0;
	font-weight: bold;
}

/* Close Button */

.flying-form .popup-form .close-div {
	position: absolute;
	top: -10px;
	left: -10px;
	background-color: #222;
	border-radius: 50px;
	width: 20px;
	height: 20px;
	line-height: 20px;
	text-align: center;
}

.flying-form .popup-form .close-div i {
	color: #eee;
	margin: 0;
}

.flying-form a.close-div {
	display: none;
}

.flying-form:hover a.close-div {
	display: block;
}
JS Dependancies (Joomla / External / 3rd Party)
- Cookie Support = jquery.cookie.js - You can probably get a newer version of this from the usual sources, but you can click on the filename and download from it from this page. Also this library has been referenced in the HTML (Bottom Content) code below.
HTML (Top Content)
<!-- Top Content -->
<div class="popup-form animated slideInRight">
	<h2 class="popup-title">You expect the next QuantumWarp survey will be about:</h2>
The form will be rendered in-between these code blocks
HTML (Bottom Content)
<!-- Bottom Content -->
	<a href="#" class="close-div"><i class="fa fa-close"></i></a>
</div>

<script src="/images/kb/2016/814/jquery.cookie.js"></script>

<script>
	(function($) {
		$(document).ready(function() {
			//$.cookie('flying-form', '0');
			$(".close-div").click(function() {
				$.cookie('flying-form', '1');
				$(".popup-form").hide();
			});

			$(".flying-form .jsn-form-submit").click(function() {
				$.cookie('flying-form', '1');
				$(".flying-form .jsn-form-content").fadeOut('slow');
				$(".flying-form .form-actions").fadeOut('slow');
				sheet = document.styleSheets[0];
				sheet.insertRule(".flying-form .jsn-form-content, .flying-form .form-actions { display: none !important }", 1);
			});

			if ($.cookie('flying-form') != 1) {
				$(".flying-form").fadeIn('slow');
			}
		});
	})((window.JoomlaShine && JoomlaShine.jQuery) ? JoomlaShine.jQuery : jQuery);
</script>
Notes
- To configure Uniform for this Flying Form effect
- Add the CSS code to your custom.css file
- and the load the jquery.cookie.js into your modules folder (ie images/modules/814/)
- Create your form as a module, I called my Flying Form
- Add flying-form as a module suffix
- Disable the WYSIWYG in both the 'Top Content' and 'Bottom Content' boxes
- Paste the HTML (Top Content) in to the 'Top Content' box
- Paste the HTML (Bottom Content) in to the 'Bottom Content' box
- Select the Stick Leftbottom [stick-leftbottom] position (or selected position)
- Publish Module
- To make this code work for anymodule or to slide in other code
- create a Custom HTML module with flying-form module suffix
- Just combine the HTML snippets and paste this into the Custom HTML module
- Paste you new module content inbetween the HTML blocks
- publish to your select module position
- Save
- The close button uses Font Awesome in the HTML and some CSS styling.
<a href="#" class="close-div"><i class="fa fa-close"></i></a>
- The cookie storing of the user closing the slider does not seem to work. Code look correct though.
- Using radio selecter keeps the form short.