Items filtered by date: December 2015
My Network Cable Notes
I am installing network sockets in every room in my house. I will have at least 1 Cat6a socket in each room running back to a nexus in one of the small bedrooms that is being used as a server room.
I will make sure that the socket locations allow the rooms to be used as normal if i decided to remove all of the kit.
I want to future proof the cabling so Cat6a is the best choice. Cat7 is difficult to use and only delivers the same as Cat6a. Cat8 has run length limitations and should only be used in datacentres for that reason. Not much stuff supports Cat8.
My Cable Selection
- Excel Catalogue Search - cat6a 500m - Overall Screening = Foil filter
- Eg : 190-196 - Excel Solid Cat6a Cable F/FTP LSOH CPR Euroclass B2ca 500m Reel Ice Blue
- Can get in White, Ice Blue, Orange
- Dont get CCA
- Eg : 190-196 - Excel Solid Cat6a Cable F/FTP LSOH CPR Euroclass B2ca 500m Reel Ice Blue
- Cat6a
- Solid Copper 23AWG (never CCA)
- Internal (LSOH / LoSmoke) or External (LPDE) cable as required.
- F/FTP or SF/FTP
- SF/FTP is better but no-one seems to make it
- You need double foil for maximum RMI shielding
- The S (Braid) is good for mechanical strength and additional cooling for PoE but can be skipped for internal wiring.
- This is better - CAT 6A F/FTP 600MHZ HDBASE-T DOUBLE SHIELDED 23 AWG ETL LSZH - BS6701 CE - 305M | eBay
All sockets and wires must be shielded to CAT6a specs otherwise it is pointless. Use what ever you want to connect into the socket (patch cables) as you wont be burying these into the wall and they can easily be upgraded later if you kit needs a faster speed.
Cable Research
I took a while to find all of this information out but I have now put it here as a reference
- Anacronyms
- LSOH = Low Smoke Zero Halogen
- LSZH = Low Smoke Zero Halogen
- LDPE = Low-density Polyethylene
- Shielded or not (always choose shielded)
- Learn About Shielded Ethernet Cables: Pros, Cons And Cost | cmple.com
- The Difference between F/UTP and U/FTP in CAT6A Cables - Pactech
- Shielded vs Unshielded Cable Explained | Tripp Lite
- Shielded vs Unshielded Ethernet Cable: Which Should You Use? | Fiber Optic Components
- Why Would You Use Shielded Ethernet Cables? | All About Ethernet
- This explains about the drain wire
- Shielded Ethernet Cables | Black Box
- Cat comparisons / General
- Cat 5e vs Cat 6 vs Cat 6a: Which Ethernet Cable Should You Choose? | Tripp Lite
- Networking: The Ultimate Guide on Ethernet | Cable Matters
- Structured Cabling Discussion: Working With CAT5e, CAT6, CAT6A & Shielded Patch Panels | YouTube
- Cat 6 vs Cat 7. What is the difference | YouTube
- Cat5e, Cat6, cat6A, Cat7... Which one should you install in your house? | YouTube
- networking - S/FTP or U/FTP when wiring a house with CAT6a cabels for 10GbE? - Super User
- What Ethernet Cable to Use? Cat5E? Cat6? Cat6A? Cat7?
- What Cable Should You Buy? Plenum / Riser / Cat6 / Cat6A / CCA / Shielded | Lawrence Systems | YouTube
- What's the difference in Categories with network cables? | Kenable
- What Kind of Ethernet (Cat5, Cat5e, Cat6, Cat6a) Cable Should I Use?
- Cat6 / Cat6a
- Cat 7
- Cat 8
- Cable Contruction
- F/UTP, U/FTP, S/UTP, U/UTP - What Are They?
- This tell you why foil is better than braid
- What does UTP, S/UTP, FTP, STP and SFTP mean? - Universal Networks
- Excellent Pictures for easy identification
- F/UTP, U/FTP, S/UTP, U/UTP - What Are They?
- RJ45 Connectors
- Making a cable
- How to cut, make, and crimp a Cat6 Ethernet Network Cable Simple and Easy Way | YouTube
- VCE (Gen 1) 25 PACK Cat7 Shielded RJ45 Connector Cat6A Modular Plug Blue : Amazon.co.uk: Computers & Accessories
- Some good fitting instructions for a Cat6a plug.
- KS-T Plus Cat.6A (418061) Montagevideo / Installation video | YouTube
- How to Terminate Ethernet Cables | RJ-45 Wiring Scheme | cableorganizer.com
- Misc
- Is Your Ethernet Cable Faulty? Signs to Watch Out For | How To Geek
- Repair a Broken Ethernet Plug : 10 Steps (with Pictures) - Instructables
- Use a zip tie to fix a network plug
- My On Site Tech Tool Bag contents and network cables. | Lawrence Systems | YouTube
- Network Technician: Whats Inside My Tool Bag | YouTube
- PoE requires cables to be solid copper. CCA or stranded cables are not allowed.
- Reaction-to-fire class according to en 13501-6 (not sure exactly what this is)
- B2ca
- Cca
- Dca
- Excel Encyclopaedia
- The Excel Encyclopaedia has been designed to be educational and impart factual content to consultants, M&E contractors, end users and installation partners and provide a thorough understanding of structured cabling and more importantly a complete insight into the Excel Structured Cabling Solution.
- Individual sections of the Encyclopaedia are available to download below. Alternatively you can read the complete Encyclopaedia online or browse a library of videos that provides a concise overview of each chapter's contents. The videos are no more than one minute each and are a great way to start your journey through the publication.
- Technical Note TN27: CPR - Eca vs Dca - Excel Networking
- Dca is a good standard of cable for putting in the wall. This is preferred over an Eca cable.
- In conclusion it could be claimed that installing an Eca class cable is really a step backwards if you cannot validate that the smoke and acid gas testing has been carried out separately. Therefore, for that additional peace of mind, it makes total sense to use a Dca cable rather than an Eca cable, if it comes without a premium.
Where to Buy
This is list of places in the UK to buy network cable and in particular Cat6a. Make sure you buy the right stuff.
- Kenable
- UK’s biggest selection of computer cables, network, audio, video & CCTV equipment | Buy Online
- A company with a wide range of networking products. The descriptions are clear and correct.
- kenable_ltd on eBay
- Excel Networking Solutions
- Excel Networking is a world-class premium performance end-to-end infrastructure solution – designed, manufactured, supported and delivered – without compromise.
- Cat6a Cable
- Look through their catalogue for the right type of cable. The information is very clear.
- All datasheets are available.
- Comms Express
- Complete network supplies specialists providing all types of business solutions, including server & data racks, network cables, & cabinets. Order online today.
- Supplies Excel products including network cable.
- The Network Store
- We supply a large range of cat 5 cable, cat 6 cable, network sockets, patch panels, cabinets and fibre optic products all at competitive prices
- Supplies Excel products including network cable.
- broadbandbuyer
- Distributors of WiFi, routers, access points, switches, cables, firewalls, VoIP, and data cabinets to small business and installers.
- Supplies Excel products including network cable.
- FruityCables
- Patch Cables from 29p. All types of Cat5e, Cat6, Cat6a & Fibre Patch Cables delivered tomorrow.
- Supplies Excel products including network cable.
- Universal Networks
- Universal Networks is a network cable supplier, providing a wide range of bespoke networking systems since 1994. Find out more about our solutions here.
- This company is probably for SMEs
- Datazonedirect
- Networking and Telecommunications Products For All Job Sizes!
- Only company I found that sells External Cat6a F/FTP
- datazonedirect on eBay
- Cablenet
- Audio Visual, Voice and Data Cables and professional hardware at Cablenet.co.uk
- Connectix Ltd Group
- Cable Monkey
- Thousands of products in stock | Next day delivery or same day collection | Premium quality products at low prices for home and business
- Wide variety of products.
- Netstore Direct
- Networking equipment, cables, fibre, switches, routers, racks & cabinets in stock and available for next day delivery. Discover our fantastic prices and order online today
- Magic Patch
- Connectix Cabling Systems
- Cable Monkey
My Server Rack Mount Cabinet Notes
This is my research into Server Cabinets
My Kit
- Cabinet: Excel Environ CR600 - 600mm Wide Comms Rack (542-2468-GSBN-BK) (24U 600w x 800d)
- 24U allows me to have:
- a shelf for my UPS
- a shelf for 2 x Desktop PCS
- a shelf for Low profile PC that I will use for my router
- a rack mount KVM switch
- a rack mount switch
- a rack mount patch panel
- Some cable tidies
- Not too tall so I can put a monitor on the top and a Wifi keyboard attached to my KVM for occasional use.
- Max Load: 800KG
- 24U allows me to have:
- 3 x StarTech 1U 19 inch Adjustable Vented Rack Mount Shelf Heavy Duty Fixed Server Rack Cabinet Shelf (ADJSHELFHDV)
- They fill the full depth of my cabinet (from post to post)
- Strong
- Can be used for whatever I want
- Vented to keep air flowing and I can use these vents to secure equipment with
- Penn Elcom Delux Cage Nut Tool CN01 | PennElcomOnline.com
- Good for removing nuts easily and can be used for putting them in when plenty of space.
- Penn Elcom Economy Cage nut tool SX1100 | PennElcomOnline.com
- Easy for putting tools in. can be done from the front so not much space in the rack is needed.
Cabinets / Racks
- Cabinets and rack mountable measured in 'U's
- i.e. 1U, 12U, 24U
- An 8U rack has 8 units of vertical server rack space.
- A server rack unit, or U, is a unit of measurement used to describe the amount of equipment space a server rack has.
- A U is:
- 1.75 inches High
- 44.45mm High
- 3 holes on a post
- What is a server rack, and how can I tell if it will work in my setup? | United Kingdom
- This discusses the different types of server racks, 2 post and 4 post, open and closed. It also goes into the standardised sizing units.
- Really easy to read article.
- What is "U" height? Rack Units explained - RackSolutions
- Has diagrams.
- Server Rack Sizes: Understanding the Differences - RackSolutions
- Understanding Server Rack Needs Based on Units - RackSolutions
- Cage Nut Tools (and tools)
- Cage Nuts - 10-32 - 50 Pack - Black - Rack-Mounting Screws and Cage Nuts | Server Rack Accessories - All Startech cage nuts seem to come with this tool
- 50x Kauden Black Cage Nuts For Rack Mounts M6 Nut 15mm Bolt Insertion Tool Kit | eBay - Has a professional tool
- Universal Rack Cage Nut Tool SX1100 by Penn Elcom | eBay - Similllar to the Startech one.
- Penn Elcom CN01 Deluxe Aluminium M4 M5 M6 Cage Nut Insertion and Extraction Tool | eBay
- This eBay page - shows how the Screws should be fitted into the buts with a collar
- How do I use cage nuts? | StarTech.com
- Mounting Ear - This refers to the right angled metal fitting lugs.
- Cabinets are just closed boxes with racks in them
- 4 posts
- Cabinets which have 4 posts can usually have their posts moved closer together if required (i.e. they are adjustable)
- 21inch (53.34cm) is the distance between the forward and rear facing parts of the posts (usually)
- 2 post
- This configuration is usually found in the smaller cabinets.
- Half
- Different widths and heights
- Most 19" cabinets are 600mm wide. This allows some space either side of the racks.
- Rack Unit Calculator from Penn Elcom Online
- A rack unit (or U) is the standard terminology for describing sizes associated with 19 inch racking. Knowing how much rack unit space you require is incredibly important when installing 19 inch rack cabinets and enclosures. The unit calculator below can convert rack U's into cm, inches and feet, which makes it a very useful tool for any installer or musician who needs to know exactly what equipment to buy when building a 19 inch rack. Scroll down for a complete table of rack U-to-inch/feet/cm values.
- Server Rack Buying Guide | Server Rack Ordering Info
- How to Plan A Server Rack Installation | Cabinet Layout Guide | Home Network Rack
- Before You Buy - Server Racks | StarTech
- This video covers things you need to know before you purchase a server rack, including what a rack unit is, the difference between 2 and 4 post racks, open and closed racks, and minimum and maxmimum mounting depths, as well as to consider mounting devices on both sides of a rack, whether you need casters, want to bolt your rack to the ground, or leave it free standing.
Shelves / Drawers
There are different Types of Shelves
- Cantilever
- This are fixed by 2 posts. A front or rear pair.
- When describing the size of these shelves i.e. 350mm/450mm/500mm this refers to the depth of the shelf.
- They are all the same width because they are for 19" racks.
- Clamping
- This is similar to a cantilever shelf except the sides are level all the way to the back.
- These level sides allow clamps to be attached to the sides to help attach things.
- Fixed
- These require a 4 post cabinet and are fixed at both ends.
- Tend to have higher load capacities
- When describing the size it refers to the overall depth of the cabinet usually. So a 800mm deep cabinet would require a 550mm (21inch/53.34cm + the M6 bolts) so it would fit inside the cabinet. Double check this before purchase as sometimes sellers get mixed up.
- They are all the same width because they are for 19" racks.
- Fixed (Adjustable)
- Same properties as a Fixed shelf but with the ability to configure for a range of cabinet depths.
- Sliding
- These are used for things like keyboards or light equipment you need to pull out easily.
- Drawers
- These are just like your normal clothes drawers except made out of metal.
- Usually have locks on them
They can come with Different options
- Vented
- Holes are milled into the metal to provide better air circulation.
- Heavy Duty
- Thicker or better quality metal that can take more weight.
- These units are usually heavier that normal shelves.
- Different colours
- Personal choice, but I always will pick black.
Where to Buy
Cabinets
- Racks & Cabinets | Excel
- They do not directly sell their products but the catalogue is very useful to decide what you want.
- Excellent British company.
- If you want a cabinet, start with this brand.
- Server Cabinets | The Networking Store
- Keyzone for ALL your IT needs
Shelves
- CCL Computers - supplies a lot of Startech stuff
- StarTech 1U 19 inch Adjustable Vented Rack Mount Shelf Heavy Duty Fixed Server Rack Cabinet Shelf | CCL Computers
- Manufacturer Code: ADJSHELFHDV
- Weight Capacity 113 kg
- Adjustable mounting depth of 19.5" - 38"
- £89.04
- Product Page | Startech.com
- StarTech.com Adjustable Depth Fixed Server Rack Cabinet Shelf | CCL Computers
- Manufacturer Code: ADJSHELF
- Weight Capacity: 80 kg
- Adjustable mounting depth of 19.5" - 38"
- £88.27
- Product Page | Startech.com
- StarTech Rack Mount Shelf review | YouTube
- 1U Adjustable Server Rack Mount Shelf Heavy Duty | Startech.com
- Manufacturer Code: ADJSHELFHD
- Non-Vented version of ADJSHELF ?
- Weight Capacity: 80 kg
- StarTech 1U 19 inch Adjustable Vented Rack Mount Shelf Heavy Duty Fixed Server Rack Cabinet Shelf | CCL Computers
- Environ Adjustable Shelf Black (542-026-BK)
- Part Code: 542-026-BK
- This fits into the side parts of the posts in a rack.
- Requires a 4 post rack with side mounts
- Compataible with the Environ range of cabinets.
- Probably will be compatible with many other brands.
- Because it uses the side fitments, it is not as long as the Startech shelf.
- 80KG load capacity
- Excel Environ Adjustable Shelf - Black - 542-026-BK - Excel Cabinet Shelves - Cabinet Accessories | The Networking Store
- Environ Adjustable Shelf- 542-026-BK | DTT
- Server Rack Accessories | StarTech.com
- Penn Elcom Online
- Made in the UK
- A lot of their products have 3D CAD models so you can see if they fit.
- Official Online Shop
- Stagebox Online | eBay Stores
- Has a retail shop in Blackpool
- Sells Penn Elcom stuff
- 1U Vented Rack Shelf With Rear Support 558mm/21.97" Deep RSU01-600 by Penn Elcom 840149903707 | eBay
- This is a fixed shelf for a 800mm deep cabinet
- Has a nice diagram
- Boxes, Enclosures, Racks | Rack Components | DigiKey
- Server Rack Shelf | Adjustable Server Shelf | RS Components
- Rack Supplier Ltd / racksupplier.co.uk / Towerez Enclosures
- Slow site, small company??
- Has Diagerams
- Fixed Server Cabinet Shelf 800mm depth cabinets with mounting ear | eBay
- Same Company
- 500mm Deep Server Rack Shelves & Data Cabinet Shelves - broadbandbuyer.com
- Racking Shelves | Cabinet & Rack Accessories | CPC
My Treadmill Notes
General Treadmill Questions
Slippery Treadmill Belt / Why are my trainers slipping on the Running Belt?
This is dealing with you and your trainers slipping on the treadmill belt, not about the belt slipping on the motor.
Scenarios
- Visually it looks like it should still have traction. when I clean it, it looks pretty gross and seems to help a little bit but gets slippery again soon after.
- When I try to google anything the results are mostly people talking about "slipping" as in the belt itself is slipping.
- New trainers don't make a difference
- The belt feels slippy underfoot
- My trainers started to slip while walking, running is no longer safe.
- Cannot push and pull the belt while the Treadmill is off with just my feet and trainers (Belt surface is very slippy).
Causes
- The belt is smooth because it is covered in dirt.
- The belt is too smooth to provide grip.
- The belt is now porous and is letting the lube through from the underside of the belt to the top layer which you walk on.
- When I wipe the belt down, black grease comes off.
- It sounds like you are slipping on the lube for the belt. The lube is on the underside of the belt to keep it from dragging on the walk platform but sometimes some of it can work its way out of the edges and might have gotten onto the top of the belt. In that case you can wet a cloth in warm water and mild soap and use it to remove the lube from the walking surface.
- Since you already tried wiping away the lube with no success it might be that your belt has worn to the point where the lube can soak through the belt itself to the walking surface. Unfortunately, in that case the lube will continue to work through every time that you clean the belt and the only way to get your treadmill back to normal will be to replace the walk belt.
- The belt has completely worn out.
Solutions
- Take a bucket of warm soapy water and bristled scrub brush and scrubbed the whole thing, then towel it off. This will remove any lube that has come trough the mat.
- Roughen up the belt with sandpaper.
- Hold down sand paper on the belt while it's running.
- It seemed to help a little but I think the sandpaper I used was to fine grit.
- Don't use too abrasive sandpaper or you will ruin your belt.
- Buy a new treadmill belt (because it is worn out)
- Carl Lewis MOT25 | Euro Treadmill Belts - I bought my new belt here
- GYM PARTS - Treadmill Belt CARL LEWIS CTM003 - This site also sells pare parts from Treadmills.
- Carl Lewis Treadmill Service
Example of Bad Running Belt
The images below show the underside of my failed Running belt.


Treadmill Running Belt is slipping on the motor
This section deals with issue relating to the belt not being correctly moved by the motor.
- Why is Your Treadmill Belt Slipping or Skipping? (How to Fix) – Treadmill Reviews 2022 – Best Treadmills Compared - A really good article, why re-invent the wheel.
- The Belt Needs Lubrication
- Drive Belt May Be Loose (needs more tension)
- The Pulley on the Front Roller May Have Lost its Grip
- Walking/Running Belt May Be Too Lose
The Running Belt might need oiling/Lubrication?
- If the belt slips on the motor.
- The treadmill is making a droning noise.
- The speed is inconsistent, i.e. when your feet touch the belt, it slows down.
How to lubricate your Treadmill Running Belt
- How To Lubricate A Treadmill Belt | YouTube - Give your machine a longer life and help it run smoothly with this instructional video on how to lubricate your treadmill belt.
Carl Lewis MOT25 - General
Description
The Carl Lewis MOT25 Foldable Motorised Treadmill comes with a 0-9mph speed range and a full 15% maximum power incline, adding more variation to your workouts. Workout programmes and pulse monitor provides motivating and safe exercise. The running deck folds up at the press of a button and can be wheeled away for easy storage.
Features
Walking and running are some of the best forms of exercise for improved general fitness. Using a treadmill puts less impact on your joints and also offers a more varied workout with performance feedback.
- Power incline 0 - 15%
- 3.0 HP peak
- 0 - 10 mph speed range
- Cut off key
- Power folds for storage
- 41 x 132cm running area
- Computer Displays; speed, distance, time and pulse
- Product dimensions: (H)117, (W)160, (D)80cm
- Max body weight: 115kg
Links
Servicing Carl Lewis MOT25 Treadmill


Servicing the Console
On my console I found I had the following issues
- Buttons did not work properly, and would stick often.
- Console was very loose and so would not stay upright
- LCD displays were not always working properly
Follow these instructions and you should be able to fix both.
Obviously make sure the unit is not plugged in
- Sellotape the console to the handles as shown below. This prevents the unit falling while you are taking it apart.


- Unscrew the 15 screws at the BACK of the unit. There are 4 screws under the sticker on the front which would allow access but it would make a mess of your console so i decided not to go this route.

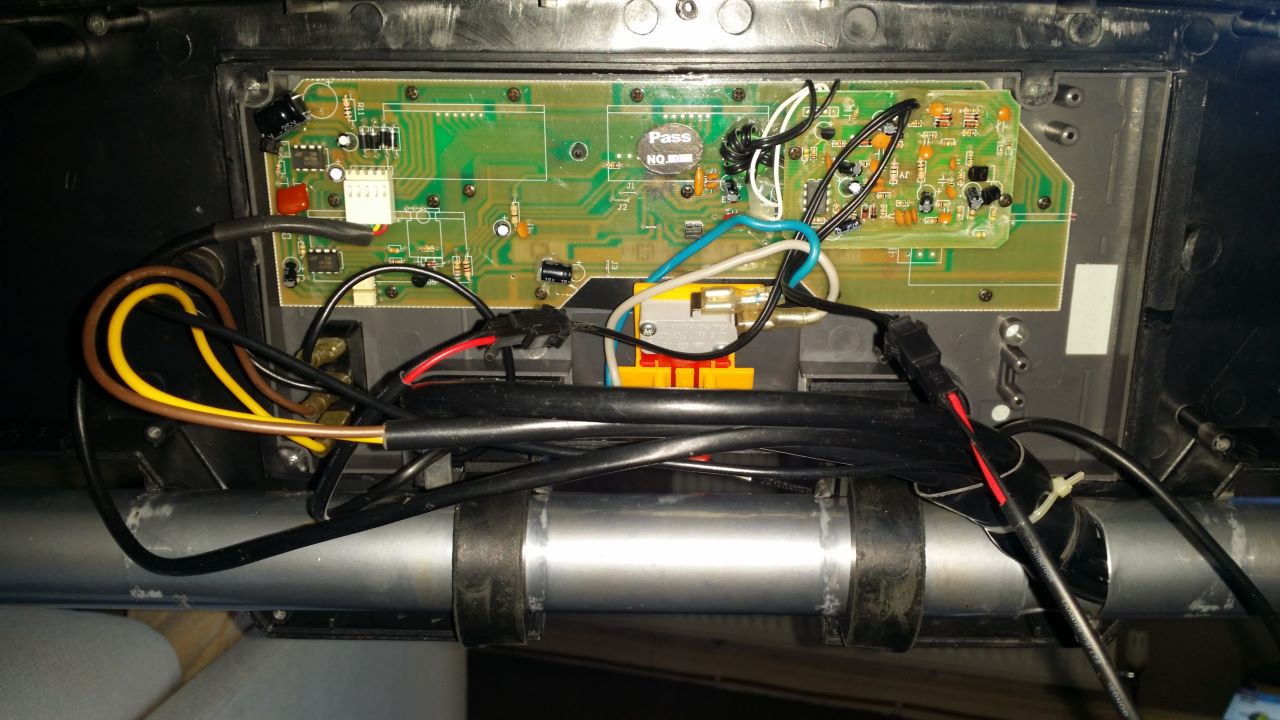
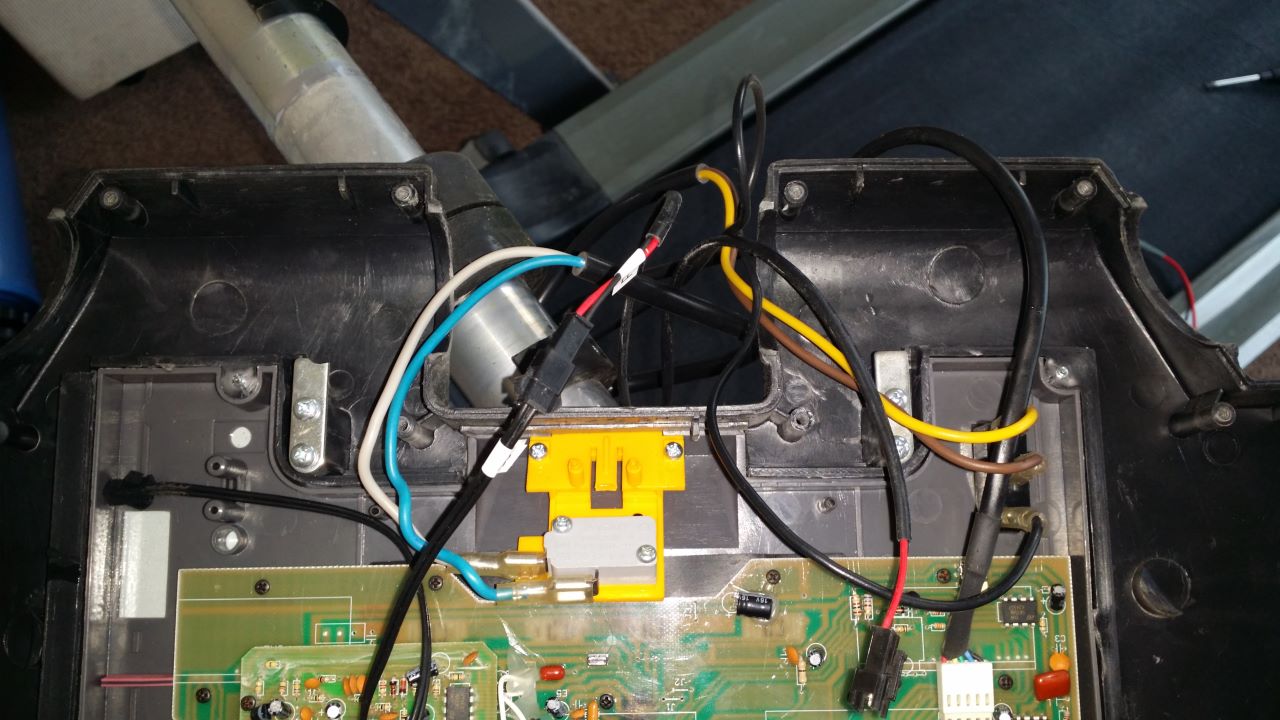
- Carefully pull the back casing away from the unit and you will find some wires fall out. Make a note of these wires and how they look for easier re-installations, a photo with your phone is probably best.
- Put the case back to one side. I would put the screws in this to keep them safe.
- Reposition the case for easier access to the PCB.
- Remove the Sellotape holding the case in place
- Push the case forwards and it will come off the main crossbar
- place the console case flat on the arms of your treadmill
- Remove the 2 rubber grommets making not of their position

- the flat bit goes at the bottom and allows the screw cylinders to meet each other when you put the case back together
- Clean the rubbers and crossbar (this fixes the console not standing up straight)
- simply was the rubber grommets in warm water (no soap) with your hands to remove all of the dirt and then let them air dry some where warm in your house.
- If the rubber has perished, use a fine grain sandpaper to roughen them up a little.
- Clean the cross bar with a lint free cloth and some Isopropanol Alcohol
- If you want to remove the wires from the PC to make things easier, make notes of what went where or take several photos.
- I personal left all of the mains wires connected and just disconnected the heart monitor sensors after putting labels on them and then motor control plug.
- I personal left all of the mains wires connected and just disconnected the heart monitor sensors after putting labels on them and then motor control plug.
- Remove the 2 screws from the heart rate monitor module.

- Remove the other black screws from the main PCB.

- Note how tight them were.
- Also the image above still has the Heart Rate monitor attached. There are 2 more screws underneath it for the main PCB.
- You can now remove the PCB from the case.
- Some of the LCDs and their rubber connectors will still be attached and some left on the PCB, so make note of what went where
- Pull the rubber buttons out and clean them
- Warm water in your sink (no soap) and wash with your hands gently.
- Shake of the majority of the water and then place the rubber buttons somewhere warm in your house to air dry. You should make sure both sides get dried.
- Do not use any cloths to clean these as the fibres will get stuck on the button and you will have to start again.
- The button pads on the PCB need cleaning.
- Using a lint free cloth and some Isopropanol Alcohol just rub on the pads gently until they are clean
- Cleaning the display feed PCB pads - I have not done this bit.
- Using the same technique as the cleaning the button pads, clean the display PCB pads
- Cleaning the display rubber signal transfer pads - I have not done this as I am not sure if this will damage them
- Clean them with Isopropanol Alcohol
- Re-install the dry and clean buttons
- Re-install the main PCB
- Correctly locate the display transfer pads either on the PCB on on in the main case ready for mating.
- Place the PCB back in the main case
- Screw the PCB down making sure that you lightly press the board down while doing this to get a good compression of pads.
- Re-install the Heart Rate monitor daughter board.
- place down correctly and screw in
- Re-install the dry and clean rubber grommets (in the correct direction)
- Push the case back on
- Correctly locate the wires (as per photo you took earlier)
- push the case back on to the crossbar with the rubber grommets going into their appropriate slots.
- The 2 metal stops should be push against the black blocks on the cross bar. This should put the console in the upright position.
- Sellotape the case in position (as before) so we can work on it easier.
- Reconnect the heart rate monitor
Now is a good time to check if all of the buttons, displays and functions work before continuing. Be safe when messing with mains voltage. Fix any issues before going any further.
- Change to/from Miles/Kilometres if required.
- see notes below
- Push the rear case back onto the main case
- When you do this make sure no wires are trapped where they should not be as this will stop the case going back together.
- If in doubt consult your photo from earlier on how the wires should go back in.
- Done
Your buttons and displays should now work with no issues for years to come.
Changing from Miles to Kilometres
Assuming you have the console opened as described above, the change from Miles to Kilometers or the other way around is easy.

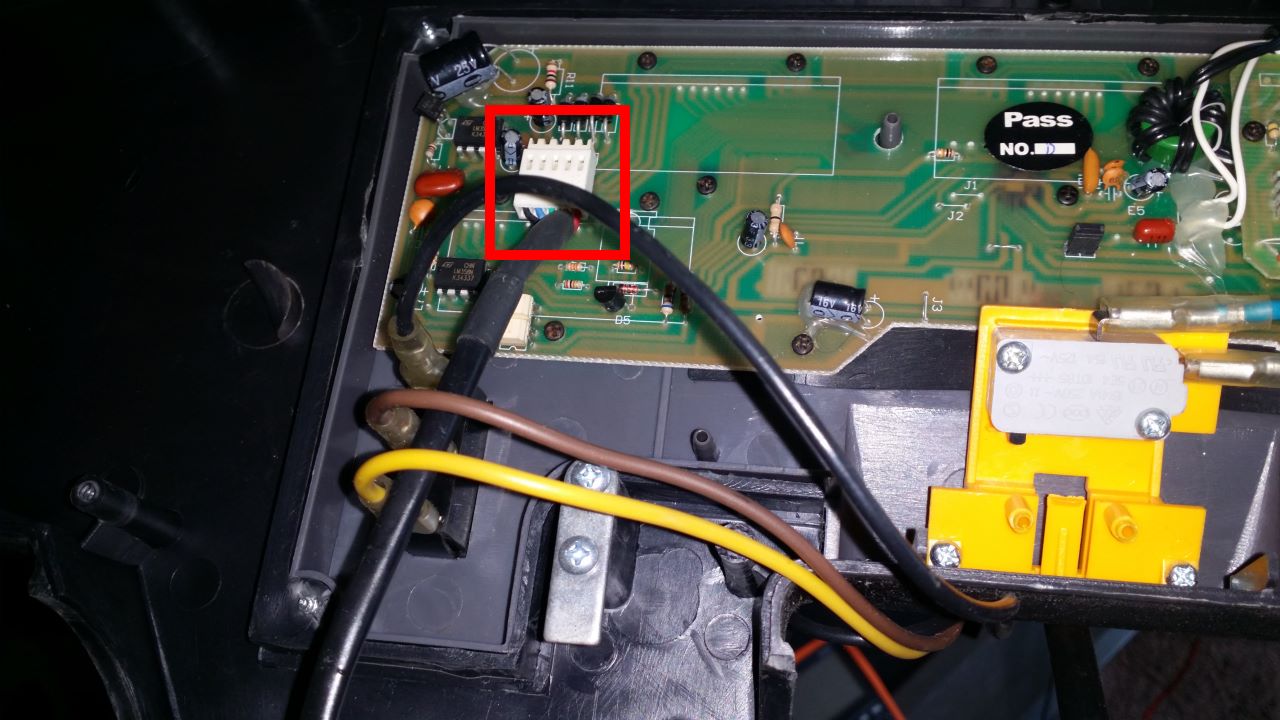
There is a jumper on the PCB that controls this feature and only has 2 positions:
- Closed (Jumper present) = Miles
- Open (Jumper missing) = Kilometres
The location is shown in the image below (currently closed), set to your preference as required:

This option is set in the factory due to the region it was going to get sold in.
Removing the Running Belt
- Put the treadmill flat with no incline
- Because there is a large capacitor in the motor housing you should leave the unit to discharge over night or be very careful.
- Make sure the treadmill is off and unplugged
- Remove the Rear Roller Adjustment covers by removing the 2 screws that hold each of them in.

- Remove the side rails by pulling sliding them off the end.


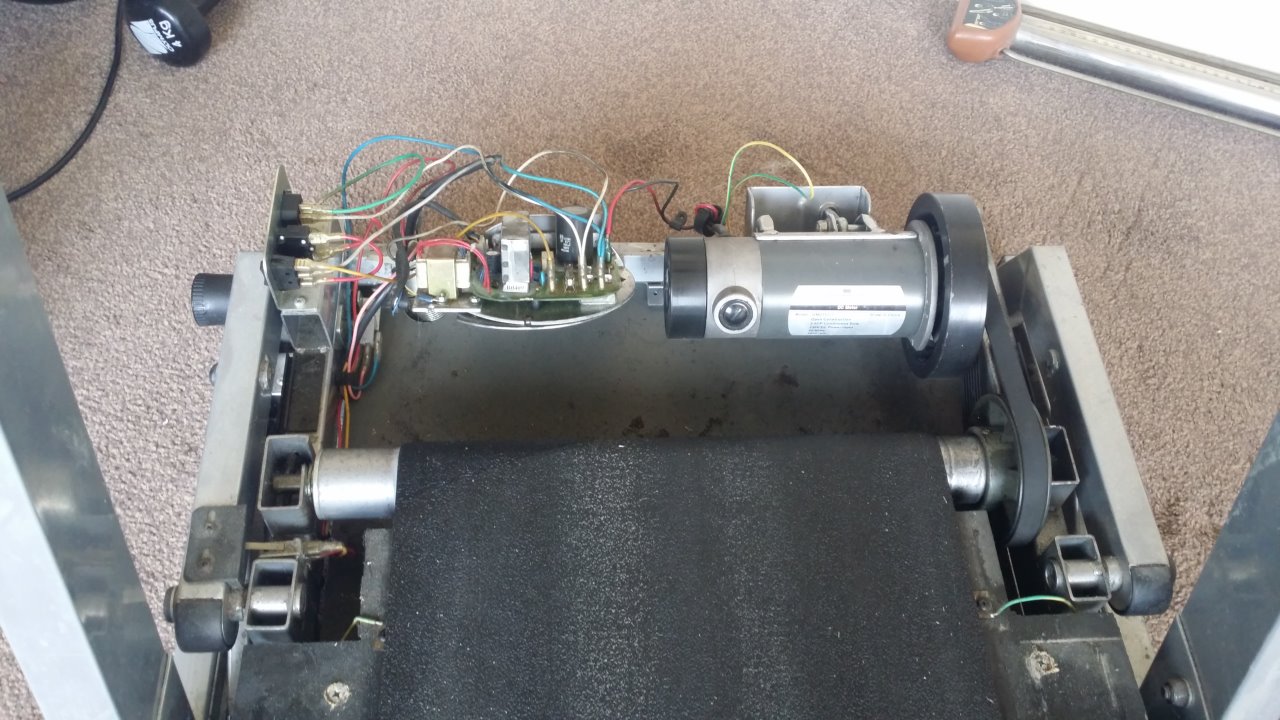
- Your treadmill should now look like this with the Main Motor Cowling still present at the back

- Remove the Power Supply and Main Motor area cowling.

- removing the 4 holding screws
- lift the covering straight up. It should move with relative ease.
- The will now expose the power supply and main motor

- Remove the Rear Roller (not the motor end)

- Unscrew the adjustment bolts a little bit on one side and then the other, so the bolts are released evenly otherwise the roller could become stuck or damaged. Keep doing this until the bolts have been removed.

- Put the bolts to one side
- Take a photo of the roller so you know how it was installed
- The roller is now loose and can be removed by pushing it towards the motor

Make sure you do not loose the metal washers
- Place the roller on a piece of clean plastic or surface. A bin/Trash bag should do.

- Put one of the adjustment bolts back in the roller and the other placed back in the treadmill. This is so you can identify which way around the roller fit in the treadmill.


- Unscrew the adjustment bolts a little bit on one side and then the other, so the bolts are released evenly otherwise the roller could become stuck or damaged. Keep doing this until the bolts have been removed.
- Remove the front motor roller
- Before removing the bolt, put some Tipex on the shaft so when you take it out you know the insertion depth it was set at.
- The adjustment bolt should be unscrewed all the way.

- Remove the motor belt whilst making a note of what direction it goes in
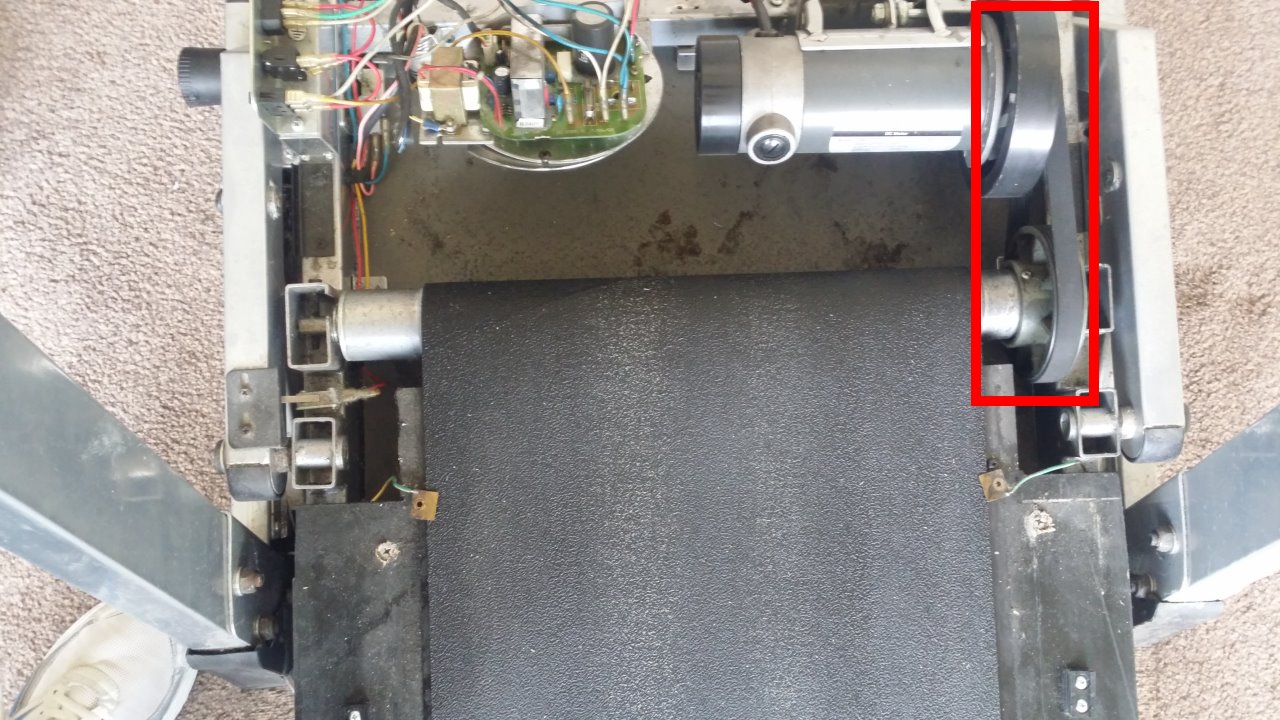
- Remove the roller and place next to your other roller.
- Remove the the Deck (and belt)
- Unscrew the anti-static plates from the Deck and then put the screws back in the board for safe keeping

- Unscrew the Deck fixing screws in the order as shown below but only partway before you move to the next screw.
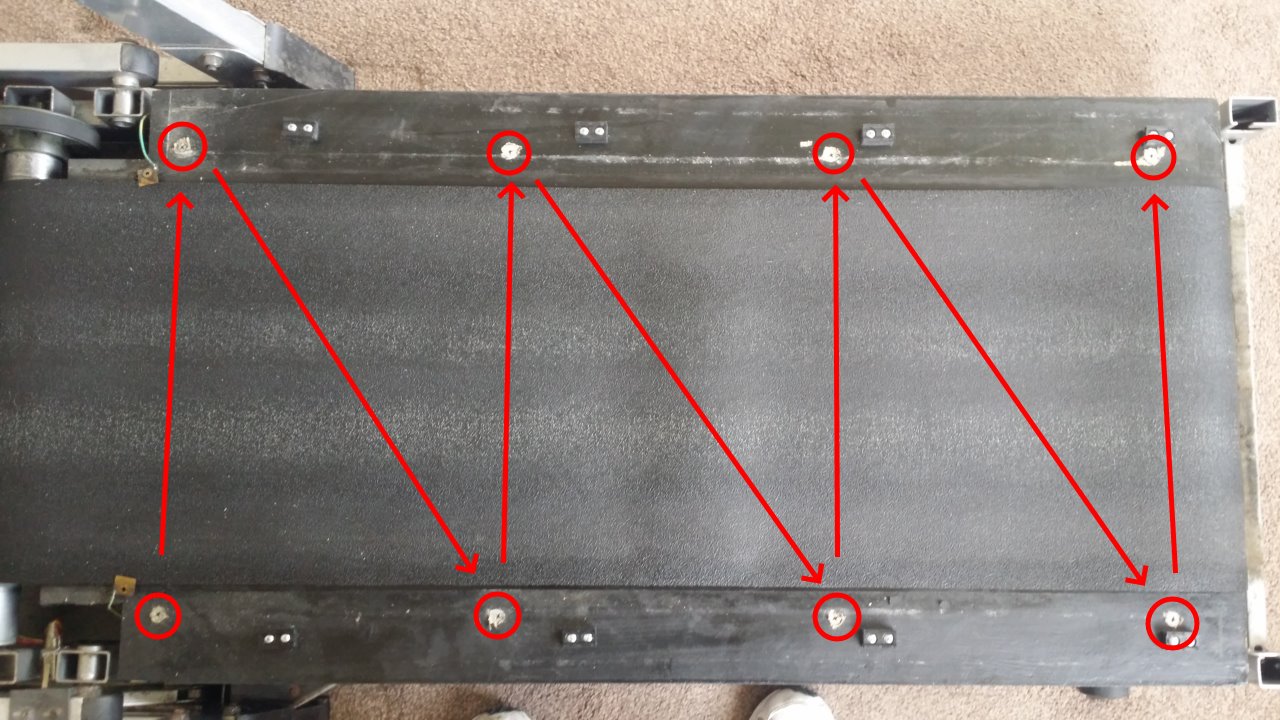
- They have to be removed in this way because the screws sometime unscrew the rubber mounting below instead of coming out on their own and this method prevents the Deck from getting damaged by lifting the Deck evenly irrespective of which screws fail to come out of their rubber mounting on their own.

- Take your time doing this section and make sure you use a the correct screw fitting (low profile fat cross)
- When you think you have undone the all of the a screws, lift the Deck and see if it is free.

- When free lift both the Deck and the belt away from the treadmill.

- They have to be removed in this way because the screws sometime unscrew the rubber mounting below instead of coming out on their own and this method prevents the Deck from getting damaged by lifting the Deck evenly irrespective of which screws fail to come out of their rubber mounting on their own.
- Separate the belt from the Deck
- The running belt is removed.

- Remove any rubber mountings still present on the underside of the deck.

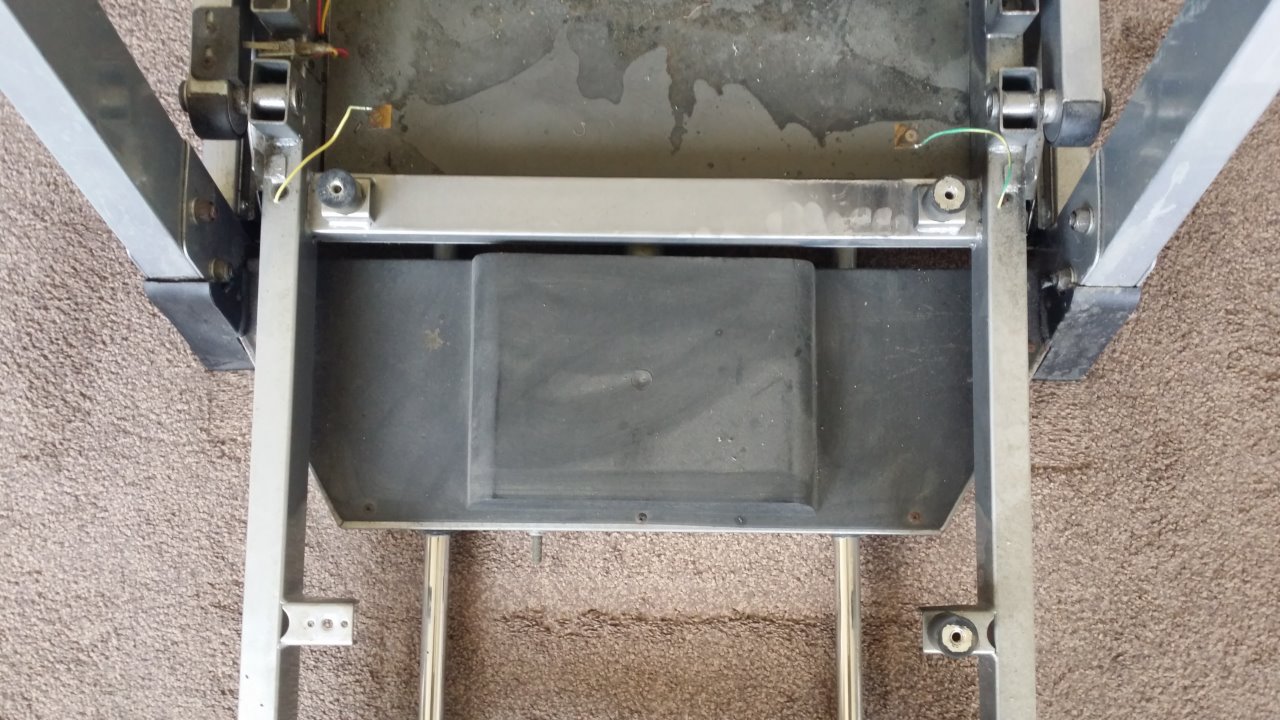
- Your treadmill should now look like this

- Replace any rubber mounts that came off with the Deck back onto the frame of the Treadmill.
- Unscrew the anti-static plates from the Deck and then put the screws back in the board for safe keeping
Cleaning the Running Belt area
This assumes you have just removed the old one and your treadmill following the instructions above.
This is optional but highly recommend because you don't swap your running Belt everyday.
While your treadmill is open, clean the following parts with warm soapy water:
- The rollers
- Clean only with a lint free cloth by wiping the rollers clean of any dirt.
- They do not need to be oiled
- So dirt might just need some encouragement with your finger nails to come off, again be gentle.
- Deck
- avoid the slippery running surface with soapy water, this should be cleaned with a clean lint free cloth only
- Anti-Static plates
- The side rails
- The corner covers
- The Motor Housing/Cowling
- The Motor area
Installing a new Running Belt
This assumes you have just removed the old one and your treadmill following the instructions above.
- Follow the instructions above in reverse with the following exceptions:
- Before running or configuring the belt, Check to see if your Running Belt needs Lubrcation. If it does, apply some lubrication sparingly to the slide surface of the Deck. This is important to prevent damage.
- Done
Front Roller Angle Configuration
Not all Treadmills have this adjustable front roller
This is required otherwise your Running Belt will always track left and no amount of adjustment will fix it.
Method 1
- Screw the thread in to the Tipex mark you made earlier on the adjustment bolt
Method 2
- Pull the belt tight against the Front roller
- With your hands evenly placed on the belt (so both sides are pulled the same)
- Palm down and pulling the running belt towards you
- Not much force is required
- The motor will make a bit of a weird noise, but this is normal
- You should now see that the running belt is probably on an angle
- Using the drive roller adjustment bolt
- Tighten this slowly until the Front Roller and therefore the Running Belt are in alignment (parallel) with the Deck. Check with a ruler as shown below.

- The belt should be in the middle of the slide surface.
- Every few turns you might need to re-pull the belt with you hands to make sure it is sitting right and the adjustment is applied correctly.
- Tighten this slowly until the Front Roller and therefore the Running Belt are in alignment (parallel) with the Deck. Check with a ruler as shown below.
How to configure the Running Belt's tension (Euro Treadmill Belts Method)
Video: Replacement treadmill belt - how to tension your belt | EuroTreadmillBelts.com
These are my notes for this method which I have used successfully.
You can use masking or electrical tape instead of Tipex
- This method creates a 0.5% pre-tension on the belt.
- This is a precise method and so should your measurements
- Before starting, the belt should be installed but not tensioned
- Tensioning your belt
- Make 2 marks on each side, exactly 1 meter apart. It does not really matter where these marks are as long as they are 1m apart.
- Leaving the tape measure on the treadmill (not on the Running Belt), tension one side untill you have stretched it my 5mm. You will see the Running Belt stretch against the tape measure.
- Now do the other side.
- See if the belt is now gripping, if not, tension each side up a little more (not too much)
- Dynamically Track
- If the belt is gripping, you can make adjustments using the tension screws independently to correct any issue with the left/right tracking.
- After Fitting
- Ideally the belt should allow enough room to fit the belt and give about 50-60% of the adjustment potential to tension the bel. This allows for further tensioning during the belts lifetime.
Stomp Test
After you believe you have configure/tensioned your Running belt correctly as per the method above, we now need to do a final test.
- How To Adjust A Treadmill Belt | Treadmill Maintenance
- This is best to be done with the cowling of so you can see the actually motor, but is not required.
- Video time is set to the part where the stomp test is demonstrated
- This video also shows you how to track a Treadmill but not pre-tension it.
Re-assemble the Treadmill
This is pretty much the reverse as above (after installing your new belt), but here is an overview:
- Replace the motor cowling
- Put the side rails back on
- Put the Rear Roller Adjustment covers back on.
Cleaning the Incline and Vertical Store motor areas
This area is only possible to access if you put the treadmill into it's vertical storage mode.
- Put the treadmill in to it's vertical storage mode
- Because there is a large capacitor in the motor housing you should leave the unit to discharge over night or be very careful.
- Make sure the treadmill is off and unplugged
- Remove the feet protectors

- Remove the Vertical Storage and Incline Motor Cowling
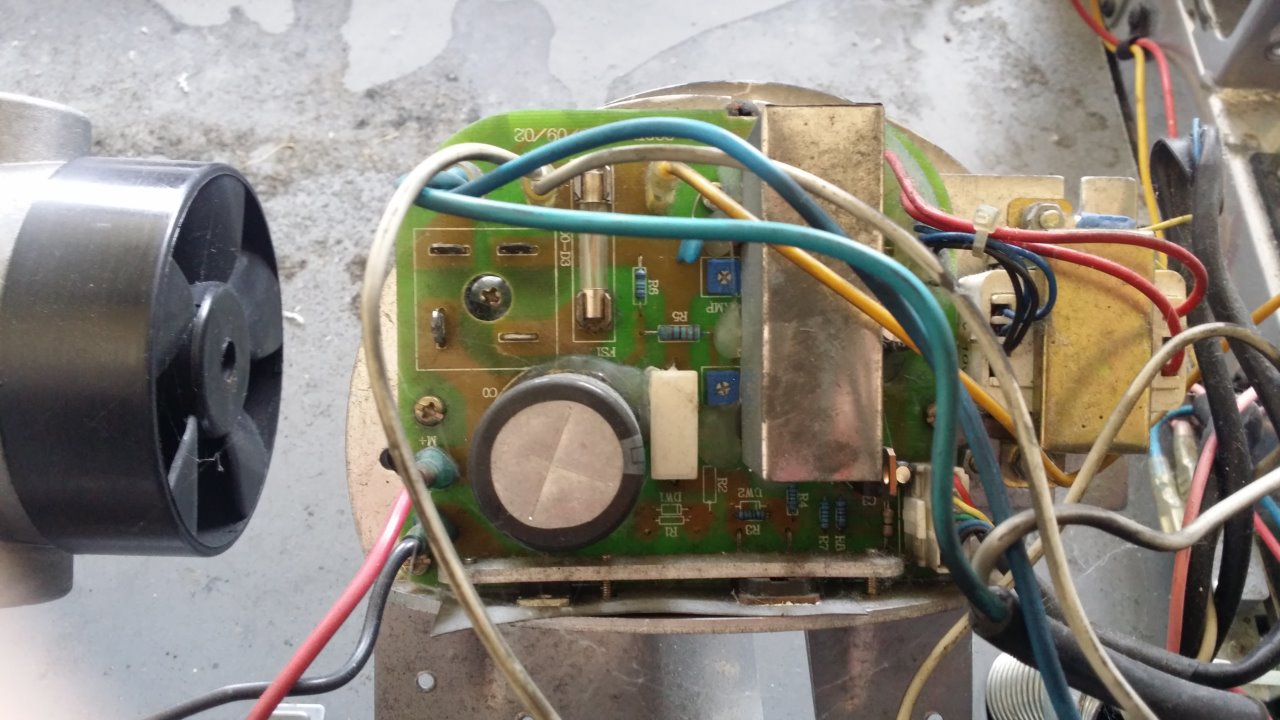
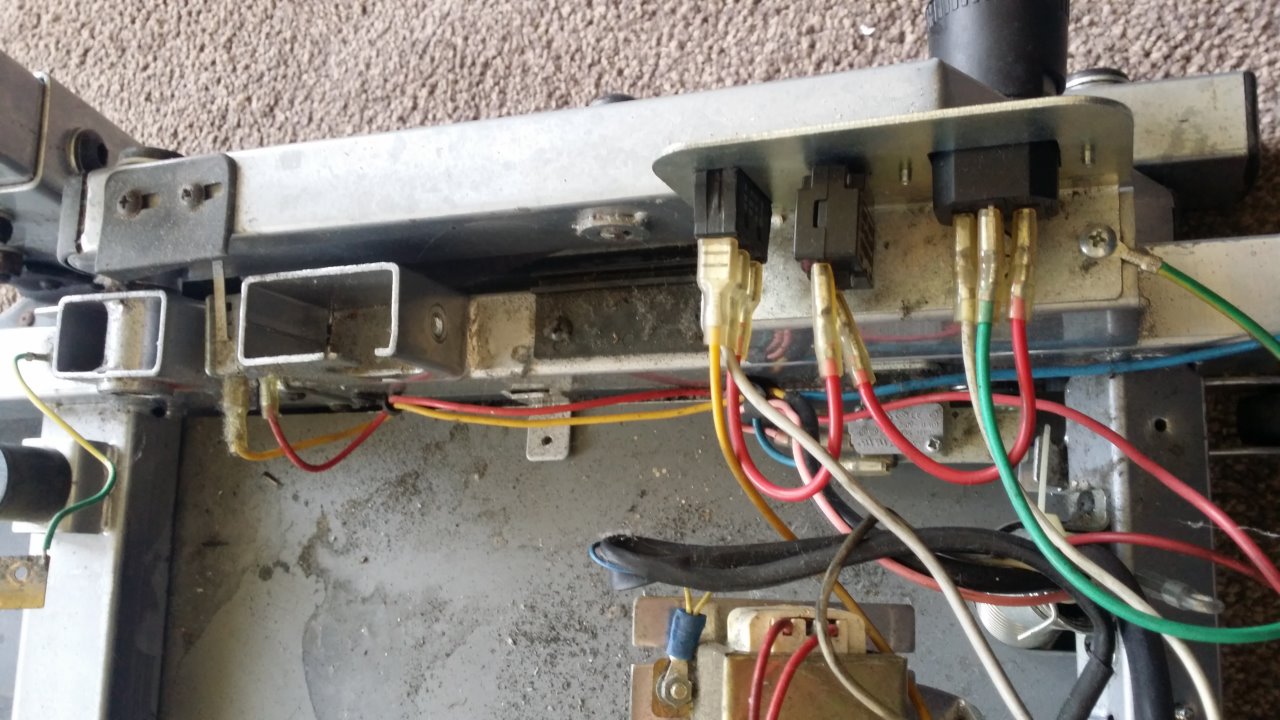
Parts Close Up Pictures
- Power Supply and Main Motor Area (Front)
- Power Supply and Main Motor Area (Rear)
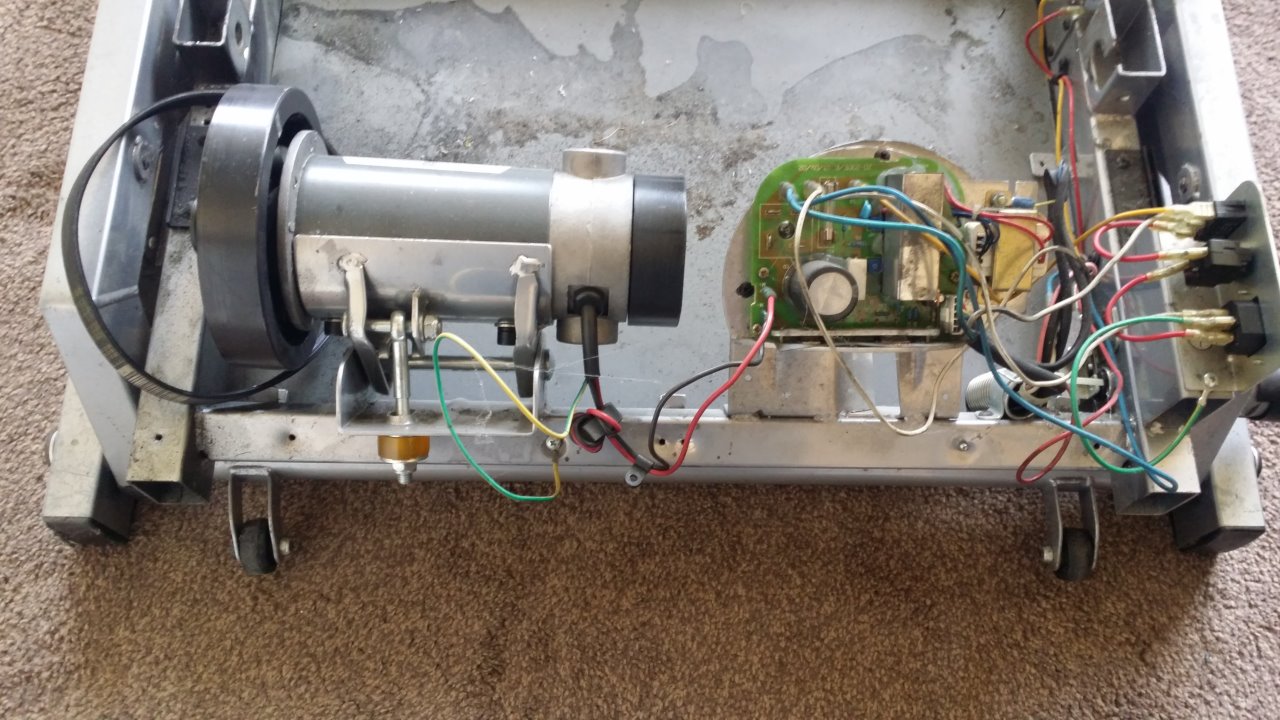
- Main Motor

- Main Motor Belt

- Power Supply
- Power Supply Switches
- as
cPanel - Global Email Filter not working
I wanted to filter emails by the From field using the 'Global Email Filters' feature in my cPanel Account, but this is not working.
Below is an example rule called 'Dodgy SPAM (PCP)'.

And this is an example email I wanted to block:
From:	PCP Claims <pcpclaims@somespammer.com>
Sent:	13 February 2022 17:35
To:	iamspam@example.com
Subject:	If you took finance for your car, you may have been overcharged

Did you take finance for your car?

There's a chance that you were overcharged

If you have a current PCP agreement, or it has ended within the last 5
years, then the likelihood is that you were the victim of mis-selling.

Whether that's undisclosed commission, hidden APR's, failure to offer a
more suitable product or one of many other reasons.

Get A Free Assessment

If you no longer wish to receive these let us know here
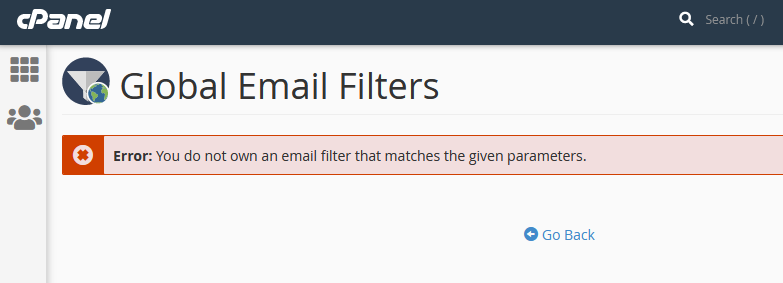
When i tested the email it says "Error: You do not own an email filter that matches the given parameters."
So my rules are in place and I have a suitable email text to test and it should be working.
NB: It should be noted that blocking SPAM using the individual email account filters works fine, just not the global one.
Solution
After some back and forth tickets with my provider the following solution was reached and my issue disappeared.
There is some problem with 'Global email filter' option from the cpanel itself due to which is not working. Now we have forwarded this issue to the Cpanel team. They will look into it and once we received any update from them then we will update you on the same ticket accordingly.
Hosting Provider
So they then followed this up with the following resolution:
I found that the vfilters file for this domain was missing. This is where the global filters are normally stored and read from when Exim processes them.
[01:46:26 server77 root@xxxxxxxx ~]cPs# cat /etc/vfilters/quantumwarp.com
cat: /etc/vfilters/quantumwarp.com: No such file or directory
I created this file and corrected permissions.
[01:47:00 server77 root@xxxxxxxx ~]cPs# touch /etc/vfilters/quantumwarp.com && /scripts/mailperm abcdefg --verbose
Checking mx configuration for demo.quantumwarp.com (abcdefg)...[auto]...Done
Checking mx configuration for quantumwarp.com (abcdefg)...[local]...Done
Checking mx configuration for search.quantumwarp.com (abcdefg)...[auto]...Done
Fixed permissions on /etc/vfilters/quantumwarp.com : was (0644), now (0640)
Fixed ownership of /etc/vfilters/quantumwarp.com : was (uid=0,gid=0), now (uid=1481,gid=12)
Fixed permissions on /home/abcdefg/mail/quantumwarp.com/hosting/dovecot-quota: was (0600), now (0640)
The custom filters are now there as normally expected:
[01:50:28 server77 root@xxxxxxxx ~]cPs# wc -l /etc/vfilters/quantumwarp.com
65 /etc/vfilters/quantumwarp.com
With this, the filters should proceed to function as expected. You may find this helpful for testing the filters going forward:
As per their update (cPanel), there was issue with the vfilter configuration file which was missing for the site (quantumwarp.com). Now they have rectified the issue and 'Global Email Filter' option is working fine now.
Commodore Tape Transfers
I struggled to find instructions on how someone actually transferred a real Commodore Plus4 or C16 tape into a TAP file written for newbies. I hope to address that and once you have done a couple everything will make sense. I always find once I have got something to work everything else gets easier.
Prerequisites
Hardware
- 2 x Pendrives
- One for booting Dos
- One for holding all of the software we will run (Commodore and PC) and to hold TAP of captures tapes.
- 1 x Transfer cable (X1531 / XE1541)
- X1531
- Used for connecting 1531 directly to the PC's parallel port.
- XE1541
- Is better for newer PCs.
- is compatible with VC1541 and MTAP so I will use this one.
- This is the same as X1541 but with diodes for newer types of parallel ports.
- Other cables such as can be used, but for the purposes of this tutorial this is what I am going to use becasue it is what I have
- X1531
- 1 x Old PC with a compatible Parallel port (LPT) (DOS PC)
- 1 x Modern Windows 10 PC
- 1 x Commodore Computer (C16 / Plus4 / C64)
Software
- Rufus - For creating bootable USB Pendrives
- Windows 98 SE Boot Disk Image
- Enhanced DOSKEY
- Enhanced DosKey with autocompletion
- You can probably use DOSKEY from MS-DOS if you can find it.
- CWSDPMI - (Is included in MTAP and VC1541)
- MTAP
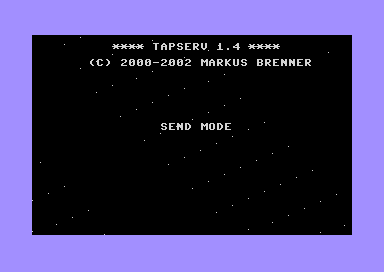
- TAPSERV (included in MTAP)
- Software that runs on a C64 to aid in generating digital backups of tapes (TAP) of the X1541 cable range.
- Only Wholewave (V1 TAP) format is supported.
- PTAP
- VC1541
- 1541 Drive emulator you run on your PC (supports X1541 or XE1541)
- This works with any Commodore that has the serial port.
- TTAPSERV
- By Ulysses777
- Software that runs on a C16/Plus4 to aid in generating digital backups of tapes (TAP) of the X1541 cable range.
- Both Wholewave (V1 TAP) and Halfwave (V2 TAP) formats are supported.
- Tape Wave Checker (formerly WAVCHECK) (will add link later)
- By Ulysses777
- A VERY experimental program for checking the waveform of a tape.
- PTAP
- Temporary download link
- By Ulysses777
- This is an experimental modification of PTAP which will also work with halfwave tapes. There are no extra command line switches needed.
- TAPClean Front End
- A fork of FinalTAP with a GUI
- Maintained by Luigi Di Fraia (and is maintained)
- Archiver-Copy
- Plus4
- Written by Pigmy, a legendary member of the early Plus/4 scene
- Should handle reading halfwave.
- Copy between any combination of tape and disk.
Batch Files and Commands
We now need to work out what commands we are going to need and then build the relevant batch files.
Bach files are optional because they just run the command we program them to do but they will save you a lot of time and heartache when you get the command wrong and have to type it again.
MTAP
Most of the transfer methods below use MTAP so it is important we deal with the MTAP commands now and while we are at it, we will make some batch files to make life easier.
The Commands
mtap - Commodore TAP file Generator v0.36

usage: mtap [-lpt] [-x[e]] [-buffer <size>] [-v] <tap output file>
  -lpt<x>:  use parallel port x (default: lpt1)
  -x:       use X1541  cable for transfer
  -xa:      use XA1541 cable for transfer
  -xe:      use XE1541 cable for transfer
  -b:       increase buffer size (default: 4 MB)
  -h:       halfwaves
  -v:       record Version 0 TAP
  -vicntsc: record VIC-20 NTSC tape
  -vicpal:  record VIC-20 PAL  tape
  -c16ntsc: record C16 NTSC tape
  -c16pal:  record C16 PAL  tape
  -c64ntsc: record C64 NTSC tape
  -c64pal:  record C64 PAL  tape
Once you understand these you can write your own as required.
Explained Examples
mtap -lpt1 -b 10 -h -c16pal C:\TAPS\OUTPUT.TAP
- -lpt1 - MTAP only works on the parallel port so what is this. This is X1531 mode and is the original method to grab tapes using the X1531 cable (or C64S adapter)
- -b 10 - Use a buffer of 10MB. MTAP needs to store the whole tape in memory otherwise it will fail. The buffer default is 4MB but some tapes are bigger (not many) so it does not harm to set it to 10MB.
- -h - Sample the tape in halfwave mode. This sets MTAP to sample in halfwaves which is specific to C16 and Plus4 computers
- -c16pal - There is a need to set the frequency of the sampling because it is different in the NTSC and PAL regions and also across the different devices.
- C:\TAPS\OUTPUT.TAP - This is obviously the output location of the TAP file. Keep the filepath and filename all in CAPS so VC1541 can handle the TAPs.
mtap -xa -b 10 -c16pal C:\TAPS\OUTPUT.TAP
- -xa - use XA1541 cable for transfer. This requires you are running either TTAPSERV.PRG (C16/Plus4) or TAPSERV.PRG (C64) on your Commodore of choice. These are called Tape Servers and aid in getting full digital copies of tapes via real hardware.
Batch Files
In this section you build your own MTAP commands and then move them into batch files (makew.bat and makeh.bat).
These batch files will go in the root of the Software pendrive and can be called instead of typing out the whole command every time (unless you install DOSKEY)
- Create your MTAP commands.
- We are going to make one for Wholewave and one for Halfwave tapes.
- There are some examples below.
mtap -lpt1 -b 10 -h -c16pal C:\TAPS\OUTPUT.TAP
mtap -lpt1 -b 10 -c16pal C:\TAPS\OUTPUT.TAP
- Make the MTAP Batch commands.
- We are going to make one for Halfwave and one for Wholewave tapes.
- Edit the file makeh.bat (Halfwave) and put your command in it with the format:
mtap -lpt1 -b 10 -h -c16pal C:\TAPS\%1.TAP
- Create a file called makew.bat (Wholewave) and put your command in it with the format:
mtap -lpt1 -b 10 -c16pal C:\TAPS\%1.TAP
- To run the command from DOS, enter the relevant command below to which will create a TAP with the name OUTPUT.TAP
makew OUTPUT
makeh OUTPUT
- When the batch file is run, the batch variable %1 will be replaced by the name, OUTPUT.
- So from this you can see you only have to type in the new name for the TAP file whether you are sampling a Wholewave or Halfwave tape.
- Done
VC1541 Batch file (Virtual Disk Drive)
- Create a file called diskemu.bat and its contents should be this command line
vc1541 -dir C:\DISKS -lpt 1 -cable XE1541
- Move this batch file to the the root of the Software pendrive
- Done
Setup Windows PC
We all need one of these.
- Install Emulator
- VICE Commodore Emulator or YAPE C16-Plus/4 Emulator
- You need to make sure the TAP files work.
Setup DOS PC
This is your old computer with a compatible parallel port.
Build DOS
Now we need to configure the DOS environment.
- Bootable pendrive
- Install and run Rufus on your Windows PC
- Take one of the pendrives and make it bootable with Rufus using the Win98SE boot disk image.
- Software Pendrive
- Take the other pendrive and format it with FAT32
- Put the software on the pendrive as shown below:
/DISKS/AZIMUTH.D64
/DISKS/TAPSERV.PRG
/DISKS/TTAPSERV.PRG
/DISKS/TAPE_WAVE_CHECKE.PRG
/TAPS/
CWSDPMI.EXE
diskemu.bat
doskey.com
makeh.bat
makew.bat
MTAP.EXE
PTAP
VC1541.EXE
- The folders 'DISKS' and 'TAPS' must be in capitals for VC1541 to use them.
- Yes I know they are not all disks !!! but is a nice easy name for a folder.
- You might not use all this software but it makes it easier for these instructions.
Boot DOS
We need to boot from the DOS pendrive (on the DOS PC) you have just built and follow these instructions to complete your DOS environment preparation.
Connect your Commodore cables to the PC before turning on either the PC or the Commodore on to prevent damage.
- Place both pendrives in your DOS PC
- Ensure in the BIOS that the following are set
- LPT1 = ECP (this is a good default but this depend on your cable)
- Boot from USB is enabled
- Legacy USB Keyboard/Mouse
- Check other settings are suitable.
- Turn the DOS PC on
- Window 98SE Boot disk will load
- Select "Start computer without CD-ROM support." as this prevents any junk being loaded
The bootable pendrive will map to the drive letter A:
The Software pendrive will map to the drive letter C: - Run the following commands
c:
doskey
CWSDPMI   (optional, see below)
- C: just puts us where we should be.
- DOSKEY just makes life easier because you can use the up and down arrows to save re-typing commands.
- CWSDPMI
- Is not always needed.
- To check, run MTAP.EXE and if it runs without error, installing CWSDPMI can be skipped.
- I had one motherboard that needed this another that ran with the need. This might be the difference between AMD and Intel but I am not sure.
- If CWSDPMI is required, the error will be "Load error: no DPMI - Get csdpmi*b.zip"
- In Windows you don't need the CWS*.EXE files at all, since Windows uses DPMI already. But don't use MTAP in Windows, this just helps explain the issue.
- DPMI = (DOS Protected-Mode Interface) server
- The sed (Stream Editor) FAQ - 5.5. What is CSDPMI*B.ZIP and why do I need it?
- This explains the issue well.
- binaries and sources are available here.
- Alt Downloads
- HDPMI - DPMI Server (Version 3.17) - An alternative to CWSDMPI but I have not used it or had the need. This is for reference only.
- Your DOS environment is now setup and ready for use.
- Proceed to 'Transfer Methods' section and pick which options suits you and your equipment.
Notes
- This is my setup which works well but you can
- Try other DOS disks such as FreeDos which will only require 1 pendrive
- Different software for creating bootable USB
- Be crazy and boot from a real floppy disk
- Use a Win98SE disk with the bare minimum of files on it. I just used the default one because I did not want to spend the time removing all of the unneeded stuff.
- if you use Rufus and to create bootable USB pendrive then the partition on it will only be 1.44MB which is normal.
- MS-DOS 6.22 does not support FAT32 so that is why we use Win98SE boot diisk which supports it.
- You might need to try different LPT modes on your mother board (SPP/ECP/EPP/ECP+EPP) to see which one works. bear in mind your adapter cable has to be compatible with that LPT mode.
- Parallel Port (additional)
- Parallel port - Wikipedia - An article on Parallel Ports and their different modes.
- Downtown Doug Brown » Parallel Port Tester
- After playing around with a ton of parallel port cards in an attempt to figure out Willem programmer compatibility, I decided it would be useful to write a parallel port tester program. Just a simple utility where you can set the output value of each output pin and read the value of each input pin.
- An easy to use Windows utility
- Parallel port output - Simple circuits and examples to describe how to use PC parallel port as general purpose output port.
- How to Use a PC's Parallel Port to Commun | Maxim Integrated - This tutorial shows how to build a quick, simple, and cost-effective 2-wire (I2C-compatible) interface using a PC's parallel port. No difficult to procure ICs, microcontrollers, or firmware needed.
- DOS Utilities Collection
- Many DOS utilities
- LPTstat v1.0 (LPTSTAT.EXE) - The PC parallel port uses a practically direct I/O port to pin connection. LPTstat shows each bit's status in real-time, and includes the bit's location in the PC address space and its corresponding pin number on a DB-25 connector. You can use the left and right arrow keys to switch LPT ports, and the up and down arrow keys followed by ENTER to toggle a bit.
- PCI Parallel port doesn't work under DOS 6.22 | PC Review
- Hi all,I tried to get a PCI parallel port (LPT2) to work under DOS 6.22, but without luck. When I connect the printer to LPT1 it is immediately online even if the computer is turned off, whereas for LPT2 the card isn't recognized, and the printer never gets online.
- Some PCI parallel cards just will not work under as a DOS parallel port. Under DOS, there were only 3 recognized addresses ( 0x3bc, 0x378, and 0x278) and 2 recognized IRQs 7 & 5. These are not normally assigned to a PCI device because of possible conflicts with existing devices. Any PCI card that will work with DOS programs must be settable to these settings, either through a utility program/driver or jumpers. I know there are some out there, just don't remember who makes or sells them. You need to search for a PCI card that specifically says it will work with DOS programs. Or rewrite the DOS program to use the addresses and irqs the PCI card is being assigned.
- Check if printer is on LPT from DOS batch file - 'm searching for a method to check from a batch file if a printer is connected to LPT port.
- How can I make a test lpt port in MS-DOS ? - Techyv.com - Hi everyone, I think my lpt port is damaged, please, how to proceed to check this error? And how to make a dos lpt test? thank you in advance!
- LPT Port Test Utility i386 / x64
- https://www.xlentelectronics.nl/LPTTest/LPTTestUtility.exe is the home page but the software is not available.
- LPT Port Tester
- The LPTPortTest software (LPT Port Test) is used to test the correct software and physical (electrical) operation of a parallel port (LPT), both on the inputs and on the outputs.
- Logiciels - Freewares - LPTPortTest - Homepage
- https://www.sonelec-musique.com/logiciels/lptporttest/lptporttest_files_v2_0_0_0.zip
- LPT Port Test Utility i386 / x64
Transfer Methods (Commodore Tape to PC)
There are several methods on transferring tapes to .TAP files on a PC but are mostly the same for Vic20, C16, Plus4, C64, C128, PET tapes.
- Plus4 and C16 tapes should be always sampled in Halfwave mode (TAP V2)
- C64, C128, VIC20 and other Commodore tapes should be always sampled in Wholewave mode (TAP V1)
Connect Parallel Port direct to a Commodore Cassette drive (X1531 Method)
There are 2 adaptors that can be used to connect your tape drive directly to your LPT port on the PC, this just depends on whether it is a 1530 or a 1531 drive. These two drives are identical inside and just differ in their connectors. The 1531 has a mini DIN connector whereas the 1530 (C2N) has a female edge connector. When people refer to the X1531 Cable this can mean either drive setup with their appropriate adapter.
- C64S tape adapter
- In this link you can see a modified X1541 connector with a tape port added. You can make an adapter without the serial port.
- Don't connect the tape drive and a serial device at the same time
- Only connect the power when using the tape drive.
- X1531 tape connector - A simple tutorial on how to make the adapter for the 1531 Tape Drive.
- Will only work on a SPP parallel port on older PCs.
- More notes on cables below in the 'Cables' section
Some people online say that the 'Game Port' might not be able to supply enough power to the Datassette when doing long tapes. I am unable to confirm this but perhaps should be something to watch out for.
Instructions
- (Optional) Edit your batch files on the Software pendrive
- Make sure the PC is turned off.
- Connect the X1531 cable to the PC and the 1531 Datassette.
- Make sure the parallel port is set to SPP
- Load your DOS environment on the DOS PC
- Turn the Commodore computer on.
- Place a cassette into the 1530/1531 the drive that you want to sample.
- Make sure the tape is fully rewound before you start.
- Now sample the tape with MTAP by running one of these commands on the DOS PC, select the appropriate one or use your own:
mtap -lpt1 -b 10 -h -c16pal C:\TAPS\OUTPUT.TAP
mtap -lpt1 -b 10 -c16pal C:\TAPS\OUTPUT.TAP
makeh OUTPUT
makew OUTPUT
- The batch commands assume you have set your batch files as follows (to match the examples above):
makeh.bat
mtap -lpt1 -b 10 -h -c16pal C:\TAPS\%1.TAP

makew.bat
mtap -lpt1 -b 10 -c16pal C:\TAPS\%1.TAP
- The batch commands assume you have set your batch files as follows (to match the examples above):
- "Press <PLAY> on tape!" will appear, now press play on your Commodore Datassette.
- The tape will play to the end and then play button will pop up as normal.
- (optional) Re-run to get a second copy
- Binary compare the 2 tapes (or quickly by size with DOS dir command), they should be the same. same size or very close.
- If they don't match it could be because 'the tape is damaged or dirty'/head needs aligning/tape players is defective/heads are dirty/rubber band faulty
- Regular cleaning of the tape heads when using old tapes is important
- Turn off the DOS PC and move the Software pendrive to the Windows PC
- Load the TAP in an emulator and see if it works.
- Done
TTAPSERV (Preferred Method)
This will do Wholewave and Halfwave tapes (i.e. All Commodore tapes)
This is the most reliable method of reading taps because it is using real Commodore C16 or Plus4 that supports both Wholewave and Halfwave tapes, and this method ensures the Datassette will get enough power for it's motors when dealing with long tapes.
This is what I do to transfer my commodore tapes to the PC.
Instructions
- (Optional) Edit your batch files on the Software pendrive
- Make sure the PC is turned off.
- Connect the Plus4 to the parallel port of the PC using the XE1541 cable
- Make sure the parallel port is set to ECP
- This is recommended in the VC1541 instructions because of auto-detection of EPP/DMA is dodgy.
- Load your DOS environment.
- Turn the Commodore computer on now otherwise you will might get a cable detection error and file transfers will be disabled.
- Run the VC1541 software on the DOS PC. (CWSDPMI.EXE might not be needed on your system, see notes above)
VC1541.EXE -dir C:\DISKS -lpt 1 -cable XE1541
or
diskemu.bat
- The 'DISKS' folder should already be selected because we defined it in the commands above and this folder has the TTAPSERV.PRG in it, if not, just browse for the file with your cursor keys.
- The directory shown on the left is what is presented as the directory to the Commodore computer.
- Load TTAPSERV.PRG on your Plus4 by typing in the following command:
LOAD "TTAPSERV.PRG",8
- VC1541 now will transfer the file from the PC to the Plus4 as if it were a real 1541 disk drive.
- Type RUN on the Plus4 to launch TTAPSERV.
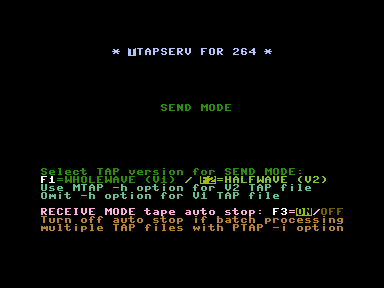
- Set TTAPSERV to the appropriate mode to match your MTAP command.
- F1 = Wholewave
- F2 = Halfwave
- Exit VC1541 on the DOS PC
- Place a cassette into the 1530/1531 the drive that you want to sample.
- Make sure the tape is fully rewound before you start.
- Now sample the tape with MTAP by running one of these commands on the DOS PC, select the appropriate one or use your own:
mtap -xe -b 10 -h -c16pal C:\TAPS\OUTPUT.TAP
mtap -xe -b 10 -c16pal C:\TAPS\OUTPUT.TAP
makeh OUTPUT
makew OUTPUT
- The batch commands assume you have set your batch files as follows (to match the examples above):
makeh.bat
mtap -xe -b 10 -h -c16pal C:\TAPS\%1.TAP

makew.bat
mtap -xe -b 10 -c16pal C:\TAPS\%1.TAP
- The batch commands assume you have set your batch files as follows (to match the examples above):
- "Press <PLAY> on tape!" will appear, now press play on your Commodore Datasette.
- The tape will play to the end and then play button will pop up as normal.
- (optional) Re-run to get a second copy
- Binary compare the 2 tapes (or quickly by size with DOS dir command), they should be the same. same size or very close.
- If they don't match it could be because 'the tape is damaged or dirty'/head needs aligning/tape players is defective/heads are dirty/rubber band faulty
- Regular cleaning of the tape heads when using old tapes is important
- Turn off the DOS PC and move the Software pendrive to the Windows PC
- Load the TAP in an emulator and see if it works.
- Done
These instructions were adapted from the forum thread Best or easiest way to transfer from tape - Commodore 64 (C64) Forum
TAPSERV
This will do Wholewave tapes only. (Cannot sample some C16 and Plus4 tapes)
- Same as for TTAPSERV.PRG except
- You use a Commodore C64
- You use TAPSERV.PRG as the tape server
- There is no option to select Wholewave or Halfwave tapes.
- This is the original tape server that is designed to run on the C64 but is only capable of capturing Wholewave tapes.
- TAPSERV for the C64 cannot read halfwave tapes, as the C64 is unable to read them itself.
1530USB (Audio and WAV)
I have not used this method
This is a little more around the houses but might be useful when the tape is really dirty.
- 1530USB Homepage | Load64
- Setting up the USB1530 adapter and how to use | Load64
- Use TAPClean instead of FinalTAP becasue it is a newer fork and is currently maintained.
- TAPClean will only work with Wholewave TAPs and possibly only C64
- There is no hardware limitation. You can create half, full, triangle etc. wave ,and it will be recorded to the tape.
- USB1530 advantages
- can be used to sample really dirty tapes and then clean them up if you cannot load normally
- This device can do many brands of tape (possibly)
- 1530USB Datasette To PC Adapter Cable Backup C64 Cassette Tapes Commodore 64 Preserve Back up X1531 | Youtube | Remzi | Load64
- Commodore 1530USB Datasette - PC Adaptor C2N Tape Recorder Tapuino C64 VIC20 PET | eBay - I bought my 1530USB from Remzi here
- WAV-PRG and Audiotap: from Commodore tapes to PC and back
- WAV-PRG
- WAV-PRG is a program able to create a .TAP file or Commodore 64 tape from a C64 emulator file (.PRG, .P00, .T64), create a clean .TAP file from a .TAP or .WAV file, and create emulator files (.PRG, .P00, .T64) from a Commodore 64 tape. The latter can only be done if the tape is in a format supported by an existing plug-in.
- Audiotap
- Audiotap is a program for conversion between .TAP files and Commodore 64 tapes.
- Audiotap can read/write WAV files containing the sampled sound of a tape, and can also record tapes from the sound card and play sound to the sound card.
- WAV-PRG
- Tape Mastering | The New Dimension
- Have you written a game and you wanted to master the game to tape/tap format with a loading picture, etc then run the game so that your game has a spiffy loading picture and then run (or prompt the user to press spacebar). There are different methods in which can be used to master your programs to .tap or tape. Some not recommended, and some which are highly recommended.
- PC->Plus/4 trasfer without spec. cable! - This is a thread about create PRG from WAV rather than using a X1541 cable. Some useful insites fro when I revisit this topic.
- Step-by-step instructions on how to transfer cassette tapes programs to your PC – Vintage is The New Old
- This is not specifically for a Commodore tape but it goes through how to setup Audacity and your tape player. This is a good reference guide.
- Loading Tapes - How To (Mike D)
- How to sample tapes using a standard cassette deck by Mike D.
- I've decided to put this how-to document together to help you to load in your plus/4 tapes. It's fairly hard to do, but once you've found a setting that works, you can load everything you have!
- What is the default Tape wave format for the Plus4 - Forum (#44961) - Plus/4 World
- Don't know if you ever got to see it, Mike D who used to have his +4 emulator Minus4 on plus4.com in the very early 2000's did a great write up on how to make .wav tapes using any old cassette player and a PC. It was no means easy to get working, but once you had something setup I managed to copy a few tapes, see Rockman.wav which was one of mine.
- That little write-up first appeared on his scotch.demon.co.uk site
DC2N (DMP Files)
I have not used this method, hence the lack of detailed instructions
DC2N is a piece of hardware that can do high resolutions dumps of tapes to it's own DMP format which can be converted to TAP but requires a special piece of hardware
- The DC2N Project Homepage - A tape preservation device for Commodore and Sinclair home computers
- Luigi Di Fraia's e-Footsteps | Retro-blogging since 2011 - Retro-blogging since 2011 and the latest information from Luigi.
- Luigi Di Fraia's Homepage | Retro-inventing and automating since 2002 - Another of Luigi's homepages.
This seems to be the preferred way of making tape backups in the scene because they are high res and you can make TAP files from them.
OpenCBM - ZoomTape/ZoomTAP/TapeXUM/tapread.exe
I don't know much about this, but I discovered TAP utilities in the OpenCBM package and references to a ZoomTape device.
- TapeXUM - c64scene.pl
- TapeXUM is an adapter that connects a tape recorder (Datasette) to a PC via USB. With its help, you can save and archive data on a cassette from/to TAP files. TapeXUM is based on the ZoomTape project.
- ZoomTape was an appetizer for ZoomFloppy whose audience is mainly Commodore fans from overseas. In the states, the purchase of a computer with a station in the 1980s was not a utopia and the cassette player was forgotten very quickly and probably often never even found its way into homes, which results in their lack of sentiment towards the cassette medium. The story was different with us, the tape recorder was the basic accessory.
- I decided to resurrect ZoomTape on a new board using DIY-friendly electronic components, such as the Arduino Pro Micro, which, combined with appropriate modifications in the code, contributed to positive results. I called the whole thing TapeXUM and I published all the files related to the project free of charge. Everyone can assemble and test the adapter with the cassette on their own. Currently, the device will only work in Windows 7 and 10 64-bit, and communication is carried out using tools in the command line.
- GitHub - r1me/TapeXUM: - Capture and write Commodore tapes via USB device. The project's home
- TapeXUM - Capture and write Commodore tapes via USB device - Share Project - PCBWay
- What's TapeXUM ?TapeXUM is a USB device that can read and write to cassettes of Commodore 16/64/VIC-20 (read and write) and ZX Spectrum (read only) format. It requires a Commodore datasette connected to it. This project is based on ZoomTape by Arnd Menge, a great idea and originally a part of OpenCBM package. TapeXUM uses Arduino Pro Micro and through hole components so it's a DIY friendly design.
- Explains a bit of the history aswell.
- ZoomTape daughterboard for the ZoomFloppy, when available? - Commodore 64 (C64) Forum
- ZoomFloppy - CBM 1530/1531 - Tape Drive Connection | jonnz.de
- This might of been an original concept but schematics were never released.
- It gives some screenshots of the software in use.
- Advises to use the Google Group here - https://googlegroups.com/group/zoomfloppy-users
- zoomtape.de.vu - This seems to be the same site. I have used Wayback Machine to get this site
- Zoom Floppy and Cassette | Google Groups
- This is the part of the discussion showing a schematic of a ZoomTape/TapeXUM
- RetroInnovations has made a schematic and mentions Arnd Menge has made an imroved version.
- CRX 2018 - Nate Lawson - ZoomFloppy | YouTube | Commodore Retro eXpo
- Presentation by Nate Lawson about the history of the ZoomFloppy and the latest update in the works.
- This is an excellent talk going ito some of the technical details on how the device and the various Commodore driver work
- ZoomTape Daughter board mentioned at this time - Arnd Menge designed the daughter board but does not seem to of released it.
Transfer Methods (Other)
TAP to WAV
see 1530USB
Manual Copy PRGs to Emulated Disk drive
- Setup a virtual Commodore Disk Drive on a PC (VC1541/viceEMU/etc...)
- Run manual BASIC commands or other PRG to copy files from the tape to the disk drive.
- What command did I use for King Size to Disk. asked here http://plus4world.powweb.com/forum/44433
- The emulated disk drive can be supplied from where ever but the VC1541 over the XE1541 cable is a good starting point.
- From tape to disk? - Commodore 64 (C64) Forum
- Just using BASIC commands to copy programs from Tape to Disk will not work.
- The reason is that when you use the SAVE command it will only copy the BASIC portion of the game.
- You must use a copier program which defeats the object of this method.
- Some tapes will use their own Turbo Loaders to load the game and this could cause issues.
- This might only be true if you use SAVE"FILENAME" / SAVE"FILENAME",1 / SAVE"FILENAME",1,0 / SAVE"FILENAME",8 / SAVE"FILENAME",8,0 as these statements only save the BASIC part.
- SAVE - C64-Wiki
- LOAD - C64-Wiki
- When a program autoruns it is because the code that has just been loaded has overwritten the 'Ready' prompt call so when the 'Ready' prompt is called after the program has been loaded, the PRGs code is executed instead of the 'Ready' prompt and thus the program runs.
I have used the following method to get games of the King Size Volume 1 & 2 tapes to a Disk. This will not work with games that have Turbo Loaders.
LOAD"FILENAME"       (Load as normal)
Press Run/Stop       (You must be able to stop the program with this key)

SAVE"FILENAME",8     (Save the file to disk as a BASIC program)
or
SAVE"FILENAME",8,1   (Save the file to disk as Machine Code, If above save does not work try this one)
- Just to state the obvious
- You do this procedure on a real Commodore computer whilst running VC1541 Disk emulator on your DOS PC and then the PRG saves will be on your PC.
- Check the Saves work
Creating TAP files from PC/PRG/Disk (not real tapes) - TAP to Tape
- Creating TAP files from Yape | YAPE - Info about how to create TAPs from the emulator itself.
- Novamaker | Easily convert PRG files to TAP files for your C16 or Plus/4 | YouTube
- I test out a really handy command line utility called NOVAMAKER that will convert Commodore 16 and Plus/4 .PRG (program) files to .TAP (tape) files using the Novaload turbo loader algorithm. Very handy if you don't have access to an SD2IEC or Pi1541!
Access real drives in emulators
- VICE - Connect Real Disk Drives
- VICE uses OpenCBM as a proxy to communicate with the real drives so it is only limited by this software.
- You need a compatible cable to connect your Disk Drive: XM1541, XA1541, XU1541, XUM1541 (a.k.a ZoomFloppy)
- The following addon cables are supported: XP1541 or XP1571
- OpenCBM - Supported Disk Drives
- VICE communicates with the drive, but the uses the CBM4WIN driver which only implements basic access to the drive.
- Also a lot of custom loaders used in games etc will simply fail when using Vice with a real drive. It's much better to use the XM1541-cable only for creating disk images and using those in VICE.
- OpenCBM - Supported Drives
- For saftey only connect your Commodore equiment when you PC is off. I have heard that connecting these devices while on can damage the Commodore kit.
- In VICE:
- Settings --> Peripheral devices --> Drive Type = the drive you are adding. I am not sure how important this is, but it cant harm to have this match.
- Settings --> Peripheral devices --> IEC-Device , enable and set 'Device type' to "Real device (OpenCBM)".
- YAPE (Parallel 1541 emulation)
- In YAPE
- Settings --> Drive X setup --> Drive Emulation = Parallel 1541 emulation [CPU level/compatibility mode]
- In YAPE
I have not found any support for directly using the 1530/1531 to Datassettes in any emulator. If anyone knows different please let me know.
Capture PET Tapes to Disk using a 1530/1531 Datassette attached to a C64
I got this from How can I get PET Tape programs onto disk? | Port Commodore
- I have not tried this and I don't fully understand this code but I wanted to add this to my site as well so it does not get lost.
- This involves using a Commodore 64 but with the code being BASIC it might work on a C16/Plus4
- I am guessing this changes the tape sample frequency.
You could load/save programs (which relocates the start address which you have to fix later) or you can use this program I discovered for the 64. This program will automatically LOAD each file off of tape and subsequently SAVE it to disk (device number 8) and continue until you stop it (or a disk error occurs when it attempts to save a file with the same name as one already on disk, disk full, or end of tape.)
Here is the listing (remember this is written for the Commodore 64):
5 rem tape2disk
10 for i=53181 to 53247:read a:poke i,a:next i
20 print "[clr][down][down][down]tape to disk transfer program!"
30 print"[down]insert formatted disk in drive 8."
40 print"[down]insert tape, rewind and then press play.[down]"
50 sys 53181
100 data 169,1,162,1,160,1,32,186,255,169,0,162,65,160,3,32,189,255
110 data 169,0,32,213,255,169,8,162,8,160,255,32,186,255,169,20,162
120 data 65,160,3,32,189,255,173,61,3,141,251,0,173,62,3,141,252,0
130 data 169,251,174,63,3,172,64,3,32,216,255,76,189,207
- Type this in, SAVE it (don't want to type it in again, right?),
- put a blank formatted disk in drive 8, type RUN.
- If everything is working the message will display and the computer will now ask you to press PLAY on tape, put in a cassette,
- rewind if necessary, and press PLAY.
- Let it run through the tape (this could take an hour or more if it is a long tape).
- Reset the computer and load the disk directory.
- You should now have the tape programs on the disk
- NB: that the filenames are all padded with extra spaces, you will need to use a disk or directory editor to “fix” the file names.
Notes
What Happens?
This is a table that will just let you know what happens when you sample tapes using a Datasette 1531 and various setups and tapes. This will help you identify what is normal behaviour and what sort of tape format you are sampling.
| Software / Hardware / MTAP Mode | Fullwave Tape (Number Builder) |
Halfwave Tape (Bridgehead +4) |
|
|
|
|
|
|
|
|
|
|
|
|
|
|
|
|
|
|
NB: replace %1 for output.tap or whatever you want your tape to be called.
X Series Adapters Types
XA1541 is the most advanced of the legacy X series adapters. ZoomFloppy/XUM1541 is now recommended for standard disk drive operations.
I have found some good explanations of the different cable types and I will put theme here for you to look through
- Way to transfer files from a PC to Commodore Computers? - Page 2 - Commodore 8-bit Computers - AtariAge Forums
- X1541 - The original cable, between PC LPT and floppy drive. It requires an SPP or PS/2 type parallel port found on 286, 386, 486. All wires, no other components.
- XE1541 - The extended cable, used on Pentium 1 and upwards running MS-DOS. It features four 1N5819 or BAT85 Schottky diodes to make some signals only go one way.
- XM1541 - The multitask cable, essentially the same as XE1541, but two wires swapped which makes it usable in Windows 9X/2000/XP etc and Linux.
- XA1541 - The active cable, which replaces the Schottky diodes with transistors and resistors. Intended for special PC motherboards with a so picky parallel port that the XE/XM cables don't work.
- XH1541/XH1571 - The hybrid cables, used together with the X1541 cable (not XE/XM/XA) and a modified floppy drive that lets you transfer data to the drive at a higher rate.
- XP1541/XP1571 - The parallel cables, used together with an X/XE/XM/XA1541 cable and a modified floppy drive that lets you transfer data from and to the drive at a higher rate.
- XU1541 - The original USB cable, so you don't need a parallel port any longer.
- XUM1541 - The extended USB cable that also supports parallel cables. The ZoomFloppy is an implementation of the XUM1541.
- XS1541 - The serial cable which connects to a PC serial port or USB, and supports both the IEC port and IEEE-488. It uses different software than all the above cables and acts more like a terminal. I don't know how widely it is supported.
- The Star Commander Documentation (Star Commander) - This explains in explicit details the differences of all interface cables and how they work. Read this and you will know the difference between all of them.
- The serial connection is done using the X1541 interface or its substitutes. If you only have an EPP or ECP port then you have to substitute the X1541 interface with the XE1541, XM1541 or XA1541 interface.
- The XE1541 extended cable is a substitution for the X1541 cable. Its advantage is that works in all modes of all parallel ports. Its drawbacks are that you need special diodes to build it and that only a few programs support it. Please, note that this cable has problems with motherboards that use the ALI 5 chipset and certain laptops. On these machines, use the XA1541 active cable instead
- The XA1541 active cable is similar to the XM1541 multitask cable but it uses transistors and resistors instead of diodes. This makes it the ultimate transfer cable because it works with all kinds of parallel ports, including the ones the XE1541 extended cable and the XM1541 multitask cable have problems with. Again, it is supported by only a few programs. This cable also works under Linux.
- I got a copy of the v0.82 instructions in a PDF from PC_Star Commander (eng).pdf (www.mypccollection.altervista.org)
- Cables and adapters (Star Commander) - A full list of all the various cables and adapters that are available and can be built. A wealth of information.
- The X1541-series interfaces (Star Commander) - The X1541-series interfaces explained again with lots of information which will help you decide which cable to use.
- Purchase or build the X-series cables | 64Copy Central - Links to build or buy XA1541, XM1541, XE1541, X1541
- X1541 family of cables question - Commodore 64 (C64) Forum - What is the difference between the X1541, XA1541, XE1541 and XM1541 cables for transferring files to and from the PC and the C-64? And which one should I get?
- If you are looking for USB: XU1541, XUM1541 (AKA ZoomFloppy)
- For a modern computer, get a ZoomFloppy. It is USB and works with newer versions of Windows
- X1541 - You probably don't want that... Only for really old PC
- XE1541 - For StarCommander or 64HDD under DOS
- XM1541 - For OpenCBM/CBMXFER/VICE under Win XP
- Which cable to prefer - XA1541 or XM1541? - Commodore 64 (C64) Forum
- The XE1541 extended cable is a substitution for the X1541 cable. Its advantage is that works in all modes of all parallel ports. Its drawbacks are that you need special diodes to build it and that only a few programs support it. Please, note that this cable has problems with motherboards that use the ALI 5 chipset and certain laptops. On these machines, use the XA1541 active cable instead.
- The XM1541 multitask cable differs from the XE1541 extended cable in two wires swapped at the Commodore end. This enables other transfer programs to use interrupts rather than polling for handshake with the external Commodore drive. Its drawbacks are similar to the XE1541 extended cable. It's supported by less programs than the XE1541 extended cable, however, it works under Linux, as well.
- The XA1541 active cable is similar to the XM1541 multitask cable but it uses transistors and resistors instead of diodes. This makes it the ultimate transfer cable because it works with all kinds of parallel ports, including the ones the XE1541 extended cable and the XM1541 multitask cable have problems with. Again, it is supported by only a few programs. This cable also works under Linux.
- X1541 - C64-Wiki - This article describes in detail all of the different X series cables.
- X1541 (Original)
- XE1541 (Extended)
- Building a XE1541 cable | Commodore Info Page
- Building the XE1541 serial cable - This is called an "extended serial" cable and it replaces the X1541 cable in that it is more compatible with present-day parallel ports and their various modes (ECP, EPP).
- XM1541 (Multitask)
- No specific iformation on this adapter at this time
- XA1541 (Advanced)
- The adapter has been tested with Star Commander in Ms-dos and CBMXfer (a GUI for cbm4win / OpenCBM) in Windows XP.
- You can also use QTCBM, another GUI.
- Not connecting to Commodore Drive
- XA1541 problems, says drive not present - Commodore 64 (C64) Forum
- Common problem actually - could be many things, but the easiest for me to remember is go into your PC's BIOS settings and change the parallel port type setting to ECP+EPP.
- The adapter is probably fine, they're just extremely tempermental devices. They just don't like some parallel ports. Laptops commonly cause problems from memory.
- XA1541 problems, says drive not present - Commodore 64 (C64) Forum
- My X Series Adapters (NKC Electronics)(for my reference)
- I cant remember where I bought these, maybe https://markus.brenner.de/ and these were a very early revision
- Electronical parts | markus.brenner.de - The following shops sell the electronical parts that are used in the cables and adaptors discussed on these pages.
- XA1541
- Commodore XA1541 Adapter - NKC Electronics (This is my revision)
- XE1541 + XM1541
- Commodore XE+XM1541 Adapter - NKC Electronics (This is my revision)
- File:NKC electronics XEM1541 V6 (Commodore XE+XM1541 Adapter) VIN-0100.jpg - Wikimedia Commons - This picture identifies the diodes used (Schottky BAT42W)
- Diode Repair - research and sites
- Standard and Form Factor descriptions etc..
- Diode Case Packages, DO-123 Style, SOD-123 surface mount package - Graphic of a SOD-123 Diode Package, surface mount package style Outline, SMD Dimensions and definition
- SMD Packages: Sizes Dimensions Details » Electronics Notes - SMT components, SMDs come in a variety of packages - there are several standard packages: 1206, 0805, 0603, 0403, 0201, SOT, SOIC, QFP, BGA, etc. . .
- SOD-123 Component Package | mbedded.ninja - SOD-123 Component Package descriptions
- SOD123 | diodes.com
- Category:Diode - ElectroDragon Wiki - A wiki article on diodes
- Small Outline Diode - Wikipedia - Small Outline Diode (SOD) is a designation for a group of semiconductor packages for surface mounted diodes. The standard includes multiple variants such as SOD-123, SOD-323, SOD-523 and SOD-923.[1] SOD-123 is the largest, SOD-923 is the smallest. Electronics Shop
- Digi-Key Electronics - Digi-Key is your authorized distributor with over a million in stock products from the world’s top suppliers. Rated #1 in content and design support!
- Package Outlines and Suggest Pad Layouts - Diodes Incorporated's product packaging: Product Carton and Product Label Specifications, Surface Mount (SMD) Packaging, Through-hole Packaging, etc
- Diode Package styles | interfacebus.com - Listing for Graphics of Semiconductor Diode Packages by package type including both through-hole and surface mount component packages, diode package name.
- SOD123, SOD323, SOD523, SOD723, SOD923, SMA, SMB, SMC - SOD_All.pdf | topline.tv
- SOD123.pdf | diodes.com
- SMD Dimension Selection Guide - SMDDimensionSelectionGuide.pdf | mccsemi.com
- Small Signal Schottky and Switching Diodes PDF | Vishay
- BAT42W
- BAT42WS (Schottky (Less than .5A)) - Diodes' selection of Schottky diodes less than .5A includes a wide selection ranging from Dual, Com., Anode, and Isolated Configurations.
- BAT42W Single 200 mA SMD/SMT SOD-123-2 Schottky Diodes 30 V Schottky Diodes & Rectifiers | mouser.co.uk
- BAT42W Schottky Diodes & Rectifiers | mouser.co.uk
- BAT42WS-7-F | mouser.co.uk
- bat42w diode - Buy bat42w diode with free shipping on AliExpress - Quality bat42w diode with free worldwide shipping on AliExpress
- 100PCS BAT42W S7 SOD123 SOD 123 1206 Schottky Diodes New Original|Diodes| - AliExpress - I Bought these
- Standard and Form Factor descriptions etc..
Imaging Tapes
- When imaging tapes
- When imaging tapes, keep a constant eye on the tape head, it will get covered in crap from the old taps.
- Pressing pay will expose the heads making them easier clean. regular cleaning when dealing with old tapes get consistent results
- I recommend getting a proper tape cassette cleaner
- If you find you transfers getting smaller or inconsistent and then the TAPs not working this is most likely becasue your tape player heads are dirty. This does not preclude the other basic stuff ie belts, motor and a knackered head. this is caused by tape player working and then it stops working because of use.
- If the tape keeps causing the play button to trigger (like when you get to the end of the tape) the fastfoward the tape and rewind it and this will loosen it off.
- The TAP file is created as the tape is played and the size is dependent on the length of the tape, the contents do not change the size.
- When you transfer a tape to TAP some times there will be a slight difference in the file sizes but this is normal. They should be around the same size.
- If you start getting a lot of tap grabs faiing using TTAPSERV.PRG then it could be the serial port on your Commodore failing or the serial interface.
- When using MTAP, if you find you start getting some bad results, try rebooting your DOS PC. I am sure MTAP is stable but it does not harm.
- If the tape does not read first time, keep trying and trying as it seems to clean crap off the tape.
- Clean the tape head regularly as tapes deposity crap on the heads, especially old ones.
- Try at a different part of the day i.e. cold in morning, warm in the afternoon might make data capture better (not 100% abut this one)
- Dont run your tape player too long (i.e. loads of tapes).
- These datassettes are old.
- Let them cool down between batches.
- When the motors are warm as they do not provide as much power/torque.
- Tapes that dont read properly on the first time more than likely will have deposited crap on the tape head so after a dogy read, inspect clean the head.
- I tend to do tapes in small baches of ten and then check/clean heads. i would rather have 10 failed tapes than 50.
- After imaging long tapes, check the head because it is like doing several small tapes
- On bad tapes always do A and B sides as one might work
- Some tapes have different stuff on side A and side B. I generally read the tape insert to assess this. If in doubt do both sides as they might be different anyway (i.e. Winter Games)
- If you image the tape the several times on the same side and the file size is the same then it is most likely to be a good digitisation.
- The same program on different sides of the tape can generate slightly different file sizes but should be within 1KB
- Some tapes are not recorded on both sides (this is rare)
- Dont leave TTAPSERV running when you are not imaging tapes because it keeps the tape player powered up and spinning (i.e. the capston)
- If your datassette jams
- The XE1541 LED will probably go off if running MTAP
- It will be permanently powered off for safety (i think)
- You must power cycle your Commodore to bring it back online
- Check on Plus4 World
- Always check on plus4world to see if your tape, inlay and any other information such as stickers are present and correct.
- Sometimes you might have a slightly different version.
- I would recommend to always image your tapes (in V2/halfwave) just incase this is not on plus4world.
- If your TAP files are very small (<1KB) when using TTAPSERV or TAPSERV
- The connection from your PC to the datasette is faulty.
- check you XEM1541 for blown diodes, i did and I found one had gone. Teseting them is outside the scope of this article. But it is not hard and just requires a multimeter.
- TAP doesn't work - When you check a TAP image it is not working, these are some reasons:
- Doesn't Work: potentially the tape is halfwave and you have not added the switch
- You can check against the same tape on Plus4world and see if it has the same number of parts/files
- Check it runs in VICE and then if not check in YAPE as some times it will run in one but not the other.
- Always make sure the all program runs. I also use a cheat when the game has mulitple parts on the tape that are loaded after you complete one section so I can check each part (i.e. Ye Are Kung fu).
- Getting garbled graphics on the screen
- Does not (always) mean the TAP image has failed.
- Some rare games will only play on a C16 (or Plus 4 with 16k ram)
- E.G. Rockman loads but graphics are garble on Yape and VICE. The Rockman TAP online at Plus4 World works fine.
- A .TAP you might be interested in... - Plus/4 World - A technical explanation of this bug.
- Does not like that does not like that particular emulator. Try the game in another emulator.
- Not all games work with LOAD"" - some need LOAD"",1,1 and some a SYS command. Instructions are usually found on the inlay if required.#
- Check for notes or loading instructions on plus4world, someone might have already found and fixed the issue
- The datasette needs cleaning.
- Set the Tape player Head Azimuth
- When using VICE use 'Attach/Load' the 'Autostart' does not always work. i.e. Space 2 Pilot will not load
- The tape has perished beyond recovery.
- VICE does display TAP file directory for halfwaves because the headers are stored in fullwave
- c64 use - TAPSERV or COPY 235 (disk and tape)
- Finaltap/CleanTAP will check tap image validity and give you loads of information on it - This only works on wholewave tapes (i.e. C64)
- is there a command to copy ech file on tape to the disk
- Tape Transfer | Commodore Info Page - A great overview of the process.
- Tapes usually have the game recorded on both sides of the tape.
- Commodore 16 tape imaging | offog.org - A real persons instructions on how he imaged his tapes.
- Archiving C64 Tapes Correctly – pagetable.com - A article how this guy on his journey figured out how to image C64 tapes. It does have some technical aspects to it but is an easy read.
- Accurately dump Commodore 64 tapes | PythonRepo - This includes a full process from research, to programming in Python and building a custom adapter. Diagrams and schematics are available.
- Commodore 64 C64S Tape Adapter | YouTube
- This homemade C64S Tape Adapter allows You to connect a C2N datasette to a PC running DOS and transfer data from or to Your C64 tape deck.
- This video shows the guy using this nice looking adapter to capture TAP images and using tapeio.exe to check head azimuth.
- I have tapeio.exe and although it is a C64 program it will allow you to set the head azimuth of your Commodore Datasette from a PC, see the video.
- Links to all the required software
- A great video.
- Best or easiest way to transfer from tape - Commodore 64 (C64) Forum - I based my instructions on this.
- RAW Audio and WAV
- Audio/WAV has mixed results because it is converting a digital signal into an analogue signal and so on.
- Making Commodore 64 Cassette Tapes - Part 1 | YouTube and Making Commodore 64 Cassette Tapes - Part 2 | YouTube
- This covers stripping a 1530 and focuses on tape capturing Tapes using RAW audio.
- GitHub - francescovannini/truetape64: - Accurately dump Commodore 64 tapes by building an inexpensive hardware adapter
- awsm — Build your own 1530 to C16,C116,Plus/4 adapter and make an C64 SD2IEC work on your 264 computer
- Build your own 1530 to C16,C116,Plus/4 adapter and make an C64 SD2IEC work on your 264 computer
Tape Formats
- VICE Manual - 17 The emulator file formats - Very technical and includes the frequencies at which the various Commodore computer tapes were recorded at.
- Tap file - Just Solve the File Format Problem - A basic description of a TAP file
- The C64 file formats list | ist.uwaterloo.ca - A lot of detailed information.
- How did the Cbm64/vic20 tapes work technically - Markus Brenner described the actually reading/writing process of Commodore tapes drives to help with the author of YAPE implement TAP support in his Plus/4 emulator.
- C64 RAW TAPE (.TAP) FILE FORMAT. - A simple breakdown.
- The DC2N Project Homepage - Technical information - The DC2N format and other technical data.
- zinc64/Analyzing C64 tape loaders.txt at master · binaryfields/zinc64 · GitHub
- This explains Turbo Loaders and other technical details about the tape process.
- A Turbo Loader is a piece of software that is loaded by the normal Commodore tape procedures and is then executed as any normal program. The function of the Turbo Loader is to read non-standard pulses on the tape which are put together a lot closer that normal tapes allowing them to be loaded up quicker and have a higher density of data on a tape.
- How Commodore tapes work | wav-prg
- Forget T64
- it's not really a tape archive but more something like a file container. If you want real backups of tapes then use the TAP format.
- TAP filesize depends on the amount of data not tape length, but it is a good indicator (longer tape, bigger TAP). Halfwave files are twice the size of a Wholewave tape.
- TAP files come in the following flavours:
- V0 - The intial format and is not used anymore.
- V1 - This revision only supports Wholewaves and it referred to as Wholewave mode.
- V2 - This supports Wholewaves and Halfwaves but is also referred to as Halfwave mode.
- VICE (C64) will not load TAP V2 files
- Rather than it being impossible it probably is a choice of the developers not to use TAP V2 for C64 as it is never needed.
- You cannot see filenames in the files either as it porbably doe snot know how to search for headers in them.
Halfwave / Wholewave
- There are 2 ways of recording tapes in the Commodore range and they vary how the signal is recorded on the tap.
- Wholewave
- All Commodore computers in the 264 range can read this format.
- Example Wholewave Games: Number Builder
- Halfwave
- This format is only compatible with the C16 and Plus4
- For the same tape, halfwaves files are twice as big
- halfwaves TAPs are twice the size for the same length (time) of tape.
- For the same length of tape, the halfwave files are twice as big
- Example Halfwave Games: Aardvark, ACE, ACE2, Airwolf2, Beach Head, Bongo, Bridgehead +4, Demolition, Finders Keepers, Frank Brunos Boxing, Ikari Warriors, Legionnaire, Molecule Man, Paper Boy, Pharaohs Tomb, Sea Strike, Sky Hawk, Space Pilot, Steve davis Snooker, Strip Poker, Strip Poker 2, Summer Events, Task Force, Thrust, Tomcat, Who Dares Wins 2 and Winter Events.
- Transfering C16 taps to real tapes - the horror, the pain... - Commodore 64 (C64) Forum
- PTAP does not support halfwaves
- PTAP options have vic20ntsc / vic20pal, but there's no option for c16, so i just used "ptap nameofthegame.tap"
- The C16 and Plus/4 can use either half or whole (C64) waves
- One can convert a half-wave TAP to a whole-wave TAP and record it at C16 frequency?
- Short answer is that "halfwaves" can not be converted to "wholewaves". It's because the C64 tape input is level-triggered whereas the plus/4's is edge-triggered.
- The long answer would be that some TAP images could indeed be converted to C64's native "wholewave" format (where an entire square wave pulse is encoded per TAP "unit"). Those loaders that do not invert (usually incidentally) the phase of the signal. This is depending on the actual loader: KERNAL and Novaload are generally fine, but later tape turbos will not work as wholewave TAP whatever we'd try. Most TAP images on Plus4world are in fact encoded in wholewaves, especially the old "classic" games, mostly because a lot of the archiving was already done when Markus figured that the plus/4 is just different in this respect.
- "Half-wave" means that by one TAP byte we measure the length of one half of a square wave pulse, and the initial phase is "low" (for the same C64 TAP you would store the sum of the two subsequenting bytes on one TAP byte). While the C64 tape input is edge triggered (IIRC) the plus/4 does not have this and many custom tape loaders invert the phase of the tape pulse (probably incidentally).
- Captured King Size Volume 1 and 2 tapes with MTAP and TAPSERV but the programs will not load - Plus/4 World
- My discovery on imaging tapes and finding out what Halfwaves were.
- Lots of information here and a good thread to read if you are stuck.
- The size difference for your Number Builder TAPs is normal. The reason for this is explained by the differences between the two TAP formats:
- The fullwave/wholewave TAP format is the original format, and was originally designed for C64 emulators. Each byte in the file represents the duration of a complete low-high wave, which is how the C64 responds to tape pulses.
- However, because the fullwave TAP format is designed to assume a low-high wave, it will not work for turbos which use inverted (high-low) waves. That's where the halfwave TAP format comes in. Each byte in a halfwave TAP file represents the duration of each half of each wave cycle independently.
- Basically, the halfwave TAP format is simply a more precise method of dumping tapes. Any tape that can be dumped as a fullwave TAP can also be dumped as a halfwave TAP, and there are some tapes that can only be dumped as a halfwave TAP.
- TAP -> WAV -> PC sound card -> cassette recorder -> datasette -> c16/+4 - Plus/4 World
- this discusses halwaves
- sampling from an audio sort
- Physically modifying your Plus4 to play loading sound from the tape player and potential using this sound to set the azimuth of the heads.
- Are turbo loaders required to use halfwave formats? = I think so.
- Is halwave a type of turbo? = no, halwave wave is how the signal is stored on the tape.
- How can I tell which tapes are using halfwaves? = Use 'Tape Wave Checher'
- Does TAPSERV.PRG handle halfwaves? = no
- Will TTAPSERV image C64 tapes, will it do PET tapes? = It will do C64 tapes, but might not do PET tapes
- Wholewave
- What is the default Tape wave format for the Plus4 - Forum (#44961) - Plus/4 World
- The normal kernal save routine is wholewave. Anything that does not use a Turbo is wholewave.
- Halfwave is only found with Turbo Loaders on C16/Plus4, but maybe only 75% of the Turbo Loaders out there actually use it.
- Novaload is a wholewave for example, but stuff from say Anco are ALL halfwave. Something like that commercial Kingsize Turbo saving program was halfwave.
- Halfwave was used to prevent copying or make it more difficult, but that just turned out to be puny. All halfwave did was make some prog's a bit more difficult to load if your tape deck was not aligned properly.
Hardware
- Datassette (1531/1530/C2N)
- Commodore Datasette - Wikipedia
- A detailed article on all the different versions of the tape drives.
- Explains how the Wholewave storage works.
- Datasette service manual model C2N/1530/1531, preliminary, Oct. 1984 PN-314002-02. - Schematics and technical information
- Commodore Datasette Collection | YouTube | Chuck Hutchins - All if not most, Commodore Datasettes are shown here
- Commodore C2N/1530/1531 Service Manual: Contents | devili.iki.fi
- Unlock Your Datasette - Modifying the 1530 Datassette (or get a 1530USB)
- You will be able to load games to your C64 using a PC, phone, tablet or MP3 player.
- You can backup your original cassette tapes to your PC.
- You can record games to blank cassette tapes.
- Commodore plus/4 Cassette Adapter | YouTube
- Building an adapter to connect a 1531 to a PET, or a C2N to a plus/4
- Commodore Datasette - Wikipedia
- General Tape Player Information
- Tape transport - Wikipedia
- This explains how a tape player works.
- What does a cassette capstan do and what causes tapes to play fast? | YouTube | ANT&TEC
- Short video explaining how a cassette tape capstan works in a cassette player.
- If you have a cassette player with a playback speed that is two fast, the cause is usually down to a bad capstan pinch roller.
- How To Clean And Demagnetize Your Tape Recorder | YouTube | Joe Collins
- Here is a 'how to' video about keeping your tape heads clean and demagnetized.
- Audiomover Tech - Fixing the Cassette Tape Pressure Pad | YouTube | AudioMover
- Hundreds of thousands of cassette tapes have moved through our studio.
- In our experience there is one problem with aging cassettes that is more common than all others.
- This video explains what it is and how to fix it.
- Leader tapes become detached from the reel | YouTube | AudioMover
- At AudioMover, we have digitized hundreds of thousands of cassettes. This is one of the most rare and interesting problems we see.
- INTERFACE Tips Tricks How To: Clean, Align and Demagnetize A Cassette Deck | YouTube | Scotty D
- JC show you hot to properly maintain you tape deck and get the top audio performance from it.
- Cleaning your tape player
- Capstan lubrication easy procedure | YouTube | Nacho Paches
- This is my dirty personal procedure to oil and lubricate capstans from tape decks.
- Capstan lubrication doesn't usually fail in decks, but when it does, it produces nasty speed variations that sometimes are not properly traced to this origin.
- Cassette Tape Player. How it works and how to repair. | YouTube | Steve's Electronic Repair Shop
- How Cassette player mechanisms work and how to repair and align them.
- The 'Pinch Roller' and it's Capston are responsible for pulling the tape through, NOT the reel/spindle motors. The motor on the receiving spindle is just for removing the slack in the tape and so they run slightly faster that the 'Pinch Roller' too prevent tapes getting chewed up by always keeping tension on the tape. The receiving spindle is also on a clutch system to allow for the speed differential during the progression of the tape and the changing of the tape spindle diameters.
- Tape transport - Wikipedia
- If you find no communications is happening over your parallel port adapter the try the following
- change the parallel port mode in the BIOS SPP/ECP/EPP/ECP+EPP
- Try another PC and its parallel port (i did and everything worked)
- Older PCs are better
- ECP is preferred mode.
- Test programs - http://sta.c64.org/scextprg.html#xctest
- Disk Drives
- Commodore Software - CBM Transfer v1.00
- A Commodore IEC drive (1541/1571 etc), OpenCBM, X-Cable or Zoom Floppy adapter.
- A Commodore IEEE drive (4040,8050 etc), OpenCBM, Zoom Floppy adapter with IEEE connector.
- A Commodore IEEE drive (4040,8050 etc), CBMLink, CBMLink cable or adapter, Commodore Computer
- Commodore 1541 Floppy Drive Repair - pt 1 | YouTube
- Commodore Software - CBM Transfer v1.00
Datassette Maintenance
You need to make sure your Datassette is running well so I will outline the things your should do.
- Issues
- If the tape no longer spins and the play button has not popped
- This means the pinch roller is slipping cause by one or more of the following reasons:
- pinch roller is dirty, too smooth or both
- The drive belt might be faulty
- This means the pinch roller is slipping cause by one or more of the following reasons:
- If the tape no longer spins and the play button has not popped
- Don't have a tight drive belt. With a tighter:
- It will make the tape run at the wrong speed with the increased tension.
- The motor will struggle and motors fail quite quickly when the belt is too tight.
- Clean Pinch Roller
- Clean it off with some isopropayl alcohol
- Play the tape unit while cleaning the roller with a lint free cleaning bud (you might have to remove the datasette cassette door)
- Roughend the roller with some very light sandpaper. You do this by holding the sandpaper against the roller while the unit is playing
- Clean the roller with isopropanol agai
- Press Stop and let the roller dry
- Head Alignment
- Head Alignment Without the Real C64 | Load64 - This is not easy, you will have to try a few times.
- Datassette Health Check | Load64
- Recorder Justage - Software Details - Plus/4 World - A head alignement tool - possibly C16 / Plus4
- [CSDb] - Recorder-Justage [german] by Empire (1985) For C64 Datassette head alignment Original in German)
- [CSDb] - Cassette Azimuth (2007) - English version of Recorder Justice - C64 only, but you can use an adapter and still do the X1531.
- [CSDb] - HeadAlign 1.1 by Onslaught (2010) - A tape head alignment utility, similar to Recorder Justice. c64 only.
- [CSDb] - Minimal Head Align by Onslaught (2007) - Datassette head align ment utilit - same as recorder justice
- TAPEIO
- TAPEIO for turbo tape to t64 transfer and head alignment
- The link is from the Wayback Machine
- This software runs on the PC, NOT the C64
- Commodore 64 C64S Tape Adapter | YouTube
- This video shows the guy using this nice looking adapter to capture TAP images and using tapeio.exe to check head azimuth.
- I have tapeio.exe and although it is a C64 program it will allow you to set the head azimuth of your Commodore Datasette from a PC.
- TAPEIO for turbo tape to t64 transfer and head alignment
- Commodore C2N 1530 datasette adjust azimuth angle and repair | YouTube | TechJump - Cleaning and repairing a commodore C2N 1530 datasette and loading a game. Im also adjusting the azimuth.
- Head azimuth software (C64) - Loadstar / Azimuth 3000 - Commodore Remix - Give the idea of making your own tap from a TAP on a known good device to help fixing a datasette out of alignment.
- Renew the Drive Belts
- Drive Belt: Square (75mm x 1.2mm)
- Counter Belt: Square (55mm x 1.2mm)
- Clean off any old belt residue with isopropyl alcohol.
- Do not use any type of grease or lubricant on the belts.
- Some other people have said, Drive Belt: Square (80mm x 1.2mm)
- Sellers of Belts
- Drive Belts | Dataserve - I have bought a set of 1531 drive belts from this chap:
- AUDIO/CASSETTE SQUARE SECTION DRIVE BELT. 80mm x 1.2mm (1 BELT) | eBay
- COMMODORE C64 VIC C2N 1530 1531 DATASETTE DRIVE RUBBER BELT REPAIR REPLACEMENT | eBay
- Stripping and Cleaning the the Datassette
- Commodore C2N Datasette Repair Attempt | YouTube | Jan Beta and Commodore C2N Datasette Repair Part 2 | YouTube | Jan Beta
- A full teardown of the C2N / 1530 Tape drive.
- Links for all the software in the descriptions.
- Commodore C2N Datasette Repair Attempt | YouTube | Jan Beta and Commodore C2N Datasette Repair Part 2 | YouTube | Jan Beta
- Related Forum threads - Some real life situations and what people did for reference
- 1530 Datasette Problem - Commodore 64 (C64) Forum
- Problems with 1530 datassette - Commodore 64 (C64) Forum
- Cassette player maintenance - stardot.org.uk
- Known Issues with the adapter (1530 from load64)
- Known Issues with the adapter, but some of the imfromation is relevant to cassette maintenance
- Two buyers reported that they had problems while backing up 45 and 60 minute tapes.
- Near the end of the tape,datasette slows down,struggles to rotate.
- First thing to do is change the drive belt and clean the heads+pinch roller.
- If there are screws on the tape,unscrew it little bit,it might be too tight inside.
Squeaking Tapes
- If your tape makes a squeaking noise, stop what you are doing and read this section
I swapped my belts in my commodore 1531 drive and on a few cassettes I get a squeaking noise, the tapes then either really slow down or the tape player just stops turning but the play button does not pop up. I have cleaned the pinch roller with isopropanol alcohol.
This is a common issue with older tapes, and it is usually the tapes that cause this. These instructions assume your Datassette is in perfect working order (i.e. clean heads, working drive belt).
Cause
- The tape inside the cassettes when they are made are impregnated with a lubricated (not visibly to naked eye etc..) to aid the tape running smoothly through tape players. Over time this lubricate dissipates and this lack of lubricant that causes the squeak.
- In particular, the squeak is caused by the tape on the donour reel creating too much friction preventing the 'Pinch Roller' from pulling the tape through smoothly. When this happens the 'Pinch Roller' slips on the tape creating the distinctive squeak.
- When a tape squeaks, where does the noise come actually from?
- The tape between the sponge and the head? = No.
- The pinch roller slipping on the tape? = Usually, as it’s trying to pull the tape through, but can’t get it off the reel.
- Other = Can also be the cassette drive belt slipping on the pulley / capstan.
Solutions
- Fast forward and rewind the tape a few times. This does not always work.
- Turn the cassette player so the receiving reel is towards the ground.
- This is not the same as turning the tape over.
- This changes the abient fall direction of the tape and might re-wrap it better ad/or make less friction.
- This will only make a small difference so don't expect miracles.
- Try a different drive. Sometimes a drive might have a slightly more powerful motor which is just enough.
- How to relubricate your stuck cassette tapes | YouTube | ANA[DIA]LOG
- This explains squeaky tapes and potentially how to fix them.
- In this video we learn how to restore the lubricant in audio cassette tapes and obtain perfect transportation free of wow and flutter issues and squeaky sounds!
- This is not really a permanent solution, it is more to allow you to recover the data on the tapes.
- Cassette tape cleaner - What, how & why? | YouTube | Techmoan - This video shows a tape cleaning machine. Perhaps build your own.
- (Thanks to Dave @ www.dataserve-retro.co.uk)
- Lubricate the tapes manually
- Me
- I swapped my belts in my commodore 1531 drive and on a few cassettes I get a squeaking noise, the tapes then either really slow down or the tape player just stops turning but the play button does not pop up. I have cleaned the pinch roller with isopropanol alcohol.
- Do you know what this could be?
- Dave
- That’s a very common problem.
- It’s not a Datassette issue, it’s the tapes themselves (unless you know for certain that they were OK before the belt change).
- For some reason, some tapes (a lot) tighten up with age to the point where cassette players struggle to pull the tape through and audibly complain.
- I have tried quite a few ways of sorting this out over the years, lubricating the cassettes, cleaning them with head cleaner and lubricating with silicone, WD40 and PTFE lubricant sprays.
- I did get some success with silicone lubricant which didn’t damage the tape and I thought all was well. However, after a few weeks on the shelf, I tested them again but they were tight again and wouldn’t load. It seems to be a terminal illness for them.
- Will this spray be good for fixing tapes (temporarily of course)
- Flomasta Silicone Spray 200ml (6699X) | ScreFix = Yes, should be OK.
- 31631-AB | Ambersil Lubricant Silicone 500 ml Silicone LUBRICANT | RS = Yes, should be OK.
- Me
- Use a tighter belt?
- Me
- I am still playing around the squeaking tapes. I think the squeak is the drive belt slipping probably caused by the tape and in particular the clamping of the tape by the head into the spring loaded sponge. I will let you know. I thought it might of been the pinch roller but I am not sure. I am also going to try a tighter belt as this will be able to generate more friction on the spools and see if that solves my issue. Fastforward and rewind work fine. My goal is to sample my tapes not really to keep them as a going concern.
- How tight should these rubber bands be on the tape player. I am just wondering if they are actually tight enough because if I hold one of the rollers (spinny things inside) with my finger and spin another, it is quite free. I am just wondering if I got a bum band or your suppliers are sending you some out of tolerance. Some on the internet say 80mm and another advert says 75mm band, maybe this is the issue. My tapes all fast forward and reverse with no issue.
- I am also going to try a tighter belt as this will be able to generate more friction on the spools and see if that solves my issue. Fastforward and rewind work fine.
- Dave
- Be careful with a tighter belt, it will make the tape run at the wrong speed with the increased tension, the motor will struggle and they fail quite quickly when too tight.
- Me
- Mould is a real problem on floppy disks, but not seen it very often on cassettes though.
- Lubricate the tapes manually
Drive Emulators
- Commodore 64 disk / tape emulation - Wikipedia - A big list of emulators of which most will work with the C16 and Plus4.
- Partial Emulators (Parallel Port)
- VC1541
- Can run with a X1541 or XE1541 cable
- Easy to setup
- supports read and write
- VC1541 disk drive not recognised/not found
- Start order: Power PC on to DOS, turn Commodore Computer on, run VC1541
- You might have to reboot both PC and the Commodore sometimes
- Check physical connections. unplug and re-plug them, especialy with old cables the connections might not be perfect
- If the XE adapter LED goes off upon accessing VC1541 with the Commodore computer
- There is probably a bad connection.
- I redid my solder joints on the adapter (cold joints) but also pay attention to the pin connections of the parallel port onto the board as these could be liable for failure.
- vice1541EMU
- Might need a special cable The 1541EMU cable (type 1) | Star Commander
- I think it can use a XE1541 cable??
- 1541EMU - C64-Wiki
- The 1541EMU software emulates the internal hardware of the Commodore 1541 disk drive on a PC connected to the C64 by a designated cable. Because the actual 1541 hardware is emulated, even fastloaders can be supported.[1]
- The 1541EMU software can run successfully only on PCs with real-time capability and single task operating systems. The requirements for emulating the 1541 disk drive are exceptionally hard. The software was developed on Pentium PCs, and timing can be an issue on newer computers.
- 1541EmU: Demo | YouTube | Electronics Tinkerer
- GitHub - ElectronicsTinkerer/1541EmU: Source code and eagle files for the 1541 Emulator
- With this software you can use your PC computer as a disk drive for those 8-bit Commodore home computers that are equipped with serial bus (this includes for example C-64, C-128, VIC-20, Plus/4 and C-16). Instead of recognizing just the stock serial bus protocol and some of the drive commands, 1541EMU completely emulates the internal hardware of the Commodore 1541 disk drive. This means that even fastloaders are supported.
- 64HDD
- A serial bus and disk drive emulator
- Will run with either X1541 or XE1541 cables
- CBM-HD
- CBM-HD is a project where a PC simulates one or more IEEE devices. If you are familiar with 64HDD, a PC simulating a 1541 drive, then you can consider CBM-HD as its IEEE equivalent.
- Emulates PET drives (IEEE): 3040, 4040, 8050, 8250
- This requires a special interface
- VC1541
- Hardware Drive Emulators
- Pi1541
- Pi1541 is a real-time, cycle exact, Commodore 1541 disk drive emulator that can run on a Raspberry Pi 3B, 3B+ or 3A+.
- A powerful setup but can be pricey.
- Can get them in mini 1541 drive cases
- Unlike SD2IEC, Pi1541 emulates a 6502 and the two 6522s. Any code it is asked to run is run in a cycle exact way.
- As Pi1541 can execute code on its emulated 6502 core it supports a vast range of fast loaders (games and demo scene) even copy protected originals.
- SD2IEC
- Very popular on eBay and you can get them in mini 1541 3D printed cases
- SD2IEC supports a limited set of fast loaders by attempting to guess the fast loader from the code sent to it. SD2IEC will not, and cannot, execute the code, it just simulates the communication protocols. As a consequence only a small amount of popular fast loaders are supported.
- Pi1541
Emulator
- VICE
- When you reset the emulator, the tape counter is reset, so to disable it:
- If using the older Win32 interface, it's in Settings -> Datasette settings -> uncheck 'Reset Datasette with CPU'
- If using the GTK interface, it's in Settings drop menu -> Settings -> I/O Extensions -> Tape port devices -> uncheck 'Reset datasette with CPU'
- When you reset the emulator, the tape counter is reset, so to disable it:
Tape Wave Checker (TAPE_WAVE_CHECKE.PRG) (a.k.a WAVECHECK)
- Download here
- Yes, there is an 'R' missing at the end because the filename exceeded the maximum number of allowd characters, which is 16.
- A VERY experimental program for checking the waveform of a tape.
- When you run it, you'll get a blank screen, and it will display flashing bars when reading the tape.
- If the bars are white, it means the waveform is undetermined, this normally happens on leader sections.
- If the bars are continuous green, then the waveform is normal (low-high).
- If the bars are red, then the waveform is inverted (high-low), and will need a halfwave TAP.
- If you get mixed white and coloured bars, or flashes of white bars, then it probably uses an asymmetric waveform (Darron Broad's turbo loader is an example of this). Again, this will need a halfwave TAP.
- Also, try not to start playing the tape in the middle of a leader section, as it may show the wrong colour happy.
How it works
This software listens to a tape when you play it and visually displays the type of wave being read. This software works just aswell in an emulator with a TAP file.
- The Start sceen
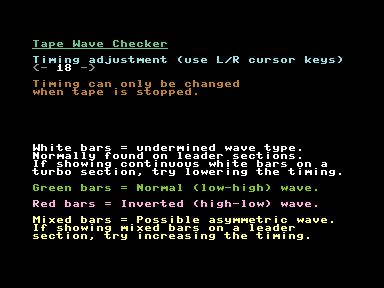
- If it shows a blank screen when the tape is being played then not data is being read.

- If the bars are white, it means it is an undetermined wave type, this normally happens on leader sections.

- If the bars are continuous green, then the wave type is a: Normal (low-high) wave

- If the bars are continuous red, then the wave type is an: Inverted (high-low) wave. This will need a halfwave TAP image.

- If you get mixed white and coloured bars, or flashes of white bars, then the wave type is probably an: Asymmetric wave. This will need a halfwave TAP image.


- Darron Broad's Turbo Loader uses an asymmetric waveform.
- Tomcat and Taskforce are Darron Broad's games.
- The Razorsoft games Mail Trail, Mega Zap, Raider and Sea Strike also use an asymmetric loader, as do their Paxman M199 rereleases.
- Also, try not to start playing the tape in the middle of a leader section, as it may show the wrong colour.
Software
- Tape Wave Checker (TAPE_WAVE_CHECKE.PRG) - See above
- MTAP
- not all PCs need CSWDPMI running. If when you run MTAP it does not ask for CSWDPMI then you don't need it. Same for VC1541
- http://markus.brenner.de/
- cable - http://markus.brenner.de/x1531/index.html
- never run MTAP under windows (as per the instructions)
- C64 Tape to PC (.TAP) - X1541 oldskool LongPlay | YouTube
- This is a slow video but shows you the guy firstly using Star Commander to put files on a disk including TAPSERV which he then saves to tape and after that loads it and uses MTAP to capture tapes.
- Commodore 64 data transfer with C64TPC, Star Commander and TAPSERV (MTAP / PTAP) - A great video on how to use MTAP and Star Commander.
- TAPDancer - Play TAPs from PC
- Chrome App - Dancer - Chrome Web Store - tapDancer Virtual Datasette: Plays back TAP/T64/PRG/P00 / TZX / CDT / UEF / CAS to audio output socket
- android app - can find this but there was one
- FinalTAP / TAPClean differences - Commodore 64 (C64) Forum
- Hello, I am the author of Final TAP (SubChrist), I worked on it between 2001-2006 and released the source in 2006, the sources were picked up and worked on further by a team of TAP experts/enthusiasts and their project is TAPclean.
- I honestly couldn't tell you exactly what the differences are as I havn't followed their developments too much but it's probably safe to assume they have added support for a few of the less common formats/loaders (this was their primary objective I think) + ironed out a few issues and ported it to other platforms.
- The difference between TAP v0 and TAP v1 is all about the pauses (silence) in TAP files, TAP v1 uses a kind of run-length compression rather than storing long sequences of zeroes in the file (TAP v0).
- ps. The preferred method of dumping cassette tapes to binaries is now through the use of the (Luigi di Fraia's) DC2N hardware which can create higher resolution dumps (not TAP files) than were previously possible with ie. the X1541 adaptor and ie. Marcus Brenner's MTAP software.
- These high res dump files (from the DC2N) should never be edited/cleaned but TAP files can be generated from them.
- Some other TAP information
- [CSDb] - TapEx V1.7 by SLC (2021) - A tool for analysing, verifying and cleaning Commodore 64 tape images (TAP V0, TAP V1 and DC2N RAW files (16, 24 & 32 bit).
- Commodore Software - Tape Utilities
- A great list of tools
- Categories: Tape Tester / Alignment Tools, Tape Transfer Tools, Tape Turbo Loaders
- Tree: Commodore 64 Software --> Utilities --> Tape Utilities
- Crossplatform Transfer Utilities | Zimmers.net - A wealth of software here but might not be the most upto date software.
Basic Commands I might use
To load and show directory
LOAD"$",8
LIST

To load a PRG and execute it
LOAD"TTAPSERV.PRG",8
RUN
- Commodore 64 BASIC v2 Disk Drive Commands – The WP Guru
- Commodore 64 commands - The Silicon Underground - A list of common or useful Commodore 64 commands, including disk drive commands.
- LOAD "$",8,1 – what it means - The Silicon Underground - This explains the ,8,1 switches
- LOAD"*",8 vs. LOAD"*",8,1 on the Commodore 64 | YouTube - What's the difference between LOAD"*",8,1 and LOAD"*",8 ? We take a look at several games which require these and other incantations to start, and explore the concept of the load address of Commodore PRG files.
Capture Digital Video Cassette Tapes and Convert with Chapters
DV tapes are now a legacy technology but because they are digital you can still get your videos back without data loss as long as the tapes and camera are in good working order. There are a couple of steps to go through to get these videos in a usable format.
FireWire is also known as iLINK or IEEE1394 depending on the brand, but they are all the same.
This article is a follow on to my other article Capture Analogue Video Cassette Tapes | QuantumWarp, there is a lot of cross over so you might find answer there aswell.
Prerequisites
- Windows 7 PC with a 1394 FireWire port
- WinDV
- WinDV is a small and easy to use Windows application for capturing videos from DV device (camcorder) into AVI-files and for recording AVI-files into DV device via FireWire (IEEE 1394) interface.
- Hover over the screenshots to get more information on the configuration options.
- WinDV 1.2.3 - VideoHelp - An alternative download page.
- MKVToolNix + GUI (gMKVExtractGUI or MKVCleaver)
- HandBrake
- VLC Media Player (optional)
- AviDemux
- MediaInfo
- A DV Camcorder (Video Camera)
- Firewire Cables
- Firewire Card
Setting Up Windows
- Make sure you have a FireWire device installed in your Windows 7 PC, obviously.
- Change to Legacy drivers
- This is done because Windows 7 removed the DV functionality from the drivers that were present in Vista, however they are still accessible if you want them. The legacy driver has been completely removed in Windows 10, hence why we are using Windows 7. Vista is far too old to be using.
- Go into the Device manager and locate your 1394 FireWire Drivers
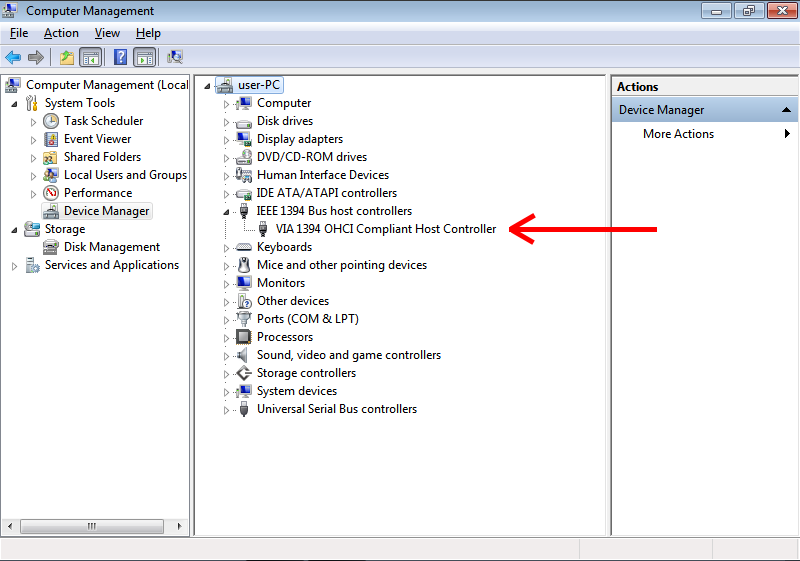
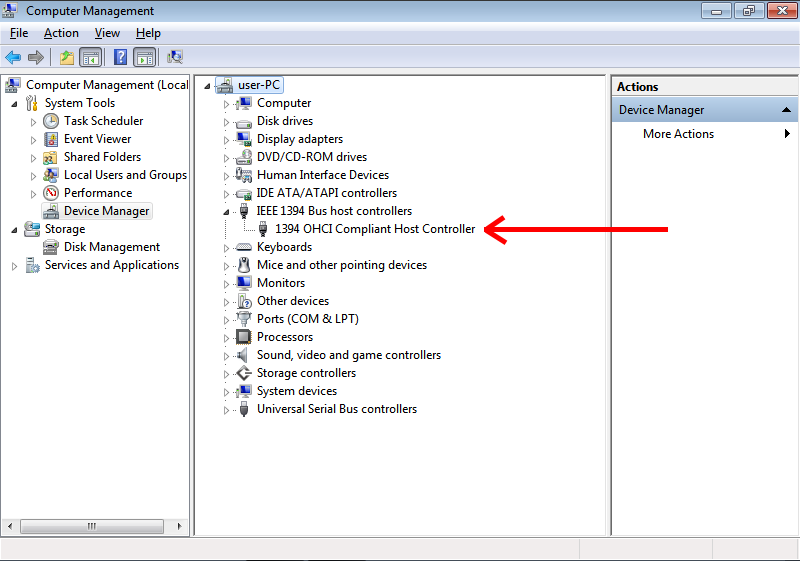
- Change this to the Legacy version
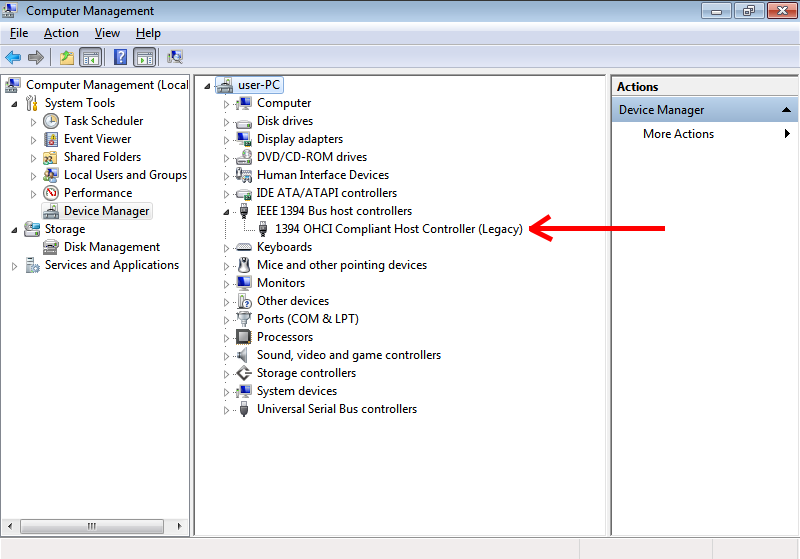
- A reboot is probably not needed but it does not harm to perform one here.
- Install all of the software above so it is ready when needed.
Notes
- Fixing FireWire (IEEE 1394) Problems in Windows 10 and 11. Legacy Firewire Driver, Microsoft Firewire OHCI Legacy Drive, Firewire PCI and PCI E cards and how to install them. David Knarr
- An in-depth tutorial and fixes for the various operating systems
- Windows 10 and earlier will not detect DV camera connected to firewire iLink ieee1394 port - a solution | Microsoft Community
- Windows 10 and IEEE 1394 FireWire Legacy Drivers (Unable to Install the 8.1 drivers) | Microsoft Community
- Installing the correct driver (Windows 7 only) - How to transfer DV or Digital8 videos to your PC | Sony UK
- Windows 7 comes with two i.LINK/IEEE 1394 drivers; a new one and a legacy one. For video capture, you will need to use the legacy driver. Simply follow these step-by-step instructions to make sure the right one is installed.
Capture the Videos (WinDV)
For the user of the camcorder (video camera) it was possible to hit a button on the camera that would put a marker on the video stream which was breakpoint (like a chapter). These breakpoints were also present when the user stopped and started the camcorder. WinDV captures the video stream but when it discovers one of these breakpoints it creates another file. Not all cameras add this marker. The files are labelled sequentially (by default) in time order.
- Go into the Device manager and Change the FireWire drivers to the 'Legacy' version.
- Connect your camera to the PC with the Firewire cable.
- Turn your camcorder on.
- Windows will find a new device and then new drivers for it are installed. It location indevice manage should be in `Imaging devices`:

- The camera should be turned to the correct mode for data transfer if not already.
- Windows will find a new device and then new drivers for it are installed. It location indevice manage should be in `Imaging devices`:
- Put a cassette in the Video Camera
- Now open WinDV
- i did use open as administrator, but i don't think it makes any difference)
- Open the config and set the following:

- Discontinuity treshold (sec): 1
- Every time a user has set a chapter, I want it as a separate file.
- Setting this value to anything other than 0 tells WinDV to automatically split the video into a new file whenever it detects a gap in the recording timestamp on the tape.
- AVI-Type: type-2 AVI (vids+auds)
- Type 2 is generally recommended for modern video editing software.
- Max AVI size (frames): 1000000
- This is the maximum number of frames per file.
- Changing this setting prevents WinDV chopping tapes automatically into chapters when there are none.
- DV format is 1500 frames a minute
- Default: 22500 (15 minutes / 900 seconds)
- Allowed Range: 10 --> 1000000 (666.667 minutes / 11.11 hours)
- Discontinuity treshold (sec): 1
- Enable DV Device Control

- Make sure the checkbox next to the
Configbutton has a tick in it. - This allows the DV-camcorder or VCR to be automatically controlled by WinDV.
- The "Error: No video device found" message is just because I did not have my camcorder plugged in when I did the screenshot.
- In WinDV, this checkbox is for the control of your camera to start and stop recording, when checked, this feature allows WinDV to communicate with your camera, providing you with the ability to send commands to the camera from the software.
- Checked:
- When the box is checked, WinDV will take control of your camcorder or other DV device. It can cue the tape, initiate play for pre-roll, and start/stop recording automatically. This is typically the standard setting for capturing footage.
- Unchecked:
- When the box is unchecked, WinDV does not control the tape transport. This is used for "live" capturing or with certain devices where external control is not needed or not supported, such as with an ADVC converter.
- Make sure the checkbox next to the
- Click Capture
- when you click capture on WinDV it waits until it gets a signal from the camera to start recording, and when the tape is done will stop capturing.
- Press play on the camcorder and the capture will begin
Notes
- You are more than likely to get many files create but this is normal.
- Windows 10 does not natively support DV Tapes anymore, it was removed. I think the last version that has it is windows 7
- In windows 7 + vista you still need to change the drivers to legacy drivers
- You can install the drivers in windows 10 by using some extracted (tutorials in my links)
- Firewire cards don't always work because of incompatibilities
- Using windows 7 or vista and WinDV is probably the easiest way to capture videos
- Some software allows you to control the DV camera from the PC (possibly virtual dub)
- WinDV - No audio on some scenes / Only 1 scene has no sound, the rest of the tape is fine.
- There can be a mix of working and non working scenes, it does not have to be just 1, this description just makes it easier to explain.
- Cause:
- This is caused by recording over another video with a different sound format (12/16bit) and there being no defined scene definition, so WinDV never changes is sample rate/type hence the lost audio.
- This is caused by the audio type changing while playback is occurring, and this is most likely because the user used the same tape in 2 different cameras and they had different settings. Changing the settings on a camera would also have the same effect.
- WindDV will does not recognise the change in the audio type so audio is no longer recorded because the codec it is using no longer understands the audio stream.
- This issue only occurs when you swap scenes and the 2 scenes have different audio encodings.
- Video is unaffected because the video format is always constant and if the bit rate changes it does not matter. there are also key frames at the begining of every scene.
- Solutions:
- You have to record the scenes before and after the audio change separately and then later bring them back together but this time using the same codec and audio settings. This will involve transcoding.
- Start capturing in the new section (to be sure, when audio of the new scene starts) so there is no failed format transition (Preferred)
- Use audio cable to capture audio the old fashion way
- Use another software (untested)
- Try WinDV Type1 capture (untested)
- Links
- no sound in DV captures - VideoHelp Forum
- Joining the discussion late, but starting the camera slightly before capturing is the solution I also found when I had a similar issue (no sound on some transferred DV). There's a known bug in WinDV that effects using the WinDV camera controls and not getting audio; confirmed by WinDV's developer.
- WinDV - help in transferring Type-II AVI - VideoHelp Forum
- No sound in winDV captures, DV-type 2 - VideoHelp Forum
- It's probably a mismatch between audio sample rates. (edit: as I see you are now noticing.) DV can record 4 channels @ 32khz or 2 channels @ 48. Once you have "taught" windv what you are using it ought to be ok. If your tape switches back and forth you will need to restart the capture at each break. 44.1 is very unusual though technically it is in the specs.
- [SOLVED] Strange problem with capturing MiniDV via firewire - missing audio - VideoHelp Forum
- sometimes tapes were re-used and the audio settings had been changed. if the very beginning of the tape was used in 16 bit mode and later recorded over at the 12 bit setting windv or other transfer software will start in 16 bit mode and stay there even if the recording goes to 12 bit mode.
- one way to get around it is to not start he capture on the computer until you hear audio from the recording you want. that way the software will start in the right mode.
- WinDV, Audio capture issue - VideoHelp Forum - WinDV captures and separates all the dv video as desired. However, 2 of the 12 files do not have any sound (2 video segments). The 2 files are at random places in the dv tape. The 10 other files are perfectly fine.
- WinDV - WinDV digital video capture program instructions
- no sound in DV captures - VideoHelp Forum
- No Sound at all
- Causes:
- Is the relevant codec on your PC missing?
- Does your TV support the relevant codec?
- Are your speakers on?
- Solutions:
- Try VLC player
- You could recapture the tape but it is unlikely to be this if other tapes sample fine
- Install missing codecs
- Try playing on another device
- Causes:
Correct DV Video Bitrates (AviDemux)
The video and audio formats must match otherwise errors will occur when we try and merge the videos with MKVToolNix. For the most part you will find your videos are all the same format but occasionally they might not be.
Checking the videos have the same format
Below are some options for checking if the video files are all in the same format:
- Examine the files with MediaInfo (preferred)
- Gives you complete readout of each files specifications and codecs it uses.
- The information provided here will be helpful if you need to converts a video file to a matching format, as you will need to know the new format.
- Use Windows explorer
- Open the folder with the files in
- Change to details view
- Enable the bitrate column
- Examine the results to see if all the bitrates match
- Test output resolution with VLC player
- You can test the output resolution by
- playing the video file in VLC Player
- Taking a Snapshot: (Video --> Take Snapshot) which will go into your "My Pictures" folder.
- Check the resolution of the Snapshot.
- You can test the output resolution by
- You can try merging the videos and see if you get an error.
- It will do this before proceeding to do any real work.
Changing the Audio Bitrate (When required)
These instructions are just for changing the audio because this is most likely going to be the only issue you have
- Open Avidemux
- Open the file with the incorrect bitrate (File --> Open)
- Under Audio Output
- Change 'Copy' to 'PCM'
- Click 'Filters'
- Click 'Resampling (Hz) and change to the relevant bitrate (i.e. 48000)
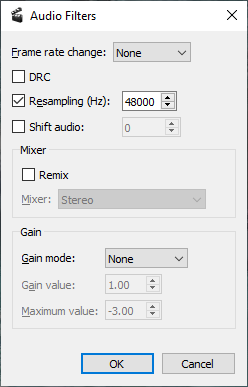
- Click 'OK'
- Under Output Format
- Select 'AVI Muxer'
- Click 'Save'
- You will be prompted to save the new video, select a name and location and click 'OK'
- Repeat this for each video segment you need to re-sample.
These new files can now be used along with your others in the next section because they will all match.
Notes
- How to Fix an Incorrect Audio/Video Sync Setting and Save it Permanently using 'Avidemux'
- How to get started with avidemux, edit and convert any video format - VideoHelp Forum
- Quick And Easy Video Editing Tutorial For Beginners. | YouTube
- How to Cut, Split, or Trim Videos with Avidemux | YouTube
Merging the video files while creating chapters (MKVToolNix)
The videos (and happy memories) have now been recovered into a digital format (corrected when needed) on your PC but are in a weird format which only VLC Player will play and they are still split in to multiple files, 1 for each chapter. If you only have 1 file then not all of this section will apply to you.
The files created by WinDV are labelled (by default) in time order so we can still use them to create chapters and this is one of the reasons for the multistep approach.
We will now use MKVToolNix to combine the video parts into one MKV file with chapters:
- In the input window add the first video fragment/file.
- Select the file you have just added in the input window and click 'Append Files'
- Select all of the other files/chapters you want to add
- Set the view to details to sort by date/time, so do they start oldest first
- Now select them all (excluding the first file which is already added)
- They can now be added in one go, instead of one by one (unless you want too !!)
- Set (Output Tab --> 'Generating chapters') = 'One chapter for each appended file'
- Set the output location and file.
- Now to run click on 'Start multiplexing'
- This software will now create a single MKV file with chapters using the original uncompressed codecs, hence the large size.
Links
- Joining Videos without Conversion using MKVToolNix - A guide on how to join compatible videos into one MKV file without conversion using MKVToolNix.
- Joining Videos without Conversion using Video to Video - A guide on how to join videos with conversion of the codecs using Video to Video, a free full-featured converter available on Windows.
Transcode to a Usable Codec (HandBrake)
The file we created in the previous section will play and have chapters in VLC Player but the codecs used are very old and not many Televisions or consumer kit will play the DV codec so we must now convert them into one they will use, however you just want to archive the files or play them on a PC you do not need to do this step as these files can be played with VLC player.
- Prevent crashing tips
- Do not control your transcoding over Remote Dsektop (RDP)
- Set Windows to the High Performance profile
- Disable screen being turned off
- Disable the screen saver
- Set Windows to never sleep
- Once encoding is started, leave your PC alone
- Limit the number of threads encoding can use. This is set in `Advanced Options` on the `Video Tab`.
- Other notes
- H.265 is not present on all new devices, but the number that support this improved codec is growing.
- Target File
- .MKV - This is a great choice because it supports chapters and is widely supported.
- Target Stream
- Progressive: We will be converting the source from an interlaced to a progressive format while retaining the original Storage Aspect Ratio (SAR) and Display Aspect Ratio (DAR).
- We are not permanently upscaling the stream becasue HandBrake does not upscale sources well.
- Target CODEC:
- Video: H264 - MPEG-4-AVC(part 10) (avc1) :: H.264 (x264)
- Audio: MPEG AAC Audio (mp4a) :: AAC (avcodec)
- These are modern CODECs that can be played on most, if not all modern TVs and PCs.
Instructions
In the panels below make sure your settings match what is shown and that you read each step's notes.
The instructions are for PAL so if you are working with NTSC you will need to change frame rates and resolutions to the relevant settings accordingly.
Source Selection
![]()
- Open your file that you want to transcode.
- Once you get the hang of things you can do batch conversions.
Summary Tab
![]()
- Select the H.264 MKV 720p30 preset
- Set you output location
Dimensions Tab
![]()
- Orientation and Cropping:
N/A- Cropping is not needed because our source files are already the correct size. Cropped would only be needed if you are removing the overscan area.
- The DV format does not have black bars or overscan, the whole resolution is used for the image.
- Resolution and Scaling:
Anamorphic- PAL and NTSC digital formats always rely on the frames being stored as one resolution (SAR), and then stretched to match the screen it is being displayed on (DAR) which is why we have the `Anamorphic` option which controls the display resolution (DAR).
- Option 1 - Anamorphic
- Leave `Anamorphic` on automatic as it always works as expected as you can see by the 4:3 Aspect Ratio. We are just changing the codec used and currently HandBrake only offers limited support for upscaling.
- Target Storage Resolutions
- PAL = 720 x 576 (SAR = 5:4)
- NTSC = 720 x 480 (SAR = 3:2)
- Target Display Resolutions
- PAL = 768 x 576 (DAR = 4:3)
- NTSC = 720 x 540 (DAR = 4:3)
- HandBrake Documentation — Anamorphic Guide
- Option 2 - Upscale
- Use this to set the Storage and Display resolutions to be the same.
- PAL = 768 x 576 (DAR = 4:3)
- NTSC = 720 x 540 (DAR = 4:3)
- Enable
Allow Upscaling - You might need to disable
Optimal Size - I am not sure how well HandBrake upscales
- How to Upscale and Enhance Video Quality with HandBrake
- As for upscaling, HandBrake does support it—but only to a limited extent.
- In versions 1.4.0 and later, a feature called "Allow upscaling" was introduced.
- When enabled, this option allows you to increase the resolution of your video beyond its original dimensions.
- However, the output will be a larger version of the original video, not necessarily a clearer or more detailed one.
- In most cases, upscaling with HandBrake simply stretches the pixels, without actually improving visual quality.
- HandBrake Documentation — Resizing Video
- While upscaling is NOT recommended, there are some instances where it is useful (i.e. uploading to YouTube). To enable this, check the “Allow upscaling” checkbox.
- NB: When upscaling gets better in HandBrake I would recommend using it.
- Use this to set the Storage and Display resolutions to be the same.
- Borders:
N/A- If you see black bars, these would of been cut of when played back as the CRT screens never showed the whole frame/image, but the image will always have a 4:3 ratio.
- This option allows you to add borders but unless you are wanting to retroactively create a legacy PAL or NTSC video file you will not need this.
Filters Tab
HandBrake Documentation — Summary of Filters - gives further information about these options.
- NTSC and Pal are recorded in Rec .601 but we are not bothered what they were, but what they will be stored as.
- These videos will only ever be played on a modern TV or monitor and are not for archival purposes, in which case it is a bit different.
- We will convert to BT.709, Progressive (i.e. non-interlaced). I have not upscaled becasue HandBrake is not great at it yet.
![]()
- Interlace Detection:
Off- All DV and VHS videos are interlaced, so detecting interlacing throughout the video file is pointless.
- Tooltip: Interlace Detection, when enabled, allows the Deinterlace filter to only process interlaced frames.
- Ocassionally you maight need to specify the field order and the instructions for that are below in the notes section.
- I want to completely deinterlace a few files, how do I enable 100% deinterlace detection? · HandBrake/HandBrake · Discussion #6098 · GitHub
- Disable the interlace detection filter, then the deinterlace filter will deinterlace everything.
- Interlace detection: how beneficial is it? · HandBrake/HandBrake · Discussion #5979 · GitHub
- Deinterlace without interlace detection will be somewhat faster
- Interlace detection can have a small number of false negatives which result in some visible combing where the deinterlacer should have been applied, but wasn't
- Interlaced video that is relatively still with little motion will be higher quality with interlaced detection enabled because the still scenes will not have the deinterlace filter applied (which degrades quality)
- If some of your video is interlaced and some not, interlace detection can be used in a "set it and forget it" preset that can be used on all your videos
- Deinterlace:
Yadif + Bob- Deinterlace (Filter)
- Yadif (Yet Another Deinterlacing Filter)
- I use this in OBS and the results are great.
- 11.288 yadif - FFmpeg Filters Documentation
- using:video_filter_yadif | Avidemux - Description and the settings are explained
- Decomb
- I have not used this
- Bwdif (Bob Weaver Deinterlacing Filter)
- I have not used this
- 11.19 bwdif - FFmpeg Filters Documentation - Motion adaptive deinterlacing based on yadif with the use of w3fdif and cubic interpolation algorithms.
- Yadif (Yet Another Deinterlacing Filter)
- Preset (Tunes)
- Default
- Default: Is well balanced for speed and quality.
- Skip Spatial Check:
- Lets Yadif skip correcting certain avoidable artifacts for a slight speed boost.
- EEDI2:
- Uses a slower, higher quality interpolation algorithm for Decomb. Useful for the most difficult sources.
- EEDI2 is the best, but very slow???
- Bob
- Attempts to better preserve motion for a slight penalty to perceived resolution.
- When you select this option, the deinterlacer will look at the previous and next frame to help it build the current frame.
- eg: If you select Yadif + Bob this is the same as Yadif 2x on OBS studio.
- The name Bob comes from the fact that the scanner bobs between the odd and even lines.
- https://forum.handbrake.fr/viewtopic.php?t=43050
- So bob will extract both fields and makes separate frames.
- If you don’t use a Bob, you throw away half of the Fields (and half your temporal resolution ) lead into a 30 frames per second output.
- Use Bob if doubling the frame rate
- Default
- Field Selection (Manual/Custom) (HandBrake)
- An interlaced source file has 2 fields per frame (Top field / Bottom Field), so when transcoding HandBrake will read the field order from the file's metadata. This is why there is no general option for selecting field order as it is not usually needed.
- For reference:
- VHS: Top Field first
- DVD: Top Field First
- DV: Bottom Field First
- Field order detection (Parity) - for Yadif and Bwdif and I think also for DeComb.
- The default value is auto. If the interlacing is unknown or the decoder does not export this information, top field first will be assumed.
- Field detection is automatic by default for most deinterlaces and specifically Yadif/bwdif
- When dealing with digital sources (i.e. DV) the file will have a value in it's metadata saying what field is first and this is read and used by HandBrake.
- You should never need to set a custom Deinterlace option for this.
- If the field order is wrong, the transcoded video will be horrid.
- Using Yadif or Bwdif, if you want to specify which field is first you need to specify the mode and then the field to be first as follows:
## Yadif/Bwdif format
mode=m;parity=p

## Yadif/Bwdif Bob with automatic selection
mode=7;parity=-1

## Yadif/Bwdif Bob with TFF
mode=7;parity=0

## Yadif/Bwdif Bob with BFF
mode=7;parity=1
- Decomb has different options to (Yadif and Bwdif)
- If You hover over the Custom input field it will show you the format.

- HandBrake/libhb/param.c - L173-L216 · HandBrake/HandBrake · GitHub - Shows the modes and presets in the code.
- Deinterlace looks great, but the frames are out of order | Reddit
- If you hover over a field, there is a tooltip (most of the time) that explains the options.
- For Yadif, if you select Custom as the preset, and hover over the box that appears, it tells you that Yadif has mode=m:parity=p options, so I then went into the activity log to see what option number I'd been using and plugged that in, then used 0 for one test and 1 for another test to see which would work on my video. From that one test I'm guessing that 1 is default, so try using parity=0 on the videos that weren't working for you.
- Edit: According to this thread on github, I have them reversed. TFF=0, BFF=1 and there's an auto mode, which I assume handbrake uses by default?
- = these match
bwdifinffmpegwhich is based onyadif
- = these match
- add frame order setting to filters when using deinterlace or decomp · Issue #1928 · HandBrake/HandBrake · GitHub
- This has a link to the presets values for the deinterlacers
- It would seem you want to set
mode=23:parity=pfor bob, with p set to -1 for auto, 0 for top field first, or 1 for bottom field first.
- The Deinterlace Library
- HandBrake/libhb/deinterlace.c at master · HandBrake/HandBrake · GitHub - HandBrake's development repository
/* Deinterlace Settings
 *  mode:parity
 *
 *  mode   - yadif deinterlace mode
 *  parity - field parity

 *
 *  Modes:
 *      1 = Enabled ("send_frame")
 *      2 = Spatial [Yadif only]
 *      4 = Bob ("send_field")
 *      8 = Selective
 *
 *  Parity:
 *      0  = Top Field First
 *      1  = Bottom Field First
 *      -1 = Automatic detection of field parity
 *
 */
- HandBrake/libhb/deinterlace.c at master · HandBrake/HandBrake · GitHub - HandBrake's development repository
- What is Deinterlacing?
- What is deinterlacing? The best method to deinterlace movies | 100fps.com
- A great part of this site deals with interlacing/deinterlacing which introduces some of the nastiest interlacing problems.
- Great example images and explanations of them.
- Explains Bob
- Bob = (Progressive scan)
- Deinterlacing - Wikipedia - Deinterlacing is the process of converting interlaced video into a non-interlaced or progressive form
- The Interlaced Video Problem - Computerphile - YouTube - Why do computers have such a hard time showing TV footage? Dr Steve Bagley unlaces the problem.
- Deinterlace Examples
- EEDI2 vs Yadif vs Bob Deinterlacing. Handbrake. - YouTube
- Practical side-by-side examples
- EEDI2 is the best looking one, but it's so painfully slow. Yadif looks the same as Decomb.
- To use EEDI2 would I still need to use the Bob version if doubling the frame rate as I have to with Yadif? I like to retain smooth motion and these are 50fps shows interlaced at 25fps. I might give EEDI2 a go if I don't lose the will to live before the encoder finishes.
- EEDI2 vs Yadif vs Bob Deinterlacing. Handbrake. - YouTube
- Tutorials
- How to Deinterlace Videos and Remove Jagged Artifacts
- How to deinterlace videos to non-interlaced and progressive files without jagged edge artifacts? Learn best ways to deinterlace videos to smooth motions with Handbrake, VLC, Premiere, etc.
- Deinterlace video using a combination of Yadif or Decomb using a preset bob, eedi2, or eedi2 bob.
- DeComb EEDI2 (without Bob) is the best image quality. Less aliasing and best missing lines reconstruction. The one which looks more like progressive footage. The problem is: it is very very slow, takes lots of time.
- DeComb Bob (without EEDI2) is the best quality/speed balance. It has a little more aliasing but not disturbing and it is much faster. Best option if you cannot wait longer.
- Most effective 2x deinterlacer? | Reddit
- They are two different algorithms for deinterlacing.
- I am a big fan of yadif. It is a much simpler deinterlacer, and much faster, and in motion, to me, everything looks as it would look on an actual TV. If it looks wrong in yadif, then it'll look wrong viewing it on an actual interlaced TV, IMHO.
- But, decomb is an attempt to improve on it further, and it can sometimes get a slightly better result in cases where yadif (and real interlaced TVs) struggle like near-horizontal lines or repeated patterns of fine horizontal lines. Also, decomb is a bit "smarter" in the sense that it can switch into different modes depending on context. Visually to me, though, occasionally this means it leaves a little bit of "combing effect" in the picture where it is only slight, which yadif by its nature never does. On the other hand, yadif by its nature can tend to have a bit of a "smoothing" effect which you may or may not like.
- Having performance/speed tested bwdif as implemented in the Handbrake nightlies, it's fast and/or parallelizes well with many cores, so it beats Decomb+EEDI2 by an order of magnitude or more. Hopefully, it ends up being the qualitatively superior option that some users are looking for, but that remains to be seen, I don't think I'm qualified to do that testing so I'll have to wait for somebody else to do it.
- Best Deinterlace Settings? | Reddit
- The safest bet if you don't know the source is Bob deinterlace, 2x frame rate (I prefer "yadif" to "decomb" but YMMV, decomb is much slower though) but you can do better with film source DVDs which will usually be telecined as 3:2 pulldown so you can do a detelecine first, in most cases auto will work, and then completely disable deinterlacing and it should be crisp.
- thanks for sharing your knowledge. I got great results for deinterlacing an old interlaced sitcom from dvd source, went with yadif + bob + 2x framerate (59.94) and the motion is so smooth, picture looks great (although a bit softer), and no visible combing. I always thought "decomb + default" was fine, but I apparently didn't know what I was missing :) It's fantastic.
- For me, I have found that decomb with the preset of EEDI2 Bob works great. Takes a long time though. I have interlaced detection at default and everything set to off.
- A Complete Guide to Deinterlace Video with HandBrake
- How to use HandBrake to deinterlace DVD or video? What's the difference of Yadif and Decomb? Is there a simpler tool than HandBrake to deinterlace video? All will be answered in this article.
- Yadif is a popular and fast deinterlacer.
- Decomb switches between multiple interpolation algorithms for speed and quality.
- Interlace Detection, when enabled, allows the Deinterlace filter to only process interlaced video frames.
- HandBrake deinterlacing settings? - digitalFAQ Forum
- Use Decomb, EEDI2Bob
- It's better than Yadif for AA (anti-alias), but still worse than QTGMC.
- Yadif leaves % of jaggies, not pleasant to watch.
- HandBrake deinterlacing settings | Reddit
- When you use 'bob' you have to set the framerate in the video tab accordingly.
- 50fps for PAL, 59.94 for NTSC, with 'constant framerate' selected
- Should come out nice and smooth like watching it on a CRT TV.
- Field order will be automatically detected.
- Handbrake settings for DVD Decomb/Deinterlace? | AVS Forum
- Custom Deinterlace options. These might be an old version.
- As long as your DVD only contains a single type of interlaced video, there is normally a clear best choice on which deinterlace filter to use in Handbrake:
- If each half frame shows a different point in time, you should use filter "Decomb → EEDI2 Bob". If that takes too long for you, "Yadif → Bob" is your next best option. Setting the framerate to "Same as source" results in the loss of half your frames. Instead, set the framerate to how many half frames per second your source has: PAL DVD: 50i → 50; NTSC DVD: 59.94i → 59.94. I recommend always using constant framerate. Footage interlaced in this way was normally taken with an interlace scan camera, commonly used in TV productions. You can use MediaInfo to get the framerate of your source, but know that it shows the number of full frames per second, and you want to encode one frame per half frame when using Bob-style deinterlacing; unless you need to encode to a specific target framerate of course.
- If each point in time is shared by two successive half frames it means they were created from a progressive source, film for example, and you can just interleave them again to regain the full height resolution by having all deinterlace and detelecine filters disabled. Commonly found on PAL DVDs. Framerate "Same as source" will select the correct framerate here. Again, go with constant framerate.
- For reverting the 3:2 pulldown that's used to make 23.976p material compatible with the 59.94i NTSC standard you need to use a detelecine filter, "Default" should do the job for the vast majority of movies on NTSC DVDs. Make sure to enforce a (constant) framerate of 23.976 fps when using this filter.
- Handbrake - Home-Recorded DVDs to MP4s - Best Deinterlace Settings - VideoHelp Forum
- I have only just realised that coverting a PAL DVD using Bob results in a 50fps file anyway - even when the framerate is left as "same as source". I really thought this produced a 25 fps file.
- Check your output files. Handbrake doesn't always double the frame rate when bob is selected and the output framerate is Same As Source. It depends on some other settings too. For example, using Deinterlace:decomb will not double the frame rate. Using Deinterlace:Yadif will.
- And routinely bobbing all your videos isn't the best for most film sources (most movies, TV shows, etc.). Every pair of frames will be identical, making them harder to play back smoothly, and wasting some bitrate.
- I've never use Decomb as I was told this was not the best method. So should I be using Yadif or Decomb? And also, what are the best Preset and Interlace Dection settings for the types of DVDs I'm encoding?
- Best De-interlacing to turn 50/60 fields per second to 50/60P | Reddit
- What is the best way to convert 50/60I to 50/60P? I am transcoding satellite feeds and want to keep the temporal resolution of 50/60fps
- The best option in Handbrake would be EEDI2 Bob but it's extremely intensive and will take a very long time to run. If time isn't an issue then it should be your best quality option then.
- I usually go with Decomb Bob or Yadif Bob. Decomb claims to switch between various algorithms but I haven't noticed any improvement between it and Yadif.
- Bob deinterlacing modes are the ones that retain the temporal resolution.
- Always make sure you change the output frame rate to exactly what you want it to be, if you leave it set to "same as source" it will come out at the standard halved "frame rate", ie 59.94Hz video will be 29.97p, even if you have Bob deinterlacing enabled.
- So make sure you pick 59.94 frames per second, or 50 frames per second for PAL stuff.
- Andrew's Tutorial Blog: Which deinterlacing algorithm is the best? Part 1 - HD interlaced footage
- How to Deinterlace Videos and Remove Jagged Artifacts
- Deinterlace (Filter)
- Denoise:
Off- Tutorials
- In-depth look at de-noising in Handbrake 0.9.9 (with image/video examples) | mattgadient.com - De-noising in Handbrake has historically been one of the tricker aspects to delve into. Here I delve away, giving examples of what different settings do.
- Tutorials
- Colourspace:
BT.709- BT 709 is the modern colour space and it makes sense to conver these at the same time. When dealing with digital you could leave them as is?
- BT 709 is the recommended colour space for H.264
- If this set to “Off” then HandBrake will keep the colorspace of the video.
- How to Choose the Right Video Color Space - How do you choose the right video color space for your project? I want to take you through a few basic color spaces and their applications.
- I just captured VHS with a Rec 709 colors space instead of Rec 601. - VideoHelp Forum - I used the wrong colors space for SD. I captured with a 709 color. How much does this matter? It doesn't look any different. Would I have problems down the road?
- Is 4:1:1 color space adequate for VHS rips? | Reddit
- VHS has color space that is much worse than 4:1:1, so no worries. VHS is probably 4:½:½ or worse! :-)
Video Tab
![]()
- Video Encoder:
H.264(x264)- Because DV, VHS and TV all use the same constant frame rate, this is what you should use.
- H.264(x264) is a software encoder
- By using a software encoder, encoding will probably will take longer but you will be using the latest version of the CODEC. Using a Hardware encoder is ok and if the kit is very new it should not be a problem.
- HandBrake Documentation — Video codecs
- Framerate (FPS):
50 / Constant Framerate (FPS)- PAL = 50 fps
NTSC = 59.94 fps
- PAL = 50 fps
- Color Range:
Limited- Options
- Same as source = Automatic
- Limited = Colors are limited to 16-240
- Full = Full Color Gamut 0-255
- Notes
- `Same as source` - I am not sure if the colour range is set in a DV header and if it is needed to be for correct auto detection, so why take the risk.
- Color range selection · Issue #5743 · HandBrake/HandBrake · GitHub
- Half of the players out there can't even display full range properly, so if your source is not full range it's better to keep it the limited range.
- Options
- Quality:
RF 22
- This is the default value
- This is what I use in OBS for VHS capture and is a good level for video sources where there can be some graininess.
- Constant Quality = CQP
- HandBrake Documentation — Adjusting quality - This gives the recommended RF settings for various media and why.
- Encoder Options
- Encoder Preset:
VerySlow- VerySlow is the best you should use. Placebo generates such large files for such little gain it is not worth using.
- This set the preset flag for the H.264 encoder.
- Each of the encoder's presets enable different preconfigured settings like those you can add in `Advanced Options`(such as look ahead and B frames) and inmost cases only selecting the best preset for you is all that is needed.
- The presets do not directly control compression but because as you go up the presets, more features are enabled which in turn increases compression of the video.
- HandBrake Documentation — x264 Presets and Tunes
- UltraFast - Very high speed encoding, but requires much higher bit-rates to maintain quality. This means you can expect much larger file sizes.
- Placebo - Extremely slow encoding but provides the best Quality and/or filesize for a given source. - This option is often considered a placebo because it offers diminishing returns in terms of quality and filesize.
- Typically, it’s recommended to use the Very Fast to Slow settings range for best results, or one of the slower options if you don’t mind the speed loss. Medium is a good balance and most of HandBrakes presets use this option.
- Encoder Tune:
None / Fast Decode = off- Maybe set this to `Film` to combat some graininess
- HandBrake Documentation — x264 Presets and Tunes
- Film - Real life footage, films etc may benefit. (Not Cartoons or Anime). Typically won’t do any harm to if left on for most content.
- Animation - Used for hand-drawn animated content.
- Grain - Typically used for very grainy or old content.
- Still Image - Can be used for Slideshows, Presentations etc where there is very little moving content.
- PSNR - Used for benchmarking quality. Should not be used for normal use.
- SSIM - Used for benchmarking quality. Should not be used for normal use.
- Fast Decode - Optimise for faster decoding. Useful for low power devices that struggle to decode the video.
- Preset Options — x265 documentation
- x265 has ten predefined
--presetoptions that optimize the trade-off between encoding speed (encoded frames per second) and compression efficiency (quality per bit in the bitstream). - Film Grain - This setting aims to encode grainy content with the best visual quality. The purpose of this option is neither to retain nor eliminate grain, but prevent noticeable artifacts caused by uneven distribution of grain.
- Fast Decode - disables encoder features which tend to be bottlenecks for the decoder. It is intended for use with 4K content at high bitrates which can cause decoders to struggle. It disables both HEVC loop filters, which tend to be process bottlenecks:
- x265 has ten predefined
- beandog's x264 preset reference - x264 is well documented, and I like using it, but sometimes I want to see all the flags that a preset is using, compared to the defaults. So, I put this little table together to work as a reference.
- Encoder Profile:
high- Auto = HandBrake will pick the best profile it thinks you setup will handle.
- Baseline = The most compatible with the weakest compression.
- High = Most CPU to compile, most CPU to decompress.
- I don't know what `high422` and `high444` are.
- HandBrake Documentation — Profiles and Levels
- Video Profiles - Define the features / capabilities that the encoder can use.
- HandBrake Documentation — x264 Profiles and Levels
- H.264 profiles - Define the features / capabilities that the encoder can use.
- H.264 Levels - The levels are another form of constraints that define things like maximum bitrates, framerates and resolution etc.
- Encoder Level:
4.1- This controls the maximum compression but also what devices can play this file as they need to be able to play this level of file.
- HandBrake Documentation — Profiles and Levels
- Levels - The levels are another form of constraints that define things like maximum bitrates, framerates and resolution etc.
- A “best settings” guide for Handbrake 0.9.9 and 0.10 | mattgadient.com
- Higher profiles & levels tend to get you better compression (so better quality in a given filesize). However, you’re going to be limited by the profile support of the hardware devices you’re planning to play your videos on.
- Currently, High Profile, Level 4.1 is the most popular profile on recent / cutting edge devices. Such a device will also play Baseline/Main, and any level between 1.0-4.0. The industry’s stagnated at Level 4.1 for a couple years, probably because it’s at the point where it’s “good enough” until H265 starts taking over.
- Levels - Advanced Video Coding (AVC) - Wikipedia
- As the term is used in the standard, a "level" is a specified set of constraints that indicate a degree of required decoder performance for a profile.
- For example, a level of support within a profile specifies the maximum picture resolution, frame rate, and bit rate that a decoder may use.
- A decoder that conforms to a given level must be able to decode all bitstreams encoded for that level and all lower levels.
- Advanced Options
- Nothing to add here because the `Encoder Preset` has done everything for us.
- Encoder Preset:
Audio Tab
![]()
- These audio settings are the highest quality the DV format can goto and are far better than VHS, so use these.
- Bitrate: 384kbps
- Mixdown: Stereo
- Samplerate: 48kHz
- Bit Depth: 16-bit (which I think it is)
Subtitles Tab
![]()
- Nothing to do here.
Chapters Tab
![]()
- Nothing to do be done here unless you want to name all of your chapters.
- The file/chapters can always be edited later without re-encoding.
- Leave chapter markers on.
Start Encode
- Click on the `Start Encode Button
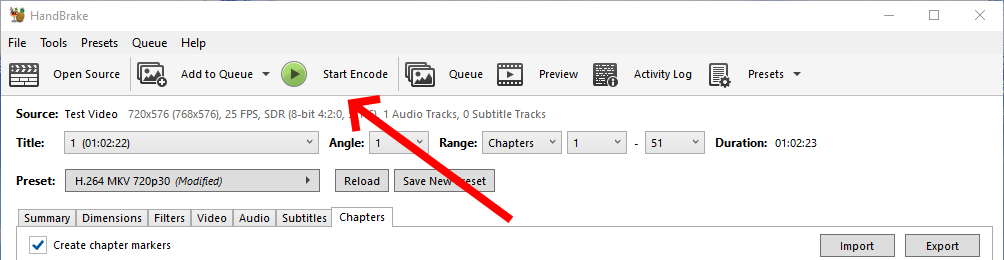
- HandBrake will now create a new MKV file, maintaining the chapters (if present).
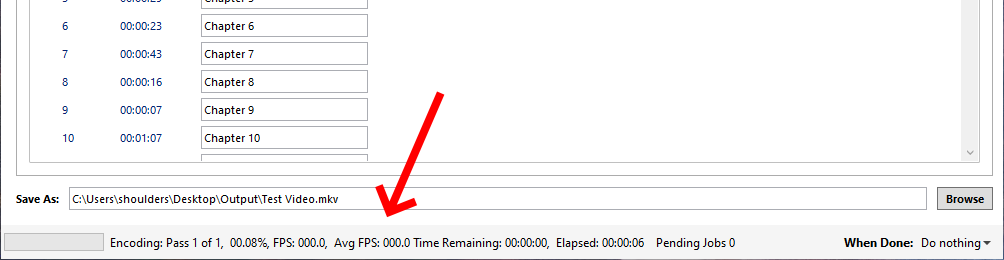
- This MKV will have a massively reduced filesize with the additional benefit that this file will play on most modern TVs and devices.
- For me a 1 Hour tape (13.3GB) was about 1GB in size when converted.
Save your Preset (optional)
Now that you have entered your settings you might as well save them for future use.
- Click on the `Save New Preset` button
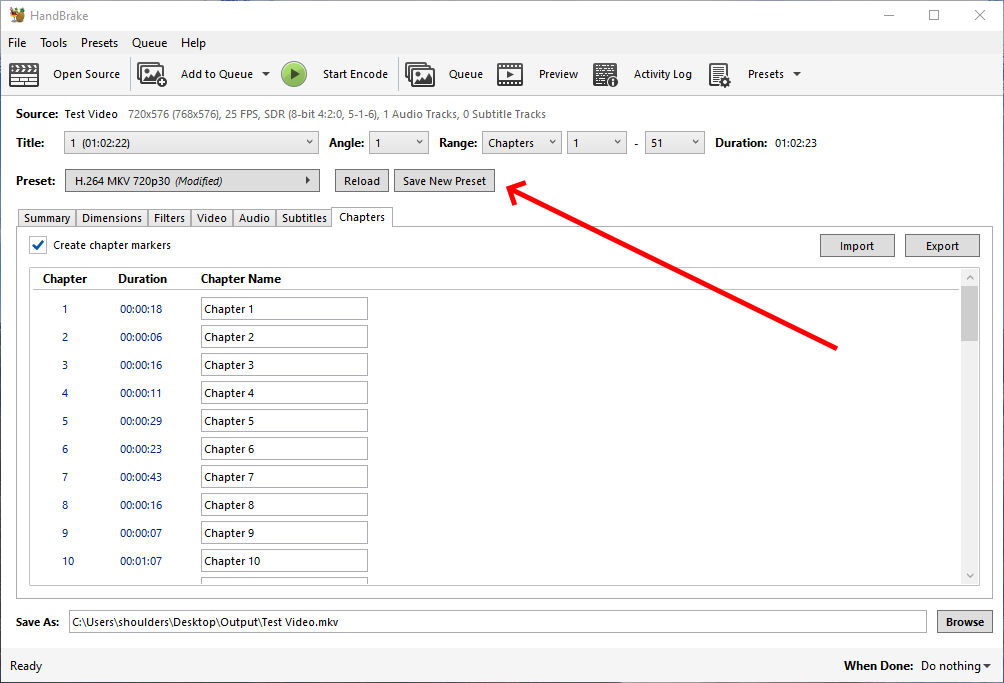
- Fill in your presets basic information
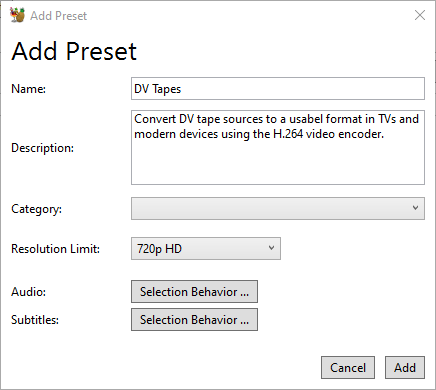
- Audio is not stored in the main part of the preset so for some reason has to be set independently here other wise the Audio will be left as default when you load your preset.

- Subtitles does not need anything changing.

Batch Convert
Make sure you have followed the instructions above at least once and you have saved the settings as a preset (e.g. 'DV Tapes').
- Optionally set your default output folder before starting.
- Open and HandBrake
- Set folder here: Tools --> Preferences --> Output Files --> Default Path
- The default folder is the `Videos` folder in your profile.
- Close HandBrake
- Open HandBrake
- Select all of your files either by dragging or selecting a folder.
- All of the files will be opened as titles.
- Select your 'DV Tapes' preset which will apply it's settings to all of the titles.
- However the output folder is not included and as such it will use the default output folder.
- The input filename is used as the output file name but with the extensions changed to MKV (in our case).
- Add to Queue --> Add all
- Start Encode
- Done, wait for the files to be transcoded.
Notes
General
- Remux
- Changing Container
- no transcoding (changing of codecs) occurs.
- Remuxing Files to MKV | Plex Support - Remuxing, in our context, refers to the process of changing the “container” format used for a given file. For example...
- Muxing
- Is the merging of multiple sources/files into one container file (i.e. MKV).
- Transcode
- Re-encoding the video/audio stream to another format
- Software Decoders
- Software decoders are much better at encoding as they are not limited to what the hardware will do and are not time limited. They can take much longer to encode the same video source but the output is generally better.
- Software can be updated to benefit from the latest Algorithm and codecs but hardware generally cannot.
- I only use hardware encoding in OBS because I need to encoded on the fly which is where hardware encoding is much better. When capturing from a video cassette, you cannot wait for the system to finish encoding a frame before it gets the next one. When transcoding a file there is no such time constraints.
- If your cpu is powerful enought you can use software encoding for analogue capture as there is nothing stopping you, but just make sure your system can keep up with sampling from analogues sources because of the aforementioned timing constraints.
- Hardware vs Software Encoding
- HandBrake – Convert Files with GPU/Nvenc Rather than CPU – Ryan and Debi & Toren - In this post, I’ll show how to use this feature in Handbrake and show some comparisons to illustrate the benefits and tradeoffs that result.
- Software Encoding is much better than hardware compression because:
- Always the latest algorithm available
- Not limited by input time, so can convert at it's own pace meaning there will be no dropped frames.
- can produce the best compression ratios
- More options available
- Hardware Encoding
- This is useful when your CPU cannot handle the amount of bandwidth coming from a live stream or analogue source.
- Very useful for on the fly compression
- Usually old algorithms.
- Limited options
- Compression not as good as software
- The encoded can not be upgraded because it is on the silicon
DV Format and Hardware
- General
- DV Specs
- The DV format does not have black bars or overscan, the whole resolution is used for the image.
- PAL
- Interlaced
- Storage Field Resolution: 720x288
- Storage Frame Resolution: 720×576
- Storage Aspect Ratio (SAR): 5:4
- Display Frame Resolution: 768x576
- Display Aspect Ratio (DAR): 4:3
- Audio: PCM
- NTSC
- Interlaced
- Storage Field Resolution: 720x240
- Storage Frame Resolution: 720x480
- Storage Aspect Ratio (SAR): 3:2
- Display Frame Resolution: 720×540
- Display Aspect Ratio (DAR): 4:3
- Audio: PCM
- DV - Wikipedia
- KB Corel: About DV (IEEE-1394) connections with Studio
- Has a picture of the port
- Possible labels:
- 1394
- iLink
- DV
- Firewire
- DV uses lossy compression of video while audio is stored uncompressed and should be transferred (as per this tutorial) and not captured via other means.
- DV Format Explained with Examples - Free Video Workshop - DV format facts. What are the different types of DV formats. How is DV compressed? Explore the different types of DV tapes and more.
- DV (from VHS/Hi8/miniDV) -> HD. Expand color/luma? Bad idea? - VideoHelp Forum
- HDV is similar to DV in that both use 4:2:0 (actually PAL DV uses 4:2:0 and NTSC DV uses 4:1:1 but the amount of information is the same).
- HDV and DV also have the same luma/chroma ranges (the 16-235 etc). So, the important part of your process is the quality of the upsampling from SD to HD. This is especially true for NTSC since it has to go from 4:1:1 to 4:2:0 (assuming that's what your final format uses).
- If your final format supports 4:2:2, it would be wise to test that option for NTSC DV source.
- DV Specs
- MiniDV
- MiniDV Wiki: All You Need to Know About mini-DV Tape Format - Free Video Workshop
- What is a mini-DV? Learn more about this digital video format which allowed the easily capturing of digital video to a computer via an IEEE 1394 connection.
- The mini-DV resolution is 720 x 480 pixels (NTSC) and 720×576 (PAL) with interlaced scanning.
- Audio is recorded at different sample rates with the best quality being 48 0000Hz at 16 bits.
- The horizontal resolution of mini-DV when viewed on television is around 500 lines, compared to VHS’s 240 lines and Hi-8’s and S-VHS’s 400 lines.
- MiniDV Wiki: All You Need to Know About mini-DV Tape Format - Free Video Workshop - What is a mini-DV? Learn more about this digital video format which allowed the easily capturing of digital video to a computer via an IEEE 1394 connection.
- Hi8 vs MiniDV : Difference Between Hi8 and MiniDV Video Formats - Hi8 vs MiniDV - main differences between the Hi8 and MiniDV tape formats. Tape width, video quality and compression ratio are covered.
- Digital8 vs mini DV : Difference Between Digital8 and mini DV Explained - YouTube - Digital8 vs mini DV : Learn the difference between Digital8 and mini DV.
- MiniDV Wiki: All You Need to Know About mini-DV Tape Format - Free Video Workshop
- DV vs HDV
- DV vs HDV: What’s the Difference and Related Hardware? - DV vs HDV capture format, what are the differences between them? Which one to choose? What device to use to record in the selected format?
- Variations Between DV and HDV: Examining Details | Coconut© - The DV and HDV video formats are revisited. Discover how they shaped video history and digital creation.
Codecs and Encoding Formats
- MKV
- Is a container.
- The data within can use different codecs for sound, audio
- This container can hold subtitles and other assets etc...
- .264 and .265
- Are not supported by medium to old TVs
- I am not sure what a modern Vestel TV (LG, JVC) supports.
- Vestel TVs
- Do not like ExFAT, they do like FAT and NTFS.
- AAC or AC3
- MKV, AAC Or AC3 - VideoHelp Forum
- With DVDs I usually convert to MP4 as the files are lower then 4gb. I try to keep the audio intact, if i can't then I use AAC.
- Use AC3 when you want 5.1 etc.. see link above
- HandBrake defaults to 'AAC (avcodec)
- MKV, AAC Or AC3 - VideoHelp Forum
- HandBrake default formats for MKV
Video: H264 - MPEG-4-AVC(part 10) (avc1) :: H.264 (x264)
Audio: MPEG AAC Audio (mp4a) :: AAC (avcodec) - MKV standard code
Video Mpeg4 AVC (x264)
AC3 (lav) - EEDI2
- EEDI2 - Avisynth wiki
- EEDI2 (Enhanced Edge Directed Interpolation) resizes an image by 2x in the vertical direction by copying the existing image to 2*y(n) and interpolating the missing field. It is intended for edge-directed interpolation for deinterlacing (i.e. not really made for resizing a normal image, but can do that as well).
- Links to various GitHub repositories
- GitHub - HandBrake's EEDI2 port with nicely commented source code: eedi2.c, eedi2.h
- EEDI2 - Avisynth wiki
Software
HandBrake
- Description
- is a transcoder
- maintains chapters
- lots of presets for different devices
- support most (if not all) video formats)
- has a batch mode
- Official Sites (HandBrake)
- HandBrake (Unofficial) | Reddit - This is the unofficial subreddit for the handbrake video conversion software (handbrake.fr), this sub is for information exchange and helping out, not affiliated with the developers.
- GitHub - HandBrake/HandBrake - HandBrake's main development repository.
- HandBrake Forum
- Official Documentation (HandBrake)
- When looking at the documentation be aware there is documentation for each version number and Google/Bing just pick one. So my advise is too make sure the version in the URL is `latest` and does not specify a number like 1.7.0 which you can just replace with the word `latest`.
- HandBrake Documentation - English documentation is currently available for the following HandBrake versions.
- HandBrake Documentation — CLI Guide - The following details all the available options in the command line interface.
- HandBrake Documentation — Summary of Filters
- Colorspace + tonemap filter. Can change/tonemap the colorspace of the video into one of the following:
- If this set to “Off” then HandBrake will keep the colorspace of the video.
- HandBrake Documentation — Custom Presets
- HandBrake comes with many built-in presets which cover the most common use case scenarios. However there are many scenarios and devices that many not be covered.
- Audio and Subtitle settings are special. The preset does not store selected audio and subtitle tracks from the main window. It uses rules to automatically select them for each new source or title that you selected. You can modify these rules by editing the settings on the relevant “selection behaviour” screen.
- Hardware Decoding
- HandBrake can make use of Hardware Decoders:
- Video Tab --> Video Encoder
- HandBrake Documentation — NVIDIA NVENC - Supported Hardware and Configurations
- HandBrake Documentation — AMD VCN - Supported Hardware and Configurations
- HandBrake Documentation — Intel Quick Sync Video - Supported Hardware and Configurations
- Tutorials
- Handbrake: Complete Step-by-step Guide (2024 Update) — RapidSeedbox - Learn all about Handbrake, a tool that easily converts video content recorded from almost any common device and converts it into common video formats.
- A “best settings” guide for Handbrake 0.9.9 and 0.10 | mattgadient.com
- Aimed at v0.9.9 but helpful for all versions of Handbrake, this guide is aimed at those who want to understand what each of the options actually do.
- This is where things can get a little tricky. Higher profiles & levels tend to get you better compression (so better quality in a given filesize). However, you’re going to be limited by the profile support of the hardware devices you’re planning to play your videos on. Here’s the order of things:
- Explains the different tune settings including level
- currently, High Profile, Level 4.1 is the most popular profile on recent / cutting edge devices.
- Almost every current-generation device supports High Profile, Level 4.1.
- Thus, you probably don’t want to exceed Level 4.1. If you go any higher, your video probably won’t play, or will play-with-glitches on any current smartphones, tablets, etc. Note that some slower computers which lack hardware playback support may also struggle to smoothly play back videos encoded at very high levels.
- Using Handbrake for H.264 encoding - YouTube - Handbrake is a free program that can make high quality H.264 and H.265 video. I use it to make all my tutorial videos as it can compress them to very small files and still look good. You can also use it to remake files which do not work properly in your editing program.
- Tips for Encoding Videos using HandBrake
- Tips for creating good video encodings or DVD/BluRay rips, specifically when using HandBrake.
- The tips give concrete instructions for the program HandBrake, which is a freely available, popular, and good tool for encoding videos—if you use it correctly.
- A very indepth tutorial and does not just apply to HandBrake.
- Yadif or Bwdif vs. decomb
- My advice is to only use either the ‘Off’ or ‘Bwdif/Yadif
- Does not mention EDDID
- Avoid decomb, unless you are dealing with the rare case of mixed interlaced and progressive material, because this is one of those dubious algorithms that attempts to only apply deinterlacing when it believes it to be appropriate.
- Regular deinterlace vs. ‘Bob’
- The first implementations of deinterlace methods only tried to produce one deinterlaced output frame per input frame. As I explained above, video may contain two unique fields per frame and in that case one would want two progressive deinterlaced frames per interlaced frame. In HandBrake the deinterlace filters have a ‘Bob’ preset (no idea where the name comes from). This is the one you need if you want to get both fields out of a single interlaced frame, and you must also set the output framerate to twice that of the interlaced input. Only enable this if the video really has two fields per frame, otherwise you'll just get each frame repeated twice.
- In HandBrake the deinterlace filters have a ‘Bob’ preset (no idea where the name comes from). This is the one you need if you want to get both fields out of a single interlaced frame, and you must also set the output framerate to twice that of the interlaced input. Only enable this if the video really has two fields per frame, otherwise you'll just get each frame repeated twice.
- = use bob + 50 for PAL and 59.94 (twice the frame rate, mtaches the field rate)
- = x2 option in OBS
- The lowest sensible RF value is widely considered to be 18 (beyond that, you're wasting bits on encoding invisible details).
- For high-definition movies, 22 is generally a good value, for DVD material it is better to stay around 20.
- A file encoded at RF 22 with the ‘slow’ preset will usually but not necessarily be smaller than one encoded with the ‘fast’ preset, but even when it isn't smaller, it will likely look better.
- Denoise
- In short: if you want to preserve film grain, you will need a very high bitrate. If you want a small file, apply denoising to get good image quality at a low bitrate. NLMeans works best.
- = use NLMeans + does loose some of the image
- = HQDN3D will inevitably degrade the entire image
- = denoise will reduce file size but you potentially will loose quality
- Modern codecs like H.264 are pretty good at keeping quality acceptable even at lower bitrates. However, although these codecs do have a kind of denoising effect at low bitrates, below a certain point this breaks down and the codec makes a mess of it. If you have a noisy video source (e.g., low-quality VHS tapes, a DVD of an old TV show, a film with a lot of ‘grain’), and you cannot afford encoding it at the extremely high bitrate that will correctly preserve all the noise, then it is a better idea to filter out as much of the noise as possible before the actual encoding starts. The codec will then have a much easier job at producing a good image at a low bitrate.
- In short: if you want to preserve film grain, you will need a very high bitrate. If you want a small file, apply denoising to get good image quality at a low bitrate. NLMeans works best.
- Recent versions of HandBrake have two types of denoise filters: the old HQDN3D (has nothing to do with Duke Nukem 3D by the way), and the new NLMeans.
- Easiest Best Optimal settings for Handbrake DVD to H264 Video Conversion on Mac, Windows and Linux 2022 - This is a simple easy guide on how to make the best encodes with the smallest file size in Handbrake using H.264 without having to know or understand all of the settings. Just copy my settings and you’re done!
- Tweaking4All.com - HandBrake - Optimizing Video Encoding (h264)
- For those who'd like to optimize the video encoder settings with HandBrake seeking to reach optimal results when it comes to file size and quality.
- Rule of thumb: DVD RF 20, BLU-RAY RF 22
- How to Compress Video Files without much Quality Loss using Handbrake - In this step by step tutorial you will get acquainted with Handbrake, and how to use it to compress large videos without much quality loss.
- Best Settings for Video Compression in Handbrake | NVENC / CPU - YouTube - NOTE: PASCAL GPUS, NVIDIA 1000 SERIES, has a very weak NVENC engine that does not have many features that allow for good compression of H264 and H265. Users who have these GPUs will see drastically worse compression results and should stick with CPU compression settings used in this video.
- Handbrake Complete Tutorial Part 1: How to Transcode & Compress Videos | OCFreaks!
- An in-depth guide cum tutorial showing how to properly transcode videos using handbrake, with all the settings explained in as simple and concise a manner as possible, without sacrificing the finer details.
- Covers de-interlacing
- Denoise: If you’ve got excess grain or blur in your video, you can use this option to reduce it, but at the expense of loss of finer details.
- Deblock: This filter can be used to remove visible sharp edges between adjacent macroblocks. Only use this option as a last resort.
- x264 Exclusive Settings:
- x264 Preset: By using this slider you can adjust the level of tradeoff between encoding speed and filesize and/or quality. The extreme left setting will finish encoding quicker but the filesize will be larger for the quality. The extreme right setting will take much longer to encode, but it will offer the lowest filesize for the quality.
- x264 Tune: Options of None, Film, Animation, Grain, Still Image, PSNR, SSIM, Fast Decode are provided. Choose any one of these options according to your requirements. (For example, Film if your source is a movie, Grain if you want to retain grain, etc. PSNR and SSIM will offer you maximum quality the way a computer will see it, and is not generally recommended to use.)
- H.264 Profile: Four profile options are provided: Main, Baseline, High, Auto.
- Main: Less CPU intensive, Fast Encode, Fast Decode (Playback), Large Filesize.
- Baseline: More CPU Intensive, Slower Encode, Slower Decode (Playback), Lower Filesize.
- High: Most CPU Intensive, Slowest Encode, Slowest Decode (Playback), Lowest Filesize.
- Auto: Selects the Profile most suited for your settings automatically.
- H.264 Level: Each H.264 level provides a set of constraints like max bit rate, frame size, etc for encoding. For the full list of constraints for each level, see: H.264 Levels
- Handbrake Tutorial Part 2: x264 Advanced Encoding & Compression Settings Guide | OCFreaks!
- An in-depth Guide/Tutorial explaining all the x264 intricacies and advanced settings offered in handbrake advanced tab. The settings in this tab are for those who like to tweak and fine tune the encoder's settings for the video.
- Very in-depth
- Shows how to access advanced tab
- HandBrake vs FFMpeg
- HandBrake Documentation — Supported source formats
- One of HandBrake’s strengths is its ability to open a wide variety of video formats. HandBrake uses FFmpeg libavformat and libavcodec libraries under the hood and generally can open whatever FFmpeg will, in addition to disc-based formats like DVD and Blu-ray.
- What the difference between ffmpeg and software like Handbrake? | Reddit
- Handbrake will do things to try and save the user from themselves. For example, if you resize the video to a size that is not within the original video’s aspect ratio, it will automatically correct and resize to a size that maintains aspect ratio. It may have updated to include a option to choose to not do this, but things like this are what make handbrake different. With Ffmpeg, you can see the automatic choices being made if you turn up its logging verbosity.
- Handbrake uses ffmpeg's libraries under the hood. It's essentially a GUI frontend for ffmpeg. As such, it simplifies a lot of operations for the user, meaning that it's both much easier to use for newcomers but also much more restricted in its functionality.
- Handbrake does have at least one feature advantage over FFmpeg. They have their own NLMeans filter which is multithreaded and therefore massively faster than FFmpeg's single-threaded one. They also have presets for the various filters they have, which I'd say counts as a feature advantage, I certainly could use such presets in FFmpeg.
- [FFmpeg vs HandBrake] What’s the Difference and Which One to Choose? - Aiming to help users understand what transcoding program they want, this article reviews two well-known open-source software FFmpeg and HandBrake, and makes a detailed comparison between them in an FFmpeg vs HandBrake guide.
- Handbrake vs ffmpeg | Reddit
- Handbrake (in most cases) uses the same encoders on back-end that ffmpeg uses. H264 is encoded using a software library called x264, and HEVC uses a software library called x265. Handbrake just gives you a nice GUI and hides some advanced options available in ffmpeg.
- HandBrake Documentation — Supported source formats
VLC Player
- How to transfer your old DV/Hi8 cassettes to modern hardware â THE FULL GUIDE w/ problem solving - YouTube | kleines Filmröllchen
- The most comprehensive 2021 tutorial on how to “digitize” DV and Hi8/Digital8 tapes with your old camcorders and modern hardware, almost for free. With lots of tricks and tips on how to avoid frequent mistakes and fix common errors.
- Uses VLC player to grab the DV stream.
- Find out Video Resolution and Frame Rate using VLC - Find out video resolution and frame rate, which contributes largely towards the quality of a video. Determine your video quality using this method.
- VLC Player can potential build MKV with chapters.
- How to quickly convert MKV to MP4 file using VLC? JVC camcorder stuck in 'safeguard' mode? - UK Vintage Radio Repair and Restoration Discussion Forum - JVC camcorder stuck in 'safeguard' mode? Vintage Television and Video
- I can use VLC player to convert MKv to MP4 or OBS Studio
Other DV Software (WinDV Alternatives)
- ScenalyzerLive 4.0 20060412 Free Download - VideoHelp - ScenalyzerLive (short: ScLive) makes capturing video and selecting useful scenes from your DV-tapes very easy, comfortable and FUN! Sclive is the "missing link" between the Camera and your editing-program.
- HDVSplit 0.77 beta Free Download - VideoHelp - HDVSplit is a utility for capturing HDV stream from your camcorder with scene splitting by timestamp.
- Adobe Premiere Pro 24.1 Free Download - VideoHelp - Adobe Premiere Pro software is a nonlinear video editing application. Powerful real-time video and audio editing tools give you precise control over virtually every aspect of your production.
- Stoik Video Capture 1.0 Free Download - VideoHelp - STOIK Capturer allows you to capture video from DV camcorder through FireWire interface or any analog video source such as TV tuner card, video card, webcam etc.
- Enosoft DV Processor 1.5.4 Free Download - VideoHelp - Enosoft DV Processor is primarily designed to perform real time processing on DV streams, either from an attached DV device or from existing DV AVI files.
- DVdate 8.3.7 Free Download - VideoHelp - DVdate is a nice utility for all video avi-files, but specially useful when dealing with DV video clips. Retrieve basic video information like the codec, image size, duration, audio format.
- GitHub - ddennedy/dvgrab: Command line FireWire DV and HDV capture tool for Linux - Command line FireWire DV and HDV capture tool for Linux
- dvgrab(1) - Linux man page - Capture DV or MPEG-2 Transport Stream (HDV) video and audio data from FireWire
Windows and Drivers
- Win8 and Win8.1 FireWire drivers
- legacy IEEE1394 OHCI drivers from Microsoft
- Extract the drivers by running
msiexec /a C:\full_path_to_1394_OHCI_LegacyDriver.msi /qb TARGETDIR=C:\full_path_to_1394_extract_dir
- Install with the right button or by updating the IEEE1394 driver and make sure it has a "(Legacy)" after the update. This will enable "Microsoft DV Camera and VCR", but that's it. Virtualdub, WinDV or any capture software are able to connect to your DV camera or device.
- FireWire port-based device does not work correctly in Windows 8.1 or Windows 8 - Microsoft Support - Fixes an issue in which legacy 1394 bus drivers (1394bus.sys and Ochi1394.sys) are lost in Windows 8.1 or Windows 8.
- FireWire card and Windows 10 - Encoding old MiniDV's
- I have a few older camcorders that use FireWire cables to connect to a PC. In the past, before Windows 10 and older versions of Vegas, I didn't have any issues connecting and encoding/transferring videos from older tapes. Windows 10 and new PC's don't play nice with FireWire cards, as I have learned from personal experience and posts on forums.
- So is there another way to connect an old camcorder with a FireWire cable to my brand new PC with Windows 10 so that I can import old tapes?
- DV capture with Windows 10 - VideoHelp Forum
- Between XP and Vista the support for DV capture was dropped and everything I've found over the internet is useless so far, from what I've discover is that you need to install the legacy IEEE1394 OHCI drivers from Microsoft.
- Windows 10 for DV is a useless piece of junk! With linux and dvgrab it works like a charm!
- Import mini DV tapes into Windows 10 Movie Maker - Microsoft Community | Microsoft Answers - Trying to import video from an old Panasonic Vid camera using mini DV tapes into Windows 10 Movie Maker (MM). When I click 'import video' in MM I get a message saying, 'the video device is currently in use. Close any other programs and try again'. The thing is, the video device is not in use. I've tried turning off and back on again but I have the same result. I'm getting nowhere, can anyone help please?
- Does Windows 11 support FireWire 1394? - Microsoft Community
- I trying to get some Digital8 video tapes from my Sony DCR TRV725E to my PC where i've installed a FireWire PCi interface.
- Windows 11 does support FireWire 1394. The issue you're experiencing with ClipChamp and Microsoft Teams may be specific to those applications. It's recommended to contact ClipChamp support for further assistance. Meanwhile, you can continue using WinDV or try alternative video capture software for your FireWire camera.
DV Capture Tutorials
- How to transfer DV to Laptop without having a Firewire port - YouTube - How to transfer DV to Laptop without having a Firewire port. We will be using Pinnacle MovieBox.
- Convert Old tapes to Digital with a Mini DV camcorder - YouTube - How to use a Sony DCR-HC96 to convert Video 8, Hi 8, and VCR tapes to Digital to store in computer.
- Dummy Question - How do I capture video from my mini DV tapes? - VideoHelp Forum
- MiniDV to PC - VideoHelp Forum
- Q:
- I've got a Panasonic NV-DS65 video camera and some old MiniDV tapes with some recordings that are pretty close to my heart and it would gut me to lose the footage. I've been looking into trying to put the footage onto my PC and it works. I can record the footage using recording software but I can't get the audio to be put along side the video. I know this is a question that has been asked here a lot and I have consulted the other posts first but I simply can't get the audio recording to work...
- A:
- If these tapes are truly important to you and installing an old OS isn't an option, my next suggestion would be to just install a Firewire card with your current OS, and to rent Adobe Premiere Pro for a month, ($60US, but be sure to cancel it before it auto-renews for another month,) assuming that you can't capture all of your tapes in the span of a week, which is how long Adobe's free trial lasts.
- The reason I suggest Adobe Premiere Pro for the capture is that Adobe's DV capture capabilities are some of the best available, and I know that it doesn't screw with the data that you're capturing in any way.
- Q:
- Fixing FireWire (IEEE 1394) Problems in Windows 10 and 11. Legacy Firewire Driver, Microsoft Firewire OHCI Legacy Drive, Firewire PCI and PCI E cards and how to install them. David Knarr | Studio1
- This article contains a lot of information for connecting Camcorders, Editing Deck, Scanners, Hard Drives and Audio equipment. Along with covering different Firewire ports, what Firewire cards work best and the Legacy Firewire Driver you will need. Please read the article first, then go back and follow the instructions to correct the problem.
- How to capture DV & HDV video tapes on a Windows 11 PC using FireWire to Thunderbolt 3/USB-C - YouTube
- In this video I show the best way to capture your old mini DV camcorder tapes using a PC running the latest version of Windows 11 (22H2) using the adapters required to go from FireWire (i.Link, IEEE 1394, etc) to Thunderbolt 3 or (USB-C plug). Below are time stamps and links to the hardware and software you'll need.
- Thunderbolt 3/4 --> Thunderbolt 1/2 --> FireWire 800 --> FireWire 400/600
- A lot of stuff you can skip.
- How to Transfer mini-DV tapes to Computer without a Camcorder - Free Video Workshop - Find out how to transfer mini-DV tapes to computer without a camcorder through this easy guide.
- Introduction to DV: Capture FAQ and Myth Guide – The Digital FAQ - Although some of this page is more like a rant than a guide, the information is important to know. When it comes to the DV format and equipment based on DV, the ignorance surrounding it the past decade has been thick enough to cut with a knife. Though this author’s current video configuration is proudly DV-free, I submit the following valuable information for your DV needs.
- Two Ways To Transfer Mini DV Tapes To Computer | vhsconverters.com
- How to Capture DV and HDV Tapes on Windows Without a Firewire Port | DVMP Pro 8 - How to Capture DV and HDV Video without Firewire
- How to Capture DV and HDV Tapes via USB ports | DVMP Pro 8 - How to Capture DV and HDV Video via USB ports
- DV capture with Windows 10 - VideoHelp Forum
- Between XP and Vista the support for DV capture was dropped.
- Win8 and Win8.1 FireWire drivers and install commands
- Some dvgrab commands
My Radiator Notes
Ecostrad, Beldray, Warm Home Heating are all made in the same factory because they all have the same specs, the advertising liturature is all the same and they all use the same APP to control them. This is my opinion.
- Manuals
- Reviews
- Ecostrad iQ Ceramic WiFi Electric Radiator Review - Kezzabeth | DIY & Renovation Blog
- An in-depth review of the new Ecostrad iQ Ceramic Wifi Electric Radiator including approx running costs and our overall thoughts!
- Beldray Ceramic Radiator with WiFi - Bikemation.com
- Stay warm this winter with The Beldray Ceramic Radiator and control it from the comfort of your sofa thanks to the Wifi feature and smartphone app. The radiator Is available in 1000W, 1500W and 2000W models. With four heating modes: comfort, economic, Anti – freeze and open window function.The Open Window Detection feature also means … Beldray Ceramic Radiator with WiFi Read More »
- Ecostrad iQ Review Wifi Ceramic Radiator With Open Window Detection | Gadget Explained - Reviews Gadgets Electronics Tech
- Because every tech deserves its own tailor made review! Eye catchy photography, quirky opinions and extended video unboxings, all at Gadget Explained!
- Ecostrad iQ Ceramic WiFi Electric Radiator Review - Kezzabeth | DIY & Renovation Blog
- Where to Buy
- Smart Ceramic Core Radiator | Beldray Store
- Beldray delivers dependable home cleaning products at competitive prices. Beldray provides everything that you could need for your home.
- This seems to be the official company. I know this becasue the postal address seems to be the same all over the place (here and amazon)
- This site also sell spare parts but is not as cheap as elsewhere.
- Buy Beldray EH3110W 2kW Smart Ceramic Core Radiator | Heaters and radiators | Argos
- Buy Beldray EH3110W 2kW Smart Ceramic Core Radiator at Argos. Thousands of products for same day delivery, or fast store collection.
- Beldray EH3108W Smart Ceramic Core Radiator, Connect and Control Wirelessly from Your Smartphone, LCD Display, 1000 W, 7-Day Timer Function, Free Standing or Wall Mountable, White : Amazon.co.uk: DIY & Tools
- Free delivery and returns on eligible orders. Buy Beldray EH3108W Smart Ceramic Core Radiator, Connect and Control Wirelessly from Your Smartphone, LCD Display, 1000 W, 7-Day Timer Function, Free Standing or Wall Mountable, White at Amazon UK.
- Beldray EH3110W Smart Ceramic Core Portable Radiator, Use Freestanding or Wall Mounted, Connect and Control Wirelessly from Your Smartphone, LCD Display, 2000 W, 7-Day Timer Function : Amazon.co.uk: DIY & Tools
- Free delivery and returns on eligible orders. Buy Beldray EH3110W Smart Ceramic Core Portable Radiator, Use Freestanding or Wall Mounted, Connect and Control Wirelessly from Your Smartphone, LCD Display, 2000 W, 7-Day Timer Function at Amazon UK.
- Ecostrad iQ Ceramic WiFi Controlled Electric Radiator - 2000w
- The Ecostrad iQ Ceramic is an impressive mix of modern aesthetics, efficient technology and cutting-edge control. Offering WiFi heat management, smart speaker compatibility and a motion sensor mode, it’s a heating system that always finds the level of control you need. This Ecostrad 2000w radiator uses CeramiQ heat lock technology to stay warmer for longer and is the ideal choice if you need to keep large rooms comfortably heated.
- 2000W White Digital Electric Radiator | YESSS Electrical - kens radiator brand
- Electric Radiators | Electric Radiator Shop | Free Delivery
- Electric Radiator Shop are a leading supplier of energy efficient electric radiators, panel heaters & electric towel rails. Free next day delivery, with a 14 day money back guarantee.
- Electric Radiators | Buy an Energy Efficient Electric Radiator Online
- Electric Radiators Direct, the UK's Leading Supplier of energy efficient electric radiators, electric heaters and electric towel rails.
- Coupons
10% off code 'BLOG10'
5% off  'save5'
- Smart Ceramic Core Radiator | Beldray Store
- Other Radiators to look at
- 2000W Housing Heater with WiFi, 840 x 80 x 580mm, White - no description
- 1500W Digital Panel Convector Heater, 645 x 65 x 430mm, LED, White | YESSS Electrical - no description
- Beldray company information from Amazon
Business Name:UP GLOBAL SOURCING UK LTD Business Type:Privately-owned business Trade Register Number:3357718 VAT Number:GB864438987 Phone number:03335779820 Customer Services Address: Manor Mill Victoria Street Chadderton Oldham OL9 0DD GB Business Address: Manor Mill Victoria Street Chadderton Oldham OL9 0DD GB - Are electric heaters cheaper than Gas Central Heating
- Is it cheaper to use an electric heater in a room or central heating? | This is Money - As the weather gets colder, I am thinking about how I can save money on my energy bills. Am I better off buying an electric heater and using it as and when I need it and turning off the central heating?
- Electric Heating or Gas Heating | Which Is Best? | EDF
- Find out which type of heating is better for you. If you're renovating your home and looking at upgrading your heating, it's good to consider newer, low carbon and more efficient heating options.
- Energy Efficient Home Heating | Net Zero & Heating | EDF
- As the biggest generator of zero carbon electricity, we're committed to Net Zero by 2050. Find out more about energy efficient heating and how it can help you to lower your home's carbon footprint and energy bills.
- We can help you replace your existing electric heating system with a more energy-efficient solution.
- Electric Radiators | Buy Energy Efficient Heaters | EDF
- Get energy-efficient electric radiators. Stylish, modern and easy to install our electric heaters help you reduce your energy waste, save money on your bills and be kind to our planet at the same time.
- Are electric radiators worth getting?
- Can Electric Heating Be Cheaper Than Gas?
- Finding the cheapest option is usually what many of life’s decisions are based on. No one wants to waste money if there’s an affordable alternative - and rightly so. The same probably goes for your home heating system, which is why it’s a good idea
- Oil Vs Electric Radiators
- Ceramic Radiators vs Oil-Filled Radiators - Rio Heating - Finding the best radiator for your needs is no simple task. With so many options in size, shape, price and heating method, where do you begin? Here we answer some common questions to help you decide which is right for you!
- Choosing Between Ceramic Core and Oil Filled Electric Radiators - YouTube - Understand the difference between traditional oil filled radiators and new ceramic core radiators and choose an electric radiator that's perfect for your hom...
- NEW ELECTRIC RADIATORS - Why not central heating? - YouTube - It's great to finally have the heating sorted in these rooms. As mentioned in the video, there are a few reasons why electric worked well this time round es...
- Room Calculators
- Heating Calculator - Electric Radiator Shop
- Electric Radiator Calculator | Electric Radiators Direct - Our heating calculator can help work out the appropriate heat output for each room of your home - and what are the best electric radiators for the job.
- iQ Ceramic Radiator notes
- Do they give more heat for their size than normal radiators? = yes
- Do you do a hub or WiFi only with a phone app? = no, app only
- Is it 5ghz compatible? = no
- Do the behave like normal radiators with their heating curve? = yes
- Extended Warranty = no, but might be bringing out replacement electronics units
- Are they 'ERP Lot 20' is the latest set of European energy efficiency regulations = probably not sure
- Does the app do zones? i would like to control both lounge radiators as on. = yes,... they have just brought out a new app they have made
- Can i turn all radiators on at the same time like normal central heating = yes if the radiators are all in one zone.
- Do these have fans in them? = yes, but should be quite
- Will they all work with standard 13 pin plugs? = yes but if you have more than a couple consult an electrician because of the amount of power they will draw.
- Any recommendations on ring mains when doing whole house with these instead of central heating? = nope
- Are their made in UK? = made in china
- Instant Hot Water
- Ariston Aures Electric Instant Water Heater 9.5kW | Water Heaters | Screwfix.com
- Order online at Screwfix.com. Ariston Aures Slim Multi delivers fast hot water saving time and energy every time you turn on the tap. Compact and easy to install. Multi-point installation to enable a hot water supply at multiple points of use. Double safety thermostat to prevent scalding. Heats water only when the tap is turned on. FREE next day delivery available, free collection in 5 minutes.
- Can an Instantaneous Water Heater fill a bath? > Advice Centre
- Questions on Instantaneous Water Heaters? Ask the experts! To view more information or to make a purchase visit our webpage
- Best Instant Hot Water Tap for Home in 2022 (Reviews + Buying Guide)
- If your mixer tap just isn't enough, consider one of our recommended instant water heaters -- they all provide clean, warm water in a matter of seconds.
- Ariston Aures Electric Instant Water Heater 9.5kW | Water Heaters | Screwfix.com
- Towel Rail
- Can You Fit An Electric Towel Rail Yourself?
- Comfortable warmth, toasty towels and intuitive control – it’s easy to see why electric towel rails are fast becoming a bathroom staple. Supplying robust heat whilst keeping your towels dry, they make a practical and effective heating solution for any
- is there an IQ Ceramique for the bathroom? = smart Fina towel rail
- Can You Fit An Electric Towel Rail Yourself?
My pfSense Notes
A pfSense setup guide by QuantumWarp covering most areas people will need to start using the router software on a regular PC. The notes also can be used for setting up pfSense on Netgate hardware.
- I have disabled IPv6 and not used it in things such as the OpenVPN servers
- This Tutorial has only been possible with the help of:
- Netgate - For pfSense and a community forum.
- pfBlockerNG
- A Firewall - IP and Domain Management package for pfSense
- By BBcan177
- pfBlockerNG Patreon Page
- Lawrence Systems - For amazing videos and forum.
- HeadingsMap Firefox Add-On
- This plugin shows the tree structure of the headings in a side bar.
- It will make using this article as a reference document much easier.
Preface
This tutorial will show you how to setup your pfSense router from scratch and only a small amount of networking knowledge is needed. All settings and research is provided and no stone has been left unturned.
This article can also be used as a reference document (along with Ctrl+F) when you cannot remember that one thing that you need to do.
As I discover new things I will add them here for my reference and so other people can see them
This tutorial covers the following:
- Installing pfSense on your own hardware
- Configure Internet Routing
- pfBlocker - A Detailed setup including Blocklists.
- DNS Hijacking - Force the use of specified DNS servers using encryption for privacy with DNS Hijacking in place to prevent unauthorised use of DNS/DoT/DoH on your network.
- Port Forwarding and NAT Reflection
- OpenVPN Server (TUN Routed network and TAP Bridged network)
- OpenVPN Client Gateway (PrivacyVPN) - Using Policy Routing
- Many other settings for pfSense are covered
My Setup Overview
The Software
Just for clarity, the version of pfSense I did these notes with is: 2.6.0-RELEASE (amd64) CE and pfSense configuration mostly the same as this article.
The Hardware
You can easily virtualise pfSense with PCI Passthrough for the quad NIC on TrueNAS using KVM which is what I do.
- Lenovo FCKT99AUS
- Low profile PC
- Intel(R) Core(TM) i3-4150 CPU @ 3.50GHz
- 4 CPUs: 1 package(s) x 2 core(s) x 2 hardware threads
- AES-NI CPU Crypto: Yes (inactive)
- QAT Crypto: No
- A single Realtek 1000MB onboard NIC
- 8GB RAM
- 120GB Kingston SSD
- Dell 0YT674 0H092P Intel PRO/1000 VT Quad Port Gigabit Ethernet Adapter Card
- Intel Low-Profile Bracket for E1G44ET, E1G44ET2, I340-T4, I350-T4 Quad Port
- This is an old card
- Cisco branded - Intel i350T4V2 with iSCSI NIC (UCSC-PCIE-IRJ45) Quad Port 1Gbps NIC
- Intel® Ethernet Server Adapter I350 | Intel - Drivers, Docs and Utilities
- Openreach/Huawei EchoLife HG612 FTTC VDSL NTE modem
Using only the dedicated quad network card is better because you can utilise the onboard processing power of the card. These cards are always better at handling traffic because they are not a budget item bolted onto the motherboard.
Hardware Settings
- PC BIOS
- Make sure the power state is set to ON after a power cut.
- This makes the pfSense function just like a normal router and maintains your network's connectivity by bringing the router backup as soon as there is power
- Make sure the power state is set to ON after a power cut.
Installation
- I saw the the installer noticed the Virtualization technologies were disabled. I don't think it needs them, but it does not harm to turn them on.
- Download the ISO
- Download pfSense Community Edition - pfSense is a free and open source firewall and router that also features unified threat management, load balancing, multi WAN, and more
- Download pfSense Community Edition (pfsense.app) - This isn't an official pfSense page. It's an archived version of the download page from before pfSense required a login to download the CE.
- sgpfiles Mirror - Direct download mirror
- atxfiles Mirror - Direct download mirror
- Partitioning

- Choose Auto (ZFS) : Guided Root-on-ZFS
- ZFS Configuration - Configure Options

- Partition Scheme: GPT (BIOS+UEFI)
- This creates an EFISYS partition on GPT hard disk (on my UEFI)
- I had to turn on legacy booting (CSM) in my PC's BIOS to get this to work. Probably because the PC is old.
- Swap Size
- This should be twice the systems RAM. So if your PC has 8GB then the Swap Size should be 16GB.
- This cannot be changed once pfSense is installed, you would need to re-install pfSense to reset this as it is a Swap partition and not a Swap file.
- Partition Scheme: GPT (BIOS+UEFI)
- Pool Type/Disks


- 1 disk striped (No Redundancy)
- Notes
- My selection is becasue I can easily swap the SSD and restore my backed up router config quickly. My settings do not change all the time and there is not data I am that bothered about and also a bit of downtime is not the end of the world.
- Companies that cannot afford any downtime (mission critical) or loss of data such as logging data on the router should always run a mirror using at least 2 SSDs.
- ZFS Partitioning | pfSense Documentation
- When you start the installation

- Complete

- Click Reboot
- Shell is for advanced users
- pfSense will now load to the console (WebConfigurator)

At the Console (WebConfigurator)
- Assign Interfaces
- No VLANs
- WAN, Autodetect, Plug the WAN (PPPoE modem) cable into the onboard network socket, Press enter
- LAN, Autodetect, Plug the LAN cable into the top socket (port 0) on the Intel low profile NIC, press enter
- Add no more
- Accept settings
- Set Interface(s) IP address
- Set LAN
- IPv4 = 10.0.0.1
- Subnet: 24 (255.255.255.0)
- No LAN IPv6 (enable at a later date)
- Enable DHCP on LAN
- Client address range = 10.0.0.100 --> 10.0.0.199
- Do you want to revert to HTTP as the webConfigurator protocol?
- Currently the web-server is using HTTPS and this is asking if you want to downgrade to HTTP
- Select No
Setup Wizard via GUI (WebGUI)
- If password does not work just after you set it using the setup wizard (common issue) then the solution is easy.
- Just reset the password With the WebConfigurator, and once in the WebGUI make sure it is a complex password.
- Login for pfsense not working | Netgate Forum
- Login into pfsense GUI
- URL: https://10.0.0.1/
- Default Username: admin
- Default Password: pfsense
- Follow the pfSense Setup Wizard
- Step 1 - Netgate® Global Support is available 24/7
- Just click next.
- Step 2 - General Information
- Hostname: pfsense
- Domain: mydomain.com
gives: pfsense.mydomain.com - Primary DNS Server: 9.9.9.9
- Secondary DNS Server: n/a
- Override DNS: unticked
- Step 3 - Time Server Information
- Time server hostname: 2.pfsense.pool.ntp.org (default)
- Timezone: GB (or what ever you require)
- Seths these:
- System --> General Setup --> Timezone
- System --> General Setup --> Timeservers
- Step 4 – Configure WAN Interface
- Fill in details as required
- DNS Server Override: Unticked
- Block RFC1918 Private Networks: leave ticked
- Block bogon networks: leave ticked
- Step 5 – Configure LAN interface
- LAN IP Address: 10.0.0.1
- Subnet Mask: 24
- Step 6 – Set Admin WebGUI Password
- Make sure you use a complex one as shortly your router will be online
- Step 7 – Reload configuration
- Click ‘Reload’
- Step 8 - Reload in progress
- Just wait
- Step 9 – Wizard Complete
- Check for updates (optional)
- Click Finish
- Step 1 - Netgate® Global Support is available 24/7
Advanced/Further settings via GUI (WebGUI/webConfigurator)
Take your time going through these instructions as a small mistake can stop things working and can be potentially hard to find where you went wrong.
GUI Appearance
These settings are for the general use and appearance of the GUI.
- Set Dashboard to 3 Columns
- System --> General Setup --> webConfigurator --> Dashboard Columns: 3
- Dark Theme
- System --> General Setup --> WebConfigurator --> Theme: pfsense-dark
- This is a much easier theme to use than the default brite white theme.
- Disable the constant pfSense version checker on the Dashboard
- System --> Update --> Update Settings --> Disable the Dashboard auto-update check: ticked
- Releases are not that frequent
- Show log entries in reverse order (newest entries on top)
- Status --> System Logs --> Settings (tab) --> Forward/Reverse Display
- This will make logs a lot easier to read.
- Display page name first in browser tab (Optional)
- System --> Advanced --> Admin Access --> webConfigurator --> Browser tab text = ticked
- When this is unchecked, the browser tab shows the host name followed by the current page. Check this box to display the current page followed by the host name.
- If you only have one router you might prefer this. I have left it as default for now.
Hostname and Domain
- System --> General Setup
- Hostname: pfsense (already done in wizard)
- Domain: mydomain.com (already done in wizard)
Disable IPv6
This is done because I want to make sure I control all of my traffic and I don't fully understand IPv6.
The following instructions are partially based on this article (with pictures)
- Disable IPv6 on PFSense | by Teri Radichel | Cloud Security | Medium
- If you don't need IPv6 you can disable it to simplify network management
- Whenever I post something about disabling IPv6 I get slammed by a bunch of IPv6 fans so bracing for it with this post.
- I’ve already written that IPv6 can be implemented securely and if you need it, you can use it. Do you need IPv6? I wrote about that.
- I also have written about how disabling it can simplify network management on a home network here.
- A continuation of my posts on network security.
- System --> Advanced --> Networking
- Allow IPv6: unticked
- Prefer IPv4 over IPv6: leave ticked
- Services --> DHCPv6 Relay = unticked
- Disable IPv6 on each of the interfaces (this will need to be re-run at the end of the tutorial for additional interfaces......)
- Interfaces --> WAN (pppoe0) --> General Configuration --> IPv6 Configuration Type: None
- Interfaces --> LAN (igb0) --> General Configuration --> IPv6 Configuration Type: None (already done in wizard)
- Repeat for all other interfaces that this applies to.
- System --> Routing --> Gateways --> Default gateway IPv6 = None
- This might already be set to none.
- Firewall rules to block IPv6
- You probably don’t need this as well but I also create firewall rules to block IPv6 so I can tell if something isn’t working or gets misconfigured.
- Firewall --> Rules --> LAN --> Rules --> Default allow LAN IPv6 to any rule: Disable (but don't delete as you might want it for experimenting with later)
I am still getting some IPv6 traffic which is getting blocked, however I think it is coming from my locally connected devices such as my Windows PC.
Manually set the default gateway
This might already be done and thus no changes required.
- System --> Routing --> Gateways --> Default gateway
- Default gateway IPv4: WAN_PPPOE
- Default gateway IPv6: none
Monitoring IP for WAN
- System --> Routing --> Gateways --> WAN_PPPOE --> Edit --> Monitor IP: 9.9.9.9
- This just allows pfSense to make sure the WAN_PPPOE connection is up.
- Not all Gateways respons to ICMP request so this gets around that issue.
- This is needed to control what happens when your connection goes down.
- You can use any reliable IP you want.
- Make sure you check the IP responds to a PING manually so you know it will work for the monitor.
- pfSense create a static route to 9.9.9.9 (I think this is hidden)
Custom WAN DNS Servers (Secure) (Forced)
- I will be using Quad9 for my DNS provider.
- Which Is The Best DNS for Secure Browsing: CloudFlare, Quad9, NextDNS, and AdGuard DNS - YouTube | Lawrence Systems
- System --> General Setup --> DNS Server Settings
- DNS Servers:
- (DNS Server: 9.9.9.9 / DNS Hostname: dns.quad9.net) (Primary DNS) (partly already done in wizard)
- (DNS Server: 149.112.112.112 / DNS Hostname: dns.quad9.net) (Secondary DNS) (optional)
- Dont add a Secondary DNS, this will make it harder to diagnose DNS issues and security later. The performance increase is negligible.
- DNS Server Override: unticked (already done in wizard??)
- DNS Resolution Behavior: Use local DNS (127.0.0.1), ignore remote DNS Servers
- DNS Servers:
- Services --> DNS Resolver --> General Settings
- Network Interfaces: All
- ALL is easier but on a high load system you might want to specify these.
- Outgoing Network Interfaces: WAN
- Strict Outgoing Network Interface Binding: ticked
- DNSSEC: unticked
- This option enables DNSSEC validation.
- Quad9 does all of this upstream so we don't need too and waste CPU cycles. Quad9 will only ever return valid domains.
- DNSSEC needs to be turned off because it just causes extra traffic. Since you're forwarding the request and the remote resolver already is using this. I verified this by running a test with DNSSEC turned off in pfSense.
- This is option is not required to allow devices on my network to use
Dig,Delvand other apps to make DNS requests to get responses with DNSSEC information. - Should I enable DNSSEC in pfSense when using Quad9 and full DNS HiJacking? | Netgate Forum
- no, if you forward DNS, enabling DNSSEC on pfSense makes zero sense - either where you forward is doing it or they are not. You setting it in unbound is going to cause issue. Even Quad9 themselves tell you that.
- Disasble DNSSEC - DNS Forwarder Best Practices - Quad9 Documentation
- Disable DNSSEC Validation: Since Quad9 already performs DNSSEC validation, DNSSEC being enabled in the forwarder will cause a duplication of the DNSSEC process, significantly reducing performance and potentially causing false BOGUS responses.
- Enable Forwarding Mode: ticked
- DNS Resolver uses unbound and the old way of doing things was with DNS Forwarder powered by dnsmasq which could only forward DNS requests.
- Controls whether unbound uses resolver mode (unchecked) or forwarding mode (checked). See DNS Resolver Mode for an explanation of the modes.
- I need to put DNS Resolver into forwarder mode to utilise Quad9 blocking capabilities.
- Use SSL/TLS for outgoing DNS Queries to Forwarding Servers: ticked
- Network Interfaces: All
- Services --> DNS Resolver --> General Settings
- Query Name Minimization: unticked
- This is unticked by default but I mention it so people know what it is.
- Disable QNAME Minimization - DNS Forwarder Best Practices - Quad9 Documentation
- QNAME Minimization is a privacy feature that is intended to be used when you operate a recursive resolver (Quad9), but in a DNS forwarder, it provides no privacy enhancement and significantly reduces performance.
- QNAME Minimization and Your Privacy - ISC - Surveillance is the business model of the Internet. Everyone is under constant surveillance by many companies, ranging from social networks like Facebook to cellphone providers.
- Strict Query Name Minimization: unticked
- This is unticked by default, see above.
- Query Name Minimization: unticked
Custom LAN DNS Servers
- Services --> DHCP Server --> LAN --> Servers --> DNS Servers: 10.0.0.1
- This makes sure the DNS servers given out over DHCP are not those configure in General settings but the one(s) we specify.
Enable DNS over TLS (DoT)
Using DoT on my local network is good because it can prevent MITM attacks on local DNS traffic which can happen if your network is compromised. Your DNS server will still be able to read the requests when it receives them as the encryption is only between pfSense and the client.
Enabling this allows pfSense to serve DNS over TLS (Port 853). It is not required for standard DNS to work as this is on port 53
- Services --> DNS Resolver --> General Settings
- Enable SSL/TLS Service: ticked
- Configures the DNS Resolver to act as a DNS over SSL/TLS server which can answer queries from clients which also support DNS over TLS.
- Activating this option disables automatic interface response routing behaviour, thus it works best with specific interface bindings.
- This warning is about unbound's behavior when bound to multiple interfaces, especially bound to all. With that box active, it responds back to the client from the closest interface routing-wise for UDP. With it inactive, unbound is smart enough to always reply back to the client from the address to which the original query was sent. That behavior doesn't matter for most. Primarily things like DNS over IPsec tunnels are affected.
- DNS Resolver Enable SSL/TLS Service - automatic interface response routing behavior | Netgate Forum
- Some one was asking that question a while ago: Quad9 DNS-over-TLS setup with Unbound & forwarding in 2.4.4-RC | Netgate Forum
- The answer was: The warning there is about unbound's behavior when bound to multiple interfaces, especially bound to all. With that box active, it responds back to the client from the closest interface routing-wise for UDP. With it inactive, unbound is smart enough to always reply back to the client from the address to which the original query was sent. That behavior doesn't matter for most. Primarily things like DNS over IPsec tunnels are affected.
- SSL/TLS Certificate: WebConfigurator default
- Clients may reject this certificate if it is self-signed, consider using a certificate from ACME.
- Client on your local network performing a DoT request can usually be configured to not be strict with certificate validation and this will not affect operations.
- It is always best to have a valid SSL/TLS certificate.
- I have a separate Web Server that is taking all of the DNS and WWW requests and I dont want the hassle of setting up a fully verified cert on my router, i just want to enforce TLS/SSL. It is this Webserver that would be required to generate the SSL certificates or at least install the SCME wildcard TXT record.
- SSL/TLS Listen Port: empty/853
- Enable SSL/TLS Service: ticked
Notes
- Configuring DNS over TLS | pfSense Documentation
- DNS Resolver Configuration | pfSense Documentation
- ACME package | pfSense Documentation
Set DHCP Pool
- Services --> DHCP Server --> LAN --> General Options --> Range: 10.0.0.100 – 10.0.0.199 (already done in wizard)
- It did not seem to get setup correctly in the GUI, however pfSense was respecting this range. So perhaps a small GUI bug fixed by just re-saving the range here.
Automatic Hostnames
- Services --> DNS Resolver --> General Settings --> (DHCP Registration) Register DHCP leases in the DNS Resolver: ticked
- Note that this will cause the Resolver to reload and flush its resolution cache whenever a DHCP lease is issued.
- Potential could put a high load on the DNS server, fine for small outfits (this is my interpretation)
- Services --> DNS Resolver --> General Settings --> (Static DHCP) Register DHCP static mappings: ticked
- This is so you statically mapped DHCP clients are registered (this will not break pfBlockerNG - Unbound Python Mode)
pfBlockerNG
This package make pfSense even more powerful and can block traffic based on IP, DNSBL and other metrics. It is highly configurable.
- Packages — pfBlockerNG Package | pfSense Documentation
- pfBlockerNG-devel is the Next Generation of pfBlockerNG.
- Manage IPv4/v6 List Sources into 'Deny, Permit or Match' formats.
- GeoIP database by MaxMind Inc. (GeoLite2 Free version).
- De-Duplication, Suppression, and Reputation enhancements.
- Provision to download from diverse List formats.
- Advanced Integration for Proofpoint ET IQRisk IP Reputation Threat Sources.
- Domain Name (DNSBL) blocking via Unbound DNS Resolver.
Install the package
- System --> Package Manager --> Available Packages --> Search: pfBlockerNG 3 (3.1.0_4 at time of writing) --> Install
Run the Wizard (can be re-run)
- Firewall --> pfBlockerNG
- Step 1 (pfBlockerNG Components)
- Click next
- Step 2 (pfBlockerNG IP Component Configuration)
- Select Inbound Firewall Interface: WAN
- Select Outbound Firewall Interface: LAN
- Step 3 (pfBlockerNG DNSBL Component Configuration)
- VIP Address: 10.10.10.1
- Port: 8081
- SSL Port: 8443
- IPv6 DNSBL: unticked
- Lawrence Systems does not mention about this so leave as is
- Firewall --> pfBlockerNG --> DNSBL --> DNSBL Webserver Configuration --> IPv6 DNSBL
- DNSBL Whitelist: ticked
- Step 4 (pfBlockerNG Finalize)
- Click Finish
- pfBlockerNG has been successfully configured and updated. This installation will now block IPs based on some recommended Feed source providers. It will also block most ADverts based on Feed sources including EasyList/EasyPrivacy. Some additional Feed source providers include some malicious domain blocking.
Force Options
Firewall --> pfBlockerNG --> Update Settings
- Running a 'Force' option
- Select your 'Force' option (Update|Cron|Reload)
- if you choose 'Reload'
- Select 'Reload' option: All
- Click 'Run' to start
- View will show you the log
- 'Force' Options explained
- Update
- This will process new changes and download new Alias/Lists.
- This downloads and updates lists from the internet. This will trigger a reload if there are changes to the files.
- Cron
- This will download any Alias/Lists that are within the Frequency Setting (due for Update).
- Reload
- This will reload all Lists using the existing Downloaded files.
- This is useful when Lists are out of "sync", Whitelisting, Blacklisting, Suppression, TLD or Reputation changes were made.
- This rebuilds pfBlockerNG internal lists it uses for blocking, it does not download files from the internet.
- Update
Misc Settings
- Remove the default DNSBL Whitelist entries
- Firewall --> pfBlockerNG --> DNSBL --> DNSBL Whitelist (at bottom of page)
- Swap the default entries for
.pfsense.org
.netgate.com
- If this causes any issues you can add exceptions backin. The default entries asre in the notes pfBlockerNG notes section towards the end of this article.
- pfBlockerNG Default Whitelist - More info needed | Reddit
- Could you delete them, sure. But they are like Google, YouTube, Dropbox, PBS, github and AWS; they were most likely put there as a failsafe though. If you don't like the whitelist, copy/save them and then titrate to what you want.
- Firewall --> pfBlockerNG --> Reports --> Alerts --> Alert Settings --> Select the DNS server for the DNSBL Whitelist CNAME lookup
- This is set by default to 8.8.8.8
- Change this to 9.9.9.9
- You are not able to select 127.0.0.1 here or your own custom DNS servers which is not secure.
- I have reported this issue here: https://redmine.pfsense.org/issues/13200
- Firewall --> pfBlockerNG --> General settings --> Download Failure Threshold: 2
- Firewall --> pfBlockerNG --> DNSBL --> DNSBL IPs --> List Action: Disabled
- This is disabled by default
- When IPs are found in any Domain based Feed, these IPs will be added to the pfB_DNSBL_IP IP Aliastable and a firewall rule will be added to block those IPs.
- I will leave this off for now because I don't know if it will benefit me. Most DNSBL lists do not have IPs in them.
IP handling
- Firewall --> pfBlockerNG --> IP --> IP Configuration
- CIDR Aggregation: ticked
- This is CPU intensive when it builds the lists but you get better performance afterwards.
- pfBlockerNG: What are De-Duplication and CIDR Aggregation for? : PFSENSE
- BBCan177: That CIDR aggregation is for IP blocking. It has nothing to do with routing. There is no harm in enabling these options and is meant to reduce the number of entries in the firewall. They can however uses some CPU power to process and it's why it's an optional tunable setting.
- ASN Reporting: Enabled - ASN entries cached for 24 hours
- CIDR Aggregation: ticked
- Firewall --> pfBlockerNG --> IP --> IP Interface/Rules Configuration
- Inbound Firewall Rules: WAN
- Outbound Firewall Rules: LAN
- As you add inbound interfaces, you might need to add them here e.g. (LAN/ROUTEDVPN/BRIDGEDVPN/OpenVPN etc..)
- Floating Rules: ticked
- Apply rules not specific to any interface
- All rules appear in one place
- Appear in the floating tab instead of separate (WAN/LAN/LAN2) tabs (Firewall --> Rules)
- Kill States: ticked
- If an IP appears in a Blocklist which you have live connections too, drop them
- You need to Force Reload of settings for the floating rules to appear in floating tab instead of WAN and LAN tabs in the firewall rules (Firewall --> Rules)
Configure IP Reputation
- Firewall --> pfBlockerNG --> IP --> Reputation
- Individual List Reputation
- Max: ticked
- Max Setting: 5
- Collective List Reputation
- pMAX: ticked
- pMax Setting: 50
- dMAX: ticked
- dMax Setting: 5
- Country Code Settings (max/dMax)
- ccwhite Action: Ignore
- ccblack Action: Block
- IPv4 Country Exclusion: select countries you are interested in excluding, if any.
- Individual List Reputation
This might use a lot of CPU when compiling the modified lists but after that it is no extra performance cost
Maxmind GeoIP API Setup
This is required to be able to use the Maxmind API for our GEOIP lookups. There is no issue with signing up for a free account
- Firewall --> pfBlockerNG --> IP --> MaxMind GeoIP configuration
- Register and get a license key
- GeoLite2 Sign Up | MaxMind
- Account --> Manage License Keys --> Generate new license key
- License key description: pfSense
- Old versions of our GeoIP Update program use a different license key format. Will this key be used for GeoIP Update?: Yes
- Select "Generate a license key and config file for use with
geoipupdateversion3.1.1or newer." - Click Confirm
- Store the Key somewhere safe
- Enter the settings
- MaxMind License Key: xxxxx
- MaxMind Localized Language: Your language
- Check to disable MaxMind CSV updates: unticked
- Click 'Save IP Settings'
- All settings usually require a reload to apply them, so do this now.
- Blocking outbound and Inbound are different
- pfBlockerNG MaxMind Registration required to continue to use the GeoIP functionality! | Lawrence Systems
GeoIP Configuration (MaxMind)
- Firewall --> pfBlockerNG --> IP --> GeoIP
- By Default all lists are disabled.
- You need to edit each list as required including selecting enable and then save
- Action: Deny Inbound
- stops spammers coming in but allow your traffic out to wherever your want.
- You can stop outbound traffic if you want.
Apply Block Rules to Inbound and Outbound IPv4 traffic
These rules are probably created by pfBlockerNG. I dont know if you can set the direction in pfBlockerNG, eitherway make sure the IP lists act in both directions.
- Firewall --> pfBlockerNG --> IP --> IPv4 --> [PRI1] --> Action: Deny Both
- Do for each group
As you add groups in the future, always select 'Deny Both'
View/Delete Blocklists
This is for reference only.
- They are in different locations for the different type of list
- Firewall --> pfBlockerNG --> IP --> IPv4 --> [PRI1] --> Edit
- Firewall --> pfBlockerNG --> DNSBL --> DNSBL Groups [Name] --> Trash Can
Add a Blocklist Feed (IPv4/IPv6/DNSBL)
This is for reference only.
- Firewall --> pfBlockerNG --> Feeds
- Click on a desired list
- Change the state to ON
- Save Settings
- (Optional) Firewall --> pfBlockerNG --> IP --> IPv4
- Enable the relevant group and click save
- Might already be on
- NB: The added list will be assigned to it's relevant group
- A file pole is required because we need to get the newly specified file
- Firewall --> pfBlockerNG --> Update --> Select 'Force' option: Upload
- Click 'Run' for the changes to apply
Add Alienvault IPv4 Blocklist
I have added this here as an example and not necessarily as a recommendation.
- Lawrences add this one and it is by AT&T
- Firewall --> pfBlockerNG --> Feeds
- Client the 'Add' icon on the 'Alienvault' line
- Set 'State' to On
- Leave everything else as is
- Click 'Save IPv4 Settings'
- Goto Firewall --> pfBlockerNG --> IP --> IPv4
- PRI2 Collection --> Action --> Deny Both
- Click Save
Add Easylist DNSBL
I have added this here as an example and not necessarily as a recommendation.
- The EasyList filter lists are sets of rules originally designed for Adblock (adblock.mozdev.org on WayBackMachine (archive.org)) that automatically remove unwanted content from the internet, including annoying adverts, bothersome banners and troublesome tracking.
EasyList is the primary filter list that removes most adverts from international webpages, including unwanted frames, images and objects. It is the most popular list used by many ad blockers and forms the basis of over a dozen combination and supplementary filter lists. - Firewall --> pfBlockerNG --> Feeds
- Client the 'Add' icon on the 'EasyList' line
- Set
- DNSBL Source Definitions --> State: On
- Settings --> Action: Unbound
- Leave everything else as is
- Click 'Save IPv4 Settings'
- Goto Firewall --> pfBlockerNG --> IP --> IPv4
- PRI2 Collection --> Action --> Deny Both
- Click Save
Add a Custom DNSBL Blocklists (Eg DoH)
This is for reference only.
- Firewall --> pfBlockerNG --> DNSBL --> Add
- See 'Add a Custom DoH DNSBL Blocklist into pfBlockerNG' below
DNSBL Category (Web Category Blocking)
Firewall --> pfBlockerNG --> DNSBL --> DNSBL Category
Not everyone will want to set this feature. This will allow you to block websites of a certain category and this data is currently supplied by 2 feeds:
- Shallalist
- Dead but still in pfBlockerNG.
- UT1
- The University of Toulouse Capitole has been broadcasting a blacklist of URLs, managed by Fabrice Prigent in order to allow better control of the use of the Internet. This database, which is widely used by schools, can be integrated into a large number of free or commercial tools, in addition to other lists.
The settings are straight forward on this page and do not need further instructions.
DNS Hijacking
Clients can make their own connections to direct connections to DNS servers, so block them on TCP/UDP ports 53 and 853 to ensure the clients only query the pfSense DNS Resolver. We also have to block DNS requests sent over HTTPS (DoH) which is harder to do.
This block of rules need to be at the top of your Floating rules and below pfBlockerNG rules if they are present. To make sure your BNS is actually Hijacked.
DNS and DoT
- Add the following floating rules in order - These rules will work on every interface you select and only need to write them once
- Blocking External Client DNS Queries | pfSense Documentation
- Firewall --> Rules --> Floating
- Allow Web Server DNS Queries (Port 53) (only needed when you are running your own DNS server for hosted websites)
- Action: Pass
- Quick: ticked
- Interface: LAN (this is the network your Web server is on)
- Direction: any
- Address Family: IpV4
- Protocol: TCP/UDP
- Source: any
- Destination: LAN net (You can specify the actual Web Server IP for more security here i.e. 10.0.0.13)
- Port: DNS (53)
- Description: Allow Web Server DNS
- Allow Web Server DNS over TLS (DoT) (Port 853) (only needed when you are running your own DNS server for hosted websites)
- Action: Pass
- Quick: ticked
- Interface: LAN (this is the network your Web server is on)
- Direction: any
- Address Family: IpV4
- Protocol: TCP
- Source: any
- Destination: LAN net (You can specify the actual Web Server IP for more security here i.e. 10.0.0.13)
- Port: DNS over TLS (853)
- Description: Allow Web Server DoT
- Allow Local DNS Queries (Port 53)
- Action: Pass
- Quick: ticked
- Interface: LAN
- Direction: any
- Address Family: IpV4
- Protocol: TCP/UDP
- Source: any
- Destination: This Firewall (self)
- Port: DNS (53)
- Description: Allow Local DNS
- Allow Local DNS over TLS (DoT) (Port 853)
- Action: Pass
- Quick: ticked
- Interface: LAN
- Direction: any
- Address Family: IPv4+IPv6
- Protocol: TCP
- Source: any
- Destination: This Firewall (self)
- Port: DNS over TLS (853)
- Description: Allow Local DoT
- Block DNS Queries (Port 53)
- Action: Reject
- Quick: ticked
- Interface: LAN
- Direction: any
- Address Family: IPv4+IPv6
- Protocol: TCP/UDP
- Source: any
- Destination: any
- Port: DNS (53)
- Description: Deny DNS
- Block DNS over TLS (DoT) and DNS over QUIC (DoH) (Port 853)
- Action: Reject
- Quick: ticked
- Interface: LAN
- Direction: any
- Address Family: IPv4+IPv6
- Protocol: TCP/UDP
- Source: any
- Destination: any
- Port: DNS over TLS (853)
- Description: Deny DoT / DoQ
Notes
- Redirect DNS Traffic on port 53
- Rather than redirecting, I prefer to block unwanted traffic.
- Redirecting Client DNS Requests | pfSense Documentation
- Instead of dropping all of the DNS requests we can re-route them through our secure DNS chain.
- This has the benefit of your can see all of the requests.
- Redirecting DoT (853) requests would have issues with the certificates not matching up. So this only worked for standard DHCP
- You need one rule for Ipv4 (127.0.0.1) and one for IPv6 (::1)
- This option might be better for some IoT devices by not hard blocking DNS requests but just sending to my router. IoT might not resend a DNS request, however do you want these sorts of devices sending dodgy DNS requests.
- This will grab all traffic on port 53/853.
- Floating Rules
- Floating rules are run on the WAN, then then port forward rules are applied (NAT), then the floating rules are re-proccesed for the LAN. This is why there is a rule for the Web Server DNS in the floating rules, it needs to run before the other floating rules otherwise your Web Server will not resolve DNS requests.
- Firewall — Rule Methodology | pfSense Documentation - Floating rules are run first but only applied first if the 'Quick' option is ticked
DoH Blocking
- Firewall --> pfBlockerNG --> DNSBL DNSBL SafeSearch --> DNS over HTTPS/TLS Blocking --> DoH/DoT Blocking: Enable
- Select all domains
Canary Domain (FireFox Only)
- This is not needed if using pfBockerNG
- Add as per the document above
Services --> DNS Resolver --> General Settings --> Custom options
server:
local-zone: "use-application-dns.net" always_nxdomain
- This canary domain is in pfBlockerNG DoH blocklist.
- Chrome does not have a canary domain as it works on a different model
- Canary domain to disable Firefox/Chrome DOH : sysadmin
- DNS-over-HTTPS Setting - Chrome Enterprise Community
- DNS over HTTPS (aka DoH)
Add Inbuilt DoH Feeds
- Firewall --> pfBlockerNG --> Feeds
- Scroll down to find the DoH group
- Add the DoH group
- Click on the + icon on the right handside of the DoH group line (in grey). This will add all of the feeds in the group.
- Enable all feeds by changing their State to On
- Change the Action to Unbound
- Leave all the other settings the same
- Click 'Save DNSBL Settings'
- It should look like this when you are done:

- Firewall --> pfBlockerNG --> DNSBL --> DNSBL Groups
- Move DoH group to the top of the list and save
These lists will not be added until you Update and reload your Feeds.
Add Inbuilt DoH IP Feeds
Generally DoH is handled by domain names but there are some exceptions such as 9.9.9.9 and 1.1.1.1 so this list is a good additional for those edges cases and possibly softwarte getting around traditional DoH blocking by not using domain names. Ignore the group DOH_6 as this is for IPv6, unless you need to block IPv6 addresses.
- Firewall --> pfBlockerNG --> Feeds
- Scroll down to find the DoH group
- Add the DoH_IP group (currently only has 'TheGreatWall_DoH_IP' feed)
- Click on the + icon on the right handside of the DoH_IP group line (in grey). This will add all of the feeds in the group.
- Enable all feeds by changing their State to On
- Change the Action to Deny Both
- Leave all the other settings the same
- Click 'Save IPv4 Settings'
- Firewall --> pfBlockerNG --> DNSBL --> DNSBL Groups
- Move DoH_IP group to the top of the list and save
These lists will not be added until you Update and reload your Feeds.
Add a Custom DNSBL DoH feed into pfBlockerNG (dibdot)
- Firewall --> pfBlockerNG --> DNSBL --> DNSBL Groups -->Add
- Info
- Name: Custom_DoH
- Description: Custom DoH Blocklist
- DNSBL Source Defintions
- Format: Auto
- State: ON
- Source: https://raw.githubusercontent.com/dibdot/DoH-IP-blocklists/master/doh-domains.txt
- Header/Label: 1_dibdot_DoH
- The order of these feeds in a group is set alphabetically on the Header/Label, so I have added a number at the begining of this Header/Label so I can control is order (i.e. always first).
- Settings
- Action: Unbound
- Update Frequency: Weekly (daily for more active lists)
- Weekly (day of Week): Monday
- Auto-Sort Header field: Enable auto-sort
- Group Order: Default
- Logging / Blocking Mode: DNSBL WebServer/VIP
- TOP1M Whitelist: unticked
- Advanced Tuneables
- Leave as is
- DNSBL Custom_List
- Leave as is
- Click 'Save DNSBL Settings'
- Firewall --> pfBlockerNG --> DNSBL --> DNSBL Groups
- Move to the top of the list and save
- Info
These lists will not be added until you Update and reload your Feeds.
Add a Custom DoH IP feed into pfBlockerNG (dibdot)
- Firewall --> pfBlockerNG --> IP --> IPv4 -->Add
- Info
- Name: Custom_DoH_IP
- Description: Custom DoH IP Blocklist
- IPv4 Source Definitions
- Format: Auto
- State: ON
- Source: https://github.com/dibdot/DoH-IP-blocklists/blob/master/doh-ipv4.txt
- Header/Label: 1_dibdot_DoH_IP
- The order of these feeds in a group is set alphabetically on the Header/Label, so I have added a number at the begining of this Header/Label so I can control is order (i.e. always first).
- Settings
- Action: Deny Both
- Update Frequency: Weekly (daily for more active lists)
- Weekly (day of Week): Monday
- Auto-Sort Header field: Enable auto-sort
- Enable Loggin: Enabled
- States Removal: Enabled
- TOP1M Whitelist: unticked
- Advanced Inbound Firewall Rule Settings
- Leave as is
- Advanced Outbound Firewall Rule Settings
- Leave as is
- Advanced Tuneables
- Leave as is
- IPv4 Custom_List
- Leave as is
- Click 'Save IPv4 Settings'
- Firewall --> pfBlockerNG --> DNSBL --> DNSBL Groups
- Move to the top of the list and save
- Info
These lists will not be added until you Update and reload your Feeds.
Test DNS Hijacking
DNS and DoT
The test will be similiar for DNS and DoT but the ports will be different.
- Check if you are using Quad9
- Quad9 is my chosen Secure DNS provider used in this tutorial.
- Just visit the page below and it will tell you if you are using Quad9, and you should be.
- How Do I Confirm I'm Using Quad9? - FAQs - Quad9 Documentation
- DNS Leak Test
- I think a DNS leak test resends DNS requests mant times and analyses the result to see the different reponding IP addresses. These addresses hide behind lets say the 9.9.9.9 which is an entry point to an AnyCast network where a group of servers respond as a swarm.
- You should only see servers from your provider and if running a VPN those from your VPN provider only. Otherwise this shows that the DNS traffic is not all going to the same place, a DNS leak.
- eg: My laptop has Wifi and ethernet, this test can see if the DNS is going out of the wrong interface or even if it is being hijacked by malware
- DNSLeakTest.com - DNSleaktest.com offers a simple test to determine if you DNS requests are being leaked which may represent a critical privacy threat. The test takes only a few seconds and we show you how you can simply fix the problem.
- DNS Leaks Tests | Strong Technology - DNS leak is a security flaw, which can be used by your ISP or DNS server provider to log your activity, collect statistics, block access to some domains, or other purposes. Even though you are using encrypted VPN service with DNS leak your privacy is at risk.
- Quad9 is on an AnyCast network so 9.9.9.9 traffic is subrouted to many servers throughout the world so you will see many IPs and servers but only from your choosen provider, In my case Quad9 provided by WoodyNet or PCH and others.
- Quad9 Network Providers: WoodyNet, PCH.net, i3D, GSL Networks | Quad9 - Quad9 utilizes multiple network providers in our global network, this page lists them.
- DNS Spoofing Test (GRC.com)
- GRC | DNS Nameserver Spoofability Test - GRC's DNS Nameserver spoofability testing facility
- I think this is the same as a DNS Leak Test, I could be wrong.
- Lots of information
- DNS Benchmark (GRC.com)
- GRC's | DNS Nameserver Performance Benchmark - DNS Nameserver Performance Benchmark
- All dns servers should be blocked except 10.0.0.1
- To verify the internet connection, DNS Benchmark tries to access the internets Root DNS Server. It should fail this and say the internet is not working because we have denied access to these servers.
- Continue by ignoring the error.
- Nameserver resolution will now occur using your computers Primary DNS server (10.0.0.1) to resolve the nameservers hostnames, it will fail to resolve any (or most) of the DNS servers because we have DoH protection in place.
- Run the Benchmark (optional)
- So, the DNS Benchmark should fail and only have 1 server listed as online.
- Telnet
- This is a simple one. If you run the test below on windows you should get a response (black screen) which indicates there is a server present and that you can access it. If there is no response then you can assume the request is blocked.
-
telnet 8.8.8.8 53
- Do this test on a few DNS servers jsut for an overview.
- NSLookup
- This test on windows is a good indicator but I dont know how to change the port so only standard DNS on port 53 is available for test.
-
nslookup bing.com
nslookup bing.com 8.8.8.8
nslookup bing.com 10.0.0.1
- Packet Capture and WireShark
- Diagnostics --> Packet Capture
- Using Packet capture and WireShark you can analyse the DNS traffic to see if correct blocking is happening.
- Study the WAN and LAN interfaces, for posts 53 and 853.
- There should only be traffic out of the WAN to 9.9.9.9 on port 853
- Traffic to any address other than 10.0.0.1 on port 53 should be getting blocked and you can tell this by the request not having any response and this traffic not going out of the LAN.
DoH
Do DoH testing before adding DoH_IP blocklists
- DOH! DNS over HTTPS explained | APNIC Blog - A deeper look at the potential benefits of DNS over HTTPS, or DOH.
- This is a test command that you can run in your browser
https://dns.google.com/resolve?name=www.potaroo.net&type=A
- This is a test command that you can run in your browser
- DNS Queries over HTTPS (DOH) - This document describes how to make DNS queries over HTTPS.
- Make API requests to 1.1.1.1 over DoH | Cloudflare - Some techical stuff from Cloudflare
- Possible examples
https://1.1.1.1/dns-query?name=cloudflare.com
- Possible examples
- Quad9 DoH
- DoH with Quad9 DNS Servers | Quad9
- Possible Examples
https://dns.quad9.net/dns-query
https://dns.quad9.net/dns-query?
https://dns.quad9.net:5053/dns-query?name=quad9.net
https://9.9.9.9:5053/dns-query?name=quad9.net
Blocklist Research
- Don't add a load of lists in one go. Add in blocks or one by one so you can make sure you don't get any adverse effects by blocking too much.
- Make sure the lists you use are not too big otherwise they will break pfBlockerNG and pfSense will probably stop routing. If this happens there will be an error generated and you can figure out which of your lists is too large.
- Everyone's list will probably be different
Blocklists
- FireHol IPSets
- This is a very powerful list and can be used for good or to completely block your network if used incorrectly.
- FireHOL combines many different IP blocklists from all over the world and combines them in to their combined lists.
- Both the source lists and the combined lists can be used in pfSense.
- GEOIP list are also available.
- The lists are great but the websites and Repo are confusing
- The feeds only update once a day
- The feeds are all IP based
- FireHOL - Linux firewalling and traffic shaping for humans (firehol.org)
- FireHOL and FireQOS offer simple and powerful configuration for all Linux firewall and traffic shaping requirements.
- FireHOL is an iptables firewall generator producing stateful iptables packet filtering firewalls, on Linux hosts and routers with any number of network interfaces, any number of routes, any number of services served, any number of complexity between variations of the services (including positive and negative expressions).
- This is the software that builds these lists.
- This site aggregates, analyzes, compares and documents publicly available IP Feeds, with a focus on attacks and abuse. It is automatically generated and maintained using open source software (check the wiki), that can be installed and run on your systems too, to download all IP lists directly from their maintainers, process them and re-generate the site and its data.
- Special care has been given to make this analysis as scientific and objective as possible, respecting the hard work of the security teams, security companies and security professionals who offer these IP lists to the rest of us.
- Of course, security is achieved with a lot more than IP lists. And not all IP lists included here should be used for blocking traffic at a firewall or border router. Many of them, should be used, for example, to influence the way applications handle clients, or help in the development of further threat analysis.
- GitHub - firehol/firehol - This is FireHOL's repo. Not needed but is included for reference.
- GitHub - firehol/blocklist-ipsets
- ipsets dynamically updated with firehol's update-ipsets.sh script
- This repo contains the updated IP lists
- GitHub - firehol/blocklist-ipsets - Which ones to use - A brief outline of a few of the aggregated lists
- FireHOL IP Lists | IP Blacklists | IP Blocklists | IP Reputation (iplists.firehol.org)
- 350+ IP blacklists, IP blocklists and IP Reputation feeds, about Cybercrime, Fraud, Botnets, Μalware, Virus, Abuse, Attacks, Open Proxies, Anonymizers. See their changes and updates, size over time, retention policy, geographic coverage, comparisons and overlaps.
- This is a website related to the usage of the FireHOL Blocklists and gives further infomation about them.
- FireHOL Aggregated Feeds - I could not find any defined list of these so this is a best guess.
- firehol_abusers_1d
- An ipset made from blocklists that track abusers in the last 24 hours. (includes: botscout_1d cleantalk_new_1d cleantalk_updated_1d php_commenters_1d php_dictionary_1d php_harvesters_1d php_spammers_1d stopforumspam_1)
- About Page: https://iplists.firehol.org/?ipset=firehol_abusers_1d
- Feed: https://raw.githubusercontent.com/firehol/blocklist-ipsets/master/firehol_abusers_1d.netset
- firehol_abusers_30d
- An ipset made from blocklists that track abusers in the last 30 days. (includes: cleantalk_new_30d cleantalk_updated_30d php_commenters_30d php_dictionary_30d php_harvesters_30d php_spammers_30d stopforumspam sblam)
- About Page: https://iplists.firehol.org/?ipset=firehol_abusers_30d
- Feed: https://raw.githubusercontent.com/firehol/blocklist-ipsets/master/firehol_abusers_30d.netset (large)
- firehol_anonymous
- An ipset that includes all the anonymizing IPs of the world. (includes: anonymous dm_tor firehol_proxies tor_exits)
- About Page: https://iplists.firehol.org/?ipset=firehol_anonymous
- Feed: https://raw.githubusercontent.com/firehol/blocklist-ipsets/master/firehol_anonymous.netset (large)
- firehol_level1
- A firewall blacklist composed from IP lists, providing maximum protection with minimum false positives. Suitable for basic protection on all internet facing servers, routers and firewalls. (includes: bambenek_c2 dshield feodo fullbogons spamhaus_drop spamhaus_edrop sslbl ransomware_rw)
- About Page: https://iplists.firehol.org/?ipset=firehol_level1
- Feed: https://raw.githubusercontent.com/firehol/blocklist-ipsets/master/firehol_level1.netset
- firehol_level2
- An ipset made from blocklists that track attacks, during about the last 48 hours. (includes: blocklist_de dshield_1d greensnow)
- About Page: https://iplists.firehol.org/?ipset=firehol_level2
- Feed: https://raw.githubusercontent.com/firehol/blocklist-ipsets/master/firehol_level2.netset
- firehol_level3
- An ipset made from blocklists that track attacks, spyware, viruses. It includes IPs than have been reported or detected in the last 30 days. (includes: bruteforceblocker ciarmy dshield_30d dshield_top_1000 malc0de maxmind_proxy_fraud myip shunlist snort_ipfilter sslbl_aggressive talosintel_ipfilter vxvault)
- About Page: https://iplists.firehol.org/?ipset=firehol_level3
- Feed: https://raw.githubusercontent.com/firehol/blocklist-ipsets/master/firehol_level3.netset
- firehol_level4
- An ipset made from blocklists that track attacks, but may include a large number of false positives. (includes: blocklist_net_ua botscout_30d cruzit_web_attacks cybercrime haley_ssh iblocklist_hijacked iblocklist_spyware iblocklist_webexploit ipblacklistcloud_top iw_wormlist malwaredomainlist)
- About Page: https://iplists.firehol.org/?ipset=firehol_level4
- Feed: https://raw.githubusercontent.com/firehol/blocklist-ipsets/master/firehol_level4.netset (large)
- firehol_proxies
- An ipset made from all sources that track open proxies. It includes IPs reported or detected in the last 30 days. (includes: iblocklist_proxies maxmind_proxy_fraud ip2proxy_px1lite proxylists_30d proxz_30d socks_proxy_30d sslproxies_30d xroxy_30d)
- About Page: https://iplists.firehol.org/?ipset=firehol_proxies
- Feed: https://raw.githubusercontent.com/firehol/blocklist-ipsets/master/firehol_proxies.netset (large)
- firehol_webclient
- An IP blacklist made from blocklists that track IPs that a web client should never talk to. This list is to be used on top of firehol_level1. (includes: ransomware_online sslbl_aggressive cybercrime dyndns_ponmocup maxmind_proxy_fraud)
- About Page: https://iplists.firehol.org/?ipset=firehol_webclient
- Feed: https://raw.githubusercontent.com/firehol/blocklist-ipsets/master/firehol_webclient.netset
- firehol_webserver
- A web server IP blacklist made from blocklists that track IPs that should never be used by your web users. (This list includes IPs that are servers hosting malware, bots, etc or users having a long criminal history. This list is to be used on top of firehol_level1, firehol_level2, firehol_level3 and possibly firehol_proxies or firehol_anonymous). (includes: maxmind_proxy_fraud myip pushing_inertia_blocklist stopforumspam_toxic)
- About Page: https://iplists.firehol.org/?ipset=firehol_webserver
- Feed: https://raw.githubusercontent.com/firehol/blocklist-ipsets/master/firehol_webserver.netset
- firehol_abusers_1d
- An example FireHOL feed setup in pfBlockerNG
- Click here to see the feed should look in pfBlockerNG
- Feature #13201: Add FireHol Security IP Feeds - pfSense Packages - pfSense bugtracker - My request to add this Feed to pfBlockerNG
- Some additional DoH lists that you can add
-
Some additional DoH links:

Header/Label: 2_crypt0rr_DoH
https://gist.githubusercontent.com/ckuethe/f71185f604be9cde370e702aa179fc2e/raw/53fe52046836ac3009e9505b7b8b8b5de42d84e3/doh-blocklist.txt

Header/Label: 3_ckuethe_DoH
https://raw.githubusercontent.com/crypt0rr/public-doh-servers/main/dns.list

Header/Label: 4_tjay_DoH
https://raw.githubusercontent.com/tjay/DoH-List/master/hosts
These will look like:
-
- General
- Free threat intelligence feeds - threatfeeds.io - Search and download free and open-source threat intelligence feeds with threatfeeds.io.
- GreenSnow // BlockingList - GreenSnow is a team consisting of the best specialists in computer security, we harvest a large number of IPs from different computers located around the world. GreenSnow is comparable with SpamHaus.org for attacks of any kind except for spam.
- Best Cyber Threat Intelligence Feeds — Silent Push Threat Intelligence - In this blog post, we use a number of open source feeds to show two indicators of feeds that we use to determine the quality of feeds: originator percentage and overlap percentage.
- MISP Default Feeds - MISP includes a set of public OSINT feeds in its default configuration and are available on this page.
- World Crime Feeds (WCF) - A Unified Approach on Cyber Defence - If you are searching about cyber threat data feeds, cyber and world crime feeds agents then call OneFirewall Alliance. We share in real time actionable threat intelligence cyber crime feeds (OFA).
- Threat Intel Sources - BluSapphire - BluSapphire natively collects from the below list of Sources, de-duplicates the data, consolidates and validates the data before consuming the threat intelligence.
- FilterLists | Subscriptions for uBlock Origin, Adblock Plus, AdGuard - FilterLists is the independent, comprehensive directory of filter and host lists for advertisements, trackers, malware, and annoyances. By Collin M. Barrett.
- oisd | domain blocklist
- This list prioritizes functionality over blocking. Thís is the list to use at home, at work or at your (grand-)parents place.
- There are several feeds made from a source of aggregates feeds, all of which are availabe to use.
- oisd Blocklist NSFW - Probably the most extensive NSFW list on the web
- IP Block Lists | Juggernaut Security and Firewall Documentation - Juggernaut Security and Firewall Documentation
- specials/Blocklisten at master · RPiList/specials · GitHub - Schutz vor Fakeshops, Werbung, Tracking und anderen Angriffen aus dem Internet - specials/Blocklisten at master · RPiList/specials
- GitHub - olbat/ut1-blacklists - Collection of websites blacklists managed by the Université Toulouse Capitole - GitHub - olbat/ut1-blacklists: Collection of websites blacklists managed by the Université Toulouse Capitole
- AbuseIPDB - IP address abuse reports - Making the Internet safer, one IP at a time - AbuseIPDB is an IP address blacklist for webmasters and sysadmins to report IP addresses engaging in abusive behavior on their networks, or check the report history of any IP.
- Feeds - SANS Internet Storm Center
- SANS Internet Storm Center - A global cooperative cyber threat / internet security monitor and alert system. Featuring daily handler diaries with summarizing and analyzing new threats to networks and internet security events.
- We offer one blocklist, and one blocklist only (https://isc.sans.edu/block.txt). Unlike for our other lists, we will remove IPs from this blocklist if asked to.
- GitHub - hagezi/dns-blocklists: DNS-Blocklists:
- For a better internet - keep the internet clean!
- An all-in-one DNS blocklist in various versions (light, normal, pro, pro++ and ultimate). It can be used as a standalone blocklist. For every region. Blocks ads, affiliate, tracking, metrics, telemetry, fake, phishing, malware, scam, coins and other "crap". Based on various native blocklists. No, they are not just block lists cobbled together from different sources. They have been optimized and extended to efficiently "clean the Internet" in all areas.
- Zonefiles
- Compromised domain lists. Malware and ransom compromised domains
- Daily updated lists of compromised domains. Suspicious, malware, phishing and ransom domain tracker.
- currently active (ipv4 and IPv6 combined)
- Compromised IP lists. Malware and ransom compromised IPs
- Daily updated lists of compromised IPs. Suspicious, malware, phishing and ransom IP tracker.
- Full + active (ipv4 and IPv6 combined)
- The company said on a chat, "There is no retention period, it's a permanent list", which is obviously a bad thing as the list will get poisned over time and be useless.
- = stupid
- All active domain lists. Total 1568 domains zones. - Download the full list of all active domains. Includes classic and country-code zones.
- Compromised domain lists. Malware and ransom compromised domains
- ACCOMPLIST - List Compile
- GitHub - cbuijs/accomplist: ACCOMPLIST - List Compiler - Blocklist Compiler with goal of having the smallest/efficient/aggregated combined list with no overlap/duplication and more!
- accomplist/nrd/plain.black.top-n.hostdomains.list at master · cbuijs/accomplist · GitHub
- How to block newly registered domains? Use this list.
- Q: Perfect! How old/new are the domains listed?
- A: It is per day. So the "youngest" domains are not older then 24h. I purge the list of entries older then four weeks (automatically).
- CrowedSec
- CrowdSec Blocklists - CrowdSec is an open-source and collaborative security stack leveraging the crowd power. Analyze behaviors, respond to attacks & share signals across the community. Join the community and let's make the Internet safer, together.
- Discover CrowdSec’s Free Third-Party Blocklists - All users on the CrowdSec Console can subscribe their Security Engines to third-party blocklists to secure their systems against VoIP fraud, botnets, and more.
- Explore CrowdSec Blocklists with the New Blocklist Catalog - Introducing a centralized hub to explore and compare the CrowdSec Blocklists, helping you select the most relevant to your security needs.
- Pi-Hole
- Avoid The Hack: The Best Pi-Hole Blocklists (2023) | avoidthehack!
- BlockList:Project - The BlockList Project aims to empower users by enabling them to select the lists they want to include in their preferred ad blocker. This community-driven initiative strives to improve the online experience for all.
- GitHub - blocklistproject/Lists: Primary Block Lists - Primary Block Lists. Contribute to blocklistproject/Lists development by creating an account on GitHub.
- pihole-blocklists · GitHub Topics · GitHub - A search on GitHub for 'pihole-blocklists'
- pihole-blocklists · Topics · GitLab - A search on GitLab for 'pihole-blocklists'
- 7 Best PiHole Blocklists 2023 - Safely Block all Ads - NINJA IDE - These 7 Best PiHole Blocklists will keep your network and devices safe from intrusive ads. We have included default, custom and community-filtered lists.
- The Best Pi-hole Blocking Lists 2023 (10 MILLION domains) - Computer How To - We have collected in our opinion The Best Pi-hole Blocking Lists 2023 where is over 10000000 domains. How to Add Block list to Pi-Hole.
- Shut Your Pi-hole – Beacon Sandwich - Pi-hole is a simple and powerful tool that should be used by everyone who can, but is it all just plain sailing?
- Blocklist Collection ¦ Firebog
- Pi-hole compatible blocklists for you to have a more enjoyable online presence.
- This collection hopes to help you minimise these issues, and to maintain a more enjoyable online presence, using the wonderful, free and open source utility known as Pi-hole.
Notes
- NSFW = Not safe for work
- pfBlockerNG Guide - zenarmor.com (was sunnyvalley.io)
- IPv4 Category feeds are divided into five groups(PRI1-5). These PRI groups are Known Ransomware, malware, botnets, Command & Control (C&C) servers, bots, web scripts, phishing & compromised servers, malicious IP's found attacking SSH, SMTP, IMAP, TELNET, FTP endpoints and other known originators of malicious behavior. In general, the lower the number, the more pfBlockerNG tries to avoid false positives.
- You may enable different DNSBL feeds as you wish on your pfBlockerNG by following the next steps. Here, we will enable EasyList group feeds on our pgBlockerNG as an example. We also recommend you add the Steven Black feed is one of the best-maintained blacklist databases on the internet.
- EasyList is the primary filter list that removes the majority of advertisements from international webpages, as well as unwanted frames, images, and objects. It is the most commonly used list by many ad blockers and serves as the foundation for over a dozen combination and supplementary filter lists.
- Open your favorite browser and enter the domain name that you added to the Custom DNSBL list. It is dnsbltest.com for our example.
- Blocking... or trying to... DNS over HTTPS (aka DoH) - Thiago Crepaldi
- This post is complementary to a previous POST protecting your network from malicIous DNS. Here we are going to leverage a recent addition to pfBlockerNG: a brand new DoH feed! What is the big deal in allowing DNS over HTTPS (aka DoH) on your network?! Well, users can bypass the DNS over TLS of your...
- Block DNS over HTTPS (DoH), using pfsense | jpgpi250 | GitHub - PDF covers a lot of stuff and has some useful information.
Block DNS over HTTPS (DoH), using pfsense | jpgpi250 | PDF - User-defined script (sh or python) on a downloaded Feed
- Add new Feature to execute a user-defined script (sh or python) on a downloaded Feed.
- Useful to process Amazon Web Services IP Range feed for specific Regions.
- When you edit a feed you can run a 'Pre-process Script' which currently has scripts in it to download Amazon AWS server IPs in particular regeions. Not exaclty sure how to use these.
- AWS IP address ranges - AWS General Reference - Lists the IP address ranges for AWS.
Enable Auto Config Backup (Free service)
Auto Configuration Backup automatically encrypts configuration backup content using the Encryption Password below and then securely uploads the encrypted backup over HTTPS to Netgate servers.
- Get your 'Device key' and store it somewhere safe
- Services --> Auto Configuration Backup --> Backup Now --> Device key
- Services --> Auto Configuration Backup --> Settings
- Enable automatic configuration backups: ticked
- Backup Frequency: Automatically backup on a regular schedule
- If you edit your config a lot on one day, and knowing that 'Auto Config Backup' has a limit of the last 100 configs, you should set a daily backup schedule as I have.
- Schedule:
- These settingsfollow the Cron format and will perform a daily backup at 00:20 every morning.
- Minute (0-59): 20
- Hours (0-23): 0
- Day (1-31): *
- Month (1-12): *
- Day of week (0-6): *
- Encryption Password: Make this very complex and then back it up somewhere safe
- Hint/Identifier: Something human readable and unique
- Manual backups to keep: 20
- Run a backup now
- Services --> Auto Configuration Backup --> Backup Now --> Backup
- [pfSense] Making automatic backups with AutoConfigBackup – Provya
- This Stores the last 100 configs at Netgate hashed by your encryption Key
- This only backs up the basic configurations, not the extended information of pfSense.
Enable SSH
- Instructions
- System --> Advanced --> Admin Access --> Secure Shell --> Enable Secure Shell: ticked
- Username: root
- Password: same as you admin password
- Protocol: SFTP over SSH
- NB: This will not be available on the WAN unless you setup firewall rules (i am guessing)
- Guides
- Granting Users Access to SSH | pfSense Documentation
- How to Enable SSH on pfSense in 2024 - WunderTech - Discover how to securely enable SSH on pfSense with this step-by-step tutorial, taking just 5 minutes and using secure RSA keys!
Port Forwarding
This is for reference only.
- Firewall --> NAT --> Port Forward
- Very simple to setup
- pfSense: How To NAT / Port Forward With a Multiple Wan / Fail over setup | Lawrence Systems
- Touches on NAT Reflection and says you should leave these 2 options as they are:
- NAT reflection: Use system default
- Filter rule association: Add associated filter rule
- Network Address Translation — Port Forwards | pfSense Documentation
- How to Set Up Port Forwarding in pfSense Software | YouTube | Netgate
- How To Setup Port Forwarding on pfsense 2.4 | Lawrence Systems
Allow WAN Ping (Optional, but useful)
- Firewall --> Rules --> WAN --> Add
- Action: Pass
- Protocol: ICMP
- ICMP subtypes: Echo request
- Source: any
- Destination: This Firewall (self)
- Description: Allow Ping
- Notes
- How to allow ping on pfSense WAN? - Thiago Crepaldi
- tcp - Ping port number? - Network Engineering Stack Exchange
- The standard ping command does not use TCP or UDP. It uses ICMP. To be more precise ICMP type 8 (echo message) and type 0 (echo reply message) are used. ICMP has no ports!
- See RFC792 for further details.
- It is always the router that will respond to the ping, not your webserver or anything internally with this rule.
Allow WAN IGMP (Optional)
- Firewall --> Rules --> WAN --> Add
- Action: Pass
- Protocol: IGMP
- Source: any
- Destination: This Firewall (self)
- Description: Allow IGMP
- Services — IGMP Proxy | pfSense Documentation
- The Internet Group Management Protocol (IGMP) Proxy provides a means to proxy multicast traffic between network segments.
- What is the Internet Control Message Protocol (ICMP)? | Cloudflare
- Internet Control Message Protocol | Wikipedia
- Is on by default in OpenWRT
- Should I disable IGMP Proxying? Your Question Answered - Robot Powered Home
- An indepth look at IGMP
- IGMP Proxy settings for IPTV : PFSENSE
- I recently received a IPTV box from my ISP and I can't get it to work behind my pfSense router.
- After multiple searches, I understood it had something to do with IGMP Proxy which I've never heard of, and I have no idea how to configure.
NAT Reflection (Enable Globally)
- Accessing Port Forwards from Local Networks | pfSense Documentation
- System --> Advanced --> Firewall & NAT --> Network Address Translation
- NAT Reflection mode for port forwards: Pure NAT
- Enable NAT Reflection for 1:1 NAT: unticked
- This is not needed for normal NAT Loopback.
- I am not sure what this is for really except I don't currently needed it.
- This might solve a problem that I am not having.
- Enable automatic outbound NAT for Reflection: ticked
- System --> Advanced --> Firewall & NAT --> Network Address Translation
Notes
- NAT reflection allows you to access a URL from the Intranet as well as the Internet without doing stupid changes.
- Same as NAT Loopback on OpenWRT
- NAT Reflection needs to be turned on
- When setting up a port forward just leave the relevant rule to use the system default
- NAT reflection: Use system default
- I am using NAT Reflection instead of Split DNS because I am running a webserver with many domains on it and I do not want to add and manage all of these domain names in the DNS Resolver.
- This will enable NAT Reflection for all rules when needed, assuming you have not specifically disabled them in the port forward rule.
- Firewall/NAT Tab - NAT Reflection for Port Forwards | pfSense Documentation
- This explains the different settings very clearly.
- How to deal with NAT on pfSense/OPNSense. Real world examples. 1:1 NAT, Inbound NAT, Outbound NAT.
- In this video I'll show you the real world operations with NAT on 2 opensource firewall products: pfSense and OPNSense.
- Network Address Translation — 1:1 NAT | pfSense Documentation
- NAT on pfSense 2.3 | YouTube | Netgate
- A great video on NAT, Port Forwarding and NAT Reflection
- NAT 1:1 and Reflection discussed here
- I have set the URL to be at the right time stamp
- Can someone explain to me what is NAT Reflection Mode in simple terms like level 1 (i'm old and newbie to pfSense) : PFSENSE
- Understand & Configure NAT Reflection, NAT Loopback, Hairpinning on Cisco ASA 5500-X for TelePresence ExpressWay and Other Applications
- Check your ports are not unnecessarily exposed with GRC Shields Up
- You can run NAT Reflection and Split DNS at the same time
- NAT Reflection makes sure any traffic for a website on your webserver is redirected and not lost and this stops the need to configure every domain. Re-routing takes a little more time and CPU so for small networks this wont make much difference.
- Split DNS allows the local override of DNS for a particular website which gives a quicker connection becasue it is not being re-routed by the router. Every domain has to be configured and this could be a bit fo a task. This is needed for devices that are not exposed to the internet or do not have FQDN that can be returned by an authrative DNS server.
- Best setup = NAT Reflection is enabled to catch all traffic and re-route as needed so no reuests are missed and then Split DNS for those that need a maually DNS entry on the router.
- NAT Reflection makes sure any traffic for a website on your webserver is redirected and not lost and this stops the need to configure every domain. Re-routing takes a little more time and CPU so for small networks this wont make much difference.
VLANs
These are easy to setup and dont really need an explanation
- Interfaces --> VLANs
- Integrate pfsense into my OpenWrt managed network - OpenWrt Forum - pfSense acts as a router, OpenWrt device acts as a bridge (AP). You will need to configure the same VLANs on both devices.
- Tutorial - pfSense, OpenWrt - multiple SSIDs and VLANs | Netgate Forum
- I have created a tutorial for adding multiple SSIDs (guest wifi network) with VLAN support on an OpenWrt router/ap and pfSense firewall.
- This tutorial is based on pfSense version 2.3.2 and OpenWrt CC 15.05.1.
- Configuring a VLAN per SSID with OpenWRT and pfSense - How to setup multiple SSIDs with unique VLANs on OpenWRT with pfSense acting as the firewall/DHCP server.
- How To Setup VLANs With pfsense & UniFi 2023 - YouTube | Lawrence Systems
Notifications (Email)
- System --> Advanced --> Notifications --> Email
- These are important so you are notified about events. I have not found where you can configure specific events.
- Fill in as below when using a CWP server on your local network (with NAT Reflection).

- FQDN (server.mydomain.com ) does not work so you must use its local IP address (192.168.1.11).
- You cannot Validate the SSL/TLS certificate.
- pfSense email notification when fallback WAN connection goes down | cyberciti.biz - Explains how to configure pfSense email notification with cloud based smtp server or old good Google gmail smtp server to send notification e-mails.
Add additional Widget(s) to the Dashboard
- Click on the + at the top right and select a widget

- I have on my dashboard
- Column 1
- Gateways
- System Information
- Column 2
- Services Status
- Thermal Sensors
- Disks
- S.M.A.R.T. Status
- pfBlockerNG
- Column 3
- Interfaces
- Traffic Graphs
- Column 1
OpenVPN Server
- Virtual Private Networks — OpenVPN | pfSense Documentation
- You can install both types of OpenVPN server at the same time. This lets you play with both types, but can just do one if you want. Both types have their merits.
- You cannot use 192.168.70.x as your IP range or even 192.168.x.x because of Android Hotspots. See notes below for more details
- We will use UDP for the servers but you can easily change this to TCP when you need to. TCP will ensure data integrity but will come at the cost of speed.
- TUN vs TAP
- TUN
- Is the modern and more secure method for VPN and should be your first choice.
- This is more secure because all traffic is routed and thus can be controlled by the pfSense router.
- TAP
- Is a legacy method of running a VPN.
- It will connect you into your network as if you were there, including having a an IP address from the local network, and sending/receiving broadcast traffic which is useful for legacy apps and network discovery.
- Routing of UDP broadcasts can now be done my a pfSense package UDP Broadcast Relay, so this is one less reason to use this OpenVPN method.
- OpenVPN TAP works, but cant access any services on the router | Netgate Forum
- jimp (netgate) - TAP is not the most efficient connection. It is pointless to broadcast traffic over a vpn unless there is specific actual requirement for such a connection and also it adds overhead to every packet.
- BridgingAndRouting – OpenVPN Community
- For a brief introduction on bridging and routing
- This discussion needs to start with TAP vs TUN devices.
- Benefits and drawbacks of TAP and TUN networks.
OpenVPN TUN Server (RoutedVPN) - Using the wizard
- Tutorial: pfsense OpenVPN Configuration For Remote Users 2020 | Lawrence Systems
- This is the preferred method for clients accessing your network.
- You can re-run the wizard to make changes
- Yes, it does skip some steps (some configurations don't need all of the steps)
- This is the more secure method of VPN because you can take advantage of network routing.
- The client will get an IP from 10.200.1.0/24 range (not 10.200.1.254 - This is for the gateway)
- Your VPN clients are not on the same subnet as your LAN clients so you might need to do some additional steps (outlined below) to get clients to talk to each other but this is normal.
- RoutedVPN will still allow access to local network assets but with no broadcast traffic passing between networks and is better for security.
- This connection can be tied down because it's traffic will always be routed between 2 or more network segments on the router.
Run the Wizard
- VPN --> OpenVPN --> Wizards
- Step 1 - Authentication Type
- Select an Authentication Backend Type --> Type of Server: Local User Access
- Step 6 - Add Certificate Authority (CA)
- Descriptive name: OpenVPN
- Key length: 2048 bit
- Lifetime: 3650
- Country Code: your details
- This is capital sensitive, so do in ALL Caps i.e
US, GB
- This is capital sensitive, so do in ALL Caps i.e
- State or Province: your details
- City: your details
- Organization: your details
- Randomize Serial: ticked
- This option might not be present as it depends on your version of pfSense.
- If this option is not present perform the workaround at the end of these steps.
- Step 8 - Add a Server Certificate
- Descriptive name: OpenVPN
- Key length: 2048 bit
- Lifetime: 398
- Country Code: your details
- State or Province: your details
- City: your details
- Organization: your details
- Step 9 - Server Setup (Only change settings mentioned)
- General OpenVPN Server Information
- Protocol: UDP on IPv4 only
- Local Port: 2000 (don't use the default port for security)
- Description: RoutedVPN
- Cryptographic Settings
- Hardware Crypto: Intel RDRAND engine - RAND (you might have different options or none)
- Tunnel Settings
- Tunnel Network: 10.200.1.0/24
- Redirect Gateway: ticked
- Force all client generated traffic through the tunnel.
- Should all traffic go into your network and then back out or only what traffic is required to go in your network?
- See video for further info
- If unsure, ticked is the best option
- Local Network: 10.0.0.0/24
- Client Settings
- DNS Default Domain: mydomain.com
- DNS Server: 10.200.1.1 (you can use 10.0.0.1)
- General OpenVPN Server Information
- Step 10 - Firewall Rule Configuration
- Traffic from clients to server
- Firewall Rule: ticked
- Firewall --> Rules --> WAN --> OpenVPN RoutedVPN Wizard
- Traffic from clients through VPN
- OpenVPN rule: ticked
- Firewall --> Rules --> RoutedVPN --> OpenVPN RoutedVPN Wizard
- Traffic from clients to server
- Step 11 - Finished!
- Click 'Finish'
- You have now been redirected to
VPN --> OpenVPN --> Servers
Randomize Serial not present in the wizard - Workaround
This is only needed if the option was not available above. These instructions will enable the missing option in the OpenVPN CA and then regenerate the OpenVPN Certificate but with a random serial.
- System --> Cert. Manager --> CAs --> Certificate Authorities --> 'OpenVPN' --> Edit
- Trust Store: unticked
- I have not used this option. It implies that it will install the CA into an OS when it is downloaded, maybe this is a flag to ask the OS to install it.
- The default for this is off, I thinnk.
- Randomize Serial: ticked
- This is to ensure the certificate's serial is random.
- 'Next Certificate Serial' value will be ignored when using randomized serials
- Click save
- Trust Store: unticked
- System --> Cert. Manager --> Certificates --> Certificates --> 'OpenVPN' --> 'Reissue/Renew
- When this certificate was setup using the wizard, serial randomisation was not enabled because that option was not present in the wizard. Running this will generate a new certificate with a random serial.
- Don't worry about revoking as this certificate has never be used or sent out in to the wild.
- Leave everything as is
- Click 'Renew/Reissue'
Fine Tuning
- Edit your server you have just created
- Endpoint Configuration
- Local port: 2000
- check this is correct as sometimes the wizard makes mistakes.
- If it is wrong, check the WAN Firewall rule (OpenVPN RoutedVPN wizard)
- Local port: 2000
- Cryptographic Settings
- Peer Certificate Revocation list: pfSense Certificate Revocation List (CA: OpenVPN)
- I have set a revocation list, dont know how to use it but this setting needs to be on to be able to revoke certificates.
- Hardware Crypto: Intel RDRAND engine - RAND (or your supported engine)
- Strict User-CN Matching: ticked
- Client Certificate Key Usage Validation: ticked
- OCSP Check: unticked
- Leave this off as you have to specifiy an external server.
- Peer Certificate Revocation list: pfSense Certificate Revocation List (CA: OpenVPN)
- Tunnel Settings
- Redirect IPv4 Gateway: ticked
- Redirect IPv6 Gateway: unticked
- Concurrent connections: 1 (Only I am connecting)
- Inter-client communication: ticked
- This option controls whether or not connected clients are able to communicate with one another. To allow this behavior, check the option. When unchecked, clients can only send traffic to the server or destinations beyond the server such as routed networks or the Internet.
- Typically in remote access style deployments it is unnecessary for clients to reach each other, but there are use cases when it can be helpful. One example is remote web developers working together and running test servers on their local workstations. With this option activated, the developers can reach the other self-hosted test servers for collaborative development.
- Advanced Client Settings
- DNS Default Domain: ticked + mydomain.com
- DNS Server enable: ticked
- DNS Server 1: 10.200.1.1 (you can use 10.0.0.1)
- Block Outside DNS: ticked
- Force DNS cache update: ticked
- NetBIOS enable: unticked
- Advanced Configuration
- Custom options:
push "redirect-gateway def1 block-local"
- This is a workaround to use the block-local flag to stop access to local traffic while the VPN is connected.
- I have posted a feature request: Feature #14105: Ability to set 'block-local' gateway flag in OpenVPN Server Config - pfSense - pfSense bugtracker
- Gateway creation: IPv4 only
- If the VPN will only ever carry one type of traffic, this option can limit that behavior so the GUI will not display an unnecessary gateway entry.
- Custom options:
- Click Save
- Services --> DNS Resolver --> General Settings --> OpenVPN Clients: ticked
- This will register the certificate name and not the PCs name (i think) i.e. user.mydomain.com - In which case make the cert match the PC name and there will be no issue.
Assign OpenVPN interface
- Assigning OpenVPN Interfaces | pfSense Documentation
- It is needed to allow the assigning of DHCP addresses and for routing.
- Assigning this Interface allows you to monitor traffic coming in on that connection on the dashboard which is very useful
- The procedure for assigning an OpenVPN interface is covered in Assigning OpenVPN Interfaces.
- Manually set the default gateway
- This should already be done earlier in this tutorial
- System --> Routing --> Gateways
- Default gateway IPv4: WAN_PPPOE
- Default gateway IPv6: none
- Navigate to Interfaces --> Assignments
- Available network ports: ovpn1 (RoutedVPN)
- Click Add
- Navigate to Interfaces --> OPT1 (ovpns1)
- Enable: ticked
- Description: RoutedVPN
- Click 'Save'
- Click 'Apply Changes'
- VPN --> OpenVPN --> Servers --> Edit --> RoutedVPN
- Click Save to refresh the VPN configuration and restart its process
Firewall rules
- Firewall --> Rules --> WAN
- OpenVPN RoutedVPN
- This rule is for the OpenVPN server and allows the traffic through the WAN
- There should already be a rule created by the OpenVPN wizard called 'OpenVPN BridgedVPN Wizard'
- Edit it as follows (default is 1194 but I have changed mine after I ran the wizard for security)
- Edit Firewall Rule
- Action: Pass
- Interface: WAN
- Address Family: IPv4
- Protocol: UDP
- Source
- Invert match: unticked
- any
- Destination
- WAN address
- From - OpenVPN (2001)
- To - OpenVPN (2001)
- Description: OpenVPN BridgedVPN
- Edit Firewall Rule
- OpenVPN RoutedVPN
- Firewall --> Rules --> BRIDGEDVPN
- These rules allow the flow of traffic over the ROUTEDVPN interface.
- Add/Edit them in order show here
- Default allow ROUTEDVPN to any rule
- There should already be a rule created by the OpenVPN wizard called 'OpenVPN RoutedVPN Wizard'
- Edit it as follows
- Edit Firewall Rule
- Action: Pass
- Interface: ROUTEDVPN
- Address Family: IPv4
- Protocol: Any
- Source
- Invert match: unticked
- ROUTEDVPN net
- Destination
- any
- Extra Options
- Description: Default allow ROUTEDVPN to any rule
- Edit Firewall Rule
pfBlockerNG
- Assign ROUTEDVPN as an 'Outbound Interface'
- Firewall --> pfBlockerNG --> IP --> IP Interface/Rules Configuration
Convert RoutedVPN into an Internet Only Secure Connection (with Kill Switch) (Optional)
- You can still access the pfsense box through its IPs such as 10.0.0.1 and probably it's domain name.
- Deal with the access problem by restricting the admin interface. Dealt elsewhere in this article.
- By manually assigning a gatway, the internal routing table of pfSense is ignored/not used so routing to other assets is not possible.
- This useful for mobile phones and devices out in the real mode that just need a secure and private connection to the internet and not access to any of your local assets.
- You can setup another VPN specifically for this type of network profile, but here we are going to repurpose the current Routed VPN network as it is easy to turn this feature on or off.
- Obviously if you do this you will not be able to access any pfSense network assets.
- This still allows the assignment of clients on the Routed VPN network to the Privacy network because the 'Clients to be routed over PIA' is triggered first if the clients IP is defined in the alias.
- You will be able to see your locally hosted webservers if
- They are specified in a port forward rule on the WAN interface. This allows NAT reflection to take place.
- You specify the WAN as per these instructions.
This conversion will force all RoutedVPN traffic through the WAN and prevent communication with the pfSense local network which will give the following benefits:
- For the Remote Device
- Secure DNS (pfSense's DNS Server only)
- A clean network to access the internet
- Private connection - Traffic is hidden from the device's local environment
- pfSense Network
- Local clients cannot be compromised by malware on the remote device
Interface Rule (Add the Tag)
This rule selects the WAN Gateway and adds a tag to the OpenVPN packets where the source is from the 10.200.1.0/24 network (ROUTEDVPN net).
This rule needs adding to every interface where you want to control which clients are routed through the Privacy VPN or the default gateway (WAN) by the 'Route_Out_Over_PIA' alias. Obviously just change the interface.
- Firewall --> Rules --> RoutedVPN --> Add
- Action: Pass
- Interface: OpenVPN
- Address Family: IPv4
- Protocol: Any
- Source:
- Invert match: unticked
- ROUTEDVPN net
- Destination: any
- Description: Route the Routed VPN Network over WAN (Internet Only)
- Click 'Display Advanced'
- Advanced Options
- Tag: WAN_ONLY
- Gateway: WAN_PPPOE
- Click Save
- Click 'Apply Changes'
- Move the rule below 'IP's to be routed over PIA'
- This allows the privacy policy to still work
Floating Rule (Checks for the Tag and blocks the traffic)
On the WAN interface, block all Privacy VPN traffic that attempts to go into the WAN by matching any packets on the WAN that have a 'Private_VPN_ONLY' Tag.
- Firewall --> Rules --> Floating --> Add
Firewall — Floating Rules | pfSense Documentation
- Action: Block
- Quick: unticked
- Interface: OpenVPN
- Direction: any
- Address Family: IPv4
- Protocol: Any
- Source:
- Invert match: unticked
- any
- Destination:
- Invert match: ticked
- WAN address
- Log: ticked
- Description: Only Allow WAN Gateway (Kill Switch)
- This rule can be re-used for other interfaces by just including them.
- Click 'Display Advanced'
- Tagged:
- Invert: unticked
- Tagged: WAN_ONLY
- Tagged:
- Put this rule below your 'Privacy VPN' rules.
- You can turn this kill switch mechanism of by just disabling the interface rule 'Route the Routed VPN Network over WAN (Internet Only)'. You don't need to delete it.
- The floating rule 'Only Allow WAN Gateway (Kill Switch)' currently allows for access to your web server and other local assets via NAT Relection. If you do not want this routing, just change the 'Destination' settings to:
- Invert match: unticked
- any
- This method does not stop access to your router i.e. 10.0.0.1
OpenVPN TAP Server (BridgedVPN) - Using the wizard
- Bridging OpenVPN Connections to Local Networks | pfSense Documentation
- This method is better for site-to-site connections because it allows broadcasts and uses the same IP range.
- The examples in most other OpenVPN recipes are routed using tun interfaces which operate at layer 3 and are generally the best practice. OpenVPN also offers the option of using tap interfaces, which operate at layer 2 and support bridging clients directly onto the LAN or other internal network. This can make the remote clients appear to be on the local LAN. This is a tap VPN.
- This method is what most newbies want, a remote connection to their network sharing the same subnet.
- Either Run the wizard again with the changes below or just copy the 'OpenVPN server' from above and make changes, not forgetting you need a relevant firewall rule.
- The client will get an IP from 10.0.0.0/24 range which is the same as your LAN, infact the IP address will come from your DHCP pool.
- BridgedVPN is a raw connection to your network which allows broadcasts to flow between the LAN and the VPN clients.
- The TAP VPN method is an old way of doing things but has its uses.
- It is probably a less secure method than RoutedVPN because of the open pipe to your network.
- This connection can be tied down, but not as much as RoutedVPN.
Run the Wizard
Follow the setup wizard settings above (RoutedVPN), but with the following changes below
- Step 9 - Server Setup (Only change settings mentioned)
- General OpenVPN Server Information
- Local Port: 2001 (don't use the default port for security)
- Description: BridgedVPN
- Do the fine tuning as set out above
- General OpenVPN Server Information
Re-Configure The OpenVPN Server for Bridging mode
- VPN --> OpenVPN --> Servers --> Edit: Your OpenVPN Server
- Mode Configuration
- tap - Layer 2 Tap Mode (this will change the options later in the page)
- Tunnel Settings
- IPv4 Tunnel Network: empty (i.e. remove 10.200.1.0/24)
- Bridge DHCP: ticked
- Bridge Interface: LAN
- Your LAN interface (or whatever interface you want remote clients to exit onto)
- Do not select a bridge interface here. You should not have one configured anyway.
- It is correct to use 'LAN net' here because the clients on BridgedVPN will be sharing the same IP range and DHCP pool.
- Bridge Route Gateway: unticked
- Server Bridge DHCP Start/End:
- Optional
- Allow you to set what IP addresses are used for DHCP on the OpenVPN connections
- These will not show up in your DHCP leases so the normal DHCP Server is bypassed.
- Start: 10.0.0.190
- End: 10.0.0.199
- Advanced Client Settings
- DNS Server 1: 10.0.0.1
- NetBIOS enable: ticked
- Node Type: b-node
- Scope ID: leave blank
NetBIOS
- I have enabled NetBIOS on the BridgedVPN because I have (and use) NetBIOS on my network.
- Enabling this makes for a more complete bridge.
- Modern Windows systesm use WSD for device discovery and MAC use mDNS, so this might not be needed anymore for the more modern network.
- OpenVPN - NetBIOS Options | pfSense Documentation
- Windows Settings - Configuration | OpenVPN.net - You can configure Windows-specific settings to enable/disable NetBios for connected clients. These settings don’t affect clients installed on other operating systems.
Assign OpenVPN Server to an Interface
- Assigning OpenVPN Interfaces | pfSense Documentation
- The VPN interface must be assigned before it can become a bridge member. The procedure for assigning an OpenVPN interface is covered in Assigning OpenVPN Interfaces.
- Manually set the default gateway
- This should already be done earlier in this tutorial
- System --> Routing --> Gateways
- Default gateway IPv4: WAN_PPPOE
- Default gateway IPv6: none
- Navigate to Interfaces --> Assignments
- Available network ports: ovpns2 (BridgedVPN)
- Click Add
- Navigate to Interfaces --> OPT2 (ovpns2)
- Enable: ticked
- Description: BridgedVPN
- Click 'Save'
- Click 'Apply Changes'
- VPN --> OpenVPN --> Servers --> Edit --> BridgedVPN
- Click Save to refresh the VPN configuration and restart its process
Create Bridge between LAN and BRIDGEVPN
- Bridged OpenVPN clients also receive broadcast and multicast traffic which can greatly increase the amount of traffic passing over the VPN.
- Bridging OpenVPN Connections to Local Networks | pfSense Documentation
- Interfaces --> Assignments --> Bridges (Tab) --> Add
- Member Interfaces: LAN and BRIDGEDVPN
- Description (optional)
- Suggestion: Tap Bridge
- Click 'Save'
You should not create an interface on this bridge. It is not needed and might cause you issues down the line and you do not need to assign it an IP.
Firewall Aliases
Before we make our firewall rules we need to create some alias that will be used by them.
- Firewall --> Rules --> Aliases --> Add
- Broadcast Sources
- Name: Broadcast_Sources
- Description: Broadcast packet sources
- Type: Network(s)
- Network(s)
- 0.0.0.0/8 - self-identification (RFC 6890)
- 10.0.0.0/24 - LAN / BridgeVPN Network
- Broadcast Destinations
- Name: Broadcast_Destinations
- Description: Broadcast packet destinations
- Type: Network(s)
- Network(s)
- 224.0.0.0/24 - Non-Routable Multicast address range
- 239.255.255.250/32 - Simple Service Discovery Protocol address
- 239.255.255.253/32 - Service Location Protocol version 2 address
- 255.255.255.255/32 - IPv4 Broadcast address
- Make sure you 'Apply Changes'
- These aliases are a collection of single IPs and subnets, but both have to be declared as networks for the aliases to allow both types.
- The 0.0.0.0/8 is a special case, even thought it is treated as a single IP it is infact is the IPv4 complete network space.
- Where I have used /32, this means a single IP address
- Later on if you use these in pfBlockerNG you will find it's advanced rules will only accept aliases of Network(s) type or, Port(s) where appropriate.
Firewall Rules
- Firewall --> Rules --> WAN
- OpenVPN BridgedVPN
- This rule is for the OpenVPN server and allows the traffic through the WAN
- There should already be a rule created by the OpenVPN wizard called 'OpenVPN BridgedVPN Wizard'
- Edit it as follows
- Edit Firewall Rule
- Action: Pass
- Interface: WAN
- Address Family: IPv4
- Protocol: UDP
- Source
- Invert match: unticked
- any
- Destination
- WAN address
- From - OpenVPN (2001)
- To - OpenVPN (2001)
- Extra Options
- Description: OpenVPN BridgedVPN
- Edit Firewall Rule
- OpenVPN BridgedVPN
- Firewall --> Rules --> BRIDGEDVPN
- These rules allow the flow of traffic over the BRIDGEDVPN interface.
- Add/Edit them in order show here
- Allow DHCP Broadcasts from LAN
- Edit Firewall Rule
- Action: Pass
- Interface: BRIDGEDVPN
- Address Family: IPv4
- Protocol: UDP
- Source
- Source
- Invert match: unticked
- Single host or alias
- 0.0.0.0
- Source Port Range
- From: (other)
- Custom: 68
- To: (other)
- Custom: 68
- Destination
- Destination
- Invert match: unticked
- Single host or alias
- 255.255.255.255
- Destination Port Range
- From: (other)
- Custom: 67
- To: (other)
- Custom: 67
- Destination
- Extra Options
- Description: Allow DHCP Broadcasts from LAN
- Source
- Edit Firewall Rule
- Allow Broadcasts from LAN
- Edit Firewall Rule
- Action: Pass
- Interface: BRIDGEDVPN
- Address Family: IPv4
- Protocol: Any
- Source
- Source
- Invert match: unticked
- Single host or alias
- Broadcast_Sources
- Destination
- Destination
- Invert match: unticked
- Single host or alias
- Broadcast_Destinations
- Destination
- Extra Options
- Description: Allow Broadcasts from LAN
- Advanced Options
- Allow IP options: ticked
- Source
- Edit Firewall Rule
- Default allow BRIDGEDVPN to any rule
- This allows traffic to work normally as if were on the LAN interface directly.
- LAN net
- has been used as the source because the clients will be on the same network range as the LAN.
- is an alias for 10.0.0.0/24
- There should already be a rule created by the OpenVPN wizard called 'OpenVPN BridgedVPN Wizard'
- Edit it as follows (default is 1194 but I have changed mine after I ran the wizard for security)
- Edit Firewall Rule
- Action: Pass
- Interface: BRIDGEDVPN
- Address Family: IPv4
- Protocol: Any
- Source
- Invert match: unticked
- LAN net
- Destination
- any
- Extra Options
- Description: Default allow BRIDGEDVPN to any rule
- Edit Firewall Rule
Notes
- The broadcasts are restricted to LAN/Bridge/BridgedVPN because:
- broadcasts are not routable, hence why we need the bridge.
- the firewall rules above have source and destination defined.
- firewall rules are applied on an inbound basis.
- LAN has its own hidden rules for handling broadcasts
- Why use 'LAN Net' on the BRIDEGEDVPN interface
- BRIDGEDVPN does not have a network assigned to each so you would not be able to match LAN clients with 'BRIDGEDVPN net'.
- 'LAN net' is an alias for the network 10.0.0.0/24
- Why is 'IP options' enabled on 'Default allow BRIDGEDVPN to any rule'
- IP Options | pfSense Documentation
- Checking this box will allow packets with defined IP options to pass. By default, pf blocks all packets that have IP options set in order to deter OS fingerprinting, among other reasons. Check this box to pass IGMP or other multicast traffic containing IP options.
- Allow packets with IP options to pass. Otherwise they are blocked by default. This is usually only seen with multicast traffic.
- We are bridging 2 networks so there should be no blocks on the same subnet.
- IP Options | pfSense Documentation
- DHCP 0.0.0.0 is a special case so needs it's own firewall rule
- little confused about how pfsense handles broadcast packets, particularly with bridges. couple questions... | Netgate Forum
- The Bridge handles Layer 2 broadcasts such as ARP between LAN and BRIDGEDVPN
- pfSense routing handles Layer 3 broadcast traffic between LAN and BRIDGEDVPN
- DHCP is not a Layer 2 broadcast
- DHCP broadcast packet source IP is not in the 'LAN net' (or any network because 0.0.0.0 cannot belong to any network)
- pfSense creates rules not shown in the GUI to allow DHCP to work on a standalone interface.
- There is no DHCP server on BRIDGEDVPN so no such rule is created
- Dynamic Host Configuration Protocol (DHCP) — High-Performance Computing Technologies
- little confused about how pfsense handles broadcast packets, particularly with bridges. couple questions... | Netgate Forum
- The LAN interface has it's own hidden rules to handle broadcasts which you cannot see.
pfBlockerNG
- Assign BRIDGEDVPN as an 'Outbound Interface'
- Firewall --> pfBlockerNG --> IP --> IP Interface/Rules Configuration
Reboot the Router
- I had many issues with OpenVPN (TAP) and pfBlockerNG, the solution seems to be a proper reboot.
- If you have issues with the OpenVPN (TAP) after this, check below for more advanced troubleshooting.
Restrict Access to OpenVPN Server(s) (optional)
It is not advisable to leave your OpenVPN servers open to everyone. You should restict access where possible and these are the instructions to do this task.
- Create an alias with the following details
- Firewall --> Aliases --> Add
- Name: Allowed_Remote_Clients
- Description: Allowed remote clients
- Type: Host(s) / Network(s)
- Hosts --> IP or FQDN
- Add your IPs here that you want to allow access to your OpenVPN servers.
- Edit the OpenVPN server NAT rules
- Firewall --> Rules --> WAN -->
- OpenVPN RoutedVPN
- OpenVPN BridgedVPN
- Source
- Invert match: unticked
- Single host or alias
- Allowed_Remote_Clients
- Firewall --> Rules --> WAN -->
- Save
- Apply Changes
Move all Rules from the OpenVPN Interface to Individual Interfaces
If in the instructions above you have placed any rules on the OpenVPN interface they should all be moved as follows to their individual interfaces (RoutedVPN|BridgedVPN) for better security and control.
Change Interface Firewall Rule Assignments
These are how the rules should be arranged. Either move the ones in the OpenVPN interface or create new ones and delete where necessary.
The rules are shown below in the order they should appear.
- Firewall --> Rules
- OpenVPN
- OpenVPN (Common) - Disabled
- ROUTEDVPN
- Clients to be routed over PIA
- Route the Routed VPN Network over WAN (Internet Only)
- Default allow ROUTEDVPN to any rule
- BRIDGEDVPN
- Clients to be routed over PIA
- Allow DHCP Broadcasts from LAN
- Default allow LAN to any rule
Change Firewall Floating Rule Assignments (Optional)
- Firewall --> Rules --> Floating
- Currently in Floating Rules the rules listed below are all attached to the OpenVPN interface (and possibly others). For consistency you should keep the assignments as there are, but instead of using OpenVPN you should use ROUTEDVPN and BRIDGEDVPN.
- If you left the rules as they are, they will still work in exactly the same way because both VPNs traffic runs through the OpenVPN interface first but is better for control to have the separated.
Change pfBlockerNG Interface Assignments (Optional)
- Firewall --> pfBlockerNG --> IP --> IP Interface/Rules Configuration --> Outbound Firewall Rules
- Just like the Floating Rules, pfBlocker has the OpenVPN interface assigned because it is a common ancester of ROUTEDVPN and BRIDGEDVPN. So all you have to do is remove OpenVPN and add ROUTEDVPN and BRIDGEDVPN in 'Outbound Firewall Rules', pfBlocker will do the rest.
- As mentioned above, if you did not change this, blocking would still work on all of your VPN traffic as normal.
Additional OpenVPN Security Settings
- Update pfBlockerNG rules
- Firewall --> pfBlockerNG --> IP --> IP Interface/Rules Configuration --> Outbound Firewall Rules: LAN/OpenVPN
- This is required otherwise blocking by pfBlockerNG would not occur.
- Add the OpenVPN interface to pfBlockerNG. OpenVPN is common for both ROUTEDVPN and BRIDGEDVPN so only this should be needed.
Configure internal Certificate Revocation List (CRL)
This feature allows you to revoke certificates you have issued for OpenVPN.
- Step 1
- System --> Certificate Manager --> Certificate Revocation --> Create or Import a New Certificate Revocation List: OpenVPN
- Click Add
- Step 2
- Certificate Authority: OpenVPN
- Method: Create an internal Certificate Revocation List
- Descriptive name: OpenVPN
- Lifetime (Days): 730
- Serial: 0
- Click Save
- Certificate Management — Certificate Revocation List Management | pfSense Documentation
- You cannot at present rename your CRL.
- To be able to delete your CRL you need to make sure the CRL is not being used anywhere before the delete button will appear.
Privacy Network (with OpenVPN Client Gateway / Privacy VPN)
- This section is based on How To Setup pfsense OpenVPN Policy Routing With Kill Switch Using A Privacy VPN | Lawrence Systems
- pfSense 2.6.0 (OpenVPN Setup) | PIA Support Portal
- This tutorial will walk you through configuring a router using pfSense firmware version 2.6.0.
- Some of the settings might be out of date.
- This will take specified IP addresses and ranges, then forward/route that traffic through the VPN
- This will use your own secure DNS server(s) you specified earlier
- If the Privacy VPN goes down, the traffic will stop and not go out of another WAN interface
- pfSense connects to a remote OpnVPN server to funnel traffic through their servers for privacy
- Traffic is sent to the Privacy VPN using Firewall rules (Policy)
Common
Sign up for a Privacy VPN
- Download the relevant .ovpn file from your provider for the country or location you want traffic to come from
- This will have the certificate and usually OpenVPN settings that you will need.
- Some times separate files such as .crt/.key are downloadable individually.
- The certificate is the same in each .ovpn file from your provider
Add your Privacy VPN Certificate Authority (CA)
- Step 1
- System --> Certificate Manager --> CAs --> Add
- Click Add
- Step 2
- Descriptive name: PIA
- Method: Import an existing Certificate Authority
- Trust Store: unticked
- Randomize Serial: ticked
- This will not be needed unless you use this CA for signing Certificates, but you should turn it on anyway.
- Certificate data:
- Get this from any of the following sources:
- Within the .ovpn files and is the block starting with -----BEGIN CERTIFICATE-----
- from the file ca.rsa.4096.crt
- Get this from any of the following sources:
- Certificate Private Key: leave blank
- We do not know the private key because this is only known by PIA.
- Next Certificate Serial: leave blank
- Click Save
Add your Privacy VPN Certificate Revocation List (CRL)
This feature allows your VPN provider revoke certificates and therefore yours will be revoke if there is a security breach.
Not all providers will have this, in which case just sckip this section.
- Step 1
- System --> Certificate Manager --> Certificate Revocation --> Create or Import a New Certificate Revocation List: PIA
- Click Add
- Step 2
- Certificate Authority: PIA
- Method: Import an existing Certificate Revocation List
- Descriptive name: PIA
- CRL data:
- Get this from any of the following sources:
- Within the .ovpn files and is the block starting with -----BEGIN X509 CRL-----
- from the file crl.rsa.4096.pem
- Get this from any of the following sources:
- Click Save
Create an OpenVPN Client
This gets pfSense to act as a OpenVPN client. This will not affect the OpenVPN servers you setup earlier, both can be run at the same time.
- VPN --> OpenVPN --> Clients --> Add
- You will get all of these connection settings from your .ovpn file
- I recommend using the PIA Strong profile
- Fill the following in on the form
- General Information
- Description: PIA Switzerland
- Mode Configuration
- Server mode: Peer to Peer ( SSL / TLS )
- Device mode: tun - Layer 3 Tunnel Mode
- Endpoint Configuration
- Protocol: UDP on IPv4 only (We are only doing IPv4)
- Interface: WAN
- Local port: leave blank
- Server host or address: de-berlin.privacy.network
- Server port: 1197
- User Authentication Settings
- Username: your-privacyvpn-username
- Password: your-privacyvpn-password
- Authentication Retry / Do not retry connection when authentication fails: unticked
- Cryptographic Settings
- TLS Configuration: unticked
- TLS keydir direction: Use default direction
- Peer Certificate Authority: PIA
- Peer Certificate Authority: PIA (CA: PIA)
- Client Certificate: None (Username and/or Password required)
- Data Encryption Negotiation: ticked
- Data Encryption Algorithms: leave default settings
- Ignore the settings for this in the .ovpn as they are not upto date.
- What's the difference between AES-CBC and AES-GCM? - Knowledgebase / Technical / Application Settings and Features / Encryption - PIA Support Portal - We recently incorporated AES-GCM encryption as an encryption option for updated installations and default encryption for new installs and we will continue to add this feature in all applications.
- Fallback Data Encryption Algorithm: leave as default
- Auth digest algorithm: leave as default
- Hardware Crypto: Intel RDRAND engine - RAND
- Your options might vary or their are none because your system does not support any.
- Server Certificate Key Usage Validation: ticked
- Tunnel Settings
- Allow Compression: Compress packets (WARNING: Potentially dangerous!)
- Compression: Disable Compression, retain compression packet framing [compress]
- It is best not to have compression nowadays but not all Privacy VPN support this yet.
- If in your .ovpn you have the option comp-lzo then you will need to:
- Set Allow Compression: Compress packets (WARNING Potentially dangerous!)
- Set Compression: LZO Compression [compress lzo, equivalent to comp-lzo yes for compatibility]
- Don't pull routes: ticked
- see vid @ 448 for notes
- Don't add/remove routes: ticked
- see vid @ 448 for notes
- Pull DNS: unticked
- Ping Settings
- leave untouched
- Advanced Configuration
- Custom Options:
- Examine your .ovpn file to get any additional settings you need for custom options or get them from your provider.
- Paste your new settings into Custom Options as recommended by your VPN provider.
- You can see the 'Custom Options' notes at the bottom of this article for more information.
- These are the PIA settings
persist-key;
persist-tun;
remote-cert-tls server;
reneg-sec 0;
auth-retry interact;
- Gateway creation: Ipv4 only (we are not using IPv6 on this setup)
- Custom Options:
- Click Save
- General Information
- Check the connection works
- Status --> OpenVPN --> Client Instance Statistics --> PIA Switzerland
- Look at the entry and you should see some bytes sent and received
- Also check the log files
- Status --> System Logs --> OpenVPN
- Status --> OpenVPN --> Client Instance Statistics --> PIA Switzerland
Add VPN Client as Gateway/Interface
By attaching a OpenVPN Client connection to an interface you can use it as a gateway.
- Interfaces --> Interface Assignments
- Available network ports: ovpnc1 (PIA Switzerland)
- Click Add
- Edit The interface (Might be called OPT1/2/3/4 depending and what you have setup already)
- General Configuration
- Enable: ticked
- Description: PIA_Switzerland
- Reserved Networks
- Block private networks and loopback addresses: ticked
- Block bogon networks: ticked
- NB: This interface is a gateway so these settings are valid.
- Click Save
- click 'Apply Changes'
- General Configuration
- Restart the OpenVPN Client to change state from pending and fixes some IP issues (see vid @ 588)
- Status --> OpenVPN --> Client Instance Statistics --> PIA Switzerland --> Restart openvpn Service
- Manually set the default gateway
- This should already be done earlier in this tutorial
- System --> Routing --> Gateways
- Default gateway IPv4: WAN_PPPOE
- Default gateway IPv6: none
- Set a monitor IP for checking the connection is up - on my pfSense 2.6 this breaks monitoring and prevents the connection coming up
- System --> Routing --> Gateways --> PIA_SWITZERLAND_VPN4 Gateway --> Edit --> Monitor IP: 149.112.112.112
- I have already used 9.9.9.9 for my WAN.
- This IP is the secondary DNS server from Quad9
- Update pfBlockerNG to process this Interface
- Firewall --> pfBlockerNG --> IP --> Inbound Firewall Rules: Add 'PIA_SWITZERLAND'
- This is a gateway and should be treated as such even though there should be no un-solicited traffic because of the nature of a VPN.
- Firewall --> pfBlockerNG --> IP --> Inbound Firewall Rules: Add 'PIA_SWITZERLAND'
Outbound NAT Rules
- Currently this needs to be done for LAN (10.0.0.0/24), PRIVACYLAN (10.100.1.0/24), ROUTEDVPN (10.200.1.0/24)
- PRIVACYLAN is optionally added later in this tutorial.
- If you don't do this, traffic will not be routed to the internet.
- Firewall --> NAT --> Outbound --> Outbound NAT Mode: Hybrid Outbound NAT rule generation. (might of been set to this earlier in the tutorial)
- Click Save
- Click 'Apply Changes'
- Every network that wants to use the PIA_SWITZERLAND needs a manually mapping rule.
- Option 1 (the hard Way)
- Do a rule for each (Subnet/LAN) you want to be able to access the interface PIA_SWITZERLAND with the following settings
- Firewall --> NAT --> Outbound --> Mappings --> Add
- Interface: PIA_SWITZERLAND
- Address Family: IPv4
- Protocol: any
- Source Type: Network
- Source network: (10.0.0.0/24 | 10.100.10/24 | 10.200.1.0/24)
- Destination: Any
- Description: LAN Outbound NAT
- Firewall --> NAT --> Outbound --> Mappings --> Add
- Do a rule for each (Subnet/LAN) you want to be able to access the interface PIA_SWITZERLAND with the following settings
- Option 2 - Alias (the easy way)
- Create an alias
- Firewall --> Aliases --> IP --> Add
- With the following details
- Name: My_Local_Networks
- Description: My local networks
- Type: Networks(s)
- Networks
- 10.0.0.1-24 LAN
- 10.100.1.0/24 PRIVACYLAN
- 10.200.1.0/24 ROUTEDVPN
- Now follow 'Option 1' with the single change:
- Source network: My_Local_Networks /32
- it will revert to /32 anyway
- Source network: My_Local_Networks /32
- Create an alias
- Option 1 (the hard Way)
- Click 'Apply Changes'
- Now all the mappings for your networks should be done. You can add or remove networks from the alias.
Privacy Policy Client (Policy Routing)
Policy routing is where we set rules on how to handle certain traffic. In this case we are using an alias to tell pfSense the identifed devices should be routed out over the PrivacyVPN. This method has the benefit of an admin being able to add and remove devices at will from the Privacy Network routing (but obviously not when you are on the PRIVACYLAN network dealt with in the next section)
I summary the mechanism as follows:
- We create a firewall alias which we add our devices to as required.
- A firewall rule identifies packets from the devices specified in the alias and then adds a tag to the packets, but also tells the packets to go out of the PrivacyVPN.
- If the packet's destination is not the PrivacyVPN, a `Kill Switch`firewall rules drops the packet.
- This prevents the packet going out of any other WAN that is available.
- This is a known issue with pfSense. I would not call it a bug otherwise it would of been fixed years ago.
This does not prevent network segment cross communication on your local router.
Specify devices with a Firewall Alias
An alias is a list that contains specified Hosts(s), Network(s) or IP(s) which can be dynamically changed without having to update your rules manually because you specify the alias in your rules and not the individual devices.
In this alias you will add the devices that you want to be routed out over your VPN. Devices can be added and removed very easily in one place.
- Firewall --> Aliases --> IP --> Add
- Name: Route_Out_Over_PIA
- Description: Devices that route over VPN
- Type: Host(s)
- You can change this to other options such as 'network(s)'
- Hosts:
- Add all the required devices here from single devices (they should ideally have static IPs) to network ranges.
- e.g. 10.0.0.182, 10.0.015-10.0.0.20
- The Host(s) description is optional but always better to have a one. If one is not entered I think it is fill with the creation date.
Gateway Selection with a Firewall Kill Switch Rule
These rules will route any traffic for a device specifed in the 'Route_Out_Over_PIA' alias down the Privacy VPN. So I can add/remove any device on my network easily in to a Privacy Network in a single operation. Traffic is also prevented escaping over the WAN when they have been tagged to go over the Privacy VPN. Gateway selection is where the term 'Policy Routing' comes from becasue we have determined the route by a policy we have installed.
These rules combined:
- Any packets identified as a their source being present in the alias are
- Tagged with 'Private_VPN_ONLY' tag.
- 'PIA_SWITZERLAND_VPNV4' is set as the gateway
- Each interface will require this rule.
- Floating rules are then processed which is where we have our rule 'Block Alias for VPN Going Out over WAN' which will prevent any Privacy traffic going out the WAN whent he Privacy VPN gateway fails (goes offline)
- This rule sits on the WAN interface only.
- All traffic from a Privacy client is tagged with 'Private_VPN_ONLY'
- This rule checks for the 'Private_VPN_ONLY' tag
- If any traffic has the tag 'Private_VPN_ONLY' it is dropped.
Notes
- Prevent Any Traffic from VPN Hosts from Egressing the WAN | infoTechWerx - This uses the same mechanisim as this Kill Switch.
Interface Rule
This rule selects the Privacy VPN Gateway and adds a tag to the LAN packets where the source is specified in the alias 'Route_Out_Over_PIA'.
This rule needs adding to every interface where you want to control which clients are routed through the Privacy VPN or the default gateway (WAN) by using the 'Route_Out_Over_PIA' alias. Obviously just change the interface.
- Firewall --> Rules --> LAN --> Add
- Action: Pass
- Interface: LAN
- Address Family: IPv4
- Protocol: Any
- Source:
- Invert match: unticked
- Single host or alias
- Route_Out_Over_PIA
- Destination: any
- Description: IP's to be routed over PIA
- Click 'Display Advanced'
- Advanced Options
- Tag: Private_VPN_ONLY
- Gateway: PIA_SWITZERLAND_VPNV4
- Click Save
- Click 'Apply Changes'
- Move the rule to the top of your block Rules, if not already, then click Save
Floating Rule
On the WAN interface, block all Privacy VPN traffic that attempts to go into the WAN by matching any packets on the WAN that have a 'Private_VPN_ONLY' Tag.
- Firewall --> Rules --> Floating --> Add (top)
Firewall — Floating Rules | pfSense Documentation
- Action: Block
- Quick: unticked
- Interface: WAN
- Direction: any
- Address Family: IPv4
- Protocol: Any
- Source: any
- Destination: any
- Log: ticked
- Description: Block Alias for VPN Going Out over WAN
- Click 'Display Advanced'
- Tagged:
- Invert: unticked
- Tagged: Private_VPN_ONLY
- Tagged:
- Put this rule above your Custom DNS rules.
Notes
- This rule should be assigned to the WAN interface because it is the default gateway.
- If you have anything else set as your default gateway then this rule should be applied to that.
- If you have any other gateways your traffic could fall over to, just to be on the safe side, add this rule to them. This includes Gateway Groups.
- I only have 1 WAN so this is enough for me.
- This rule will be performed on traffic sent from all Interfaces to the WAN with the tag 'Private_VPN_ONLY'.
- This means you only need one rule to block Privacy traffic going down the WAN.
- If you have several privacy networks setup, use the same tag.
PRIVACYLAN - A Physically separated Privacy Network (Optional)
Create an additional PRIVACYLAN Interface with a different subnet for your own Physically separated Privacy Network (Optional) where all traffic is routed through your Privacy VPN.
- This section will create another LAN interface on your pfSense router with a subnet and functioning internet.
- It is not currently private or routed through the Privacy VPN.
- The will be a physically segmented network with a different subnet.
- This requires unused ethernet sockets on your router
- If you do not have any spare sockets, skip to the next section.
The reason you would want to do this is:
- To have a physically different network for devices that you want to go through the Privacy VPN.
- To have a network seperated by VLAN for such things as IoT devices.
- VLANs can also be used when utilising different ethernet sockets, but again this is optional
- You know that all devices connected through the related network socket would be protected.
- You want this network to be on a different subnet
- All traffic will be forced over the Privacy VPN and no local routing will occur.
- The DNS will be piped through the secure DNS channel we setup earlier (ie DNS Hijacking)
Create the interface
- Interfaces --> Interface Assignments --> Available network ports: igb3
- I have an Intel Quad Port network card. This is the last port, but you can choose any one you want.
- Click Add
- Edit The interface (Might be called OPT1/2/3/4 depending and what you have setup already)
- General Configuration
- Enable: ticked
- Description: PRIVACYLAN
- IPv4 Configuration Type: Static IPv4
- IPv6 Configuration Type:None
- Static IPv4 Configuration
- Static IPv4 Address: 10.100.1.1/24
- IPv4 Upstream gateway: None
- Click Save
- Click 'Apply Changes'
- General Configuration
Configure the DHCP Server
- Services --> DHCP Server --> PRIVACYLAN
- General Options
- Enable: ticked
- Range: 10.100.1.1 - 10.100.1.254
- Servers
- DNS Servers: 10.100.1.1 (you can use 10.0.0.1)
- Other Options
- Domain name: privacy.lan
- It makes sense here to have a diffferent domain for easy identification of devices. You can use mydomain.com if you really need to.
- Domain name: privacy.lan
- Click Save
- General Options
- Restart the DHCP Service
Firewall Rules
- Update pfBlockerNG to process this network
- Firewall --> pfBlockerNG --> IP --> IP Interface/Rules Configuration --> Outbound Firewall Rules: Add 'PRIVACYLAN'
- Update the DNS Floating Rules to include PRIVACYLAN
- Firewall --> Rules --> Floating
- Deny DNS (Except Local)
- Deny DoT / DoQ
- Firewall --> Rules --> Floating
- Add an allow all rule for the network
- Firewall --> Rules --> PRIVACYLAN
- Action: Pass
- Interface: PRIVACYLAN
- Address Family: IPv4
- Protocol: Any
- Source:
- Invert match: unticked
- PRIVACYLAN net
- Destination:
- Invert match: unticked
- any
- Description: Route network over PIA
- Click 'Display Advanced'
- Tag: PRIVACY_VPN_ONLY
- Gateway: PIA_SWITZERLAND_VPNV4
- Click 'Save'
- Firewall --> Rules --> PRIVACYLAN
Outbound NAT Rules
Make sure you create an Outbound NAT rule if you have not already done this as per the instructions in the 'Outbound NAT Rules' section above.
Add the network 10.100.1.0/24 to the My_Local_Networks alias.
Allow Privacy Network Clients to see Web Server (on LAN)
- When opening up assets on your LAN you should be very specific and only give access to specific services and specific ports (e.g. your public webserver on ports 80 and 443).
- You should not blanket open your LAN network to your Privacy Network/Privacy Policy Clients as this will give them full access to your LAN and therefore the Privacy Network is no longer isolated defeating the object of this security step.
Currently everyone who is in the Privacy Network (either a client of the PRIVACYLAN or a Privacy Policy Client) will not be able to connect to any local LAN Clients/Servers which can be awkward.
How does this work
- All privacy traffic packets are tagged with the
Private_VPN_ONLYtag when they enter the router. - If the destination IP of the traffic is determined to be our local webserver.
- NAT Reflection will change the destination IP from the Web Server's Public IP (123.123.123.123) to the Web Server's local network IP (10.0.0.13).
- You can access your webserver directly with it's local IP address.
- This packet is then processed through the floating rules
- Floating rules are processed first, however the
Private_VPN_ONLYtag has been added prior to these allowing this mechanism to work (modified Kill Switch).
- Floating rules are processed first, however the
- If a rule condition is met, the traffic will be sanctioned and will be forwarded to the web server.
- pfSense uses it's
System Routing Tablerather than the Privacy VPN Gateway, allowing the Servers/Assets to be potentially accessible while on the Privacy Network.
- pfSense uses it's
- If non of the rules are matched because the traffic is not destined for the local network it will be allowed to carry on to the Privacy Gateway.
- When a gateway is specified in a rule this is called P
olicy Based Routingand theSystem Routing Tableis ignored meaning pfSense cannot use predefined rules to route traffic to where it is needed such a locally based web servers on the LAN.
- When a gateway is specified in a rule this is called P
The Rules
These rules will not break privacy, your DNS will still be routed via your secure channel (DNS Hijacking) and it is only specif LAN traffic for your webserver that is redirected.
Assuming the following has been correctly set (As above)
- WAN is normal gateway with your public IP
- LAN is your primary network with your Web server on it
- You have setup port forwarding rules on the WAN interface to point to a LAN address
- Correct 'Outbound NAT Mode' is set.
If have been following this tutorial in totality, you need both rules. If you have not employed the PRIVACYLAN option, then obviously you do not need the second rule.
- The PRIVACYLAN clients and the Privacy Policy Clients both get the tag Route_Out_Over_PIA
- You could merge these 2 rules into one but I like to keep the Privacy Network and the Privacy Policy Clients separate for easy logic.
- To merge, delete the PRIVACYLAN Clients rule and add the PRIVACYLAN network into the Privacy Policy Rule. Rename it if you want.
Create a Web Server Allowed Ports Alias
We need to restrict access to the web server ports from the privacy network
- Firewall --> Aliases --> Ports --> Add
- Name: Web_Server_Allowed_Ports
- Description: My Web Server's allowed ports list
- Type: Port(s)
- Port:
- 80 / HTTP
- 443 / HTTPS
- Apply Changes
Allow Privacy Policy Clients to see Web Server
Floating Rule to allow any device defined in 'Route_Out_Over_PIA' alias (Privacy Policy) to see LAN based servers and assets while maintaining privacy via the Privacy VPN for all other traffic.
- Firewall --> Rules --> Floating --> Add
- Action: Pass
- Disabled: unticked
- Quick: ticked
- Interface: LAN, OpenVPN
- Direction: any
- Address Family: IPv4
- Protocol: TCP/UDP
- Source:
- Invert match: unticked
- Address or Alias
- Route_Out_Over_PIA
- Destination:
- Invert match: unticked
- Address or Alias
- Web_Server_Local_IP
- Destination Port Range
- From: (other)
- Custom: Web_Server_Allowed_Ports
- To: (other)
- Custom: Web_Server_Allowed_Ports
- Description: Allow Privacy Policy Clients to see Web Server
- This rule needs to be above the 'Block Alias for VPN Going Out over WAN' rule.
No tag checking this is done in this rule as it is not needed, it is in the Kill Switch preventing gateway escape.
Allow PRIVACYLAN Clients to see Web Server
Floating Rule to allow any device on the PRIVACYLAN interface to see LAN based servers and assets while maintaining privacy via the Privacy VPN for all other traffic.
- Firewall --> Rules --> Floating --> Add
- Action: Pass
- Disabled: unticked
- Quick: ticked
- Interface: PRIVACYLAN
- Direction: any
- Address Family: IPv4
- Protocol: TCP/UDP
- Source:
- any
- Destination:
- Invert match: unticked
- Address or Alias
- Web_Server_Local_IP
- Destination Port Range
- From: (other)
- Custom: Web_Server_Allowed_Ports
- To: (other)
- Custom: Web_Server_Allowed_Ports
- Description: Allow PRIVACYLAN Clients to see Web Server
- This rule needs to be below the 'Block Alias for VPN Going Out over WAN' rule.
No tag checking this is done in this rule as it is not needed, it is in the Kill Switch preventing gateway escape.
The Floating rules should look like this

The separator blocks are optional. If you have not added them you should take a moment and do this now as it will makes things easier. Jusy click on the 'Separator' button at the bottom right. Don't forget to click save when you have added them.
Additional Step for RoutedVPN
For the Routed VPN, we to add another 'Outbound Mapping' so the traffic will route from ROUTEDVPN to the PIA_SWITZERLAND gateway, otherwise pfSense will not know how to route it and the packets will get dropped.
- Firewall --> NAT --> Outbound --> Mappings --> Add
- Interface: PIA_SWITZERLAND
- Address Family: IPv4
- Protocol: any
- Source Type: Network
- Source network: 10.200.1.0/24
- Destination: Any
- Description: ROUTEDVPN Outbound NAT
- NB: The Bridged VPN terminates on the LAN so does not need a mapping.
Prevent routing between the Privacy Network and local Network Segments (RFC 1918)
Now we have created our Privacy Network we need to make sure it stays isolated from the rest of our network and to do that we need to add a few more rules.
- These rules only handle IPv4.
- These rules will block access to the WebGUI becasue the router's IP is a RFC 1918 address.
- Clients of the LAN will always be able to access the WebGUI because fo the
Anti-Lockout Ruleand this is ok.
Before continuing, take a full backup of your pfSense config, just incase.
Create an Alias
This alias will contain the private IP address ranges in IPv4 which ahppen to be called RFC 1918.
- Create a firewall Alias as follows (Firewall --> Aliases --> IP --> Add):

Create a PRIVACYLAN rule
This rules applies to traffic in and out of the PRIVACYLAN network.
- Firewall --> Rules --> Floating --> Add (at bottom of all your rules)
- Action: Block
- Disabled: unticked
- Quick: ticked
- Interface: PRIVACYLAN
- Direction: any
- Address Family: IPv4
- Protocol: Any
- Source: Any
- Destination: Address or Alias / RFC_1918_Networks
- Description: Block PRIVACYLAN Clients to WebGUI and other Network Segments
Create a Privacy Policy Clients rule
- This rule applies to traffic in and out of the network segment the client is on.
- Add all of the required networks except for PRIVACYLAN as this would be pointless.
- Firewall --> Rules --> Floating --> Add (at bottom of all your rules)
- Action: Block
- Disabled: unticked
- Quick: ticked
- Interface: LAN, OpenVPN
- Direction: any
- Address Family: IPv4
- Protocol: Any
- Source: Address or Alias / Route_Out_Over_PIA
- Destination: Address or Alias / RFC_1918_Networks
- Description: Block Privacy Policy Clients to WebGUI and other Network Segments
Notes
- Block traffic/No routing between LANs on pfSense | Netgate Forum
- I think this will also block access to the WebGUI except on the LAN where there is an anti-lockout rule.
- viragomann
- Add an alias of type networks in Firewall > Aliases and add all RFC 1918 networks to it:
10.0.0.0/8
172.16.0.0/12
192.168.0.0/16
- Set a name for the alias like RFC1918
- If you only want to enable upstream traffic on all interfaces, you can do this with one rule:
Action: Pass
Protocol: TCP/UDP (or any if you want)
Source: any or only the respective network to have it more restrictive
Destination: "Invert match." checked, "Single host or alias" and enter the RFC1918 alias.
- You may also enable upstream access with a single floating rule applied on multiple interfaces.
- Add an alias of type networks in Firewall > Aliases and add all RFC 1918 networks to it:
- johnpoz
- While The inverted rule can work, and I have used it for long time.. It has been known to have some issues if your using any sort of vips and stuff. So if your going to use the inverted rule on your allow, make sure test that everything is actually working how you think it should be working.
- The other method, which is preferred method is to actually do an explicit block above your allow. You can use the same rfc1918 alias created.. Also don't forget to allow the stuff you need/want to allow to get pfsense IP on that network or else where on your nework.. Maybe you run ntp on opt2 network or something and want lan and opt1 to be able to use that for net.. DNS is forgotten a lot, set to tcp (default) vs tcp/udp - both are need for dns. I like to be able to ping my gateway as well for connectivity checks... Here is example for allow internet but not anything else on your network.
- You can use just normal
block vs rejectif you want, but since its local - sometimes it better to actually tell the client, sorry you can not do that. Vs the client having to wait for timeout to figure out that not going to work. - Users normally have issues with rules, is that they forget that rules are evaluated top down, first rule to trigger wins, no other rules are evaluated.
- You always place your rules on the interface where traffic will enter pfsense.. Not on the interface of the dest, etc.
Wierd Behaviour and Fixes
This section tries to address what happens to clients on the PRIVACYLAN.
When the router is rebooted, the Privacy VPN does not come back up automatically
- Workaround: You have to manually restart the OpenVPN Client which will bring the VPN back online.
- Fix: Later on in this tutorial we will install 'Service_Watchdog' which you can use to monitor the following services (and a lot of others) and will auto-restart them if they fail or in this case after a restart:
- openvpn: OpenVPN server: RoutedVPN
- openvpn: OpenVPN server: BridgedVPN
- openvpn: OpenVPN Client Gateway (Privacy VPN) - Will be called something different on your system
What happens when the Privacy VPN gateway is down (Offline)
- The Privacy VPN gateway is replaced in all firewall rules with the default gateway (usually WAN). This seems stupid and can cause unwanted routing.
- When the WAN is the assigned gateway, NAT reflection works and you can see your webserver that you have set up to be visible from the internet with Port Forwarding (WAN --> LAN).
- The Kill Switch (Tag) prevents the 'Privacy Traffic' going out of the WAN gateway by using the following firewall rules:
- LAN or PRIVACYLAN Rule: Adding a tag 'Private_VPN_ONLY' irrespective of what gateway is assigned. This rule also specifies to use the Privacy VPN.
- Floating Rule: This checks all packets going in/out of the WAN for the presense of a 'Private_VPN_ONLY' tag and if it finds it, the firewall will block the packet/traffic.
System --> Advanced --> Miscellaneous --> Skip rules when gateway is down
- This option is not ideal and could potential have issues with fail-over lines
- By default, when a rule has a gateway specified and this gateway is down, the rule is created omitting the gateway. This option overrides that behavior by omitting the entire rule instead and in which case the 'Private_VPN_ONLY' tag will not get applied allowing Privacy traffic to escape out of the WAN.
- OpenVPN Client needs restart after pfsense reboot : PFSENSE | Reddit
- If it is not checked and pfsense detects that your gateway is down, it recreates the rule with gateway set as default gateway instead of your vpn gateway. That will create a leak, and then you will have traffic continuing that route due to states being set up.
- If you want to be extra sure that the traffic doesn't escape onto your WAN, follow each rule going out the VPN gateway with a duplicate rule except that it is blocked instead of passed, and the default gateway is used instead of the VPN gateway. The rules with the "Skip rules when gateway is down" option selected will prevent that leak.
Gateway Notes
- Multiple WAN Connections — Policy Routing Configuration | pfSense Documentation
- Setting a Gateway on a firewall rule will cause traffic matching the rule to use the chosen gateway or group, following the configured behavior of the group.
- This can be generalized by making an alias for any RFC1918 traffic which would cover all private networks, and then using that in a rule. The alias contains 192.168.0.0/16, 172.16.0.0/12, and 10.0.0.0/8.
- All traffic will use default gateway unless otherwise specified (because the default gateway is set on every rule)
Final Things
This is not always needed but if you are having problems with the Privacy VPN not routing traffic where it should or not at all, then run these.
- These are required to make sure the pfSense routing information is correct
- Status --> Filter Reload --> Reload Filter
- Diagnostics --> States --> Reset States
- NB: you can reboot the router instead (Diagnostics --> Reboot)
Test your Privacy Network
Test your devices to see if they are on the Privacy VPN.
While testing, remember that if a connection is made then that route's state is sometimes maintained, so when enabling/disabling rules you need to close the browser or command prompt to use another state which will then follow the new rules.
- PRIVACYLAN Clients should:
- not access the WebGUI
- not talk to other network segments
- go out of the Privacy Gateway
- Privacy Policy Clients should:
- not access the WebGUI (unless on LAN)
- not talk to other network segments
- go out of the Privacy Gateway
- What is my IP address? — ifconfig.co
- Use the following website to check your VPN works as expect
- The best tool to find your own IP address, and information about it.
OpenVPN Clients
How to setup and configure the OpenVPN Client for various platforms.
- OpenVPN-GUI-New Manual – OpenVPN Community
- GitHub - OpenVPN/openvpn-gui - Readme
- OpenVPN GUI is a graphical frontend for OpenVPN running on Windows 7 / 8 / 10. It creates an icon in the notification area from which you can control OpenVPN to start/stop your VPN tunnels, view th...
Setup Android, Laptops and PCs to connect into your network
Never use the 'admin' account or other privileged user for VPN connections because if the VPN user's device or credentials are comprimised, so is your router and the VPN have a big flag telling the hacker where it is.
You can manually setup an OpenVPN client or you can use the 'Client Export' package to get the correct files for various applications and devices.
- Create a User with a strong password
- System --> User Manager --> Users --> Add
- Username: xxxxx
- Password: xxxxx
- Click to create a user certificate: ticked
- Descriptive name: My OpenVPN
- Click 'Save'
- System --> User Manager --> Users --> Add
- Install the 'OpenVPN client export' tool
- System --> Package Manager --> Available Packages: Install openvpn-client-export
- Client Export
- VPN --> OpenVPN --> Client Export
- Settings
- OpenVPN Server
- Remote Access Server: Select the appropriate 'Remote Access Server' e.g. RoutedVPN/BridgedVPN
- Client Connection Behaviour
- Host Name Resolution: Interface IP Address
- Verify Server CN: Automatic - Use verify-x509-name where possible
- Block Outside DNS: ticked
- Legacy Client: unticked
- Silent Installer: unticked
- Bind Mode: Do not bind to the local port
- Certificate Export Options
- PKCS#11 Certificate Storage: unticked
- Microsoft Certificate Storage: unticked
- Use Microsoft Certificate Storage instead of local files.
- This option is more secure when using Windows because the relevant files are not stored in plain text on the harddrive.
- Don't use this option if you are testing because if you need to remove a certificate it will take a few more steps.
- Password Protect Certificate: unticked
- Use a password to protect the pkcs12 file contents or key in Viscosity bundle.
- Don't use this option if you are testing.
- I have not tested all the packages with this option.
- My advice is to start with the password on if working in a live enviroment for the extra security and if you find it does not work as expected or does not suit your needs you can disable this option. Security first!!!
- This is not your user's password.
- Proxy Options
- Use A Proxy: unticked
- Advanced
- Additional configuration options: empty
- OpenVPN Server
- Click 'Save as default' (optional)
- This step just stops you having to keep ticking the right options everytime.
- Scroll down to the OpenVPN Clients section
- Click on the Export button for the relevant config you want for the user that you just created. The configurations should include all information as required except for the username and password.
Notes
- Adding OpenVPN Remote Access Users | pfSense Documentation
- On Windows the OpenVPN Keys, Config and Certs are located here when using plain text mode as in these instructions otherwise they are stored in the 'Microsoft Certificate Storage'
C:\program Files\OpenVPN\config
- The exported creates a user specific package with all the required configurations present. It is very handy but does not always give you the latest OpenVPN client. After install you can get the latest client from the link below and just install over the top:
- When using TAP (BridgedVPN) the OpenVPN Client does not show the IP for the adapter (10.200.1.x) which is normal as the adapter does not get an IP from the OpenVPN server but the LAN DHCP server.
- 'Block Outside DNS' option
- This option is present on both the server and the client exporter and is intentional.
- Todo #14155: 'Block Outside DNS' option is present in the server and on the client - pfSense Packages - pfSense bugtracker
- The two options cover different scenarios: The option in the base pushes to all clients, the option in the client export activates it only on specific clients. It gives the user control over who gets the option and who doesn't. The same is true of any options in the same context.
- It's in the package for convenience and to make it more obvious that it's possible. Yes, anything could be put in advanced options (or made GUI options) but we try to strike a balance of convenience. Removing the option would make it less convenient and it's been there for years and very few others appear be confused by it vs those that find it useful.
- OpenVPN Client export has private key in it. | Netgate Forum
- Q (me):
- When exporting Android or 'OpenVPN Connect' inline configurations with 'Client Export' for OpenVPN they include the private key.
- -----BEGIN PRIVATE KEY-----
- I was under the assumption that a private key should stay private on the server. Am I correct or is there a use of the private key I do not know
- A (viragomann):
- No, it's the client's private key.
- The servers private key stays stored on pfSense. But you can export it from the cert manager if you want.
- The private key is needed on the device, which has to provide its certificate to the remote device.
- A (johnpoz Moderator):
- It has your cert and then you have your private key for that cert..
- Now I might mess up the steps here, its been forever since have looked into the specific of openvpn auth method. Or for that matter just ssl/tls in general, keep in might your also prob using the tls key which is also encrypting or signing or both depending on method of auth or auth and encryption of the control channel info - in general openvpn uses the static tls key to throw away bad traffic, etc. Like said its been a while..
- But in a nutshell this should be somewhat close to the process.. And why you need the private key to your cert..
- You might want to look up how the session key is exchanged in ssl, the server cert and client cert are not actually used for encryption of the data that will be exchanged they are used for auth and exchange of the symmetric key..
- So you have the CA of the server cert, so you can validate that a cert the server sends is signed by the CA.. Just like how you validate that somewhere.domain.tld cert they present to you is signed by the CA.. And with the cert they send you and them signing it with their private key you can validate.. Look up how signing works.
- You then use the cert they hand you that you know is signed by the CA, You then send your cert to them via this cert encryption, they know your cert has been signed by the same CA.. And they have their key to decrypt that traffic that you sent them.
- Your signature on what you sent them is done with the private key you have. They can validate this with just the public, and anything they send to your public cert you would need the private key to decrypt, but it might only be used for you to sign what your sending. Like I said it has been a long while ;)
- Short version is you validate that your talking to the correct server, and the server validates you are a valid client. And you exchange a session or symmetrical key that is used for the actual encryption and decryption of actual data you will send over the vpn.
- You do need that private key, but I don't recall if they ever send you traffic that you need to decrypt with it - I believe its only used for the signing of the session key the client sends.. The server can validate your signature via your cert.
- Q (me):
Rename Firewall Assets (Optional)
I have left asset names as close as possible to the Lawrence Sytems Youtube video but I would recommend some improvements to make them more relevant to this setup. These are optional but if you change them, you must make sure you change them everywhere they occur.
You can of course use your own. I would just recommend that you make sure everything works and you backup before changing these assets.
- Alias
- Route_Out_Over_PIA --> Privacy_Policy_Clients
- Tag
- Private_VPN_ONLY --> PRIVACY_VPN_ONLY
- Interface Rule Description
- IP's to be routed over PIA --> Clients to be routed over PIA
- Floating Rule Description
- Block Alias for VPN Going Out over WAN --> Block Privacy Clients going through WAN (Kill Switch)
Install and configure these Additional Packages
These are the packages I would install and use from the begining.
System_Patches
This package allows you to install recommended patches (from Netgate) or custom ones as required.
Recommended patches are usually made available for large issues and major security issues preventing the need to update the whole pfSense installation or for Netgate to make another point release. They are sometimes available in the forum and you can apply them by creating a custom patch but you should only apply patches like this if you are experienced at using pfSense.
You are able to apply and revert patches as required but this should be done with some caution.
The recommended System Patches are for the specific running version of pfSense software. These patches are curated by Netgate and may include security fixes, bug fixes, and other beneficial changes which come up between releases. This list is only updated when the package is updated, so check the package manager for updates. The controls in this section are limited as there is no need to edit the entries or the list. The patch list is updated only when you update the package so Netgate could utilise the update mechanisim already present without having to write another system.
From the 'System Patches' page:
"After upgrading, do not revert a patch if the changes from the patch were included in the upgrade. This will remove the changes, which is unlikely to be helpful."
- Install Package
- System --> Package Manager --> Available Packages
- Search for 'System_Patches'
- Click Install
- Click Confirm
- A new menu item will now be present
- System --> Patches
Notes
- Apply all system patches | Netgate Forum
- Q: Do I apply all patches or only ones to fix my specific problems? What is recommended?
- A:
- SteveITS
- Only install packages for your version, or risk breaking it. If yours is older, select it in System/Update/Update Settings.
- When upgrading, let it finish; do not reboot early. Allow 10-15 minutes, or more depending on packages and device speed.
- jimp (Netgate)
- All of the patches are "Recommended" or they wouldn't be in the "Recommended" list :-)
- They are not all lumped together or automatic because users like control over what they apply and some environments have rules/regulations about what they can apply and when.
- Nobody but you can tell you if you want all of them. Most likely you would want all of them, but every environment is different.
- Most likely you would want all of them, but every environment is different.
- By the time a patch makes it into the "Recommended" list it's usually either already included in a newer release or it's been well tested internally and confirmed to solve the problem in question.
- stephenw10 (Netgate)
- Personally I only apply the patches for things I know I might hit.
- SteveITS
- My personal view on that is, patches listed as Recommended are solid enough for Netgate to want to push them out. Fixes suggested in forum posts (often by @jimp!) are still pretty solid but haven't yet made the Recommended list. Of course one can just view the patch contents and (if familiar with PHP/coding) see what is being changed.
- Basically all of them are generated due to Redmine bug reports and once the issue is closed they will be in the next version of pfSense anyway. So maybe the answer is to track down the Redmine entry and see what it says.
- SteveITS
- What happens to patched during an upgrade
- The patched get delisted from Patches because they dont not exist for the new version as the code is part of the update.
- So if you apply aload of patches, you dont need to rever them before an upgrade.
- If the patch is still shown in the new versioin, do not revert it. I would only expect this to ever be an inssue in point releases.
- Ugrade Example with patches applied. (2.7.1 --> 2.7.2)
- Before (open in a new window for larger version)

- After (open in a new window for larger version)

- Before (open in a new window for larger version)
Service_Watchdog
This package allows you to add services that if they fail should be brought back up automatically by this software. There is an additional option to be notfied of these events on a per service basis.
You need to have a notification mechanism setup in (System --> Advanced --> Notifications)
- Install Package
- System --> Package Manager --> Available Packages
- Search for 'Service_Watchdog'
- Click Install
- Click Confirm
- Configure the Service(s) you want to monitor and automatically restore
- Services --> Service Watchdog --> Add New Service
- Click 'Add the service'
- Service to Add: your-choosen-service
- Click Add
- Configure your Notifications
- Services --> Service Watchdog
- Check the 'Notify' box for each service you want event notifications about
- Click 'Save Notification Settings'
I would add all available services with notifications on.
If you stop any service manually you must make sure they are not in the list otherwise they will start again. If you disabled a service I dont think this will restart it.
- pfb_dnsbl: pfBlockerNG DNSBL service
- pfb_filter: pfBlockerNG firewall filter service
- unbound: DNS Resolver
- syslogd: System Logger Daemon
- dhcpd: DHCP Service
- dpinger: Gateway Monitoring Daemon
- sshd: Secure Shell Daemo
- openvpn: OpenVPN server: RoutedVPN
- openvpn: OpenVPN server: BridgedVPN
- openvpn: OpenVPN Client Gateway (Privacy VPN) - Will be called something different on your system
Status_Traffic_Totals
This will allow you to see a nice overview of your traffic. this does install a daemon but I dont think it is a high resource one.
- Install 'Status_Traffic_Totals' via the package manager
- Goto (Status --> Traffic Totals)
- Select the interfaces you want to see a graph for
- Click 'Display Advanced'
- Click 'Enable Graphing'
- Enable monitoring and notifications
- Services --> Service Watchdog
It will take a couple of minutes before any graphs will show because to needs to collect some data first.
Blocklist Research (IP and DNSBL)
This is important and is probably very specific to you setup. If I can come up with a basline setup I will add it here.
- The Ultimate List of IP and DNSBL Blocklists for Home Internet Security Firewall and Gateway: Supratim Sanyal's Computing Blog
- Hand-compiled working list of IP address and DNS blocklists for use with pfBlockerNG on pfSense firewall router.
- Explains aspects of the different blocklists like their level.
- Using pfBlockerNG (And Block Lists) On pfSense - Linux Included
- How to install pfBlockerNG and configure to use blocklists
- Discusses the Firehol lists
- After testing in a few environments for several weeks, I found the firehol_level3 list to be extremely effective and I haven’t yet experienced a false positive.
Final Things
DNS Leak Test
We need to make sure you DNS is private. Go to this website to do a test DNS leak test
- DNSleaktest.com offers a simple test to determine if you DNS requests are being leaked which may represent a critical privacy threat. The test takes only a few seconds and we show you how you can simply fix the problem.
- Quad9 Network Providers: WoodyNet, PCH.net, i3D, GSL Networks - When you run a leak test you might not see 9.9.9.9, see this page for different options.
- For me the leak test showed the ISP as WoodyNet which is Quad9.
Hardware Settings
- System --> Advanced --> Networking --> Network Interfaces
- Configuration — Advanced Configuration Options — Networking Tab | pfSense Documentation
- Leave these settings alone, I have put them here to make you aware of them so you dont touch them
- Disable hardware checksum offload: unticked (Default: unticked)
- Disable hardware TCP segmentation offload: ticked (default ticked)
- Do not uncheck this option unless directed to do so by a support representative.
- Disable hardware large receive offload: ticked (default ticked)
- Do not uncheck this option unless directed to do so by a support representative.
- System --> Advanced --> Miscellaneous --> Cryptographic & Thermal Hardware
- Configuration — Advanced Configuration Options — Miscellaneous Tab | pfSense Documentation
- Cryptographic Hardware: AES-NI and BSD Crypto Device (aesni, cryptodev)
- This will speed routing up by using the Crypto hardware on the CPU.
- If you look in the 'System Information' widget on the Dashboard, it tells you if your CPU supports AES-NI

- Load both the AES-NI and BSD Crypto Device modules together, which is the optimal configuration in most cases. Choose this unless a specific environment or configuration is found to work better without it.

- If your CPU does not support AES-NI try 'BSD Crypto Device' on its own.
- Thermal Sensors: Intel Core* CPU on-die thermal sensor
- More sensors = better
- Because I have an Intel i3 CPU
- 'None/ACPI' works fine but has limited sensors

- The Intel driver displays the ACPI sensors and individual CPU Core temperatures.

After changing hardware settings, it is recommended to reboot the router to make sure the correct kernel modules are loaded/unloaded.
Manual Config Backup
You can back up all required aspects of pfSense with this feature
- Instructions
- Diagnostics --> Backup & Restore --> Backup & Restore
- Backup area: All
- Skip packages: unticked
- Skip RRD data: ticked
- Include extra data: ticked (this is important otherwise things like pfSense Custom Block lists are not backed up)
- Backup SSH keys: ticked
- Encryption: optional
- Click on 'Download configuration as XML'
- Save the file somewhere safe
- Diagnostics --> Backup & Restore --> Backup & Restore
- Notes
- Backup and Recovery — Making Backups in the GUI | pfSense Documentation
- Exporting Firewall rules
- The backup contains all of the firewall rules in an XML format
- You can also get the current rules by editing/downloading the file
/tmp/rules.debug - Editing Files on the Firewall | pfSense Documentation
- Diagnostics --> Edit file
- Diagnostics --> Edit file
Disable or remove what you will never use to reduce your attack surface (optional)
In this tutorial I have enabled several types of OpenVPN, you might not want all of these, if not your should disabled or remove them and then do another backup.
Update and reboot
- Update Blocklists
- Firewall --> pfBlockerNG --> Update --> Select 'Force' option: Update
- Reboot the router
- Diagnostics --> Halt System
Security (Additional)
- I have not exposed my pfSense GUI to the internet. I will use an OpenVPN into my network and then access it.
- Missing administration features when using not using the 'admin' account? Some features might only be available under the main admin account.
I have done this section last because incorrect settings here could leave you locked out of your pfSense router, easy enough though for someone experienced to get around. If you get locked out, see Troubleshooting — Troubleshooting Access when Locked Out of the Firewall | pfSense Documentation.
Even if your pfSense router (GUI/SSH) is never exposes to the internet, you should consider side attacks from within your network. You might not want or need all of this security but I will just mention them and let you make your own mind up. Some of these settings are already on their default values which is fine for most people.
Admin Access | pfSense Documentation - A lot of these security items are mentioned here, so this is worth a read.
WebGUI
- WebGUI Login Autocomplete
- System --> Advanced --> Admin Access --> webConfigurator --> WebGUI Login Autocomplete: unticked
- Max number of webConfigurator processes to run
- System --> Advanced --> Admin Access --> webConfigurator --> Max Processes
- Enter the number of webConfigurator processes to run. This defaults to 2. Increasing this will allow more users/browsers to access the GUI concurrently.
- You can reduce this to 1.
- Brute force protection
- System --> Advanced --> Admin Access --> Login Protection
- The sshguard daemon is used by the firewall to protect against brute force logins for both the GUI and SSH connections. The options in this section fine-tune the behavior of this protection.
- The default settings are probably good for most people.
- Console Password
- System --> Advanced --> Admin Access --> Console Options --> Password protect the console menu (Console menu) (optional)
- Normally the firewall always presents the menu on the console, and the menu will be available as long as someone has physical access to the console. In high-security environments this is not desirable.
- This option adds password protection to the console.
- The console accepts the same usernames and passwords used to access the GUI.
- After setting this option, the firewall must be rebooted before it takes effect.
- While this will stop accidental key presses and keep out casual users, this is by no means a perfect security method.
- A knowledgeable person with physical access can still reset the passwords (see Forgotten Password with a Locked Console).
- Consider other physical security methods if console security is a requirement.
Admin Account
The
Anti-Lockout Ruleshould never be removed unless you know what you are doing
- Rename the default admin account
- The admin user cannot be deleted and its username may not be changed, but you can disable it.
- Disable the admin account
- Proceed with caution!!!
- System --> User Manager
- User Management and Authentication — Manage Local Users | pfSense Documentation
- Make a new account in the user manager, give it admin rights, and then you can disable the default admin account.
- The only area that will fail on is XMLRPC sync as part of a failover cluster, which only supports synchronizing as admin currently. (Netgate forum post 2013)
- Apply All Recommend Patches
- System --> Patches --> Apply All Recommend
- Patches are there for a reason. You might not need all of them, but it should not harm.
- Other
- Securely Managing Web-administered Devices | Netgate Blog
- Keep up to date
- Restrict management access
- Don’t browse the Internet with the same browser you use for administration
- Use a dedicated system not connected to the Internet for administration
- Securely Managing Web-administered Devices | Netgate Blog
- Restrict access to the WebGUI / Restricting WebGUI Access To one Interface
- As mentioned previously unless you remove the
Anti-Lockout Ruleyou will always be able to access the WebGUI from the LAN. - The rule below will block access to the WebGUI on whichever network you specify and we have also specified the ports to allow other services from the firewall to run correctly.
- This is not needed on network segements where you have blocked the RFC 1918 addresses such as in the section `Prevent routing between the Privacy Network and local Network Segments (RFC 1918)`.
- Create a Port Alias
- Firewall --> Aliases --> Ports --> Add
- Name: pfSense_WebGUI_Ports
- Description: pfSense WebGUI Ports
- Type: Port(s)
- Port:
- 22 / SSH
- 80 / HTTP
- 443 / HTTPS
- This cannot currenyl be used because tehre are 2 different protocols being used.
- Firewall --> Aliases --> Ports --> Add
- Create the rule
- Firewall --> Rules --> Floating --> Add (at bottom of all your rules)
- Action: Block
- Disabled: unticked
- Quick: ticked
- Interface: Your Choosen Network
- Direction: any
- Address Family: IPv4
- Protocol: Any
- Source: Any
- Destination: This Firewall (self)
- Description: Block access to the pfSense WebGUI
- As long as this is at the very bottom of your floating rules eveything should work as expected.
- Firewall --> Rules --> Floating --> Add (at bottom of all your rules)
- Allowing Remote Access to the GUI | pfSense Documentation
- The default configuration of pfSense software allows management access from any machine on the LAN and denies it to anything outside of the local network.
- There is also an anti-lockout rule enabled by default that prevents firewall rules from being configured in a way that will lock the user out of the web interface.
- As mentioned previously unless you remove the
What Now!!!
- Now go through all of the settings and change any that you need.
- If you are not sure what a setting does, then don't change it on a live system.
- Setup a test pfSense box and play with all of the settings first.
Additional Features
pfBlockerNG - Unbound Python Mode
- What is this? This is a Python Script (active process rather than passive) for handling DNSL requests and has more features than the standard 'Unbound Mode'.
- To use pfBlockerNG You must be using pfSense as a Resolver i.e. not forwarding DNS requests / Forwarding mode turned off).
- BBCan117: You can easily flip back and forth between the 2 modes. (Pytnong and non-Python)
- Unbound Mode mode will utilize Unbound local-zone/local-data entries for DNSBL (requires more memory).
The only downside of using 'Unbound Python Mode' is that machines that specify their hostname when requesting an IPv4 DHCP lease CANNOT be registered in the DNS Resolver so that their name can be resolved. See mitigations below.
- Pros (features)
- This mode will utilise the python integration of Unbound for DNSBL.
- This mode will allow logging of DNS Replies, and more advanced DNSBL Blocking features.
- You can see all DNS requests (DNS Replies)
- Blocked requests either do not get to the DNS server or are returned as NXDOMAIN
- Regex Blocking
- You can do some TLD domain filtering
- You can block IDN domains
- All IDN domains start with xn--
- IDN domains are domains that use non-ascii characters and can be used to trick people into thinkinf they are a different website (i.e. spoofing)
- These should be blocked.
- Wildcard domain blocking
- Has better performance.
- Uses significantly less memory than Unbound Mode. This is especially helpful if you have large lists or multiple ones.
- Enabling Python mode also enables more DNSBL filtering options (including Unified tab)
- Includes a policy section that allows you to add IP's that are allowed to circumvent pfblocker.
- With this mode you can now whitelist a sub domain even when it's wildcard blocked via TLD.
- Reports has some more tabs
- DNS Reply - Individual information about the replay and where it comes from etc..
- DNS Reply Stats - Compiled statistics for DNS replies
- The unified feed is eaiser to read and has additional columns.
- There are additional options in the 'General Settings' settings
- Firewall --> pfBlockerNG --> General Settings
- It is possible to exclude IP (or even networks ?) using the pfBlockerNG GUI.
- Cons
- none
Enable Unbound Python mode
- The Unbound mode is toggled here
- Firewall --> pfBlockerNG --> DNSBL --> DNSBL --> DNSBL Mode: (Unbound mode | Unbound python mode)
- Disable DHCP
- Services --> DNS Resolver --> General Resolver Options --> DHCP Registration = Disabled
- Apply the change
- This needed to be enabled in versions earlier than pfSense 2.7.0 but is no longer an issue. I have kept it here for reference so people know what option to reverse.
- Change pfBlockerNG to use 'Unbound Python Mode'
- Firewall --> pfBlockerNG --> DNSBL --> DNSBL --> DNSBL Mode = 'Unbound python mode'
- Apply changes
- Firewall --> pfBlockerNG --> Update --> Update Settings --> Select 'Forece' option = Reload
- Click Run
- Done
Configuration (and brief explanation)
Do these settings
- Wildcard Blocking (TLD) = On
- TLD is fully automated to wildcard block all root domains that are listed in the Feeds and not wildcard block any sub-domains that are listed in the Feeds.
- You can manually Blacklist or Whitelist TLD
- Examples - Doesnt have to be a root domain (e.g. .com)
com
quantumwarp.com
mysubdomain.quantumwarp.com
anothersubdomain.mysubdomain.quantumwarp.com
- Wildcard Blocking (TLD) is also in 'Unbound mode'
- Examples - Doesnt have to be a root domain (e.g. .com)
- BBCan177 - How to block subdomains with pfBlockNG? : pfBlockerNG
- This is compatible with the YOYO feeds and many other feeds.
- There are hundreds of feeds that can be used with pfBlockerNG. The pkg has a parser for most formats of feeds, however, the feed/format you linked is not supported. That format is also non-standard.
- The feed that is recommended is this one (as listed in the pfBlockerNG Feeds Tab): - https://pgl.yoyo.org/adservers/serverlist.php?hostformat=hosts&mimetype=plaintext
- YOYO is one of the few maintainers of feeds that support a wildcard blocklist. Almost 99.9% of the other feeds, including ones that list malicious domains are in a single domain per line.
- Almost all other DNS based pkgs will only block the single root domain and not wildcard block these domains. Since these feeds are not static, it is not practical to try and manually manage which domains in these feeds should be wildcard blocked or not.
- The TLD Wildcard feature will parse the YOYO feed and all other feeds, and provide the exact same experience that you are expecting and its all automatic. On top of that, it provides increased security to wildcard block those malicious domains.
- For the single purpose of AD Blocking, this is pretty much irrelevant as wildcard blocking is not needed for just that purpose alone.
- You can also opt to use the YOYO pre-defined Unbound Feed and add it to the pfSense Unbound custom config without using any package. https://pgl.yoyo.org/as/serverlist.php?hostformat=unbound
- The other features for TLD are "TLD Blacklist/Whitelist", that is used to wildcard block a whole TLD like "CN" or "RU". The benefit of that is to reduce the number of domains that need to be added to Unbound, since a single local-zone entry will be used to block the whole TLD's, and in effect consume less memory and overhead.
- BBCan177 - Best way to block all subdomains? : PFSENSE
- TLD is an automated process that goes thru all of the feeds and determines if each domain should be individually blocked, or wildcard blocked automagically.
- For AD blocking TLD/wildcard blocking is not as necessary, but for malicious domains, you would want to block the full domain and subdomain.
- There are many users that add millions of domains and most of those feeds all post the root domain, so other blockers are only blocking the root domain only. Keep in mind that malware is hardly ever on the root domain, but in the subdomains.
- A simple test is to ping a domain that is in the blacklists, and then try to ping a random subdomain.
- TLD relies on Unbound zone entries. Each domain is one zone. Each zone is a pointer in memory. So the more domains that are blocked via TLD, the more memory required. The Unbound Resolver is a different animal than DNSMasq.
- This is present in 'Unbound mode' aswell
- You can manually add TLD to be blocked in a box that appears below
- When this feature is enabled. The TLD Whitelist is not utilized and instead uses the DNSBL Whitelist
- BBCan177 - Creating a wildcard list (fruitless effort) : pfBlockerNG
- You need to enable the TLD wildcard feature. So when it processes any feeds, it will wildcard block any root domains that are listed and otherwise block sub-domains.
- So if the feed had "example.com", it would block that domain and sub-domain.
- If the feed had " ads.example.com" it only will block that sub-domain only.
- TLD utilizes the Mozilla TLD list to help determine which domains should be wildcard blocked.
- It's all automatic, and no need to append any asterixes which are not valid anyways.
- If there is an odd ball domain, you could also add that to the python regex feature.
- Also if you are blocking the whole "ru" TLD for example, TLD will also remove all the ru domains as they are all blocked anyways freeing some memory requirements.
- In pfB, only the Whitelist allows a prefixed "." For wildcard.
- The more TLDs that are blocked, the more domains that could be added before hitting memory limits since TLD will trim the domains that are blocking whole TLDs.
- BBCan177 - Benefit of TLD blocking (ELInoob?) : pfBlockerNG
- Well ADs are on most webpages, so you see all that activity... Hitting malicious domains is hopefully less prevalent in your network :)
- Everyone focuses on how many ADs are getting blocked, but pay zero attention to when devices on you LAN are hitting malicious domains.
- PfBlockerNG v2.1 w/TLD | Netgate Forum - List memory requirements for TLD Domain blocking
- pfBlockerNG-devel TLD | Netgate Forum
- When TLD is enabled, there is a significant benefit in wildcard blocking of malicious domains. Most DNSBL feed post the root domain for a malicious site. ie: example.com. So with TLD disabled, DNSBL will only block DNS resolution to example.com. So for ADverts this works fine since you typically just need to block the single sub-domain that is serving the ADverts. But typically, malicious sites host malware etc on sub-domains. So with TLD enabled, it will wildcard block the root domain and all sub-domains and thus protect your network from these domains fully!
- TLD is fully automated to wildcard block all root domains that are listed in the Feeds and not wildcard block any sub-domains that are listed in the Feeds.
- Python Control = Off
- Allow sending python_control commands (via DNS TXT) to the Python integration
- Unless you know what this is, leave this off.
- DNS Reply Logging = On
- Enable the logging of all DNS Replies that were not blocked via DNSBL.
- Blocked DNS replies/request are logged by default, but allowed replies, this fixes that.
- DNSBL Blocking = On
- This option must be on for the DNSBL blocking to work.
- I assume you can turn this off so you can do other things with this section if you know what you are doing.
- HSTS mode = On
- I am not sure waht this is for but it is on by default.
- TLD Allow = Off
- This will block all TLDs that are not specifically selected.
- IDN Blocking = On
- IDN domains are domains that use non-ascii characters and can be used to trick people into thinkinf they are a different website (i.e. spoofing)
- All IDN domains start with xn--
- Regex Blocking = Off
- This is only required if you need to do some specific domain filtering by using REGEX.
- Just keep in mind that regex is expensive in processing, so it can slow DNS resolution depending on how well the rules are drafted and how many regex entries are added.
- CNAME Validation = On
- All CNAMES will be evaluated against DNSBL database and blocked.
- This option must be enabled to make sure that an Ad domain cannot bypass DNSBL by using a different DNS name.
- no AAAA = Off
- This can be used to force IPv6 DNS requests to be downgraded to IPv4 for certain domains.
- If and IPv6 request is blocked most systems will re-request with IPv4.
- If no re-request is done, the clietns request will just fail.
- Most people will not need this as it is probably an edge case usage scenario.
- When on, another box appears where you can enter domains.
- Python Group Policy = Off
- Allow certain Local LAN IPs to bypass DNSBL
- When on, another box appears where you can enter IP addresses.
- Only use this when you need it.
You should now do a 'Force Reload' to make sure everything is correct.
Notes
- pfBlockerNG Guide - zenarmor.com (was sunnyvalley.io) - pfBlockerNG Guide including a relevant section (Figure 36. Adding DNS server on pfSense® software) covering 'Unbound python mode'.
- Setup pfBlockerNG python mode with pfSense - Vikash.nl - In this blog post I will show you how to setup pfBlockerNG python mode with pfsense.
- Why can Windows machines resolve local names when Linux can't? - Server Fault
- Windows uses NetBIOS names, and such protocol, being a broadcast one, allows them to find each other without any central server.
- Linux machines in modern distros uses natively a protocol called Avahi, which is also a server-independent, broadcast protocol. Local network machines have a suffix .local, so you can ping from Linux to Linux using ping hostname.local, or see them with avahi-discover package. some apps in Gnome use avahi to list machines in the network (for example, the Remote Desktop Viewer)
Network intrusion prevention and detection system (IDS/IPS)
An intrusion detection system (IDS; also intrusion prevention system or IPS) is a device or software application that monitors a network or systems for malicious activity or policy violations.
The following software are available as pfSense packages. These packages are memory heavy and if you do a lot of logging will need a lot of disk space. The packages can use up to 2GB for high load networks.
This type of system is different to pfBlockerNG because it analyses the traffic.packets for dodgy things rather than the source and desitnation of a packet. Can detect applications active on your network by analysing layer 7 data.
Snort (preferred package)
Packages — IDS / IPS — Configuring the Snort Package | pfSense Documentation
What is Snort?
- Snort is an intrusion detection and prevention system. It can be configured to simply log detected network events to both log and block them. Thanks to OpenAppID detectors and rules, Snort package enables application detection and filtering.
- Snort is the foremost Open Source Intrusion Prevention System (IPS) in the world. Snort IPS uses a series of rules that help define malicious network activity and uses those rules to find packets that match against them and generates alerts for users.
- Snort can be deployed inline to stop these packets, as well. Snort has three primary uses: As a packet sniffer like tcpdump, as a packet logger — which is useful for network traffic debugging, or it can be used as a full-blown network intrusion prevention system. Snort can be downloaded and configured for personal and business use alike.
- Snort is an open source network intrusion prevention and detection system (IDS/IPS). Combining the benefits of signature, protocol, and anomaly-based inspection.
Instructions
- These instructions mainly follow this instructional video, pfSense + snort is AWESOME, quick look at IPS/IDS (For Free) | YouTube | The Network Berg.
- You should always put Snort on your LANs, WANs are no longer recommended.
- I have left the instructions to follow the video for easy of learning.
- For this article you should setup Snort on LAN, PRIVACYLAN, ROUTEDVPN, BRIDGEDVPN.
- See the notes below for the WAN/LAN debate
- For interfaces with a real hardware interface such as LAN, PRIVACYLAN use INLINE IPS, for the rest where this mode is not possible you should use LEGACY MODE.
- Backup your pfSense
- Create an account with Snort and get an Oinkmaster Code
- Sign Up for a free Registered User Rules Account
- You find the Oinkcode in your account settings on the left
- System --> Package manager --> Available Packages --> Search --> snort --> Install
- Services --> Snort
- Snort Interfaces
- Nothing Yet
- Global Settings
- Enable Snort VRT
- Snort Oinkmaster Code = You got this from your Snort account.
- Enable Snort GPLv2
- Enable ET Open
- Enable OpenAppID
- Enable AppID Open Text Rules
- Enable FEODO Tracker Botnet C2 IP Rules
- Update Interval = 12 Hours
- Update Start Time: 00:22
- Hide Deprecated Rules Categories
- Remove Blocked Hosts Interval = 1 Hour
- If something goes wrong, at most your IP will only be blocked for 1 hour.
- Click Save
- Updates
- Update Your rule Set --> Update Rules
- Alerts
- Nothing to do here
- Blocked
- Nothing to do here
- Pass Lists (Whitelists)
- Nothing to do here
- Supress
- Nothing to do here
- IP Lists
- Nothing to do here
- SID Mgmt
- Nothing to do here
- Log Mgmt
- Nothing to do here
- Sync
- Nothing to do here
- Snort Interfaces
- Services --> Snort --> Snort Interfaces
- Snort Interfaces -->Add
- LAN Settings
- This will just be for the LAN (this is all most setups will need)
- Add with the following settings
- General Settings
- Enable: ticked
- Interface: LAN
- Description: LAN
- Snap Length: 1518
- Alert Settings
- Leave all options off
- Send Alerts to System Log: ticked (optional, but you probably don't need this)
- The only reason you would need to do this is so you can send the Snort data is sent to pfSense system log which is then pushed to a remote Syslog server for deeper analysis.
- Enable Remote Logging needs to be enabled to be able to send data to the remote server
- Status --> System Logs --> Settings (tab) --> Remote Logging Options: Fill in as required
- The only reason you would need to do this is so you can send the Snort data is sent to pfSense system log which is then pushed to a remote Syslog server for deeper analysis.
- Block Settings
- Just use the default IDS (detection-only) mode for at least two weeks and potentially a month so you can see what alerts happen on your network. This lets you investigate and weed out false positives without getting frustrated because things get blocked. Come back to this later
- Block Offenders: ticked
- NB: if you are not sure if you might end up blocking access to the router or other devices, dont enable 'Block Settings' until you have run pfSense with Snort on it for a while, maybe a week or so.
- IPS Mode:
- Select blocking mode operation. Legacy Mode inspects copies of packets while Inline Mode inserts the Snort inspection engine into the network stack between the NIC and the OS. Default is Legacy Mode.
- Legacy Mode uses the PCAP engine to generate copies of packets for inspection as they traverse the interface. Some "leakage" of packets will occur before Snort can determine if the traffic matches a rule and should be blocked. Inline mode instead intercepts and inspects packets before they are handed off to the host network stack for further processing. Packets matching DROP rules are simply discarded (dropped) and not passed to the host network stack. No leakage of packets occurs with Inline Mode. WARNING: Inline Mode only works with NIC drivers which properly support Netmap! Supported drivers: bnxt, cc, cxgbe, cxl, em, em, ena, ice, igb, igc, ix, ixgbe, ixl, lem, re, vmx, vtnet. If problems are experienced with Inline Mode, switch to Legacy Mode instead.
- Inline Mode (preferred)
Important Information About IPS Inline Mode Blocking
- When using Inline IPS Mode blocking, you must manually change the rule action from ALERT to DROP for every rule which you wish to block traffic when triggered.
- The default action for rules is ALERT. This will produce alerts but will not block traffic when using Inline IPS Mode for blocking.
- Use the "dropsid.conf" feature on the SID MGMT tab to select rules whose action should be changed from ALERT to DROP.
- If you run the Snort Subscriber Rules and have an IPS policy selected on the CATEGORIES tab, then rules defined as DROP by the selected IPS policy will have their action automatically changed to DROP when the "IPS Policy Mode" selector is configured for "Policy". This will not affect other rule sets present in Snort.
- When you choose 'Inline Mode' you will get this error on unsupported interfaces:
The following input errors were detected:
- The 'lan' interface do not support Inline Mode.
- pfSense hardware must be configured correctly, amend as needed and do not change any other settings in this section.
WARNING! IPS inline mode requires that Hardware Checksum Offloading, Hardware TCP Segmentation Offloading and Hardware Large Receive Offloading all be disabled for proper operation. This firewall currently has one or more of these Offloading settings NOT disabled. Visit the System > Advanced > Networking tab and ensure all three of these Offloading settings are disabled.
- Legacy Mode
When you choose 'Legacy Mode' there are a few things you should know.
- You can only alert or block offenders.
- Legacy mode cannot perform 'DROP' on packets at the driver level so it must use the firewall to block IP. (I think it uses the firewall, not 100%)
- Some packets will leak through because of the nature of the parallel inspection method used via the PCAP package.
- Kill States: ticked
- Which IP to Block: BOTH
- By default your local networks are whitelisted so BOTH is fine. See the section 'Choose the Networks Snort Should Inspect and Whitelist' for verifiction.
- Just use the default IDS (detection-only) mode for at least two weeks and potentially a month so you can see what alerts happen on your network. This lets you investigate and weed out false positives without getting frustrated because things get blocked. Come back to this later
- General Settings
- Detection Performance Settings
- Leave as default
- Choose the Networks Snort Should Inspect and Whitelist
- Leave as default
- Choose a Suppression or Filtering List (Optional)
- Leave as default
- Custom Configuration Options
- Leave as default/empty
- Save
- Snort Interfaces -->Add
- Edit the LAN interface
- LAN Categories (Select which types of rules will protect the network)
The categories on this page contain the rules, and those that are ticked will be applied.
- Packages — IDS / IPS — Configuring the Snort Package | pfSense Documentation
- Resolve Flowbits: ticked
- Use IPS Policy: ticked
- IPS Policy Selection: Security
- The IPS policies are only available when the Snort VRT rules are enabled.
- If Snort is unfamiliar to you, then using the less restrictive Connectivity policy in non-blocking mode (the default setting) is recommended as a starting point to identify and whitelist false positives. Once experience with Snort has been gained in this network environment, blocking mode may be enabled (via the Block Offenders option in the Snort Interface Settings tab) and a more restrictive IPS policy may be chosen.
- IPS Policy Mode: Policy (Inline Mode Only)
- When Policy is selected, this will automatically change the action for rules in the selected IPS Policy from their default action of alert to the action specified in the policy metadata (typically drop, but may be alert for some policy rules).
- This enables blocking on as per the rules set out in the IPS policy.
- You still need to enable 'Block Offenders' to block offenders.
- I am not sure if this is the case.
- I have reported this issue here for clarification Bug #14223: Block Offenders - Incorrect statement/description - pfSense Packages - pfSense bugtracker
- If this is left on 'Alert' and you are on
- 'Inline Mode': then no dropping of packets will occur, only alerts when a rule is triggered, irrespective of it's policy rule.
- Snort GPLv2 Community Rules (Talos certified): ticked
- Feodo Tracker Botnet C2 IP Rules: Ticked
- Click save
- LAN Rules (Select which types of signatures will protect the network)
- This tab is for manually editing rules within enabled rule categories. It does not enable or disable rulesets.
- Packages — IDS / IPS — Configuring the Snort Package | pfSense Documentation
- Click the Rules tab for the interface to configure individual rules in the enabled categories. Generally this page is only used to disable particular rules that may be generating too many false positives in a particular network environment. Be sure they are in fact truly false positives before taking the step of disabling a Snort rule!
- Legacy Interface rules always have the action of 'Alert' because that is how they are loaded.
- Edit a rule (not required at this time)
- Available Rule Categories --> Category Selection: 'IPS Policy - Security'
- Rule Signature ID (SID) Enable/Disable Overrides --> SID Actions --> Apply
- Rule Signature ID (SID) Enable/Disable Overrides
- These are just action butons for manually applying changes to the rules.
- LAN Variables (Define servers to protect and improve performance)
- Packages — IDS / IPS — Configuring the Snort Package | pfSense Documentation
- Packages — IDS / IPS — Snort Server Definitions | pfSense Documentation
- The Variables tab is where the specific types of hosts on the network are configured. For example, the specific IP addresses or network ranges containing web servers to protect may be defined. This can make Snort more efficient because it won’t waste time scanning for web server threats on IP addresses where web servers do not exist. Similarly, Snort performance can be optimized by instructing it which addresses contain other critical servers such as SMTP, POP, DNS, etc.
- Leave as default
- LAN Preprocs (Preprocessor Settings)
- Preprocessing: An Introduction - Snort Cookbook [Book] | O'Reilly
- Snort has several components other than the rules engine. For example, some packets and applications have to be decoded into plain text for Snort rules to trigger. The component that handles the packets before they get to the rules engine is called the preprocessor.
- Lists what the individual Snort preprocessors do.
- Auto Rule Disable: ticked
- Leave the rest as default
- Click save
- Preprocessing: An Introduction - Snort Cookbook [Book] | O'Reilly
- LAN IP Rep (IP Reputation Preprocessor Configuration)
- Packages — IDS / IPS — Snort IP Address Reputation Preprocessor | pfSense Documentation
- This tab allows configuration of the parameters specific to the IP Reputation preprocessor on the interface. It also allows the assignment of blacklist and whitelist files of IP addresses to the interface.
- Enable IP Reputation: ticked
- Scan Local: ticked
- becasue LAN is local network.
- Leave the rest as default
- Click save
- Packages — IDS / IPS — Snort IP Address Reputation Preprocessor | pfSense Documentation
- LAN Logs (View the Logs)
- Nothing to do here
- LAN Categories (Select which types of rules will protect the network)
- Services --> Snort --> Snort Interfaces --> LAN
- Click on the 'Play' button to start Snort on this interface.
- Service Watchdog
- Irrelevant of Snort's service status, when you reboot the router the service comes back online.
- You might consider adding Snort to the 'Service Watchdog'
Snort is now all setup.
Notes
- Official Sites
- Snort
- Snort - Network Intrusion Detection & Prevention System - Home page
- Snort Setup Guides for Emerging Threats Prevention - Get access to all documented Snort Setup Guides, User Manual, Startup Scripts, Deployment Guides and Whitepapers for managing your open source IPS software.
- Snort Frequently Asked Questions - The official Snort FAQ/Wiki is hosted here, and on Github.
- Netgate
- Snort
- General
- Version 3 is multi-threaded.
- This also has a dashboard widget.
- This was the original IDS
- SNORT happens before the firewall so blocks will not be shown in firewall logs ?
- Block Offenders
- Services --> Snort --> Snort Interfaces --> interface --> Edit --> interface Settings --> Block Settings --> Block Offenders
- If enabled then Snort will be in IPS (intrusion prevention system) mode where it will block and take action against bad traffic.
- If disabled then Snort will be in IDS (intrusion detection system) mode where it will only log and alert you of infractions.
- Rules
- Why are rules commented out by default?
- There are five states that we place rules in when created, four of the states are assigned to policies.
- This lists and explains the uses of the different policies.
- The Max-Detect policy is meant to be used in testing environments and as such is not optimized for performance.
- How Automatic SID Management and User Rule Overrides Work in Snort and Suricata | Netgate Forum | bmeeks
- The explains the flow of packets through the rules in detail.
- Both Snort and Suricata offer two similar ways to customize the rules utilized for inspecting traffic. You can use the CATEGORIES tab or the SID MGMT tab. Before diving off into the details, let's first review a few basic points.
- There are three ways to enable rules and rule categories in the pfSense Snort and Suricata package
- The first is to use the CATEGORIES tab to select (by checking) the rule categories you want to use from the list extracted from the gzip rule archives you have enabled for download (Snort, Emerging Threats, etc.).
- Another way to select rules or rule categories is by using the features on the SID MGMT tab of each IDS package.
- The third way to select individual rules is by using the User-Forced Enable/Disable icons on the RULES tab.
- GID:SID
- SID MGMT
- What Does "SID State Order" Mean on the SID MGMT Tab?
- Snort Package 4.0 -- Inline IPS Mode Introduction and Configuration Instructions | Netgate Forum | bmeeks
- There are up to three methods to choose from for the method which you want to use for changing rule actions to DROP for those rules you wish to block traffic. You can only pick one.
- Use the SID MGMT tab
- Manually force rule action changes on the RULES tab
- Use the Snort Subscriber Rules and choose an IPS Policy and set the policy action to "Policy" (CATEGORIES tab).
- Using IPS Policy to Automatically Change Rule Actions
- Using SID MGMT to Automatically Change Rule Actions
- Force Rule Actions Using Icons on the RULES Tab
- What is 'Enable Automatic SID State Management'?
- Enable automatic management of rule state and content using configuration lists. Default is Not Checked.
- Snort will automatically enable/disable/modify text rules upon each update using criteria specified in SID Management Configuration lists. The supported configuration format is the same as that used in the PulledPork and Oinkmaster enablesid.conf, disablesid.conf and modifysid.conf files. You can either upload existing configurations to the firewall or create new ones using ADD below.
- The default lists are empty.
- There are up to three methods to choose from for the method which you want to use for changing rule actions to DROP for those rules you wish to block traffic. You can only pick one.
- SID mgmt enable/disable question | Netgate Forum | bmeeks
- I'll try to explain how SID MGMT works in the package without getting too deep into the woods.
- Excellent explanation of the logic flow.
- SNORT SID Mgmt Disable not working | Netgate Forum
- A worked example of using SID MGMT setup.
- Hello! I have never used SID management before. I read through @bmeeks "How Automatic SID Management and User Rule Overrides Work in Snort and Suricata" sticky and I think I set this up correctly.
- Snort Rules Examples and Usage: A Beginner's Guide - Sapphire - A snort effectively identifies suspicious patterns and behaviors, providing early alerts. What are the Snort rules, examples, and usage?
- Why are rules commented out by default?
- Preprocessors
- Services --> Snort --> Snort Interfaces --> LAN(igb1) --> LAN Preprocs (change the interface as required)
- Dont touch unless you know what you are doing.
- Preprocessing: An Introduction - Snort Cookbook [Book] | O'Reilly
- Snort has several components other than the rules engine. For example, some packets and applications have to be decoded into plain text for Snort rules to trigger. The component that handles the packets before they get to the rules engine is called the preprocessor.
- Lists what the individual Snort preprocessors do.
- Wan vs LAN
- Always monitor the LAN so you can see the original source and destination of a packet. If you monitor the WAN you will only see the NAT'ed address on one side.
- It is pointless to monitor the WAN and LAN.
- Tutorials
- Snort Package 4.0 -- Inline IPS Mode Introduction and Configuration Instructions | Netgate Forum | bmeeks
- This indepth technical tutorial tells you how to configure Snort but also discusses the difference between the IPS and Legacy mode and why IPS is better.
- The new Inline IPS Mode of Snort will only work on interfaces running on a supported network interface card (NIC). Only the following NIC families currently have netmap support in FreeBSD and hence pfSense: em, igb, ixgb, ixl, lem, re or cxgbe. If your NIC driver is not from one of these families, netmap and Inline IPS Mode is not going to work properly, if it works at all.
- This is a great read.
- pfSense + snort is AWESOME, quick look at IPS/IDS (For Free) | YouTube | The Network Berg
- Tutorial, Setting up Snort On pfsense 2.4 With OpenappID | YouTube | Lawrence Systems
- Snort IDS / IPS Complete Practical Guide | TryHackme | YouTube | Motasem Hamdan
- In this video walk-through, we covered configuring snort as an IDS/IPS open-source solution. Snort operates as sniffer, packet logger and IPS/IDS.
- This deals with Snort on the command line and not as a pfSense package. It also covers the basics of IDS/IPS/HIPS etc..
- pfSense Snort Configuration (IPS IDS) - YouTube | Tech Me Out - pfSense snort configuration is relatively an involved process that requires a bit of a networking knowldge. In this video we will see how to install, configure and enable Snort on pfSense.
- pfsense 2.4.5 - Snort IDS IPS - YouTube - Install Snort, add interface, enable rules, use oinkcode, emergent threats, openappID, enable barnyard2, detect alerts, enable preprocessors.
- GitHub - Graylog2/graylog-guide-snort - How to send structured Snort IDS alert logs into Graylog - GitHub - Graylog2/graylog-guide-snort: How to send structured Snort IDS alert logs into Graylog.
- How to Set Up Intrusion Detection Using Snort on pfSense 2.0 - TurboFuture
- The Snort package allows you to turn a pfSense firewall into a powerful network intrusion detection system. Learn how to set it up here.
- Before Snort can start functioning as an intrusion detection system, you must assign interfaces for it to monitor. The typical configuration is for Snort to monitor any WAN interfaces. The other most common configuration is for Snort to monitor the WAN and LAN interface.
- Monitoring the LAN interface can provide some visibility to attacks going on from within your network. It's not uncommon for a PC on the LAN network to become infected with malware and begin launching attacks on systems inside and outside the network.
- If you are running a multi-wan router, you can go ahead and configure the other WAN interfaces on your system. I also recommend adding the LAN interface.
- Extending pfsense with SNORT for Intrusion detection & prevention. - PDF Free Download - Extending pfsense with SNORT for Intrusion detection & prevention PDF of unknown author.
- Quick Snort Setup Instructions for New Users | Netgate Forum
- Here are the steps for a very quick and easy initial setup of the Snort package on pfSense for new users
- Click the checkbox to "Send alerts to the main System logs".
- Dont mess with pre-processors.
- This is an old article but has some useful discussions by the developer bmeeks
- How To Setup Your Own IDS/IPS in PfSense With Snort - YouTube | InfoSec Hub - With Snort you can setup your own Intrusion detection and prevention system on top of the amazing open source PfSense. Snort will give you good insights on what kind of naughty stuff is happening on your network.
- Snort PfSense : Detect DoS Attack » Simplificando Redes
- Let's introduce How to Use Snort in PfSense to Detect DoS Attack. For this we use a practical scenario and use real scenario.
- Tells you how to test Snort with Kali Linux.
- There is a video attached to this article.
- How To Secure pfsense with Snort: From Tuning Rules To Understanding CPU Performance - YouTube | Lawrence Systems
- Snort Package 4.0 -- Inline IPS Mode Introduction and Configuration Instructions | Netgate Forum | bmeeks
- Information
- Snort (software) - Wikipedia
- Capacity Planning for Snort IDS | Bulbous, Not Tapered - Snort is a very capable network intrusion detection system, but planning a first-time hardware purchase can be difficult. It requires fairly deep knowledge of x86 server performance, network usage patterns at your site, along with some snort-specific knowledge. Documentation is poor, current planning guides tend to focus on one or two factors in depth without addressing other broad issues that can cause serious performance problems. This post aims to be a comprehensive but high-level overview of the issues that must be considered when sizing a medium to large snort deployment.
- Snort IDS/IPS Explained. What - Why you need - How it works - sunnyvalley.io
- Snort IDS/IPS Explained
- What - Why you need
- How it works
- in-depth
- What are the Differences Between Snort and Suricata?
- Software's history
- PFsense IP and DNS filter with PFBLOCKERNG / Application Filter with Snort and OpenAppID - HackMD
- Today I will show you guys how to filter website with PFBLOCKERNG on pfsense
- What is Snort Blocking Right Now? | Netgate Forum
- The IP that Snort blocked will be shown in two places. One is on the ALERTS tab and the other is on the BLOCKS tab. They are as plain as day to see there if you go look. Both tabs show you the blocked address, and the ALERTS tab shows you both the source and destination IP addresses (if you are running Snort on the LAN interface as I recommend). If you are running Snort on the WAN, then the only local IP address you will see is your WAN IP.
- Snort and Suricata are not like an anti-virus client. You can't just install the package, download all the rules and call it done. Both packages are designed for security admins with training on IDS/IPS operation, rule selection and tuning. If you don't want to take the time to do all the research to learn how to do these things, running either of those packages is not going to be fun for you. You are going to get lots of blocks from false positives. These packages are really not intended for use on home networks unless your day job is an IDS/IPS admin.
- Understanding and Configuring Snort Rules | Rapid7 Blog - In this article, we will learn the makeup of Snort rules and how we can we configure them on Windows to get alerts for any attacks performed.
- Snort doesn't know about SRC-DST pairs thus unable to whitelist anything | Netgate Forum
- bmeeks
- On the INTERFACE SETTINGS page for your LAN configure Snort to block "BOTH" source and destination IP addresses. This is because bad traffic can be coming in either direction (sourced from some Internet site, or destined from your LAN host to an Internet-based CnC server). The hint text on the page suggests you use the BOTH setting for "which IP to block".
- By default, your LAN hosts will not be blocked if you leave the Pass List setting on the INTERFACE SETTINGS tab set to "default".
- Now things will work as follows:
- A source on the Internet attempts to send a malicious payload to your LAN host. The flow is from the Internet (SRC) to your LAN host (DST). Snort detects the payload incoming and will attempt to block both IP addresses in the packet (source and destination) because the setting for which IP to block is BOTH; however, because the default Pass List says to never block LAN IP addresses, only the Internet source IP of the malicious traffic will actually get blocked. The flow of bad packets is now stopped, and that's what you wanted.
- Conversely, if a LAN host is already infected via some other method (say from a USB drive), and that host attempts to talk out to some CnC bot server to download more malicious code, Snort will detect the attempt and again act to block both IP addresses in the packet. This time, though, the flow is from your LAN host (SRC) to the remote host (DST) so SRC IP is your LAN host and DST IP is the remote Internet CnC server. Snort will once again wind up only blocking the remote DST IP of the CnC server because the default Pass List says to never block LAN host IPs. The flow of bad packets is now stopped -- again what you wanted.
- It really does no good to leave such blocks in place forever, so I recommend users configure the setting on the GLOBAL SETTINGS tab to remove blocked hosts on an interval. One hour, or even a shorter time, is a good setting for clearing out blocked hosts that have not seen any traffic within the time interval selected.
- bmeeks
- If you want to primarily block LAN users from visiting corporately-banned content such as porn or perhaps social media sites, then you would really need to head towards another tool. Snort and Suricata are funamentally designed to detect and block malicious content based on data signatures. OpenAppID within Snort can do some DPI (deep packet inspection) and alert based on application ID (Facebook, YouTube, Messenger, etc.), but that gets more and more dicey as all web content moves to SSL. Encrypted packets can't be inspected. Only decrypted packets can be inspected. OpenAppID works by looking for some really basic header stuff that is outside the SSL encryption wrapper. Truly guarding against offensive content requires some type of proxy with MITM (man-in-the-middle) certificates. That is not necessarily hard to accomplish in a corporate network where you rigidly control the software on machines. It is darn near impossible to administer on BYOD (bring-your-own-device) networks.
- bmeeks
- Ah-ha! I understand now. As you have correctly surmised, Snort works by placing IP addresses in a pre-existing pf table called snort2c. That table is created by the pfSense code at bootup and is present even when the Snort package is not installed. There are also a handful of other special tables created at bootup by pfSense. These types of firewall tables can only take IP addresses as their input parameters. They are not set up to accept port numbers.
- Snort on pfSense actually blocks by use of a custom output plugin created for the Snort binary by the original package author. I inherited maintenance of the package several years ago. I have made some modifications and enhancements to that custom plugin, but I did not create it. The plugin makes FreeBSD system calls to place IP addresses into the snort2c table. The plugin does not actually create a firewall rule, though. The rule is pre-existing (created at firewall bootup) and simply uses the table IP addresses as its SRC/DST addresses. The blocking plugin simply feeds the offending IP addresses to the table.
- bmeeks
- Inline Mode
- Snort IPS Inline Mode on Ubuntu – Sublime Robots
- snort inline performance : PFSENSE
- Questions about Snort "IPS Mode: Inline Mode" : PFSENSE
- Snort Inline Mode and Hardware offloading issues : PFSENSE
- Snort inline IPS mode | Netgate Forum
- There is an Inline IPS Mode available for the Suricata package on pfSense-2.4.5, but use of the Inline IPS mode with either package requires that your NIC driver fully support the netmap kernel device. Several popular Intel NICs do, and a handful of others from other manufacturers will as well. However not every NIC driver is compatible. If your particular NIC driver is not, then you can have problems ranging from nuisance log noise all the way to the firewall stops passing traffic on the interface and/or randomly reboots.
- Output Data
- Currently i have not configured the alerts to goto Graylog or another Syslog server.
- CSV
- Snort FAQ - CSV output plugin - The CSV output plugin gives an interface for users to specify what information they see for alerts. csv provides this by outputting the data in comma separated value format, configured by the user in the snort configuration file.
- Snort.conf output options | TechTarget - IDS Snort offers functional equivalents for FAST, FULL and SYSLOG command line output modes, as shown here.
- wireshark - Is there a way to change the format of the output from snort? - Information Security Stack Exchange
- Errors
- (spp_sip) Maximum dialogs within a session reached
- This is caused by my VOIP phone.
- Solution is to change the phone from UDP to TCP in it's settings.
- (spp_sip) Maximum dialogs within a session reached
- Troubleshooting
- Snort Keeps Stopping | Netgate Forum - I recently upgraded my pfSense system to version 2.3.3-RELEASE-p1 and now Snort keeps stopping on its own about once every 2 days. I have to keep manually restarting the service. Anyone have any ideas how I can troubleshoot this? It appears to have failed during a rules update.
- Enabling blocking offenders results in net down and lost access to the GUI | Netgate Forum
- I had to change the following for INLINE mode to work here, there was a popup somewhere that told me to change these settings in (System --> Advanced --> Networking --> Network Interfaces):
- CHECK (ticked) - Hardware Checksum Offloading/Disable hardware checksum offload
- CHECK (ticked) - Hardware TCP Segmentation Offloading/Disable hardware TCP segmentation offload
- CHECK (ticked) - Hardware Large Receive Offloading/Disable hardware large receive offload
- bmeeks
- All three offloading settings should always be disabled for all modes of the IDS/IPS packages. That's because the NIC will create packets that are too large when these offloading options are not disabled. With those offloading options enabled, the NIC itself is reassembling packets instead of letting the pfSense kernel do so. The IDS/IPS packages expect standard size packets (typically 1500 bytes or so). Having the offloading options enabled will result in packets that are too large for the kernel-configured netmap buffer size. That will lead to netmap errors.
- sers need to understand that Inline Mode for both packages (Snort and Suricata) uses a special kernel-provided networking device called the netmap adapter. That adapter, especially on FreeBSD-11 and earlier, requires the NIC hardware driver be cognizant of and operate with the kernel's netmap device. If not, problems will occur. FreeBSD-12 is a little better as the netmap interoperability was moved into the new iflib wrapper for network drivers. But that wrapper code is new and still getting the occasional bug fix on the FreeBSD side.
- I had to change the following for INLINE mode to work here, there was a popup somewhere that told me to change these settings in (System --> Advanced --> Networking --> Network Interfaces):
Suricata
I have not used this.
what is Suricata?
- This is similiar to SNORT and uses SNORT's rules.
- Suricata is a high performance, open source network analysis and threat detection software used by most private and public organizations, and embedded by major vendors to protect their assets.
Instructions
- System --> Package manager --> Available Packages --> Search --> Suricata --> Install
Suricata Notes
- Home - Suricata
- Packages — IDS / IPS | pfSense Documentation
- this shares documentation with Snort
- Tutorial videos
- uses SNORT rules, so why not use Snort?
- Suricata is multi-threaded
- Configuring pfSense/netmap for Suricata Inline IPS mode on em/igb interfaces | Netgate Forum
- Beginning w/ Suricata, lots of alerts but no blocks | Reddit
- I have Suricata installed, a bunch of lists successfully downloading and applying and so I get a nice flood of alerts in the log. But despite having "block offenders" checked, nothing ends up on the Block list. I'm using Legacy Mode, not Inline. And "Which IP to block" I set to just SRC, which in theory should prevent the blocks from not happening because the DST would be on the pass list (but my pass list is just the default settings anyway)
- Suricata V3.0 Inline Mode | Netgate Forum
- I do need some help however with the new Suricata V3.0. I have a Pfsense 2.3 with an Intel server network card that supports the Inline Mode but have not been understand how to configure it in the new Inline Mode.
- I plan to update the docs on the pfSense Wiki eventually, but in the meantime here is a quick how-to.
IDS/IPS Notes
- General
- Unless you're port forwarding and/or host a website from your home there's little need for an IDS. This not always the case.
- IDS = Detection only
- IPS = Detection and blocking
- IDS Vs IPS - Check Point Software - IDS vs IPS, which is the better solution? Here we discuss their advantages and disadvantages, and how both contribute to protecting an organization.
- Snort or Suricata
- Open source IDS: Snort or Suricata? [updated 2021] | Infosec Resources - Although early types of Network Intrusion Detection Systems go back all the way to the early 1980s, the concept of IDS took off when Martin Roesch created his free and open source IDS system SNORT.
- Snort or Suricata which one is better? | Netgate Forum
- I'm a novice as well and still going through the learning pains, however I can offer this bit of insight/experience.
- They both essentially do the same thing, however they just do it differently.
- That being said, i started out with Snort, i now been running suricata. Suricata has it's own rules and can run the snort rules as well, so you get the best of both worlds. Also, Suricata is more modern and built to take advantage of modern multi-core cpus, whereas Snort in the beginning could only run on a single thread. The latest version of Snort was re-written to take advantage of multiple cores, but how well it does it in its current incarnation, i don't know.
- Suricata also is capable of inline scanning, I don't know if Snort is at the moment.
- Yes it is if you use 'Inline Mode'
- The current Snort version on pfSense does indeed offer an Inline IPS Mode, the same as Suricata.
- Suricata can use most Snort rules, but not all. If you were to enable all of the Snort rule categories in Suricata, you would see up to a couple hundred or more fail to load and generate errors in the suricata.log file for the interface. It won't stop Suricata from starting, but it will discard those Snort rules that contain syntax Suricata does not understand.
- Snort3 is the latest multithreaded version of Snort from upstream, but it does not yet exist as a pfSense package. So multithreaded Snort is not possible for now on pfSense.
- I'm a novice as well and still going through the learning pains, however I can offer this bit of insight/experience.
- WAN or LAN? What interface(s) should i put my IDS on? (WAN/LAN/WAN+LAN)
- You should put Snort/IDS on your LAN interface(s) because:
- Allows you to see the internal/local IP of the device the traffic is destined or coming from. If you install on the WAN you will always see the destination/source of the traffic as your public IP and not the actual local IP address of the device.
- pfBlockerNG is active on the WAN. This blocks by using blocklists and can perform country blocking. There is no point in analysing traffic that will be dropped by pfBlockerNG.
- A properly configured firewall would drop a lot of traffic anyway before it goes to the LAN
- If you install on your LAN all traffic is inspected on that network before it goes up any gateway so only 1 instances of Snort is needed. If you choose to install Snort on the WAN(s) you will have to install it on every Gateway you have including OpenVPN connections.
- Traffic from the LAN which is routed over a OpenVPN connection will be inspected before going down that pipe.
- You don't need to run snort on both your WAN and LAN interface, it's basically just doing everything twice
- Snort on LAN, WAN or DMZ? | Netgate Forum
- The LAN is the place I recommend, mainly for the reason you listed -- local hosts show up with their actual IP addresses instead of everything having the WAN's public IP due to NAT.
- If you have Internet-facing hosts in the DMZ, then an IDS/IPS instance there can be useful running rules specific to any exposed risks in the DMZ. For example, if you run web hosts, then you would run Snort's web server and similar rules on the DMZ instance. If you have public-facing DNS or mail servers, then you would run Snort's DNS and mail server rules, and so forth.
- There is usually never a good reason to put Snort on your WAN. First, a properly configured firewall is going to drop a lot of unsolicited inbound traffic anyway. So why waste CPU cycles analyzing traffic that your firewall rules are going to drop? If a packet is destined for your LAN or DMZ, then the Snort rules running there will catch and inspect it. So again, having it inspected on the WAN does next to nothing. pfSense itself is pretty well secured. Having Snort on the WAN does nothing for pfSense itself. If you think the firewall is insecure enough that you need an IDS/IPS on your WAN to protect the firewall, then you need a new firewal
- Best rules to best protection in WAN and LAN Interface | Netgate Forum
- bmeeks - For someone new to an IDS/IPS, here is my recommendation.
- Configure Snort on your LAN interface only. There is generally no extra security obtained by putting an instance on your WAN as the WAN, by default in pfSense, drops all unsolicited inbound traffic anyway.
- Do NOT configure blocking at first. Just use the default IDS (detection-only) mode for at least two weeks and potentially a month so you can see what alerts happen on your network. This lets you investigate and weed out false positives without getting frustrated because things get blocked.
- Register for either a free or paid ($29.99/year for paid) Snort Subscriber Rules Oinkcode. There is link for that on the GLOBAL SETTINGS tab when you click the checkbox to enable the Snort Subscriber Rules. For convenience, here is another copy of the link: https://www.snort.org/products#rule_subscriptions. Once you have done this, go to the UPDATES tab and force a rules update so your Snort Subscriber Rules will download.
- Edit the LAN interface in Snort and go to the CATEGORIES tab. Check the box to use an IPS Policy and then choose IPS-Connectivity in the drop-down selector. This is an excellent starter policy that offers very good protection with hardly any false positives. Save the change then start Snort on the LAN interface (or restart it if it was already running).
- Sit back and study the alerts you receive by periodically reviewing the ALERTS tab. It is likely you will get some false positive alerts from the HTTP_INSPECT preprocessor rules. Here is a link to an older thread about Suppression Lists and using the SID MGMT tab to control false positives: https://forum.netgate.com/topic/50708/suricata-snort-master-sid-disablesid-conf. Remember that with Snort, once blocking is enabled, every alert you see could have resulted in a block of host traffic. This is why you examine the alerts and suppress or disable those rules which are firing on benign traffic in your environment.
- After you get the rule set tuned up, you can go back and enable blocking mode. If things are smooth, then you can bump up your IPS Policy to IPS-Balanced and see how that works for you. I do not recommend folks use the IPS-Security policy as that one enables a bunch of extra rules that are highly prone to false positives (especially in home networks). You can also choose to start using some of the free Emerging Threats rule categories by going back to the GLOBAL SETTINGS tab and enabling the Emerging Threats Open rules. You would then add those rule categories to your ruleset back on the CATEGORIES tab for your LAN interface.
- Snort at home - WAN or LAN? | Netgate Forum
- LAN is where you want it with NAT. Otherwise, all the IP addresses you see in alerts will either be your WAN IP or some far-end Internet host. You would never see any LAN IP addresses if you run Snort on the WAN interface. Without the LAN addresses, identifying an infected host on your LAN becomes quite hard. This is because Snort on the WAN only sees the traffic after NAT rules have been applied.
- bmeeks - For someone new to an IDS/IPS, here is my recommendation.
- You should put Snort/IDS on your LAN interface(s) because:
NTP Server (NTPD)
This feature allows pfSense to run as a NTP server and can be polled by other computers on your network to sync their times. This can be very useful if running time sensitive machines on your local network as they will all be on the same times.
- The NTP server is enabled by default.
- You may need to disable NTP if pfSense is running in a virtual machine and the host is responsible for the clock.
- This is not an issue for TrueNAS Scale becasue it uses KVM which avoids these issues by providing guest virtual machines with a paravirtualized clock (kvm-clock).
- When you start a KVM, the time (UTC/Local) from your Host is used as the start time for the emulated RTC of the Guest, then it is soley maintained in the VM.
- You may need to disable NTP if pfSense is running in a virtual machine and the host is responsible for the clock.
- NTPD | pfSense Documentation
- The NTP service is a Network Time Protocol (NTP) daemon which will listen for requests from clients and allow them to synchronize their clock with that of a firewall running pfSense® software.
- By running a local NTP server and using it for local clients, it reduces the load on the lower-stratum servers and can ensure that local systems can always reach a time server.
- NTP Server Configuration | pfSense Documentation
- The NTP server is located in the GUI at:
- Services --> NTP
- This pages lists all of the configurable options.
- The NTP server is located in the GUI at:
Transparent Proxy (Squid Proxy)
Article Notes
pfSense
General
- Official Sites
- Netgate Forum
- pfSense bugtracker
- GitHub - pfsense/pfsense - Main repository for pfSense. Contribute to pfsense/pfsense development by creating an account on GitHub.
- Official Documentation
- Official pfSense Documentation - Netgate Documentation is brilliant, well written and can be easily understood
- Download as a PDF/ePub | pfSense Documentation - Download all the documentation as a PDF or ePub. This is netgate thinking about the end user. Imagine you needed the documentation after breaking your pfSense box so could not get online to read it, this solve the issue as long as you download it first.
- pfSense® software Configuration Recipes | pfSense Documentation - Many tutorials and further reading from Netgate
- pfSense – LTS Documentation
- An index of knowledge curated by Lawrence Technology Services on pfSense and other related things.
- These are the goto guys (or Lawrence is) for pfSense tutorials
- Console Menu Basics | pfSense Documentation - Basic configuration and maintenance tasks can be performed from the pfSense® system console. The console is available using a keyboard and monitor, serial console, or by using SSH. Access methods vary depending on hardware.
- Installation Tutorials
- 2020 Getting started with pfsense 2.4 Tutorial: Network Setup, VLANs, Features & Packages - YouTube | Lawrence Systems - A tutorial by Lawrence Sytems who supplies this software professionally. From installing to configuring your local network.
- 2018 Getting started with pfsense 2.4 from install to secure! including multiple separate networks | Lawrence Systems
- Installing and Upgrading — Perform the Installation — Installation Walkthrough | pfSense Documentation - The starting point for learning. This will walk you through the setup of pfSense.
- pfSense baseline guide with VPN, Guest and VLAN support | nguvu.org
- Very in-depth with pictures for every step
- Local subnet overview section
- Professional setup
- Has an Alias list for ports
- How to Configure pfSense: The Ultimate Setup Guide for 2022 - pfSense's GUI can be daunting to newer users. In this post, we provide an overview of how to configure pfSense after a default installation, with screenshots.
- How to Install and Configure pfSense on X86-64bit Win10 Mini PC? - Latest Open Tech From Seeed - A look at and then installation of pfSense
- PfSense Web Filter With pfBlockerNG - Filter Ads and Malicious Websites | Open School Solutions - I would like to describe how you can build a pfSense web filter with pfBlockerNG to filter advertising, unwanted content and malicious websites network-wide. This is useful in a home or school network, for example.
- Configuring pfsense Firewall Rules For Home | Lawrence Systems
- How to Configure pfSense: The Ultimate Setup Guide for 2022 - pfSense's GUI can be daunting to newer users. In this post, we provide an overview of how to configure pfSense after a default installation, with screenshots.
- How to install OpenVPN on pfSense: Ultimate Beginner Guide - Learn how to install OpenVPN on pfSense 2.5 in this complete, beginner-friendly step-by-step guide including video and images!
- pfSense: A Guide to NAT, Firewall Rules and some Networking 101 · blog.muffn.io - So, you’ve decided to ditch that POS ISP provided router, or just literally anything marketed towards consumers and have installed pfSense, so.. what now?
- pfSense Firewall - pfSense Administration Full Course - YouTube | nowledge Power - It is 3.5 hours long so it does what it says on the tin.
- Specific Task Tutorials
- Configuring pfsense Firewall Rules For Home - YouTube - A lawrence systems video
- How To Setup pfsense OpenVPN Policy Routing With Kill Switch Using A Privacy VPN - YouTube | Lawrence Systems
- pfsense and Rules For IoT Devices with mDNS | Lawrence Systems
- The Homelab Show Episode 41: Network Segmentation, VLAN, And Subnets | Lawrence Systems
- pfSense Archives - TechExpert - This page will list in a single place all tutorials related to pfSense available on our website. Here, you can find tutorials showing how to install, configure and keep your pfSense firewall safe.
- pfSense WebGUI / webConfigurator
- System --> General Setup --> webConfigurator
- When you get more that 10 interfaces, the tabs on the 'Firewall Rules' page are converted to a dropdown menu because you no longer have room to dispaly all the tabs. I have not found a setting to override this yet.
- How to change the remote access port for pfSense - WP Computer Solutions (only if really needed)
- Rearrange pfSense interface order - Server Fault
- System --> General Setup --> webConfigurator --> Interfaces Sort: Sort Alphabetically
- Misc
- pfSense Future
- Announcing pfSense® Plus - and the downgrading of pfSense CE
- pfSense going closed source - Ars Technica OpenForum
- Differences Between pfsense CE and pfsense plus in February 2022 | Lawrence Systems
- Migrate from pfSense CE software to Netgate pfSense Plus software! - With the release of pfSense CE software release 2.6 Netgate provides an easy migration path to pfSense Plus software Release 22.01.
- Version Number
- You can get the pfSense version number from an offline installation from
/etc/version
- You can get the pfSense version number from an offline installation from
- pfSense Security zones interface. Security Zones Interface concept | by Vladyslav Diadenko | Medium - Security Zones Interface concept
- Default Configuration
- Installing and Upgrading — Perform the Installation | pfSense Documentation
- This has the default configuration of pfSense i.e. 192.168.1.1/24
- config.xml
- This contains all settings in 1 file and is all that is needed to re-install pfSense
- You can use the boot disk to recover the config.xml if you did not back it up before a crash.
- DHCP option 121
- Tutorial Pfsense - Remote Syslog Configuration [ Step by Step ]
- Needed to use DHCP option 121, so rather than spending 10 minutes hand calculating the value I spent 3+ hours writing a JS tool to do the same job.
- For the ones like me who don't know DHCP Options: Answer by OpenAI: DHCP Option 121 is a configuration option for DHCP (Dynamic Host Configuration Protocol) that specifies a static route to be used by a client. This option can be used to specify routes that are specific to a particular client or subnet, allowing for more flexible routing configurations. The option is specified as a pair of IP addresses, with the first address representing the destination network and the second address representing the router to use for that network. This option is typically used in conjunction with other routing options, such as the default gateway option, to provide a complete routing configuration for a client.
- RFC3442: This document defines a new Dynamic Host Configuration Protocol (DHCP) option which is passed from the DHCP Server to the DHCP Client to configure a list of static routes in the client. The network destinations in these routes are classless - each routing table entry includes a subnet mask.
- Source code: GitHub - FrayedString/rfc3442 - Calculator to build RFC3442 DHCP Option 121 strings for PfSense and other software that uses the same format.
- Tutorial Pfsense - Remote Syslog Configuration [ Step by Step ]
- See what is using the CPU using
-
top -aSH
- How to Use the top Command in Linux - A detailed tutorial about the top command, a built-in Linux utility that provides comprehensive information about running processes.
-
- pfSense Future
- ZFS or UFS
- ZFS is more reliable and less prone to file corruption. It does not use massive amounts of memory but does like RAM.
- ZFS is the first in the list hinting at being the preferred option.
- pfSense UFS filesystem corruption after power loss
- When pfSense system losses power at a wrong moment, the UFS filesystem may get corrupted, which may result in unbootable router.
- In our experience ZFS is immune to the issue, so we strongly recommend using ZFS instead of UFS.
- Should I use ZFS or UFS for my file system? : PFSENSE
- I switched to ZFS on all my installs about 2 years ago, and I'm not looking back. It does marginally increase RAM usage, but gives you the benefit of ZFS file system integrity. ZFS does much better on power failure than UFS with regard to file system corruption. ZFS is atomic, which means you'll never have a half-written log or configuration file if you lose power, or worse the file system writes part of the file near something important and the next read causes memory corruption.
- ZFS vs UFS and power loss | Netgate Forum
- Does ZFS offer any better protection against power loss vs UFS on pfSense firewalls? Yes, it is about zillion times better than UFS. Switching to ZFS should be a complete no brainer with anything that has 4GB of RAM or better. I'd still go for it even with 2GB boxes, had nothing but pain with UFS for years. Garbage filesystem.
- Pfsense 2.4 ZFS File System | Netgate Forum
- What will be the hardware requirements for utilizing the ZFS file system? Same as any other FreeBSD system running ZFS.
- Mostly true, ZFS is not memory intensive or a resource hog any more than your average database can be depending on the setup. There's one thing I'm worried about and that's the high amount of incorrect information on the net concerning the more advanced features of ZFS such as dedup. You can expect an influx of newbies asking why their pfSense locked up hard when they enabled dedup just for the fun of it.
- What are the advantages of ZFS in a pfsense install? Unlike UFS, it doesn't crash and burn, bricking your boxes over and over again. That's enough of an advantage for me.
- ZFS w/single drive? : PFSENSE
- ZFS is the better file system and this threads explains why.
- Partition / Filesystem Selection
- Installing and Upgrading — Perform the Installation — Installation Walkthrough | pfSense Documentation
- The ZFS filesystem type is more reliable and has more features than UFS, however ZFS can be memory hungry. Either filesystem will work on hardware with several GB of RAM, but if RAM usage is critical to other tasks that will run on this firewall, UFS is a more conservative choice. For hardware that requires UEFI, use ZFS.
- Select the file system going down the list and select the first one your hardware will support:
- Auto (ZFS)
- Needs plenty of RAM
- Has more disk features.
- Auto (UFS) UEFI
- Automatically creates partitions and formats the disk with UFS and a UEFI boot environment.
- Though systems which support UEFI natively should use this option in most cases, there are occasional incompatibilities between FreeBSD and UEFI implementations. If the system fails to boot, configure the system for BIOS/legacy booting and choose that installation option instead.
- Auto (UFS) BIOS
- Automatically creates partitions and formats the disk with UFS and a traditional/legacy BIOS style boot environment.
- Auto (ZFS)
- Installing and Upgrading — Perform the Installation — Installation Walkthrough | pfSense Documentation
- TRIM Support
- Feature #2319: include SSD TRIM option in installer - pfSense - pfSense bugtracker
- No longer relevant. It's automatic for ZFS and is already enabled where needed.
- Feature #2319: include SSD TRIM option in installer - pfSense - pfSense bugtracker
- pfSense Vs OPNsense vs OpenWRT vs Others
- Firewall Comparison, Which Ones We Use and Why We Use Them: Untangle / pfsense / Ubiquiti | Lawrence Systems
- pfsense VS OPNSense | Lawrence Systems
- Top 7 pfSense Alternatives - HomeTechHacker - pfSense is a great choice for software for your router, but it isn't the only choice. Here are 7 top alternatives to pfSense
- 10 Best Open Source Firewall for 2022 - Cyber Security News - Open Source Firewall are best known for protecting network from threat by filtering the inbound and out bound traffic and ensure the network security.
- Switch back to Pfsense from Opnsense and why. | SmallNetBuilder Forums - I wanted to post this in case anyone else has questions about Pfsense vs. Opnsense, or why to use one over the other, as I have personally used both, and recently made the decision to switch back to Pfsense where I started in the first place.
- Openwrt vs. pfsense – Which one is better for building a router system - When it comes to building and managing a router system, openwrt and pfsense are two of the best ways to go, but which one is better?
- What Are The Best Open Source Firewalls? - sunnyvalley.io - Best Open Source Firewalls
- pfSense vs OPNsense - pfSense vs OPNsense - which router operating system is better?
- Difference between pfSense and OpenWrt - Installing and Using OpenWrt - OpenWrt Forum - Hi What is the difference between pfSense and OpenWRT? Expect one is based on BSD and the other on Linux?
- 5 Router OS Turns Old PC Into High Performance Router And Enterprise Network Switch - If you have an old Windows Desktop PC lying around collecting dust, why not turn it into a gateway and router for your home (overkill and waste of electricity) or a small office network?
- pfSense on a Virtual PC (VirtualBox/VMWare/KVM/....)
- I use TrueNAS which uses KVM for its hypervisor and combined with using PCI Passthrough for my Intel i350 quad card, it runs perfectly.
- VM is a type 1 hypervisor, which essentially means it is able to run on bare metal.
- It is better to use a real NIC on passthrough rather than a Virtualised NIC. This method also allows the easier use of VLANs.
- Should I Virtualise pfSense
- Hardware
- Virtualization | pfSense Documentation
- pfSense® software supports a variety of Type-1 (bare metal/native) and Type-2 (hosted) virtualization environments, such as VMware (vSphere, Fusion or Workstation), Proxmox VE, VirtualBox, Xen, KVM, Hyper-V and so on.
- We recommend using Type-1 hypervisors for production use. Type-2 hypervisors such as VirtualBox or VMware Workstation work fine for testing, but avoid using them for production roles where possible.
- VirtIO Driver Support | pfSense Documentation
- The FreeBSD kernel used by pfSense® software includes VirtIO drivers built into the kernel. No special action is necessary to enable the drivers.
- Hardware checksums and other NIC offloading features like TSO may also need to be disabled on the hypervisor system in addition to the pfSense VM.
- Disable 'Hardware Checksum Offloading' in pfSense.
- pfSense within VirtualBox on FreeNAS | TrueNAS Community
- Pfsense wants kernel-level access to the NICs.
- Virtualization | pfSense Documentation
- Installation
- How To Install PfSense on VirtualBox? – GetLabsDone - In this blog, we will cover how you can install pfSense on a virtual box hypervisor. Since Oracle VirtualBox is free and supports Windows, MAC, and Linux operating systems, it is a great choice for someone who wanted to start with pfSense.
- How to install pfSense on VirtualBox - Quick & Easy to follow Step-by-Step Tutorial on how Install pfSense on VirtualBox. I'll guide you through each step!
- How to install pfSense on Virtualbox or Vmware player - tutorial - H2S Media - Install, setup and use the pfSense firewall on Virtualbox or Vmware workstation player virtual machine omn Ubuntu Linux, WIndows or macOS.
- Performance
- Extreme slow internet speed pfsense over proxmox | Bots! - For a qemu proxmox guest PFSense acts weriedly with the network speed- it gets extremely slow. So her goes the little tweaks that worked for me-
- Certificates
- Certificate Management — Certificate Authority Management | pfSense Documentation
- Trust Store
- Controls whether or not this CA is added to the certificate trust store on the firewall.
- Add this Certificate Authority to the Operating System Trust Store | Netgate Forum
- Most users would not need to use this. Checking this when importing or creating a CA will do nothing for remote clients (like an OpenVPN client) that might need the CA cert later.
- This allows a client application on the firewall to connect to something using that CA that would otherwise not be trusted. So for example a local LDAP server using LDAPS can be added to the firewall and be authenticated.
- Randomize Serial
- Controls whether or not the CA will randomize serial numbers when it signs certificates or if it will use a sequential serial number.
- The current best practice is to randomize serial numbers so they are unpredictable. This also reduces the chances of generating two certificates with the same serial number in circumstances where the CA is moved between different hosts or signs certificates in multiple places.
- Trust Store
- 2048 or 4096 bits
- So you're making an RSA key for an HTTPS certificate. What key size do you use? - Or: why you probably don't want a 4096 bit RSA cert
- OCSP— Cryptographic Settings | pfSense Documentation - When set, OpenVPN will attempt to confirm client certificate validity using Online Certificate Status Protocol (OCSP) against the site listed in the OCSP URL field.
- OSCP is the replacement technology for CRL. OCSP Stapling will replace OCSP.
- CRL Explained: What Is a Certificate Revocation List? - Hashed Out by The SSL Store™
- Need to revoke a certificate? There’s a list for that…
- An excellent article and tutorial.
- The video is very easy to follow and explains the 3 main revocation technologies.
- Certificate Management — Certificate Authority Management | pfSense Documentation
- SIP / VOIP
- Configuring NAT for VoIP Phones | pfSense Documentation
- If VoIP is being used, the default settings may not be correct in certain circumstances. The default settings handle the majority of scenarios, but depending on the specifics of a particular setup, changes may be necessary to obtain a working configuration.
- The following sections will help to get local handsets working with a remote PBX.
- Configuring NAT for a VoIP PBX | pfSense Documentation
- For VoIP there are typically a few components to get right for proper inbound and outbound audio from a local PBX.
- Packages — Siproxd package | pfSense Documentation
- or many modern SIP configurations this package is unnecessary. Please only install and use siproxd if it is absolutely required.
- Does pfsense have sip alg? | Netgate Forum
- jimp
- No
- The closest thing to a SIP ALG is the siproxd package, which you almost never want.
- If you have local phones + a remote PBX the most common thing that causes them to get tripped up are states not living long enough to keep their external port mappings consistent. If the phones do not send or receive any traffic, eventually their states timeout and when that happens the PBX can't contact them, and if they try to make contact with the PBX again they end up on a different port.
- The best fix for that is to set the firewall to Conservative mode (System > Advanced, Firewall & NAT tab), and to set the phones to re-register every 30-60s, and if they have a keep-alive option, set it similarly.
- jimp
- Configuring NAT for VoIP Phones | pfSense Documentation
- High Availability (HA) / CARP
- Developers / Bug Reports / Programming
- Reporting Issues with pfSense Software | pfSense Documentation - This page serves as a guide for providing legitimate bug reports with pfSense software.
- Development | pfSense Documentation - These articles cover advanced topics related to developing on or with pfSense software.
- Developing Packages | pfSense Documentation - Developers familiar with FreeBSD, pkg, and PHP, will find it fairly straightforward to create packages for pfSense® software. End users and organizations can benefit from developing a package that does not exist.
- Testing/Building Individual Packages - Developing Packages | pfSense Documentation - This tells you how to do local development.
- Package Port Directory Structure | pfSense Documentation
- The directory structure of a package for pfSense® software is similar to that of a traditional FreeBSD port.
- This gives a real example and with its structure.
- Scheduling a reboot
- This is not recommend because you should never have to reboot pfSense and so you are just hiding the issue you are trying to fix rather than fixing it.
- Useful if you are going on holiday and do not have time to fix a particular issue
- Using the Cron package
- To schedule a reboot | Netgate Forum
- Install cron package.
- This is an example configuration
minute 	hour 	mday 	month 	wday 	who 	command
1 	4 	* 	* 	7 	root 	/sbin/shutdown -r now
- I would use: /etc/rc.reboot there. It reboots more cleanly, stops pkgs backs-up ram disks etc. ????
- How do I restart pfSense every X days? | Reddit
- How can i set rule in pfsense for rebooting | Netgate Forum
- If you just want to schedule 1 reboot or shutdown, then you can do the
/etc/crontabediting. Because pfSense creates /etc/crontab again when it boots, your entry will be gone - which might be exactly what you want. - The command for reboot is:
shutdown -r now
- The command for shutdown and stop (halt) is:
shutdown -h now
- If you halt, then you need some other way to start again later - wake-on-LAN from another box if your hardware supports it, or press the power button.
- If you want a regular reboot or halt, then you have to install the Cron package and use the GUI to add a job to do the command at the regular times you want it.
- If you just want to schedule 1 reboot or shutdown, then you can do the
- To schedule a reboot | Netgate Forum
Networking
- IPv6
- How to Setup IPv6 with Pfsense - Mark Allison - In my previous post I talked about what I learnt about IPv6. In this post I want to show you how easy it is to set up IPv6 using pfSense as the router, and Zen Internet (UK) as the ISP.
- Interface Types and Configuration — IPv6 Configuration Types | pfSense Documentation - Similar to IPv4, the IPv6 Configuration Type controls if and how an IPv6 address is assigned to an interface. There are several different ways to configure IPv6 and the exact method depends on the network to which this firewall is connected and how the ISP has deployed IPv6.
- Networking Concepts — IPv6 | pfSense Documentation
- Services — DHCPv6 Server | pfSense Documentation - The DHCPv6 server in pfSense® software will hand out addresses to DHCPv6 clients and automatically configure them for network access. By default, the DHCPv6 server is enabled on the LAN interface and set to use a prefix obtained by tracking WAN’s DHCPv6 delegation.
- How to configure pfsense to obtain IPv6 addresses from Telstra - This is a step by step guide on how to configure pfsense to work with Telstra's implementation of IPv6.
- IPv6 for dummies? | Reddit
- What does a simple-minded pfSense user need to know about IPv6? When do I actually need to set up DHCPv6 or do I ever need it?
- This is based on pfSense.
- This has some really useful information.
- Advanced networking options
- System --> Advanced --> Networking
- Configuration — Advanced Configuration Options — Networking Tab | pfSense Documentation
- Hardware Checksum Offloading
- When checked, this option disables hardware checksum offloading on the network cards. Checksum offloading is usually beneficial as it allows the checksum to be calculated (outgoing) or verified (incoming) in hardware at a much faster rate than it could be handled in software.
- NB: When checksum offloading is enabled, a packet capture will see empty (all zero) or flag incorrect packet checksums. These are normal when checksum handling is happening in hardware.
- So turing this off you get a performance decrease but the IDS in this mode requires the packets to be untouched.
- Disabling Hardware Offloading - sunnyvalley.io
- Offloading or acceleration is the technique of offloading computing operations onto computer hardware or systems that have been expressly developed to do certain jobs more effectively than software running on a general-purpose CPU.
- This option is incompatible with netmap
- Hardware TCP Segmentation Offloading
- Do not uncheck this option unless directed to do so by a support representative.
- So no change here.
- Hardware Large Receive Offloading
- Do not uncheck this option unless directed to do so by a support representative.
- So no change here.
- Traffic Shaping / Rate Limiting
- Limiters | pfSense Documentation
- Firewall --> Traffic Shaper --> Limiters tab.
- Limiters are an alternate method of traffic shaping. Limiters use dummynet(4) to enact bandwidth limits and perform other prioritization tasks, and they do not rely on ALTQ. Limiters are currently the only way to achieve per-IP address or per-network bandwidth rate limiting using pfSense® software.
- Limiters are also used internally by Captive Portal for per-user bandwidth limits.
- 2020 pfSense 2.4 Limiter Tutorial: Limiting bandwidth per-IP on your network devices - YouTube | DATApush3r - Quick 10 Minute pfSense 2.4 Limiter Tutorial: Limiting bandwidth per-IP on your network devices.
- [pfSense] Limit maximum bandwidth per user with Limiters – Provya - In this article, we set up limiters in order to equitably distribute the bandwidth of our Internet connection among all the users of our local network.
- Limiters | pfSense Documentation
- Diagnostics
- How To Troubleshoot and Diagnose Networking Issues Using pfsense - YouTube | Lawrence Systems - How to Configure Traffic Monitoring with ntopng on pfsense.
Settings
- Kernel Page Table Isolation (PTI)
- Leave as is, it is set automatically as required.
- Kernel Page Table Isolation (PTI) - Miscellaneous | pfSense Documentation
- Kernel PTI is a method for working around CPU vulnerabilities such as Meltdown. By exploiting that vulnerability without Kernel PTI, kernel memory could be accessed by unprivileged users on affected CPUs.
- Kernel PTI is active by default only on CPUs affected by the vulnerability.
- This option forces the workaround off, and requires a reboot to change.
- If a vulnerable CPU is not detected, PTI is disabled by default and this option will have no effect.
- The current state of Kernel PTI is printed below the option.
- Kernel PTI disabled | Netgate Forum
- Enabling it in pfSense prevents users/processes access the memory regions of other users/processes by exploiting the Meltdown vulnerability.
- As I understand it that only affects users/processes running in pfSense not pfSense as a VM. You need to be looking for a fix in the hypervisor for that.
- In general Meltdown/Spectre has minimal impact for most pfSense use cases where there are not multiple users with different privilege levels running on the firewall. IMO ;)
- Still better to have it available than not though.
- Microarchitectural Data Sampling (MDS) Mitigation
- Leave off
- Microarchitectural Data Sampling (MDS) Mitigation - Miscellaneous | pfSense Documentation
- Microarchitectural Data Sampling (MDS) mitigation is a method for working around weaknesses in Intel CPUs which support hyperthreading. By exploiting MDS without mitigation in place, kernel memory could be accessed by unprivileged users on affected CPUs.
- MDS mitigation is a feature that protects against Microarchitectural Data Sampling (MDS) attacks that exploit CPU vulnerabilities to leak sensitive data.
- The mitigation clears the affected CPU buffers when switching between user and kernel space or between host and guest.
- MDS - Microarchitectural Data Sampling — The Linux Kernel documentation - Microarchitectural Data Sampling is a hardware vulnerability which allows unprivileged speculative access to data which is available in various CPU internal buffers.
- MDS Mitigation: any reason that's not enabled automatically? | Netgate Forum
- A possible 10-15% performance hit
- johnpoz
- It could be a problem if were say running 3rd party code on your firewall that is untrusted. Or allowing users to access said firewall that could exe code.
- But in the vast majority of your typical firewall deployment this would not be a concern, in its present form.
- You also have those people that would scream and complain that why isn't xyz implemented... Even though not actually a concern.
- So you make it available, and those that "want" to implement it can - but with it being a performance hit.. I have to think that it would be the rare oddball use of pfsense that this could ever come into play as a concern.
- jimp
- It's not on by default because it doesn't impact most users an appliance role.
- You could turn it on if you want if:
- You have other users who login to the firewall who can run arbitrary code (e.g. from shell or Diag > Command), but they already probably have access to read anything this exploit would get them
- You run something on the firewall from an untrusted third party repository or package source
- You have enabled some other situation we didn't cover that has a way to run untrusted code on the firewall.
- It's there if you need it, it's there if you want it, but for most people using pfSense in its typical roles, it doesn't come into play.
- Feature #9532: GUI indication and options for MDS mitigation - pfSense - pfSense bugtracker
- File Manager
- there is not a fully fledged file manager becasue it is not needed but you can browse save, load and edit files using:
- Diagnostics --> Edit File
- Editing Files on the Firewall | pfSense Documentation - Diagnostics --> Edit File contains a file editor that allows editing and creating files on the filesystem of a device running pfSense® software.
- there is not a fully fledged file manager becasue it is not needed but you can browse save, load and edit files using:
Interfaces
- General
- Interface Types and Configuration — Interface Configuration | pfSense Documentation
- Explains Bogon networks
- Bogons on external gatweays should always be enabbled on all gateways = yes
- Interface Aliases
- ip aliasing - Add an alias to a pfSense interface? - Server Fault
- Yes, it's possible but its configuration is in a location that isn't intuitive. Here's how!
- ip aliasing - Add an alias to a pfSense interface? - Server Fault
- Changing the WAN interface PPPoE 'Network port'
- Interfaces --> Assignments --> PPPs --> Edit your 'PPP Interface'
- Change the 'Link interface' to the new port as required.
- Save
- Move the modem from the old ethernet socket to the new one and it will auto dial
- Should be working now, but a reboot for me did not harm.
- Changing the LAN interface 'Network port'
- Notes
- You cannot change an interface's 'Network port' when it is active.
- Do NOT use the console to change the interface assignments, it will most likely cause all of your interfaces, Gateways and Gateway Groups to be deleted and will probably mess up all of your firewall rules.
- Cannot change LAN interface Network port | Netgate Forum - My thread
- The info helped, try this:
- Login to the pfSense GUI via any other route that the LAN interface. If you do not have another method, set one up (OpenVPN, LAN2)
- Unplug the LAN ethernet (might not be needed but you need to do it any way)
- Interfaces --> LAN --> Edit --> Disable
- Save and apply changes
- Interfaces --> Assignments --> LAN --> Change the Network port
- Save changes
- Interfaces --> LAN --> Edit --> Enable
- Save and apply changes
- Plug the ethernet cable into the new socket
- should be working now, but a reboot for me did not harm
- And obviously reconnect via the LAN to test
- The info helped, try this:
- Login to the pfSense GUI via any other route that the LAN interface. If you do not have another method, set one up (OpenVPN, LAN2)
- Unplug the LAN ethernet (might not be needed but you need to do it any way)
- Interfaces --> LAN --> Edit --> Disable
- Save and apply changes
- Interfaces --> Assignments --> LAN --> Change the Network port
- Save changes
- Interfaces --> LAN --> Edit --> Enable
- Save and apply changes
- Plug the ethernet cable into the new socket
- Should be working now, but a reboot for me did not harm.
- Notes
- Blocking Access Between Subnets/Interfaces
- You can only block between interfaces.
- You should not have more than one IP range on one interface.
- Put each network on a separate pyshical ethernet port.
- Firewall rules are evaluated on interface traffic enters pfsense top down first rule wins and no other rules are evaluated.
- Interface Types and Configuration — Interface Configuration | pfSense Documentation
- Interface Groups
- Interface Types and Configuration — Interface Groups | pfSense Documentation
- Unlike the other interfaces in this chapter, an Interface Group is not a type of interface that can be assigned. Interface groups are used to apply firewall or NAT rules to a set of interfaces on a common tab.
- Interface Types and Configuration — Interface Groups | pfSense Documentation
Routing
- Static Routes
- Routing — Static Routes | pfSense Documentation
- Static routes are used when hosts or networks are reachable through a router other than the default gateway.
- The firewall knows about the networks directly attached to it, and it reaches all other networks as directed by the routing table. In networks where an internal router connects additional internal subnets, a static route must be defined for those networks to be reachable.
- Routing — Static Routes | pfSense Documentation
- Policy Routing
- Policy routing is just using firewall rules to assign certain traffic to certain gateways and other traffic to other gateways.
- Routing specific devices through your VPN gateway using pfSense - Thiago Crepaldi
- A post on how to route specific devices (your NAS server, laptop, iPhone, etc) through your VPN while the rest of your house still use the old ISP gateway.
- This includes a Kill switch option.
- Static Routes
- You assign traffic to use gateways via static routes. (System --> Routing --> Static Routes)
- NIC-CITE R.Graves Youtube
- Part 1: pfSense Routing - Project Routing Overview
- Part 2: pfSense Routing - Gateways and Static Routes
- A Static route tells pfSense what gateway to use to forward traffic to for a known 3rd party newtwork
- Part 3: pfSense Routing - Firewall Rules Routes
- how to route from WAN to another third net behind LAN on pfsense
- Gateway
- Changing name on a gateway is not allowed
- Most people will come across this.
- As long as an interface is using that specific gateway, it wont let you change it.
- I used the 'Copy Gateway' option, rename and saved the new one, then I deleted the old one
- Bug #8151: Changing name on a gateway is not allowed - pfSense - pfSense bugtracker
- The gateway is referenced by name throughout the configuration in places like firewall rules for policy routing, routes, gateway groups, etc. Because of the way it is referenced, changing its name is non-trivial. The field could be made static/read only though.
- This is the official line on things
- Changing name on a gateway is not allowed
DNS
- Logging DNS Queries
- Services --> DNS Resolver --> General Settings --> Custom options: Add
server:
log-queries: yes
log-replies: yes
#log-tag-queryreply: yes
- Troubleshooting DNS Queries | pfSense Documentation
- Access the static logs via the GUI
- Status --> System Logs --> System --> DNS Resolver
- Only up to a Maximum 500 records.
- Access the log via SSH
- /var/log/resolver.log
- Is there a means within pfSense to log accessed web traffic in real time? | Reddit
- full instructions on watch live DNS requests via the command line.
- Squid and squidguard can do this and will get the direct urls accessed. You can also do this with pfblocker but your only getting the dns domain and not the full url or objects accessed.
- Services --> DNS Resolver --> General Settings --> Custom options: Add
- DNS / DoH / DoT / DoQ - DNS Hijacking
- Quad9 Recommended Settings - Recommended: Malware Blocking, DNSSEC Validation (this is the most typical configuration)
- Configuring Quad9 on pfSense - Linux Included
- Configuring DNS over TLS | pfSense Documentation
- DNS Over TLS On pfSense 2.4.5 | Lawrence Systems
- Covers a little on PF Blocker
- Mentions DoH and related issues with blocking it.
- DNS over TLS with pfSense | Netgate
- Cloudflare’s new DNS service has a lot of industry attention, so we wanted to offer a quick guide that covers setting up your DNS servers in pfSense®, including configuring DNS over TLS. In addition to Cloudflare DNS servers, the following guide also applies to Quad9 DNS service.
- These instructions are old, but have settings you can put in the 'Custom Options' box which will still be valid.
- Request Info - DoH BlockList | Reddit - some useful information.
- DNS over QUIC (DoQ)
- New DNS over QUIC protocol makes encrypted DNS traffic faster and more efficient | Cybersecurity | SIDN - This spring, DNS-over-QUIC (DoQ) has been standardized as RFC 9250. This makes the benefits of native QUIC – namely faster response times and higher efficiency – also immediately available for encrypted DNS transport.
- What is DNS over TLS (DoT), DNS over Quic (DoQ) and DNS over HTTPS (DoH & DoH3)? - Getting Started - NextDNS Help Center
- Where is pfSense support for HTTP/3 and QUIC protocol support? | Netgate Forum
- Most of the QUIC payload is encrypted.
- The push for QUIC is that the connection setup is done in one handshake instead of the 3 needed for current TCP+TLS+HTTP/2
- Currently browsers which support QUIC also send a TCP 443 connection as a fallback in case the QUIC (UDP 443) packet is blocked.
- QUIC is intended to replace ANY TCP connection not just HTTP.
- It uses UDP simply to raise the possibility of transit through intermediary routers instead of trying to introduce a new IP protocol number.
- The video I posted is an interview with one of the RFC authors David Marx and goes into the protocol level of how it works -- it's a pretty easy video to follow.
- The new challenge is that QUIC is already past the 25% mark of total traffic since it's used by the big content providers (Google, FB) and supported by the major browsers. Chrome will flip the setting bit soon to enable it by default.
- What is QUIC - This new Google Protocol makes Firewalls Blind
- QUIC (Quick UDP Internet Connections) is a new generation Internet protocol that speeds online web applications that are susceptible to delay, such as searching, video streaming etc., by reducing the round-trip time (RTT) needed to connect to a server.
- UDP Transport to avoid TCP head-of-line blocking
- Cisco and Palo Alto for example recommend administrators to block UDP port 443 on the firewalls in order to force Chrome browsers to fall-back to regular TCP 443 connections instead of QUIC. Connectivity of the users will not be lost since the browser will silently fall-back to TLS (TCP443).
- Therefore, if you want to block some Google applications on your next generation firewall (such as Youtube, Gmail etc) you will need to block UDP443 in order to block QUIC. Otherwise, the proprietary encryption used with QUIC will not allow the firewall to correctly identify Google applications and restrict them if needed.
- 'Split Horizon' DNS (Split DNS)
- This just means having 2 (or more) sources of DNS, one for the outside internet and one for your internal network. This setup can also be implemented whilst using NAT Reflection.
- Options on pfSense
- Host Overrides
- Services --> DNS Resolver --> General Settings --> Host Overrides
- An host override in pfSense required for each hostname in use behind the firewall.
- Domain Overrides
- Services --> DNS Resolver --> General Settings --> Domain Overrides
- Domain Overrides are used to configure specific DNS Servers for particular domains.
- Host Overrides
- Options on pfSense
- My Split DNS Setup
- My 2 sources of DNS are:
- Webserver
- Host Overrides
- For my webserver and its hosted websites I did the following Host Overrides
- I setup an intial host with my primary webserver domain:
- quantumwarp.com
- Host:
- Domain: quantumwarp.com
- IP: 123.123.123.123
- quantumwarp.com
- Then I set all of the other hosted websites as aliases of this record. Do not add separate records for each domain as they will get wiped out. You can only have 1 record per IP.
- I setup an intial host with my primary webserver domain:
- My 2 sources of DNS are:
- Network Address Translation — Split DNS | pfSense Documentation
- A preferable alternative to NAT reflection is deploying a split DNS infrastructure. Split DNS refers to a DNS configuration where, for a given hostname, public Internet DNS resolves to public IP address, and DNS on the internal network resolves to the internal, private IP address.
- Split-horizon DNS - Wikipedia
- In computer networking, split-horizon DNS (also known as split-view DNS, split-brain DNS, or split DNS) is the facility of a Domain Name System (DNS) implementation to provide different sets of DNS information, usually selected by the source address of the DNS request.
- Configuring Windows to Support Split-Horizon DNS | Jamf Learning Hub
- Split-horizon DNS (also known as split-view DNS, split-brain DNS, or split DNS) is a term used when two zones for the same domain are created—one zone is used by the internal network and the other by the external network (usually the internet). This means that a domain can resolve to different IP addresses depending on which DNS server you are using, which depends on whether you're "inside" or "outside" the network.
- Split DNS - Advanced Configurations - A split DNS allows you to rewrite DNS requests from *.domain.com directly to your server instead of having to go through the router, it has several benefits.
- This just means having 2 (or more) sources of DNS, one for the outside internet and one for your internal network. This setup can also be implemented whilst using NAT Reflection.
- Host Overrides / Static Hostnames
- Services — DNS Resolver | pfSense Documentation
- Services --> DNS Resolver --> General Settings --> Host Overrides --> Add
- Examples
- server.mydomain.com (Local Server)
- Host: server
- Domain: mydomain.com
- IP: 10.0.0.31
- quantumwarp.com
- Host:
- Domain: quantumwarp.com
- IP: 123.123.123.123
- www.bbc.co.uk
- Host: www
- Domain: bbc.co.uk
- IP: 151.101.64.81
- server.mydomain.com (Local Server)
- This entries can be used for local devices or Split DNS.
- Services — DNS Resolver | pfSense Documentation
- Services — DNS Resolver — Host Overrides | pfSense Documentation
- pfsense DNS Host Overrides | Lawrence systems - this overrides entries that are brought down from the remote DNS server, if they are present ??
- how to resolve local hostname to ip in pfSense | Netgate Forum
- Wildcards are not supported in the GUI
- DNS — Creating Wildcard Records in DNS Forwarder/Resolver | pfSense Documentation
- Wildcard DNS resolver | Reddit
- Wildcards should be possible in either the DNS Resolver or DNS Forwarder just not in the GUI directly. In either case it needs a directive in the 'Custom options' box.
- For example, to make *.cs.quantumwarp.com resolve to 192.168.1.5:
DNS Resolver:

server:
local-zone: "cs.quantumwarp.com" redirect
local-data: "cs.quantumwarp.com 3600 IN A 192.168.1.5"

DNS Forwarder:

address=/.cs.quantumwarp.com/192.168.1.5
- Host Overrides Not working
- DoH and DNS over HTTP not being hijacked properly can cause the local overrides not to work becasue they bypass your DNS Resolver
- Fix: After saving and applying
- Wait a 1-2 minutes for changes to go through (might be quicker)
- ipconfig /flushdns (just to make sure you are not going to ping the public IP if applicable)
- re-ping to check
- If it still doesnt work, rebooting your router might fix this. You should not need to keep doing this, I only needed to do it once. It could just be some wiered settings that need refreshing.
- pfSense Host Overrides are Not Resolving | Walt Stoneburner's - pfSense Host Overrides are Not Resolving
- Domain Overrides
- Services --> DNS Resolver --> General Settings --> Host Overrides
- Domain Overrides are used to configure specific DNS Servers for particular domains. This is useful for split DNS.
- pfSense Domain Overrides explained - Learn everything you need to know about pfSense Domain Overrides as well as pfSense Host Overrides. Easy & Beginner-Friendly.
- Slow DNS
- Services — DNS Resolver — DNS Resolver Advanced Options | pfSense Documentation
- 'Prefetch Support'
- Services --> DNS Resolver --> Advanced --> Prefetch DNS Key Support
- Controls whether or not Unbound prefetches message cache elements before they expire to help keep the cache up to date.
- This option can cause an increase of around 10% more DNS traffic and load on the server, but frequently requested items will not expire from the cache.
- Probably only of any use for a larger network.
- DNS local Cache and slow DNS Queries in pfSense | Reddit
- I recently enabled DNS over TLS and used DNS Query Forwarding to quad 9 servers and I found that my initial queries were very slow and was making my internet a mess since I have a lot of smart devices.
- A Quad9 staff member did some techical explantions of how Quad9 works.
- Some settings mentioned
- Prefetch Support = Enable
- Prefetch DNS Key Support = Enabled (only matters if you have DNSSEC enabled)
- Serve Expired = Enabled
- 'Prefetch Support'
- Services — DNS Resolver — DNS Resolver Advanced Options | pfSense Documentation
- Clear DNS Cache
- Troubleshooting the DNS Cache | pfSense Documentation
- This has all the different methods to clear the pfSense/unbound DNS cache.
- Restarting pfSense
- I found this not to clear the cache.
- Restarting the DNS Resolver
- I found this not to clear the cache.
- From the shell
unbound-control -c /var/unbound/unbound.conf flush <name>
unbound-control -c /var/unbound/unbound.conf flush example.com
unbound-control -c /var/unbound/unbound.conf flush www.example.com
- How to flush/clear the pfsense DNS forwarder cache - nixCraft - I am using the pfSense based firewall. How do I clear the unbound DNS forwarder cache when using the pfSense firewall?
- Troubleshooting the DNS Cache | pfSense Documentation
NAT
Internet IP --> WAN IP --> NAT --> 10.0.0.x
LAN IP --> WAN IP --> NAT Reflection --> 10.0.0.x
OpenVPN --> LAN IP --> WAN IP --> NAT Reflection --> 10.0.0.x
- The webserver never sees the real IP address when using nat reflection
- NAT re-writes the traffic so it appears to be coming from it.
- 1:1
- Network Address Translation — 1:1 NAT | pfSense Documentation
- 1:1 NAT (pronounced “one-to-one NAT”) maps one external IP address (usually public) to one internal IP address (usually private).
- All traffic originating from that private IP address going to the Internet through the interface selected on the 1:1 NAT entry will be mapped by 1:1 NAT to the public IP address defined in the entry, overriding the Outbound NAT configuration.
- Network Address Translation — 1:1 NAT | pfSense Documentation
- NAT Reflection
- Network Address Translation — NAT Reflection | pfSense Documentation - NAT reflection refers to the ability to access external services from the internal network using the external (usually public) IP address, the same as if the client were on the Internet.
- Can someone explain to me what is NAT Reflection Mode in simple terms like level 1 (i'm old and newbie to pfSense) | Reddit - A simple and concise description of this feature.
- I've lack of knowleadge about NAT reflection in pfSense - Networking & Firewalls - Lawrence Systems Forums - A more indepth scenario of how NAT Reflection works.
- vpn - Route specific HTTP requests through pfSense OpenVPN - Server Fault
- Dual WAN / 2 IP solution
- Q:
- Problem: We have an external website which we recently firewalled so it only accepts traffic from our office IP addresses. This works well at the office, but doesn't work for remote access through VPN as we don't route all traffic through OpenVPN. I would rather avoid forcing everyone to route all traffic through just to accommodate this one site.
- A:
- Got it! A coworker and I stumbled through onto success (for now).
- XXX.XXX.XXX.XXX = IP of the specific site we wanted routed over the VPN
- Solution:
- VPN --> OpenVPN --> Server --> Edit --> Custom Options: push "route XXX.XXX.XXX.XXX";
- Firewall --> NAT --> Outbound -->
- Select Manual Outbound NAT (AON)
- Add 2 routes below:
- Interface Source SrcPort Destination DestPort NATAddr NATPort StaticPort
- WAN 10.23.23.0/24 * * * * * NO
- WAN 10.0.8.0/24 * XXX.XXX.XXX.XXX/32 * * * NO
- Profit ;-)
- Step 3 is optional
- A:
- Additionally: In my case I have a dual wan setup, so I had to add a rule in the OpenVPN section to redirect traffic to a specific wan and restart OpenVPN
- OpenVPN to IP Alias, NAT reflection not working | Netgate Forum
- Dual IP solution
- Q:
- I have a problem where Open VPN clients cannot connect to the public IP of a server behind the pfSense firewall.
- From the Internet, connecting to the public IP is no problem - tells me that 1:1 NAT and IP Alias is working. From inside the protected network, DHCP clients can connect via the public IP - tells me that NAT reflection is working for those clients. But for clients connected via OpenVPN, there's no such luck.
- OpenVPN is running on the pfSense firewall itself. The public IP is not the same as the firewall public IP (provider assigned multiple addresses).
- I have two 1:1 Nat entries for this host, using each of the WAN and OpenVPN interfaces. I also have checked the option to "Automatically create outbound NAT rules which assist inbound NAT rules that direct traffic back out to the same subnet it originated from."
- A:
- I actually figured out a workaround … I created another 1:1 NAT rule with OpenVPN as the interface. Otherwise the rule is the same for the 1:1 NAT rule that sends public traffic to the private IP.
- NB: for OpenVPN clients who do not use the "send all traffic over the VPN" option, accessing the public IP is no problem, but for clients who DO send all their traffic over the VPN, this is necessary to connect to public IPs. In a few critical scripts which we share with our customers the public hostname/IP is configured, so staff who might use those scripts from a hotel/airport/conference while tunneling all traffic to the firewall make this configuration requisite.
- NAT Troubleshooting
- Troubleshooting — Troubleshooting NAT | pfSense Documentation
- Troubleshooting — Troubleshooting 1:1 NAT | pfSense Documentation
- Troubleshooting — Troubleshooting NAT Port Forwards | pfSense Documentation
- Troubleshooting — Troubleshooting NAT Reflection | pfSense Documentation
- NAT Reflection (NAT Reflection) is complex, and as such may not work in some advanced scenarios.
- The best practice is to use Split DNS instead (Split DNS) in most cases.
- However, NAT Reflection on current pfSense software releases works reasonably well for nearly all scenarios, and any problems are usually a configuration mistake.
- Troubleshooting | Mastering pfSense - Second Edition | packt - If you have created a 1:1 NAT or Port Forwarding entry and it does not have the expected effect, then there are several possible causes.
- NAT Translation Table / Mappings
- Read and examine the NAT mappings can help find traffic routes and other stuff.
- Easy way to show NAT translation table? | Netgate Forum
- Diagnostics --> States
- This is easy
- Shows all states
- Can be filtered
- Only the States table shows the NAT translations.
- CLi Commands (Diagnostics --> Command Prompt)
# NAT Rules
pfctl -s nat

# NAT Rules - More verbosity
pfctl -vvs nat

# State Table - All states
pfctl -ss

# State Table - Restrict that to just NAT
pfctl -ss | egrep '(>.*>|<.*<)'
- Diagnostics --> States
- pfctl command
- FreeBSD Manual Pages - pfctl(8) - The pfctl utility communicates with the packet filter device using the ioctl interface described in pf(4). It allows ruleset and parameter configuration and retrieval of status information from the packet filter
- pfctl(8) - OpenBSD manual pages - The pfctl utility communicates with the packet filter device using the ioctl interface described in pf(4). It allows ruleset and parameter configuration, and retrieval of status information from the packet filter.
- pfctl cheat sheet | OpenBSD Handbook - General PFCTL Commands and simple description of their switches.
Firewall
- Moving multiple firewall rules
- Introduction to the Firewall Rules screen | pfSense Documentation
- Select all the firewall rules you want with the checkboxes
- Click on anchor icon on the row below where the rule(s) should be moved.
- Hold Shift before clicking the mouse on anchor to move the rule(s) below the selected rule instead of above.
- Introduction to the Firewall Rules screen | pfSense Documentation
- Firewall — Firewalling Fundamentals | pfSense Documentation
- This includes arguments between Reject and Block
- WAN use Block, LAN use Reject
- Logging
- Rule Tracker ID is the number in the brackets on each line in the firewall log i.e. (45645678)
- pfSense enable Logging for Firewall Rules to log internal Client IPs - .matrixpost.net
- By default for outbound internet traffic with NAT you won’t see the internal client ip addresses in the firewall logs of pfSense
- pfSense by default only will log the NAT address and destination address.
- So if you want to check and see which internal client was connected to a specific internet destination, you have to enable Log packets that are handled by this rule at the specific rule which allows the client to access this destination.
- pfSense view allowed/permitted log - Server Fault
- I've just installed pfSense and noticed that it only logs "blocked" traffic". How do I log the default allowed traffic.
- Status --> System Logs --> Settings (tab) --> Log packets matched from the default pass rules put in the ruleset
- Unchecked by default. When set, logging will occur for packets matching the default pass out rules on interfaces. Setting this option will generate a large amount of log data for connections outbound from the firewall. The best practice is to only enable this for brief periods of time while performing troubleshooting or diagnostics.
- System Monitoring — Log Settings | pfSense Documentation
- As soon as a firewall rule is matched, the packet is processed with that rule and then further firewall rules are ignored.
- Rules are not working
- Double check your rules are correct.
- Some or all of these steps might be required to make sure a rule is working or not working as expected, try them in order.
- Reload Filters (Status --> Filter Reload)
- Check and clear state connections for an individual IP/Device
- Diagnostics --> States --> States
- Filter by IP ie 10.0.0.189
- You should see just connections to and from 10.0.0.189
- Kill all states for the filtered results and this should get rid of any old states causing issues. (This function seems broken at the minute pfSense 2.6.0CE)
- Clear All States ( Diagnostics --> States --> Reset States)
- Restart the Browser
- Disconnect / Reconnect the Network Connection on the Windows PC
- Reboot the Windows PC
- Reboot the Router
- 'IP Options'
- Firewall - IP Options | pfSense Documentation
- Checking this box will allow packets with defined IP options to pass. By default, pf blocks all packets that have IP options set in order to deter OS fingerprinting, among other reasons. Check this box to pass IGMP or other multicast traffic containing IP options.
- Firewall Rule --> Advanced Options --> 'Allow IP options'
- Allow packets with IP options to pass. Otherwise they are blocked by default. This is usually only seen with multicast traffic.
- IP Options - Internet Core Protocols: The Definitive Guide [Book] | O'Riley
- Internet Protocol Options - Wikipedia
- IP Options Chapter (pdf) | net.academy.lv - Technical document on the IP Options header.
- The TCP/IP Guide - IP Datagram Options and Option Format - A technical article on this subject.
- [SOLVED] Routing a bridged LAN connection. | Netgate Forum
- nimrod
- I plugged in my iptv box into port 4 and iptv box is working for a few seconds and then it stops. Picture just freezes. Then it starts working again, and then it stops again. I know that bridging two ports is not really ideal solution because of performance issues.
- Here is the question. As i already mentioned above, my isp router is set into bridge mode by default. Is it possible to plug it into port 3 on my pfsense appliance and route that bridge traffic to port 4?
- stephenw10 (Netgate)
- You probably need some additional firewall rules on the bridge (or bridge members) to pass mutlicast traffic. That requires IP options be enabled.
I would expect to see some blocked traffic in the firewall logs.
- You probably need some additional firewall rules on the bridge (or bridge members) to pass mutlicast traffic. That requires IP options be enabled.
- nimrod
- pfSense working as a router, firewall, vpn, adblocker, and parental control device.
- nimrod
- IPTV and IGMP Proxy problems | Netgate Forum
- I'm wondering if anyone could help me setup IPTV, or give a points to what I'm doing wrong?
- After a lot of head scratching I finally managed to get it to work. I'll post the settings I used, in case someone reads this post later and possibly find them useful.
- Modify the "Default allow LAN to any rule" and enable the option "This allows packets with IP options to pass
- Firewall - IP Options | pfSense Documentation
- If you leave a ping going, this will not change when you change the rules because the state has already been defined/cached.
- While learing and configuring, it is best to kill all states between changes
- When making firewall chnges, sometimes they are not instant
- The firewall will normally leave the state tables intact when changing rules.
- This Firewall (Self)
- This references all IPs that are assigned to pfSense Interfaces, internally or externally.
- Get all addresses on the firewall
Go to:
https://hostname.domain:port/status.php#NetworkInterfaces
or
https://your_firewall's_IP-addr:port/status.php#NetworkInterfaces

Ctrl+F "inet"
This status.php page is not exposed in the menus that I have found so only direct URL access is available. - This includes the exposed WAN address eg 8.8.8.8
- Tag and Tagged
- Firewall — Tag and Tagged | pfSense Documentation
- The Tag and Tagged fields are useful in concert with floating rules, so the firewall can mark a packet with a specific string as it enters an interface, and then act differently on a matched packet on the way out with a floating rule. See Marking and Matching for more on this topic.
- Firewall — Marking and Matching | pfSense Documentation
- Firewall — Tag and Tagged | pfSense Documentation
- Rules Processing Order
- Firewall — Rule Methodology | pfSense Documentation
- In pfSense® software, rules on interface tabs are applied on a per-interface basis, always in the inbound direction on that interface
- There are three main classes of rules: Regular interface rules, Floating rules, and Interface Group rules (including VPN tab rules). The order of processing of these types is significant, and it works like so:
- Floating Rules
- Interface Group Rules
- Interface Rules
- The rules are ordered in that way in the actual ruleset, keep that in mind when crafting rules. For example, if an interface group contains a rule to block traffic, that rule cannot be overridden with an interface tab rule because the traffic has already been acted upon by the group rule, which was matched first in the ruleset.
- The rules are processed until a match is found, however, so if a packet is not matched in the group rules, it can still be matched by an interface rule.
- Network Address Translation — Ordering of NAT and Firewall Processing | pfSense Documentation
- Understanding the order in which firewalling and NAT occurs is important when configuring NAT and firewall rules.
- The page lists the order in which the rules are processed when dealing with NAT.
- Floating rules without quick set process as “last match wins” instead of “first match wins”. Therefore, if a floating rule is set without quick and a packet matches that rule, then it also matches a later rule, the later rule will be used. This is the opposite of the other tab rules (groups, interfaces) and rules with quick set which stop processing as soon as a match is made. See Floating Rules for more details on how floating rules operate.
- Firewall — Rule Methodology | pfSense Documentation
- Aliases
- Firewall — Aliases | pfSense Documentation
- An alias is a list that contains specified Hosts(s), Network(s) or IP(s) which can be dynamically changed without having to update your rules manually because you specify the alias in your rules and not the individual devices.
- Alias IPs in a single list can be in different subnets
- Create an Alias and a Firewall Rule with pfSense - Today I show you how to create an Alias and a Firewall Rule with pfSense and explain to you, why it is useful using Aliases in pfSense!
- How to find where any Alias is used
- Locating unused aliases | Reddit
- I would create pfSense Backup and use an XML parser or a text editor to exmaine the file and search for the Alias.
- Search for the actual name of the Alias and not the description.
- To automate, it shouldn't be too difficult to write a python script to loop through all the <aliases> and see if they appear in a <rule><source> or <rule><destination>.
- Locating unused aliases | Reddit
Bridge / Transparent Bridge / LAN Bridge / Bridging / Network Switch
- Bridging | pfSense Documentation
- Non-Routable packets cannot be routed by the router, so can only be passed by a bridge.
- A bridge only allows broadcasts to cross over (non-routable packets), it does not pass routable traffic.
- The traffic flows as follows (Interface 1 --> Bridge --> Interface 2) and when the traffic is passed inot Interface 2 it is subject to firewall rules just as the routed traffic is.
- What Are The Fundamental Differences Between Bridging And Routing In Terms Of Configuration? | OpenVPN - Confused as to what the fundamental differences between bridging and routing in terms of configuration are? Find your answer here.
- How to Enable LAN Bridge with pfSense® - Protectli - A guide to enable LAN Bridge with pfSense®: Assigning the LAN interface to a bridge utilizing the additional ports, OPT1 and OPT2, on the Vault.
- How To Setup A Transparent Bridge & Firewall With pfsense and Suricata - YouTube | Lawrence Systems - How To Setup A Transparent Bridge & Firewall With pfsense and Suricata
- 2- Bridging on pfSense - YouTube
- In this LAB, I will show you how you can profit from Bridging on pfSense
- The brdige will be configured as an interface and the DHCP will sit on this interface.
- Configure pfSense bridge over multiple NICs as LAN | Irregular Motif - pfSense doesn’t seem to have a simple “bridge-all-NICs” option. Really?
- How To PFSense Configure Network Interface As A Bridge / Network Switch - nixCraft
- Warning: Only one interface on a bridge should have an IP address. In this example, I’ve assigned IP address to lan interface (192.168.1.254). Do not add multiple IP addresses in the same subnet on different bridge member interfaces. Other interfaces on the bridge should remain with an IP type of None.
- You need to add a firewall rule to allow traffic between each interface of the bridge
- Bridging | Learn pfSense 2.4 - packt - Bridging chapter
- A bridge only allows broadcast traffic between the interfaces? allows traddic onto the lan if that is where its target is without procssing more rules?
- NB: you can use an interface group to apply common rules to a group of interfaces. After these rules are process the individual interface rules would be processed.
- Setting up pfSense as a Stateful Bridging Firewall | Diggory Gray (PDF)
- The goal of this page is help you setup a pfSense firewall, with the following features:
- Bridging firewall, not a NAT firewall
- QoS/Packet shapping to avoid saturation of your Frodo link with low priority traffic
- Intrusion prevention using SNORT (optional, see further documentation)
- Firewall rules to block undesirable traffic.
- Integration with Oxford services, such as NTP and DNS (hum drum stuff)
- The goal of this page is help you setup a pfSense firewall, with the following features:
- Running on a Transparent pfSense Bridge - KB & Manual - ADAMnetworks - This article will show you how to setup pfSense as a transparent bridge, and installing adam:ONE (DNSthingy) to filter all traffic.
- How to Configure a pfSense Network Bridge on a Dedicated Server | OVHcloud - Bridged networking can be used to configure your pfSense virtual machine as a NAT firewall for other virtual machines on the same host. It could even be used as an extra filter for a web server. Specific steps and configurations are needed to allow the pfSense router to work on the OVHcloud network and this article will show you how a basic pfSense NAT configuration is done.
- pfSense with a bridge as a LAN interface : traffic blocked between interfaces - Server Fault
- Bridging | pfSense Documentation
- A bridge interface (e.g. bridge0) itself may be assigned as interface. This allows the bridge to act as a normal interface and have an IP address placed upon it rather than a member interface
- Bridging and Layer 2 Loops
- Managed switches employ Spanning Tree Protocol (STP) to handle situations like this, because it is often desirable to have multiple links between switches, and the network shouldn’t be exposed to complete meltdown by someone plugging one network port into another network port.
- pfSense enables STP on bridge interfaces to help with loops, but it can still lead to unexpected situations. For instance, one of the bridge ports would shut itself down to stop the loop, which could cause traffic to stop flowing unexpectedly or bypass the firewall entirely.
- Bridging — Bridging Two Internal Networks | pfSense Documentation
- When bridging one internal network to another, two things need to be done. First, ensure that DHCP is only running on the interface containing the IP address and not the bridge members without an address.
- Second, an additional firewall rule may be necessary at the top of the rules on the member interfaces to allow DHCP traffic.
- Bridging — Bridging interoperability | pfSense Documentation
- Mixing Bridged and NAT Segments
- For hosts behind the NAT/routed segment, NAT must occur as traffic exits toward the bridged systems so that the return traffic will come back to the firewall.
- For hosts on the bridged segment to reach hosts behind the NAT segment directly, a static route could be used on the bridged hosts or upstream gateway to send the “private” subnet traffic to the IP address of the firewall in the bridged network.
- Mixing Bridged and NAT Segments
Other Services of Note
- IGMP Proxy
- Services --> IGMP Proxy
- IGMP Proxy for IP-TV | Netgate Forum - How a user setup IGMP Proxy for use with his IP-TV
- Services --> IGMP Proxy
Additional Software Packages (Official)
There are some great software packages that can enhance pfSense just pick the ones you need. Have a look here Package List | pfSense Documentation.
Install packages via (System --> Package Manager)
- Monitoring Packages
- ntopng
- Advanced data flow monitor and stats
- How to Configure Traffic Monitoring with ntopng on pfsen | Lawrence Systems
- TCP Dump
- Open VM Tools package
- Packages — Open VM Tools package | pfSense Documentation
- Quiescing
- Quiesce - Wikipedia
- To quiesce is to pause or alter a device or application to achieve a consistent state, usually in preparation for a backup or other maintenance.
- Squid / Squid Guard
- How to Block Ads On Your Devices With pfSense, Squid & SquidGuard - We’re going to show you how to configure Squid and SquidGuard (SquidGuard is an extra component of Squid that enables list-based filtering) on pfSense to block ads on all of your devices.
- ACME (LetsEncrypt)
- Official Documentation
- Tutorials on gettting SSL for your pfSense
- Issuing Let’s Encrypt certificates on your pfSense using ACME! - Thiago Crepaldi - If you are like me and don’t want unencrypted data flowing on your network or maybe even on Internet, than this post is for you! I will adopt CloudFlare DNS as it has API to integrate with Let’s Encrypt SSL services through the ACME plugin. Both CloudFlare and Let’s Encrypt are free, so that is a good start!
- pfSense - Let's Encrypt guide. Get a proper SSL certificate for your WebUI. |YouTube | Gateway IT Tutorials
- Do your own certificate authority
- Creating Wildcard Certificates on pfSense with Let’s Encrypt – danielcolomb.com - In this article I’m going to cover how to add an ACMEv2 Account Key, and a wild card cert using the ACME package in pfSense.
- For all devices
- Let's Encrypt for Private Networks - Without the Sarcasm - I want to have Chrome stop telling me that the other SSL-encrypted devices on my private network are insecure. Chrome is unhappy because these devices use self-signed certificates. What I'd like to do is get certificates that are signed by a recognized certificate authority. While I don't mind a good technical challenge, I'd rather not spend a bunch of cash on my certificates.
- Official Documentation
- syslog-ng
- General
- SIEMS = Security Information Event Management
- syslog-ng becasue it is sat on the router can access and be accessed by all network segments.
- pfSense
- pfSense uses its own syslog to record it's logging records
- Packages — Package List | pfSense Documentation
- A modern syslog server which supports TCP and TLS encryption, among other features.
- Note: This service is not intended to replace the default syslog server on the firewall but rather acts as an independent syslog server.
- Tutorial Pfsense - Remote Syslog Configuration [ Step by Step ] - Learn how to configure the Pfsense remote Syslog notification feature. Our tutorial will teach you all the steps required to use a remote syslog server.
- Configuring a Syslog Server on pfSense with the syslog-ng Package - .matrixpost.net
- pfSense by default logs data from different components running on it.
- These files are a fixed size and never grow. As a consequence of this, the log will only hold a certain amount of entries and the old entries are continually pushed out of the log as new entries are added.
- If you need log retention the logs can be copied to another server with syslog, where they may be permanently retained or rotated with less frequency.
- In this Post you will see how to install and configure the pfSense syslog-ng package (Service) to gather the logs from pfSense.
- syslog-ng Official sites
- syslog-ng Open Source Edition - syslog-ng allows you to flexibly collect, parse, classify, rewrite and correlate logs from across your infrastructure and store to log analysis tools.
- GitHub - syslog-ng/syslog-ng - syslog-ng is an enhanced log daemon, supporting a wide range of input and output methods: syslog, unstructured text, message queues, databases (SQL and NoSQL alike), and more.
- syslog-ng download | SourceForge.net
- Download syslog-ng for free. Log management solution that improves the performance of SIEM. syslog-ng is the log management solution that improves the performance of your SIEM solution by reducing the amount and improving the quality of data feeding your SIEM. With syslog-ng Store Box, you can find the answer.
- This mirror has screenshots.
- FreshPorts -- sysutils/syslog-ng: Powerful syslogd replacement - syslog-ng is an enhanced log daemon, supporting a wide range of input and output methods: syslog, unstructured text, message queues, databases (SQL and NoSQL alike) and more.
- syslog-ng Open Source Edition - Technical Documentation - The syslog-ng Open Source Edition 3.5 Administrator Guide
- Tutorials (non-pfSense)
- syslog-ng Introduction to Log Management - YouTube - Some people think log collection and log management should be part of the SIEM toolkit. We beg to differ, and we have some good reasons to. Neil will introduce the concept of log management and how it completes the ecosystem around logs in an enterprise setting.
- Syslog-ng Configuration and Troubleshooting Tips | Loggly - A quick overview of installing, configuring, and testing syslog-ng. This post has answers to your syslog-ng configuration questions.
- General
- Captive Portal
- Captive Portal in pfSense® software forces users on an interface to authenticate before granting access to the Internet. Where possible, the firewall automatically presents a login web page in which the user must enter credentials such as a username/password, a voucher code, or a simple click-through agreement.
- Captive Portal | pfSense Documentation
- pfsense Captive Portal | Lawrence Systems
- Authenticating OpenVPN Users with FreeRADIUS | pfSense Documentation
- UDP Broadcast Relay
- A new UDP broadcast relay package has been added. This package can be used to relay UDP broadcast packets between networks.
- A GUI for UDP Broadcast Relay. This program listens for UDP broadcast packets and retransmits on additional interfaces.
- FreshPorts -- net/udpbroadcastrelay: UDP multicast/unicast relayer - udpbroadcastrelay is a UDP multicast relayer. Its intended use is torebroadbcast udp packets on a specific port across interfaces, be thoseinterfaces physical or VLAN.It is used where devices such as Sonos or Sky are spread accrossdifferent subnets and are not able to detect the servers or devices.
The Common pfsense Packages / Plugins We Use and Why | Lawrence Systems
- Suricata
- Intrusion Detection System (IDS)
- Suricata is the leading independent open source threat detection engine. By combining intrusion detection (IDS), intrusion prevention (IPS), network security monitoring (NSM) and PCAP processing, Suricata can quickly identify, stop, and assess even the most sophisticated attacks.
- This is only useful if you are going to monitor the alerts
- pfsense With Suricata Intrusion Detection System: How & When it works and What It Misses | Lawrence Systems
- arpwatch - Useful to monitor secure networks for device changes
- darkstat - Basic network statistics gather.
- A network statistics gatherer that offers bandwidth graphs for an interface, as well as traffic to/from specific IP addresses. Once installed, it appears under Diagnostics > darkstat.
- It's a packet sniffer that runs as a background process on a cable/DSL router, gathers all sorts of statistics about network usage, and serves them over HTTP.
- This allows you to see traffic per device on your network. Basic but does the job if you want to see who is using all the bandwidth.
- Adds the menus items
- Diagnostices --> darkstat
- Diagnostics --> darkstat Settings
- Goto settings and do the following:
- Enable darkstat
- Capture interface LAN/WAN (or your preference)
- Web Interface Binding: LAN
- Web Interface port: 666
- Web Interface Hostname or IP Address (Optional): leave empty
- You can access the http panel by the following:
- Diagnostics --> darkstat
- Diagnostics --> darkstat Settings --> Access darkstat (tab)
- http://Web Interface Binding:666/
- http://[Web Interface Hostname]:666/
- if HSTS is not enabled
- http://[pfSense Hostname]:666/
- System --> Advanced --> Admin Access --> webConfigurator --> HTST
- iperf - Great for speed testing your network
- nmap
- Nmap is a utility for network exploration or security auditing.
- Only useful for professionals from the command line.
- Status_Traffic_totals
- pfSense has always needed this, an overview of trafic usage for the various networks
- Make sure you click 'Enable Graphing' otherwise it wont do anything.
- Zabbix - This is for corporate device monitor amongst other stuff
- Snort - An open source network intrusion prevention and detection system (IDS/IPS). Combining the benefits of signature, protocol, and anomaly-based inspection.
- Suricata - Similiar package to Snort
Additional Software Packages (Not-Official)
I ahve come across these packages but have not used them.
- NetData
- Netdata is an open source tool designed to collect real-time metrics, such as CPU usage, disk activity, bandwidth usage, website visits, etc., and then display them in live, easy-to-interpret charts.
- Nedata might generate a lot of logs and you would need a decent anount of space on your SSD/HDD.
- Netdata: Monitoring and troubleshooting transformed
- GitHub - netdata/netdata: Real-time performance monitoring, done right! https://www.netdata.cloud - Real-time performance monitoring, done right!
- Install Netdata on pfSense | Learn Netdata
- Install Netdata on pfSense to monitor the health and performance of firewalls with thousands of real-time, per-second metrics.
- Old tutorial
- Install Netdata | Learn Netdata
- Download and install the open-source Netdata monitoring agent on physical/virtual servers, Linux (Ubuntu/Debian/CentOS/etc), Docker, Kubernetes, and many others, often with one command.
- Generic installers for various platforms, not pfSense
- NETDATA doesn't work in PFsense 2.6.0 | Netgate Forum - pfSense and Netdata peopel are talking here about making a Netdata pfSense package.
- Feature #13809: Add Netdata package - pfSense Packages - pfSense bugtracker - Redmine issue has been raised for this project.
- Netdata - Wikipedia
- AdGuard
- AdGuard Home is a network-wide software for blocking ads and tracking.
- AdGuard DNS — ad-blocking DNS server (Official Site)
- Create your ad-blocking DNS server that will protect your personal data, prevent tracking and allow you to control access to specific content on the Internet.
- They offer a free and paid for tiers.
- It only works on DNS queries.
- AdGuard on PFSense - ArkoJoardar - This tutorial will show you how to install AdGuard on PFSense Box.
Upgrading pfSense
- Read the release nots of the new version.
- Backup your settings (including extra data)
- Generate a list of installed packages before
- openvpn-client-export
- pfBlockerNG-devel
- Service_Watchdog
- Shellcmd
- snort
- Status_Traffic_Totals
- System_Patches
- Uninstall all packages
- Due to major changes in PHP and base OS versions, there is a higher than usual chance that packages will interfere with the upgrade process.
- To give an upgrade the best possible chance of going smoothly, uninstall all packages before starting the upgrade.
- Revert 'System Patches'
- Not sure if this is needed
- Now upgrade.
- Re-Install all packages
- Reboot
- Done
DHCP
General
- DHCP leases question (deleting a dhcp lease manually) | Netgate Forum
- Q: Is there a way (in the GUI) to manually delete DHCP lease? The DHCP server seems to "remember" even the expired leases, but I would prefer if they were removed, or there was a way to delete them.
- A:
- In the GUI, go to Diagnostics --> Edit File and load
/var/dhcpd/var/db/dhcpd.leases~ - Delete the leases you want removed, then hit Save.
- Do the same for
/var/dhcpd/var/db/dhcpd.leases - Then pressing the Save button in the DHCP Server page so it updates the current DHCP lease listing in the GUI? - this step might not be neeed
- NB: I do not know what there is 2 lease files and which is the actual one you need to manipulate.
- In the GUI, go to Diagnostics --> Edit File and load
- A:
- Deleting all the leases shown in the two files did not work for me, a reboot does however, although clearly this is a less preferable fix!
- How to release/renew DHCP | Netgate Forum - In Linux & Windows, it's easy to release the DHCP lease. In FreeBSD, the command dhclient -r is supposed to release the lease, but in pfSense, the -r option doesn't seem to exist. How is the lease released in the pfSense version of FreeBSD?
- List leases by interface
- I was told this was not possible, but at the bottom it lists counts by interface.
- You can sort by IP which will approimate listing by interface as you should know what interface has the IP range on it.
- You can also filter by IP.
DHCP Static Mappings / Static DHCP Leases (Static Leases)
This is a combination of DHCP and static IP addresses. You specify an IP address to be given out to a device when it requests a DHCP address ands this is done by using the MAC address.
There are many advantages to this but should not be used for all devices and circumstances.
The section in pfSense is located here:
- Services --> DHCP Server --> [pick you interface] --> DHCP Static Mappings for this Interface
- Services --> DNS Resolver --> General Settings --> (Static DHCP) Register DHCP static mappings: ticked
- This is so your statically mapped DHCP clients are registered (this will not break pfBlockerNG - Unbound Python Mode)
Notes
- Real static IP for servers, static DHCP mappings for portables devises such as laptops.
- Static IP vs DHCP Reservation - The Tech Journal
- In the many years I’ve been providing IT Services, I’ve noticed that whenever taking over a customer from a competitor, or providing consulting services for a company that has IT staff, that I don’t see DHCP reservations being used all that frequently. I wanted to write a post and create a video to discuss the comparison, when each should be used and the various case scenarios. I’m hoping my readers may provide their own input in the comments.
- Excellent explanation with YouTube video
- Read the comment for more insights.
- you dont need to look further, this guy speaks from exporience and knowledge explaining everything.
- It's mainly handy for something like a laptop. You would set a static assignment on the server and DHCP on the laptop. When local you can access the laptop via hostname, but when attempting to connect to another network you wouldn't have to switch back to DHCP on the laptop.
- DHCP reservations - #2 by Acestes - Lawrence Systems Forums
- This is what Netgate says:
- Static Mappings Inside DHCP Pools While ISC dhcpd will allow a static mapping to be defined inside the DHCP range/pool, it can result in unexpected behavior....
- Just assign your static IPs to one range and your DHCP to another range.
- Issuing a static IP from your DHCP pool can cause issues.
- This is what Netgate says:
- What is Static Mapping? - Management, Networking, Logging and Reporting - UTM Firewall - Sophos Community
- Static Mapping = Always assign an IP Address to specific MAC addresses and Prevent the DHCP Server from assigning it to other devices even if it is in the DHCP Range?
- That is correct. A statically mapped IP in the DHCP server can be assigned to another client. Best practice is to assign the IP outside of the regular DHCP range and it will map correctly.
- Bit different from the Windows Server implementation I normally work with where a 'reservation' is assigned to an IP/MAC pair and the IP is removed from the rest of the DHCP pool.
- Static ARP
- Why create a static entry in the Arp table? | Netgate Forum
- When setting a static IP address for hosts on the network, there is an option for "Create an ARP Table Static Entry for this MAC & IP Address pair", sometimes I have checked it, sometimes I haven't. But I have never known whether it's best to check or not check it.
- johnpoz
- Can be used as a security measure. Can prevent spoofing and or poisoning, can allow for WOL (wake on lan), can shave a ms or so off from having to arp for the IP every 20 minutes or so - whatever your cache is set for. If your whole network is setup with static arps - would lower the amount of arp traffic on that L2 network.
- Generally speaking the typical user would have no reason to set static arp entries up..
- Can be used to limit who can talk to pfsense, via only allowing to talk to IPs that have static arp entries.
- Con's would be that IP is locked to that mac - another device would not be able to use that IP, or that device would not be able to use a different IP.. Arp spoofing can be used for legitimate reasons - so if you have static arp set, you would not be able to do that.
- But again most uses are outside the scope of day to day operation for a typical home network to be honest.. Its pretty safe to say if you don't understand its use case, you wouldn't have use of it ;)
- Static ARP Entries on Ethernet Interfaces | Junos OS | Juniper Networks
- You can provision static Address Resolution Protocol (ARP) entries for a device instead of dynamically resolving an IP address to a MAC address. Note that dynamic resolution of an IP address is the default behavior. These static ARP entries enable the device to respond to ARP requests even if the destination address of the request is not local to the Ethernet interface that receives the incoming traffic.
- What Is an ARP Table? Address Resolution Protocol 101 | Auvik - Let's peer under the hood of how ARP tables help us see data similar to the "show arp" or "arp-a" command without having to open a terminal connection.
- Why create a static entry in the Arp table? | Netgate Forum
- Client ID
- When setting up a static DHCP lease, what's the difference between the Client ID field and the Hostname field? : PFSENSE
- Client ID is used to identify the client. It’s an alternative to MAC address.
- Why DHCP protocol needs Client ID? - Network Engineering Stack Exchange
- A DHCP request from multiple hosts can be differentiated using Src Mac Address. So, why do need DHCP client ID to differentiate the DHCP request. I understand that they need some IP address because DHCP works on Application layer. So, that IP address can be 255.255.255.255 for the destination. For the DHCP client the src IP will be 0.0.0.0. However, the request can be differentiated easily with the mac address. Thus, they really don't need DHCP client ID?
- DHCP defines a new 'client identifier' option that is used to pass an explicit client identifier to a DHCP server. This change eliminates the overloading of the 'chaddr' field in BOOTP messages, where 'chaddr' is used both as a hardware address for transmission of BOOTP reply messages and as a client identifier. The 'client identifier' is an opaque key, not to be interpreted by the server; for example, the 'client identifier' may contain a hardware address, identical to the contents of the 'chaddr' field, or it may contain another type of identifier, such as a DNS name. The 'client identifier' chosen by a DHCP client MUST be unique to that client within the subnet to which the client is attached. If the client uses a 'client identifier' in one message, it MUST use that same identifier in all subsequent messages, to ensure that all servers correctly identify the client.
- In my opinion, this is absolutely mandatory to support DHCP relaying. In DHCP relaying, the src IP and destination IP's are changed. Also, the source and destination mac address. So, on receiving the dhcp messages from the dhcp server, the relay interface can't keep a track of the mac address. In fact, it will just forward the packet to broadcast IP with no accurate destination mac -address. With the help of client ID, the DHCP client can understand whether the packet is meant for them or not.
- When setting up a static DHCP lease, what's the difference between the Client ID field and the Hostname field? : PFSENSE
- DHCP static mappings that don't specify hostnames | Netgate Forum
- Q: I wanted to use static mappings and let the client decide its hostname
- A:
- In short, it appears it is not possible to create the behavior I'm looking for. It's not terribly important to us, it just would've been nice.
- The scripting based solution works very nicely, it just would've been nice if we had the option to assign an IP address via DHCP static reservation without having to assign a hostname in the static reservation. That creates a condition where, when I create static reservations, I have to remember to leave the hostname field blank for Windows machines (which will register their DNS hostnames directly with AD DNS) but specify hostnames in the reservations for non-Windows systems.
- Static Mappings Inside DHCP Pools | pfSense Documentation
- While the ISC DHCP daemon will allow a static mapping to be defined inside the DHCP range/pool in its configuration, doing so can result in unexpected behavior.
- A static mapping entry in the ISC DHCP daemon is not a reservation and it does not remove that IP address from the pool.
- The daemon only checks via ICMP ping to ensure that an IP address is not actively in use when making assignments.
Gateway Groups and Load Balancing (Optional)
Up until now we have dealt with single gateways as the single terminus/endpoint for your traffic exiting your network which is ok, but by using 'Gateway Groups' we can do the following:
- Load Balance
- We can spread traffic out over several gateways
- See the official documentation about the specifics of this.
- Quick answer = set all the Gateways you want to use to 'Tier 1'
- Failover
- If a specified gateway goes down the traffic can be invisible routed over a redundant gateway to keep the network flowing.
- See the official documentation about the specifics of this.
- Scraping
- Because gateway groups allow you to use multiple IP endpoints (because of the multiple gateways) you can have a battery of IP address available for doing such things as webscraping without your IP being over used and then getting flagged.
- Set a load of OpenVPN clients (with different locations if you want), set them all to 'Tier 1' and now every connection will probably use a different gateway and get a different IP allowing for better scraping and not getting flagged so quickly.
- The more gateways the better for scraping.
- If you need to scrape GEO-sensitive sites, make sure all of your OpenVPN endpoints are in the same country.
- Extreme Privacy
- By using multiple OpenVPN endpoints, maybe in different countries, your traffic will be almost impossible to track.
- Geo-Location:
- You create a 'Gateway Group' with many different OpenVPN locations and then select one county as an endpoint.
- This is done by setting all to 'Never', then set the country you to 'Tier 1'
- You can change your the country endpoint at any time easily withou having to change a load of firewall rules.
- Gateway Alias
- Instead of going through all of your firewall rules that have policy routing and then manually changing their gateway, you can use a 'Gateway Group' instead which works like an alias (but it isn't).
- With this configuration you can change the gateway(s) within the 'Gateway Group' instead of having to manually change all of the rules where the gateway was specified/
Create a 'Gateway Group'
You can do this with one or more gateways that you have set up. If you want to have 5 Privacy VPNs which all point to different countries for instance you would need to create each of them as an interface outlined elsewhere in this article, however at this point you should have at least one setup (e.g. PIA_Switzerland).
- System --> Routing --> Gateway Groups --> Add
- Use these example details to create the group
- Group Name: Privacy_Group
- Gateway Priority:
- Set all to 'Never'
- Set 'PIA_SWITZERLAND' to 'Tier 1' and any other gateways you want to use in this group, perhaps other PIA VPNs
- If you use this gateway group for 'Privacy Clients' make sure all the interfaces you enable are 'Privacy VPNs' otherwise your users will not have a private connection.
- Link Priority: n/a
- Trigger Level: Member Down
- Description: Privacy Gateway Group
- If you are converting a rule already there such as our example, you need to
- Change all references to the PIA_SWITZERLAND gateway in the firewall rules to 'Privacy_Group' gateway
You can now maniplulate 'Privacy_Group' gateways as required such as adding further Gateways, changing their Tier settings or changing the group's purpose with having to visit each individual firewall rule.
Add additional OpenVPN Gateways into the Gateway Group
This has been dealt with in detail elsewhere in this article, but for reference this is a quick guide how how to get a OpenVPN connection present in 'Gateway Group' as a Gateway.
We will start at the beggining and add one new gateway into the 'Privacy_Gateways', should you want more modify the instructions as required.
- Create a new OpenVPN client
- VPN --> OpenVPN --> Clients --> Add
- Assign the OpenVPN client to an interface
- Interfaces --> Assignments --> Add
- Enable
- Block private networks and loopback addresses
- Block bogon networks
- By default none of these new interfaces will have any firewall rules which is ok, therefore all unsolicited incoming traffic is blocked which is ok.
- Convert interfaces to Gateways
- This is done automatically when you assign the OpenVPN client to the interface
- Once you have setup one gateway, utilise the copy button it will save you a lot time
- Edit and save each gateway as this applies hidden settings (gateway goes from '' to 'dynamic')
- NAT Mappings
- Firewall --> NAT --> Outbound --> Mappings --> Add
- This is biggest reason for traffic not to route
- How To Setup pfsense OpenVPN Policy Routing With Kill Switch Using A Privacy VPN | YouTube | Lawrence Systems
- Firewall --> Aliases
- If you have many different subnets you want to connect, you could use a 'Firewall Alias' here for your local networks.
- Firewall --> NAT --> Outbound --> Mappings --> Add
- Add the interfaces to 'Privacy_Group' gateways
- System --> Routing --> Gateway Groups --> 'Privacy_Group' --> edit
- Kill Switch
- LAN (and others) interface rules: One Tagging Rule on every interface's rules that you want to implement the 'Privacy Policy'
- Flaoting Rules: One Kill Switch Rule (WAN interface assigned)
- I would use PRIVACY_GWG_ONLY for the Tag (Privacy Gateway Group)
- How To Setup pfsense OpenVPN Policy Routing With Kill Switch Using A Privacy VPN | YouTube | Lawrence Systems
- repeat floating rule for multiple WAN, ie apply it to each, one rule for each ?
- is a WAN different to another interface/gateway. is this an issue only for the default WAN
- Allow Privacy Policy Clients to see LAN servers Floating Rule (LAN interface assigned)
- pfBlockerNG
- Firewall --> pfBlockerNG --> IP --> IP Interface/Rules Configuration --> Inbound Firewall Rules
- Treat the new OpenVPN Gateways as just that, Gateways. They should be selected in the 'Inbound Firewall rules'
- Add the individual interface (with an individual interface we can specify the type of connection it is.)
- Save
- Force Reload
- Firewall --> pfBlockerNG --> IP --> IP Interface/Rules Configuration --> Inbound Firewall Rules
- Update Custom DNS Firewall rules
- Firewall --> Rules --> Floating
- Add the individual interface to each Custom DNS rule as appropriate, should be all but 'Allow Web Server DNS'
- In this case just making sure the 'OpenVPN' interface is selected in the Custom DNS rules will do, as we do want all OpenVPN connections to follow these rules (Clients and Servers).
- Reload Filter Rules
- Status --> Filter Reload
- Update 'Service Watchdog'
- If you want to make sure a particular interface (OpenVPN client) is brought backup after failing, then you need to set it in this section.
- This assumes you have installed 'Service watchdog'
How to use a 'Gateway Group'
- Just configure the 'Gateway Group' into the particular mode you want. These modes are explained at the beginning of this section.
- They can be used in 2 places, maybe more, but these are the obvious ones.
- Assign 'Gateway Groups' to Firewall rules instead of using an individual gateway as required.
- These groups can be assigned as the default gateway
- System --> Routing --> Gateways --> Default gateway -->
- Default gateway IPv4:
- Default gateway IPv6:
- System --> Routing --> Gateways --> Default gateway -->
To change Gateway Group name (not official)
I have not tested these
- Option 1
- Backup your config.
- Duplicate the gateway group and set the new name.
- Then go through all of the firewall rules, and where the the old gateway group is present, swap out for the new gateway group.
- Check the Default WANs do not use this gateway group.
- System --> Routing --> Gateways --> Default gateway -->
- Default gateway IPv4:
- Default gateway IPv6:
- System --> Routing --> Gateways --> Default gateway -->
- Do another backup and then scan it for the old rule name to make sure you have got all references (dont forget there should be one reference of the old name which is the actual rule definition).
- Once all rules changes, delete the old rule
- Option 2
- Backup your config.
- Text replace the old interface group name with the new one.
- Restore the modfied config back to your router.
- Option 3
- You cannot directly rename a 'Gateway' or 'Gateway Group' you have to copy them, everything else such as interfaces you can just rename them.
- Example - rename PIA_SWITZERLAND gateway to WIZARD_UK_VPN4
- System --> Routing --> Gateways --> PIA_SWITZERLAND_VPNV4 --> Copy gateway
- Set the new name and description
- Save
- System --> Routing --> Gateway Groups
- This section is only required if the Gateway is part of a 'Gateway Group'
- Edit the 'Privacy_Gateways'
- set PIA_SWITZERLAND_VPNV4 to 'Never'
- set WIZARD_UK_VPN4 to 'Tier 1' PIA_SWITZERLAND_VPNV4
- System --> Routing --> Gateways
- Delete the PIA_SWITZERLAND_VPNV4 gateway
- System --> Routing --> Gateways --> PIA_SWITZERLAND_VPNV4 --> Copy gateway
Notes
- A 'Gateway Group' is like an alias for a group of gateways
- It is selected as if it were a gateway, but further processing occurs as setout in the 'Gateway Groups' configuration (i.e. Load Balancing)
- Gateway Groups are primarily used for load balancing and failovers.
- By using the tier system you can configure for load balancing or allow for failovers.
- How to route traffic through a VPN client in PFsense | YouTube | Revolt Computing
- Covers Gateway Groups
- Easy to follow
- Makes a mistake a the end with the setting 'Skip rules when gateway is down'. It does not do exactly what he says.
- Multiple WAN Connections — Load Balancing and Failover with Gateway Groups | pfSense Documentation
- If the gateways are all of the same tier, then load balancing will occur.
- If two WANs must be balanced in a weighted fashion due to differing amounts of bandwidth between them, that can be accommodated by adjusting the Weight parameter on the gateway as described in Unequal Cost Load Balancing and Advanced Gateway Settings.
- Problems with load balancing
- Single session/IP traffic can be forced down a particular gateway.
- How 'Sticky Connections' can solve this.
- Weighting and other gateway metrics
- Weighting and other metrics can be editied per gateways to modify how they balance traffic.
- System --> Routing --> Gateways --> Display Advanced --> Advanced
- Routing — Gateway Groups | pfSense Documentation
- Gateway groups are a set of gateways, but are treated as one entity in gateway fields of the GUI. Groups will appear in the gateway drop-downs available on, for example, firewall rule editing.
- Gateway groups are managed from the Groups tab on System > Routing.
- This explains the Tier system and Trigger Levels
- Routing — Gateway Settings | pfSense Documentation
- This explains in depth the weighting and other metrics that can be altered on a gateway.
- Configuration — Advanced Configuration Options — Miscellaneous Tab | pfSense Documentation
- Load Balancing and Sticky Connections
- System --> Advanced --> Miscellaneous --> Load Balancing --> Use sticky connections
- [pfSense] Multiple WAN Connections – Provya
- We will see in this article how to configure pfSense with two (or more) Internet connections that can be used in load balancing (active-active) or fail-over (active-passive) mode.
- These configurations allow to increase the available bandwidth for Internet access or to ensure continuity of service in case of failure of the primary link, for example.
- pfSense MultiWan Configuration explained: LoadBalancing and FailOver | YouTube | Gateway IT Tutorials - In this video I am going over the MultiWAN setup on pfSense firewall.
- pfSense Load Balancing & Failover (easy mode) | YouTube | The Network Berg - Welcome to a pfSense tutorial where I will be discussing the difference between load balancing & failover. We will also be configuring both gateway types and just configure our dashboard in a nice way to see if our gateways are up and how traffic is routing with our traffic monitors.
- You could use generic names for the Gateways such as 'PIA_1' prevent the need to rename them if you like changiong the OpenVPN endpoints a lot.
- How to use Multiple WAN on pfsense for Fail over and or Load Balancing | YouTube | Lawrence System -
- Monitor IP
- When you set up a 'Monitor IP' pfsense will create a hidden static route to that IP. This is why you cannot use the same monitoring IP address on more than one gateway.
- Configuring Ping & Gateway Monitoring & Logging in pfsense | YouTube | Lawrence System
- Covers packet loss and latency settings
- Bug #8151: Changing name on a gateway is not allowed - pfSense - pfSense bugtracker
- The gateway is referenced by name throughout the configuration in places like firewall rules for policy routing, routes, gateway groups, etc. Because of the way it is referenced, changing its name is non-trivial. The field could be made static/read only though.
Create an 'Interface Group'
This feature allows you to groups interfaces together and use the new group in firewall rules juts like aliases but for interfaces instead. A good example of why you would use this is if you have a lot VPN gateways which can be grouped togther to make referencing them easier, such as Privacy_Group and Scraping_Group.
When making these groups it might be worth keeping partity of the names with any releated gateway groups you have created (System --> Routing --> Gateway Groups), such as the Privacy_Group gateways, but you are free to use whatever names you want, just remeber the names cannot be changed at a later date, officially, but there might be workarounds.
You should not group WANs together using this method as it can cause issues. In this instance I believe a WAN is a physical connection/route from your network to another not such things as VPNs that go out over the WAN. Read the offical documentation for more information.
Instructions
We will create a privacy interface group to keep with our gateway group we created earlier.
- Interfaces --> Assignments --> Interface Groups --> Add
- Configure the 'Interface Group Configuration' as follows:
- Group Name: Privacy_Group
- Group Description: Privacy Interface Group
- Group Members: PIA_SWITZERLAND...
- And all of the others you specified in the
Privacy_Groupgateway. - Parity of members is not required, but for this tutorial it is.
- And all of the others you specified in the
- Save
Now when you create or edit firewall rules you can use this interface group instead of specifying each interface manually. You can alos add and remove interfaces with ease.
To change Interface Group name (not official)
I have not tested these
- Option 1
- Backup your config.
- Duplicate the interface group and set the new name.
- Then go through all of the firewall rules, and where the the old interface group is present, swap out for the new interface group.
- Do another backup and then scan it for the old rule name to make sure you have got all references (dont forget there should be one reference of the old name which is the actual rule definition).
- Once all rules changes, delete the old rule
- Option 2
- Backup your config.
- Text replace the old interface group name with the new one.
- Restore the modfied config back to your router.
Notes
- Interface Groups | pfSense Documentation
- An Interface Group is not a type of interface that can be assigned.
- Interface groups are used to apply firewall or NAT rules to a set of interfaces on a common tab.
- The best practice is to not use interface groups with multiple WANs. Doing so may appear to be convenient, but the group rules do not receive the same treatment as actual WAN tab rules.
- For example, rules on a tab for a WAN-type interface will receive
reply-towhich allows pf to return traffic back via the interface from which it entered. Group tab rules do not receivereply-towhich effectively means that the group rules only function as expected on the WAN with the default gateway.
- [pfSense] How network interfaces work – Provya
- Interface Group turns out to be ^Rule Group^! Which is awesome !! | Netgate Forum - And guess what, a couple of days back I discovered that ^Interface Groups^ are not at all ^Interface Groups^, but it are in fact ^rule-groups^.
- pfSense - Isolate vLANs with an Interface Group - Rocky Mountain Tech Team - The Use CaseOne pfSense with multiple vLANs that need to be locked down or isolated from each other. Also, need to block many vLANs from being able to access the pfSense web interface.
Disable Services on Boot (workaround)
This section is using OpenVPN as an example but the Shellcmd can be used for most services. This workaround stops the services after they have started which will do for most and prevents editing the system files manually.
- Install Shellcmd package
- Package Manager --> Available Packages --> Install
- The shellcmd utility is used to manage commands on system startup.
- Add a boot command to disable the OpenVPN services
- See the next section where you get the Client/Server and 'OpenVPN ID'
- Services --> Shellcmd --> Add
- Command:
pfSsh.php playback svc stop openvpn server 1
or
pfSsh.php playback svc stop openvpn client 3
- ShellcmdType: shellcmd
- Description: Disable my OpenVPN on boot
- Command:
- Repeat for each OpenVPN service you want to disable
Notes
- Disable OpenVPN clients on reboot | Netgate Forum
- My Thread
- This is my post and might have some other ideas when you read it.
- The Shellcmd do not seem to work until you have rebooted once (it fails), then it works everytime after. This is the case for the OpenVPN commands above, but not tested on any other command.
Shell / Command Prompt / CLi
There are 2 types of shell
- Shell
- This is the standard Linux command line
- You can run PHP-Shell stuff by invoking pfSsh.php before the commands
- PHP-Shell
- This is a pfSense shell environment for PHP commands.
- This is for accessing the pfSense software rather than the hardware and underlying Linux system.
Notes
- PHP-Shell Commands
- Development — Executing Commands at Boot | pfSense Documentation
- Useful pfSense commands – OneByte | tech blog
- A big list of commands and their use
- Automate pfSense with pfSsh.php | Open School Solutions
- There is sometimes the case that you would like to make settings via an API or the command line. pfSense does not currently have an API, this will only be available in one of the upcoming versions. Until then you can use the pfSense developer shell, also called pfSsh.php.
- This gives some good examples on how to use the PHP-Shell
- Using the PHP Shell | pfSense Documentation - Official documentation
- Shell commands
- Shellcmd
- The shellcmd utility is used to manage commands on system startup
- This is a pfSense package that allows you to run commands (and scripts) at boot time without altering raw system files which should not be done.
- Development — Executing Commands at Boot | pfSense Documentation
- OpenVPN
- [SOLVED] How to restart OpenVPN in a script? | Netgate Forum
- Thread with discussions and scripts.
- Scripts and discussions here including an active PING to check for the connections status.
- pfSense openvpn client auto reconnect | Zercle Technology Co., Ltd. - Look like pfSense doesn’t reconnect to VPN server when disconnect. Administrators need to reconnect/restart openVPN client service manually. This so annoying task. To solve this problem we have to add some script do that things for us.
- Configuring OpenVPN To Run Automatically On System Startup | OpenVPN - The best way to OpenVPN configured to run automatically by default is to install OpenVPN as a package, such as via RPM on Linux. Read more details here.
- [SOLVED] How to restart OpenVPN in a script? | Netgate Forum
- General
- How to enable a service on startup permanently to stick even through config changes? : PFSENSE - Soem examples how to do it and how not to do it
- The pfSense Console Menu | YouTube | Netgate
- Includes the Shell and PHP-Shell
- Update pfsense on the command line - Updates and Upgrades for pfsense can be done on the shell instead of the GUI. In this tutorial I'll show you how to update pfsense using the command line.
- CLI commands to start and stop services | Netgate Forum
- What are the CLI commands to start and stop a service
- Also gives you the format for cron commands
- How do I start the pfSense Menu from the Command Line? - Stack Overflow
- To secure my pfSense firewalls I generally create new users and disable the 'admin' user. However when I ssh in as the new user I get a standard linux command prompt rather than the pfSense menu. How do I get to that menu?
- I looked at the .profile and found the following line, calling this will bring up the menu to use
/etc/rc.initial
Hardware
- PC/Base Hardware
- Building A pfSense Router! | YouTube - Real life build
- Quick Review of our Super Micro A1SRi-2758F 1u Intel Lab Server | Lawrence Systems
- Minimum Hardware Requirements | pfSense Documentation - The minimum hardware requirements for pfSense® software on hardware not sold by Netgate are:
- Hardware Sizing Guidance | pfSense Documentation - When sizing hardware for pfSense® software, required throughput and necessary features are the primary factors that govern hardware selection.
- pfSense Hardware Requirements and Guidance | Netgate - The following outlines the minimum hardware requirements for pfSense software version 2.x. Note the minimum requirements are not suitable for all environments. You may be able to get by with less than the minimum, but with less memory you may start swapping to disk, which will dramatically slow down your system.
- What size drive should I get?
- 64GB NVMe or SSD. Do not buy a standard HDD as it will be very slow.
- Buying the right network card
- Intel is best for compatability.
- Choosing
- Custom pfsense Router Build: Choosing a Supported Network Card and ZFS | Lawrence Systems
- Which network card's do I need for my OpenWRT/PFSense box ? | SmallNetBuilder Forums
- How Do You know If the NIC Is Intel Based? : PFSENSE
- Guaranteed NICs that will work | Netgate Forum
- Top Picks for pfSense Network Cards (NICs) - We have 1GbE, 10GbE (SFP+ and 10Gbase-T) and 40GbE networking options for the top pfSense network cards (NICs) as they are key components in firewalls
- Intel i350 (and Intel i354)
- Intel i210 / Intel i211
- Intel 82574L
- Top Picks for FreeNAS NICs (Networking) - We have 1GbE, 10GbE (SFP+ and 10Gbase-T) and 40GbE networking options for the top FreeNAS NICs as storage performance is network dependent.
- Intel i350
- Intel i340
- Intel i210
- Intel i211
- Intel 82574L
- Intel Pro/1000 VT Quad (My old card)
- New 0H092P Intel Pro/1000 VT Quad Port PCI-e Server Adapter Wholesale 0H092P Intel Pro/1000 VT Quad Port PCI-e Server Adapter, Price 0H092P
- I have used these and they work, however they are very old now.
- Demystifying Intel PRO/1000 Quad Port NICs - Hardware - serverbuilds.net Forums
- You may have seen us recommend the Intel Pro/1000 series quad port gigabit NICs, and we do so with good reason - they’re cheap and reliable.
- Note: there is a known issue with these cards and some older systems (primarily the PT/VT chips and Dell motherboards for Sandy Bridge (2nd gen) Intel processors and for AMD embedded R-series from 2014), among many others - manifesting in kernel panics on FreeBSD systems (i.e. pfSense), missing memory, onboard diagnostics failing, and more. It is due to the SMBus pins on your card.
- If you have a mentioned system and want a quad port NIC, try the i340-T4 or the i350-T4.
- I recommend going for the i340 in any case.
- New 0H092P Intel Pro/1000 VT Quad Port PCI-e Server Adapter Wholesale 0H092P Intel Pro/1000 VT Quad Port PCI-e Server Adapter, Price 0H092P
- Intel i340 / i350
- Cisco branded - Intel i350T4V2 with iSCSI NIC (UCSC-PCIE-IRJ45) Quad Port 1Gbps NIC
- Intel® Ethernet Server Adapter I350 | Intel - Drivers, Docs and Utilities
- i340-T4 or i350-T4?? : PFSENSE
- I340-t4 showing up as pro/1000 | Netgate Forum
- FYI Those cheap Chinese i350-T4/AM4 nics on ebay work! | Netgate Forum
- Intel i350 vs i340 Differences and Recommendation - ServeTheHome - We discuss the key differences between the Intel i350 vs i340 1GbE NICs and make a simple recommendation for our readers
- Buy the i350 V2
- Comparison: Intel i350-T4 Genuine vs Fake | ServeTheHome Forums
- I recently got ahold of a new in box Intel i350-T4 (quad port) NIC from China - the box even included a Intel driver CD.. I found this a good opportunity to compare it to my genuine card which was pulled from a Dell server. The Intel i350-T4 NICs coming out of Dell severs have varying Dell part numbers on the stickers, I currently know of 3: K9CR1, THGMP and 9YD6K - there might be more. I am not comparing any stickers.
- The counterfeit cards work fine but after a few months they start to fail.
- A very indepth article with pictures to help you identify a real one.
- Intel Ethernet Server Adapter I350T4V2 Product Specifications | Intel - Intel® Ethernet Server Adapter I350-T4V2 quick reference guide including specifications, features, pricing, compatibility, design documentation, ordering codes, spec codes and more.
- Intel® Ethernet Server Adapter I350-T4V2 | Intel - Intel® Ethernet Server Adapter I350-T4V2 - Support product information, featured content and more.
- Solved: Differences: I350-T4 vs I350-T4V2 - Intel Community
- Q: What are the differences between Intel Ethernet Server Adapter I350-T4 and Intel Ethernet Server Adapter I350-T4V2 - version 2 - of this product? I can't see any differences in the specs, aside from I350-T4 being marked End of Life. It is also available on the market at a significant discount compared to the V2.
- Q: The Intel Ethernet Server Adapter I350-T4 was discontinued and is being replaced with the new version (I350-T4V2) which have the AUX Power component changes that will result in a decrease of in-rush current during power supply start-up. Product functionality does not change. That's why you don't see any differences in the specifications.
- Configuring Hardware
- Get hardware information
- How can i get my hardware info | Netgate Forum
dmesg | grep fibre channel

lspci

pciconf -lv - use this one

## Install and then run
pkg_add -r dmidecode
dmidecode
- How can i get my hardware info | Netgate Forum
Troubleshooting (pfSense)
Locked out of pfSense
- Official
- Troubleshooting Access when Locked Out of the Firewall | pfSense Documentation - This article covers every way of accessing a locked pfSense router.
- WebGUI / webConfigurator
- An administrator can (very temporarily) disable firewall rules by using the physical console or SSH.
- To disable the firewall, connect to the physical console or ssh and use option 8 to start a shell, and then type:
pfctl -d
- That command will disable the firewall, including all NAT functions. Access to the GUI is now possible from anywhere, at least for a few minutes or until a process on the firewall causes the ruleset to be reloaded (which is almost every page save or Apply Changes action)
- Once the administrator has adjusted the rules and regained the necessary access, turn the firewall back on by typing:
pfctl -e
- Disabled Admin Account (other methods)
- Accidentally disabled Admin account, what are my options? | Netgate Forum - Common scenario and perfect fix
- Q:
- Hello, in making a few security tweaks to my pfSense box I decided one of the things I would do is use a non-standard admin account to help protect myself from a brute force attack. I created a new user, gave it a password, added it to the admins group, clicked save, then disabled the admin account via the GUI. I then attempted to log in as my new user, and no luck it tells me no pages have been assigned to this user. I try logging into SSH with my new user and it closes the connection as soon as I log in. Logging in as admin tells me my user/pass is incorrect at the GUI but lets me into the shell. I attempted to reset the admin account via the shell (option 3 in the menu) and it tells me it was successful, however I am still unable to log in.
- Unfortunately I don't have a backup of my config so I was hoping to avoid restoring to factory defaults, what can I do to get back into the web interface?
- A:
- From the physical console, reset the password.
- Q:
- Disabled Admin Account & Locked Out | Netgate Forum
- Q:
- I created a new user, assigned privileges, then disabled the admin account and now the user I created is not working.
- I tried to login several times with the wrong password and Web Admin blocked me at the firewall.
- I have SSH access for some reason: How can I fix the admin account and delete the firewall rule locking me out?
- A (Gertjan):
- What about SSH in and look (make a save copy and edit) /cf/conf/config.xml
- Find the key <auth_method>
- I have <auth_method>local</auth_method>
- Change, save, reboot.
- A (tacfit):
- I learned also that to do it easier, you can just type "viconfig", which will load the config, and upon closing it will kill the cached config file, causing PFsense to reload the new config. Means you don't have to reboot.
- Q:
- Accidentally disabled Admin account, what are my options? | Netgate Forum - Common scenario and perfect fix
pfSense will not boot
- If you set the Partition Scheme: GPT (UEFI) and the pfSense does not boot then it could be the PC BIOS is not able to handle the EFI partition even though it says it can.
- Clean install of 21.02 on ZFS filesystem not booting | Netgate Forum
- This is an old bug and might not be a thing anymore.
- At the end of the install open the terminal and run this command
echo 'zfs_load="YES"' >> /boot/loader.conf
- UEFI can be flaky on older PCs so the only choice that might work is BIOS/Legacy/CSM mode
- Partition Scheme: GPT (UEFI) did not work on my PC : created a GPT disk with a EFI partition etc..
- Partition Scheme: GPT (BIOS+UEFI) + I had to turn on legacy booting : created a GPT disk with a EFI partition etc..
Block IPv4 link-local (1000000102) and Block IPv4 link-local (1000000101)
- You can disable logging of all default pfsense firewall rules (Not recommended)
- Status --> System Logs --> Settings (tab) --> Log firewall default blocks
- Noob question: Block IPv4 link-local (1000000102) and Block IPv4 link-local (1000000101) | Netgate Forum
- Q: I was inspecting my logs to see if my basic setup was working and I keep seeing Block IPv4 link-local (1000000102) and Block IPv4 link-local (1000000101) in the system log.
- A: jimp (Netgate)
- Blocking ipv4 link local, so you mean 169.254 - yeah those are APIPA address when dhcp client didn't get an IP.. Some iot devices will use them as well even when they have a IP... Not a fan myself.. My dvr bridge from directv does that.
- Yes a firewall is going to block some noise that many users are not really aware was there when they used their soho that doesn't show them any logs of any kind, etc. Or just scares them with stopped attack without any details, etc.
- Block IPv4 link-local | Netgate Forum
- Q: Is there any way to disable just the "Block IPv4 link-local" from reporting to the firewall log!
- A: A real dirty hack and not recommended. This might not work on newer version of pfSense
$config['system']['no_apipa_block'] = true;
write_config();
pfsense is blocking Autoconfiguration IPv4 Address
- pfsense is blocking Autoconfiguration IPv4 Address why ? | Netgate Forum
- A: jimp (Netgate)
- They are blocked because they have no business hitting the firewall. They can still communicate locally, but it's link-local/L2 traffic that can never route outside of its segment.
- You'd only receive one of those IP addresses if you had no DHCP service running. You can't use those addresses as your local network the same way you would use an RFC1918 network.
- A: jimp (Netgate)
How to mount a ZFS drive in windows
- How do you mount a zfs drive in Windows - Servers and NAS - Linus Tech Tips
- You cant mount this file system directly
- This has some instructions on how to get files of the disk via another PC
SWAP usage keep going to 100% (not all my RAM is used)
The image below is self explanatory.

Solution
- Since I changed the swap file from 1GB (default) to 16G (recommended / twice the RAM) the swap file has not filled up.
- I also upgraded to 2.7.2 at the same time, but I am not sure if it is this that fixed things, you never know though.
- Make sure your hypervisor is upto date and it's settings are correct
- Rebooting all of your devices might help.
- Updating all related spftware is also a must as issues do get patched.
- Turn off your hypervisor dynamic memory option (if present and enabled).
- snort and squid settings are causing them to consume massive amounts of memory.
Diagnostics
- You can also check what is using all of the RAM. Run this command from SSH not the GUI to to get the biggest memory eater at the top:
top -n -o res

or try

htop
- System Activity (Top) | pfSense Documentation
- The Diagnostics --> System Activity page displays several aspects of system activity as reported by
topwhich are updated every few seconds. - This is equivalent to running the command
top -aSHat a shell prompt.
- The Diagnostics --> System Activity page displays several aspects of system activity as reported by
- Linux Find Out What Process Are Using Swap Space - nixCraft - Linux Find Out What Process Are Using Swap Space - How to Get swap space usage and process that are using it in Linux?
- How to install htop on pfSense firewall - TrySitePrice - Here is how to install top on pfSense: Top is part of pfSense now.
- Log in to the pfSense web interface
- Go to System -> Package Manager -> Available Packages
- Search for top and select it
- Click the Install button
- Wait for the installation process to complete
- How to install htop on pfSense firewall - nixCraft
- This tutorial explains how to install htop process viewer on a pfSense firewall using pkg command line option over the ssh based session.
- I have done this and it is safe.
Notes
- PfSense uses 100% of swap but only 10% of memory. | Netgate Forum
- Ok I managed to solve the issue. The problem was that in the VM Hypervisor (Proxmox) I accidentally enabled „ballooning“ memory (which means it will remove memory on the fly if it detects that the VM is not using it).
- I disabled it and now it all works like a charm. I guess the GUI (and myself) was confused that the RAM was removed from the VM while running, therefore showing memory usage „of 11GB“ while in reality it only had way less memory at this point.
- PfSense uses SWAP even though memory is not even used 10%. Is htop wrong? Is the GUI wrong? Is Pfsense broken? | Reddit
- I'm sorry i don't know much about proxmox, does that hypervisor have a dynamic memory option that may be tightening the virtual memory artificially? If so try turning that option off and see if it helps. I've seen some situations when this causes issues on Hyper-V also. Not specifically with pfSense but other apps.
- OMG I did indeed enable a „ballooning“ memory option for this VM (for whatever reason, I forgot). Disabled it and now it works!! It now only consumes 4GB and no service crashed! Thank you very much for pointing me in the right direction!
- Not All Swap Usage is Bad - Memory Management | pfSense Documentation
- Given that knowledge, one might assume that any usage of swap is bad and should be avoided at all costs, however, that is not universally true.
- Swap consumption generally only becomes a concern when there is significant usage, such as near 50% or higher. At that point it becomes necessary to inspect everything consuming memory to see what can be reduced or tuned.
- PFSense High Swap Usage | Netgate Forum
- More than likely your snort and squid settings are causing them to consume massive amounts of memory. There is not enough information in what you have shown to speculate about a cause with any accuracy. Post a full "ps uxawwd" output for starters.
- Snort and Memory Usage / Swap Usage Concerns | Netgate Forum
- Snort eats memory like nothing else especially if you don't take steps to prevent it from doing so. In that respect your increased memory usage is completely normal. However you do not, ever, want to be swapping. It will bog down the performance dramatically. If you're not seeing that then it's likely the swap usage was not a continuous thing but it shows you are the edge of your ram requirement. You should probably either take steps to reduce Snorts footprint or add more ram.
- Swap ON or OFF in PfSense | Netgate Forum
- Unless you have specific concerns about space or drive writes etc just accepting the defaults is fine.
- In general pfSense should never use SWAP and of you see it swapping it's usually because something is misconfigured.
- I still have some test systems that run from CF and on those I always disable SWAP because of the limited write cycles there.
Why do I only have 1gb of swap? / Increase Swap Size
- The swap file size is set during the installation. IT is a swap file partition and defaultts 1GB.
- It is recommended as a rule of thumb to have twice your RAM as SWAP.
- swap size: The amount of disk space dedicated to swap space (virtual memory). This is optional. Commonly set to 2x the available RAM in the firewall, but with smaller disks that may be too large.
- The SWAP is also used for kernel dumps in emergencies. and this is why you need at least more SWAP than RAM to allow for a complete dump.
- Increase swap size | Netgate Forum
- Q: On to the real question. During the fresh install, I forgot to adjust the swap size. Last time I used the recommend twice the ram size for my swap. I have plenty of space on my SSD for it. Since I forgot to do it during the install, is there another way to adjust it? I couldn't find anything in the book or on this forum about that. It's not important, but just wondering more than anything. I'm going to leave it alone otherwise.
- A: You'll have to reinstall to change the size of the disk partitions. Even if you could adjust it with a bunch of different commands, the process would be long and prone to error. You can take a backup, reinstall with the right options, and be back up in minutes.
- Generally speaking you should not be using SWAP so the size is not that important. If you are using SWAP space it's probably because you don't have enough RAM for what you're trying to do or something is misconfigured.
Slow Network
- This could be caused by a faillin switch, powerline adapter or network card and so on. You need to power cycle through all of your network infrastructure to find out what device(s) is causing the issue. Sometimes a reboot is all that is needed.
- For me it was one of my Powerline adapters, even though it showed it was working fine, it obviously wasn't. As soon as I rebooted the offending powerline adapter the rest of the network went back to normal.
Twitch will not work
- This will be because of my strong blocking configuration.
- This is how I figured it out:
- The DNS request is successful.
- A packet is sent to an IP
- and that IP is blocked.
- This means that only an IP block will be found with no coressponding DNS block
- 146.75.74.167 / twitch.tv | Shodan - Ports open: 80, 443
pfSense not routing but console is working / PPPoE won't reconnect after link loss
Background
My pfSense router is connected to an ADTRAN SDX611B/D ONT from Openreach and pfsense uses PPPoE to control it.
The issue
Every couple of weeks (the length varies) and seems to be in the early hours of the night, I wake up to find my pfSense router is:
- No longer routing to internal and external networks
- Cannot ping pfsense (10.0.0.1)
- WebConfigurator (GUI) is not available
- Console via TruenAS (pfSense is virtualised)
- This is available
- WAN is down
- LAN shows an IP
- VPN gateways
- Cannot ping them
- Not all gateways have lost their IP but I still cannot ping those
Diagnostics
- Get the exact time the failure happened.
- I use Uptimerobot so this is easy.
- Check the ONT status
- Check pfSense GUI/TrueNAS available
- Check pfSense Console
- If you look at the console you can see some useful messages such as the one blow. I believe each line below corresponds to a PPPoE dial up packet.

- If you look at the console you can see some useful messages such as the one blow. I believe each line below corresponds to a PPPoE dial up packet.
- Check TrueNAS is available via IP
- Check other TrueNAS VMs are avaiable from their IP such as your webserver.
- Look at the logs for
- TrueNAS Virtual Machine (optional)
- pfSense System Logs (when pfSense is running is easier)
/var/log/system.log
/var/log/system.log.0
/var/log/system.log.xxx
I also tried some fo the options from the console and they did not change the status of the router:
- Restart PHP-FPM
- Restart webConfigurator
- Ping Host
NB: Restarting the router form the console does work.
Explantion
- If the NIC has failed/locked for whatever reason, this explains why there is no routing.
- The console is available becasue it does not rely on the network and is directly accessed at the hardware level (i.e. keyboard and monitor).
Cause (not confirmed)
This issue does not seem to be an issue with the TrueNAS Virtual Machine, it is purley a pfsense issue.
Bear in mind you might have one or more of these issues, for instance if your firmware update fails your internet could be off for more than an hour.
- ONT
- Firmware update
- This causes the pfSense to become disconnected from the internet.
- pfSense will keeps retrying to reconnect but will always fail, so this could be an issue with the ONT.
- IPv6 Support
- The ONT might not support IPv6 correctly.
- Is the ONT crashed out by the constant dial up requests after the initial drop?
- Firmware update
- pfSense
- Long internet outage bug
- The WAN goes down and then if the WAN is not re-connected within an hour or so this can cause the router to crapout (as described above).
- Example reconnection log lines
Oct  4 00:36:28 pfs ppp[87560]: [wan] IFACE: Removing IPv4 address from pppoe0 failed(IGNORING for now. This should be only for PPPoE friendly!): Can't assign requested address
Oct  4 00:36:28 pfs ppp[87560]: [wan] IFACE: Down event
Oct  4 00:36:28 pfs ppp[87560]: [wan] IFACE: Rename interface pppoe0 to pppoe0
Oct  4 00:36:28 pfs ppp[87560]: [wan] IFACE: Set description "WAN"
Oct  4 00:36:28 pfs ppp[87560]: [wan] IPCP: Down event
Oct  4 00:36:28 pfs ppp[87560]: [wan] IPCP: LayerFinish
Oct  4 00:36:28 pfs ppp[87560]: [wan] Bundle: No NCPs left. Closing links...
Oct  4 00:36:28 pfs ppp[87560]: [wan] IPCP: state change Closing --> Initial
Oct  4 00:36:28 pfs ppp[87560]: [wan] Bundle: Last link has gone, no links for bw-manage defined
Oct  4 00:36:28 pfs ppp[87560]: [wan_link0] LCP: SendTerminateAck #25
Oct  4 00:36:28 pfs ppp[87560]: [wan_link0] LCP: LayerDown
Oct  4 00:36:28 pfs ppp[87560]: [wan_link0] PPPoE: connection closed
Oct  4 00:36:28 pfs ppp[87560]: [wan_link0] Link: DOWN event
Oct  4 00:36:28 pfs ppp[87560]: [wan_link0] LCP: Down event
Oct  4 00:36:28 pfs ppp[87560]: [wan_link0] LCP: state change Stopping --> Starting
Oct  4 00:36:28 pfs ppp[87560]: [wan_link0] Link: reconnection attempt 1 in 4 seconds
Oct  4 00:36:32 pfs ppp[87560]: [wan_link0] Link: reconnection attempt 1
Oct  4 00:36:32 pfs ppp[87560]: [wan_link0] PPPoE: Connecting to ''
Oct  4 00:36:41 pfs ppp[87560]: [wan_link0] PPPoE connection timeout after 9 seconds
Oct  4 00:36:41 pfs ppp[87560]: [wan_link0] Link: DOWN event
Oct  4 00:36:41 pfs ppp[87560]: [wan_link0] LCP: Down event
Oct  4 00:36:41 pfs ppp[87560]: [wan_link0] Link: reconnection attempt 2 in 2 seconds
Oct  4 00:36:43 pfs ppp[87560]: [wan_link0] Link: reconnection attempt 2
Oct  4 00:36:43 pfs ppp[87560]: [wan_link0] PPPoE: Connecting to ''
Oct  4 00:36:52 pfs ppp[87560]: [wan_link0] PPPoE connection timeout after 9 seconds
Oct  4 00:36:52 pfs ppp[87560]: [wan_link0] Link: DOWN event
Oct  4 00:36:52 pfs ppp[87560]: [wan_link0] LCP: Down event
- This is an old bug but might still be an issue.
- Network Card (NIC) can lock up, this explains the network is down but the console can still be accessed.
- Long internet outage bug
- pfBlockerNG
- The updates can apparently bring the WAN down, but this might be an old bug.
- FreeBSD
- Might have issue with PPPoE
Solutions
- Remove network cable from the ONT and put back in.
- Reboot/power cycle the ONT.
- Reboot pfSense
- This might have the same effect as removing the ethernet cable from the ONT.
- Update pfSense to the latest version
- this can resolve bugs and driver issues.
- Swap the network card
- Card might be faulty
- Realtek NICs have a known fault where then can lock up
- Make sure the swerver is kept cool to prevent the NIC overheating.
- Setup a CRON to automatically reboot the pfSense router
- This is not recommend because you should never have to reboot pfSense and so you are just hiding the issue you are trying to fix rather than fixing it.
- Useful if you are going on holiday and do not have time to fix a particular issue
Notes
- Bug #13092: PPPoE WANs fail to reconnect after parameter negotiation failure - pfSense - pfSense bugtracker
- After a six hour ISP outage, the service was restored but pfSense didn't automatically re-establish the PPPoE connection and a reboot of the router (Netgate 1100) was required to re-establish. Shorter outages don't seem to affect automatically reauthenticating.
- PPPoE WAN fails to reconnect after link loss | Netgate Forum
- I'm using pfSense 2.4.3 with
emIntel network interfaces and my WAN is PPPoE based. When the connection drops for any reason, pfSense does not reconnect until a full system reboot is done. - The same WAN in a domestic router (e.g. TP-Link) reconnects just fine. I found a similar issue on Redmine but it is from six years ago.
- I have to reboot the whole pfsense box. Then it gets connected automatically. But I have tried restarting the nic it does not help.
- The threas has some great diagnostic ideas.
- I'm using pfSense 2.4.3 with
- Bug #1943: PPPoE won't reconnect after link loss when using vr(4) NICs on certain ISPs only - pfSense - pfSense bugtracker
- We got a wan interruption (they cut the cable while doing road works), and after everything was reconnected the pppoe interface doesn't come up automatically (wait many minutes).
- Disable-Enable the WAN interface doesn't help, and I restored the pppoe connection with this command:
/usr/local/sbin/pfSctl -c 'interface reload wan'
- PPPOE randomly disconnect on PfSense, have to reboot to reconnect | Reddit
- I just moved to PfSense as main router. Now I suspect some issue that WAN (PPPoE) randomly disconnect without any symptoms. There's no way to "reconnect", only the reboot helps.
- I had a similar issue when I first setup pfsense 2 weeks ago. pfsense pings the ISP gateway address every second or so to determine whether the connection is still working or not. Turns out the gateway of my ISP didn't respond to pings so after several attempts, pfsense initiates a reconnect. After doing this several times it would just fail to connect at all until rebooted. Finally found the solution that worked for me in the forum's for my ISP. I went to to System -> Routing, clicked the "Edit" icon next to the WAN PPPoE gateway and changed the "Monitor IP" to something like Google DNS 8.8.8.8 (or any other reliably online IP address that accepts pings). I haven't had any trouble since.
- I just had this exact same issue except on internal LAN. Like clockwork, once an hour i would completely loose internet connection and then it would come right back up. It was a hard drop. It ended up being pfblockerng pulling down updates and refreshing. I changed the schedule from once an hour to 3am. I didn't need the update to be that aggressive anyways. Perhaps this is what your issues is as well. GL!
- Pfsense on Hyper-V PPPoe Reconnect Issue | Reddit
- Q:
- My dedicated pfsense pc died today so I decided to finally virtualize it in Hyper-V on my Server 2019 machine. I've got it up and running no problem but I've encountered an issue when the host restarts. The machine has two NICs, set as separate virtual switches in Hyper-V. WAN switch has host OS access disabled and all hardware offloading is disabled on both switches.
- Issue is: when the host restarts and PFsense comes back up, the PPPoE connection is not re-established. Going into the PFsense GUI and disabling then re-enabling the WAN interface brings it back up again.
- A:
- Do your PPPoE logs show an empty PADO response?
- I've seen this randomly for *years* when using PPPoE. (edit, it's not specific to HyperV) AFAIK it's an issue with FreeBSD upstream, and not something which has ever been fixed. For whatever reason the netgate devs ignore any thread on the forum discussing it too... Indeed, disabling / enabling the interface, or rebooting, fixes it.
- It's an horrific bug. I spent some time with my ISP attempting to diagnose it, indeed, sniffing the interface shows a
- I've totally given up on PPPoE in pfsense, YMMV.
- Q:
- PPPoE reconenction fix - 2023 | Netgate Forum
- PPPoE via a Openreach ONT has been a headache for me with dropped connections, crashing on interface changes and multiple attempts to achieve a PPPoE handshake.
- In my case this was linked to IPv6 being enabled (as it should be) and a race condition with v23.01. The patch applied in the v23.05 update appears to have stopped all the symptoms.
- The only thing I could test changing interface details and bringing the PPPoE down and up again. Early days for sure but to date it has been rock-solid and the ppp log file looks nice and healthy.
- PPPoe reconnect issue | Netgate Forum
- I have an issue when the router looses WAN connection on the pppoe link, the link does not automatically reconnect.
- I have to unplug the cable to the fibre ONT several times before it reconnects or I have to run this command several time to re-establish the connection:
/usr/local/sbin/pfSctl -c 'interface reload wan'
- Is there any missing config for auto reconnect?
- Every couple of weeks pfSense completly stops responding? | Netgate Forum
- Q: I remember that pfSense was not responding to pings nor I could get GUI to respond.
- A:
- Both those things would happen if the LAN NIC locked up as Realtek NICs sometimes do.
- But that would not stop the console responding and that's an important test. In the console is still responsive then you know you have a NIC issue. It is isn't you probably have some other hardware issue, bad ram overheating etc.
- iflib_netmap_config | Netgate Forum
- Q: I have been getting this message on reboot:
586.587322 [857] iflib_netmap_config txr 4 rxr 4 txd 1024 rxd 1024 rbufsz 2048 - A:
- Those are harmless information messages from the netmap kernel device during its initialization. It is printing out the current configuration of netmap based on the NIC driver being used. It is detailing the number of rings, TX/RX descriptors, and the buffer size that will be used.
- There is no way to stop the message. It comes from the kernel device itself. Nothing pfSense nor any packages can do about it.
- Q: I have been getting this message on reboot:
Crash debugging / Using the logs
- General
- I monitor my sites with uptimerobot so i know exactly when it goes down which is useful for looking in the logs.
- Diagnosing a PFSense Crash | Netgate Forum
- pfSense is based on FreeBSD, so most of documentation you will find here — https://www.freebsd.org/docs.html
- You can also change the default 50 entries behaviour of syslog via GUI, if you want more just look at
/status_logs_settings.phpon you pfSense firewall, you can even setup external syslog server and send all log directly to it. - most of crashes of stable 2.3 are related to NIC drivers and this is solvable problem in most cases
- System Logs
- Syslog
- System Monitoring — Remote Logging with Syslog | pfSense Documentation
- Status --> System Logs --> Settings (tab) --> Remote Logging Options
- The logs kept by pfSense® software on the firewall itself are of a finite size. Copying these entries to a syslog server can aid troubleshooting and allow for long-term monitoring. Having a remote copy can also help diagnose events that occur before a firewall restarts or after they would have otherwise been lost due to clearing of the logs or when older entries are cycled out of the log, and in cases when local storage has failed but the network remains active.
- Logs sent using this method are delivered in the clear (not encrypted) unless the logs are sent through a VPN or using a mechanism such as Stunnel package. As an alternative, consider using the syslog-ng package which supports encrypted syslog.
- The syslog daemon only supports sending messages over UDP. To send syslog messages over TCP, consider using the syslog-ng package.
- Some examples of free syslog servers.
- Remote Logging with Syslog | pfSense Documentation
- Syslog Explained | Cisco CCNA 200-301 - YouTube | CertBros - Using a SYSLOG server allows us to centrally manage our log information. Why would you want to do that? Well, there are a few reasons why.
- Free CCNA | Syslog | Day 41 | CCNA 200-301 Complete Course - YouTube | Jeremy's IT Lab - In Day 41 of this free CCNA 200-301 complete course, you will learn about Syslog.
- GitHub - Graylog2/graylog-guide-snort - How to send structured Snort IDS alert logs into Graylog - GitHub - Graylog2/graylog-guide-snort: How to send structured Snort IDS alert logs into Graylog.
- System Monitoring — Remote Logging with Syslog | pfSense Documentation
pfBlockerNG
General
- Official Websites
- pfBlockerNG | Netgate Forum
- pfBlockerNG | Reddit Forum
- Packages — pfBlockerNG Package | pfSense Documentation
- pfBlockerNG - pfsense/FreeBSD-ports · GitHub - FreeBSD ports tree with pfSense changes. These are the pfBlockerNG files that are merged into pfSense
- History for net/pfSense-pkg-pfBlockerNG-devel - pfsense/FreeBSD-ports · GitHub - FreeBSD ports tree with pfSense changes. Monitor the commits.
- pfBlockerNG - client facing - pfsense/FreeBSD-ports · GitHub - This subsection contains the GUI, client facing php files for pfBlocker. This link just makes it easier for me to find them as it is not obvious.
- Guides
- pfBlockerNG Guide - zenarmor.com (was sunnyvalley.io)
- Very in-depth pfBlockerNG Guide
- Includes Blocklists and relevant explantions
- Tutorial: pfsense and pfBlockerNG Version 3 | Lawrence Systems - This is the best instructions for installing pfBlockerNG
- pfBlockerNG on pfSense | Netgate | YouTube - The developer of pfBlockerNG goes through the settings in-depth
- pfBlockerNG Videos | Netgate | YouTube - Videos from netgate about pfBlockerNG
- pfSense pfBlockerNG configuration guide | nguvu.org - An in-depth tutorial with lots pictures and easy to read text.
- pfsense: Blocking Threats With pfblockerNG Lists | YouTube | Lawrence Systems
- How to Setup pfBlockerNG | protectli.com - A simple tutorial.
- PFSENSE WEB FILTER WITH PFBLOCKERNG - Filter Ads and Malicious Websites | YouTube
- A nice explanation of pfblockerNG and its implementation in pfSense! It was clear and succinct and actually much better than other intros done by native english speakers!
- How to Enforce pfBlockerNG DNSBL filtering for Specific Network Clients | mitky.com
- The default DNSBL lists found under ‘DNSBL Easylist’ are managed by AdBlock Plus and do well to block most ads across the internet from your entire network.
- pfBlockerNG includes two category-relevant lists: Shallalist maintained by Shalla Secure Services and ‘UT1‘, a domain blacklist maintained by Toulouse1 Capitole University. Both include millions of domains and will extensively block for the categories you select.
- [Guide] pfblockerNG Setup (pfSense Adblocking) - pfSense/Opensense - serverbuilds.net Forums
- Introduction This guide will get you started with blocking ads on your pfsense router using a package (plugin) called pfblockerNG. This package is functionally similar to the popular standalone tool ‘pihole,’ with the added bonus of integrating directly with your pfsense router. It’s a much more robust solution than just using adblocking extensions in your browser (though we will cover that, along with added benefits of combining the two, later on).
- pfSense DNSBL - No more ads for me!
- Some time ago I setup my pfSense DNSBL, and I wanted to share my configuration and results. A DNSBL is a list of domains that the application/network does not properly resolve, hence the “black-hole”. Originally, DNSBLs prevented spam e-mails from reaching users. In this case, I wanted to block as many ads, malvertising, etc. as possible.
- Setup Guide / Tutorial for pfBlockerNG 2.2.5 on pfsense with DNSBL & GeoIP Blocking | Lawrence Systems
- Block Ads & Malvertising on pfSense Using pfBlockerNG (DNSBL) - Linux Included
- This walkthrough uses the DNSBL portion of pfBlockerNG to remove ads/advertising and more importantly, malvertising. It essentially creates a functionality similar to the pi-Hole project except it doesn’t require a separate piece of hardware. Instead, you just use your pfSense + pfBlockerNG! If you're interested in a write-up on installing/configuring the pi-hole on Ubuntu, I have one here. Please note this walkthrough is for the devel version of pfBlockerNG.
- How to block ads on pfsense with pfBlockerNG and Dnsbl? - 2021 - how ad blocking is managed by pfsense pfblockerng. dnsbl is configured with steven blacklist to block ads, malware, gambling, and adult content.
- GitHub - ahuacate/pfsense-pfblockerng: How to configure pfBlockerNG
- Disable pfBlockerNG On Specific Interface Only? | Reddit - No meta description
- To disable DNSBL blocking on a LAN device, Goto Firewall > pfBlockerNG > click the DNSBL tab > enable Python Control, DNSBL Blocking and Python Group Policy. Next, scroll down to Python Group Policy and click the +. You will now see a box where you can add LAN IP's that will be bypassed by DNSBL. Save and do a Force Update after adding IP(s). I add my device IP's so I am not sure whether or not it would work on an interface IP.
- To disable IP blocking on an interface goto Firewall > pfBlockerNG > click the IP tab > scroll down to IP Interface/Rules Configuration and make sure your interface you do not want IP blocking on is de-selected.
- How to Enforce pfBlockerNG DNSBL filtering for Specific Network Clients
- How to use pfBlockerNG-devel to filter content for clients while allowing specific IPs or networks to bypass DNSBL and visit the web normally.
- This is a good article on configurign your pfBlockerNG.
- Selectively enforcing pfBlockerNG for specific clients or networks
server: access-control-view: 192.168.10.0/24 bypass access-control-view: 192.168.20.0/24 dnsbl view: name: "bypass" view-first: yes view: name: "dnsbl" view-first: yes include: /var/unbound/pfb_dnsbl.*conf - Some additional TOR lists
- pfBlockerNG Guide - zenarmor.com (was sunnyvalley.io)
- pfBlockerNG vs PiHole
- pfSense pfBlockerNG vs Pihole Pros and Cons - Virtualization Howto - There are two open-source solutions available for download today, pfSense pfBlockerng and Pihole, that are each great solutions in their own right. However, each has pros and cons that may suit some better than others.
- Interfaces
- Packages — pfBlockerNG Package | pfSense Documentation
- Set the interfaces to be monitored by pfBlockerNG (both inbound and outbound), where the inbound is the Internet connection.
- To prevent devices or users from accessing sites in the selected countries/IP addresses, select local interfaces under outbound.
- pfSenseNG does not support Interface Groups as you need to configure the individual network interfaces as
InorOut. - pfBlockerNG on interface groups | Reddit
- my current pfSense rule setup uses interface groups in order to define rules for a number of subnets and VPNs that belong together (e.g. an "Office LAN" interface group that allows 443/80 to the internet and denies anything else).
- The problem here is that I can't apply pfBlockerNG rules to an interface group. Since the rule processing order is "Floating" -> "Group Rules" -> "Interface Rules", traffic from the Office LAN group to the Internet (Port 80/443) hits the "allow" rule in the Group rules first, and the pfBlockerNG rules are never evaluated.
- The way I understand it, I'm currently forced to use Floating Rules, which is too generic for me. Is there another way around it? Is pfBlockerNG considering supporting Interface Groups as targets for auto rule creation?
- Packages — pfBlockerNG Package | pfSense Documentation
- Blocks Lists / Feeds
- IPv4 Blocklists focus on attacks (Inbound) and security where as DNSBL focus on privacy and advertising (Outbound). They are not mutually exclusive though.
- Look at selecting your preference of IPv4 and DNSBL blocklists but do not select them all.
- To see the what IPs a pfBlockerNG rules is actually blocking, goto your firewall rules and hover over the alias on a firewall rule.
- Firewall --> Rules --> LAN --> Destination: pfB_PRI_v4
- This modal window is limited in the amount of records it can show.
- The default PRI1 - Collection is pretty good for stopping ADs
- Reports and Stats
- Firewall --> pfBlockerNG --> Reports
- Reports Homepage
- Firewall --> pfBlockerNG --> Reports --> Alerts
- See blocks happening here
- This will show actual blocks and what Blocklist stopped it
- Firewall --> pfBlockerNG --> Reports
- Logs
/var/unbound/var/log/pfblockerng/
- Upgrading pfBlockerNG
- Always check the related blog post for the update as it will have relevant information
- How to change pfBlockerNG Branch
- Firewall blocks, Pfblocker, multicast | Netgate Forum
- BBcan177
- First make sure that "Keep Settings" is enabled.
- Disable pfBlockerNG and Save
- Then Uninstall pfBlockerNG
- Then install pfBlockerNG-devel
- Re-enable pfBlockerNG-devel and run a: Force Reload - All
- Using Interface Groups
- Currently pfBlockerNG cannot utilise 'Interface Groups'
- pfBlockerNG on interface groups | Reddit
- The way I understand it, I'm currently forced to use Floating Rules, which is too generic for me. Is there another way around it? Is pfBlockerNG considering supporting Interface Groups as targets for auto rule creation?
- Feature #14100: Use interface groups as an Alias for IP Interface/Rules Configuration - pfSense Packages - pfSense bugtracker
- I have asked here to see if the 'Interface Groups' can be used as an alias for the 'IP Interface/Rules Configuration'
- I would call my groups
- Name: Privacy_GWIG
- Description: Privacy Gateway Interface Group
- What I did so it would fit in with my instructions (if it worked)
- Create interface
- Add in the interface group
- Add in the gateway group
- update the pfBlockerNG 'IP Interface/Rules Configuration' assignments
- Firewall --> pfBlockerNG --> IP --> IP Interface/Rules Configuration
- Interface groups were not present and rebooting did not work
- I wanted to move all of my OPENVPN Gateway Interfaces into a group and just alter the group rather than changing assignments all the time, just like alias.
- Ability to use pfBlockerNG Python mode and Unbound (FIXED in 2.7.0)
- 2.7.0 New Features and Changes | pfSense Documentation
- A long-standing difficult-to-reproduce crash in Unbound during reloading has been addressed. Christian McDonald tracked down the source of the Unbound SIGHUP crashes to a reference counting bug within the MaxMindDB Python module. Both a patch to MaxMind and a port revision to FreeBSD ports were submitted and accepted, and the fix is included in the 2.7.0 release.
- It is now safe again to enable DHCP registration alongside Unbound Python mode in pfBlockerNG.
- In addition to the Unbound crash, Christian also identified a memory leak with DHCP registration and Unbound Python mode (#10624). This is largely mitigated by updates to Python and related libraries, but there is additional ongoing work to resolve it further for future release.
- Releases — 23.01 New Features and Changes | pfSense Documentation
- A long-standing difficult-to-reproduce crash in Unbound during reloading has been addressed. Christian McDonald tracked it down the source of the Unbound SIGHUP crashes to a reference counting bug within the MaxMindDB Python module. Both a patch to MaxMind and a port revision to FreeBSD ports were submitted and accepted, and the fix will be included in the 23.01 release. It is now safe again to enable DHCP registration alongside Unbound Python mode in pfBlockerNG.
- In addition to the Unbound crash, Christian also identified a memory leak with DHCP registration and Unbound Python mode (#10624). This is largely mitigated by updates to Python and related libraries, but there is additional ongoing work to resolve it further for future release.
- sg-1100 2.4.5 unbound python module + DHCP lease DNS registration memory leak | Netgate Forum
- This has been addressed in the latest snapshots.
- We are testing the changes and will include them in 23.01 which is due soon.
- Register DHCP leases in the DNS Resolver will work again in pfSense+ 23.01 | Reddit.
- BBCan177
- With the work that Christian has committed so far, it should allow for the Unbound Python mode and the DNS Resolver Register DHCP leases to be used together. With these changes, it will still reload Unbound. It will cause a short DNS blackout until it's reloaded, but python mode is quicker than Unbound Mode. It is best to add as many Static DNS entries as possible and set long lease times.
- The second Redmine, as Christian stated, will take some more development, but that will use Unbound-control to add/remove dhcp lease changes without needing to Reload Unbound and having any blips in DNS coverage.
- BBCan177
- BBcan177 | creating pfBlockerNG: A Firewall - IP and Domain Management pack | Patreon
- For pfSense 2.6, there is still a restriction for DHCP Registration and DNSBL Python mode. To overcome this restriction, you will need to migrate to pfSense CE or pfSense + due to python compatibility issues
- There is a typo above. This is not fixed on the CE version of pfSense yet.
- Is it Possible Now? pfBLockerNG-devel in Unbound python mode with DHCP Registration using pfSense 2.6.0 : pfBlockerNG
- Still unresolved
- Python DNSBL mode is not compatible with the DNS Resolver DHCP Registration option (Unbound will Crash)!
- From the code: DNSBL Python mode is not compatible with dhcpleases binary code, as it attempts to HUP the Unbound PID and will cause DNSBL Python mode to crash Unbound.
- BBCan177
- The DNS Resolver (Unbound) DHCP Registration option is not compatible with DNSBL Python mode. The pfSense devs are aware and changes are required to be made to the dhcpleases binary to stop/start Unbound instead of sending a SIGHUP. The use of this option and the Unbound Python mode will cause an Unbound crash.
- If DHCP Registration is enabled in Unbound Python mode, or DHCP Registration enabled after Unbound Python mode is enabled, Unbound Python mode will be downgraded to Unbound mode to prevent Unbound from crashing.
- I am not sure when the issue with DHCP Registration will be fixed. The pfSense devs have to modify the dhcpleases binary to stop/start Unbound instead of sending a HUP command which causes a "reload" and leads to a crash in Unbound with the Python mode enabled.
- This option: Services --> DNS Resolver --> General Resolver Options --> DHCP Registration
- If this option is set, then machines that specify their hostname when requesting an IPv4 DHCP lease will be registered in the DNS Resolver so that their name can be resolved. Note that this will cause the Resolver to reload and flush its resolution cache whenever a DHCP lease is issued.
- With 'DHCP Registration' disabled, machines that specify their hostname when requesting an IPv4 DHCP lease CANNOT be registered in the DNS Resolver so that their name can be resolved.
- See mitigations below.
- Unbound Python Mode - DHCP Registration Mitigations
- Use 'Static DHCP Leases' (Static Leases)
- Define the device's DHCP IP mapping: Services --> DHCP Server --> YOUR-INTERFACE (probably LAN) --> DHCP Static Mappings for this Interface
- Register the devices name manually in the DNS: Services --> DNS Resolver --> General Settings --> Host Overrides
- Services --> DNS Resolver --> General Settings --> (Static DHCP) Register DHCP static mappings: ticked
- Use Static IP addresses and then register the names manually in the DNS
- Set the IP: manually enter the settings on the device
- Register the names manually in the DNS: Services --> DNS Resolver --> General Settings --> Host Overrides
- devicename.local
- This will not register the devices name, so it will not change anything in pfSense
- Windows does not explicitly need a PC to register with DNS for it to contact it.
- If you are in a Windows only environment (and some others), if windows cannot resolve via DNS then it will do a NETBIOS broadcast for the device's name in the .local domain.
- Use 'Static DHCP Leases' (Static Leases)
- 2.7.0 New Features and Changes | pfSense Documentation
- Sync / Push Configs to remote pfBlockerNG instance
- Firewall --> pfBlockerNG --> Sync
- This feature allows you to push one pfBlockersNG configuration to a remote pfBlockerNG instance.
- A push event will will occur on a Force Update or Cron event.
- The documentation needs some improve ment which I have reported here: Todo #14221: Sync settings and inline documentation needs improving - pfSense Packages - pfSense bugtracker
- XMLRPC Replication Targets
- You can use the 'admin' account of the remote pfSense router but creating a second user in a restricted groug just for the pfBlockerNG syncs is preferable so you do not expose your primary admin account.
- Use the same protocol/ip/hostname/port of the remote pfSense router.
- HTTP is insecure because your password will be transmitted in plain text so always use HTTPS
IPv4 Whitelists
- There are 3 ways to Whitelist IPs
- Firewall --> pfBlockerNG --> IP --> IPv4 Suppression
- Firewall --> pfBlockerNG --> IP --> IPv4 --> Add --> Permit
- Firewall --> pfBlockerNG --> IP --> IPv4 --> Add --> (Alias | Alias Native)
- Now make a Firewall rule manually and add use this alias
- Warning: traffic that is allowed by these pfBlockerNG/Firewall rules will causes further processing of rules to be stopped and the traffic will pass to the appropriate interface
Sometimes when you import a feed it will include certain IPs or ranges that will prevent your local devices or external devices accessing assets on your network. This issue can easily be overcome with Whilisting without having to disable a whole feed which other than these exceptions is exactly what you want.
We will use the inbuilt pfBlockerNG mechanism so the rules are always placed where they should be. If you use the manual alias method you might have to keep moving your rule to the top of the firewall floating rules list everytime you refresh your rules.
When using Whitelisiting on 'outbound interfaces' you are not forced to use 'Advanced Firewall Rules' which means you can leave the protocol setting on 'Any' which allows such protocols as ICMP. It is only on 'inbound interfaces/rules' you are forced to use 'Advanced Inbound Firewall Rule Settings' which then forces you to select a protocol, and the protocol list is very limited.
Whitelist - IPv4 Suppression customlist (preferred method)
- This removes the entries from pfBlockerNG's Deny aliastable, pfBlockerNG then acts as if the IPs were never added in the first place.
- This method will still required your traffic to be allowed on your interfaces with firewall rules.
- You can be more specific with the rules on your interfaces when using this method.
- These entries might get lost in a large list if you use the IPv4 Suppression feature a lot, but they will still work.
- Suppression will only handle IPs in a CIDR /32 or /24 format. For larger ranges you need to use another method.
- Firewall --> pfBlockerNG --> IP --> IPv4 Suppression
- Add the following lines to the top of the list:
191.101.64.81/32 # BBC.com
151.101.192.81/32 # BBC.co.uk
- Firewall --> pfBlockerNG --> Update --> Force Reload (IP)
- Add the following lines to the top of the list:
- This is a simple way of removing IPs from the Deny aliastable with a few limitations.
- This suppression list is for [ /32 or /24 ] IPv4 addresses only!
- When manually adding an IPv4 address [ /32 or /24 only! ] to this Suppression List, you must run a "Force Reload - IP" for the changes to take effect.
- Add an IP supression from the Alerts tab (this is for an IP record, the options change depending on the record type)
- Firewall --> pfBlockerNG --> Alerts --> go to relevant record row --> click the
+icon
- Read the information

- Do you want to Supress or Add to a Permit Whitelist Alias?: Suppress

- Select Suppression Mask: Supress /32 (/32 = single ip, /24 = Class C network i.e. 10.0.0.x)

- Do you want to add a description (optional)
 ss
ss
- Please enter a Supression description: Test suppression

- Please enter a Supression description: Test suppression
- The entry is now added

- The list is here (Firewall --> pfBlockerNG --> IP --> IPv4 Suppression)

- You do not need to do "Force Reload - IP" for the changes to take effect when using this method.
- Firewall --> pfBlockerNG --> Alerts --> go to relevant record row --> click the
Whitelist - IPv4 Whitelist using Custom_List (from Alerts tab)
You can add IPv4 entries from the Alerts tab and here is how you do it.
- Firewall --> pfBlockerNG --> Alerts --> go to relevant record row --> click the
+icon - Read the information
- Do you want to Supress or Add to a Permit Whitelist Alias? Whitelist
- Option 1 - No whitelist
- Select Whitelist: Create new pfB_Whitelist_v4

- Because pfBlockerNG knows there is no whitelist it is asking us to create on.
- Do you want to add a description?: No
- If you select Yes, the IP address and description will not get transfered, this is a bug.
- Confirm the whitelist by just click save, you do not need to do anything else.

- The whitelist has been created and the IP entry added.
- The whitelist is here: Firewall --> pfBlockerNG --> IP --> IPv4 --> IPv4 Summary
- it is called
Whitelistbut its pfSense identification ispfB_Whitelist_v4
- Select Whitelist: Create new pfB_Whitelist_v4
- Option 2 - White list is already created
- Select Whitelist: pfB_Whitelist_v4

- I am not sure how to add addition whitelists here
- Do you want to add a description?: (optional)
- Enter the description

- Enter the description
- The entry is now added with an optional description

- Select Whitelist: pfB_Whitelist_v4
- The IP has been added to the Whitelist.
- The whitelist is here: Firewall --> pfBlockerNG --> IP --> IPv4 --> IPv4 Summary
- it is called
Whitelistbut its pfSense identification ispfB_Whitelist_v4
Whitelist - IPv4 Custom_List (Manual)
- Your LAN and BRIDGEDVPN must assigned as Outbound Firewall Rules in pfblocker
- This method works by adding a firewall allow rule before the pfBlockerNG Deny rule are processed.
- With this method you do not need rules on the interfaces to handle the traffic as they have already been allowed with this rule.
- This is for an outbound rule.
- Firewall --> pfBlockerNG --> IP --> IPv4 Summary --> Add
- Info
- Name: Whitelist_BBC
- Description: Allow BBC websites
- IPv4 Source Definitions
- none
- Settings
- Action: Permit Outbound
- Update Frequency: Never
- IPv4 Custom_List
- Enable Domain/AS: unticked
-
151.101.64.81
151.101.192.81
- Save
- Move the entry to the top of the 'IPv4 Summary' and Save. (This is not required but makes things easier to understand having your Whitelists at the top.)
- Reload the lists (Firewall --> pfBlockerNG --> Reload)
- Info
- In pfBlockerNG you will find it's advanced rules will only accept aliases of Network(s) type.
- If you wanted to further restrict by source you can do, but this will not allow IGMP packets because of a limitation in 'FreeBSD packet fence'. This might get fixed/improved in later version of pfSense.
- Create an alias with the IPs you whant to Whitelist
- Firewall --> Aliases --> Add
- Advanced Outbound Firewall Rule Settings
- Custom Source
- Enable: ticked
- Invert: unticked
- Source: Alias created above
Whitelist - IPv4 Feed
As above but instead of using a IPv4 Custom_List, but you use a feed (or multiple feeds). In fact you can probably do combination of both Feeds and IPv4 Custom_List.
This is possible, but there are restrictions. You can only define the protocol to be (UDP/TCP/TCP and UDP) and because of this I could only get http(s) monitors from uptimerobot.com working. Where I wanted to have Ping (ICMP) monitors running I could not because that protocol (ICMP) is not currently available. Feature request here: https://redmine.pfsense.org/issues/13202
This is a worked example to allow access to my Web Server from the UptimeRobot servers.
- Create a firwall alias for your web server
- Firewall --> Aliases --> IP --> Add
- Name: Web_Server_Local_IP
- Description: My Web Server's local IP address
- Hosts:
- IP of FQDN: 10.0.0.58
- Description: Local IP
- Firewall --> Aliases --> IP --> Add
- Create a Whitelist rule
- Firewall --> pfBlockerNG --> IP --> IPv4 --> Add
- Info
- Name: Whitelist_Web_Server
- Description: Allow access to Web Server from these IPs
- IPv4 Source Definitions
- Format: Auto
- State: On
- Source: https://uptimerobot.com/inc/files/ips/IPv4.txt
- Header/Label: UptimeRobot
- Settings
- Action: Permit Both
- Update Frequency: Weekly
- Weekly (Day of Week): Monday
- Advanced Inbound Firewall Rule Settings
- Custom Destination:
- Enabled: ticked
- Invert: unticked
- Alias: Web_Server_Local_IP
- Custom Protocol
- Custom Destination:
- Advanced Outbound Firewall Rule Settings
- Ignore
- Advanced Tuneables
- Ignore
- IPv4 Custom_List
- Ignore
- Info
- Click 'Save'
- Firewall --> pfBlockerNG --> IP --> IPv4 --> Add
Whitelist - Alias (Deny|Permit|Match|Native)
Firewall --> pfBlockerNG --> IP --> IPv4 --> Add
- Create an IP list but in select one of the following 4 Action types to generate a pfBlockerNG alias which all have their own feature set
- Alias Deny:
- Alias Permit:
- Alias Match:
- Alias Native: This create a native pfSense Alias that can be used as normal Alias through pfSense.
- There are a couple of different flavours of the Alias method.
- This type of list only generates a pfSense alias that you can use them in your own manual rules.
- This method allows for more complex rules but the downside is you have to manually create them.
- This will create the aliastable with the IPs, but will not create any rule You can create your rules as required and associate the aliastables in those rules.
- Alias Prefix
- When manually creating 'Alias' type firewall rules; Prefix the Firewall rule Description with pfb_ This will ensure that that Dashboard widget reports those statistics correctly. Do not prefix with (pfB_) as those Rules will be auto-removed by package when 'Auto' rules are defined. (This is from the Blue infoblock icon for the (Settings--> Action) in pfBlockerNG)
- BBcan177
- For Alias type rules, you need to prefix the Firewall Rule description with pfb_ for it to show in the Dashboard widget.
IPv4 Custom Blocklist
- pfBlockerNG Customize Blocklist » Simplificando Redes
- We present two ways to use pfBlockerNG to customize blocklist. Using customize blocklists allows to block specific domains.
- Using the Blacklist/Whitelist TLD
- Second way: Creating your static blocklist - uses the 'IPv4 Custom_List'
- We present two ways to use pfBlockerNG to customize blocklist. Using customize blocklists allows to block specific domains.
Notes
IPv4 Custom Blocklist
- If you set action to 'Permit Both' or 'Deny Both', pfBlockerNG will create a rule for the 'Inbound/Outbound Firewall Rules' groups as defined in pfblockerng (Firewall --> pfBlockerNG --> IP --> IP Interface/Rules Configuration)
- Enable Domain/AS
- Firewall --> pfBlockerNG --> IP --> IPv4 --> Add/Edit --> IPv4 Custom_List --> Enable Domain/AS
- This enabled Domain/AS resolution, if it is not ticked domains and ASN that are added will not work. If disabled, the list requires lesss processing.
- Domain names or AS numbers, will be converted into their respective IPv4 addresses.
- Autonomous system (Internet) - Wikipedia - this explains what the AS number (ASN) is.
- Direction of IpV4 Custom_List
- IN OUTBOUND interfaces/rules : IPv4 Custom_List = the IP destination list
- IN INBOUND interfaces/rules rule : IPv4 Custom_List = the IP source list
- How to bypass a client IP in IP4? | Reddit
- BBcan177
- Best to use the Alerts tab to review the blocked events. Also recommend to use pfBlockerNG-devel which has an improved Alerts tab to add IPs to a whitelist, or suppress the IP if required. The firewall rules (stateful firewall) are processed top to bottom so you would add the IP to and permit rule so that it is not blocked by a block rule. Just be careful about permitting IPs inbound as you typically just need to allow the IP outbound.
- BBcan177
- Create a new alias and add these IPs that you want whitelist to the custom list at the bottom of the page, then in the Adv. Outbound Firewall rule settings, add an alias for the Lan IPs that this applies to. Then set the Action setting to "Permit Outbound".
- Check your firewall rule order setting to ensure permit rules are before the block rules (or opt for Alias type rules and manually create the firewall rules as required)
- Then you can use the Alerts tab (pfBlockerNG-devel) to add any new IPs to this new permit Alias as required.
- Firewall --> pfBlockerNG --> Reports --> Alerts
- BBcan177
- 'Advanced Inbound/Outbound Firewall Rule Settings' cannot use 'Any'
- Advanced Inbound Firewall Rule Settings - confusing description on Custom Protoc | Netgate Forum
- BBcan177
- Note: In general, Auto-Rules are created as follows: Inbound 'any' port, 'any' protocol, 'any' destination and 'any' gateway
- When you do not use Adv. In/Out settings, you need to leave the default as any…
- Once you add any SRC/DST/Ports settings etc in Adv. In/Out settings, you can't use any, and must use one of the other Protocol settings…. This is a limitation of FreeBSD packet fence...
- If, for example, you added Adv. In/Out settings, and left the Protocol as any, the additional SRC/DST/Ports settings etc are not utilized by packet fence and you will still see noise in the log for other blocked alerts which are already being blocked by the Default Block implicit rule.
- If you only have one open WAN port, then utilizing the Adv. Inbound Settings will reduce the noise hitting the WAN and will only log blocked attempts to the open WAN port (and other settings configured in the rule)
- There are settings for both Adv In/Out settings. So if you define the Adv Inbound but leave the Adv Outbound as is (default), then with Deny Both, the inbound rules are created with the Adv dst and port settings while the Outbound is set as default blocking anything outbound to those IPs.
- Note: In general, Auto-Rules are created as follows: Inbound 'any' port, 'any' protocol, 'any' destination and 'any' gateway
- BBcan177
- Advanced Inbound Firewall Rule Settings - confusing description on Custom Protoc | Netgate Forum
- Whitelist an IPv4
- IP Whitelisting in pfBlockerNG | Netgate Forum
- BBcan177
- Create a new 'Permit Outbound' alias in pfBlockerNG. Then add any IPs that you want to allow outbound in the custom list at the bottom of the permit alias.
- If none of the defined auto-rule options apply to your setup, then you will need to use 'alias type' settings and define the rules manually.
- BBcan177
- Custom IPv4 List
- Firewall --> pfBlockerNG --> IP --> IPv4 --> Add
- Name - Give this list a name such as 'Custom IP Whitelist'
- IPv4 Source definitions should be empty
- Action: (Permit Inbound|Permit Outbound|Permit Both)
- Pick what sort of whitelisting you want
- Update Frequency: Never
- Adjust the Advanced Inbound/Outbound firewall rule settings as required.
- If you are wanting to unblock outbound rules you could use the 'My_Local_Networks' alias.
- Put the IP(s) in the 'IPv4 Custom_List' box at the bottom
- Save
- This rule should go at the top of the list (for ease)
- Permit' rules create high priority 'pass' rules on the stated interfaces. They are the opposite of Deny rules, and don't create any 'blocking' effect anywhere. They have priority over all Deny rules.
- IP Whitelisting in pfBlockerNG | Netgate Forum
- Action Types explained

- Packages — pfBlockerNG Package | pfSense Documentation
- Disabled
- Will just keep selection and do nothing to selected Lists.
- Deny Inbound
- Will deny access from selected lists to the local network.
- Deny Outbound
- Will deny access from local users to IP address lists selected to block.
- Deny Both
- Will deny access on Both directions.
- Permit Inbound
- Will allow access from selected lists to the local network.
- This requires you to use the 'Advanced Inbound Firewall Rule Settings'
- Permit Outbound
- Will allow access from local users to IP address lists selected to block.
- Permit Both
- This requires you to use the 'Advanced Inbound Firewall Rule Settings'
- Match (Inbound|Outbound|Both)
- When you select "Match" it will only log the packets and nothing else.
- Alias (Permit|Deny|Match|Native)
- Alias Native would have the same net effect as the other options,but using it would involve less processing when updating the list but more processing while using the list because of how it makes the list.
- These options create an alias that can be used throughout pfSense starting with the prefix pfB_ and then the rule name added, but they will not appear in (Firewall --> Alias)
- When manually creating 'Alias' type firewall rules; Prefix the Firewall rule Description with pfb_ This will ensure that that Dashboard widget reports those statistics correctly. Do not prefix with (pfB_) as those Rules will be auto-removed by package when 'Auto' rules are defined.
- All the alias options do the same and create a single alias. The action type is just used as a visual indicator as to what YOU are using it for. The only exception is 'Alias Native' which still creates a single alias like the other alias options but without any Suppression or Deduplication, the Feeds are downloaded and used in its native format.
- PfBlockerNG Alias | Netgate Forum
- BBcan177 Explantion of Alias Action Type
- There are "Auto" generated rules from normal use of pfBlockerNG, and then there are "Alias" type rules.
- With "Alias" type rules, the pfBlockerNB package makes an Alias table for the feed with the IPs, and then you have to manually create the Firewall rules according to your network needs using the newly created Alias.
- When you select any of the Alias types [ Deny, Permit, Match or Native ], they do not create any Firewall rules, so in that sense there is no difference between any of those options. However, If you are going to use this Alias for a "Permit" rule, then select "Alias Permit".
- Alias Match, would be used for a rule whereby you just want to log packets that match the IPs in the list, but do not block or permit them... But selecting "Alias Match" and configuring the rule to be a "Permit" action is in essence the same. I would recommend to use Alias Permit for permit rules, and Alias Match for Match type rules.
- Alias Native is typically used instead of Alias Deny, where its used for a Block Type action, but the IPs do not go through the Suppression or Deduplication processes... IE: they remain native as per the source of the Feed.
- PfBlockerNG Alias | Netgate Forum
- BBcan177
- When you select "Permit" it will create rules to allow traffic.
- When you select "Match" it will only log the packets and nothing else.
- When you select "Native" its the same as "Deny" except that there is no Suppression or Deduplication, the Feeds are downloaded and used in its native format.
- There are "Auto" generated rules, and then there are "Alias" type rules. With "Alias" type rules, the pkg makes the Aliastable with the IPs, and then you have to manually create the Firewall rules according to your network needs.
- BBcan177
- When you select any of the Alias types [ Deny, Permit, Match or Native ], they do not create any Firewall rules… So in that sense there is no difference between any of those options... However, If you are going to use this Alias for a "Permit" rule, then select "Alias Permit"...
- Alias Match, would be used for a rule whereby you just want to log packets that match the IPs in the list, but do not block or permit them... But selecting "Alias Match" and configuring the rule to be a "Permit" action is in essence the same.... I would recommend to use Alias Permit for permit rules, and Alias Match for Match type rules.
- Alias Native is typically used instead of Alias Deny, where its used for a Block Type action, but the IPs do not go thru the Suppression or Deduplication processes... IE: they remain native as per the source of the Feed.
- aborsic
- To recap the discussion, would it be correct to state the following:
- "Alias Permit", "Alias Deny", "Alias Match", and "Alias Native" do not create any rule, but they just create lists of IPs (aliases)
- There is not difference in the IP lists created by "Alias Permit", "Alias Deny", "Alias Match", and "Alias Native"
- The "Permit", "Deny", "Match", and "Native" indicates only the intended purpose of the created alias, but actually selecting one alias type versus an other would not make any difference.
- This what I understood from the discussion, and would be very thankful if you kindly confirm whether this is correct.
- To recap the discussion, would it be correct to state the following:
- SteveITS
- So while using Alias Native would have the same net effect, using it would involve less processing when updating the list but more processing while using the list.
- Alias Native does not look for duplicates.
- However you should all probably read this thread (IP not covered in generated deny alias) which seems to have found that Alias Deny will remove IPs found in other lists which may not be the result you want, if rules for both lists are not denying the same port.
-
Translation
- All alias action types create a pfSense Alias
- Deny/Permit/Match are functionally all the same with the following exceptions
- Deny has de-duplication performed on it (but has a wiered behaviour)
- When you use the Alerts tab to add something to a Whitelist or Blocklist, then these action types might have a function by the Alerts Tab filtering available pfBlocker Aliases by action type depending on whether the user wants to Block or allow an IP..
- Native
- creates an alias from the raw sources without any CIDR processing or de-duplications.
- There is a potential issue with the de-duplication process, read this article (IP not covered in generated deny alias)
- BBcan177
- BBcan177 Explantion of Alias Action Type
- IP not covered in generated deny alias | Netgate Forum
- Alias Deny's are subject to being processed, Alias Native's are not.
- If I'm reading this right, it would appear that all Alias feeds (regardless of which Alias group they are in) except Native feeds, are evaluated and deduped as a whole. If this is correct it certainly isn't the way I thought it worked.
- Thanks for this. That sheds some light for me too. So if I understand right, when you have both permit and deny alias groups and/or your rules target disparate port sets, it's probably safest to have pfblocker generate native aliases and define independent firewall rules to utilise them. That, or disable deduplication. Does a CIDR aggregation also operate across multiple alias groups?
- So it seems to me that the deduping is only happening across lists that are in an Alias Deny group.
- In the Deny Alias vs Native Alias above, CIDR aggregation has no effect (on the results of the regex grep at any rate). I checked with it on and off.
- PfBlockerNG Alias types (Deny, Permit, Match, and Native) | Netgate Forum
- BBcan177 introduces Advanced Inbound Firewall Rules (old post)
- With v1.09 I have added "Adv. Inbound Firewall settings" where you can fine-tune the Inbound Port/Destination instead of needing "Alias" type rules… But for more complicated Rules, you can still use Alias types...
- When using De-duplication, all of the Aliases/Lists are acting as a whole. So one list can have a blocked range instead of many lists having the reference to a blocked range. So if you create alias type rules, you need to add rules for all of the aliases to get full coverage...
- With "Native", any lists that are used are not de-duplicated so that you can create a rule using that Alias for a certain configuration.... So its all about choice and what you are trying to achieve. Native is also good if you want to block say "Facebook" using the Hurricane Electric list. This way all of the IPs that the list has are used in the Alias without any chance of being affected by other Aliases.
- Match and Permit also do not use any De-duplication.
- BBcan177 introduces Advanced Inbound Firewall Rules (old post)
DNSBL
- Virtual IP Address
- Firewall --> pfBlockerNG --> DNSBL --> DNSBL Webserver Configuration --> Virtual IP Address
- When you do a DNS lookup it's DNS IP, if it is blocked, the DNS reply comes back as 10.10.10.1
- This is normal and means the domain is getting blocked and sent to the VIP.
- 10.10.10.1 is the default Virtual IP Address (VIP) pfBlockerNG uses to send rejected DNS requests too.
- Here is are screenshots of the DNSBL Blocked Pages.
- This is only displayed when a full Domain is blocked and not for an ADvert on a page! (e.g. https://click.redditmail.com/)

- This is only displayed when it is an ADvert that is being blocked, not a full domain. As you can see it is a single pixel so it can replace ADs without destroying the page. (e.g. https://click.redditmail.com/chicken/)

- This is only displayed when a full Domain is blocked and not for an ADvert on a page! (e.g. https://click.redditmail.com/)
- You can also create your own block page to display any customizations.
- Custom block web pages can be added to: /usr/local/www/pfblockerng/www/ folder.
- and then select the template here: Firewall --> pfBlockerNG --> DNSBL --> DNSBL Configuration --> Blocked Webpage
- This will only replace full domain blocks.
- It might be backup up when you backup your routers settings but this is untested by me.
- Permit Firewall Rules
- Firewall --> pfBlockerNG --> DNSBL --> DNSBL Configuration --> Permit Firewall Rules
- LAN Segment - Network Encyclopedia - Lan Segment is a physical portion of a local area network (LAN) that is separated from other portions by bridges or routers.
- Should "Permit Firewall Rules" be enabled? | Reddit
- You only need this if you're using the dnsbl web server..ie the page you're shown when you visit a blocked site (http only no HTTPS) and you operate multiple LAN segments/vlans.
- The DNSBL webserver is used to show a block page on http sites that you have a blocked domain for. ie it will show you a webpage that says "domain X is blocked and found on dnsbl list Y". This DNSBL Webserver server normally is only accessible to the LAN interface and so only your LAN clients would be shown this block page. If you want this DNSBL webserver available to show the block page your IOT or OPT Vlans, you need to check this box and select the interfaces you want it on.
- Do both conditions need to be true? yes, in order for the checkbox to have any practical use. If you are not using vlans that need to be shown the block page then this box will have no effect. Further, if your users aren't using HTTP to browse a website, the block page doesn't work at all. That said, there will not be any material harm to leaving it enabled.
- Feature #14196: permitted firewall rules - additional text - pfSense Packages - pfSense bugtracker - Can you add some additional information here for the end user to explain lan segment and some possible scenarios when you would use this option.
DNSBL Null Block
- DNSBL webserver https | Reddit
- Is it possible to assign a cert to the DNSBL Webserver so you don't get a 'cert invalid' error or to rederict the https request to the http version (guess not)?
- BBCan177
- No, that will not fix that issue... The browser will see the the cert doesn't match the blocked domain. Otherwise you would have to MITM the connection which the pkg doesn't do.
- You can create a new DNSBL Feed in DNSBL, and add those specific domains to the Custom list at the bottom of the page, and set the Logging to Disabled, and the Group Order to Primary. Follow that will a Force reload. This will null block (0.0.0.0) instead of using the DNSBL VIP address and avoid those cert errors.
- Its not needed with the upcoming python integration. You will be able to null block (0.0.0.0) and still get all the other DNSBL features and yes, it will allow null blocking logged events. - This is an old post.
DNSBL Whitelist
- Whitelisted Items in my feed update/reload
- Firewall --> pfBlockerNG --> Update
- When you do a Update/Reload you will see log messages showing that some of your DNSBL items are white listed (shown below) and this is normal but needs some explanation.
[ EasyList ]			 Reload [ 05/4/22 19:11:57 ] . completed ..
  Whitelist: adsafeprotected.com|amazon-adsystem.com|
  ----------------------------------------------------------------------
  Orig.    Unique     # Dups     # White    # TOP1M    Final
  ----------------------------------------------------------------------
  17237    17237      821        2          0          16414
  ----------------------------------------------------------------------
- I don't have a whitelist?
- Firewall --> pfBlockerNG --> DNSBL --> DNSBL Whitelist (at bottom of page)
- Yes you do, and it has some default entries:
s3.amazonaws.com
s3-1.amazonaws.com # CNAME for (s3.amazonaws.com)
.github.com
.githubusercontent.com
github.map.fastly.net # CNAME for (raw.githubusercontent.com)
.gitlab.com
.sourceforge.net
.fls-na.amazon.com # alexa
.control.kochava.com # alexa 2
.device-metrics-us-2.amazon.com # alexa 3
.amazon-adsystem.com # amazon app ads
.px.moatads.com # amazon app 2
.wildcard.moatads.com.edgekey.net # CNAME for (px.moatads.com)
.e13136.g.akamaiedge.net # CNAME for (px.moatads.com)
.secure-gl.imrworldwide.com # amazon app 3
.pixel.adsafeprotected.com # amazon app 4
.anycast.pixel.adsafeprotected.com # CNAME for (pixel.adsafeprotected.com)
.bs.serving-sys.com # amazon app 5
.bs.eyeblaster.akadns.net # CNAME for (bs.serving-sys.com)
.bsla.eyeblaster.akadns.net # CNAME for (bs.serving-sys.com)
.adsafeprotected.com # amazon app 6
.anycast.static.adsafeprotected.com # CNAME for (static.adsafeprotected.com)
google.com
www.google.com
youtube.com
www.youtube.com
youtube-ui.l.google.com # CNAME for (youtube.com)
stackoverflow.com
www.stackoverflow.com
dropbox.com
www.dropbox.com
www.dropbox-dns.com # CNAME for (dropbox.com)
.adsafeprotected.com
control.kochava.com
secure-gl.imrworldwide.com
pbs.twimg.com # twitter images
www.pbs.twimg.com # twitter images
cs196.wac.edgecastcdn.net # CNAME for (pbs.twimg.com)
cs2-wac.apr-8315.edgecastdns.net # CNAME for (pbs.twimg.com)
cs2-wac-us.8315.ecdns.net # CNAME for (pbs.twimg.com)
cs45.wac.edgecastcdn.net # CNAME for (pbs.twimg.com)
cs2-wac.apr-8315.edgecastdns.net # CNAME for (pbs.twimg.com)
cs2-wac-us.8315.ecdns.net # CNAME for (pbs.twimg.com)
cs45.wac.edgecastcdn.net # CNAME for (pbs.twimg.com)
.pfsense.org
.netgate.com
- If you enable DNSBL SafeSearch or DNS over HTTPS/TLS Blocking, these will be added to the Whitelist to prevent them being re-added from the standard DNSBL feeds but will still be blocked as normal.
- Firewall --> pfBlockerNG --> DNSBL --> DNSBL SafeSearch
- This explains why you have Whitelist entries that appear to be domains you want blocked or think are
- Should I remove the entries in the whitelist because I never added them?
- Looking at the entries I cannot see any harm in removing them. I will ask on the forum.
- I would definitly leave the following domains in for obvious reasons so no-one can pollute a feed and prevent my firewall updating.
.pfsense.org
.netgate.com
- DNSBL deny all except whitelisted | Netgate Forum
- How to Enforce pfBlockerNG DNSBL filtering for Specific Network Clients - How to use pfBlockerNG-devel to filter content for clients while allowing specific IPs or networks to bypass DNSBL and visit the web normally.
- Whitelisting : pfBlockerNG
- I loaded in a bunch of feeds, and all is working well. However, there are 3 domains that I need to whitelist for some users on our network.
- With Unbound mode, when a domain is block by TLD, you need to whitelist the root domain which will also whitelist any subdomains that are blocked. Other options include using the TLD Exclusion list to stop that Domain from being wildcard blocked and then whitelist the subdomain as required.
- With the new Unbound Python mode, you can now whitelist a sub domain even when it's wildcard blocked via TLD.
- BBCan177
- You don't need to add to the TLD Whitelist. Best to remove those entries and use only the DNSBL Whitelist (and best to whitelist from the Reports tab).
- That whitelist is only used when you are blocking whole TLD like "cn". So the TLD Whitelist, would allow you to add a "cn" domain to bypass the TLD cn blocking.
Exclude a local IP from DNSBL protection / Bypassing DNSBL for specific local IPs
There are a couple of different ways of bypassing the pfBlockerNG DNSBL.
Python Group Policy
This is a native pfBlockerNG feature where Python will make sure that DNS requests from the specified IPs will not be subject to it's DNSBL.
- Python Mode
- This requires pfBlocker to be in 'Unbound python mode'
- Firewall --> pfBlocker --> DNSBL --> DNSBL Mode = Unbound python mode
- Enable 'Python Group Policy'
- Firewall --> pfBlocker --> DNSBL --> Python Group Policy = ticked
- A new expandable section called 'Python Group Policy' will appear below. Expand this section.
- Enter the required IPs in the 'Bypass IP section'
- Click Save
- Do a Forced Reload
- Firewall --> pfBlocker -->Update
- This requires pfBlocker to be in 'Unbound python mode'
- Unbound Custom DNS options
- Bypassing DNSBL for specific IPs | Netgate Forum
- Allow local LAN clients to bypass pfBlockerNG
- Python mode is very iffy. I have found that using unbound custom dns options works way better to exclude hosts or networks from DNSBL where as python mode only allows /32 (Single IP) exclusions which isn’t very scalable at all. I would highly recommend that over python mode.
- The latest pfSense, and the latest pfBlockerNG makes it possible to exclude IP (or even networks ?) using the pfBlockerNG GUI.
- Select the (DNSBL) 'Python Group Policy' option and fill in the IP's.
- pfBlockerNG --> DNSBL --> Python Group Policy
- Bypassing DNSBL for specific IPs | Netgate Forum
Unbound Views
Views are possible in Unbound 1.6+ and can be used for bypassing DNSBL zones for specific IPs/ranges. I think the unbound process happens after the Python code has been run (if enabled) and is the base package for DNS on pfSense (DNS Resolver).
The solution is from Ns8h posted here Bypassing DNSBL for specific IPs | Netgate Forum along with some troubleshooting and more advanced examples.
- Add some stuff to the custom unbound options (tailored for needs)
- Services --> DNS Resolver --> General Settings --> Display Custom Options --> Custom Options
-
server: access-control-view: 192.168.0.2/32 bypass access-control-view: 192.168.0.0/24 dnsbl view: name: "bypass" view-first: yes view: name: "dnsbl" view-first: yes include: /var/unbound/pfb_dnsbl.*conf - Host 192.168.0.2 is able to bypass all pfBlockerNG inserted DNSBL zones but is able to resolve other local zones e.g. DHCP added zones. Everything else on the 192.168.0.0/24 subnet gets blocked as normal through DNSBL.
- Forec Reload pfBlocker
- Firewall --> pfBlockerNG --> Update --> Force Update
What pfBlockerNG rule was triggered?
- Quick easy way to determine if an IP is on a pfBlockerNG list? | Netgate Forum
- Every once in a while I'll see an IP has been blocked and want to determine if it is on a blocklist from pfBlockerNG and if so which one, is there an easy/quick way to do so? Right now I am just hovering over the rule and manually looking at the IPs, but this is tedious.
- You should be able to see this in the pfBlockerNG Alerts tab
- You can also grep from the shell:
cd /var/db/pfblockerng/deny/
grep "^1.2.3.4" *

Other examples:

grep "^1.2.3" *
grep "^1.2." *
grep "^1." *

add    | grep '/'  to only report CIDRs.
- How to find which pfBlockerNG rule is triggered by an IP/Domain
- This is also the same for normal firewall rules
- Status --> System Logs --> Firewall
- Do a DNS/IP request and then look at the logs
- Filter by local IP of your computer or of the remote domain/computer
- The rule name will be against the lookup
- NB: Rules need to have logging enabled on them. All of the pfBlocker rules have logging enabled by default
Alerts
- Alert Lists - Default Sort order
- Firewall --> pfBlockerNG --> Alerts
- When you click on column header to re-sort the records as you want, pfSense/pfBlockerNG remember this choice. This is also why there is no default sort order option.
- This setting must be saved locally on your pfSense box under your user preferences.
- This solution might be valid for other lists in pfSense
- Alerts - Unknown or Not listed error
- Firewall --> pfBlockerNG --> Alerts

- I get this quite often but it is normal.
- pfblockerng-devel error: Unknown Not listed! | Netgate Forum - This explains what is going on here.
- pfblockerng error: Unknown Not listed! | Netgate Forum
- Alerts will display Unknown Not listed when the IP is no longer in any IPV4 lists or during a Update as the database is being rebuilt.
- 'Unknown'
- This could be related to this IP being in a CIDR or an aggregated CIDR.
- What is "Unknown" feed? : pfBlockerNG
- BBCan117 - It's not listed anymore in DNSBL, so that it why it shows as "unknown". Maybe your OS/browser is caching the blocked domain. Are you getting any new events for that domain?
- This post is 4 years old and might be out of date.
- 'Not Listed
- I think this means the IP has been found in a CIDR or an aggregated CIDR. This should be changed to something like 'In CIDR'
- The IP has been flagged because it is in the list.
- There are 2 record shown on each row.
- Current rule that flagged this IP
- Previous rule that flagged this IP
- Firewall --> pfBlockerNG --> Alerts
pfBlockerNG DNSBL and IP Parser
This section is to educate people on what sort of formats pfBlockerNG can handle for it's DNSBL and IP feeds.
The file responsible for this code is pfblockerng.inc and is reference by line numbers as you go through the steps below.
Look at the in-built feeds in pfBlockerNG as they have quite a range but at least you know all of them work and are in an acceptable format.
Overview
- IP Block Lists
- There are no defined supported formats. All files are treated as text files and then an IPv4 and IPv6 regex is applied and all of the IPs are extracted allowing all formats and more (json, csv, xml, text).
- DNSBL
- CSV can only be used if they match one of the internally coded formats which are feed specific.
- Each line is processed as a single record
- If a valid (non 0.0.0.0 / 127.0.0.1) address is found on the same as a domain, then the domain is ignored.
- Domains are extracted (via various clean ups) from the record and then processed as you expect.
DNSBL Feeds
There is no Regex for grabbing domains from their feeds but there is a defined process that uses standard PHP functions and pfSense custom functions. This code also grabs any IP addresses it finds in the feeds.
Relevant Variables in the script
The variables below are useful in seeing what is going on in the parser:
- GitHub Lines 8342 - 8703
$header		= "{$row['header']}";
$liteparser	= FALSE;	// Minimal DNSBL Parser
$rev_format	= FALSE;	// Host style format is reversed
$domain_data_ip	= array();	// Array of IPs found in feed
$domain_data	= '';		// List of Domains found in feed
- The 'CSV Parser' processes one line of the feed per loop, and adds the domain to $domain_data_ip
- The parser is one giant loop that relies on a continue statement when matches on lines are made.
- Does the parser accept zips? The parser does not directly handle zips so if you can add a ZIP feed then this file type is handled upstream and the parser only ever sees the uncompressed file.
Parse downloaded file for Domain names - The Loop
Below is a quick overview of the most relevant parts of the DNSBL feeds parser. Notes are at the bottom
Start of Loop
- Initial Processing
- GitHub Lines 8349 - 8443
- // Validate EasyList/AdBlock/uBlock/ADGuard Feeds
- Checks for special sources and flags as needed
- // Remove any '^M' characters
- // Remove invalid characters
- Removes all unwanted characters from the beginning and end of the line
- If easylist skip the first line
- // If 'tab' character found, replace with whitespace
- // If '%20' found, remove.
- Remove whitespace
- // Remove comment lines and special format considerations
- Remove lines that start with #
- Remove special case lines that match these rules
- // Remove slash comment lines
- Remove lines that start with // to make comments
- // Remove any 'End of line' comments (Some contains commas)
- Comments that are allowed at the end of a line using #
- // Convert CSV line into array
- If source is a csv, convert line into an array and add to $csvline
- // Remove blank lines
- // CSV parser
- GitHub Lines 8446 - 8562
- Only run this section if a CSV is the source
- All CSV files are special case, there are no rules to handle unknown csv feed types. This probably because a CSV by definition is customized.
- If you want to use a CSV file, select a format of one of these special cases and the parser will not know any difference.
- This will exract one line from the csv and return it as a single line for the script as $line
- // EasyList Parser
- GitHub Lines 8565 - 8589
- Specific parser for easylost
- // Typical Host Feed format - Remove characters before space
- // Remove characters after space
- // Determine if line contains only an alpha-numeric Domain name
- // Lite Parser
- GitHub Lines 8591 - 8627
- This cleans up the line and extract the domain name (host name)
- This is the main code that extracts the domain and uses $host = parse_url($line)
- // If 'http|https|telnet|ftp://' found, remove
- // If '/' character found, remove characters after '/'
- // If '#' character found, remove characters after '#'
- // If '?' character found, remove characters after '?'
- // If special characters found, parse line for host
- // Remove any Port numbers at end of line
- // Collect any IPs found in domain feed
- GitHub Lines 8631 - 8641
- This will check the record for an IP address and store them in $domain_data_ip
- If an IP address is found, it is stored in $domain_data_ip and the script continues to the next record. Domain processing will be skipped for this line.
- This routine will extract and validate a single IP address. It expects only a single IP address.
- The function is_ipaddrv4() is located in the file /etc/inc/util.inc
- // Convert IDN (Unicode domains) to ASCII (punycode)
- GitHub Lines 8644 - 8660
- This just sanitizes the domains to ASCII
- // Domain Validation
- GitHub Lines 8666 - 8681
- Using pfSense functions make sure there is a valid domain in this line
- Write the domain to the relevant file
- GitHub Line 8697
- @fwrite($dhandle, $domain_data);
End Of Loop
- // Remove duplicates and save any IPs found in domain feed
- GitHub Lines 8712 - 8720
- Any IPs that have been found should be de-duplicated and stored
The rest of the does what it does, DNS lookup for all of the Domain names and then combines the 2 lists that have just been generated perhaps.
Notes
- A single line is processed as a single record
- All whitespace and tabs are removed
- All comment lines are removed (// and #)
- All 'End of line' comments are removed (#)
- All protocols are removed (http|https|telnet|ftp://)
- All port numbers are removed (:8080)
- All parts of the slug are removed (/snailsarebetter/thanslugs/)
- All queries are removed (?somevariable=here)
- Unwanted special characters are removed.
- IDN (Unicode domains) are converted to ASCII (punycode)
- CSV are handled as specific cases and must match to one of the specific rules otherwise they are failed.
- If an IP and a domain are on the same line in a feed, then domain is ignored unless (I guess) the IP address is an invalid one such as 0.0.0.0 or 127.0.0.1
- From BBCan117 - Block lists - Supported formats : pfBlockerNG
- One domain per line is the simplest format to maintain. It has parsers for many different feeds but those are all specific use cases.
- You can add ”#" comments which will be ignored. So have a # at the start of the line will ignore the whole line, have a # after the domain will collect the domain and skip the remaining comment.
- Do not use * (asterisks) or any other special characters unless it's in Puny code or ISDN (Unicode) format which is also acceptable
- For IP, one entry per line. Best as a single IP with or without CIDR. Using a range format is also acceptable but just takes more effort to convert. No special characters allowed., and the same syntax for comments as above.
IP Feeds REGEX (IPv4 / IPv6)
This is straight forward, the IP parser handles all sources as a text file and performs a regex on the file to extract all of the IPs. This means that you can supply almost any sort of feel such as CSV, XML, JSON, HTML or even PHP.
The relevant parser section is shown below with the regex that is used
Download and Collect IPv4/IPv6 lists
// IPv4 REGEX Definitions
$pfb['range']	= '/((?:(?:25[0-5]|2[0-4][0-9]|[01]?[0-9][0-9]?)\.){3}(?:25[0-5]|2[0-4][0-9]|[01]?[0-9][0-9]?))-((?:(?:25[0-5]|2[0-4][0-9]|[01]?[0-9][0-9]?)\.){3}(?:25[0-5]|2[0-4][0-9]|[01]?[0-9][0-9]?))/';
$pfb['ipv4']	= '/(?:(?:25[0-5]|2[0-4][0-9]|[01]?[0-9][0-9]?)\.){3}(?:25[0-5]|2[0-4][0-9]|[01]?[0-9][0-9]?)((\/(3[012]|[12]?[0-9]))?(?![-0-9a-zA-Z]))/';

// IPv6 REGEX Definitions - Reference: http://labs.spritelink.net/regex
$pfb['ipv6'] = '/((([0-9A-Fa-f]{1,4}:){7}([0-9A-Fa-f]{1,4}|:))|(([0-9A-Fa-f]{1,4}:){6}(:[0-9A-Fa-f]{1,4}|((25[0-5]|2[0-4]\d|1\d\d|[1-9]?\d)(\.(25[0-5]|2[0-4]\d|1\d\d|[1-9]?\d)){3})|:))|(([0-9A-Fa-f]{1,4}:){5}(((:[0-9A-Fa-f]{1,4}){1,2})|:((25[0-5]|2[0-4]\d|1\d\d|[1-9]?\d)(\.(25[0-5]|2[0-4]\d|1\d\d|[1-9]?\d)){3})|:))|(([0-9A-Fa-f]{1,4}:){4}(((:[0-9A-Fa-f]{1,4}){1,3})|((:[0-9A-Fa-f]{1,4})?:((25[0-5]|2[0-4]\d|1\d\d|[1-9]?\d)(\.(25[0-5]|2[0-4]\d|1\d\d|[1-9]?\d)){3}))|:))|(([0-9A-Fa-f]{1,4}:){3}(((:[0-9A-Fa-f]{1,4}){1,4})|((:[0-9A-Fa-f]{1,4}){0,2}:((25[0-5]|2[0-4]\d|1\d\d|[1-9]?\d)(\.(25[0-5]|2[0-4]\d|1\d\d|[1-9]?\d)){3}))|:))|(([0-9A-Fa-f]{1,4}:){2}(((:[0-9A-Fa-f]{1,4}){1,5})|((:[0-9A-Fa-f]{1,4}){0,3}:((25[0-5]|2[0-4]\d|1\d\d|[1-9]?\d)(\.(25[0-5]|2[0-4]\d|1\d\d|[1-9]?\d)){3}))|:))|(([0-9A-Fa-f]{1,4}:){1}(((:[0-9A-Fa-f]{1,4}){1,6})|((:[0-9A-Fa-f]{1,4}){0,4}:((25[0-5]|2[0-4]\d|1\d\d|[1-9]?\d)(\.(25[0-5]|2[0-4]\d|1\d\d|[1-9]?\d)){3}))|:))|(:(((:[0-9A-Fa-f]{1,4}){1,7})|((:[0-9A-Fa-f]{1,4}){0,5}:((25[0-5]|2[0-4]\d|1\d\d|[1-9]?\d)(\.(25[0-5]|2[0-4]\d|1\d\d|[1-9]?\d)){3}))|:)))(%.+)?(\/[0-9][0-9]?|1([01][0-9]|2[0-8]))?/';
Asset Locations
- pfBlockerNG Package on Github: https://github.com/pfsense/FreeBSD-ports/tree/devel/net/pfSense-pkg-pfBlockerNG-devel
- pfBlockerNF Feed List: https://github.com/pfsense/FreeBSD-ports/blob/devel/net/pfSense-pkg-pfBlockerNG-devel/files/usr/local/www/pfblockerng/pfblockerng_feeds.json
- pfBlockerNG Parser is in this file: https://github.com/pfsense/FreeBSD-ports/blob/devel/net/pfSense-pkg-pfBlockerNG-devel/files/usr/local/pkg/pfblockerng/pfblockerng.inc
- File locations | Netgate Forum
- /usr/local/pkg/pfblockerng/
OpenVPN
General
- Official Websites
- OpenVPN Support Forum - Official Forum
- Official Documentation
- OpenVPN Community Wiki and Tracker - This is the official OpenVPN community project wiki and bug tracker.
- Virtual Private Networks — OpenVPN | pfSense Documentation
- Which VPN should I choose?
- I went with Private Internet Access (PIA)
- Which VPN To Use In pfsense? - YouTube | Lawrence Systems
- Tutorials
- Site-To-Site
- Site To Site VPN Routing Explained In Detail | OpenVPN
- A site to site VPN setup is where two (or more) different networks are connected together using one OpenVPN tunnel.
- Linux based
- Routing internet traffic through a site-to-site OpenVPN-connection in PfSense 2.1 – Vorkbaard uit de toekomst - In this article I’ll show you how to create a site-to-site connection using OpenVPN and how to route the internet connection of site A through site B with PfSense 2.1RC0.
- 3-way routing | OpenVPN 2 Cookbook | packt
- For a small number (less than four) of fixed endpoints, a point-to-point setup is very flexible. In this recipe, we set up three OpenVPN tunnels between three sites, including routing between the endpoints. By setting up three tunnels, we create a redundant routing so that all sites are connected even if one of the tunnels is disrupted.
- Uses 'vpn_gateway'
- Routing Internet Traffic Through A Site-To-Site OpenVPN Tunnel | pfSense Documentation - This article shows how route Internet traffic from one site through a second site over OpenVPN on pfSense software.
- pfSense - OpenVPN Site-to-Site Setup (TUN) - Mayfield IT Consulting - How to establish a Site-to-Site VPN using pfSense and OpenVPN. This tutorial uses pfSense 2.4.4 and OpenVPN Server & Client packages.
- Routing Internet Traffic Through A Site-To-Site OpenVPN Tunnel | pfSense Documentation
- Site To Site VPN Routing Explained In Detail | OpenVPN
- OpenVPN Server (TUN / Routed / Standard)
- pfSense remote access via OpenVPN | nguvu.org - How to setup pfSense with DynamicDNS and OpenVPN. an in-depth tutorial with lots of pictures. It also handles setting up a Certificate Revocation List and a revocation of a certificate.
- OpenVPN Setup Guide for pfSense - pfSense® OpenVPN Setup Guide Basic pfSense Setup
- How to Setup your own OpenVPN Server in pfSense - In this guide, we're going to give you our step-by-step guide on how to setup your own OpenVPN server using pfSense.
- How to Set Up OpenVPN on pfSense in 2022 - This tutorial shows how to set up OpenVPN on pfSense to securely access your local network. Full VPN setup tutorial that walks through all settings.
- How to Setup OpenVPN Using pfSense? - In this lab, I am going to show you how you can set up an OpenVPN on your PfSense firewall. That way you can connect to your remote branch from anywhere on the internet.
- OpenVPN Server (TAP/Bridged)
- HOW TO: OpenVPN TAP Bridging with LAN | Netgate Forum - For a few days. I've been trying to get TAP to work. I finally found this guide last night, and it most definitely works!
- [pfSense] Bridging interfaces – Provya - A tutorial with images
- How To PFSense Configure Network Interface As A Bridge / Network Switch | cyberciti.biz - The server has four Ethernet ports. I’ve installed PFSense firewall on it and configure WAN + LAN ports. How do I setup IPv4 software bridge using PFSense so that the rest of ports act as a network switch?
- Open VPN as WAN / OpenVPN Client Gateway
- OpenVPN as a WAN on pfSense | YouTube | Netgate
- Setup as a WAN
- Policy routing
- Firewall rules
- OpenVPN as a WAN on pfSense | YouTube | Netgate
- Misc
- pfSense / OpenVPN IP assignments - Networking & Firewalls - Lawrence Systems Forums
- OpenVPN does not assign them LAN IP addresses that would be the same as another adapter because it is not designed to work that way. But you can use FreeRadius to assign each user a static IP in the OpenVPN IPv4 tunnel network range.
- How To Configure FreeRadius on pfsense and static assign IP addresses to VPN users - YouTube | Lawrence Systems
- pfSense / OpenVPN IP assignments - Networking & Firewalls - Lawrence Systems Forums
- Windows
- Troubleshooting
- Site-To-Site
- Misc
- When you make changes to the server you will most likely need to export the installer/Certs/Keys again for each client
- You dont have to use the wizard, easier when first setting up.
- One server per port
- When you delete a server, the unique ID goes back into the pool, so no single use
- When OpenVPn Client/Server services are manually stopped they will restart after a reboot.
- You must disable them to prevent restarting on reboot.
- This behaviour happens even without the package 'Service_Watchdog' being installed.
- If you rename a firewall rule created by the OpenVPN wizard and run the wizard again, you will find the wizard creates some new rules. If you dont rename your rules and re-rerun the wizard the previous rule with the same name will be replaced.
- Find out what version of OpenVPN your pfSense router is running
- Diganostics --> Command Prompt
- Execute the shell command:
openvpn --version
- pfSense 2.6.0 = OpenVPN 2.5.4 amd64-portbld-freebsd12.3 [SSL (OpenSSL)] [LZO] [LZ4] [MH/RECVDA] [AEAD] built on Jan 12 2022
- When you save or restart an OpenVPN server on pfSense it rebuils all of the .ovpn, key and certificate files. This means you cannot make manual modifications to the ovpn files.
- UDP is recommend unless you cannot get it to work because of your networks security in which case, then try TCP. TCP can have issues with how it handles traffic.
- UDP is definately much quicker.
- Firewall rules for OpenVPN are processed in the following order depending on what server they come in on and if they have been assigned.
- OpenVPN
- OpenVPN --> [Interface]
- OpenVPN --> RoutedVPN
- OpenVPN --> BRIDGEDVPN
- This means you can put firewall rules specific to an interface (if assigned) to control a specific OpenVPN server. Just remember not to make rules to broad (i.e. allow everything) as rules below this will then be ignored/not triggered.
- Virtual Private Networks — OpenVPN — OpenVPN Firewall Rules | pfSense Documentation
- Rules on the OpenVPN tab apply to all OpenVPN server and client instances.
- The OpenVPN interface may also be assigned (Assigning OpenVPN Interfaces) in which case there will be a separate firewall rule tab for that VPN, upon which rules can pass traffic for that specific VPN.
- Rules on assigned OpenVPN interface tabs are processed after rules on the OpenVPN tab.
- Rules on the OpenVPN tab must not pass or block traffic too broadly or the firewall will stop processing before it gets to the assigned interface tab rules.
- Wireguard
- Access LAN IP range without using a bridge (WireGuard) | Netgate Forum
- Q:
- I have a Netgate 4100. It’s set up to be a Wireguard VPN server, and that’s working great. Peers connected to the Wireguard VPN can see the Netgate on 192.168.1.1 and 192.168.2.1 (which is in their subnet), but they cannot see other LAN devices (192.168.1.x) other than 192.168.1.1. Is there an easy way to allow bidirectional access between 192.168.1.x (LAN) and 192.168.2.x (WG_VPN)? A bridge seems like overkill, maybe just some sort of routing rules, like whatever permits access to 192.168.1.1 (not actually sure why that works)?
- A:
- Yes, I had even the same idea. So maybe you could try to masquerade the traffic on pfSense.
- You can do this with an outbound NAT rule. On the outbound NAT tab enable the hybrid mode first.
- Then add a rule with this values:
- interface: LAN
- source: 192.168.2.0/24
- destination: any
- translation: interface address
- This replaces the source address with pfSense LAN address, so it's inside the subnet. Maybe this works.
- This basically uses the LAN IP and NATs traffic fromn the remote network on to the local network as itself. Connections might only be from outside in but would allow a remote user to access a server?
- NB:
- I am sure I can access all of my local assets on RoutedVPN. perhaps this is an issue with wireguard package.
- This setup NATs the incoming wireguard traffic through the LAN IP
- Q:
- GitHub - linuxserver/docker-wireguard
- Contribute to linuxserver/docker-wireguard development by creating an account on GitHub.
- WireGuard® is an extremely simple yet fast and modern VPN that utilizes state-of-the-art cryptography. It aims to be faster, simpler, leaner, and more useful than IPsec, while avoiding the massive headache. It intends to be considerably more performant than OpenVPN. WireGuard is designed as a general purpose VPN for running on embedded interfaces and super computers alike, fit for many different circumstances. Initially released for the Linux kernel, it is now cross-platform (Windows, macOS, BSD, iOS, Android) and widely deployable. It is currently under heavy development, but already it might be regarded as the most secure, easiest to use, and simplest VPN solution in the industry.
- Docker image is available.
- pfSense with WireGuard - Guides | Mullvad VPN - This is a guide on how to set up pfSense to use WireGuard.
- Access LAN IP range without using a bridge (WireGuard) | Netgate Forum
- CrowdSec
- They offer a free and paid for tiers.
- CrowdSec: Open Source Collaborative Community Security - YouTube | Lawrence Systems - He gives an overview of this software.
- Williamdes's blog - Installing Crowdsec on pfSense - Protect pfSense from bad actors/IPs using CrowdSec.
- IP blocking on PfSense with CrowdSec | vacum.se - Adding Alpaca super powers to pfSense
- Status on Pfsense plugin? - crowdsec - CrowdSec
- Hi, wondering now that the Opnsense plugin exists, what the status is for the pfsense plugin?
- A pfsense plugin is being discussed but nothing concrete has been determined yet. In the meantime you can use the mirror bouncer which exposes a list of ips that should be blocked via a webserver so the firewall can download it as a dynamic blocklist. Pfsense supports this.
- Integrating CrowdSec with Firewall appliances - The open-source & collaborative IPS | CrowdSec - In this article, we’ll show you how to integrate CrowdSec at the appliance level of a modern IT infrastructure thanks to Blocklist Mirror component.
- Updated blocklist export for crowdsec | vacum.se - Crowdsec just released a new bouncer for users who use firewalls that can import IP lists.
- Blocklist mirror | CrowdSec - This bouncer exposes CrowdSec's active decisions via provided HTTP endpoints in pre-defined formats. It can be used by network appliances which support consumption of blocklists via HTTP.
- Split Tunnel
- This is where only the traffic destined for the network at the other end of the VPN, is sent down the VPN and traffic hat need to go to the internet will use the local gateway. The opposite of a Split Tunnel is where all traffic is sent down the VPN irrespective of the destination.
- What is VPN Split Tunneling? | Private Internet Access - Learn what is VPN split tunneling and why it's important for you. Find out how PIA can enable you to choose which internet traffic to encrypt via VPN.
- Road Warriors
- Road Warriors are remote users who need secure access to the companies infrastructure.
- Road warrior (computing) - Wikipedia
- The Benefits Of Using A Road Warrior VPN - A road warrior VPN is a type of VPN connection that allows users to connect to a private network while away from the office. This type of VPN is typically used by employees who need to access their company’s network while on the road. Road warrior VPNs are also sometimes used by students and employees who work from home.
- Client Gateway / PrivacyVPN / Replace WAN with OpenVPN
- How to Set Up pfSense with OpenVPN | ExpressVPN
- pfSense 2.5 Setup with NordVPN | NordVPN support - Use NordVPN and pfSense to delivery privacy
- pfSense 2.6.0 (OpenVPN Setup) | PIA Support Portal - This tutorial will completely walk you through configuring a router for OpenVPN using pfSense firmware version 2.6.0.
- pfSense 2.4.5 (OpenVPN Setup) | PIA Support Portal - This tutorial will completely walk you through configuring a router for OpenVPN using pfSense firmware version 2.4.5.
- How to set up an OpenVPN client in pfSense | Comparitech - pfSense is a powerful open-source firewall/router. In this guide we show you how to connect pfSense to a commercial VPN provider over OpenVPN.
- Install OpenVPN on pfSense - The Complete Step-by-Step Guide | YouTube - In this tutorial, you will learn how to install OpenVPN on pfSense in a complete Step-by-Step guide, including a written article.
- pfSense OpenVPN Setup Tutorial | Strong Technology - In this guide you will learn how to set up StrongVPN OpenVPN set up on pfSense, an open source firewall or router computer software distribution based on FreeBSD.
- How to Setup and Use NordVPN on pfSense (Updated for 2022) - Are you finding it difficult to set up and use NordVPN on pfSense? See how to install NordVPN on your pfSense router with these easy and clear steps.
- pfSense 2.5 Setup with NordVPN | NordVPN support - Configure pfSense to use NordVPN.
- How to route traffic through a VPN client in PFsense | YouTube | Revolt Computing
- Covers Gateway Groups
- Easy to follow
- Makes a mistake a the end with the setting 'Skip rules when gateway is down'. It does not do exactly what he says.
- Disable OpenVPN Servers
- You can easy disable the OpenVPN Servers by:
- VPN --> OpenVPN --> Servers --> [Your VPN Server] --> Edit --> Disabled: ticked
and/or - Navigate to (Firewall --> Rules --> WAN) and disable the relevant rule(s)
- OpenVPN Interface
- This interface acts more like an 'Interface Group' where all the VPN interfaces are a member. The rules in this group are run before any indvidual VPN interface rules. So you can put rules in here that apply to all VPN interfaces which can be useful or dangerous.
- It is not advisable, unless really nessary to put rules in this interface (OpenVPN). It is better to put them on the individual interfaces to allow a fine grain aprroach to traffic control like we have done above.
- Allow all traffic on all VPN interfaces
- The 'OpenVPN (Common)' rule can actually be quite dangerous, but it is good for testing and making sure things work before tying them down.
- If you put the following rule on on the OpenVPN interace all VPN traffic will flow unhindered

- Firewall --> Rules --> OpenVPN
- Add a new 'Common' OpenVPN rule
- Interface: OpenVPN
- Address Family: IPv4
- Protocol: Any
- Source: any
- Destination: any
- Description: OpenVPN (Common)
- This rule is the same as the original wizard rules allowing all traffic.
- VPN Port Forwarding
- What is Port Forwarding in a VPN - The Beginner's Guide | YouTube | Geekman
- Explains the subject and promote3 compatible providers: Private Internet Access (PIA), TorGuard, PrivateVPN
- What Is VPN Port Forwarding, and How Do You Set It Up? - Port forwarding allows you to bypass your router’s firewall by assigning ports to specific traffic. Learn what VPN port forwarding is and how to set it up.
- What is Port Forwarding and Why Use it With Your VPN? - Port forwarding can make torrents faster and allow remote access to devices while away from home through a VPN or router. But do you need it and is it safe?
- What is Port Forwarding in a VPN - The Beginner's Guide | YouTube | Geekman
- Private Internet Access VPN (PIA)
- General
- Private Internet Access: The #1 Best VPN Service For 10+ Years - PIA VPN is 2023's top-rated VPN service – with ultra-fast speeds, worldwide streaming servers, and 100% open-source software. Try PIA risk free for 30 days.
- Their offer PIA: £ 43.94 first 2 years and yearly thereafter = £43.94 for year 1 and year 2 inclusive, and then from year 3, it is £43.94 per year.
- If you pay by PayPal, just remove the automatic subscription at PayPal and then you can probably get the offer again. Don't use a card as you will not have the smae control.
- Tutorial
- Setup a PIA VPN with pfSense 2.4.5 - Many of us use a VPN in one way or another these days, they have seen a surge inpopularity over the last decade or so with many people seeking to use them asmeans of bypassing content restrictions with Netflix or other streamingservices, as a way of connecting to home or work to access documents on the go, or to just retain as much of our privacy online as we can.
- Setting up VPN client on your pfSense using Private Internet Access (PIA) service with Kill switch - Geek is the Way! - Private Internet Access (aka PIA) provides a cheap VPN service that allows up to 10 simultaneous devices. Recently I have switched from Surfshark to PIA because although Surfshark allows unlimited devices, having multiple connections in the same device (pfSense router) doesn’t always work.
- Setup PIA VPN in home network with pfSense - NetOSec - Start protecting your online world with VPN. Easy step by step guide in setting up OpenVPN Client with pfSense for your home network.
- Supports the following protocols:
- OpenVPN
- WireGaurd
- IPSec
- Profiles
- The certificates are included in these profiles.
- Where can I find your OVPN files? - Knowledgebase / Technical / Troubleshooting / OpenVPN - PIA Support Portal
- We offer several sets of configuration files for OpenVPN. The files are different in how they connect and/or the strength of the security they use.
- The different ones
- Default
- These files connect over UDP port 1198 with AES-128-CBC+SHA1, using the server name to connect.
- This is for legacy devices.
- Default (Windows only plus block-outside-dns)
- These files connect over UDP port 1198 with AES-128-CBC+SHA1, using the server name to connect.
- This is for legacy devices.
- Strong (Preferred)
- These files connect over UDP port 1197 with AES-256-CBC+SHA256, using the server name to connect.
- Very secure.
- Static IP
- These files connect over UDP port 1198 with AES-128-CBC+SHA1, using the server name to connect.
- This is for legacy devices.
- TCP
- These files connect over TCP port 502 with AES-128-CBC+SHA1, using the server name to connect.
- This is for legacy devices.
- Strong TCP
- These files connect over TCP port 501 with AES-256-CBC+SHA256, using the server name to connect.
- Very secure.
- Default
- Ciphers
- The strong profile uses higher encryption levels making the handshake and connection more secure. There is a compromise though as the handshake takes longer. There may also be a slight dip in speed. In my experience, its negligible. I usually use the strong profiles.
- PIA Server IP addresses
- PIA QA Engineer: We don't provide lists of IPs to provide an optimal experience for our users. Where you wish to whitelist our IPs, there are many who would instead blacklist us, and we want to ensure access to all services to the best of our ability.
- PIA mainly use domain names for connections but you can connect by a specific IP if you want.
- How to get the Server IP addresses
- Use the 'Static IP' profile supplied by PIA
- GitHub - Lars-/PIA-servers - This open source repository contains an automatically updated list of all Private Internet Access servers.
- How To Find All IPs for VPN Service (Private Internet Access) - Sick Codes - Security Research, Hardware & Software Hacking, Consulting, Linux, IoT, Cloud, Embedded, Arch, Tweaks & Tips!
- I wanted to use every Private Internet Access (PIA) IPs to run a script using each of their full list of IP addresses once.
- For other companies, copy and paste a list of their whole network addresses list.
- Ping the server domain to get the IP
- https://serverlist.piaservers.net/vpninfo/servers/v6 - This is a list generated by API.
- How to use the IP
- Edit your .OVPN (if using a client) or edit your pfsense settings to use this IP rather than the domain. it will work until they kill of the IP or rotate it out.
- Port Forwarding
- How do I enable port forwarding on my VPN? - Knowledgebase / Technical / Browsing and Internet / Torrents - PIA Support Portal - The port forwarding option in our application can be used for a variety of uses.
- Manual Connection and Port Forwarding Scripts for Linux - Knowledgebase / Technical / Application Settings and Features / Application & Features - PIA Support Portal - Manual Connection and Port Forwarding Scripts for Linux.
- GitHub - pia-foss/manual-connections: Scripts for manual connections to Private Internet Access - Scripts for manual connections to Private Internet Access including TrueNAS and pfSense instructions.
- General
Security
- Data Encryption Algorithms
- The default list of encryption algorithms and their order is the best so no need to change.
- AES-256-GCM
- AES-128-GCM
- CHACHA20-POLY1305
- Virtual Private Networks — OpenVPN — OpenVPN Configuration Options — Server Configuration Options — Cryptographic Settings | pfSense Documentation
- 128 or 256 bit Encryption: Which Should I Use? - Ubiq
- Picking Between AES-128 and AES-256
- 128-bit and 256-bit AES both have their pros and cons. AES-128 is faster and more efficient and less likely to have a full attack developed against it (due to a stronger key schedule). AES-256 is more resistant to brute force attacks and is only weak against related key attacks (which should never happen anyway).
- Since both algorithms are secure against modern and anticipated future threats, the choice between them doesn’t really matter from a security perspective. Our best guidance is that AES-128 provides more than adequate security while being faster and more resource-efficient but readers who want that extra security provided by greater key sizes and more rounds in the algorithm should choose AES-256.
- Picking Between AES-128 and AES-256
- What's the difference between AES-CBC and AES-GCM? - Knowledgebase / Technical / Application Settings and Features / Encryption - PIA Support Portal - A good description of the difference and why AES-128-GCM is good enough in modern day.
- Change Encryption Cipher In Access Server | OpenVPN - Before you begin changing the encryption cipher, it’s important to note that all OpenVPN Access Servers work with a single encryption scheme.
- Pfsense / OpenVPN advise - Traffic through tunnel seems very slow
- Q:
- Looking for input on tuning OpenVPN on pfSense. Traffic through tunnel seems very slow. Currently downloading less than 1MB/s via SMB through OpenVPN. RTSP streams over 800kbps don't seem to make it through the tunnel.
- A:
- Use AES-GCM. The AEAD packet format has a smaller crypto overhead than the CBC packet format, (e.g. 20 bytes per packet for AES-128-GCM instead of 36 bytes per packet for AES-128-CBC + HMAC-SHA1), and SHA1 isn't accelerated on most systems (it is on C3000).
- Since SHA isn't accelerated, it becomes the dominant part of the operation. AES-GCM doesn't need the authentication algorithm second pass (because it is an AEAD), and therefore, you end up with all AES-NI accelerated crypto.
- AES-GCM is also faster than AES-CBC (even without an HMAC) when AES-NI is used.
- Also: OpenVPN will prefer AES-GCM-256 unless you set AES-GCM-128 and disable 'ncp-enable'.
- Use AES-GCM instead of AES-CBC. Chain Block Cipher is single threaded because it needs to wait on the result of one block before it can be used to encrypt the next block. Galois Counter Method is able to encrypt each block independent of each other, making it parellalizable. Although it does provide slightly better security, it's main benefit is that it provides vastly better performance, which is perfect for older hardware.
- Other detailed information on some types of encryption.
- Q:
- The default list of encryption algorithms and their order is the best so no need to change.
- Don't Use Compression
- OpenVPN compression | Netgate Forum
- I want to setup OpenVPN, Compression has multiple options. In the past I have choosen Adaptive LZO Compression, recently I have read that Adaptive LZO Compression is depreciated in 2.4 version and has been removed in 2.5. Which option is recommended to choose? "Omit Preference (Use OpenVPN Default) has been choosen by default.
- Jim Pingle: The current best practice is to disable compression for OpenVPN, due to attacks such as VORACLE which are possible when VPN traffic is compressed.
- "Disable Compression, retain compression packet framing (compress)" - This page also discussed how to use this method (similiar to PIA pfSense 2.6.0)
- HEADS UP: OpenVPN deprecating shared key mode, requires TLS, deprecating cipher selection | Netgate Forum
- Disable compression on all OpenVPN tunnels, which you should do anyhow because compression is insecure and doesn't help much these days.
- Deprecated Options in OpenVPN - Option: --comp-lzo
- OpenVPN is a software VPN product which has been around since May 2001. And it has mostly been backwards compatible on the most important features through all these years. But the world moves forward, security issues are discovered, and expectations of how a secure VPN should be configured have changed over the years.
- Compression is not recommended and is a feature users should avoid using. See --compress for more details.
- VORACLE attack and OpenVPN - Security researcher Ahamed Nafeez has presented a new attack vector which targets VPN tunnels which utilizes compression, named VORACLE. The attack vector bears similarities to the CRIME and BREACH attacks, which hit especially HTTPS based connections.
- OpenVPN compression | Netgate Forum
- Revoke Certificate
- How to revocate user certificate on pFSense (OpenVPN) | IT Blog - You have pFSense OpenVPN configured with local CA and user certificates, and now – somebody is leaving the company, or certificate is compromised, what should you do? Simply deleting user account or certificate is not a good practice, and it probably won`t work.
OpenVPN Settings
- route-nopull
- Just add "route-nopull" to the client openvpn config, then all pushed commands from the server are ignored.
- To get access to the local net, you must now add e.g. "route 192.168.5.0 255.255.255.0" to the client openvpn config, if the local net you want to connect to is 192.168.5.0/24
- redirect-gateway / redirect-gateway def1 (Redirect IPv4 Gateway)
- Force all client-generated IPv4 traffic through the tunnel.
- This will add a static route to the VPN service you use, remove your current default route and add a default route towards the VPN tunnel. Keep in mind, however, that this could lead to undesirable consequences, such as inability to access resources of your corporate network or your ISP DNS servers when the VPN connection is active.
- routing - How does openvpn's redirect-gateway option work? - Server Fault
- OpenVPN equivalent: --redirect-gateway flags
- Redirect IPv4 Gateway and Redirect IPv6 Gateway do NOT prohibit communication with other devices on the same subnet, those options ONLY effect routing of traffic outside of the local subnet.
- This does not block local traffic, for that you need --block-local
- Flags
- local -- Add the local flag if both OpenVPN servers are directly connected via a common subnet, such as with wireless. The local flag will cause step 1 above to be omitted.
- autolocal -- Try to automatically determine whether to enable local flag above.
- def1 -- Use this flag to override the default gateway by using 0.0.0.0/1 and 128.0.0.0/1 rather than 0.0.0.0/0. This has the benefit of overriding but not wiping out the original default gateway.
- bypass-dhcp -- Add a direct route to the DHCP server (if it is non-local) which bypasses the tunnel (Available on Windows clients, may not be available on non-Windows clients).
- bypass-dns -- Add a direct route to the DNS server(s) (if they are non-local) which bypasses the tunnel (Available on Windows clients, may not be available on non-Windows clients).
- block-local
- Block access to local LAN when the tunnel is active, except for the LAN gateway itself. This is accomplished by routing the local LAN (except for the LAN gateway address) into the tunnel.
- redirect-gateway's block-local parameter isn't working - OpenVPN Support Forum
- block-local is a redirect-gateway flag and not a command
- Example commands
server-side:   push "redirect-gateway def1 block-local"
client-side:   redirect-gateway def1 block-local
- ipv6 -- Redirect IPv6 routing into the tunnel. This works similar to the def1 flag, that is, more specific IPv6 routes are added (2000::/4, 3000::/4), covering the whole IPv6 unicast space.
- !ipv4 -- Do not redirect IPv4 traffic - typically used in the flag pair ipv6 !ipv4 to redirect IPv6-only.
- IgnoreRedirectGateway – OpenVPN Community
- If you are running OpenVPN as a client, and the server you use is using push "redirect-gateway" then your client redirects all internet traffic over the VPN. Sometimes clients do not want this, but they can not change the server's configuration. This page explains how to override redirect-gateway so the client does not need to redirect internet even though the server says to.
- def1 -- Use this flag to override the default gateway by using 0.0.0.0/1 and 128.0.0.0/1 rather than 0.0.0.0/0. This has the benefit of overriding but not wiping out the original default gateway.
- Firewall Traffic Needs "redirect-gateway def1" to Route Thru VPN? | Netgate Forum
- To manually use VPN as default gateway, use "redirect-gateway def1;" in advanced options, don't set under System > Routing
- OpenVPN will put 0.0.0.0/1 and 128.0.0.0/1 in routing table so it does not stomp system default gateway, otherwise VPN traffic couldn't exit.
- OpenVPN Configuration Options — Server Configuration Options — Tunnel Settings | pfSense Documentation
- OpenVPN Configuration Options — Custom Configuration Options | pfSense Documentation
- Redirect Gateway(s)
- 'Redirect IPv4 Gateway' option adds to the server config: push "redirect-gateway def1";
- 'Redirect IPv6 Gateway' option adds to the server config: push "redirect-gateway ipv6";
- Both of these options will force all traffic down the VPN (opposite of a Split Tunnel)
- Forces all traffic through the VPN by making it the default gateway. This is what most people want 99.999% of the time. You would not want this if for whatever reason, you only wanted some traffic going over the VPN, and other traffic going out your real gateway (Split Tunnel).
- Redirect Gateway(s)
- 'Bridge Route Gateway' (pfSense)
- Push the Bridge Interface IPv4 address to connecting clients as a route gateway.
- 'Bridge Route Gateway' when enabled removes a lot of explicit route that are pushed to the client. I think if this is on 'Redirect IPv4 traffic' might not be fully respected
- I have recently found the .OVPN config files in /var/etc/openvpn
- The equivalent OpenVPN command is --route-gateway
- The way I found this setting is
- Create an pfSense XML Backup
- Search the XML for the relvant key (you might need to change some wording to find your choosen key as they will not be named exactly the same)
- What I found
<openvpn-server> ...... <serverbridge_routegateway>yes</serverbridge_routegateway> - I now made an educated guess that is was --route-gateway
- This setting is present on all OpenVPNs but can only be active on TAP servers.
- The way I found this setting is
- client-side Scripting
- Explanation Of Client-side Scripting With Simple Examples | OpenVPN
- What is client-side scripting and what can it do? Learn about this scripting process here.
- OpenVPN Access Server supports pushing scripts to VPN clients. By default OpenVPN Connect for Windows and Mac prompts once for the user to confirm if scripts should be executed or not. If the user approves then the script runs from that point on whenever the user connects or disconnects.
- For security reasons, client-side script commands are limited to the user context. For system-wide configuration, you must call a program that asks the user for privilege escalation.
- Explanation Of Client-side Scripting With Simple Examples | OpenVPN
- Force a host resolution to a given IP on Windows.
- You could update your host file with a script (admin privialage required) or open a browser with a modfied start string.
- openvpn client: force a host resolution to a given IP - Server Fault
- OpenVPN itself does not provide any name resolution
- Configure the VPN client such that it will run a script once the connection has been established. This script can then either modify the local hosts file or change the name servers as required.
- Simulate manipulation of the etc/hosts file in Google Chrome - Super User
- You can use the --host-resolver-rules argument when starting Chrome to inject your own DNS entries to chrome.
- This might be the case for other browsers
- Disable IPv6
- Only enable IPv4 (UDP|TCP) on the OpenVPN server in pfSense
- VPN --> OpenVPN --> [Server] --> edit --> Endpoint Configuration --> Protocol
- disable IPv6 for a client - OpenVPN Support Forum
- In client specific overrides, add these lines to disable IPv6:
push-remove ifconfig-ipv6;push-remove route-ipv6
- In client specific overrides, add these lines to disable IPv6:
- --block-ipv6
- From Reference Manual For OpenVPN 2.5 | OpenVPN
- On the client, instead of sending IPv6 packets over the VPN tunnel, all IPv6 packets are answered with an ICMPv6 no route host message.
- On the server, all IPv6 packets from clients are answered with an ICMPv6 no route to host message.
- This options is intended for cases when IPv6 should be blocked and other options are not available. --block-ipv6 will use the remote IPv6 as source address of the ICMPv6 packets if set, otherwise will use fe80::7 as source address.
- For this option to make sense you actually have to route traffic to the tun interface. The following example config block would send all IPv6 traffic to OpenVPN and answer all requests with no route to host, effectively blocking IPv6 (to avoid IPv6 connections from dual-stacked clients leaking around IPv4-only VPN services).
--ifconfig-ipv6 fd15:53b6:dead::2/64 fd15:53b6:dead::1
- Blocking ipv6 traffic through tunnel, LAN still accessible - OpenVPN Support Forum
- So if I use block-ipv6 then there is no need for routing a specific ipv6 subnet like 2000::/3?
- In that case would it be best recommended to use block-ipv6 server-side, and then push block-ipv6 to the client, just so I've covered both sides?
- Like explained in the manual I've currently put this in my server config, along with a push for block-ipv6 incase it isn't in any of my client configs:
push "ifconfig-ipv6 fd15:53b6:dead::2/64 fd15:53b6:dead::1"
push "redirect-gateway def1 ipv6 bypass-dhcp"
push "block-ipv6"
block-ipv6
- Only enable IPv4 (UDP|TCP) on the OpenVPN server in pfSense
- OpenVPN Configuration files on pfSense
- The .OVPN config files for the OpenVPN servers and clients are saved in the path
/var/etc/openvpn/
- These files are useful to see what OpenVPN settings have actually been configured by pfSense server side.
- You can see what settings are pushed to the clients.
- Do not edit these files directly.
- The .OVPN config files for the OpenVPN servers and clients are saved in the path
- Verobiosty Levels
- OpenVPN Logging Levels <packt>
- The following table provides a brief description of each level and provides the primary key log messages provided at that level. After the table, log samples showing a few different key levels are provided to illustrate the level of detail.
- Excellent human descriptions of the different levels
- openvpn/errlevel.h at master · OpenVPN/openvpn · GitHub - Source code description of the logging levels.
- OpenVPN Logging Levels <packt>
- remote-cert-tls server
- OpenVPN and remote-cert-tls server – V13 - This required a bit of digging into OpenVPN's and OpenSSL's code to figure out what this option does.
Custom Options
Reference Manual For OpenVPN 2.5 (Options) | OpenVPN
- Examine your .ovpn file to get any additional settings you need for custom options. Here is a worked example
client                         - Is this a client or server (pf)
dev tun                        - type of adapter eg tun/tap (pf)
proto udp                      - protocol to use (pf)
remote 103.103.103.103 1194    - the remote server and port (pf)
resolv-retry infinite          - Resolve server hostname retries, infinite is the default setting.
nobind                         - Do not bind to local address and port (pf: Interface and Local Port)
tun-mtu 1500                   - Maximum Transmission unit (OpenVPN default is 1500)
tun-mtu-extra 32               - This parameter only controls internal OpenVPN buffer sizing, so there is no transmission overhead associated with using a larger value.
mssfix 1450                    - Maximum MTU before encapsulation?
persist-key                    - When restarting with non-root, keep Keys
persist-tun                    - Don't close and reopen TUN/TAP device
auth-user-pass                 - keep the username and password in memory (pf: probably)
comp-lzo                       - Compression enabled and type (pf)
reneg-sec 0                    - Renegotiate data channel key after n seconds. This controls how often OpenVPN renegotiates authentication with clients. (default=3600)
verb 3                         - Logging Level (pf)
- Add additional settings
auth-retry interact - If authentication fails OpenVPN will automatically try to re-authenticate (no 100% about this setting) remote-random-hostname - Prepend a random string (6 bytes, 12 hex characters) to hostname to prevent DNS caching. For example, "foo.bar.gov" would be modified to "<random-chars>.foo.bar.gov". (optional) No good if you want to control clients by their hostname block-local - Block access to local LAN when the tunnel is active, except for the LAN gateway itself. This is accomplished by routing the local LAN (except for the LAN gateway address) into the tunnel. - Add Semi-Colons on the end of each line. However I do think that as long as each command is on a new line the semi-colon is optional.
- The new Custom Options should look like
tun-mtu 1500;
tun-mtu-extra 32;
mssfix 1450;
persist-key;
persist-tun;
reneg-sec 0;
auth-retry interact;
- I am not sure if the packet size specifications (tun-mtu, tun-mtu-extra) are needed in pfsense but there is no options for them and the options above look like default values anyway.
- These PIA settings will assist your VPN reconnect quicker if the connection goes down and are recommended
persist-key;
persist-tun;
remote-cert-tls server;
reneg-sec 0;
auth-retry interact;
- Add additional settings
Pushing Options
- You cannot push all options. If you try and push an invalid option you will get a context error.
- Pushing DHCP Options To Clients | OpenVPN - The OpenVPN server can push DHCP options such as DNS and WINS server addresses to clients. However there are some caveats to be aware of.
- Win 10 connection made but no access to LAN; Android works fine - OpenVPN Support Forum - no description
- How to push DNS servers to the Windows client with net30 on the server? - OpenVPN Support Forum - no description
- DNS and Domain Suffix not pushing - OpenVPN Support Forum - no description
- Push Examples
- VPN --> OpenVPN --> Client Export Utility --> [Your OpenVPN Client] --> Advanced --> Additional configuration options
dhcp-option DNS 10.0.0.1
dhcp-option DOMAIN mydomain.com
- VPN --> OpenVPN --> Servers --> [Your OpenVPN Server] --> Edit --> Advanced --> Additional configuration options
push "route 192.168.100.0 255.255.255.0"
push "dhcp-option WINS 10.0.0.1"
push "dhcp-option DNS 10.0.0.1 "
push "dhcp-option DOMAIN mydomain.com"
- VPN --> OpenVPN --> Client Export Utility --> [Your OpenVPN Client] --> Advanced --> Additional configuration options
- What options can be pushed
- Reference Manual For OpenVPN 2.5 | OpenVPN
- search for "--push option"
- Push a config file option back to the client for remote execution. Note that option must be enclosed in double quotes (""). The client must specify --pull in its config file. The set of options which can be pushed is limited by both feasibility and security. Some options such as those which would execute scripts are banned, since they would effectively allow a compromised server to execute arbitrary code on the client. Other options such as TLS or MTU parameters cannot be pushed because the client needs to know them before the connection to the server can be initiated.
- This is a partial list of options which can currently be pushed: --route, --route-gateway, --route-delay, --redirect-gateway, --ip-win32, --dhcp-option, --inactive, --ping, --ping-exit, --ping-restart, --setenv, --auth-token, --persist-key, --persist-tun, --echo, --comp-lzo, --socket-flags, --sndbuf, --rcvbuf
- openvpn - How to get a list of options, that can pushed to the clients? - Server Fault
- This give a technical method of going through the source code to find what options can be pushed.
- Reference Manual For OpenVPN 2.5 | OpenVPN
Routing
- Expanding The VPN To Include Additional Machines | OpenVPN
- Once the VPN is operational, it may be desirable to expand the scope of the VPN so that clients can reach multiple machines on the server network.
- Cpvers both tun and tap connections.
- windows - OpenVPN: Only route a specific IP addresses through VPN? - Super User
- By default, OpenVPN routes all network packets destined for the remote network on which the VPN server resides, through the VPN. Unfortunately, accessing the file server through the VPN is extremely slow!
- How can I configure the OpenVPN client to ONLY route traffic through the VPN that is destined for a single, specific IP address -- namely the database server?
- By default, OpenVPN routes all network packets destined for the remote network on which the VPN server resides, through the VPN. Unfortunately, accessing the file server through the VPN is extremely slow!
- Solved: LIVEcommunity - Access to Internal Web Site Through pfSense VPN - LIVEcommunity - 414918
- Q: The problem I am running into when i connect to the pfSense VPN i cannot browse to a web server that sits on server 192.168.130.221. I can ping the host just appears that no TCP communications is allowed. I have also checked my policies and nothing in my findings is blocking it.
- A:
- Looks like asymmetric routing issue.
- Pfsense will see server local and go direct
- Add a static route on the server to 10.31.253.0/24 via Gatway 192.168.130.249
- Routing specific websites through your VPN gateway using pfSense - Geek is the Way!
- The idea behind this post is creating a Firewall alias on your pfSense and then modify your LAN firewall rules to switch to a different gateway (aka the VPN gateway) when the selected websites are detected.
- Has a kill switch option.
- vpn - pfSense OpenVPN clients routing - Server Fault
- Q:
- Local subnet is 192.168.1.0/24, VPN clients are 10.0.1.0/24
- We also have another subnet 192.168.0.0/24 which is connected through pfSense IPSec as a Site-To-Site VPN.
- OpenVPN clients are able to ping hosts on 192.168.1.0/24 subnet without any problems, but are unable to ping hosts on 192.168.0.0/24.
- pfSense itself is able to ping 192.168.0.0/24 clients from "Diagnostics > Ping" menu, but unable to do so from shell.
- We need to enable OpenVPN clients to access hosts on 192.168.0.0./24 subnet.
- A:
- You need two things. One, a push route on the OpenVPN server to send the clients a route. push "route 192.168.0.0 255.255.255.0" Then a second phase 2 with the local being 10.1.0.0/24 and remote 192.168.0.0/24, and vice versa on the remote end.
- Q:
- Setting Up Routing | OpenVPN
- If you set up a routed VPN, you need to set up routing between the subnets so that packets will transit the VPN. Here is a possible network configuration.
- Instructions for Linux
- PFsense OpenVPN NAT - #11 by Token - Networking - Level1Techs Forums
- PPPoE is Point to Point Protocol over Ethernet and is used for dialing ADSL modems from the router.
- L2TP is Layer 2 Tunnelling Protocol, although technically relevant, its not here.
- OpenVPN gets its routes for what local networks it can connect to via the server as upon connecting a user the server will push the routes to them. (see the openvpn server config -> IPv4 Local Networks)
Pushing Routes
- networking - What is "push route" used for in OpenVPN? - Super User
- route is used to allow a client remote access to a subnet (i.e. LAN) behind the router. push is specified in the server config to push the route directive to the client upon the client connecting to the server, negating the need to have the route directive in the client's *.ovpn config.
- Difference "route" & "push route" commands - OpenVPN Support Forum
- route 10.0.1.0 255.255.255.0 is used to add to local OpenVPN server's routing table only. And it may be used as on OpenVPN server as on client too.
- push "route 10.0 .2.0 255.255.255.0" - is used only in OpenVPN server's config to push the routes to client's. Insteed of using "route" command on all client's config, you can use one "push route" on server config to do the same on all clients.
- routing - OpenVPN: Push a route to client with a different gateway - Unix & Linux Stack Exchange
- push "route 10.10.10.0 255.255.255.0 10.0.0.2 1"
- --route network/IP [netmask] [gateway] [metric]
- This tells the server config to "push" to the client, the route command which sets a networking route of the 10.10.10.0/24 subnet via the gateway 10.0.0.2 with a metric of 1. Metrics are used to give "preference" if multiple routes exist (such that the lowest cost wins).
- ip routing - How to push a gateway and route to an OpenVPN client? - Server Fault
- I just noticed that push "route-gateway 10.10.0.1" and push "route 10.10.0.0 255.255.0.0 10.10.0.1" pushes the gateway/route to the "static server clients" but not to the clients that receive their VPN IP via DHCP. Why are they not also applied to the DHCP clients?
- push "route 10.10.0.0 255.255.0.0 net_gateway 1" - to use the client's gateway
- '--route args' (from OpenVPN 2.5 Manual)
-
push"route {target_ip_or_network} {NET_MASK} {GATEWAY} {METRIC(PRIORITY)}" push "route 123.123.123.123 255.255.255.255 10.0.0.1 1" this does push the route but seems to be put after the tunnel push "route 192.168.5.0 255.255.255.0 vpn_gateway 5" vpn_gateway is just an alias push "route 123.123.123.123 255.255.255.255 10.0.0.1 1" push "route vpn_gateway 255.255.255.255 net_gateway 1" - Metric does not seem to match when using the commands above to those on my Windows PC.
-
- Exclude IP from OpenVPN route - Stack Overflow
- I have an OpenVPN server, and would like to make clients route an address range, like 1.2.3.0/24 through VPN. However, I do NOT want to make clients use VPN for a specific IP address on that same range.
- You can add a more specific route for the IP address that you don't want to go through the VPN and use the net_gateway and vpn_gateway options to specify the gateway for the route.
- This shows how 'net_gateway and vpn_gateway' should be used.
Network Topology
- OpenVPN vs IPSec vs L2TP Vs WireGuard (Different types of VPN)
- IPsec is good for site-to-site connections (Router to Router)
- Layer 2 Tunnel Protocol (L2TP) is a VPN protocol that doesn’t offer any encryption. That’s why it’s usually implemented along with IPsec encryption. As it’s built into modern desktop operating systems and mobile devices, it’s fairly easy to implement. But it uses UDP port 500 — that means it can’t be disguised on another port, like OpenVPN can. It’s thus much easier to block and harder to get around firewalls with.
- IPsec can be used on its own for point to point connectsion. If you are connecting 2 sites, use this.
- You can connect clients in with IPSec and L2TP/IPSec such as windows and phones but it is not recommended.
- L2TP on its own is unencrypted, that is why you find the term L2TP/IPSec because L2TP provides the tunneling and IPSec provides the security.
- Which Is the Best VPN Protocol? PPTP vs. OpenVPN vs. L2TP/IPsec vs. SSTP - Want to use a VPN? If you’re looking for a VPN provider or setting up your own VPN, you’ll need to choose a protocol. Some VPN providers may even provide you with a choice of protocols.
- PPTP vs IPSec IKEv2 vs OpenVPN vs WireGuard - Compare PPTP, IPSec IKEv2, OpenVPN and WireGuard to determine which VPN protocol offers the best combination of security, speed and ease of use for your needs.
- VPN Protocols: OpenVPN vs IPSec, WireGuard, L2TP, & IKEv2 - This guide examines the different VPN protocols, including OpenVPN, IPSec, WireGuard, L2TP, and IKEv2 to see which performed the best.
- VPN Protocols: From PPTP, L2TP, and OpenVPN to Wireguard - Don't get overwhelmed by endless acronyms like PPTP, L2TP, or IKEv2; learn what they really mean and how they can and can't protect you.
- Which is better L2TP vs OpenVPN? | VPN Tutorials - Which is better L2TP vs OpenVPN?
- IPSec Vs OpenVPN | 5 Differences between IPSec and OpenVPN - With all the threats surrounding the internet, the VPNs have become the popular option among users. This not only applies to organizati...
- PPTP vs IPSec IKEv2 vs OpenVPN vs WireGuard
- Types of VPNs | Mastering OpenVPN | packt
- There are many VPN products available on the market, both commercial and open source. Almost all of these VPN products can be separated into the following four.
- Excellent description of Openvpn technoclgies and the other types of vpn.
- The IPSec standard is the official IEEE/IETF standard for IP security. It is officially registered as RFC2411 (see https://www.ietf.org/rfc/rfc2411.txt for the full standard). IPSec is also built into the IPv6 standard. = The way to go for for bridging two networks.
- WireGuard vs OpenVPN: Is WireGuard Better Than OpenVPN? - OpenVPN and WireGuard are the two best VPN protocols available, but which is better and which should you use? Find out in this direct comparison guide.
- Virtual Private Networks — WireGuard | pfSense Documentation
- WireGuard is a new VPN Layer 3 protocol designed for speed and simplicity. It performs nearly as fast as hardware-accelerated IPsec and has only a small number of options in its configuration.
- This implies that IPsec is harware accelerated.
- WireGuard vs OpenVPN: Is WireGuard Better Than OpenVPN? - OpenVPN and WireGuard are the two best VPN protocols available, but which is better and which should you use? Find out in this direct comparison guide.
- VPN Protocols Explained & Compared | Which Protocol Is Best? - Find out which VPN protocols will secure your data, which will put you at risk, and which will slow you down in this complete guide to VPN protocols.
- IPsec
- Is not required for OpenVPN to work, but probably can be used for something.
- What is IPsec (Internet Protocol Security)?
- IP Security, or IPsec, is a framework for securely exchanging data over unprotected networks. Read about how it's used and the key steps to making it work.
- IPsec is used for protecting sensitive data, such as financial transactions, medical records and corporate communications, as it's transmitted across the network. It's also used to secure virtual private networks (VPNs), where IPsec tunneling encrypts all data sent between two endpoints.
- VPN Performance & Scaling for OpenVPN and IPSec on pfsense | Lawrence Systems
- How IPsec works, it’s components and purpose | CSO Online
- IPsec (Internet Protocol Security) is a suite of protocols that are used to secure internet communications. It is a common element of VPNs.
- Virtual Private Networks — IPsec — IPsec Configuration | pfSense Documentation
- IPsec Site-to-Site VPN Example with Pre-Shared Keys | pfSense Documentation
- pfSense | Site-To-Site VPN | How to Setup an IPSEC Site-to-VPN with pfSense - YouTube
- Vpn: Site-To-Site IPSec Tunnel behind NAT | CopyProgramming
- Site-To-Site IPSec Tunnel behind NAT
- Configure a L2TP/IPsec server behind a NAT-T device
- IPsec Transport Mode NAT Traversal Security Risks
- What is IPsec? | How IPsec VPNs work | Cloudflare - IPsec is a protocol suite for encrypting network communications. Learn how IPsec VPNs work, what port IPsec uses, how IPsec tunnels work, and more.
- L2TP
- A protocol to establish connections.
- Is not required for OpenVPN to work, but probably can be used for something.
- What is Layer 2 Tunneling Protocol (L2TP)? | NordVPN
- The online world has traffic, and there are tunnels to protect it. What is Layer 2 Tunneling Protocol (L2TP) and how does it works with a VPN?
- What is L2TP protocol? Layer 2 Tunneling Protocol (or L2TP) is a tunneling protocol used by both VPNs and internet service providers (ISPs). It doesn’t encrypt your content but simply creates a connection between you and a VPN server.
- L2TP is applied as a configuration protocol for VPN services;
- Layer 2 Tunneling Protocol - Wikipedia
- In computer networking, Layer 2 Tunneling Protocol (L2TP) is a tunneling protocol used to support virtual private networks (VPNs) or as part of the delivery of services by ISPs. It uses encryption ('hiding') only for its own control messages (using an optional pre-shared secret), and does not provide any encryption or confidentiality of content by itself. Rather, it provides a tunnel for Layer 2 (which may be encrypted), and the tunnel itself may be passed over a Layer 3 encryption protocol such as IPsec.
- L2TP/IPsec Remote Access VPN Configuration Example | pfSense Documentation
- MikroTik Site to Site VPN with L2TP/IPsec - System Zone
- Connecting remote workstation/client: In this method, a L2TP client supported operating system such as Windows can communicate with MikroTik L2TP server through L2TP tunnel whenever required and can access remote private network as if it was directly connected to the remote private network.
- Site to Site L2TP: This method is also known as VPN between routers. In this method, a L2TP client supported router always establishes a L2TP tunnel with MikroTik L2TP Server. So, private networks of these routers can communicate to each other as if they were directly connected to the same router.
- PfSence Firewall:How to Configure L2TP VPN Part03.2020 - YouTube no sound
- TCP vs UDP?
- UDP vs. TCP: What's the Difference & Which Should You Use?
- UDP and TCP are communication protocols used to send data. Discover the differences between the two and learn which is better for your VPN connection.
- This answers all of my questions and is an excellent article.
- Applications will continue to use TCP for their connection inside your UDP VPN tunnel, which means any services that require TCP’s guaranteed packet delivery can still have it.
- It is a common misconception that you should use a TCP-based VPN tunnel for applications that need extra reliability. This is not necessary, and often not a good idea. The inner connection still has TCP if it needs it – the VPN tunnel doesn’t need to add another layer.
- If you wrap a TCP VPN tunnel around a TCP connection, you run the risk of “TCP meltdown”. This happens when both layers of TCP attempt to compensate for lost packets. It occurs because the inner and outer TCP layers have independent timers used to decide when a packet is lost.
- TCP vs. UDP: Protocol & Port Differences - What’s the difference between TCP and UDP protocols and ports? Find everything you need to know about TCP and UDP, plus when and how to use them.
- Why Does OpenVPN Use UDP And TCP? | OpenVPN
- The OpenVPN protocol itself functions best over just the UDP protocol. Learn more about why we use both UDP and TCP here.
- For example on a public network it can be quite normal to see that only traffic for protocols such as HTTP, FTP, SMTP, POP3, and IMAP, are allowed, with usually some additional ports for SSL secured versions of those protocols, like HTTPS. Those protocols are almost all TCP-only and not UDP. That is why TCP is an option to allow the traffic to pass on these restricted networks.
- TCP vs UDP VPN: Learn the differences | NordVPN
- Internet protocols can be confusing. How do they transfer data? What are their strengths and weaknesses? Read this post to learn more about TCP and UDP.
- NordVPN wants to provide the best browsing experience without compromising on speed, so we use the UDP protocol by default. We recommend trying the UDP protocol first and only switching to TCP if you experience any issues
- Is TCP or UDP better for VPN ? :: SG FAQ
- Generally, TCP is more reliable than UDP, however, UDP performs better than TCP.
- Generally, VPN UDP is better for VoIP, media streaming and gaming traffic, as well as high capacity broadband connections where packet loss is unlikely. TCP is better for overall reliability of transmitted data, and slower/unreliable connections (3G/4G/Wireless, Satellite, etc.)
- OpenVPN has a TCP mode for highly unreliable connections but this mode sacrifices significant performance due to the inefficiency of encapsulating TCP within TCP.
- UDP vs. TCP: What's the Difference & Which Should You Use?
OpenVPN Client Software
- Official OpenVPN Client Software
- Configuring OpenVPN Client To Run Automatically On System Startup | OpenVPN
- The best way to OpenVPN configured to run automatically by default is to install OpenVPN as a package, such as via RPM on Linux. Read more details here.
- Configuring OpenVPN Client To Run Automatically On System Startup | OpenVPN
- OpenVPN Client Software Downloads
- Community Downloads | OpenVPN - Visit this page to download the latest version of the open source VPN, OpenVPN.
- Connecting To Access Server With Android | OpenVPN
- The OpenVPN protocol is not one that is built into the Android operating system, therefore a client program is required. Read more about your options here.
- There are 2 clients here
- You can install a profile by using a URL
- Pritunl Client - Open Source OpenVPN Client - Free open source cross platform OpenVPN client.
- Log Locations
- Debugging - Log Locations | Pritunl
- Service Log: C:\ProgramData\Pritunl\pritunl-client.log
- Interface Log: C:\Users\USERNAME\AppData\Roaming\pritunl\pritunl-client.log
- Profile Logs: C:\Users\USERNAME\AppData\Roaming\pritunl\profiles\PROFILE_ID.log
- C:\Users\[username]\AppData\Roaming\pritunl\
- C:\Users\[username]\AppData\Roaming\pritunl\profiles\
- Does not support Key/Certificate setups, only basic authorisation.
- Log Locations
- SoftEther VPN Project - SoftEther VPN Project
- SoftEther VPN ("SoftEther" means "Software Ethernet") is one of the world's most powerful and easy-to-use multi-protocol VPN software. It runs on Windows, Linux, Mac, FreeBSD and Solari.
- This is very complicated to setup and is not really for end users.
- It has many different software packages
- VPNB Server
- VPN Client
- VPN Bridge
- Command Line Admin Utility (vpncmd)
- VPN Server Manger
- Made by a Japansese University.
- A massive amount of configurable options.
- VPN Gate - Public Free VPN Cloud by Univ of Tsukuba, Japan
- Connect to 6000+ active VPN servers with L2TP/IPsec, OpenVPN, MS-SSTP or SSL-VPN protocol. Academic project by University of Tsukuba, free of charge.
- Use with caution
- This is based on SoftEther VPN
- Tunnelblick | Free open source OpenVPN VPN client server software for macOS
- Free open source OpenVPN VPN client server software for macOS
- Viscosity - OpenVPN Client for Mac and Windows
- Viscosity is a commercial OpenVPN client for Mac and Windows, providing a rich user interface for creating, editing, and controlling VPN connections.
- Seems really good value for money if you want some extra enterprise features.
- Best Open-Source VPNs Update 2022 - 5 Choices To Consider! - One of the benefits of using an open-source VPN client when compared to a custom VPN is that all the source codes of the VPN apps are public.
- 8 Free Open Source VPN - Compatible OpenVPN Client Alternatives | geckoandfly.com
Where do I find the 'OpenVPN ID'
- Whether the connecion is a server or a client is fairly straight forward and is found along with the ID when you know where to look.
- You will probably be looking for this if you get the message in the CLi. This can be cause by an incorrect statement of the fact the number is missing.
Invalid OpenVPN ID, must be numeric
- Edit the OpenVPN (Server|Client) service configuration
- VPN --> OpenVPN --> (Servers|Clients) --> edit --> Unique VPN ID

- Service Status Widget
- Service name format: openvpn, openvpn_2, openvpn_3
- It has client/server in the description

- Interface Assignments / Network port
- Service name format: ovpns1, ovpns1, ovpnc1, ovpnc2
- In the service names: c = client, s = server

- Status / Services
- Service name format: They are all labelled 'openvpn'
- It has client/server in the description

- Notes
Bridging
- OpenVPN Bridging Tutorials (pfsense)
- Configure Layer 2 'tap' firewall VPN with Open Source PfSense & OpenVPN | by Sarathi Balakrishnan | Medium
- Seems to be incomplete
- How to setup pfSense to act as OpenVPN server for Ewon devices (PDF) - This document lists the different steps to configure pfSense to work as OpenVPN server in
Bridged mode and how to connect Ewon devices to the pfSense - Howto: Bridged L2 VPN without "tunnel network" / Control over "server"directive | Netgate Forum - jimp (Netgate) says how to set it up in 4 paragraphs.
- First, read all of the text descriptions on the new fields that show up when you switch to TAP. The notes are important.
- Add a new VPN instance, select tap, fill in all your other info as you want, If you want to provide DHCP to clients, check the box to bridge DHCP, select the interface you will be bridging to, and (optionally) fill in the DHCP server pool. If you fill in the DHCP server start/end it should be a range of IPs outside of your existing DHCP pool. If you leave the IPs blank, it will pass DHCP through to your LAN DHCP server.
- After you save the VPN settings, go to Interfaces --> (assign), assign the new VPN interface. Go to Interfaces --> OPTx, enable, leave IP type as "none", save. Go to Interfaces --> (assign), bridges tab, bridge the VPN interface and your LAN or whatever internal interface(s) you want.
- Go to Firewall --> Rules, on the VPN interface be sure to add rules there that will pass DHCP and whatever other traffic you want (or just pass any/all).
- Bridge confusion | Netgate Forum
- Q:
- I am trying to follow the pfSense book to configure my OpenVPN server using the 'tap' device mode. I am confused as to whether or not a bridge is actually needed.
- from the Docs "If Bridge DHCP is selected, DHCP will be passed through to the bridged interface that will be setup later. In the most common scenario, this would be LAN. Using this method, connecting clients would receive IPs from the same DHCP pool used by directly wired LAN clients."
- Does this mean that I should declare the LAN as the "Bridge Interface"? Or, does it simply mean that the LAN interface is typically the DHCP server, BUT you must still create a Bridge Interface to use the DHCP server running from the LAN interface?
- A:
- jimp (Netgate)
- If you want the VPN to be connected to LAN you must do both. Selecting LAN for the bridge in OpenVPN does not create a bridge, it only tells it where your LAN network is. You must create the LAN/OpenVPN bridge yourself separate from that setting.
- Q:
- Configure Layer 2 'tap' firewall VPN with Open Source PfSense & OpenVPN | by Sarathi Balakrishnan | Medium
Troubleshooting (OpenVPN)
In this section I will deal with OpenVPN troubleshooting for both client and server.
General
- Troubleshooting pfSense | pfSense Documentation - All aspects of pfSense are covered by troubleshooting topics here.
- Troubleshooting OpenVPN | pfSense Documentation - This section describes several troubleshooting techniques for OpenVPN, as well as common issues users encounter with OpenVPN along with their solutions.
- Troubleshooting — Troubleshooting OpenVPN Internal Routing (iroute) | pfSense Documentation - For a site-to-site PKI (SSL) OpenVPN setup with a tunnel network larger than /30, OpenVPN must have an internal route for the client subnet. Without the internal route, the firewall will forward traffic into OpenVPN but OpenVPN will drop the traffic as it has no way to determine the proper destination. There are a couple common scenarios where this may have difficulties.
- OpenVPN Bridge on pfsense: once LAN pings clients, connectivity breaks - Server Fault
- System -> Advanced -> firewall/NAT -> disable scrubbing
- If your OpenVPN do not show as online after intial setup, reboot your router and it will probably be fine.
- Troubleshooting Reaching Systems Over The VPN Tunnel | OpenVPN
- Having trouble reaching systems over the VPN tunnel. Get your answers and solutions here.
- What we mean by connection path problems is the path between the OpenVPN client and the target server you're trying to reach. We are specifically not talking here about problems with establish the OpenVPN tunnel itself. That is handled on a separate page: troubleshooting client VPN tunnel connectivity problems.
- This page deals with doing tests that eliminate possibilities until a conclusion emerges that you can use to effectively resolve the issue.
- DNS
- Troubleshooting DNS Resolution Problems | OpenVPN
- The guide provides a way of checking to see if the DNS query you are doing from your OpenVPN client device, is actually making it through the VPN tunnel.
- Split-DNS is the principle of resolving only certain zones (domains) through a DNS server pushed by the VPN server, and the rest through your already present local DNS servers.
- Troubleshooting DNS Resolution Problems | OpenVPN
- Site to Site
- Cant ping LAN devices with Pfsense and OpenVPN - Server Fault
- This is a 2 pfSense Router setup
- Solution: Routing from the default should need to be modified. You will have to create a NAT rule to allow the OpenVPN ports.
- Cant ping LAN devices with Pfsense and OpenVPN - Server Fault
pfSense
- OpenVPN client Gateway showing 100% packetloss
- Majority of VPN provider ignore ping which explain why you getting 100% Packetlost
- Try my solution below and if that does not work, then you will need to diable gateway monitoring.
- My solution is easy, don't specify a monitor IP address.
- System --> Routing --> [Your VPN Gateway] --> edit
- Configure as follows

- Disable Gateway Monitoring = unticked
- Disable Gateway Monitoring Action = unticked
- Monitor IP = empty
- Configure as follows
- What happens is that if not monitor IP is set pfSense uses the 'Virtual IP' presented by the OpenVPN client to PING and this only becomes available after the OpenVPN client has successfully connected.
- I suspect that PINGs to the outside world are happening before the client/route is initialised or that the PING is not being routed and this is why if you use a real IP the monitoring is not working and because of this failure, pFsense flags the Gateway as offline.
- System --> Routing --> [Your VPN Gateway] --> edit
- OpenVPN client showing 100% packetloss following 2.5.0 upgrade | Netgate Forum - This thread has the common ideas and workarounds.
- Majority of VPN provider ignore ping which explain why you getting 100% Packetlost
- Unable to check for updates
- The error
- System --> Update --> System Update --> "Unable to check for updates"

- System --> Update --> System Update --> "Unable to check for updates"
- Causes
- This can be caused if you have not kept up to date with updates and pfSense gets confused.
- This might be caused if there are no updates.
- The Netgate servers are overloaded.
- Your configuration is blocking the update servers.
- Solution 1
- Refresh the page: System --> Update --> System Update
- Solution 2
- System --> Update --> System Update Settings

- Select "Current Stable Release (x.x.x)"
- Click Save
- System --> Update --> System Update
- You should now see any updates and not the error message.
- System --> Update --> System Update Settings
- A Working System
- An update is available

- The system is up to date

- An update is available
- The error
OpenVPN Server
- Errors:
-
AEAD Decrypt error: bad packet ID (may be a replay)
- Generally, you can ignore this message, if it only happens once in a while.
- Only happens if you are using UDP
- OpenVPN how to fix: AEAD Decrypt error: bad packet ID - Adam In Tech - When using OpenVPN to connect multiple tunnels together, you may get some errors along the way. These are normal and easy to fix.
-
OpenVPN Client
- Troubleshooting — Troubleshooting Windows OpenVPN Client Connectivity | pfSense Documentation - Historically, OpenVPN client software on Windows had issues with routing due to a lack of privileges. Current versions of the OpenVPN client software for Windows run as a service which only requires administrative privileges during the installation process and not when the client software runs afterward.
- Errors
-
WARNING: You have specified redirect-gateway and redirect-private at the same time (or the same option multiple times). This is not well supported and may lead to unexpected results
- Error Explained
- In pfSense the redirect-private is never actually used from what I can see which means that the redirect-gateway is being called multiple times and this is not recommended.
- Causes
- Redirect IPv4 Gateway is enabled there is an entry in the hidden field IPv4 Local network(s).
- Redirect IPv6 Gateway is enabled there is an entry in the hidden field IPv6 Local network(s). I have not verified this one but should be the same as the IPv4.
- Redirect IPv6 Gateway is enabled but you do not have IPv6 enabled. This might just causes a second entry in the log rather than actually causing the error which is just replicated when present by having 2 redirect gateway commands issued.
- redirect-gateway is overridden in either the Server or Client Custom Options.
- Solutions
- Remove the check mark at 'Redirect IPv4 Gateway', are there any entries in 'IPv4 Local network(s)'? If so remove them and re-check redirect gateway.
- Remove the check mark at 'Redirect IPv6 Gateway', are there any entries in 'IPv6 Local network(s)'? If so remove them and re-check redirect gateway.
- If not using IPv6, disable 'Redirect IPv6 Gateway'.
- Remove all custom 'redirect-gateway' from 'Custom Options' for both server and client.
- What Now
- You should now cured this error and know what rule caused it.
- Leave or fix the rule that is causing the issue.
- This error can be ignored as everything still works. Ignoring it though, is not ideal.
- Notes
- redirect-private
- This option behaves very similar to the redirect-gateway directive, especially when the new parameters are used, but it does not alter the default gateway.
- I cannot find where the option redirect-private is being added (possibly having the redirect IPv6 when the protocol is not enabled)
- Not in the Client config
- Not in the server config: /var/etc/openvpn/
- In the OpenVPN reference manual it gives the following information
--redirect-private [flags]
    Like --redirect-gateway, but omit actually changing the default gateway. Useful when pushing private subnets.
- redirect-private
- Links
- Question about WARNING message: You have specified redirect-gateway and redirect-private at the same time - OpenVPN Support Forum
- You can see in what was pushed, the multiple redirect-private settings. You can disregard that warning for Access Server. Our people did/do know what they are doing.
- I don't know if there is a fine-grained way to make AS not push those multiple --redirect-private settings without breaking something. The log message is part of the open source openvpn(8) software, which was not patched to remove those warnings.
- How to fix "WARNING: You have specified redirect-gateway and redirect-private at the same time" | Netgate Forum
- viragomann gave the solution to check the 'IPv4 Local network(s)' and remove the entries.
- Question about WARNING message: You have specified redirect-gateway and redirect-private at the same time - OpenVPN Support Forum
- Error Explained
-
WARNING: this configuration may cache passwords in memory -- use the auth-nocache option to prevent this
- Error Explained
- Don't cache --askpass or --auth-user-pass username/passwords in virtual memory.
- The OpenVPN client is by default is allowed to store the username and password in memory and/or on the disk and this can be a security risk so a warning is issued.
- Solutions
- Disabled the ability to cache the username and password by adding auth-nocache into the client's Custom Options which in pfSense adds it to the client's .OVPN file.
- This will require the username and password to be re-entered on every connection and potentially every hour if the connection timeout is still set to the default.
- You can put your login and password to the text file login.txt and add option 'auth-user-pass login.txt' to your config. This suppress login window and you can use auth-nocache option without reasking password.
- The risks with this is that your password is stored in plain text on your computers harddrive.
- Disabled the ability to cache the username and password by adding auth-nocache into the client's Custom Options which in pfSense adds it to the client's .OVPN file.
- What Now
- This warning is not causing any issue with your connection so depending on your situation you can probably just ignore this.
- Notes
- By default OpenVPN will want to reconnect every hour.
- This command cannot be pushed, if you try you will get an error as follows: "Options error: option 'auth-nocache' cannot be used in this context ([PUSH-OPTIONS])"
- Links
- vpn - OpenVPN: how to suppress "WARNING: this configuration may cache passwords in memory -- use the auth-nocache option to prevent this" - Super User
- Offers the login.txt solution.
- WARNING: this configuration may cache passwords in memory | SurfBouncer
- The latest version of the OpenVPN client allows for the elimination of the login user name and password from the computers memory. This is beneficial in high security applications where always having to enter the user name and password when reconnecting is desirable. The default configuration for SurfBouncer is to have this feature turned off, as it results in frequent prompting for the user name and password and is not necessary for most people.
- vpn - OpenVPN: how to suppress "WARNING: this configuration may cache passwords in memory -- use the auth-nocache option to prevent this" - Super User
- Error Explained
-
WARNING: OpenVPN was configured to add an IPv6 route. However, no IPv6 has been configured for OpenVPN TAP-Windows6, therefore the route installation may fail or may not work as expected.
- Error Explained
- This one is exactly what it is says.
- Causes
- You have enabled Redirect IPv6 Gateway in your OpenVPN server but do not have the IPv6 protocol enabled.
- Solutions
- Enable the IPv6 protocol on your OpenVPN server.
- Disable 'Redirect IPv6 Gateway' on your OpenVPN server.
- Error Explained
-
WARNING: OpenVPN was configured to add an IPv4 route. However, no IPv4 has been configured for OpenVPN TAP-Windows6, therefore the route installation may fail or may not work as expected.
- Error Explained
- This one is exactly what it is says.
- Causes
- You have enabled Redirect IPv4 Gateway in your OpenVPN server but do not have the IPv4 protocol enabled.
- Solutions
- Enable the IPv4 protocol on your OpenVPN server.
- Disable 'Redirect IPv4 Gateway' on your OpenVPN server.
- Error Explained
-
Warning: route gateway is not reachable on any active network adapters: 10.0.0.1
- Error Explained
- It is saying that it cannot reach my pfSense gateway of 10.0.0.1
- Causes
- Possibly the correct routes have not been pushed
- Solutions
- This error went away when I rebooted my pfSense router.
- Notes
- When I got this error I was testing my OpenVPN enviroment a lot and changing settings often.
- Error Explained
-
- After one hour of use, OpenVPN asks me to sign in again
- After one hour of use, OpenVPN request me again to sign in for unknow reason. | Netgate Forum
- Cause
- OpenVPN renegotiates every hour by default.
- Caching authorization on the client means you generally do not notice.
- People tend to see problems when they employ multi-factor authentication.
- Solution
- Adding this to the client disables negotiation from the client side: reneg-sec 0;
- That can be added in the client exporter or usually directly on the client.
- You can then control renegotiations on the server with something like: reneg-sec 43200;
- Cause
- After one hour of use, OpenVPN request me again to sign in for unknow reason. | Netgate Forum
- Client IP not showing up in system tray or OpenVPN client GUI
- Client IP not showing up in system tray - OpenVPN Support Forum
- Issue only when using TAP
- Fault in the client, try updating to the latest release.
- IP is still assigned to the 'TAP' adapter/interface correctly.
- If you do a ipconfig you can see all settings are correct.
- This is normal.............. add notes
- No Gateway assigned to client but everything still works
- OpenVPN no Gateway assigned to client | Netgate Forum
- OpenVPN does not assign a gateway.
- It installs two routes: 0.0.0.0/1 and 128.0.0.0/1
- These cover the entire IPv4 internet, are more specific than 0.0.0.0/0 so they are preferred, and relieves OpenVPN of the duty to save and put back the existing default gateway when it closes.
- This is governed by the Redirect IPv4 Gateway checkbox in the server configuration.
- Redirect IPv4 Gateway = redirect-gateway def1 option.
- The client can also choose to ignore the gateway routes pushed by the server.
- In the pfSense client configuration, that is the Don't pull routes checkbox.
- No need for a gateway when this route is installed.
- OpenVPN no Gateway assigned to client | Netgate Forum
- OpenVPN clients can still see local LAN even with redirect IPv4/6 Gateway Options selected? : PFSENSE | Reddit
- Redirect IPv4 Gateway and Redirect IPv6 Gateway do NOT prohibit communication with other devices on the same subnet, those options ONLY effect routing of traffic outside of the local subnet.
- It is working as intended.
- You would need to add block-local gateway flag (push this via the server or add to the client .OVPN). The server push command would look:
push "redirect-gateway def1 block-local"
- pfSense currently does not have the ability to configure this flag in the GUI
- OpenVPN TAP works, but cant access any services on the router | Netgate Forum
- A few people had issues with OpenVPN and pfBlockerNG
- The problem seemed to be pfblockerng.
- Solution: Stop and start pfBlockerNG
- Firewall --> pfBlockerNG --> IP --> IP Interface/Rules Configuration --> Outbound Firewall Rules: LAN, BRIDGEDVPN, OpenVPN
- Click 'Save'
- Firewall --> pfBlockerNG --> General Settings --> pfBlockerNG: unticked
- Click 'Save'
- Firewall --> pfBlockerNG --> General Settings --> pfBlockerNG: ticked
- Click 'Save'
- Diagnotics --> Reboot --> Normal reboot
- Click 'Submit'
- Diagnostics --> Reboot
- NB: it is more than likely that just rebooting the router that did the trick, but just in-case it wasn't.
- How to Fix OpenVPN block-outside-dns Problems in Windows 10 - Arador - If you’re using an OpenVPN client on Windows 10 and you use the block-outside-dns option to prevent DNS leaks then you may experience some serious connection delays. The easiest way to fix the block-outside-dns connection issue is through the Network and Sharing Center, here’s how to do it
- Set PC routing table entry metrics
- Windows 10 DNS resolution via VPN connection not working - Super User
- I have fixed this problem permanently by manually setting the metric of my LAN connection to a higher value than the metric of the VPN connection.
- This can be done in two ways
- Through the GUI: Network connections > Properties > double click IPv4 > Advanced > Uncheck Automatic Metric > Enter 15 for interface metric > OK > OK.
- Command line: netsh int ip set interface interface="LAN CONNECTION NAME" metric=15
- Default gateway route doesn't appear in Routing Table - Windows Client | Microsoft Learn - Provides a solution to an issue where default gateway route doesn't appear in the Routing Table.
- Viewing and Changing Your Computer's Routing Table
- Here, you use the route command to view and change your computers internal routing table. Even though your computer is not a router, it maintains an internet routing table with entries for the network interface network, the loopback network, and details of other internal networks.
- Metric - The metric assigned to the route. If there are two entries for the network destination, the lower metric is the route chosen.
- Windows 10 DNS resolution via VPN connection not working - Super User
- Find out the IP route of a packet (windows)
- Use 'pathping' as it is the easiest command to see which gateway your traffic is going.
- 'route print' will show the route table in windows
- networking - On Windows, how to determine route for IP destination? - Super User
- pathping - The pathping command is similar to tracert but includes the outgoing interface.
- tracert - Find the path to the target in hops.
- Find-NetRoute - This is probably the closest you're going to get to ip route get on Windows.
- How do I changes the automatic connection timer when I start the OpenVPN client
- OpenVPN-GUI-New - Entering Username and Password | OpenVPN Community
- The way it works is like this: if username/password is available, the dialog window is prefilled and displayed for 6 seconds. If during that time the user clicks on the window, the timeout is cancelled and the dialog stays on the screen until manually submitted. Otherwise it's auto-ubmitted after the 6 seconds timeout.
- The 6 seconds value is not configurable.
- If silent-connection is enabled and the username/password are saved then the dialog is not shown.
- OpenVPN-GUI-New - Entering Username and Password | OpenVPN Community
- How to prevent OpenVPN connect from connecting at startup? - Super User
- Some workarouns listed here such as chaninging the service's start type.
Cannot use 192.168.70.x for Routed VPN because of Android Hotspots
You cannot use 192.168.70.x as shown in the Lawrence Systems YouTube video. We must change IP Subnet to prevent issues with Android Hotspots.
This might apply to more than Android Hotspots, but I have been bitten by this one while making this tutorial. I was using a laptop connected to my Android Hotspot to test the Routed VPN and one day when I connected, things were not working (Internet/Local Web server/DNS) so I checked and re-checked all of my settings and firewall rules but could not find any issue. It was only by chance I discovered that the Android Hotspot was using the IP range 192.168.70.0/24 and then the penny dropped.
The Android Hotspot is hardcoded to use 192.168 for the first 2 octects and then a randomly choosen 3rd Octect (192.168.X) for it's network on each connection giving a network in the range (192.168.1.0 - 192.168.254.0). The gateway and IP addresses are also random on each connection.
The only way to avoid this issue is to use a network subnet for the routed VPN that will never be assigned by the Android Hotspot, so I chose 10.200.1.0/24 and used it above.
BridgedVPN (TAP) client connects, but does not get a DHCP address
This is a common and frustration situation to be in. The following are common reasons for DHCP not working:
- OpenVPN Server Settings
- 'Bridge Interface' should be 'LAN'
- Most people make the mistake of setting a bridge interface here which is wrong. You should set the traget networks interface which in most people;s case is 'LAN'
- "The interface to which this TAP instance will be bridged. This is not done automatically. This interface must be assigned and the bridge created separately."
- 'Bridge Interface' should be 'LAN'
- pfBlockerNG
- one of its rules is blocking DHCP requests/responses
- Solution 1 - Disable pfBlockerNG (good for checking it is pfBlockerNG but not a permanent solution)
- Solution 2 - Find the offending group and feed, then disable it
- I found the firewall/pfBlocker rule that was triggered, opened the relevant group, took each feed and opened them in my browser and looked for entries that would block DHCP
- In my case my firehol_v4 rule and in particular the Level 1 feed had 0.0.0.0/8 (blocks DHCP) and 10.0.0./8 (blocks local address range)
- Solution 3 - Whitelist in broadcast traffic pfBlockerNG
- Solution 4 - If your are not getting any traffic even on the normal network, Stop and Start pfBlockerNG as outlined above (Solution: Stop and start pfBlockerNG), not just a reboot.
- one of its rules is blocking DHCP requests/responses
- Snort
- Are any Snort rules blocking DHCP. Check the logs.
- Bridge
- Have you created the bridge
- Have you created the bridge interface. If you did you should delete it as it might have unwanted firewall rules on it, or the lack of them.
- Firewall Rules
- Are your firewall rules allowing the DHCP packets to pass or even blocking the packets.
- You should have a DHCP allow rule on the BRIDGEVPN interface.
- Client
- Dont rely on the client to show you your IP. When using TAP you will not see an IP in the client, your need to use ipconfig at the command prompt.
- [SOLVED] Client has no ip addressed assigned - OpenVPN Support Forum - This is "by design" : server-bridge + remote DHCP has the side effect that the openvpn client does not bring up the tap0 interface by itself - this is left to the OS; on windows this is done automagically, on linux you need to run something like 'dhclient tap0' ; this can be added to the client config using
- Dont rely on the client to show you your IP. When using TAP you will not see an IP in the client, your need to use ipconfig at the command prompt.
OpenVPN Clients cannot PING or connect to LAN clients and Vice Versa
This is mostly an issue for RoutedVPN because the OpenVPN network and the LAN network are on different subnets however some fixes will be valid for BridgedVPN.
At this point you have to understand your pfSense router is behaving as instructed and if you are having issues, some further configuration is needed.
You more than likely can use the internet through your VPN and connect to the router aswell as ping it, but not much else.
Causes
- A device has Ping disabled or is not capable of a ping response.
- Device Firewall(s)
- Windows Defender Firewall
- Windows Defender Firewall by default only allows traffic from local subnet for private and public profiles (domain is not used unless you are logged intoa domain and in which case there are no restrictions)
- Does not have PING enabled (on the correct profile Domain/Private/Public)
- PING is restricted to the same subnet
- File sharing is not enabled (on the correct profile Domain/Private/Public)
- File sharing is restricted to the same subnet
- Comodo Firewall
- Windows Defender Firewall is not automatically turned off when CIS is installed (because of M$)
- No allow rules added for the remote subnet/network
- Other Firewalls
- Windows Defender Firewall
- pfSense Firewall Rules (or lack off)
- pfBlockerNG
- One of its rules generated from a feed is blocking access to the network
- In my case my firehol_v4 rule and in particular the Level 1 feed was blocking the ranges 10.0.0.0/8, 0.0.0.0/8, 255.255.255.255 and others.
- This only causes issue if you are connecting to your VPN server from your local network which you usually do when testing.
- One of its rules generated from a feed is blocking access to the network
NAT Reflection is not working
- My Forum post with a full description of my setup: NAT Reflection not working on Bridged network segment | Netgate Forum
Can NAT Reflection work over OpenVPN?
The answer is yes and no.
- No: If you only have 1 public IP address because your OpenVPN will be on the same Public IP as your assets such as a webserver
- Yes: If you have 2 Public IPs and the assets you are trying to access are not on the same public IP as your OpenVPN server.
Explanation of why NAT Reflection will not work with 1 public IP
It is not an issue of whether you can do NAT Reflection over OpenVPN but more a matter of IP routes.
For the purpose of the example we will assume the following:
- Setup
- You have 1 public IP which is running your OpenVPN server and your Webserver
- OpenVPN TAP server (called BRIDGEDVPN) which is bridged to my LAN via a bridge (bridge0) which does not have an IP or an interface
- 'Redirect IPv4 Gateway/Force all client-generated IPv4 traffic through the tunnel.' is on (as per this article)
- I have added the 'allow DHCP rule' and 'Allow traffic on the brideged interface' rule on the BRIDGEDVPN interface.
- I am connecting in remotely with a laptop over OpenVPN
- What Works
- My openvpn clients get an IP from DHCP etc...
- My devices on the OpenVPN client can talk to devices on my LAN
- I can get the internet from the LAN and the OpenVPN clients
- I can talk to my router either by IP or by its FQDN
- On my LAN, the devices can access my webserver via its FDQN because I have NAT Reflection on.
- DNS on both segments seem correctly hijacked by my firewall DNS floating rules which are attached to the OpenVPN interface.
- My webserver is fully available from the internet
- NAT Reflection is not working
- I cannot access my webserver via its FQDN on my LAN network segment
- Tracert gets no response from the pings and therefore no route
From the example above the OpenVPN clients can access the internet and talk to local clients with no issue, they just cannot talk to the webserver ony uour LAN and the websites hosted on it, whereas the direct LAN clients can.
But I hear you say "is the OpenVPN connection not bridged to the LAN?", and you would be right about this. The two interfaces are bridged so you would think that the traffic would go onto the LAN and then through the WAN as traffic direct from the LAN, which is exactly how I thought it should.
After many hours on diagnostics, Packet Sniffing and monitoring of logs I came across the answer:
- routing - why does a VPN need to access a public IP address directly (not through the tunnel)? - Unix & Linux Stack Exchange
- Your encrypted data has to flow through the internet to the VPN endpoint somehow. So, everything but that endpoint needs to go through a tunnel. But the communication with the endpoint must happen "directly" over the unencrypted network.
The following statements below happen to the OpenVPN client as it tries and connects to your local webserver:
- Your OpenVPN and Webserver are on your public IP 123.123.123.123
- On your remote OpenVPN client Windows PC once the VPN is connected:
- There is a route to your public IP over the internet through your normal internet connection
- There is route to your private network through the VPN tunnel (10.0.0.0/24)
- You have an IP from your LANs DHCP server (10.0.0.171)
- OpenVPN connects to your public IP over the internet using the route from the routing table. It can only ever go this route.
- OpenVPN captures all IPv4 traffic (except the actual VPN tunnel traffic because you cannot send the VPN connection down itself)
- You now try and connect to your website hosted on your local server quantumwarp.com
- The DNS request is sent over the VPN tunnel and is received correctly
- 1 of 2 things will now happen depending on the setting of 'Bridge Route Gateway' in your BridgedVPN OpenVPN server
- Bridge Route Gateway = Off
- You will not be able to access your website
- Bridge Route Gateway = On
- You can access your website
- Bridge Route Gateway = Off
Answer
- All traffic that needs to go your public IP (123.123.123.123) will always go down the first route it finds in the computers routing table, and because the first route it finds is the same one that your OpenVPN client is using to connect to your VPN server, the traffic will be sent down that one.
- This means that any traffic that needs to go to 123.123.123.123 will never go down the VPN tunnel.
- The open VPN client does not do any packet inspection to be able to say when traffic for 123.123.123.123 should go down the tunnel or the open internet.
- When 'Bridge Route Gateway' is enabled you can access your websites because
- Any traffic in the tunnel that is destined for 123.123.123.123 has a route over the open internet available to it and it will use it.
- This option pushes a gateway/route to allow the traffic to go over the open internet by using the local adapters gateway.
- This is less secure because traffic is going out over the open internet.
- You will not have access to hidden/restricted services that are only available when access your webserver from the LAN.
- RoutedVPN does not have this setting but behaves as if it were on.
- If the 'Bridge Route Gateway' option is disabled then any traffic destined for 123.123.123.123 (except for the VPN tunnel traffic) will NOT flow out from the OpenVPN client either over the adapter gateway or the over the VPN tunnel to your pfsense router.
- The OpenVPN client cannot distinguish between tunnel traffic and webserver traffic because they share the same destination IP, so traffic from the OpenVPN client destined your webserver never reaches your LAN because it is never routed over the VPN tunnel therefore NAT Reflection on your pfSense router for the webserver traffic never takes place so rather that it not working it is just never required. The webserver traffic is either routed over your open internet connection or it never leaves the OpenVPN client because it has not route which explains the 'Bridge Route Gateway' option.
Suggested Fixes
These are just ideas I had:
- Use another OpenVPN client that is able to route the webserver traffic down the VPN tunnel (not found one).
- OpenVPN could improve their client to allow for routing webserver traffic down the VPN tunnel.
- Push DNS override via the OpenVPN server config
Workarounds
- You can use your windows hosts file to do a DNS mapping to the local IP, when you are connected by OpenVPN
- VPN in to your network and then connect in to a local computer with RDP/VNC
Solutions
- 'Split Horizon' DNS (Split DNS)
- Quick answer: So you add an entry in your DNS resolver to point your local domains to your webserver's local IP so you always access by the 10.0.0.x address
- 2 Public IPs
- Host your OpenVPN server on a different IP that that of your other webassets
- Both IPs can be present on your pfSense router.
OpenVPN Clients not getting DHCP address
I will now outline some steps to run through to diagnose where the fault it.
Start by going down the checklist and they see if any of the sultions in this section will fix the problem.
Checklist
- Reboot your pfSense Router
- Check your ISP has not got a firewall on
- I have recently upgraded to FTTP from FTTC and even though it says the firewall is still off, their systems might of turned it back on and not changed the status iin my ISPs cpanel. Turn it on and off again.
- Is your remote IP allowed in the firewall rules, I have mine restricted.
- If using a mobile phone as a hotspot, check it's internet connection has not swapped from the mobile connection to your local WiFi which is your local LAN (where your pfsense router is).
- Setting python to normal 'unbound' mode
- Enabled logging on your OpenVPN NAT rule
- should be on: Firewall --> Rules --> WAN
- Examine the Firewall log and see if a rule is blocking the OpenVPN connection
- Run through the OpenVPN section to make sure your settings are correct such as:
- VPN --> OpenVPN --> BridgedVPN --> Edit --> Bridge Interface = LAN
- You have not assigned and interface to the BridgedVPN bridge
- pfBlocker
- I discovered IPs and ranges were being blocked by the firehol_v4 group and in particular the Level 1 feed:
- 10.0.0.0/8 - This IP range block is only an issue if you are trying to connect to your OpenVPN service locally (usually for testing).
- 0.0.0.0/8 - This is used as souce IP for broadcasts, the most common is DHCP.
- 255.255.255.255 - This is used as the destination for broadcast traffic.
- Some IGMP traffic.
- I identified the individual feed by opeing the Feed group and opening each active feed in my browser and searching to see if my IP was listed.
- I used my phone as a hotspot for testing instead of disabling a feed as there are many IPs blocked in this list and I wanted to keep them active.
- Solutions
- Disable any offending feed.
- Whitelist broadcast traffic
- I discovered IPs and ranges were being blocked by the firehol_v4 group and in particular the Level 1 feed:
- Snort
- Check Snort logs to make sure this IDS is not blocking the OpenVPN traffic.
- Enable OpenVPN logging
- VPN --> OpenVPN --> RoutedVPN/BridgedVPN --> Edit --> Advanced Configuration --> Verbosity level = 4
- Level 4 is the best
- Examine the OpenVPN Logs
- Status --> System Logs --> OpenVPN
- Have a look to see if there are any errors related to your connetion. You can filter by IP if required.
- Check the certificates are valid
- System --> Cert. Manager --> Certificates
- Check to see if there are any patches for the issue
- System --> Patches
- Check to see if the client is the issue
- Uninstall and re-install the OpenVPN client
- Check the Passwords
pfBlocker - Allow Broadcast Traffic (BridgedVPN)
- Firewall --> pfBlockerNG --> IP --> IP Interface/Rules Configuration
Sometimes when you import a feed it will include certain IPs or ranges that will prevent broadcasts being allowed over the bridge.
These solutions will allow DHCP, IGMP, NetBIOS and other broadcast traffic accross the OpenVPN Bridge so your connection into your network works as expected. You can just allow DHCP if you wanted but this is a more complete solution.
We will use the inbuilt pfBlockerNG mechanism so the rules are always placed where they should be.
IPv4 Suppression (preferred method)
- This removes the entries from pfBlockerNG's Deny aliastable, pfBlockerNG then acts as if the IPs were never added in the first place.
- This method will still require your traffic to be allowed on your interfaces with firewall rules.
- You can be more specific with the rules on your interfaces when using this method.
- These entries might get lost in a large list if you use the IPv4 Suppression feature a lot, but they will still work.
- Firewall --> pfBlockerNG --> IP --> IPv4 Suppression
- Add the following lines to the top of the list:
224.0.0.0/24 # Non-Routable Multicast address range
239.255.255.250/32 # Simple Service Discovery Protocol address
239.255.255.253/32 # Service Location Protocol version 2 address
255.255.255.255/32 # IPv4 Broadcast address
- Firewall --> pfBlockerNG --> Update --> Force Reload (IP)
- Add the following lines to the top of the list:
Whitelist - IPv4 Custom_List
- Your LAN and BRIDGEDVPN must assigned as Outbound Firewall Rules in pfblocker
- This method works by adding a firewall allow rule before the pfBlockerNG Deny rule are processed.
- With this method you do not need rules on the interfaces to handle broadcasts as they are already allowed, but I would not delete them as you might disable pfBlockerNG at some point.
- This will not let IGMP traffic with 'IP Options' pass. This is because you cannot enable the 'IP options' setting on the firewall rules that are created.
- Firewall --> pfBlockerNG --> IP --> IPv4 Summary --> Add
- Info
- Name: Whitelist_Broadcasts
- Description: Allow broadcast packets through the OpenVPN TAP Bridge
- IPv4 Source Definitions
- none
- Settings
- Action: Permit Outbound
- Update Frequency: Never
- IPv4 Custom_List
- Enable Domain/AS: unticked
-
224.0.0.0/24
239.255.255.250
239.255.255.253
255.255.255.255
- Save
- Move the entry to the top of the 'Pv4 Summary' and Save. (This is not requiered but makes things easier to understand having your Whitelists at the top.)
- Reload the lists (Firewall --> pfBlockerNG --> Update)
- Info
- In pfBlockerNG you will find it's advanced rules will only accept aliases of Network(s) type.
- If you wanted to further restrict by source you can do, but this will not allow IGMP packets because of a limitation in 'FreeBSD packet fence'. This might get fixed/improved in later version of pfSense.
- Advanced Outbound Firewall Rule Settings
- Custom Source
- Enable: ticked
- Invert: unticked
- Source: Broadcast_Sources (alias created earlier)
Certificate Issues (advanced)
I have seen this as a recommendation to regenerate the certificates fixed the issue even though they were valid. Only do this as a last resort because you have to revoke certificates and all the admin that goes with that procedure. I did not find this to work when I did it. My issue was caused by an issue from the checklist I missed.
- Regenerate Certificates
- Use Strict Security for certificates
- Certificate Management — Certificate Properties | pfSense Documentation - Server certificates have stricter requirements for their lifetime. The current accepted maximum lifetime for server certificates is 398 days. Most browsers and other software will no longer accept new server certificates with longer lifetimes.
- Regenerate OpenVPN TLS Key
- OpenVPN - TLS incoming plaintext read error? | Netgate Forum
- VPN --> OpenVPN --> Servers --> RoutedVPN/BridgedVPN --> Edit
- Delete the TLS Key
- 'TLS Key: Unticked
- Save
- VPN --> OpenVPN --> Servers --> RoutedVPN/BridgedVPN --> Edit
- 'TLS Key: Ticked
- Save
- The key will now be regenerated
- VPN --> OpenVPN --> Servers --> RoutedVPN/BridgedVPN --> Edit
- OpenVPN - TLS incoming plaintext read error? | Netgate Forum
- "CRL has expired" error
- This is caused by a pfSense v2.6.0 bug and you get this or similiar error
VERIFY ERROR: depth=0, error=CRL has expired: C=GB, ST=Lancashire, L=London, O=QuantumWarp, CN=user, serial=4
- Solution
- Install 'System Patches' package
- System --> Patches
- Apply the patch: Fix for CRL expiration lifetime default and maximum values (Redmine #13424)
- Reboot Firewall
- NB: you might have to generate and delete a certificate top regenerate some things. See article below.
- pfsense - CRL has expired in openvpn server
- A few days ago we ran into an issue where pfsense appliances started to refuse openvpn connections by showing "CRL has expired" error messages. As it shows the reason is an overflow a date.
- This is an indepth analysis of the issue and resolution.
- How to fix "CRL has expired" openvpn error on pfSense - Pasquale 'sid' Fiorillo
- Straight to the point and solution.
- Mentions the 'System Patches' package
- CRL = Certificate Revocation List
- This is caused by a pfSense v2.6.0 bug and you get this or similiar error
Cannot Ping other devices (with diagnostics)
Ping and Connect to other devices
- Try PING'ing or connecting to various devices to see if it is just the one device you are having connectivity issues with.
- This might seem simple, but Windows PCs do not respond to ICMP Ping by default from different subnets. The same goes for Windows file sharing.
- If you can connect and ping other devices, especially no windows devices then it is an issue with the remote device.
Enable Logging on firewall rules
- To see rules being flagged in the firewall logs, they first need to have the 'Log packets that are handled by this rule' enabled.
- This is a very useful tool to see what is going on.
Disable the Firewall on the remote device you are trying to ping
- On the remote device you are trying to ping, disable any 3rd party firewall and if a Windows PC also make sure the Windows Defender Firewall has been disabled.
- If you find you can now ping the device then it is the device's firewall(s) on this device that need fixing.
pfSense Firewall Rules (or lack off)
- There is no one size fit all solution here.
- Just check you have ICMP allowed on the firewall for the relevant interfaces.
- Putting 'Allow all' rules on various interfaces temporarily could help.
Diagnose pfSense Firewall rules using Packet Capture
These are some quick instructions on how to make sure your packets/traffic is getting where it should so you don't tear your hair how trying to guess all of the time.
- Connect a PC to your RoutedVPN network
- Verify you have internet and can ping the router. If using a Windows PC make sure you have allowed ping from different subnets.
- We will call this computer VPNPC.
- We will assume it's IP is 10.200.1.2
- Get another PC and put it on your LAN network.
- Make sure you can ping this PC from the LAN network.
- We will call this PC LANPC.
- We will assume it's IP is 10.0.0.189
- On the VPNPC run the following command
ping 10.0.0.189 -t
- Login to your pfSense router and got to
- Goto: Diagnostics --> Packet Capture
- Select the 'Interface': OpenVPN Server: RoutedVPN
- Enter the 'Host Address': 10.200.1.2 (LANPC)
- Click 'Start'
- Wait for a couple of pings from VPNPC
- Click 'Stop'
- You should now see the ping results showing at the bottom of the page (you might have other traffic showing aswell)
- Success - You can see a request and then a response.
14:19:24.151898 IP 10.200.1.2 > 10.0.0.189: ICMP echo request, id 1, seq 114, length 40
14:19:24.151905 IP 10.0.0.189 > 10.200.1.2: ICMP echo reply, id 1, seq 114, length 40
14:19:25.153165 IP 10.200.1.2 > 10.0.0.189: ICMP echo request, id 1, seq 115, length 40
14:19:25.153170 IP 10.0.0.189 > 10.200.1.2: ICMP echo reply, id 1, seq 115, length 40
14:19:26.151414 IP 10.200.1.2 > 10.0.0.189: ICMP echo request, id 1, seq 116, length 40
14:19:26.151420 IP 10.0.0.189 > 10.200.1.2: ICMP echo reply, id 1, seq 116, length 40
14:19:27.192176 IP 10.200.1.2 > 10.0.0.189: ICMP echo request, id 1, seq 117, length 40
14:19:27.192181 IP 10.0.0.189 > 10.200.1.2: ICMP echo reply, id 1, seq 117, length 40
- Failure - There are no responses, just requests.
14:20:55.191734 IP 10.200.1.2 > 10.0.0.189: ICMP echo request, id 1, seq 118, length 40
14:21:00.152081 IP 10.200.1.2 > 10.0.0.189: ICMP echo request, id 1, seq 119, length 40
14:21:05.152389 IP 10.200.1.2 > 10.0.0.189: ICMP echo request, id 1, seq 120, length 40
14:21:10.194476 IP 10.200.1.2 > 10.0.0.189: ICMP echo request, id 1, seq 121, length 40
- Success - You can see a request and then a response.
- You should test for traffic on each Interface in the following order until you find where the break is.
- OpenVPN Server: RoutedVPN (done above)
- OpenVPN
- ROUTEDVPN
- LAN
- When you get to the LAN Interface and you can still see the traffic, you know that the packets are getting routed correctly to the LAN.
- You dont need to see a ICMP response, just the fact the packets are arriving at the LAN is enough.
- This means it is likely the device you are pinging is not responding rather than a routing issue.
- Check Firewall rules on the device (i.e. Windows and subnets)
- Check firewall there are no firewall rules blocking traffic in the opposite direction.
- Still not working, go and have a coffee and double check everything.
Solutions
You should now know what device/firewall is causing the issue and I have outlined a solution below. If I find anymore causes I will also add them here.
- These solutions are for PCs that are present on the LAN where RoutedVPN clients are connecting in.
- To allow LAN clients to connect to RoutedVPN clients just change the IP ranges in the solutions below from (10.200.1.1 - 10.200.1.254) to (10.0.0.1 - 10.0.0.254)
Hardware checksum offload
- networking - OpenVPN on pfSense, can ping but nothing else - Server Fault
- Xenserver has a problem with TX checksum offloading and it is not handled properly. You will have to disable it in the pfSense interface and for all the xenserver interface that pfsense use.
- System --> Advanced --> Networking -->Disable hardware checksum offload = unchecked, then you'll have to reboot pfSense manually, even if not prompted.
Solution: Window 10 PC running Windows Defender Firewall with Comodo Firewall installed and enabled will not Ping
This assumes your pfSense is correctly configured and you have run through the steps above to confirm this.
These rules will fix the ping issue, but will also fix File and Printer sharing.
- Turn off Comodo Firewall and then turn off the Windows Defender Firewall
- This should only be temporary measure.
- Leave both the Comodo and Windows Defender Firewalls on and:
- Comodo Firewall Settings:
- Add 'Allow' rules for (ICMP Ping/File Sharing/Print Sharing)
- See below for options
- Windows Defender Firewall Settings:
- Remove the Local subnet restrictions for (ICMP Ping/File Sharing/Print Sharing)
- See below for options
- Comodo Firewall Settings:
- (Comodo Recommended) Disable the Windows Defender Firewall and keep the Comodo Firewall on and:
- Comodo Firewall Settings:
- Add 'Allow' rules for (ICMP Ping/File Sharing/Print Sharing)
- See below for options
- Comodo Firewall Settings:
Remove Windows Defender Local Subnet restrictions
Option 1
Add a single rule to allow an IP range through your firewall
Follow one of the tutorials below:
- Wizard - How to configure Windows Firewall to allow IP ranges [FULL GUIDE]
- Remote IP Range: 10.200.1.1 - 10.200.1.254
- Name: RoutedVPN Network
- Description: Allow clients on the Routed VPN Netwrok to be able to use local services on this PC (Ping/File Sharing/Printers/etc...). This is needed because the clients are on another subnet.
- Command Line - How to Allow Pings (ICMP Echo Requests) Through Your Windows Firewall
- This will need adapting
Option 2
Manually remove the restrictions on each of the rules. This is a lot of mess and is not recommended.
- Remove the restriction for ICMP Ping to 'Local subnet' only
- Control Panel --> All Control Panel Items --> Windows Defender Firewall --> Advanced Settings --> Inbound Rules: File and Printer Sharing (Echo Request - ICMPv4-In) (Public|Private) --> Scope --> Remote IP address: Any IP Address
- Remove the restriction for File Sharing to the 'Local subnet' only
- Control Panel --> All Control Panel Items --> Windows Defender Firewall --> Advanced Settings --> Inbound Rules: File and Printer Sharing (Echo Request - ICMPv4-In) (Public|Private) --> Scope --> Remote IP address: Any IP Address
- Remove the restriction for Print Sharing to the 'Local subnet' only
- There are a lot more serices. I did not try this but they are in the same place.
- You might only need to do the 'Public' profiles
Comodo Firewall - Allow Local services from the RoutedVPN Subnet/Network
In the rules below you can see I have used a Zone called 'pfSense Network' and this is just a zone created in (Settings --> Firewall --> Network Zones) with the IP range 10.200.1.1 - 10.200.1.254 added. This Zone can be used like an alias so I could even have a couple of network ranges in the same zone or specify the subnet with a different type. I would also point out that the network zone that you are on now with your pfSense box is probably the best Zone to add the subnet's IP range into, this is because it is this zone that you will be on when connections come in from the 10.200.1.x subnet. You could just set the IP range in the firewall rule instead of using the alias.
Add an 'Allow RoutedVPN Network' rule to allow connections from the network 10.200.1.x
- Settings --> Firewall --> Global Rules --> Add:
- Action: Allow
- Log as firewall event if this rule is fired: unticked
- Protocol: IP
- Direction: In or Out
- Description: Allow RoutedVPN Network
- Source Address:
- Type: Network Zone
- Zone: pfSense Network
- Destination:
- Type: Network Zone
Zone: pfSense Network
- Type: Network Zone
- IP Details
- IP Protocol: Any
- Click 'OK'
- Click 'OK' again
Add an 'Allow Ping' rule to allow pings from the network 10.200.1.x (This is not needed if you have used the rule above)
- Settings --> Firewall --> Global Rules --> Add:
- Action: Allow
- Log as firewall event if this rule is fired: unticked
- Protocol: ICMP
- Direction: In or Out
- Description: Allow ICMP Ping
- Source Address:
- Type: Network Zone
- Zone: pfSense Network
- Destination:
- Type: Network Zone
Zone: pfSense Network
- Type: Network Zone
- ICMP Details
- Type: ICMPv4
- Message: ICMP Echo Request
- Click 'OK'
- Click 'OK' again
Notes
This is not just related to OpenVPN but the worked example is.
- pfSense
- Can route traffic between subnets connected on local interfaces by default
- The hostname of the connected OpenVPN client is that of it's certificate, not the device name as defined in Windows. (not sure if this can be changed)
- Firewall rules are required to allow traffic as there is a 'Deny All' default rule in place.
- pfSense and OpenVPN
- PFSense with Open VPN Can't access windows machines - Networking & Firewalls - Lawrence Systems Forums
- You have to add rules in the Windows firewall to allow connections from more than the default subnet.
- How to get the remote vpn client to "see" the lan network behind the pfsense router? | Netgate Forum
- The OpenVPN connection has been setup and works fine. But the remote vpn client does not see any computers when I go to File Explorer and click Network.
- On the local LAN, that relies on broadcasts. Since broadcasts are not passed through routers, you need a domain controller, such as Active Directory, to display the remote systems. You should be able to reach the remote systems, but file explorer won't display them.
- Your client Windows computers will see anything outside their own subnet as "public" and thus block everything. Check their firewalls. You will have to adjust those if you have not.
- PfSense and having the vpn clients having access to lan resources - Networking & Firewalls - Lawrence Systems Forums
- The OpenVPN tunnel network should not overlap with the local networks or it will not be able to route. Make sure you have the rules to allow the OpenVPN clients to access the network in the firewall.
- Network General
- Broadcast packets are not passed between subnets
- Bridging 2 interfaces allows broadcast traffic to be passed.
- A static route is only needed when routing to another network which is behind a gateway and this tells pfSense the route to the target network.
- Ubuntu/Linux/IoT Devices do not generally have a subnet restriction for traffic.
- Windows PCs
- Have PING disabled by default
- Will only accept traffic from the same subnet by default
- Firewall rules have 3 different 'Profiles'
- Domain - for when on an Active Directory
- Public - On a Public network
- Private - On a private network such as Home or Work
- Windows Firewall
- Is the Windows firewall still on
- security - How to check window's firewall is enabled or not using commands - Stack Overflow
netsh advfirewall show all state
netsh advfirewall show currentprofile
- security - How to check window's firewall is enabled or not using commands - Stack Overflow
- How to disable the Windows firewall
- Windows --> Control Panel --> Windows Defender Firewall --> Customise Settings
- 5 ways to open the Windows Defender Firewall | Digital Citizen - All the ways, shortcuts, and commands that you can use to open the Windows Defender Firewall, including from CMD.
- How to disable firewall on Windows 10 - Pureinfotech - You can enable or disable the firewall on Windows 10 using Windows Security, Control Panel, Command Prompt, and PowerShell. Here's how.
- How to Disable the Windows Firewall in Windows - Here's how to disable the Windows Firewall in Windows 10, 8, 7, Vista & XP. Disabling the firewall is sometimes necessary.
- Turn Microsoft Defender Firewall on or off - Get the steps for turning Windows Defender Firewall on or off.
- How to enable PING (Does not enable other subnets, this will need another step)
- Configure the Windows firewall to allow pings - If you have a firewall enabled in Windows, ping requests are blocked by default.
- How to Allow Pings (ICMP Echo Requests) Through Your Windows Firewall | How-To Geek
- When Windows Firewall is enabled with default settings, you can’t use the ping command from another device to see if your PC is alive. Here’s how to change that.
- From the command line by adding an extra rule
- Easy
- How to Allow Ping through the Firewall in Windows 10 - No one can send ping requests to your system to know whether it is alive or not when the Firewall is enabled on your Windows 10 computer system. You can enable ping by disabling the Firewall but this can prove to be very disastrous, as your PC will be exposed to external threats and malware.
- 4 Ways to Allow or Block Ping Response in Windows • Raymond.CC - How to enable ping on several different firewalls. Well written.
- Enable traffic from different subnets
- Enable file sharing across different subnets on Windows 7 firewall – Console - The Simple answer, Thanks.
- Add new subnet example 192.168.32.0/24 for file sharing
Control Panel > System and Security > Windows Firewall > Advanced Settings and select the Inbound Rules > File and Printer Sharing (SMB-In)
- Choose the profile that your network is in (Private, Public, Domain).
Double-click (or right-click > Properties) > Scope > Remote IP address > These IP addresses: > Add your new subnet address
- Add new subnet example 192.168.32.0/24 for file sharing
- How to configure the Windows Firewall to allow only specific IP Address to connect your ports? | AccuWebHosting - If you want to allow or whitelist only a specific IP address on a port, you can enable using this article.
- Configuring Windows Firewall and Network Access Protection | Microsoft Press Store - This lesson from MCTS Self-Paced Training Kit (Exam 70-642): Configuring Windows Server 2008 Network Infrastructure, 2nd Edition describes how to plan and implement Windows Firewall and NAP using Windows Server 2008 R2.
- Chris explained what Local Subnet is (no static IP address): It is the network address of directly connected NICs. The situation would then need to be corrected if this was possible. Using a scenario like this, we need to add this subnet manually to any Windows Firewall rule, for example, for VPN users.
- clean explanations and how use notes.
- Windows Firewall blocking remote subnets - Windows Forum
- I'm having a problem with the Windows Firewall, blocking traffic from my non-domain / remote subnets in our branch offices.
- The default rules of the Windows Firewall allow domain clients, from any subnet, to communicate with their DC and the other clients in the whole network
- [SOLVED] Windows firewall - allowing other subnets to access shares? - A worked example in this thread.
- How to configure Windows Firewall to allow IP ranges [FULL GUIDE]
- Users can configure the Windows Firewall to allow ip ranges with the New Inbound Rule Wizard.
- This allows you to write one rule with out altering the default ones.
- Enable file sharing across different subnets on Windows 7 firewall – Console - The Simple answer, Thanks.
- Is the Windows firewall still on
- Comodo Firewall (CIS)
- General
- CIS Settings, Antivirus Software, Firewall Software, Virus Scan | COMODO - Official Comodo Documentation for CIS 12.2
- The Windows Defender Firewall is still running after the Comodo Firewall (or CIS) is installed and this is normal. Official explanations and how you should setup.
- Win10 firewall might be still on after Comodo Firewall install - Firewall Help - CIS
- NEVER disable the Windows Firewall Service . . . . . it is required for several essential Windows functions
- Turn off the Windows Firewall on your private network(s)
- Above you said to turn it off on private networks (highlighting mine).
- When I go to Control Panel --> Windows Defender Firewall --> Turn Windows Defender Firewall on or off,
there are 2 options: one to turn it on/off for private network and a separate section for public network. - So to clarify, are you saying I should ONLY turn it off for private network but leave it enabled for public network?
- You should turn it off for each network type that way only CFW handles connection filtering regardless on which type of network you are connected to.
- Windows Firewall not disabled on W10 1511 [M1790] - CIS
- From Comodo: CIS disabled Window FW only on Win 7 and and lower. According to requirement from Microsoft, CIS does not has the right to turn off their components beginning with Windows 8.
- So users would need to manually turn off the windows firewall if they should choose to. Note this applies to the Windows Firewall control panel applet, do not disable the windows firewall service. Moving to resolved.
- This is not a bug, but by design, a design dictated by Microsoft.
- Should I disable Windows Firewall with CIS [Merged] - Firewall Help - CIS
- Right click the Start button, select Control Panel. Select Windows Firewall, and when the firewall window opens, on the left side, select Turn off Windows Firewall.
- Yes you should disable the windows firewall if you have comodo firewall installed and you shouldn't get warnings from windows if you disable the windows firewall as long as comodo's firewall is on.
- Don't disable the service, but do turn off the firewall. This will prevent any unexpected conflicts to arise, giving unexpected results.
- It is possible to set rules in one just to discover they don't work due to the other firewall letting whatever bypass the former's rules.
Disabling one will help ensure you don't experience issues with either.
- Should we turn off Windows Firewall after installing Comodo IS? - Firewall Help - CIS
- Win10 firewall might be still on after Comodo Firewall install - Firewall Help - CIS
- When you disable the Comodo Firewall you still cannot ping.
- When you disable the Comodo Firewall the Microsoft Defender Firewall enables itself or is still running.
- Fix: disable Comodo Firewall and then disable the Defender Firewall.
- Firewall Log
- Diagnostics
- Settings --> Firewall --> Global Rules --> your-rule --> edit: 'Log as firewall event if this rule is fired'
- On any rule you create you can enable logging and then see if it is getting triggered by the firewall.
- In firewall logs I see that there is an application call 'Windows Operating System'
- Windows Operating System Blocked - Firewall Help - CIS
- You are specifically telling the firewall to log blocked incoming connection attempts, which in turn will show 'Windows Operating System'(WOS) as no application is listening on the given port that was blocked.
- Request for enhancement - CIS to block when the application is not running - CIS
- Not true, in fact when you see a block event with Windows Operating System listed under application column it means the firewall blocked it from being sent to the OS. If the packet had made it the OS and there was no application listening on that given port, then Windows would send either a TCP packet with the RST (Reset) flag set to the sender or an ICMP Destination Unreachable - Port Unreachable (Type 3, Code 3) error message if the connection attempt was for a UDP port. This is all because the firewall filter driver resides in the kernel at the same layer where the OS kernel resides and hence filter packets at the kernel aka ring0.
- Windows Operating System Blocked - Firewall Help - CIS
- Diagnostics
- Network Zones
- Comodo Internet Security Network Zones, Firewall Protection | Internet Security
- What Network Zone am I on?
- Tasks Widget --> Firewall Tasks --> Manage Networks
- Disable
- Settings --> Firewall --> Network Zones --> Enable automatic detection of private networks: unticked
- Any: Defaults to an IP range of 0.0.0.0- 255.255.255.255 to block connection from all IP addresses
- Once created, a network zone can be: Quickly called as 'Zone' when creating or modifying a Firewall Ruleset (alias)
- Stealth Ports
- Tasks Widget --> Firewall Tasks --> Stealth Ports
- The wizard doesn't exist anymore.
- Hide PC Ports Using Stealth Ports Wizard | Internet Security Help - Hide your Internet PC ports from snooping hackers using our Stealth Ports interface. Click here to read more about Stealth Ports utility in the Firewall Tasks.
- General
Windows
General
- Windows Host File
- Tips and Tricks Using the Windows Hosts File | TechGenix
- Here I will discuss how to access, open, and modify the Windows hosts file. I’ll give some tips and advice on making redirects, whether you want to block or filter sites or create shortcuts to certain websites.
- Inserting a redirect into the hosts file is simple. Just enter the IP address of the desired server or host, leave a single space, and then enter the domain or hostname you want to point to that IP. Enter only one redirect per line.
- Automate host entries with a script
- A better way to add and remove Windows hosts file entries
- In this article I present a couple of simple PowerShell scripts which will modify the hosts file on one (or more) Windows machines, so that you can route traffic destined for certain domains to specific IP addresses with minimal fuss. The scripts do this by adding (or removing) entries to (or from) the hosts file and they do this idempotently[1], so you don't need to write any checks when adding or removing. In other words, when you add a host to the hosts file, it won't add it if it's already there.
- This has 3 PowerShell scripts (add|Remove|Update)
- GitHub - TomChantler/EditHosts: Easy way to add and remove Windows hosts file entries
- How to Add DNS entry to hosts file using the command prompt | 4iT - Here is the format to add an entry to the hosts file on the local pc using the command prompt
- Windows Batch: How to add Host-Entries? - Stack Overflow
- A better way to add and remove Windows hosts file entries
- Tips and Tricks Using the Windows Hosts File | TechGenix
- In-Built VPN support
- This image shows you the native VPN support Windows 10 offers

- This image shows you the native VPN support Windows 10 offers
Windows PC Cannot Ping Local Devices by their Hostnames
This wil be a worked example of how I fixed my issue so might not exactly be the same as your issue if your are reading this. The issue for me was caused by OpenWRT routers that I had configured as AP points. These routers had their DHCP disable, but this only stops DHCP for IPv4, IPv6 has its own version of DHCP which I had not disabled.
This is an overview of the issue:
- Ping is allowed by my firewall / Firewall is disabled (see above to troubledshoot pinging)
- Can ping external domains
- Can ping domains on my local hosted webserver (Port Forward / NAT Reflection)
- Can ping local devices by their IP (10.0.0.x / 192.168.1.x)
- Cannot ping local devices by their hostnames (mycomputer.lan / mycomputer.lan / mycomputer)
- nslookup
Microsoft Windows [Version 10.0.19044.1586] (c) Microsoft Corporation. All rights reserved. C:\Users\quantumwarp>nslookup Default Server: UnKnown Address: ffff:bb14:329f::1 > bbc.co.uk Server: UnKnown Address: ffff:bb14:329f::1 Non-authoritative answer: Name: bbc.co.uk Addresses: 2a04:4e42::81 2a04:4e42:200::81 2a04:4e42:400::81 2a04:4e42:600::81 151.101.0.81 151.101.64.81 151.101.128.81 151.101.192.81 > mytv.mydomain.com Server: UnKnown Address: ffff:bb14:329f::1 *** No internal type for both IPv4 and IPv6 Addresses (A+AAAA) records available for mytv.mydomain.com >- Defaults to an IPv6 server
- Resolves external domain names
- Resolves domains on my locally hosted webserver
- Does not resolve local hostnames
Diagnostics
- ifconfig /all
- How To use the IPConfig Command and Options Explained — LazyAdmin - This article will help you learn about ipconfig command. Learn about how to use the command, the options available to you, etc. Windows and Linux.
- Shows many adapters
- Multiple 'Microsoft Wi-Fi Direct Virtual Adapter' adapters that are also not showing in 'Network Connections'
- windows 10 - What is "Microsoft Wi-Fi Direct Virtual Adapter" used for? - Super User - When I type ipconfig /all command in Windows command prompt, it shows some adapters with description of "Microsoft Wi-Fi Direct Virtual Adapter". Where did they come from?
- What Is Wi-Fi Direct? Here's Everything You Need to Know | Digital Trends - What is Wi-Fi Direct? This technology creates useful connections between devices, especially mobile devices. Here's everything you need to know about this tech.
- What does Intel My WiFi Technology do? | Microsoft Answers Forum
- Wi-fi Direct is not available on my computer, there is no option of Wi-Fi Direct on my computer. | Microsoft Answers Forum
- Multiple 'VirtualBox Host-Only Network' adapters
- Multiple 'Microsoft Wi-Fi Direct Virtual Adapter' adapters that are also not showing in 'Network Connections'
- Shows many 'Temporary IPv6 Address'
- networking - Why does my Windows have hundreds of temporary IPv6 addresses? - Super User
- Identifying and Disabling Temporary IPv6 Addresses | Tableau Software - Might be useful.
- How to force a new temporary IPv6 address in Windows 10? - Microsoft Q&A
- IPv6 on Windows | NetworkAcademy.io
- Prior to Windows Vista and Windows Server 2008, Windows hosts used only MAC addresses to create Interface Identifiers (EUI-64). Globally unique addresses and Link-local ones were created using the segment's prefix plus the EUI-64 identifier which is generated from the physical address of the host. With the rise of network security, this was found to be a security vulnerability because an IPv6 address can be easily tied to a MAC address, which uniquely identifies physical equipment.
- Companies realized that and introduced two concepts that help to improve user's privacy - Random Interface Identifiers and Temporary IPv6 addresses. Let's start by looking at what the first term is.
- IPv6 address when IPv6 is disabled on pfSense
- [SOLVED] IPv6 address getting assigned, no IPv6 DHCP server - Networking
- If you have IPv6 enabled on your NIC card (Control Panel --> Network Adapter Settings --> Properties --> little checkbox next to IPv6 ) then youre going to get an IPv6 address. This is due to stateless autoconfiguration.
- Stateless Autoconfiguration: IPv6 lets any host generate its own IP address and check if it's unique in the scope where it will be used. IPv6 addresses consist of two parts. The leftmost 64 bits are the subnet prefix to which the host is connected, and the rightmost 64 bits are the identifier of the host's interface on the subnet. This means that the identifier need only be unique on the subnet to which the host is connected, which makes it much easier for the host to check for uniqueness on its own.
- As long as IPv6 is enabled on your NIC you will get a unique address
- The left half of the address is the subnet prefix of your network
- The right half of the address is your NIC's MAC address.
- [SOLVED] IPv6 address getting assigned, no IPv6 DHCP server - Networking
- Disable Firewalls
- I disabled my Comodo CIS Firewall and the Windows Defender Firewall and this made no difference.
- After confirming this, I turned the Firewall back on immediately.
- Reset Windows Network
- Settings --> Network & Internet --> Network reset
- Disable 'Microsoft Wi-Fi Direct Virtual Adapter' adapters
- You can remove them if you want but for me disabling is easier and can be reversed.
- How to Disable or Remove the Microsoft Wi-Fi Direct Virtual Adapter in Windows? | Windows OS Hub - The Microsoft Wi-Fi Direct Virtual Adapter is a Windows virtual device that is used to directly connect two devices using Wi-Fi Direct, bypassing Wi-Fi access points/routers.
- Re-Install VirtualBox (because I use it)
- Multiple 'VirtualBox Host-Only Network' adapters turned back up, so this is a setting in VirtualBox
- File --> Host Network Manager
- Make sure you only need one and delete the others
- Multiple 'VirtualBox Host-Only Network' adapters turned back up, so this is a setting in VirtualBox
- Disabled IPv6 in Network Adapter(s)
- Control Panel --> Network and Internet --> Network Connections --> Ethernet/WiFi Adapter --> Properties --> Internet Protocol 6 (TCP/IPv6): unticked
- I can now ping by hostnames
- nslookup by default uses an IPv4 address (i.e. 10.0.0.1)
- re-enabled IPv6 for futher testing
- Ping the IPv6 DNS server
- Do you get a response?
- Leave a continuous ping going and uplug kit from the network
ping -6 ffff:bb14:329f::1 -t
- Open the IPv6 DNS server in a Web Browser
- IPv6 address can be confusing so what seems like a local address might not be.
- Most network kit has a web interface on the port 80
- This will help you identify the kit (I wish I figured this out earlier)
- Open the IPv6 address using the following format:
https://[ffff:bb14:329f::1]/
https://[ffff:bb14:329f::1]:8080/index.html
- Log the DNS queries
- See if this gives you any more infromation
At this point with IPv6 still enables, none of what we have done has fixed the issue.
Packet Capture all 'Port 53' traffic on the LAN interface
I have DNS Hijacking enabled on my pfSense box so how are DNS lookups getting made when IPv6 has also been turned off (mostly) on my router.
- I followed the steps below:
- Keep all traffic to a minimum
- Close all browsers
- Close all apps
- Open nslookup by just typing nslookup which defaults to using the IPv6 server which is what we want.
- Type in a domain name bbc.co.uk but do not press enter
- Opened (pfSense --> Diagnostics --> Packet Capture) with the following settings:
- Interface: LAN
- Port: 53
- leave the rest the same
- Scroll to the bottom and click 'Start'
- Press enter in nslookup
- Wait a moment and then click 'Stop' on the Packet Capture page.
- In the 'Packet Capture' field at the bottom you should see something like this:

- What this shows is that the only address that did a DNS lookup as far as pfSense is concerned is 10.0.0.5
- Where is my DNS lookup because my IP address is 10.0.0.183
- Your capture log might not be as clean as the one above.
- Further analysis is required with Wireshark
- Download the capture by click 'Download Capture'
- Open the file with Wireshark. Install the software if you dont have it.
- You should now see something like this

- We can see clearly that the address 10.0.0.5 did a DNS lookup for bbc.co.uk which must of been initiated by me or by chance the device with the address 10.0.0.5 browsed the BBC website at the exact same time, so lets assume it was me.
- So how did my DNS request get to 10.0.0.5?
Cause
I had an OpenWRT router configured as an AP (Access Point) using the IP 10.0.0.5 which I had disabled DHCP on them as you would expect.
So to explain the packet capture above:
- The OpenWRT AP was still running RA and SLAAC services (IPv6 equivalent of DHCP)
- My Windows PC was being assigned IPv6 Temporary Addresses and IPv6 DNS servers because of this.
- My Windows PC DNS request was:
- Sent over IPv6 to the OpenWRT AP
- because there was an IPv6 server configured on the Windows PC, and by default in Windows IPv6 is the prefered network protocol, so the IPv6 Server was used.
- The OpenWRT device used its own internal DNS Daemon to forward the request to its upstream DNS resolver over IPv4 which was my pfSense router (10.0.0.1)
- You cannot see it, but the pfSense router then forwarded it upstream to it's resolver, and processed the returned results.
- pfSense sent the results to the OpenWRT AP over IPv4
- The OpenWRT AP then returned the results to the Windows PC over IPv6
- Sent over IPv6 to the OpenWRT AP
So the IPv6 traffic skipped the pfSense router and as far as it was concerned the OpenWRt AP was making the DNS request.
This OpenWRT AP had the IPv4 10.0.0.5 and the IPv6 address ffff:bb14:329f::1 that was assigned to my Windows PC as a DNS server.
Solutions
You might find a small speed improvement when either of these options are applied because now your DNS lookups are going direct to the pfSense router rather than goping through the OpenWRT AP.
Option 1 - On the OpenWRT AP - Disable IPv4 and IPv6 DHCP, DNS and related services on the LAN interface only
This assumes you are using the default configuration where LAN is your primary network and it is this that is connected to the rest of the network via ethernet.
- OpenWRT --> Network --> Interfaces --> LAN --> Edit --> DHCP Server
- General Setup
- Ignore interface: ticked
- IPv6 Settings
- RA-Service: disabled
- This includes SLAAC
- DHCPv6-Service: disabled
- This includes Local IPv6 DNS server
- All the other settings will dissapear.
- RA-Service: disabled
- General Setup
- Click 'Save'
- Click 'Save & Apply'
- Reboot OpenWRT
- OpenWRT -->System --> Perform Reboot
- Reboot the Windows PC
- You might be able to get away with stopping and starting your Network adapter.
Option 2 - On the OpenWRT AP - Disable all IPv4 and IPv6 DHCP, DNS and related services
- OpenWRT --> System --> Startup --> Stop and Disable
- dnsmasq
- odhcpd
- This configuration will not survive a system upgrade.
- This is Ok for quick testing and a temporary fix.
- It will disable these services across all interfaces.
Workarounds
These are not ideal and I have just put them here for reference or for when you cannot access the relvant nework kit to re-configure them as required.
- Prefer IPv4 over IPv6 (on Windows PC)
- This will force Windows ot use IPv4 first thus skipping the IPv6 issue.
- Prefer IPv4 over IPv6 in Windows Networks - .matrixpost.net - By default Windows will prefer IPv6 over IPv4. Below you will see how you can change this behavior.
- Prioritising IPv4 over IPv6 on Windows 10 and 11 - IPv6 is an integral part of Windows. It's tempting to disable IPv6 on Windows especially on home networks. This can have a variety of side effects that might cause applications and processes to misbehave. Microsoft explicitly does not recommend you disable IPv6. The best way to ensure your Windows computer uses IPv4 is to simply change the IPv6 prefix policy precedence.
- networking - IPv4 vs IPv6 priority in Windows 7 - Super User - I have IPv6 connectivity through Hurricane Electric tunnel. Since IPv6 day this year, many services (google.com, facebook.com, etc.) enabled IPv6 on their main domains. On my Windows machine, IPv6 is preferred over IPv4. This means that whenever I visit Google, all traffic goes through my tunnel to Hurricane Electric, which raises the latency by more than 100%:
- Prefer IPv4 over IPv6 on Windows – Dimitri's Wanderings - Prefer IPv4 over IPv6 on Windows using KB 929852 registry setting, GPO or alternatively netsh prefix policy without reboot needed.
- Why does Windows 10 prefer IPv4 over IPv6? - Super User - I'm running the latest version of Windows 10 as of this writing (1903) and I have a working dual-stack connection. If I ping the hostname of a dual-stack device from the command line, Windows prefers the IPv4 address. If I turn off IPv4, it will use the IPv6 address. According to numerous sources (including this answer), Windows should prefer IPv6.
- Prioritizing IPv4 Connections | SocketTools10
- Windows will normally prefer to use IPv6 instead of IPv4 if the local system has been configured with IPv6 enabled and the system you want to connect with has an IPv6 address assigned in its DNS record. However, there may be situations where you want the system to prioritize IPv4 instead.
- A good article and clearly explained.
- Use IPv4 Instead of IPv6 | UNBLOG - How to use IPv4 prefers instead of IPv6 using Windows. The affine coexistence of IPv6 and IPv4 for resources in the transition period is not necessarily
- Disable IPv6 (on Windows PC)
- This is self explanatory
- Control Panel --> Network and Internet --> Network Connections --> Ethernet/WiFi Adapter --> Properties --> Internet Protocol 6 (TCP/IPv6): unticked
- Remove the OpenWRT AP device from the network
- This is self explanatory
Conclusion
- All the Temporary IPv6 addresses have now dissapeared.
- It was the OpenWRT AP causing the problem by leaving the IPv6 DHCP Equivalent services running.
- My traffic was getting split, IPv4 to pfSense and IPv6 traffic to OpenWRT AP.
- This mis-configuration might of been causing issues with network connectivity beyound local hostname lookups.
- nslookup now defaults to 10.0.0.1 for its DNS server which means there is no IPv6 DNS server on the network.
Notes
- Windows Routes
- routing - Windows route selection and "route print -6" vs "netsh interface ipv6 show route" - Super User - So I'm using Windows 10 and I need to redirect some IPv6 multicast traffic to a specific interface (a USB-Ethernet adapter to be more specific). By default all multicast traffic is going to my WiFi connection (verified using WireShark). If I disable the WiFi interface, I can observe the multicast traffic in question going to the USB-Ethernet adapter.
- winsock - How to flush route table in windows? - Stack Overflow - I am trying to write a program that changes the default gateway of network time by time. But it seems that there are caches on the route table in every process so that I cannot control the network behavior accurately. Can I just flush route table to that process?
- IPv6 Routing Table Removing a route | Microsoft Answers Forum - Could someone please help me with the correct command to remove a route from the ipv6 routing table below?
- Ipv6 General
- networking - How can I get windows to release an IPv6 address - Super User - I have a windows system with an IPv4 address and an IPv6 address and I'm trying to figure out how to release my IPv6 address.I've tried ipconfig /release6 and I get this error.
- domain name system - Prevent automatic Windows DNS from registering global IPv6 addresses - Server Fault
- When having IPv6 enabled the automatic Windows DNS registration adds AAAA records for both the ULA and the global unicast address. This is not a problem for most networks, but causes issues when using a VPN without routing the global addresses through it (which is not always viable). Thus I would like to prevent it from registering the global address, but haven't found an option for that so far.
- I know that I could solve the issue by disabling IPv6 or the automatic DNS, but I look for a better option. My only other idea was to use some DNS forwarder to filter out these records, but obviously this is not a feature of any common forwarder.
- How do I disable IPv6 for Windows Server DNS? | securly - Simple instructions
- SLAAC Attack – 0day Windows Network Interception Configuration Vulnerability - Infosec Resources
- Ignore the primary use of this article.
- IPv6 Background - Aside from the increased address space, IPv6 is fundamentally different to IPv4 in several key areas. This article isn’t intended to be an IPv6 primer, but I’ll highlight the main features of IPv6.
- FE80::/64
- This is network is used for Link-Local Ipv6 Addresses
- Might be equivalent to 127.0.0.1
Networking
I will add non pfsense specific networking links and information.
- General
- Protocols used for PING | Baeldung on Computer Science - In this tutorial, we’ll try to explain the protocols used by ping and explore various aspects of them.
- networking - What do the following mean: TCP:RA, TCP:FA ,TCP:PA, TCP:S, TCP:SEC - Server Fault
- Differences Between TCP, UDP, and ICMP | PingPlotter - What’s the difference between TCP, UDP & ICMP? Learn this and how different packet types can help you capture better evidence of internet connection problems.
- IP Address | radware - A vulnerability (in computer security) is any weakness in a computer system, network, software, or any device that allows one to circumvent security measures.
- 255.255.255.255 – Represents the broadcast address, or place to route messages to be sent to every device within a network
- List of assigned /8 IPv4 address blocks - Wikipedia
- 0.0.0.0/8 Originally IANA - Reserved 1981-09. 0.0.0.0/8 reserved for self-identification (RFC 6890)
- networking - What does it mean to have a subnet mask /32? - Super User
- Network Security. Blog posts, papers, and articles | by Teri Radichel | Cloud Security | Medium - Blog posts, papers, and articles on Network Security by Teri Radichel
- Introduction to NATs and SNATs | MyF5 - You can configure the BIG-IP system to translation IP addresses in packets that pass through the system. You can configure objects for both network address translation (NATs) and source network address translation (SNATs).
- What Is an Open Proxy? | Fortinet - An open proxy is a type of proxy server that can be used by anyone who wants to connect to the internet. Discover their pros and cons, and how to detect and avoid them.
- CIDR
- Understanding CIDR Subnet Mask Notation | pfSense Documentation - pfSense software uses CIDR (Classless Inter-Domain Routing) notation rather than the common subnet mask
255.x.x.xwhen configuring addresses and networks.
- Understanding CIDR Subnet Mask Notation | pfSense Documentation - pfSense software uses CIDR (Classless Inter-Domain Routing) notation rather than the common subnet mask
- IP Classes
- 5 Classes of IPv4 Addresses [Class A, B, C, D and E] - Quick reference guide on five IPv4 classes, IP range, number of networks and host, and special classes.
- Network Classes - TCP/IP and Data Communications Administration Guide | Oracle Docs - Currently there are three classes of TCP/IP networks. Each class uses the 32-bit IP address space differently, providing more or fewer bits for the network part of the address. These classes are class A, class B, and class C.
- 5 Classes of IPv4 Addresses [Class A, B, C, D and E] - Quick reference guide on five IPv4 classes, IP range, number of networks and host, and special classes.
- 0.0.0.0
- c - What is the meaning of 0.0.0.0 address while receiving broadcast (or other packets)? - Stack Overflow
- the 0.0.0.0 is a special addres that means every IP address of your machine. = broacast / send to every IP
- What is the Difference Between 127.0.0.1 and 0.0.0.0?
- Most of us have heard of ‘127.0.0.1 and 0.0.0.0’ but have probably not given much thought to them, but if both actually seem to point to the same location, then what is the actual difference between the two? Today’s SuperUser Q&A post helps clear things up for a confused reader.
- 0.0.0.0 is a non-routable meta-address used to designate an invalid, unknown, or non-applicable target (a ‘no particular address’ place holder).
- In the context of servers, 0.0.0.0 means all IPv4 addresses on the local machine.
- 0.0.0.0 - Wikipedia
- 0.0.0.0/0 is not the same as 0.0.0.0/8
- The CIDR notation 0.0.0.0/0 which defines an IP block containing all possible IP addresses.
- 0.0.0.0/8 Originally IANA - Reserved 1981-09. 0.0.0.0/8 reserved for self-identification (RFC 6890)
- c - What is the meaning of 0.0.0.0 address while receiving broadcast (or other packets)? - Stack Overflow
- Broadcasts
- Broadcast Packet - Network Encyclopedia - Broadcast Packet is an Internet Protocol (IP) packet with the IP address 255.255.255.255.
- Broadcast address and 255.255.255.255 - Cisco Community
- What is the difference between 255.255.255.255 and this one 192.168.20.255 ( Network Address 192.168.20.0/24)
- The 3 types of broadcasts explained
- Multicast / IGMP
- Multicast address - Wikipedia
- 224.0.0.1 The All Hosts multicast group addresses all hosts on the same network segment.
- pfSense with routed IPTV and OpenVPN client for private internet access - Vikash.nl
- A tutorial on setting up IPTV and the use of pfSense's IGMP Proxy
- We have to setup IGMP Proxy because IPTV uses multicast. The multicast traffic needs to be received by the set-op box in order to function properly. The way to get the IGMP traffic from the WAN_IPTV interface (from your ISP) to the set-op box is to let pfSense proxy it. By using IGMP proxy we also can isolate multicast traffic to only the set-op boxes in stead of flooding you whole LAN constantly with it. This in a nutshell is why we use IGMP proxy.
- Understanding IP Multicasting - Learn the basics of IP multicasting. How it works and how it is used. How multicasting differs from broadcasting.
- IPv4 Multicast Address Space Registry
- Host Extensions for IP Multicasting [RFC1112] specifies the extensions required of a host implementation of the Internet Protocol (IP) to support multicasting. The multicast addresses are in the range 224.0.0.0 through 239.255.255.255.
- The range of addresses between 224.0.0.0 and 224.0.0.255, inclusive, is reserved for the use of routing protocols and other low-level topology discovery or maintenance protocols, such as gateway discovery and group membership reporting. Multicast routers should not forward any multicast datagram with destination addresses in this range, regardless of its TTL.
- Address assignments are listed on this page.
- Services — IGMP Proxy | pfSense Documentation
- 224.0.0.0/3 - IPv4 Subnet Calculator | adminsubnet
- Network 224.0.0.0/3
- First IP 224.0.0.1
- Last IP 255.255.255.254
- Multicast addresses | hpe.com
- This article breaks the packet structure down.
- IANA assigned the Class D address block (224.0.0.0 to 239.255.255.255) to IPv4 multicast.
- Multicast address - Wikipedia
- NetBIOS
- NetBIOS is useful on your local networks if you are using Windows PCs.
- Windows uses NetBIOS names, and such protocol, being a broadcast one, allows them to find each other without any central server.
- This is a legacy option and is not required anymore
- This is not needed for \\computer
- This is an insecure protocol (maybe)
- Should I disable NetBIOS over TCP IP? - Quora
- Disable NetBIOS in Windows networks – 4sysops
- NetBIOS was initially created to allow applications to communicate without understanding the details of the network, including error recovery. It operates at the session layer, layer 5 of the OSI model. As with other legacy technologies, the main reason for disabling NetBIOS is security.
- There are two ways to achieve this goal: via either DHCP or a registry key.
- OpenVPN - NetBIOS Options | pfSense Documentation
- Tools
- Subnet Calculators
- IP Calculator / IP Subnetting - ipcalc takes an IP address and netmask and calculates the resulting broadcast, network, Cisco wildcard mask, and host range. By giving a second netmask, you can design subnets and supernets. It is also intended to be a teaching tool and presents the subnetting results as easy-to-understand binary values.
- Ip Multi Tools
- IP Tools | rst.im
- IP calculator and many many other useless tools.
- ip, calculator, subnet, cidr to netmask, netmask to cidr, ip to long, long to ip, ip2long, long2ip, oui lookup,
- IP Tools | rst.im
- IP Lookup
- IP Address Lookup Tools | IP Address (English)
- This site provides the latest and most complete IP address information, IP information inquiry and other contents, including local information, IP map generation, common IP query tools, IP related knowledge, etc.
- Domains, IP and local IP information such as 255.255.255.255
- IP Address Lookup Tools | IP Address (English)
- Subnet Calculators
- Bogons
- Bogons = bogus (fake) IP addresses of a computer network
- 0.0.0.0/8, 10.0.0.0/8, 192.168.0.0/16 are bogons
- Netgate Bogon Feeds - Several different lists.
- Question about the BOGON table | Netgate Forum
- How to create a bogon blocklist using the netgate bogon feeds and pfSense alias.
- Bogon Networks - Block Bogon IP Addresses | Team Cymru
- Are you aware of bogon prefixes? If not, it is crucial to understand them. To protect yourself from potential DDoS attacks, packets routed over public networks (not including VPNs or other tunnels) should avoid these address ranges! Learn more about it today!
- Excellent explanation.
- Bogon Reference: via HTTP | Team Cymru
- We offer a range of HTTP resources to help you stay up-to-date with bogon allocations. Browse the HTML Formatted or Plain Text options to find the best fit for your needs.
- Original source of the bogon feeds.
- Bogon filtering - Wikipedia
- Feature #14159: Add netgate bogon feeds - pfSense Packages - pfSense bugtracker
Alternative Firewalls
The following is a list of pfSense alternatives just incase you wanbt to have a look.
- The Firewalls
- OPNsense® a true open source security platform and more - From Virtual Private Networking to Intrusion Detection, Best in class, FREE Open Source Project.
- Sophos Home Edition Firewall - Our Free Home Use Firewall is a fully equipped software version of the Sophos Firewall, available at no cost for home users – no strings attached. Features full protection for your home network, including anti-malware, web security and URL filtering, application control, IPS, traffic shaping, VPN, reporting and monitoring, and much more.
- IPFire - The Open Source Linux-based Firewall Operating System with a Comprehensive Feature Set.
- Vs
- pfSense CE (Community Edition) vs OPNsense - Firewalls, Networking & Security - Sheridan Computers - When it comes to choosing a firewall solution for your network, two prominent open-source options often come to mind: pfSense CE and OPNsense. Both are highly capable, feature-rich platforms that offer extensive functionality and flexibility. This guide aims to help you make an informed decision by comparing these two firewalls across various dimensions.
My InnoDB Notes
InnoDB is the better engine and is the one I will be using in all of my projects. InnoDB is faster and more resilient to errors.
These article brings together all of my InnoDB notes which were built while trying to get my head around the different SQL engines (InnoDB vs MyISAM) and which one to use.
- MyISAM to InnoDB
- WordPress specifies no table type in the create statements, so it uses MySQL's default table engine which is InnoDB from version 5.5 onwards.
- Which is Better MySQL Engine for WordPress : MyISAM or InnoDB
- This article explains with clear thought that InnoDB is better and why while using WordPress as a focus.
- This article also has a few SQL scripts for checking and changing.
- Your server defaults determine the database table format because WordPress does not specify the engine to use. This is a choice the developers have made.
- InnoDB is capable of taking advantage of multiple cores, but MyISAM can only use one core.
- InnoDB likes RAM.
- InnoDB can recover better from a crash and is more stable in general.
- If improperly set up InnoDB can lead to more frequent crashes leading to WordPress Database Connection Error.
- InnoDB has referential integrity which involves supporting foreign keys (RDBMS) and relationship constraints.
- InnoDB supports transactions, which means you can rollback.
- InnoDb is the winner in performance for the average user.
- MyISAM is easier to backup raw while running for server snapshots, where InnoDB data may get corrupted in backups performed in that way – you need manual checking.
- Switching the format of database tables to InnoDB will decrease overall CPU load on the server, the site may become faster. Although there are some risks of crashes, it is generally accepted that InnoDB is the better engine for WordPress databases.
- mysql - MyISAM versus InnoDB - Stack Overflow - A good discussion.
- JV-LinkDirectory 4.8 Dev Update: Database Level Changes
- JV-LD has been using MyISAM as the primary MySQL engine type in all the versions till now. We are making a conscious shift to InnoDB engine type with JV-LD 4.8.
- InnoDB is one of the several engine types that MySQL provides and is a very powerful, performance oriented engine.
- InnoDB provides transactional (OLTP - Online Transaction Processing) capabilities, that enable integrity of transactions to be maintained.
- With InnoDB, JV-LD will now use several foreign keys with in the tables, which maintain relationships between tables in a more efficient way and speed up the execution.
- InnoDB is also the preferred engine, as your directory grows, as it gives you better locking mechanisms unlike MyISAM which does row level locking only.
- InnoDB is a largely ACID (Atomicity, Consistency, Isolation, Durability) engine, built to guarantee consistency and durability. It does this through a transaction log (with the option of a two-phase commit if you have the binary log enabled), a double-write buffer and automatic checksumming and checksum validation of database pages. These safety measures not only prevent corruption on "hard" shutdowns, but can even detect hardware failure (such as memory failure/corruption) and prevent damage to your data
- MySQL :: MySQL 8.0 Reference Manual :: 15.6.1.5 Converting Tables from MyISAM to InnoDB
- If you have MyISAM tables that you want to convert to InnoDB for better reliability and scalability, review the following guidelines and tips before converting.
- This article has many explanations of the different InnoDB settings.
- MySQL :: MySQL 5.6 Reference Manual :: 14.6.1.5 Converting Tables from MyISAM to InnoDB - Just the same document for MySQL 5.6
- WordPress: Choosing mySQL Database Engine: myISAM or InnoDB?
- Since MySQL 5.5 InnoDB is the default engine.
- InnoDB supports transactions, it is very fast in insert or update operations because it supports row locking allowing for multiple operations over same table and it supports foreign keys for table relations.
- If you have powerful server with a lot of memory, you will not notice any slowdowns (if InnoDB is set properly), and for many operations you may notice speed improvements.
- For normal websites, with no big traffic, engine is not that important. Speed issues comes into play if you have a lot of traffic on your website. I think the speed difference now is always noticeable especially as websites with CMS get more complicated.
- InnoDB vs MyISAM - Faster WordPress - Friday Next
- Choosing the Right Storage Engine - MariaDB Knowledge Base
- A high-level overview of the main reasons for choosing a particular storage engine.
- InnoDB is a good general transaction storage engine, and, from MariaDB 10.2, the best choice in most cases. It is the default storage engine from MariaDB 10.2.
- Enhance WordPress Performance by Moving from MyISAM to Innodb
- The Ultimate Developer's Guide to the WordPress Database
- A storage engine is the part of the database that is responsible for reading and writing data. Since MySQL 5.5 the default storage engine has been InnoDB. It is the most commonly used storage engine, as it has row-level locking instead of full table-level locking (super important when you’re doing a mysqldump export/backup), has support for transactions (allowing you to commit and rollback SQL statements), and has full support for foreign keys and relationship constraints.
- MyISAM was the storage engine used in the past by WordPress and you might still have older WordPress sites running on it. Some sites might even have a mix of tables using both MyISAM and InnoDB storage engines.
- WordPress Database Optimization - Support Center | WP Engine
- WP Engine only supports the InnoDB table storage engine and any tables using MyISAM will be converted automatically. The storage engine your site uses will make a big difference in performance due to the way they write data and use server resources, and we’ve found that InnoDB consistently performs better.
- MyISAM performs just fine for database read operations, but when it comes to writing or updating data, the entire table is locked until the process is complete. This prevents any other read/write operations from starting in that table until that individual process is done. InnoDB only locks the single row being written to, freeing up the rest of the table for simultaneous operations.
- Another big difference is the way both storage engines interact with memory on the server. There is a specific pool of Memory called the InnoDB Buffer Pool to be used by InnoDB tables. Tables which use MyISAM are not able to use this Memory pool, meaning they write to disk (swap) instead of using the database memory.
- database - WordPress site uses MyISAM, should I switch to InnoDB necessary? - WordPress Development Stack Exchange
- MyISAM could not be backed up while the database is running either. Databases generally cannot be backed up by running using a naive method like taring up the files. The data has to be static / point-in-time consistent. So if you take a snapshot and back up a snapshot, that is fine.
- With InnoDB you can also use xtrabackup, which is faster to back up and much, much faster to restore than mysqldump. You can also use mysqldump --single-transaction to back up without locking the tables (mysqldump with MyISAM results in all tables being locked during the backup process).
- WordPress Plugins (MyISAM to InnoDB)
- Simple MyISAM to InnoDB – WordPress plugin | WordPress.org - I have used this and it just works.
- Use InnoDB – WordPress plugin | WordPress.org
- Not updated in a while but the description has the following note
- The InnoDB storage engine locks tables (when needed) on a single row level, while MyISAM does this on the entire table level, this is less effective and leads to WordPress slow-ness when working with highly loaded sites or large options table
- Conversion Scripts / Tutorials
- MyISAM to InnoDB | rjweb.org
- You have decided to change some table(s) from MyISAM to InnoDB. That should be as simple as ALTER TABLE foo ENGINE=InnoDB. But you have heard that there might be some subtle issues.
- This is describes the possible issues and what do do about them
- Converting MySQL Tables From MyISAM to InnoDB | Pantheon Docs - A very well written script with feedback.
- k2_items innodb - Community Forum - JoomlaWorks
- As recommended but Fotis at Joomla K2 for converting K2 tables.
- On a production server, InnoDB is much faster for practical reasons.
- Convert Tables from MyISAM 2 InnoDB 4 Performance? - Community Forum - JoomlaWorks - Realted to converting K2 database.
- k2_items innodb - Community Forum - JoomlaWorks
- mysql - How to convert all tables from MyISAM into InnoDB? - Stack Overflow
- How to change the database engine of a MySQL database table? - SiteGround KB
- Command to change a single table
-
ALTER TABLE my_table ENGINE = InnoDB;
- Converting MyISAM to InnoDB - Joomla! Forum - community, help and support - The last post has the script.
- Converting WordPress database tables from MyIASM to InnoDB – Paul Stenning
- MySQL Storage Engine - How to Convert MyISAM to InnoDB | Kinsta - A great and easy to read tutorial
- Converting WordPress Database Tables from MyISAM to InnoDB with WP-CLI •
- This simple script uses PHP to change your databaase tables from MyISAM to InnoDB.
<?php // connect your database here first $dbhost = 'localhost'; $dbuser = '*********'; $dbpass = '*********'; $dbname = '*********'; $conn = mysql_connect($dbhost, $dbuser, $dbpass) or die ('Error connecting to mysql'); mysql_select_db($dbname); // Actual code starts here $sql = "SHOW tables"; $rs = mysql_query($sql); while($row = mysql_fetch_array($rs)) { $tbl = $row[0]; $sql = "ALTER TABLE $tbl ENGINE=INNODB"; mysql_query($sql); } ?> - Conversion MyISAM To InnoDB / WordPress Agentur JoeWP - This uses phpMyAdmin for the conversion.
- How to change your MyISAM DB to InnoDB using phpMyAdmin | MODX
- InnoDB is a more robust and better database table type for modern applications like MODX Revolution compared to the older MyISAM table type. With InnoDB, you should see improvements in platform I/O, your sites should perform better and faster, and they should better survive database hiccups that can occur, too. MODX Revolution 2.6 will default to InnoDB for new installations, if supported.
- Converting to InnoDB from MyISAM tables using the Command Line | MODX
- This is a slightly more advanced companion to our [previous tutorial to convert to InnoDB using phpMyAdmin](blog/convert-myisam-to-innodb-with-phpmyadmin). It is especially useful for power users and larger databases that may fail conversion when using a GUI web app.
- MyISAM to InnoDB | rjweb.org
- What is the purpose of ibdata1, ib_logfile0, ib_logfile1
- what is the purpose of ibdata1,ib_logfile0,ib_logfile1 - Other MySQL® Questions - Percona Community Forum
- Those are the files where the actual data, indexes and the innodb log are stored for all innodb databases
- If you’re using the innodb_file_per_table option, then each InnoDB table gets its own .ibd file, so you can recover freed-up space in a table by rebuilding just that one table.
- The easiest way to rebuild an InnoDB table is to run the command, “ALTER TABLE tablename ENGINE=InnoDB;”. However, this will build the new copy of the table on disk before dropping the old one, so you’ll need to have enough free disk space to keep the entire second copy of the table.
- If you’re tight on disk space on the database server (which is probably why you want to free up the space trapped in the InnoDB tablespace in the first place), then you can mysqldump the table to another machine with more free space and then re-import it back into the database server. It’s still a pain to have to do that, but it’s a lot better than having to dump ALL of your tables.
- Does mysql configuration options accepts - instead of _?
- Does mysql configuration options accepts - instead of _? - Database Administrators Stack Exchange
- Within option names, dash (-) and underscore (_) may be used interchangeably. For example, --skip-grant-tables and --skip_grant_tables are equivalent. (However, the leading dashes cannot be given as underscores.)
- This applies to options when you use them in option files, as well as command-line flags.
- However, when using option variables in SQL queries, like in SET GLOBAL read_only=ON, you must use underscores only. Even putting the variable in back-ticks doesn't allow you to use hyphens.
- Hyphens in column names in MySQL DB | Newbedev
- Hyphens are a big problem because if you end up mapping a column name to a variable, most languages do not like to have hyphens inside variable names.
- I dont know which is better to update my notes with.
- Does mysql configuration options accepts - instead of _? - Database Administrators Stack Exchange
- innodb_file_per_table option
- innodb_file_per_table is enabled by default in MariaDB.
- With this option enabled you can actually shrink .ibd tables.
- mysql - Why using innodb_file_per_table? - Database Administrators Stack Exchange - A good discussion.
- Reasons to use innodb_file_per_table – code.openark.org - A lot of aspects are discussed here.
- With this parameter set, a .ibd file is created per table. What we get is this:
- Tablespace is not shared among different tables, and certainly not among different schemes.
- Each file is considered a tablespace of its own.
- Again, tablespace never reduces in size.
- It is possible to regain space per tablespace.
- With this parameter set, a .ibd file is created per table. What we get is this:
- innodb - MySql - changing innodb_file_per_table for a live db - Database Administrators Stack Exchange - Several methods on changing to seperate table files.
- InnoDB File-Per-Table Tablespaces - MariaDB Knowledge Base
- When you create a table using the InnoDB storage engine, data written to that table is stored on the file system in a data file called a tablespace. Tablespace files contain both the data and indexes.
- When innodb-file-per-table=ON is set, InnoDB uses one tablespace file per InnoDB table. These tablespace files have the .ibd extension. When innodb_file_per_table=OFF is set, InnoDB stores all tables in the InnoDB system tablespace.
- MySQL InnoDB - innodb_file_per_table cons? - Server Fault
- By default MySQL InnoDB stores all tables of all DBs in one global file. You can change this by setting innodb_file_per_table in the config, which then creates one data file for each table. I am wondering why innodb_file_per_table is not enabled by default. Are there downsides to using it?
- Once innodb_file_per_table is put in place, and new InnoDB tables can be shrunk using ALTER TABLE <innodb-table-name> ENGINE=InnoDB'; This will shrink new .ibd files GUARANTEED.
- If you run ALTER TABLE <innodb-table-name> ENGINE=InnoDB'; on an InnoDB table created before you used innodb_file_per_table, it will yank the data and indexes for that table out of the ibdata1 file and store it in a .ibd file, This will leave a permanent pigeon whole in the ibdata1 that can never be reused.
- Complete Instructions on how to convert current data aswell.
- By default MySQL InnoDB stores all tables of all DBs in one global file. You can change this by setting innodb_file_per_table in the config, which then creates one data file for each table. I am wondering why innodb_file_per_table is not enabled by default. Are there downsides to using it?
- MySQL - Converting to Per Table Data for InnoDB • Conetix
- MySQL :: MySQL 5.6 Reference Manual :: 14.6.3.2 File-Per-Table Tablespaces
- Repairing Database
- Tutorial - InnoDB Corruption Repair Guide | cPanel Forums
- This basic guide goes over some of the methods you can use to deal with some of the most common InnoDB corruption issues, from start to finish. It is fairly lengthy.
- InnoDB Recovery Modes - MariaDB Knowledge Base
- Tutorial - InnoDB Corruption Repair Guide | cPanel Forums
- Configuring / Tuning / Performance
- Configuring MariaDB for Optimal Performance - MariaDB Knowledge Base
- InnoDB or XtraDB is normally the default storage engine with MariaDB.
- You should set innodb_buffer_pool_size to about 80% of your memory. The goal is to ensure that 80 % of your working set is in memory!
- This makes other configuration recommendations
- Configuring MariaDB with Option Files - MariaDB Knowledge Base
- You can configure MariaDB to run the way you want by configuring the server with MariaDB's option files. The default MariaDB option file is called my.cnf on Unix-like operating systems and my.ini on Windows. Depending on how you've installed MariaDB, the default option file may be in a number of places, or it may not exist at all.
- How to optimize Mysql or MariaDB - Best VPS Guide 2021
- 10 MySQL settings to tune after installation - How to... blog
- Explains some of the InnoDB options and other options in a easy to read format.
- debian - What is the configuration file of MariaDB? - Stack Overflow
- Configuring MariaDB for Optimal Performance - MariaDB Knowledge Base
- Get the MariaDB variables
- MariaDB default my.cnf in sources - Stack Overflow
- No, MariaDB does not have a configuration file which would list all available options and their default values. Different MariaDB packages might provide some configuration files, but those are different, they only contain a small subset of options, and the values are different from default ones.
- You can output the default MariaDB variables and settings by running:
Default configuration and explanation of the settings
mysqld --no-defaults --verbose --help

or, on a running 10.1+ server, by executing
SELECT variable_name, default_value FROM information_schema.system_variables ORDER BY variable_name
- You can output the current MariabDB variables:
- In the CWP GUI (SQL Services --> MySQL Manager --> Settings --> Show MySQL Variables) This runs mysql -e "show variables;" -B
- From the command line run one of these:
mysqld --verbose --help

mysqladmin variables
- SHOW VARIABLES - MariaDB Knowledge Base
- MySQL Tutorial => SHOW VARIABLES example | RIP Tutorial
- MariaDB default my.cnf in sources - Stack Overflow
- MySQL Tuner
- GitHub - major/MySQLTuner-perl: MySQLTuner is a script written in Perl that will assist you with your MySQL configuration and make recommendations for increased performance and stability.
- MySQLTuner is a script written in Perl that allows you to review a MySQL installation quickly and make adjustments to increase performance and stability. The current configuration variables and status data is retrieved and presented in a brief format along with some basic performance suggestions.
- Releem - Automatic MySQL performance tuning. Boost MySQL performance in under a minute. - YouTube - This is a script that utilises the MySQL Tuner
- How to Optimize MySQL Performance Using MySQLTuner | Linode
- GitHub - major/MySQLTuner-perl: MySQLTuner is a script written in Perl that will assist you with your MySQL configuration and make recommendations for increased performance and stability.
- Example my.cnf files
- Optimized my.cnf configuration for MySQL/MariaDB (on Ubuntu, CentOS, Almalinux etc. servers) · GitHub - A complex example by Fotis who I think develops Joomla K2.
- Default my.cnf for MariaDB 10.3.12 · GitHub
- etc-server/mysql/my.cnf — Generic Config - Example MariaDB config file for medium systems.
- MySQL and MariaDB Configuration File template (my.cnf/my.ini) | FromDual
- The following MySQL configuration file is in our opinion a good average configuration file for MySQL, Galera Cluster, MariaDB and Percona Server. For MySQL servers more performance tuning is not need in most cases.
- MariaDB configuration file example | IBM - The following example of the my.cnf file contains the minimum resource configuration that was tested for runtime metrics collection.
- Optimized my.cnf configuration for MySQL 8 (on cPanel/WHM servers) • Best SEO Blog | HostSEO.com
- InnoDB to MyISAM in CWP - Knowledgebase - Host IT Smart - A very basic my.cnf file.
- my.cnf Configuration In Centos 7 | Webnoid Schools
my.cnf / my.ini Example with Annotations
This is an example my.cnf/my.ini (my-innodb-heavy-4G.ini) taken from an old version of Xampp running on Windows. This is useful because it has annotations against a lot of the settings.
#BEGIN CONFIG INFO
#DESCR: 4GB RAM, InnoDB only, ACID, few connections, heavy queries
#TYPE: SYSTEM
#END CONFIG INFO

#
# This is a MySQL example config file for systems with 4GB of memory
# running mostly MySQL using InnoDB only tables and performing complex
# queries with few connections.
#
# MySQL programs look for option files in a set of
# locations which depend on the deployment platform.
# You can copy this option file to one of those
# locations. For information about these locations, see:
# http://dev.mysql.com/doc/mysql/en/option-files.html
#
# In this file, you can use all long options that a program supports.
# If you want to know which options a program supports, run the program
# with the "--help" option.
#
# More detailed information about the individual options can also be
# found in the manual.
#

#
# The following options will be read by MySQL client applications.
# Note that only client applications shipped by MySQL are guaranteed
# to read this section. If you want your own MySQL client program to
# honor these values, you need to specify it as an option during the
# MySQL client library initialization.
#
[client]
#password	= [your_password]
port		= 3306
socket		= /tmp/mysql.sock

# *** Application-specific options follow here ***

#
# The MySQL server
#
[mysqld]

# generic configuration options
port		= 3306
socket		= /tmp/mysql.sock

# back_log is the number of connections the operating system can keep in
# the listen queue, before the MySQL connection manager thread has
# processed them. If you have a very high connection rate and experience
# "connection refused" errors, you might need to increase this value.
# Check your OS documentation for the maximum value of this parameter.
# Attempting to set back_log higher than your operating system limit
# will have no effect.
back_log = 50

# Don't listen on a TCP/IP port at all. This can be a security
# enhancement, if all processes that need to connect to mysqld run
# on the same host.  All interaction with mysqld must be made via Unix
# sockets or named pipes.
# Note that using this option without enabling named pipes on Windows
# (via the "enable-named-pipe" option) will render mysqld useless!
#skip-networking

# The maximum amount of concurrent sessions the MySQL server will
# allow. One of these connections will be reserved for a user with
# SUPER privileges to allow the administrator to login even if the
# connection limit has been reached.
max_connections = 100

# Maximum amount of errors allowed per host. If this limit is reached,
# the host will be blocked from connecting to the MySQL server until
# "FLUSH HOSTS" has been run or the server was restarted. Invalid
# passwords and other errors during the connect phase result in
# increasing this value. See the "Aborted_connects" status variable for
# global counter.
max_connect_errors = 10

# The number of open tables for all threads. Increasing this value
# increases the number of file descriptors that mysqld requires.
# Therefore you have to make sure to set the amount of open files
# allowed to at least 4096 in the variable "open-files-limit" in
# section [mysqld_safe]
table_open_cache = 2048

# Enable external file level locking. Enabled file locking will have a
# negative impact on performance, so only use it in case you have
# multiple database instances running on the same files (note some
# restrictions still apply!) or if you use other software relying on
# locking MyISAM tables on file level.
#external-locking

# The maximum size of a query packet the server can handle as well as
# maximum query size server can process (Important when working with
# large BLOBs).  enlarged dynamically, for each connection.
max_allowed_packet = 16M

# The size of the cache to hold the SQL statements for the binary log
# during a transaction. If you often use big, multi-statement
# transactions you can increase this value to get more performance. All
# statements from transactions are buffered in the binary log cache and
# are being written to the binary log at once after the COMMIT.  If the
# transaction is larger than this value, temporary file on disk is used
# instead.  This buffer is allocated per connection on first update
# statement in transaction
binlog_cache_size = 1M

# Maximum allowed size for a single HEAP (in memory) table. This option
# is a protection against the accidential creation of a very large HEAP
# table which could otherwise use up all memory resources.
max_heap_table_size = 64M

# Size of the buffer used for doing full table scans.
# Allocated per thread, if a full scan is needed.
read_buffer_size = 2M

# When reading rows in sorted order after a sort, the rows are read
# through this buffer to avoid disk seeks. You can improve ORDER BY
# performance a lot, if set this to a high value.
# Allocated per thread, when needed.
read_rnd_buffer_size = 16M

# Sort buffer is used to perform sorts for some ORDER BY and GROUP BY
# queries. If sorted data does not fit into the sort buffer, a disk
# based merge sort is used instead - See the "Sort_merge_passes"
# status variable. Allocated per thread if sort is needed.
sort_buffer_size = 8M

# This buffer is used for the optimization of full JOINs (JOINs without
# indexes). Such JOINs are very bad for performance in most cases
# anyway, but setting this variable to a large value reduces the
# performance impact. See the "Select_full_join" status variable for a
# count of full JOINs. Allocated per thread if full join is found
join_buffer_size = 8M

# How many threads we should keep in a cache for reuse. When a client
# disconnects, the client's threads are put in the cache if there aren't
# more than thread_cache_size threads from before.  This greatly reduces
# the amount of thread creations needed if you have a lot of new
# connections. (Normally this doesn't give a notable performance
# improvement if you have a good thread implementation.)
thread_cache_size = 8

# This permits the application to give the threads system a hint for the
# desired number of threads that should be run at the same time.  This
# value only makes sense on systems that support the thread_concurrency()
# function call (Sun Solaris, for example).
# You should try [number of CPUs]*(2..4) for thread_concurrency
thread_concurrency = 8

# Query cache is used to cache SELECT results and later return them
# without actual executing the same query once again. Having the query
# cache enabled may result in significant speed improvements, if your
# have a lot of identical queries and rarely changing tables. See the
# "Qcache_lowmem_prunes" status variable to check if the current value
# is high enough for your load.
# Note: In case your tables change very often or if your queries are
# textually different every time, the query cache may result in a
# slowdown instead of a performance improvement.
query_cache_size = 64M

# Only cache result sets that are smaller than this limit. This is to
# protect the query cache of a very large result set overwriting all
# other query results.
query_cache_limit = 2M

# Minimum word length to be indexed by the full text search index.
# You might wish to decrease it if you need to search for shorter words.
# Note that you need to rebuild your FULLTEXT index, after you have
# modified this value.
ft_min_word_len = 4

# If your system supports the memlock() function call, you might want to
# enable this option while running MySQL to keep it locked in memory and
# to avoid potential swapping out in case of high memory pressure. Good
# for performance.
#memlock

# Table type which is used by default when creating new tables, if not
# specified differently during the CREATE TABLE statement.
default-storage-engine = MYISAM

# Thread stack size to use. This amount of memory is always reserved at
# connection time. MySQL itself usually needs no more than 64K of
# memory, while if you use your own stack hungry UDF functions or your
# OS requires more stack for some operations, you might need to set this
# to a higher value.
thread_stack = 192K

# Set the default transaction isolation level. Levels available are:
# READ-UNCOMMITTED, READ-COMMITTED, REPEATABLE-READ, SERIALIZABLE
transaction_isolation = REPEATABLE-READ

# Maximum size for internal (in-memory) temporary tables. If a table
# grows larger than this value, it is automatically converted to disk
# based table This limitation is for a single table. There can be many
# of them.
tmp_table_size = 64M

# Enable binary logging. This is required for acting as a MASTER in a
# replication configuration. You also need the binary log if you need
# the ability to do point in time recovery from your latest backup.
log-bin=mysql-bin

# binary logging format - mixed recommended
binlog_format=mixed

# If you're using replication with chained slaves (A->B->C), you need to
# enable this option on server B. It enables logging of updates done by
# the slave thread into the slave's binary log.
#log_slave_updates

# Enable the full query log. Every query (even ones with incorrect
# syntax) that the server receives will be logged. This is useful for
# debugging, it is usually disabled in production use.
#log

# Print warnings to the error log file.  If you have any problem with
# MySQL you should enable logging of warnings and examine the error log
# for possible explanations.
#log_warnings

# Log slow queries. Slow queries are queries which take more than the
# amount of time defined in "long_query_time" or which do not use
# indexes well, if log_short_format is not enabled. It is normally good idea
# to have this turned on if you frequently add new queries to the
# system.
slow_query_log

# All queries taking more than this amount of time (in seconds) will be
# trated as slow. Do not use "1" as a value here, as this will result in
# even very fast queries being logged from time to time (as MySQL
# currently measures time with second accuracy only).
long_query_time = 2


# ***  Replication related settings


# Unique server identification number between 1 and 2^32-1. This value
# is required for both master and slave hosts. It defaults to 1 if
# "master-host" is not set, but will MySQL will not function as a master
# if it is omitted.
server-id = 1

# Replication Slave (comment out master section to use this)
#
# To configure this host as a replication slave, you can choose between
# two methods :
#
# 1) Use the CHANGE MASTER TO command (fully described in our manual) -
#    the syntax is:
#
#    CHANGE MASTER TO MASTER_HOST=<host>, MASTER_PORT=<port>,
#    MASTER_USER=<user>, MASTER_PASSWORD=<password> ;
#
#    where you replace <host>, <user>, <password> by quoted strings and
#    <port> by the master's port number (3306 by default).
#
#    Example:
#
#    CHANGE MASTER TO MASTER_HOST='125.564.12.1', MASTER_PORT=3306,
#    MASTER_USER='joe', MASTER_PASSWORD='secret';
#
# OR
#
# 2) Set the variables below. However, in case you choose this method, then
#    start replication for the first time (even unsuccessfully, for example
#    if you mistyped the password in master-password and the slave fails to
#    connect), the slave will create a master.info file, and any later
#    changes in this file to the variable values below will be ignored and
#    overridden by the content of the master.info file, unless you shutdown
#    the slave server, delete master.info and restart the slaver server.
#    For that reason, you may want to leave the lines below untouched
#    (commented) and instead use CHANGE MASTER TO (see above)
#
# required unique id between 2 and 2^32 - 1
# (and different from the master)
# defaults to 2 if master-host is set
# but will not function as a slave if omitted
#server-id = 2
#
# The replication master for this slave - required
#master-host = <hostname>
#
# The username the slave will use for authentication when connecting
# to the master - required
#master-user = <username>
#
# The password the slave will authenticate with when connecting to
# the master - required
#master-password = <password>
#
# The port the master is listening on.
# optional - defaults to 3306
#master-port = <port>

# Make the slave read-only. Only users with the SUPER privilege and the
# replication slave thread will be able to modify data on it. You can
# use this to ensure that no applications will accidently modify data on
# the slave instead of the master
#read_only


#*** MyISAM Specific options


# Size of the Key Buffer, used to cache index blocks for MyISAM tables.
# Do not set it larger than 30% of your available memory, as some memory
# is also required by the OS to cache rows. Even if you're not using
# MyISAM tables, you should still set it to 8-64M as it will also be
# used for internal temporary disk tables.
key_buffer_size = 32M

# MyISAM uses special tree-like cache to make bulk inserts (that is,
# INSERT ... SELECT, INSERT ... VALUES (...), (...), ..., and LOAD DATA
# INFILE) faster. This variable limits the size of the cache tree in
# bytes per thread. Setting it to 0 will disable this optimisation.  Do
# not set it larger than "key_buffer_size" for optimal performance.
# This buffer is allocated when a bulk insert is detected.
bulk_insert_buffer_size = 64M

# This buffer is allocated when MySQL needs to rebuild the index in
# REPAIR, OPTIMIZE, ALTER table statements as well as in LOAD DATA INFILE
# into an empty table. It is allocated per thread so be careful with
# large settings.
myisam_sort_buffer_size = 128M

# The maximum size of the temporary file MySQL is allowed to use while
# recreating the index (during REPAIR, ALTER TABLE or LOAD DATA INFILE.
# If the file-size would be bigger than this, the index will be created
# through the key cache (which is slower).
myisam_max_sort_file_size = 10G

# If a table has more than one index, MyISAM can use more than one
# thread to repair them by sorting in parallel. This makes sense if you
# have multiple CPUs and plenty of memory.
myisam_repair_threads = 1

# Automatically check and repair not properly closed MyISAM tables.
myisam_recover

# *** INNODB Specific options ***

# Use this option if you have a MySQL server with InnoDB support enabled
# but you do not plan to use it. This will save memory and disk space
# and speed up some things.
#skip-innodb

# Additional memory pool that is used by InnoDB to store metadata
# information.  If InnoDB requires more memory for this purpose it will
# start to allocate it from the OS.  As this is fast enough on most
# recent operating systems, you normally do not need to change this
# value. SHOW INNODB STATUS will display the current amount used.
innodb_additional_mem_pool_size = 16M

# InnoDB, unlike MyISAM, uses a buffer pool to cache both indexes and
# row data. The bigger you set this the less disk I/O is needed to
# access data in tables. On a dedicated database server you may set this
# parameter up to 80% of the machine physical memory size. Do not set it
# too large, though, because competition of the physical memory may
# cause paging in the operating system.  Note that on 32bit systems you
# might be limited to 2-3.5G of user level memory per process, so do not
# set it too high.
innodb_buffer_pool_size = 2G

# InnoDB stores data in one or more data files forming the tablespace.
# If you have a single logical drive for your data, a single
# autoextending file would be good enough. In other cases, a single file
# per device is often a good choice. You can configure InnoDB to use raw
# disk partitions as well - please refer to the manual for more info
# about this.
innodb_data_file_path = ibdata1:10M:autoextend

# Set this option if you would like the InnoDB tablespace files to be
# stored in another location. By default this is the MySQL datadir.
#innodb_data_home_dir = <directory>

# Number of IO threads to use for async IO operations. This value is
# hardcoded to 8 on Unix, but on Windows disk I/O may benefit from a
# larger number.
innodb_write_io_threads = 8
innodb_read_io_threads = 8

# If you run into InnoDB tablespace corruption, setting this to a nonzero
# value will likely help you to dump your tables. Start from value 1 and
# increase it until you're able to dump the table successfully.
#innodb_force_recovery=1

# Number of threads allowed inside the InnoDB kernel. The optimal value
# depends highly on the application, hardware as well as the OS
# scheduler properties. A too high value may lead to thread thrashing.
innodb_thread_concurrency = 16

# If set to 1, InnoDB will flush (fsync) the transaction logs to the
# disk at each commit, which offers full ACID behavior. If you are
# willing to compromise this safety, and you are running small
# transactions, you may set this to 0 or 2 to reduce disk I/O to the
# logs. Value 0 means that the log is only written to the log file and
# the log file flushed to disk approximately once per second. Value 2
# means the log is written to the log file at each commit, but the log
# file is only flushed to disk approximately once per second.
innodb_flush_log_at_trx_commit = 1

# Speed up InnoDB shutdown. This will disable InnoDB to do a full purge
# and insert buffer merge on shutdown. It may increase shutdown time a
# lot, but InnoDB will have to do it on the next startup instead.
#innodb_fast_shutdown

# The size of the buffer InnoDB uses for buffering log data. As soon as
# it is full, InnoDB will have to flush it to disk. As it is flushed
# once per second anyway, it does not make sense to have it very large
# (even with long transactions).
innodb_log_buffer_size = 8M

# Size of each log file in a log group. You should set the combined size
# of log files to about 25%-100% of your buffer pool size to avoid
# unneeded buffer pool flush activity on log file overwrite. However,
# note that a larger logfile size will increase the time needed for the
# recovery process.
innodb_log_file_size = 256M

# Total number of files in the log group. A value of 2-3 is usually good
# enough.
innodb_log_files_in_group = 3

# Location of the InnoDB log files. Default is the MySQL datadir. You
# may wish to point it to a dedicated hard drive or a RAID1 volume for
# improved performance
#innodb_log_group_home_dir

# Maximum allowed percentage of dirty pages in the InnoDB buffer pool.
# If it is reached, InnoDB will start flushing them out agressively to
# not run out of clean pages at all. This is a soft limit, not
# guaranteed to be held.
innodb_max_dirty_pages_pct = 90

# The flush method InnoDB will use for Log. The tablespace always uses
# doublewrite flush logic. The default value is "fdatasync", another
# option is "O_DSYNC".
#innodb_flush_method=O_DSYNC

# How long an InnoDB transaction should wait for a lock to be granted
# before being rolled back. InnoDB automatically detects transaction
# deadlocks in its own lock table and rolls back the transaction. If you
# use the LOCK TABLES command, or other transaction-safe storage engines
# than InnoDB in the same transaction, then a deadlock may arise which
# InnoDB cannot notice. In cases like this the timeout is useful to
# resolve the situation.
innodb_lock_wait_timeout = 120


[mysqldump]
# Do not buffer the whole result set in memory before writing it to
# file. Required for dumping very large tables
quick

max_allowed_packet = 16M

[mysql]
no-auto-rehash

# Only allow UPDATEs and DELETEs that use keys.
#safe-updates

[myisamchk]
key_buffer_size = 512M
sort_buffer_size = 512M
read_buffer = 8M
write_buffer = 8M

[mysqlhotcopy]
interactive-timeout

[mysqld_safe]
# Increase the amount of open files allowed per process. Warning: Make
# sure you have set the global system limit high enough! The high value
# is required for a large number of opened tables
open-files-limit = 8192
Create a WordPress Divi Theme Demo Site
I will be using Divi for building the themes, but these rules will work for other WordPress themes.
Different Site Configurations
There are a couple of ways that I know of to create a theme demo site and I will outline them below.
Single WordPress Website (Multiple Themes)
- Pro
- Probably only works for themes with builders
- less files and WordPress installs
- all theme templates are available in 1 dashboard
- only 1 set of plugin to configure
- don't have the hassle of setting up multisite
- can add iframe-x header 1 and configure as needed
- less server overheads
- easy to manage
- 1 set of credentials to log in with
- uploaded files are easier to manage
- You can copy and paste assets between pages.
- Con
- Can't use Divi global headers for each theme
- Can't use the inbuilt Divi theme menu in the Divi Theme customizer
Multiple WordPress Websites (1 Theme per Website)
- Pro
- Each theme can be fully controlled
- Con
- A lot more inodes and server space is required
- more of a security risk because of the greater attack surface
- harder to manage with all of the updates needed to be applied to every site
- More CPU power needed
- Takes much longer to setup a theme
- many different credentials and databases to manage
WordPress Multisite (same as Multiple Wordpress Sites, but one WordPress instance)
- Pro
- Should work for all WordPress themes
- can use divi global headers for each theme
- only the pages for the defined theme will be in the database
- Can configure plugins on a per-theme basis (i think)
- Can use the inbuilt Divi theme menu in the Divi Theme customizer
- Con
- extra configuration required to enable multi-site
- all themes are separate and makes them harder to manage
- loads of credentials
- many theme will start to be cumbersome to manage
So after outlining the options above I figured out the best way of setting out my themes was to use the Single WordPress Website option. This allows for ease of management and a great base to keep your templates for export when you need them to build client sites.
I will not only use this as my demo site, but i will use this to store my templates which i directly export and use to build my client sites reducing the time it takes to make a site.
You can also add and make modifications to these pages as you go to fix errors, add extra features and general improvements for future projects. I find when i use a template for a client, I sometimes design or use a layout I really like so i can then add this back into my theme for future use.
Build the Site (Single WordPress Website)
If you follow these easy instructions below you can quickly build your demo site which allows for easy expansion and management.
Install WordPress
This is straight forward and does not need notes except
- When creating the Database use:
- Use utf8mb4_unicode_ci for database collation
- InnoDB for DB engine
- Extract WordPress into the public_html
- Run the WordPress Wizard
- Setup WordPress using the following details:
- Site Title: WordPress Themes
Divi Theme (Install and Configure)
- Divi
- Manually add API key: xxxxxxxxxxxxxx
- Import Theme options
- Import 'Theme Customizer'
- In options, enable the Divi Gallery (should be done as part of the options import)
- Set Divi to auto update
- Delete widgets
- Delete unwanted themes (i.e. Theme 21)
Plugins (Install and Configure)
- Delete unwanted plugins
- (i.e. Hello Dolly)
- Wordfence
- (no-reply@qwdemos.com) or what email address you use
- configure/ import settings (via long hash)
- Wordfence --> Login Security --> Settings --> Disable XML-RPC authentication: ticked
- Change file hash scanning because of high I/O (change 'Basic Scan Type Options' to 'Limited Scan' , 'Standard Scan' is normal
- Enable Automatic updates
- FluentSMTP
- configure for use with your own SMTP server
- or import settings
- Manage Notification E-mails
- import settings or configure as:
- Turn off - Automatic WordPress core update e-mail
- Turn off - Automatic WordPress plugin update e-mail
- Turn off - Automatic WordPress theme update e-mail
- Leave the rest same
- import settings or configure as:
- W3 Total Cache
- Either the PHP configuration, web server configuration or a script in the WordPress installation has zlib.output_compression enabled.
- configure/Import settings
- Load options (General Settings --> Import / Export Settings)
- Enable Page Cache (contact forms might fail to work but are not needed on the Demo Sites)
- Save settings and purge
- Now deactivate until you have finished building
- Update URLs
- This is optional but if you are importing layouts from different URLs you might want this installed so you can change the links.
- You can leave this deactivated when not in use.
- Disable all auto updates
- Easy Updates Manager – WordPress plugin | WordPress.org - Manage all your WordPress updates, including individual updates, automatic updates, logs, and loads more.
You might need to add plugins later on for specific themes, but that is ok.
General Settings
- WordPress --> Settings
- General:
- remove tagline
- Reading:
- Set home page
- Discussion:
- 'Attempt to notify any blogs linked to from the post' = off
- 'Allow link notifications from other blogs (pingbacks and trackbacks) on new posts' = off
- 'Allow people to submit comments on new posts' = off
- 'Users must be registered and logged in to comment' = on
- 'Comment must be manually approved' = on
- General:
- Delete test comments and posts
- WordPress --> Updates
- Updates:
- 'Switch to automatic updates for maintenance and security releases only.'
- Updates:
- Set all Plugins and Themes to auto update
- This makes sense from a security point of view and also that this site is not really active so your regular backups will be more than enought.
- Delete all Comments, Posts and Pages. Make sure you empty the trash afterwards.
Favicon
- Use FTP to upload your favicon.ico to the website root
- WordPress by default blocks the uploading of .ico files
- (Appearance --> Customise --> General Settings --> Site Identity --> Site Icon)
- How to Add a Favicon to Your WordPress Website in 3 Ways | Elegant Themes Blog - This includes using a Wordpress plugin for RealFaviconGenerator which will build all required favicons not jsut the basic favicon.ico
- How To Fix "Sorry, this file type is not permitted for security reasons"
Create a Homepage
- Create a homepage
- Goto (Pages --> All Pages)
- Add 'New Page' called 'QWThemes - Home'
- You can leave this page blank or add in some company information for example: "This is the demo page for QuantumWarp Themes".
- Set the homepage
- (Settings --> Reading --> Your homepage displays -> Homepage) = 'QWThemes - Home'
Create a Primary Menu
We need to create a default menu and homepage for the WordPress site. This will handle all requests that do not point to a theme page and allow us to show a nice homepage with some branding if you want.
- Create a new menu call 'Primary'
- This should have at least one 'Custom Link' pointing to the 'homepage' of the site https://themes.mydomain.com/ called 'Themes Home'
- Display Location = Primary Menu
- This is so that all default Divi pages have a menu that does not have every page listed.
Notes
- You could later on, create a menu with items pointing to:
- the homepage of each theme (if you don't have a theme toolbar, this could be a good option).
- every themes page (not recommended).
Add a Theme (Pages)
- When I refer to a Theme, I actual mean a group of pages that have the same styling such as found on Divi Layouts | Elegant Themes
- WordPress does not like numbers
- I have to use 'Theme4' instead of 'Theme 4' because WordPress cannot search by just the number '4'.
- I have to use 'theme4' as the home slug because i cannot use just '4', WordPress just changes it to '1-2'.
- The WordPress filter ignores the 's' on the end words so treats 'theme' and 'themes' as the same word
Each theme will require you to make the pages as follows (I am using example of Theme1). You can expand the Alt to have more pages if you require.
Create a Home Page
This will be used as an anchor for the theme.
- Home
- Title: Theme1 - Home
- Slug: theme1
- Parent: Main Page (no parent)
- Template = Blank Template
- Use Divi
Create a Theme Pages
All of these pages are children of the theme's home page.
- Services
- Title: Theme1 - Services
- Slug: services
- Parent: Main Page (Theme1 - Home)
- Template = Blank Template
- Use Divi
- Gallery
- Title: Theme1 - Gallery
- Slug: gallery
- Parent: Main Page (Theme1 - Home)
- Template = Blank Template
- Use Divi
- About
- Title: Theme1 - About
- Slug: about
- Parent: Main Page (Theme1 - Home)
- Template = Blank Template
- Use Divi
- Contact
- Title: Theme1 - Contact
- Slug: contact
- Parent: Main Page (Theme1 - Home)
- Template = Blank Template
- Use Divi
Alternative pages can be used when you have many variations or additional pages allowing you themes to stay uniform. These are optional for each theme.
- Alt1 (optional)
- Title: Theme1 - Alt1
- Slug: alt1
- Parent: Main Page (Theme1 - Home)
- Template = Blank Template
- Use Divi
- Alt2 (optional)
- Title: Theme1 - Alt2
- Slug: alt2
- Parent: Main Page (Theme1 - Home)
- Template = Blank Template
- Use Divi
- Alt3 (optional)
- Title: Theme1 - Alt3
- Slug: alt3
- Parent: Main Page (Theme1 - Home)
- Template = Blank Template
- Use Divi
Create a Theme Menu
Each theme needs its own custom menu and the instructions below show you how this should be done. Again I will use Theme1 as an example.
- Create a WordPress menu called 'Theme1'
- NB: There is no space between `Theme` and `1` on purpose. WordPress search does not like spaces.
- Select all of the pages for `Theme1` and add them into the menu
- Arrange them in to the correct order using drag and drop
- Theme1 - Home
- Theme1 - Services
- Theme1 - Gallery
- Theme1 - About
- Theme1 - Contact
- Theme1 - Alt1
- Theme1 - Alt2
- Theme1 - Alt3
- ...
- Edit menu Each item's navigation label to read
- Home
- Services
- Gallery
- About
- Contact
- Alt1
- Alt2
- Alt3
- ...
Build Page Content
You need to do these changes on each page you want in your theme.
- Header and Footer
- These pages will each have a copy of the header and footer.
- These can be removed as required when the layout is imported into the clients site.
- Divi Selective Sync
- Selective sync only works at module level so you cannot apply this to layouts, sections and rows.
- Using Selective Sync In Divi - YouTube - This is a good explanation and help me work out the limitations of Selective Sync otherwise I would of used this and a global menu for my themes.
- Divi Library Global Modules - YouTube
- Divi Global Modules, Rows & Sections | Elegant Themes Documentation
- Selective Sync for Global Modules not working | Divi.Help
Add a Menu Module
- I have made a generic header which contains a menu module styled exactly like the default menu with some added some socials icons.
- If you do not have one, build yourself one. The main thing is that you add a menu module to allow you to navigate the theme demo.
- This really only needs doing on one page and then you can copy and paste it to the others.
- Edit the page
- Click on the add section button and select Themes Header
- Edit the 'Menu Module' and select the 'Theme1' menu as the menu source
- Move the menu section it to the top as this will be needed there as this is the primary menu.
- Now save the page
Import a Divi Layout
- Select the theme your want to use for your theme from: Divi Layouts | Elegant Themes
- Select a specific layout for each page of your theme usually the namesakes are good ones to use eg:
- About --> About
- Contact --> Contact
- ...
- Import Layout
- You can import via the (Load from Library --> Premade Layouts) or a layout file you have locally.
- Either, 'Do Not Replace Content' as you want to keep the menu in place that you have just added.
Convert the Divi Theme Contents ready for Client Sites
Whether you have built you own layouts or used ones from Elegant themes, you will need to make changes to them to match your requirements but the following changes are specific to the layouts from Elegant Themes as they are premade with their own settings and content which we need to correct and sanitise.
Not all clients send enough information and I have found that a lot of Divi Themes look nice but can be a bit impractical to use for my clients so I need to make alterations to them first before I can even use them.
Follow the steps below for each of the Pages/Layouts to make them ready to use for your clients:
Change the Contact Details
Use these contact details on your website theme. You can use your company details if you prefer but using these as an example keeps the theme demos generic.
020 7123 456
07747 123456
no-reply@qwdemos.com

QuantumWarp House, London SW1A 1AA

QuantumWarp House
Easy Street
Westminster
London
SW1A 1AA
United Kingdom
Contact Forms
- Only 1 Contact Form
- Remove all contact forms except the one on the contact page.
- Why should I only have one contact form?
- This allows you to control the contact email address easily instead of having to change multiple contact forms.
- Reduces the attack surface
- Can apply page caching to more pages.
- Set the CSS ID (for Anchor)
- You need to set the anchor point for all of your contact buttons to use, so they are clicked the user is navigated to the correct place on the page.
- On the contact form add the CSS ID
contact-formto the contact form row.- The row is used to allow it to appear on screen better.
- You can also add the CSS ID to the section or the contact form module itself to get a good position for the anchor.
- Set as follows: (Module|Row|Section) --> Advanced --> CSS ID & Classes --> CSS ID:
contact-form
- Always add a Captcha
- Enable Standard Captcha
- Style Standard Captcha
- Contact Form --> Advanced --> Custom CSS --> Captcha Field --> margin-left: 5px;
- Contact Form --> Advanced --> Custom CSS --> Captcha Text --> color: #ffffff
- Only if styling is required.
- You don't have to use white
- Add a success message
- This is the default Divi one: 'Thanks for contacting us'
- No need to add one unless you want to change the default message.
- Remove any configured email address to prevent the forms from being activated.
- Add the email address no-reply@qwdemos.com otherwise emails will get sent to the default email account and you will get a lot of SPAM.
- The destination email can be a dead or unmonitored email account.
- If you are clever you could use the contact forms as a Honeypot.
Contact Us / Call Us Buttons
Alter all of these buttons as follows:
- Rename these buttons to Contact Us
- Add the link
https://themes.quantumwarp.com/theme1/contact/#contact-form
- This will load the contact page and navigate to the
#contact-formanchor.
- This will load the contact page and navigate to the
Google Maps (if present)
- The Google map is usually just on the contact page.
- I prefer just to have the map present on the contact page
- Hide the Google Map module for later use. This is just incase you client has specific needs.
- Where the 'Google Map Module' add a 'Code Module' as we are going to add an iframe version which does not require a credit card.
- Add the following Demo iframe code:
<iframe
src="https://www.google.com/maps/embed?pb=!1m18!1m12!1m3!1d2483.64596804941!2d-0.1440786842302416!3d51.501363979634085!2m3!1f0!2f0!3f0!3m2!1i1024!2i768!4f13.1!3m3!1m2!1s0x48760520cd5b5eb5%3A0xa26abf514d902a7!2sBuckingham%20Palace!5e0!3m2!1sen!2suk!4v1639323812962!5m2!1sen!2suk"
width="100%"
height="450"
style="border:0;display:block;"
allowfullscreen=""
loading="lazy"
></iframe>
- Map Colour Styling
- Greyscale:
style="border:0;display:block;filter:grayscale(100%);"
- Black and White:
style="border:0;display:block;filter:grayscale(100%) invert(92%) contrast(83%);"
- Greyscale:
- Map Colour Styling
Gallery Page
- If there is not already a Gallery page on your chosen theme, create one using the following basic layout:
- Grid
- 6-8 images
- No captions or pagination
- Upload logo for the menu (if needed)
- Make sure all of the text is in Lorem Ipsum.
- Remove all non-free assets
- If you have imported layouts from client websites it is important to remove all of their images and asets
- Examine each page and remove/hide sections that cannot be altered for a generic website. i.e.
- Highly specific graphics
- Cartoons
- Replace images where needed with generic ones (not for copyright reasons though)
Change the internal links to the new theme location.
Use one of these plugins to change any unwanted links to local links.
- Update URLs - Quick and Easy way to search all urls, content and replace them with new links and content in WordPress website.
- Easy-Update-Urls - Easy Search and Replace in WP database. Perfect for Migrations. Updates links to pages and references to images.Search and Replace Content in DB.
An example is as follows
https://www.elegantthemes.com/layouts/business/car-rental-landing-page/live-demo

-->

https://themes.quantumwarp.com/theme1/services
Repeat
Repeat this for process each theme you want to add. You can create the layouts on the fly in the demo site but will have to use a plugin (How To Clean Up Your WordPress Media Library | WP Engine / Media Cleaner – Clean & Optimize Space – WordPress plugin | WordPress.org ) to cleanup unwanted images after you finish or you have a separate development site.
Control who can Embed your Demo Site using an iframe
Now you have done all of this hard work you don't want other people stealing your bandwidth so you need to control who can put your site in an iframe and this can be done by several options, some old, some new, but extensively the hosting server tells the client if it can use the website in an iframe. This behaviour all works on the browser or software at the other end respecting these directives.
The options I outline below can usually be managed by decent software such as W3C Total Cache, but there is no harm in doing it manually.
Content Security Policy (CSP)
CSP allows you to control how the browser behaves with your code remotely, and locally. You can tell the browser not to execute scripts on a page or not to embed the content in and iframe. Not allowing your content to be embedded in an iframe is quite obvious, but why would you want to stop your own scripts from running? This feature prevents scripts that have been maliciously implanted from running by only allowing scripts that you want to be run. The rules can be specified a lot more precisely, but this is just a simple example.
Enable restrictions via .htaccess
These are some examples of the .htaccess rules. You only need to specify one.
<IfModule mod_headers.c>
    ## Allow embedding from sitea.com or siteb.com including sub-domains using any protocol
    Header set Content-Security-Policy "frame-ancestors 'self' *.sitea.com *.siteb.com"

    ## Allow embedding from sitea.com or siteb.com including sub-domains using only HTTPS protocol
    Header set Content-Security-Policy "frame-ancestors 'self' https://*.sitea.com https://*.siteb.com"

    ## Allow embedding from example.org, example.com, store.example.com using only HTTPS protocol
    Header set Content-Security-Policy "frame-ancestors 'self' https://example.org https://example.com https://store.example.com;"
</IfModule>
- You can use wildcards
- Using frame-ancestors 'self' is similar to using X-Frame-Options: sameorigin
- If you do not need this option, you can just remove 'self'
- When you add multiple Policies, they can be on separate lines to make it easier to read.
- You do not need to add any wrapping conditions like you do when using X-Frame-Options because the conditions are in the statement.
Enable restrictions via W3 Total Cache
- You can add these in WordPress using the W3C Total Cache plugin:
- WP Admin --> Performance --> Browser Cache --> Security Headers --> Content Security Policy: ticked
- WP Admin --> Performance --> Browser Cache --> Security Headers --> frame-ancestors: 'self' *.sitea.com siteb.com;
- WP Admin --> Performance --> Browser Cache --> Security Headers --> X-Frame-Options: unticked
Notes
- Content Security Policy
- Understanding Content Security Policy Headers | Pagely
- Content Security Policy headers are used for restricting the content types and sources that browsers will load. They help to protect your site visitors by instructing their browsers to produce an error and prevent disallowed content from loading on the page.
- Content Security Policy: Embedded Enforcement - This document defines a mechanism by which a web page can embed a nested browsing context if and only if it agrees to enforce a particular set of restrictions upon itself.
- How do I allow a iframe with a content security policy (CSP) - Stack Overflow - I keep getting this error "refused to frame 'url-to-calendly' because it violates the following content security policy directive. This thread offers solutions.
- Content-Security-Policy - HTTP | MDN - The HTTP Content-Security-Policy response header allows web site administrators to control resources the user agent is allowed to load for a given page. With a few exceptions, policies mostly involve specifying server origins and script endpoints. This helps guard against cross-site scripting attacks (Cross-site_scripting).
- Content-Security-Policy PHP Examples | Foundeo - How to add a content security policy header with PHP.
- Understanding Content Security Policy Headers | Pagely
- frame-src
- CSP: frame-src - HTTP | MDN - The HTTP Content-Security-Policy (CSP) frame-src directive specifies valid sources for nested browsing contexts loading using elements such as <frame> and <iframe>.
- Frame Ancestors
- This can be used instead of X-Frame-Options and can be more specific.
- CSP: frame-ancestors - HTTP | MDN
- The HTTP
Content-Security-Policy(CSP)frame-ancestorsdirective specifies valid parents that may embed a page using<frame>,<iframe>,<object>, or<embed>. - Setting this directive to 'none' is similar to X-Frame-Options: deny (which is also supported in older browsers).
- Note:
frame-ancestorsallows you to specify what parent source may embed a page. This differs fromframe-src, which allows you to specify where iframes in a page may be loaded from. - Warning: If no URL scheme is specified for a
host-sourceand the iframe is loaded from anhttpsURL, the URL for the page loading the iframe must also behttps, per the Does URL match expression in origin with redirect count? section of the CSP spec.
- The HTTP
- frame-ancestors in CSP ⟶ Allowing / Blocking iframes from Loading | Foundeo - How to use the CSP frame-ancestors directive in a Content-Security-Policy header to allow or block the page from being loaded within frames or iframes.
- Content Security Policy with X-Frame-Options
- Nowadays, X-Frame-Options is only needed for edge cases.
- You cannot do some configurations with CSP if you have X-Frame-Options in place unless you use some wrapping code like my example below.
- CSP frame-ancestors vs. X-Frame-Options for Clickjacking prevention · RapidSec - CSP and Security Headers Made Easy
- CSP frame-ancestors has many advantages over X-Frame-Options options with advanced capabilities. However, both should be used for backward compatibility.
- X-Frame-Options is a graceful degradation for Clickjacking protection - More simply said - it's a fallback for crappy browsers that don't support CSP: ~5% of web traffic as of Nov 2021
- Current best practices to restrict framing in the browser - This article discusses recent changes in framing restriction mechanisms, and provides concrete recommendations to secure modern web applications.
- Frame Ancestors of CSP - Caliber Security Partners - Frame Ancestors "Directive" of Content Security Policy (CSP) - a newer alternative to the X-Frame-Options header.
- http - How does Content-Security-Policy work with X-Frame-Options? - Stack Overflow
- Does Content-Security-Policy ignore X-Frame-Options, returned by a server, or is X-Frame-Options still primary?
- Adding Headers
- Add Content-Security-Policy header with htaccess | Foundeo - Using an Apache CSP header via a htaccess file.
- Read this as it explains all required options quickly
-
Header add Content-Security-Policy "default-src 'self';"
- frame-src - This policy defines what iframes the page can display.
- frame-ancestors - This policy defines what remote sites can display the page in an iframe.
- Adding Security Headers to WordPress Without 3rd-Party Plugins | Pagely
- Add Content-Security-Policy header with htaccess | Foundeo - Using an Apache CSP header via a htaccess file.
X-Frame-Options Header (rules based without using ALLOW-FROM)
You can control the X-Frame-Options headers in either .htaccess or PHP but I will use .htaccess code here because it is easier to implement and is not script dependent.
The Code
The .htaccess code below uses the X-Frame-Options and gives the same effect as using ALLOW-FROM but without using this obsolete command.
# Conditional X-Frame-Options for iframe Embedding Control
<If "%{HTTP_REFERER} == 'https://www.content-site.com/' || %{HTTP_REFERER} == 'https://www.sitea.com/' || %{HTTP_REFERER} == 'https://www.siteb.com/'">
    <IfModule mod_headers.c>
        Header always unset X-Frame-Options
    </IfModule>
</If>
<Else>
    <IfModule mod_headers.c>
        Header always append X-Frame-Options SAMEORIGIN
    </IfModule>
</Else>
- W3C Total Cache adds the X-Frame-Options header to every page if enabled, so if you use this code you should disable this feature in W3C Total Cache
- WP Admin --> Performance --> Browser Cache --> Security Headers --> X-Frame-Options: unticked
- ALLOW-FROM is not used
- Multiple clients can be granted permission to embed iframe content by just adding them to the REFERER list.
- %{HTTP_REFERER} == 'https://www.content-site.com/'
- https://www.content-site.com/ - This is the website which is hosting the content.
- Without this the first page will load in the iframe fine but if we click on any links in the iframe then they will not display
- This is needed because on the intial page load the REFERER is https://www.sitea.com/ or https://www.siteb.com/ but when we click on links in the iframe, the REFERER becomes https://www.content-site.com/
- Effectively the same as SAMEORIGIN
- The <Else> section is optional
- this is useful if you have other code implementing this directive such as W3C Total Cache. But best to keep the code handling this directive all together.
- Some plugins (Joomla 4 / Wordpress W3C Total Cache) will enable 'X-Frame-Options SAMEORIGIN' on all pages so in this case the Else statement is not needed
Header always append X-Frame-Options "SAMEORIGIN"
- The always variable is like !important is in CSS.
- ALLOW-FROM no longer works
- X-Frame-Options - HTTP | MDN
- ALLOW-FROM uri - This is an obsolete directive that no longer works in modern browsers. Don't use it. In supporting legacy browsers, a page can be displayed in a frame only on the specified origin uri. Note that in the legacy Firefox implementation this still suffered from the same problem as SAMEORIGIN did — it doesn't check the frame ancestors to see if they are in the same origin. The Content-Security-Policy HTTP header has a frame-ancestors directive which you can use instead.
- After testing, if you use the following command, iframe blocking sdoes not work at all, not just the exception not working but total failure.
Header always append X-Frame-Options "ALLOW-FROM https://www.sitea.com/"
- X-Frame-Options: ALLOW-FROM in firefox and chrome - Stack Overflow
- ALLOW-FROM is not supported in all browsers as an X-Frame-Options value.
- The solution was to branch based on browser type. For IE, ship X-Frame-Options. For everyone else, ship X-Content-Security-Policy.
- X-Frame-Options - HTTP | MDN
- Apache <If> statement
- You could add other checks into If statements or use other Apache variables, you are not limited to the ones i have used and these statements can be nested.
- Mod_Rewrite Variables Cheatsheet - Mod_Rewrite Variables Cheatsheet
- #htaccess List of all mod_rewrite variables · GitHub - List of Mod_Rewrite Variables with examples
RewriteCond %{HTTP_HOST} = www.askapache.com RewriteCond %{REMOTE_ADDR} = 8.8.8.8 - apache 2.2 - How should I use the directive in .htaccess? - Server Fault
- The <If> directive is only available in Apache 2.4+ and not 2.2 or earlier.
- apache - htaccess if statement - Stack Overflow
<If "%{HTTP_HOST} == 'foo'"> # configuration for foo </If> <Else> # default configuration </Else> - apache - Conditionally set X-Frame-Option - Stack Overflow
<IfModule mod_headers.c> <If "%{HTTP:X-Requested-From} == 'mobileapp'"> Header unset X-Frame-Options </If> <Else> Header set X-Frame-Options SAMEORIGIN </Else> </IfModule> - Apache .htaccess statement with multiple matches - Server Fault
- Conditional X-Frame-Options | LiteSpeed Support Forums
- .htaccess If/Else Example
- Code to use env= statement in htaccess.
- If Statement - core - Apache HTTP Server Version 2.4
- apache - htaccess if statement - Stack Overflow
- .htaccess If/Else Example
- apache - Conditionally set X-Frame-Option - Stack Overflow
- .htaccess If/Else Example
- Code to use env= statement in htaccess.
- apache 2.2 - How should I use the directive in .htaccess? - Server Fault
- .htaccess If/Else Example
- Code to use env= statement in htaccess.
- New in httpd 2.4: If, ElseIf, and Else : Apache HTTP Server
Notes
- Joomla
- In Joomla4 there is a plugin called "System - HTTP Headers" that adds the X-Frame-Options headers
- WordPress
- W3C Total Cache adds the X-Frame-Options headers to every page if enabled
- (WP Admin --> Performance --> Browser Cache --> Security Headers --> X-Frame-Options)
- WordPress is hardcoded to add X-Frame-Options SAMEORIGIN onto the admin section and login pages. This can be disabled with a WP function, see notes below.
- W3C Total Cache adds the X-Frame-Options headers to every page if enabled
- Enabling Clickjacking Protection (X-Frame-Options) in WordPress | Pagely
- Embedding a website inside another is one way that attackers may try to steal information. To avoid having your website embedded into another, modern web browsers are equipped to read an X-Frame-Options header to determine if the embed is allowed.
- X-Frame-Options - HTTP | MDN
- How can I add "X-Frame-Options" header for my WordPress site? | cPanel
header('X-Frame-Options: SAMEORIGIN'); - filters - How to remove X-Frame-Options: SAMEORIGIN" from WordPress? - WordPress Development Stack Exchange
- Removing send_frame_options_header from ./wp-includes/default-filters.php
- remove_action('login_init', 'send_frame_options_header');
- Removing @header( ‘X-Frame-Options: SAMEORIGIN’ ); from /wp-includes/functions.php
- Header always unset X-Frame-Options
- php - How does wordpress restrict X-FRAME to sameorigin? - Stack Overflow
- Search · x-frame-options · GitHub
- The send_frame_options_header function handles this. It's an action tied to the login_init hook.
remove_action('login_init', 'send_frame_options_header');
- Enable Wordpress X-Frame Options with .htaccess - Responsive Web Design
# Extra Security Headers
<IfModule mod_headers.c>
	Header set X-XSS-Protection "1; mode=block"
	Header always append X-Frame-Options SAMEORIGIN
	Header set X-Content-Type-Options nosniff
</IfModule>
- Why isn't my iframe loading? - Responsive Web Design
- A Detailed Guide To Add WordPress Security Headers - Patchstack
<IfModule mod_headers.c>
Header always append X-Frame-Options SAMEORIGIN
</IfModule>

Header always unset X-Frame-Options
- Secure Wordpress with X-Frame-Options & HTTPOnly Cookie
- How to Use the HTTP Headers WordPress Plugin for Better Security – InMotion Hosting Support Center
- php - How to set X-Frame-Options Header in wordpress Site - Stack Overflow
- How to configure frames with X-Frame-Options header
- How to Configure X-Frame-Options in Apache - Fedingo
Combined .htaccess Example
No matter if you use a plugin or manually create the rules in your .htaccess they should look something like this:
<IfModule mod_headers.c>
    Header always set Strict-Transport-Security "max-age=31536000"
    Header set X-XSS-Protection "1; mode=block"
    Header set X-Content-Type-Options "nosniff"
    Header set Referrer-Policy "no-referrer-when-downgrade"
    Header set Content-Security-Policy "frame-ancestors 'self' *.sitea.com *.siteb.com"
    #Header set Content-Security-Policy "frame-ancestors 'self' https://*.sitea.com https://*.siteb.com"
    #Header set Content-Security-Policy "frame-ancestors 'self' https://example.org https://example.com https://store.example.com;"
</IfModule>
Notes
- There are some commented out
Content-Security-Policyexamples for reference. - HSTS is on.
- The live
Content-Security-Policydoes not define the protocol of connections allowed. This means that both HTTP and HTTPS are allowed but because HSTS is on, all incoming HTTP connections must be upgraded to HTTPS.
Final Tasks
These are somes task that might need doing after you have built all of your Theme pages.
- Remove all un-needed images and assets
- Option 1 - Manual
- Full site backup (before anything)
- Delete all images in the gallery (but keep gallery)
- Export all pages
- Empty media library
- Import all pages
- Option 2 - Media Cleaner – Clean & Optimize Space – WordPress plugin | WordPress.org
- Clean your WordPress from unused files, broken media entries. Powerful engine and beautiful UI!
- Ypu will need to buy the Pro version
- Option 1 - Manual
- Activate W3C Total Cache
- It might aswell run quick
Your Theme Demo Site is now finished
You have built all of your Theme Demos, the last thing you have to do is:
- Update QWDemobar (only if you have this plugin on your main business site)
- You need to add the new Theme Pages to be able to show you clients
Useful Assets
- Lorem Ipsum Generator | Free Text Generator for Designers & Developers
- Generate customizable Lorem Ipsum placeholder text for your design projects.
- Choose from multiple text variations, adjust length, and format with our free online Lorem Ipsum generator.
- Divi Layout Browser | Elegant Themes
- This is the layout selector that you use whilst in Divi, however this is the website without the iframe wrapping.
- Ypu can see all of the demo sites.
- Hundreds of free Divi Layouts and Layout Packs designed by Elegant Themes.