Items filtered by date: December 2015
Add CSS and JS files to a Joomla Extension
These are my notes I made while researching this subject. There are many different ways to do the same thing.
Read this article first because it explains the different methods clearly: J3.x:Adding JavaScript and CSS to the page - Joomla!
Notes
- For your extension CSS and JS files to be overriden in a template you must use JHtml::stylesheet() and JHtml::script(). These functions have extra code in them that checks the various locations for files that would be allowed to override your files, and if present they do. In the end these 2 functions load addScript() and addStyleSheet() appropriately just with a different URL.
- As of Joomla 3.8, the majority of classes have been namespaced but with a fallback for when migrating to J4. So, you can still use JHtml::XXX, but the new approach is:
use Joomla\CMS\HTML\HTMLHelper; HTMLHelper::_('script', 'path/to/file.js'); HTMLHelper::_('stylesheet', 'path/to/file.css');- I found this information here joomla 3.x - Where or how is the Jhtml class defined? - Joomla Stack Exchange
- the class can be found here libraries/src/HTML/HTMLHelper.php
- Most of the Joomla core classes are all now in libraries/src.
Examples
Different Methods I have found. Some might be dated but at least you know I have seen the same things.
/* Add CSS and JS to the <head> */

// Method 1
$document = JFactory::getDocument();
$document->addStyleSheet( JUri::root() . 'modules/mod_helloworld/css/helloworld.css' );
$document->addScript( JUri::root() . 'modules/mod_helloworld/js/helloworld.js' );
$document->addStyleSheet( JURI::base()."components/com_jdownloads/assets/rating/css/ajaxvote.css", 'text/css', null, array() );
$modules->doc->addStyleSheet($url . '/modules/mod_easyblogticker/assets/styles/ticker-style.css');
$doc->addStyleSheet(JURI::base().'plugins/content/maogalleryview/css/maogalleryview.css', $type = 'text/css', $media = 'screen,projection');
$doc->addScript(JURI::base().'plugins/content/maogalleryview/js/slider.mini.js', 'text/javascript');

// Method 2
JFactory::getDocument()->addStyleSheet( ltrim($mtconf->get('relative_path_to_js'),'/') . 'jquery.typeahead.css');
JFactory::getDocument()->addScript( ltrim($mtconf->get('relative_path_to_js'),'/') . 'jquery.typeahead.min.js');

// Method 3 - This allows overriding
JHtml::stylesheet('mod_helloworld/css/helloworld.css', array(), true);
JHtml::script('mod_helloworld/js/helloworld.js', false, true);
JHtml::script('com_joomlaupdate/default.js', false, true, false);

/* Misc */

// Method 1 - I found this in a template default.php and have not tested it
echo JHtml::stylesheet('mod_mt_filter/mod_mt_filter.css',array(),true, false);
Use these in your extensions
// Add CSS and JS to the <head> - This method allows overriding
JHtml::stylesheet('mod_helloworld/css/helloworld.css', array(), true);
JHtml::script('mod_helloworld/js/helloworld.js', false, true);
References
Official Documentation
- J3.x:Adding JavaScript and CSS to the page - Joomla!
- Adding JavaScript - Joomla! Documentation
- J3.x:Adding JavaScript and CSS to the page - Joomla! Documentation
- J2.5:Adding JavaScript and CSS to the page - Joomla! Documentation (deprecated)
- CodeExample:JHtml::stylesheet - Joomla! Documentation - Describes the load order of files.
- Joomla! CMS 3.9 API » JoomlaCMSDocumentDocument - Document object and it's methods are described here. (addScript() and addStyleSheet())
- API17:JHtml::stylesheet - Joomla! Documentation (deprecated)
- Joomla! CMS 3.9 API » Joomla.CMS.HTML.HTMLHelper - HTML object and it's methods are described here.
3rd Party Articles
- Adding Files
- php - How to include external js file in joomla 3.8 - Stack Overflow - Not sure these are correct format.
- How to add JS/CSS files to Joomla modules? - Stack Overflow - Some basic errors explained and solved here.
- Difference Between Methods
- jfactory - Why use addStyleSheet or JHtml::stylesheet over just linking a CSS file? - Joomla Stack Exchange - Explains the difference betweent he 2 main methods. ie addStyleSheet() and addScript() add the files directly whereas JHtml::stylesheet() and JHtml::script() allow overriding.
- php - What's the difference between JHtml:script() and $doc->addScript? - Joomla Stack Exchange
- Misc
- difference between JURI::root and JURI::base ? - Joomla! Forum - community, help and support - This explains the slight difference between the 2.
- css - $document->addStyleSheet deprecated - Stack Overflow - This function is not actually deprecated but it has some variables that are.
- addStyleSheet, addScript and addSCriptDeclaration used into a plugins are positioned above those of the template and modules · Issue #6750 · joomla/joomla-cms · GitHub - I dont know if I will ever need this, so i have added it for reference only.
Joomla Release System and Configuring an Update Server
NB: This document is not finished so if you are reading this please bear with me. Thes instructions are what i am using/will use for quantumwarp.com
The Joomla Update Enviroment Explained
This might of been done in the past but I want to explain in clear terms on how the Joomla Update Enviroment works, the implementations I have found and then how I implemented my own Joomla Update Server so i can get on with what I really wanted to do in the first place which is to develop joomla extensions. There is some documentation but no real practical gold standard setup where someone says do this, use this software. Akeeba Release System is what a lot of people use but this is a difficult program to master. At the bottom of this page you will see a whole raft of resources which i used to put this article together so if there is something I have missed you might find help in one of those links and then let me know. These instructions will serve as template for setting up your own Joomla Update Server from scratch, How to implement this in your extensions and will be what I use here on quantumwarp.com and my extensions. I might also use this for non-joomla extensions if possible.
This article will cover topics such as:
- Overview of the Joomla Update Environment
- Configure and update server on your website for your Joomla extensions.
- Manage free and paid for extention updates.
- Manage non-joomla updates
- Setup your product pages witha good adapatable SEF structure
- Publish your extensions to the JED
The Different Areas of the Joomla Update Environment
I will now break down the update enviroment into their different constituent parts that you might need. Your installation should do all or some of these depending on your configuration. Also you might have one piece of software do all of these or a combination of softwares acting as one. A Joomla Update Server can be a combination of the following items but a lot of people just think the server just hands out the XML update streams, end users dont, they expect the file aswell
- Joomla Update Server
- Joomla! XML extension update streams
- XML file that informs Joomla of updates to the software that registered this stream in Joomla.
- You can use two options for your server type; collection or extension.
- The collection server type allows developers to define an extension's manifest to pull updates from a collection. This type of server can be used if the developer wants to define all of their extension's updates in a single file (not recommended) or if their extension has multiple sub-extensions which are not distributed or updated at the same time (such as a package extension type). Ideal if your extension is a package and you want to allow users to update the package components individually, also allows you to have different update XML files for different versions of Joomla.
- The extension server type allows developers to define an extension's manifest to pull updates from a single extension's manifest. All collection manifests eventually point to this XML file. All updates in this file must be defined after an <updates> tag at the beginning of the file. The below example is the update definition for the Joomla! 3.9.6 release:
- I have also seen where XML files still have the eupdate entires for olders version of the extension being downloaded.
- Multiple servers can be defined within the <updateservers> tag.
- Deploying an Update Server - Joomla! Documentation - This will explain in more detail about this file
- JED Remote XML files
- XML file for automatically updating an extension listing in the Joomla! Extensions Directory. This file is read every 24 hours by the JED. The information is not pushed to JED.
- Setting up update streams · akeeba/release-system Wiki · GitHub - This is closest to official doucmentation for the JED update stream and information of the other stream types.
- Master XML Update stream - This has a single XML that has the update streams for all of your extensions in one place. Not sure when to use this. Similiar to a Collection but different useage case.
- Download Manager - JDownloads, PhocaDownload, Straight file download (not recommended)
- Subscription Manager - PayPlans: Will have all of the license keys and payments for subscriptions. PayPlans might also offer its own update server for commerical apps.
- Joomla! XML extension update streams
- Client Joomla Installation
- Joomla Update Mechanism - This is the part of Joomla that handles getting the updates in your Joomla installation. The code is native to the platform.
- Joomla Extension
- Manifest XML - This hold all of your extensions configurations options. Either named updates.xml or named after the extension rsfirewall.xml, dont use any other name.
- Defined Update Server - This setting must be configured in your extensions manifest XML file. It is possibel to list more than one update server in your XML file.
- License key - This is needed if you need to authenticate the download rights of the license Key (optional)
Joomla Database Tables (Client) - What do they do?
These are the tables in the clients Joomla installation, not the update server.
- jos_updates - This is the local cache for available updates. When you check for updates this table is populated with available updates and is probably why it sometimes seems slow to load after clicking the 'Find Updates' button, conversely when you empty the update cache by clicking on 'Clear Cache' this table gets emptied. You might not see all of them listed in the Joomla admin because some seem to be language specific and most people only use one language.
- jos_update_sites - This table hold all of the register update streams which point to Joomla Update servers. these entries appear in the Joomla Admin Extension Update page (Admin --> Extensions --> Manage --> Update)
- jos_update_sites_extensions - This table registers multiple extensions against a single update stream which allows multiple extensiosn to share a single update stream and a single update license when needed. i.e. RSFirewall might be a combination of a main component and separate plugins. The developer might want to only update the system plugin and not the component. these updates would appear as separate available updates in the joomla admin. This is particularily useful for joomla packages, why re-install everything if you only change one item. this saves bandwidth and things going wrong.
Methods for Commercial Extension Updates
So far I have discovered there are several methods so far for handling commercial software updating. These are an overview as there are probably different ways of implementing these.
- Standard update stream XML - Manipulated Update Stream
- Use the function onInstallerBeforePackageDownload() to modify the URL of the download package in the udpate stream to added in host/hash/code to authorised the download.
- This function runs everytime the update process is run and requires a seperate installer extension but this can also be part of the main extension. (RSFirewall)
- This method was a way of sending API keys for Joomla versions less than 3.2 where the update streams needed to end in .xml , this now no longer a problem. It is also an alternative way to send host domain and other information but you could get the host information from the request header.
- Standard update stream XML - Update Stream With API Key
- The API key is added into the update stream stored into the database when the API key is added in the extension. (EasyBlog)
- This link (URL) which can be used with Joomla!'s "Install from URL" feature to install subscription-based extensions. (if multi domain installation allowed)
- Standard update stream XML - No download link
- You can implement the Update Servers in a similar way to how Paid Extensions manage it - you can implement the Update Servers to inform the users about the available updates and display a message saying that the update is available through contacting them via your website. The key point here is to inform users about the updates - the decision to provide them automatically or not is your decision. This means the user has to login in to download the extension but can still be notified. The method does not need API keys etc..
You can use a different update stream for commercial and free extensions but you can potential use these methods to allow the supply of both types using the same update stream. The difference is just in the request, the commercial ones have extra variables being sent.
RSFirewall Commercial Extension Update Environment Example
NB: `jos_` is the fictional database prefix I am using.
In this worked example I follow how RSFirewall manages its licensing information. In particular this is an example of how the update url is manipulated upon 'update this extension' submission, this will make more sense after following this through.
Installing the extension and how the update server is registered in Joomla
- After you install RSFirewall there will be a new entry added that has been added into the Joomla Extension Update sites. This is the extension's update stream and has been read from the file rsfirewall.xml found in the root of the zip file you just used to install RSFirewall. The installation adds an entry into jos_update_sites to create this record.

- After installation there will also be a record in jos_update_sites_extensions where the extension is registered against the update stream. In the case of RSFirewall there is only one entry becasue the developer manages the RSFirewall updates as a single extension.
- The code in the rsfirewall.xml in particular that was used to add this Update Server is shown below. This is the Extension's Update Stream.
<updateservers>
    <server type="extension" priority="1" name="RSFirewall!">https://www.rsjoomla.com/updates/com_rsfirewall/Component/com_rsfirewall.xml</server>
</updateservers>
What happens when you update this extension
I have not entered a license key as this is optional and because I am exploring this 'Shared XML/Manipulate Update Stream' method. i.e. you get a different version dependent on the license key or lack off. The different outcomes are explored later.
- Goto (Admin --> Extensions --> Manage --> Update)
- Click 'Find Updates'. Joomla will now dowload the com_update.xml file from RSJoomla. The code looks as shown below:
<updates>
<update>
	<name>RSFirewall! 2.12.1</name>
	<description></description>
	<element>com_rsfirewall</element>
	<type>component</type>
	<folder></folder>
	<version>2.12.1</version>
	<infourl title="RSFirewall! 2.12.1">https://www.rsjoomla.com/support/documentation/rsfirewall-user-guide/changelog.html</infourl>
	<downloads>
		<downloadurl type="full" format="">https://www.rsjoomla.com/updates/com_rsfirewall/Component/com_rsfirewall.zip</downloadurl>
	</downloads>
	<tags>
		<tag>stable</tag>
	</tags>
	<maintainer>RSJoomla!</maintainer>
	<maintainerurl>https://www.rsjoomla.com/</maintainerurl>
	<section>Updates</section>
	<targetplatform name="joomla" version=".*" />
	<client>administrator</client>
</update>
</updates>
- Joomla will parse the com_update.xml file, extract the latest version number and then compare this to the version number of installed RSFirewall extension to see if the one offered at RSJoomla is newer. When a new version is found you will see an entry like below shown in the Joomla admin

- Joomla now checks to see if RSFirewall has registered any extra code to be run before the update package is downloaded. RSFirewall has, is in the file plugins/installer/rsfirewall/rsfirewall.php and is as follows :
<?php /** * @package RSFirewall! * @copyright (C) 2015 www.rsjoomla.com * @license GPL, http://www.gnu.org/copyleft/gpl.html */ defined('_JEXEC') or die; class plgInstallerRsfirewall extends JPlugin { public function onInstallerBeforePackageDownload(&$url, &$headers) { $uri = JUri::getInstance($url); $parts = explode('/', $uri->getPath()); if ($uri->getHost() == 'www.rsjoomla.com' && in_array('com_rsfirewall', $parts)) { if (!file_exists(JPATH_ADMINISTRATOR.'/components/com_rsfirewall/helpers/config.php')) { return; } if (!file_exists(JPATH_ADMINISTRATOR.'/components/com_rsfirewall/helpers/version.php')) { return; } // Load our config require_once JPATH_ADMINISTRATOR.'/components/com_rsfirewall/helpers/config.php'; // Load our version require_once JPATH_ADMINISTRATOR.'/components/com_rsfirewall/helpers/version.php'; // Load language JFactory::getLanguage()->load('plg_installer_rsfirewall'); // Get the version $version = new RSFirewallVersion; // Get the update code $code = RSFirewallConfig::getInstance()->get('code'); // No code added if (!strlen($code)) { JFactory::getApplication()->enqueueMessage(JText::_('PLG_INSTALLER_RSFIREWALL_MISSING_UPDATE_CODE'), 'warning'); return; } // Code length is incorrect if (strlen($code) != 20) { JFactory::getApplication()->enqueueMessage(JText::_('PLG_INSTALLER_RSFIREWALL_INCORRECT_CODE'), 'warning'); return; } // Compute the update hash $uri->setVar('hash', md5($code.$version->key)); $uri->setVar('domain', JUri::getInstance()->getHost()); $uri->setVar('code', $code); $url = $uri->toString(); } } } - The class name plgInstallerRsFirewall indicates this is registered with the Joomla installer process and the extends JPlugin just means it can use Joomla functions related to plugins.
- Once you understand what the function onInstallerBeforePackageDownload() does and why, it is quite useful. If you read the class name you can clearly see that this function (if exists for the respective extension) is run by Joomla before the download package is requested but after the update stream has been read out of the database. Remember the download package is the zip file defined in com_rsfirewall.xml, in this case:
https://www.rsjoomla.com/updates/com_rsfirewall/Component/com_rsfirewall.zip
- Reading the code of onInstallerBeforePackageDownload() I figured out that this function:
- Is passed the download package URL which has been extracted from the update stream com_rsfirewall.xml earlier in the update process.
- Loads various libraries and things from Joomla and RSFirewall (not going into that here)
- It then checks if the license key is set. If it is not set then the code returns a warning saying no key set.
- If there is a key, this code then checks to make sure it is the right length, if not returns an error message.
- If the two tests above pass then the code builds some variables hash/domain/code and adds these to the download package URL as GET variables
- This modfied URL is passed back
- Joomla now grabs the download packge using the modified (or not) URL as if it was the original URL. The modified URL will look as follows:
"https://www.rsjoomla.com/updates/com_rsfirewall/Component/com_rsfirewall.zip?hash=f0588314d3680f6c15c71c7FF394129d&domain=localhost&code=xxxxxxxxxxxxxxxxxxxx"
hash = a MD5 hash of the RSFirewall Version (local) and the license key
domain = domain that RSFirewall is installed on
code = license key
Notes on this process
- Using onInstallerBeforePackageDownload() allows invisible manipulation of the update stream which facilitates:
- Being able to check for updates without a license key. Clients can see how out of data their version is even if they dont have a valid key.
- Being able to validate a subscription when a valid license key is installed and download a package if allowed.
- This code can allow the sending of host and version information. This can be useful for statisictics for the vendor.
- A single remote update stream (com_rsfirewall.xml) for both free and commercial software. It is only when you access the download URL specifed in the XML that the hash/domain/code supplied come into play.
- This code might grab all download package and run the test on very URL to see if it is pointing at www.rsjoomla.com and has com_rsfirewall in the url.
Various Error Messages
The remote server responds with various error messages in text. I do not know if this is where Joomla gets the reponse messages, styles them as errors, and them displays them at the top of the updates page, it probably is, or if it is specific to RSFirewall becasue it has installed some extra code.
- If you have the entered the wrong you get a failed message at the top of the update page
Failed to download package. Download it and install manually from https://www.rsjoomla.com/updates/com_rsfirewall/Component/com_rsfirewall.zip.
The text response from the RSJoomla Update Server is "The update code was not found in our database." - if you click try and download directly from the download package URL. basic HTML (no body etc..)
This extension cannot be downloaded directly; this is a commercial product and the only way to download it is either through your RSJoomla! account or automatically by Joomla! updates once you supply your license code in the extension's configuration.<br /> More info <a href='https://www.rsjoomla.com/support/documentation/general-faq/where-do-i-find-my-license-code-.html'>here</a>.
I found this code in action from RSFirewall by:
- search for the error message that came up after I replace the update code with a dodgy one
- Your update code appears to be incorrect. Please make sure you've copied it correctly.
- which returned
PLG_INSTALLER_RSFIREWALL_INCORRECT_CODE="Your update code appears to be incorrect. Please make sure you've copied it correctly. <strong><a href="/_QQ_"https://www.rsjoomla.com/support/documentation/general-faq/where-do-i-find-my-license-code-.html"_QQ_" target="_QQ_"_blank"_QQ_">More information</a></strong>"
- I then searched for
PLG_INSTALLER_RSFIREWALL_INCORRECT_CODE
- which returned
D:\websites\htdocs\quantumwarp.com\plugins\installer\rsfirewall\rsfirewall.php
- The function responsible is onInstallerBeforePackageDownload() is within plugins/installer/rsfirewall/rsfirewall.php, Not all extensions use this code and seems to of been added by a seperate exentions which is part of RSFirewall. If you want more information have a look in the RSFirewall Zip package.
Resources
These are articles that I have found that all relate to the Joomla Release System and will help me undertand how to implement and use it.
Official Documentation (JRS)
- General
- Deploying an Update Server - Joomla! Documentation - This tutorial is designed to teach developers how to create an update server for integration with the update system introduced in Joomla!.
- J3.x:Developing an MVC Component/Adding an update server - Joomla! Documentation - This is a multiple-article series of tutorials on how to develop a Model-View-Controller Component for Joomla! Version 3.x.
- J3.x:Creating a simple module/Adding Auto Update - Joomla! Documentation - his is a multiple article series on how to create a module for Joomla! Version 3.x.
- Joomla! Update System requirement - Starting with Joomla! 1.6, Joomla! has featured an update system to help keep systems up to date. This article goes through all of the basics.
- Manifest files - Joomla! Documentation - Within Joomla there are manifest files for all of the extensions. These files include the general installation information as well as parameters for the configuration of the extension itself.
- Joomla Language XML - A good example of an extensionset
- Publishing to the JED
- Publishing to JED - Joomla! Documentation - This page complements the Terms of Service (TOS) for extensions developers.
- Listing Approval Checklist · joomla/jed-issues Wiki · GitHub - A checklist to go through before submitting your extension.
- The Update XML File - This is an example of the JED Remote XML file. The article says it is not used yest Akeeba says his software does push changes to the JED and has a menu item for it.
- Joomla JED Schema Validation: Remote Listing Administration: Keep your listing up-to-date using a XML file hosted on your own server. · GitHub - not official, but a good example to look at.
- JED Entries License Checklist - Joomla! Documentation - This article is designed to help Extension Developers (who want to be listed at JED), JED Editors (consistence for extensions approval) and general users (on reporting JED entries).
- Extensions GPL notices - Joomla! Documentation - To list your file in JED under a GPL license, you must include proper notices for the license chosen. Choose the appropriate format for each of your files here.
- Extensions name - Joomla! Documentation - To name your extension its an art and part of a marketing strategy. But you also need to stay away of name conflicts with extensions already listed at the JED. Extension names impact the extension structure and URLs that are displayed after the extension is installed, so plan ahead. This article contains a few recommendations for naming extensions derived from best practices in the Joomla community.
- Joomla JED Schema Validation Gist - cedricwalter|GitHub - Joomla JED Schema Validation: Remote Listing Administration: Keep your listing up-to-date using a XML file hosted on your own server.
- GitHub - hiorgserver/HiOrg-Joomla - jedupdate.xml and update.xml examples.
Other Documentation
- joomla 3.x - Update server for a package or individual extention - Joomla Stack Exchange - A pratical example of how to build an updateable package
- How Joomla Extensions Upgrade Process Works - Tech Fry - Some simple information
- Joomla update server 1x1 (Translated) -An explanation of the Joomla Update system.
Implementing Code Examples
- Updating the update stream in the Database (Client)
- How to add Joomla Updater to commercial component - So the purpose of this article is to explain to commercial extension developers how they can leverage the Joomla Updater in their components, but still limit updates only to customers who have a current subscription.
- Joomla Update System requirement (From Scratch) | Smarty Blog - This article is written for those developers who face issues with update server requirements. Wont go deep into theory part but here is what I did to implement those features in my Free and paid extensions. i will cover some details that you wont find there.
- Alter the update stream on the Update Server (Vendor)
- Joomla Update System implementation for paid extensions - Digigreg -Implementing this feature for free extensions is very easy, instead Joomla Update System for paid extensions is a little bit complicated. As the official Joomla! site has not published a standard way to achieve this result, all developers use own method. This uses VirtueMart.
- Add addtional data to #__update_sites_extensions (Client?/Vendor?)
- How to provide live updates for extensions in Joomla? - The Techjoomla Blog - This uses ARS to allow for paid downloads without Akeeba Subscriptions
- Login with a Hash / API Key enabled downloads
- How to Use a Hash in the URL to Authenticate Logins to a Joomla Website | itoctopus - This is a simple example to get me started
- I might not need to login but rather construct database lookups to manually see if the user can download an update rather than relying on loging in and usr the native Joomla authorisation.
- Suitable code might be in Akeeba Subscriptions.
- Create or Update a component to convert HASHes to login details. Does Joomla store all of a user's groups in one table?
- I could hash the username with a secret key (not Joomla's becasue you could use the username to get the secret key) to make a hash and then this could be decodes to the user name and then could check what grousp the user belongs to, checks the clients domain, the required software and then provide the download if allowed.
- Maybe a separate table with random keys against users
- Make a separate helper plugin that works with Akeeba Release System
- ARS does have a system similiar tot his but it is not verified agaist usergroups
- ARS Download ID system warrants a look. It grabs the variables from the URL.
- The answer to that question is the Download ID. The Download ID is an MD5 hash derived from a user's numeric ID,
username, encrypted password and email address which uniquely identified the user to ARS. Appending the download
URL with the dlid=download_id query string parameter will allow ARS to authenticate the user and, if he has
access to the download, proceed with the download.
- The answer to that question is the Download ID. The Download ID is an MD5 hash derived from a user's numeric ID,
Release Systems
These are extensions that handle the XML and the actual download of the software. These systems dont have inbuilt subscription systems and the functionality varies.
- Update Server, by Igor Berdichevskiy - Joomla Extension Directory - This is the most complete software I have come across but it is now out of date and has been archived by the author.
- Akeeba Release System - A software dissemination / download repository component for Joomla!
- This software is not for newbies and there is a steep learingin curve.
- Akeeba Release System is an extension that allows the administration and creation of update streams for both Joomla extensions in the XML format and for other software packages using a standard INI format that is compatible across many programming platforms. ARS also is capable of automatically submitting your Joomla extensions updates to the JED automatically.
- GitHub: Akeeba Release System - Wiki - Official documentation
- My Akeeba Release System Notes | QuantumWarp - These are the note I made when trying to understand this software.
- Akeeba Release System | School IT Expert - Managing downloads with ARS If you'd like to offer downloads to your visitors, Akeeba Release System (ARS) could be what you're looking for. This article shows how to install and get started with ARS.
- Add automatic updates to your extensions with Akeeba Release System (ARS) & Native Joomla updates - The Techjoomla Blog - AS the title says.
- The Download ID plugin · akeeba/release-system Wiki · GitHub - If you want to provide updates to registered users / subscribers you will find out that the download URL in the XML and INI update streams results in a 403 Forbidden error. This is normal. These downloads are only available to registered users, but accessing the URL directly, from Joomla!'s perspective, is a guest (non logged in) visitor trying to access the URL. This of course results in a 403 Forbidden error and begs the question: how do you authenticate users? This fixes this situation.
- The Username and Download Id section is called Direct Link which is a link (URL) which can be used with Joomla!'s "Install from URL" feature to install subscription-based extensions.
- Akeebalize Your Extensions - A slideshow presentation on how to setup ARS. Note very indepth.
- Add automatic updates to your extensions with Akeeba Release System (ARS) & Native Joomla updates - The Techjoomla Blog - A short article on how to configure ARS.
- RD-Media - Release Easy 4 Joomla! - I have not used this and it is not longer publish on the JED. It als uses shell_exec() which is a bad thing.
- Using a Download ID Custom Field
- Joomla Update System For Paid Extensions - Joomla Stack Exchange - I'm trying to make this Joomla Update system work for paid extensions.
- GitHub - kyuzo1/Joomla-Update-System-For-Paid-Extensions - This is a continuation of https://github.com/mabdelaziz77/downloadid-custom-field
- GitHub - mabdelaziz77/downloadid-custom-field: Download ID as Custom Joomla Form Field - This is a custom Form Field to help Joomla! extension developers to implement Joomla Update System and meet the new JED requirement for PAID extensions. This field is developed to be used with Akeeba Subscriptions and Akeeba Release System packages, although it can be customized to work with other subscriptions and realease/downlaod managers.
- Easy Joomla Update System Implementation For Paid Extensions - Some simple instructions.
- Media Store - ExtStore
- Media Store is a Joomla 3 extension developed by ExtStore Team that allows you to sell downloadable products such as documents, e-books, software, etc. and get paid via Paypal, Moneybookers and 2Checkout.
- This is quite an all round product but it has not been updated in a while.
- Media Store Documentation - Enable Update for Joomla Extensions - This instruction helps you enable update server for your Joomla extensions. If you don't sell Joomla extension with Media Store, you can ignore this.
- MS Update Helper - ExtStore | Joomla Extensions - This is ExtStores tool for generating a compliant plugin for media store?
- Cobalt, by MintJoomla - Joomla Extension Directory - I have not verfied this yet
- Distribute Joomla extensions - How to automate distribution of Joomla extensions with Cobalt and Joomla update service feature. Cobalt 8 has new feature to support Joomla Update mechanism. When you create download listing, it automatically creates XML version of this listing to connect to Joomla update. And here I’ll describe how configure it.
- Cobalt is free but you have to buy several plugins to get this to work
Update Server (XML Only)
Create your XML files using a component rather than doing them manually.
- Update.System for ZOO, by Attavus M.D. - Joomla Extension Directory - The Update.System for ZOO is simple tool for creating update servers which used in Joomla! Update System.
If You use catalog of files which builded at Zoo applications then this plugin helps create a manifest of extensions for quickly automating the process to check all installed extensions and update them from the extension manager. - WT Extension Updates, by Wolfgang Toedt - Joomla Extension Directory - This authors website is now down. I tried finding this plugin but could not
- Implementing Joomla update system for extension hosted on Github - Joomla Stack Exchange - Simple instructions on how to use GitHub to serve your manually created XML files.
Package Checking
This is related, you need to make sure your plugins are compliant with Joomla's coding practice including using 'Tabs' which I hate.
- JED Checker, by JED Extensions - Joomla Extension Directory - Joomla extension to check components, modules or plugins for possible problems for submission to the JED
- JED Submission Error Codes - The following list defines error codes you may see if there is an issue with your listing submission to the JED.
Update Notifiers
Again these are along the same line as this article, so where better to put them to complete the circle. These Joomla extensions will notfy you of updates to your Joomla installation and it's extensions with various options. The inbuilt Joomla update notification system plugin runs every couple of hours and is the first thing I turn off. When developing multiple websites you dont want mutiple emails from multiple websites weveryday telling you the same thing. The Joomla notification plugin only notfies you of a Joomla platform update and nto the extensions.
- ExtUpNotification, by UWiX - Joomla Extension Directory - Extension Update Notification (ExtUpNotification) is a Joomla!™ 3.x Plugin to send e-mails to one or more SuperUsers when an update of an installed extension is available.
- Jinspector Site Inspector for Joomla, by Realvision Internet - Joomla Extension Directory - Reports can be sent to specified user groups, or a custom email address, or addresses, daily, weekly, two weekly or four weekly.
- CUpdater, by compojoom - Joomla Extension Directory - CUpdater is a system plugin that will notify you with a mail if there is a joomla or 3rd party extension (only for extensions that have provided an update server) update available. This plugin has not been updated since 2014.
Current Work
List the basic mechanisim in my words
To Do list
- update server (XML) for free ones: do i need to upgrade to modern standards? which component is good to go?, do i do this for free and paid?
- subscription for paid extensions (and how this relates to nonppaid xml files)
- product page: old versions displayed in a module, tabs, similiar to the joomla JED, should i use custom fields?
- internal message system ie for kunena, can I refator the one already in joomla? is this message system present in joomla 4?
- extension checker - needs updating
- Should i use Akeeba Release system?
- Should i use a combination of a Joomla article, JDownloads and a component to build the XML file
- Using a component allows me to track the usage of my software.
- Joomla uses Github RAW to serve its XML files
- I could create the XML files manually
- What SEF structure would i give to these different softawres, I have to consider I have joomla and non-joomla software that will use this system
My Update System
- Potential names: QWUpdateServer or QWUpdate (but consider QWUpdateChecker) = camelcase the name and add QW at the beginning, no more than 2 words
com_updateserver Notes
- update server has been archived.
- outputted xml is all on one line
- this only seem to create single XML file (i.e. master XML)
- cannot use for non-joomla currently
- not all fields are present
- some fields are context sensitive (not a bad thing for joomla extensions, good for consistency)
- an option to upload the file is there to be downloaded from the actually software
- no option to manually put in your own url for the file
Update Server Options
- Manually create XML files
- Pro
- Easy to do
- Can handle Joomla and Non-Joomla easily
- Repo Structure is easy to do
- Free
- Con
- Cannot directly control download rates (could use JDownloads)
- Cannot directly log downloads (could use JDownloads)
- Cannot apply subscriptions
- Pro
- Akeeba Release System
- Pro
- The component is already made
- Free
- Logs downloads
- Basic dowload control
- Con
- Very difficult to use
- Only made for Akeeba and not the end user.
- Subscriptions are only available through Akeeba subscriptions
- Pro
- Update Server (by Igor Berdichevskiy)
- Pro
- Free
- Easy to use
- can control the repo layout with menus
- Con
- basic functionality
- no longer updated
- Pro
- Make my own
- Pro
- Can make it handle only XML
- I can add joomla usergroups
- I control the software
- Free
- Can integrate it with JDownloads or other extension.
- Can integrate with PayPlans.
- Con
- Will take time to make
- Pro
Adding Subscription Integration
These are my basic notes I will use for reference:
Developing my own user authentication using a License Key in the update stream (added dynamically by onInstallerBeforePackageDownload() )
- Use a hash to verify that the user exists and then load that user's object
- The update stream request will have the key in it
- The key could be a secure hash of the username and 2 secret keys to prevent dercyption hash = md5($secretkey1.md5($secretkey2.md5($username)). This will allow simple verification.
- You can also have a table for my 'Update Component' that stores authorised domain information which will be check agast the request header.
- The user has now been identified from the key
- Without validation load the User Object
- use the consequential 'Authenticated' user's usergroup rights to dowload assets, if permissions allow, download asset.
- I am not sure how this will acutally play with jDownloads and ARS. An update stream error response is only text. Will ARS return this. JDownlaods and the relevant ARS Release must have the same usergroup configured for this to work otherwise the response might be from JDownloads mightbreak things?
- The update stream request will have the key in it
- Use a hash to verify that the user exists and then check the database for permissions
- The update stream request will have the key in it
- The key could be a secure hash of the username and 2 secret keys to prevent dercyption hash = md5($secretkey1.md5($secretkey2.md5($username)). This will allow simple verification.
- You can also have a table for my 'Update Component' that stores authorised domain information which will be check agast the request header.
- The user has now been identified from the key. The user is not be logged in.
- get his usergroups he belongs to by loading them from the database directly.
- validate he can download the requested asset by checking to see if he is a member of the correct group and response accordingly.
- The update stream request will have the key in it
NB:
- A license key generate by payplans would be better which would link to a particluar software/license from which this can then be checked either at payplans or by the groups the user belongs to
- My component would have these 2 primary functions
- A function to run through all users in a subscription group to make sure they have a unique ID. This can be used for automation.
- A function to add an indiviual user with a unique ID. This will be used when a user is manually added.
Akeeba Modification Notes
- Overrride a stream for QWcrm
- Find out where the code is blocking me using XML for a Non-Joomla platform (add a bypass for the QWcrm) but make sure the JED and other streama are not affected.
- I could modify the INI view to present an XML stream
- Can I use the Download ID system for license keys?
- Add another stream that is designed for QWcrm.
Building your own XML
- https://docs.joomla.org/Deploying_an_Update_Server - The full spec for the update.xml is here and the documentation is easy to follow.
- libraries/src/Updater/Update.php - The location for the Update class responsible for parsing the update.xml in Joomla 4.
- libraries\src\Changelog\Changelog.php - The location for the Changelog class responsible for parsingthe changelog.xml in Joomla 4.
- Different <targetplatform> version masks
- version="3.[123456789]|10"
cPanel - DNS Zone with SPF example
When you enable SPF either globally or on an indvidual cPanel account the default record uses a soft fail switch (~all) and this is not the best setting for prevent spam being sent from or on behalf of your server.
cPanel offers no options in WHM to change this default action, but there is a well known workaround which does seem to have official support and that is to alter the 'standard' Zone template.
If you do not know the syntax this will become a difficult thing to set up. So to make things easier below you will see the 'standard' Zone Template taken from cPanel v82.0.9 with the correct line added at the bottom for a 'Hard Fail' SPF record.
; cPanel %cpversion%
; Zone file for %domain%
$TTL %ttl%
@      %nsttl%	IN      SOA     %nameserver%. %rpemail%. (
		%serial%	; serial, todays date+todays
		3600		; refresh, seconds
		1800		; retry, seconds
		1209600		; expire, seconds
		86400 )		; minimum, seconds

%domain%. %nsttl% IN NS %nameserver%.
%domain%. %nsttl% IN NS %nameserver2%.
%domain%. %nsttl% IN NS %nameserver3%.
%domain%. %nsttl% IN NS %nameserver4%.

%nameserverentry%. IN A %nameservera%
%nameserverentry2%. IN A %nameservera2%
%nameserverentry3%. IN A %nameservera3%
%nameserverentry4%. IN A %nameservera4%

%domain%. IN A %ip%
%domain%. IN AAAA %ipv6%

%domain%. IN MX 0 %domain%.

mail IN CNAME %domain%.
www IN CNAME %domain%.
ftp IN CNAME %domain%.

%domain%. %ttl% IN TXT "v=spf1 +a +mx +ip4:%ip% -all"
This will generate a SPF record as follows:
v=spf1 +a +mx +ip4:xxx.xxx.xxx.xxx -all
Other Examples
%domain%. %ttl% IN TXT "v=spf1 +a +mx +ip4:xxx.xxx.xxx.xxx +include:relaydns.com -all"
%domain%. %ttl% IN TXT "v=spf1 +a +mx +ip4:xxx.xxx.xxx.xxx +include:%domain% -all"
%domain%. %ttl% IN TXT "v=spf1 +a +mx +ip4:%ip% +include:%domain% -all"
%domain%. %ttl% IN TXT "v=spf1 +a +mx +ip4:%ip% -all"
NB: Replace xxx.xxx.xxx.xxx with a real IPv4 IP
Notes
cPanel - SFTP over SSH
Once you have got your server working, like most Windows users you want to be able to login to the root file system using your favourite FTP program so to that end there are a few hoops you have to jump through first.
Allow SSH Access
- Host Access Control
- Home »Security Center »Host Access Control
- At the end of the ALLOW rules add the following
- Daemon: sshd
- Access List: [your IP]
- Action: allow
- Comment: My SSHD Allow rule
- Click save
- At the end of the ALLOW rules add the following
- Home »Security Center »Host Access Control
- Firewall record
- Add exception to the firewall (if the firewall is enabled and might not be needed because of the rule above but I have not verified)
- Home »Plugins »ConfigServer Security & Firewal »csf - Quick Actions » Quick Allow
- Add your public IP in the box and click. (If you click the cog it should fill in your public IP address)
- How to add your IP Address to the Firewall (for SSH access) | InMotion Hosting Support Center
- Add exception to the firewall (if the firewall is enabled and might not be needed because of the rule above but I have not verified)
Remove SSH Access
- Host Access Control
- Home »Security Center »Host Access Control
- Delete the information in the relevant row and click save. This will remove the record.
- Firewall record
- Home »Plugins »ConfigServer Security & Firewal »csf - ConfigServer Firewall » Firewall Allow IPs
- Remove the line with your IP on it. It might be commented with 'Manually Added'
- Click change
- If prompted to reboot services then do so
Further Information
For reference this is the information I got from my support people while trying to fox this.
Your server is not IP restricted right now, with dynamic IP address we can not restrict server root access as every time your IP address changed you will need to contact us in order to allow new IP address.
Restricting server root access is completely different from server firewall, in order to restrict server root access we will need to add your static IP address for host access control, it can be done from WHM Home »Security Center »Host Access Control, here you will need to add entries like below,sshd IP_from_which_you_want_to_access_server allow
Till the time you are using dynamic IP address [and root level restriction disabled], you can keep whitelisting IP address in firewall using option Home »Plugins »ConfigServer Security & Firewall
here you will just need to enter IP address just besides the button 'Quick allow'.
These might be the firewall rules added, but I don't know how they are entered.
- filter ALLOWIN 1 14 786 ACCEPT all -- !lo * xxx.xxx.xxx.xxx 0.0.0.0/0
- filter ALLOWOUT 1 10 635 ACCEPT all -- * !lo 0.0.0.0/0 xxx.xxx.xxx.xxx
Notes
- What port is my SSH on?
- How to Change the SSH Port with WHM
- How to enable SSH
- How to configure SSH
- How to configure your SFTP client
cPanel - enforcing secure URLs for Web Services causes redirect error
On my fresh cPanel server I configured the following settings to make things like cpanel.quantumwarp.com, webmail.quantumwarp.com require https, i.e. cPanel webservices access should be HTTPS enforced.
- Home »Server Configuration »Tweak Settings »Redirection
- Choose the closest matched domain for which that the system has a valid certificate when redirecting from non-SSL to SSL URLs. Formerly known as “Always redirect to SSL/TLS” = On
- Logout redirection URL = No Redirection
After I did this, I typed into my address bar cpanel.quantumwarp.com (note no protocol, which implies http://) I got the following error:
The page isn't redirecting properly

So I contacted my server support people and got the following reply
We have tried to set the requiressl and always_redirect_to_ssl for the cPanel proxy domain like cpanel.quantumwarp.com in cPanel configuration, after setting up it cpanel.quantumwarp.com started redirecting to https://cpanel.quantumwarp.com but after that its started showing "Too Many Redirection" error.
Also we tried to force redirect the proxy subdomains to https in apache configuration but no success.
We have now forwarded it to cPanel support team and we will update you once we receive an update from them.
And here is the response from the cPanel Team
We have received below response from cPanel support team.
=============
Thank you for your patience as I performed my investigation. The Apache headers module is not installed on your server:
-=-=-=-=-=-=-=-=-=-=-=
[19:11:24 xxxx root@88888888 ~]cPs# rpm -qa | grep mod_headers
[19:11:26 xxxx root@88888888 ~]cPs#
-=-=-=-=-=-=-=-=-=-=-=
The most common issue that occurs when the module is missing is infinite redirect loops when accessing service subdomains. However, it is likely the non-redirection issue is occurring due to the missing module.
==========
We have now installed the missing apache module and now below links are redirecting to https
Solution
Install mod_headers via EasyApache4
cPanel Ciphers
The only difference to default is that I have restricted cpanel web services and webdisk by disabling TLSv1_1 (as pere zeros and one)
Default Ciphers for cPanel 82.0.9
- I have used my fresh server install for this.
- There might be slight differences becasue my server company might of used an old cPanel image.
- This is a references list so if things stop working I can quickly revert back to defaults
- These settings as they are score an A on SSL labs
Apache
- Home »Service Configuration »Apache Configuration »Global Configuration » SSL Cipher Suite
- Default: ECDHE-ECDSA-AES256-GCM-SHA384:ECDHE-RSA-AES256-GCM-SHA384:ECDHE-ECDSA-CHACHA20-POLY1305:ECDHE-RSA-CHACHA20-POLY1305:ECDHE-ECDSA-AES128-GCM-SHA256:ECDHE-RSA-AES128-GCM-SHA256:ECDHE-ECDSA-AES256-SHA384:ECDHE-RSA-AES256-SHA384:ECDHE-ECDSA-AES128-SHA256:ECDHE-RSA-AES128-SHA256
- Custom: ECDHE-ECDSA-AES256-GCM-SHA384:ECDHE-RSA-AES256-GCM-SHA384:ECDHE-ECDSA-CHACHA20-POLY1305:ECDHE-RSA-CHACHA20-POLY1305:ECDHE-ECDSA-AES128-GCM-SHA256:ECDHE-RSA-AES128-GCM-SHA256:ECDHE-ECDSA-AES256-SHA384:ECDHE-RSA-AES256-SHA384:ECDHE-ECDSA-AES128-SHA256:ECDHE-RSA-AES128-SHA256
- Default and custom are the same
- Home »Service Configuration »Apache Configuration »Global Configuration » SSL/TLS Protocols
- Default: TLSv1.2
- Default: TLSv1.2
- Default and custom are the same
cPanel Web Disk
- Home »Service Configuration »cPanel Web Disk Configuration»TLS/SSL Cipher Suite
- cPanel pre-installed: ECDHE-ECDSA-CHACHA20-POLY1305:ECDHE-RSA-CHACHA20-POLY1305:ECDHE-ECDSA-AES128-GCM-SHA256:ECDHE-RSA-AES128-GCM-SHA256:ECDHE-ECDSA-AES256-GCM-SHA384:ECDHE-RSA-AES256-GCM-SHA384:DHE-RSA-AES128-GCM-SHA256:DHE-RSA-AES256-GCM-SHA384:ECDHE-ECDSA-AES128-SHA256:ECDHE-RSA-AES128-SHA256:ECDHE-ECDSA-AES128-SHA:ECDHE-RSA-AES256-SHA384:ECDHE-RSA-AES128-SHA:ECDHE-ECDSA-AES256-SHA384:ECDHE-ECDSA-AES256-SHA:ECDHE-RSA-AES256-SHA:DHE-RSA-AES128-SHA256:DHE-RSA-AES128-SHA:DHE-RSA-AES256-SHA256:DHE-RSA-AES256-SHA:AES128-GCM-SHA256:AES256-GCM-SHA384:AES128-SHA256:AES256-SHA256:AES128-SHA:AES256-SHA:!DSS
- Home »Service Configuration »cPanel Web Disk Configuration»TLS/SSL Protocols
- cPanel pre-installed: !SSLv23:!SSLv2:!SSLv3:!TLSv1
cPanel Web Services (cpanel/whm sub-domains etc..)
- Home »Service Configuration »cPanel Web Services Configuration»TLS/SSL Cipher List
- cPanel pre-installed: ECDHE-ECDSA-CHACHA20-POLY1305:ECDHE-RSA-CHACHA20-POLY1305:ECDHE-ECDSA-AES128-GCM-SHA256:ECDHE-RSA-AES128-GCM-SHA256:ECDHE-ECDSA-AES256-GCM-SHA384:ECDHE-RSA-AES256-GCM-SHA384:DHE-RSA-AES128-GCM-SHA256:DHE-RSA-AES256-GCM-SHA384:ECDHE-ECDSA-AES128-SHA256:ECDHE-RSA-AES128-SHA256:ECDHE-ECDSA-AES128-SHA:ECDHE-RSA-AES256-SHA384:ECDHE-RSA-AES128-SHA:ECDHE-ECDSA-AES256-SHA384:ECDHE-ECDSA-AES256-SHA:ECDHE-RSA-AES256-SHA:DHE-RSA-AES128-SHA256:DHE-RSA-AES128-SHA:DHE-RSA-AES256-SHA256:DHE-RSA-AES256-SHA:AES128-GCM-SHA256:AES256-GCM-SHA384:AES128-SHA256:AES256-SHA256:AES128-SHA:AES256-SHA:!DSS
- Home »Service Configuration »cPanel Web Services Configuration»TLS/SSL Protocols
- cPanel pre-installed: SSLv23:!SSLv2:!SSLv3
Exim/Email
- Home »Service Configuration »Exim Configuration Manager »Options for OpenSSL
- Default: +no_sslv2 +no_sslv3 +no_tlsv1 +no_tlsv1_1
- if the custom is the same as the default then the server selects default
- Home »Service Configuration »Exim Configuration Manager »SSL/TLS Cipher Suite List
- cPanel pre-installed: ECDHE-ECDSA-CHACHA20-POLY1305:ECDHE-RSA-CHACHA20-POLY1305:ECDHE-ECDSA-AES128-GCM-SHA256:ECDHE-RSA-AES128-GCM-SHA256:ECDHE-ECDSA-AES256-GCM-SHA384:ECDHE-RSA-AES256-GCM-SHA384:DHE-RSA-AES128-GCM-SHA256:DHE-RSA-AES256-GCM-SHA384:ECDHE-ECDSA-AES128-SHA256:ECDHE-RSA-AES128-SHA256:ECDHE-ECDSA-AES128-SHA:ECDHE-RSA-AES256-SHA384:ECDHE-RSA-AES128-SHA:ECDHE-ECDSA-AES256-SHA384:ECDHE-ECDSA-AES256-SHA:ECDHE-RSA-AES256-SHA:DHE-RSA-AES128-SHA256:DHE-RSA-AES128-SHA:DHE-RSA-AES256-SHA256:DHE-RSA-AES256-SHA:AES128-GCM-SHA256:AES256-GCM-SHA384:AES128-SHA256:AES256-SHA256:AES128-SHA:AES256-SHA:!DSS
FTP
- Home »Service Configuration »FTP Server Configuration »TLS Encryption Support
- Default: Optional
- Custom: Required (Command/Data)
- Home »Service Configuration »FTP Server Configuration »TLS Cipher Suite
- Default: HIGH
- Home »Service Configuration »FTP Server Selection
- Default: Pure-FTPD
Mailserver (Dovecot?)
- Home »Service Configuration »Mailserver Configuration »Allow Plaintext Authentication (from remote clients)
- Default: Yes
- Home »Service Configuration »Mailserver Configuration »SSL Cipher List
- cPanel pre-installed: ECDHE-ECDSA-CHACHA20-POLY1305:ECDHE-RSA-CHACHA20-POLY1305:ECDHE-ECDSA-AES128-GCM-SHA256:ECDHE-RSA-AES128-GCM-SHA256:ECDHE-ECDSA-AES256-GCM-SHA384:ECDHE-RSA-AES256-GCM-SHA384:DHE-RSA-AES128-GCM-SHA256:DHE-RSA-AES256-GCM-SHA384:ECDHE-ECDSA-AES128-SHA256:ECDHE-RSA-AES128-SHA256:ECDHE-ECDSA-AES128-SHA:ECDHE-RSA-AES256-SHA384:ECDHE-RSA-AES128-SHA:ECDHE-ECDSA-AES256-SHA384:ECDHE-ECDSA-AES256-SHA:ECDHE-RSA-AES256-SHA:DHE-RSA-AES128-SHA256:DHE-RSA-AES128-SHA:DHE-RSA-AES256-SHA256:DHE-RSA-AES256-SHA:ECDHE-ECDSA-DES-CBC3-SHA:ECDHE-RSA-DES-CBC3-SHA:EDH-RSA-DES-CBC3-SHA:AES128-GCM-SHA256:AES256-GCM-SHA384:AES128-SHA256:AES256-SHA256:AES128-SHA:AES256-SHA:DES-CBC3-SHA:!DSS
- Home »Service Configuration »Mailserver Configuration »SSL Minimum Protocol
- cPanel pre-installed: TLSv1.2
My Changes for a more secure server
These are the current changes I have made. The rest of the relevant cipher settings are left as default
cPanel Web Disk
- Home »Service Configuration »cPanel Web Disk Configuration»TLS/SSL Protocols
- zerosandones.co.uk: !SSLv23:!SSLv2:!SSLv3:!TLSv1:!TLSv11
cPanel Web Services (cpanel/whm sub-domains etc..)
- Home »Service Configuration »cPanel Web Services Configuration»TLS/SSL Protocols
- Zerosandones.co.uk: SSLv23:!SSLv2:!SSLv3:!TLSv1:!TLSv11
Mailserver (Dovecot?)
- Home »Service Configuration »Mailserver Configuration »Allow Plaintext Authentication (from remote clients)
- Default: No
Notes
- cipher suites and settings are not moved when you do a cPanel server to server account transfer
- cPanel 82.0.9 only supports TLS1.2 for SSL.
- cPanel TLS1.3 support has not been added yet.
- General cipher information
- Ciphers | OPENSSL.org
- How to Adjust Cipher Protocols - cPanel Knowledge Base - cPanel Documentation
- Introducing Zero Round Trip Time Resumption (0-RTT) - A new feature of TLS1.3
- TLS Cipher String · OWASP Cheat Sheet Series
- GitHub - OWASP/CheatSheetSeries: The OWASP Cheat Sheet Series was created to provide a concise collection of high value information on specific application security topics.
- TLSProtocol - ProFTPD
- 3rd party Cpanel Ciphers articles
- SSL Labs A+ Rating - Ideal settings | cPanel Forums - some good links
- Cipherli.st - Strong Ciphers for Apache, nginx and Lighttpd - Really strong cipher lists for the various cPanel technologies along with some good explanations.
- Fixing Ciphers on cPanel Servers | GeekGhost Web Hosting and Domains - old
- Getting an A+ rating on the Qualys SSL Test on all cPanel Domains - old because still has tls1.0 and tls1.1, does mention about configureing other cipher related settings on cPanel.
- cPanel PCI Compliance - Zeros & Ones - covers all cipher areas and TLS/SSL but is out of date. I did takes some of the configurations but ignored the cipher suites. This setup is not that out of date but does need a refresh.
- Getting an A+ rating on the Qualys SSL Test on all cPanel Domains - WebDesires - SSLLABS says there are issues with this but does give A+ for some reason, i.e. still has tls1.0 and tls1.1
- Cipher Tests
Reset Windows passwords when either offline or online
This is a collection of resources and software I have come across to help me reset Windows 10 profile passwords. These techniques will also work on other versions of Windows but I am aiming and Windows 10 with my examples.
Software
- Lazesoft Recover My Password Home Edition
- This by default loads the password resetter, but other than that i think it is the free Lazesoft Recovery Suite - Home Edition
- Free to use for Non-Commercial
- Can create a CD or USB boot media
- Can specify what WinPE version you want. I think this is for compatability of running software within the WinPE that the user needs to run which they supply.
- Can add WinPE Drivers
- Can set the USB Boot disk to be either FAT32 or NTFS
- Easy interface to use.
- You should select Win10 x64 for the PE version. I think this effect what software you can run in the enviroment. Win8.1 64 bit PE is the default
- This will also recover the Windows License Key, both from the Windows registry and the BIOS.
- You can also reset Microsoft accounts. (not on free version)
- This disk (Lazesoft PE Desktop) also has loads of other utilities on it:
- Microsoft Tools: Command Prompt, Microsoft Restore Point, Microsoft System Image Recovery, Microsoft Recovery Enviroment
- Map Network Drive
- Network Configurator
- Registry Editor
- Load RAID/Disk Drivers
- Lazesoft File Manager
- Lazesoft Recover My Password
- Lazesoft Windows Recovery - I think this is a Boot, Registry and File system repair
- Lazesoft Disk Image Clone
- Lazesoft Data Recovery
- Lazesoft Recovery Suite
- Notepad
- This Boot DVD seems exactly the same disk as Lazesoft Recovery Suite except the password recovery utility is loaded on startup rather than the recovery suite.
- CON:
- You have to select the Windows version of the target PC. This might mean you are limited to only resetting the version of Windows you create the disk for. Limitation of Home version?
- PCUnlocker
- This seems to be the preferred commercial application people use.
- Can create a CD or USB boot media
- This software unlockers Windows passwords of all types, local and Microsoft accounts (by converting it to a local account first)
- Reset administrator password of virtual machine runs in VMware, Parallels, VirtualBox, Microsoft Virtual PC, Hyper-V (Gen2 & Gen1 VM).
- CON:
- not free
- chntpw
- This is a linux command line utility for resetting Windows passwords directly in the hive. This allows you to reset passwords in an offline Windows installation.
- This can be used to reset Windows 10 passwords
- This utility is used by many live linux installations.
- Comes pre-installed with Partition Magic and althought not free, it is very cheap and I think it is a good way of keeping the project alive.
- CON:
- The command line can be tricky, but there are some good tutorials (see below).
- Ophcrac
- This is a password cracker to recover the used password.
- It is available as a standalone package for many platforms or via ti's own LiveCD
- I am sure it is pre-installed in many Linux installations.
- CON:
- Ophcrack can only recover passwords less than 8 characters. (Have not verified this)
- Outdated software and doesn’t work with 64-Bit computers. (Have not verified this)
- Spotmau PowerSuite
- This is getting dated and will not run on some modern PCs, the graphics gets corrupt and lockups can occur. This software was not specifically written for Windows 10 and does not support UEFI. I have included it for reference only.
- Can create a CD or USB boot media
Tutorials
- How to Reset Windows Local Password with Parted Magic | chntpw - By using Parted Magic and chntpw (which is pre-installed) you can follow these easy instructions.
- How to reset a Windows password with Linux | Opensource.com - By using Fedora and chntpw. These instructions seem a little complicated and certainly indepth.
- Reset Forgotten Microsoft Account Password for Windows 10 / 8 - This tutorial shows you how to use PCUnlocker to convert your Microsoft account to a local account and remove the existing password.
- Reset a Windows 10 password – 4sysops - This method is a Windows hack that involves swapping utilman.exe with cmd.exe, still is useful and I have done this in the past so I know it works.
Resources
- chntpw | Remove, bypass, unlock and reset forgotten Windows password - This site is the home of chntpw but it also has many tutotirals on how to use it's software and many other tutorials on different methods of resetting Windows passwords with different software and other related things.
- 7 Free Windows Password Recovery Tools (March 2019) - Windows password recovery tools are used to recover Windows log on passwords. Here are the 7 best free Windows password recovery and cracking tools.
Configure OpenWRT on a BT Home Hub 5 / Plusnet One Router as a Secure WiFi Client
- Updated to [OpenWrt Wiki] OpenWrt 21.02.1 - Service Release - 25 October 2021
- This is currently on for pre-DSA firmwares, but I am sure it can be adapted
- The BT Home Hub 5A WiFi driver is not capable of bridge mode so we use Client mode and this is why we have to use RelayD to perform a type of masquerading on the WiFi client IP.
- I do not know if the new DSA firmwares will allow proper bridging without RelayD
Disclaimer: This setup has not been tested with IPv6 or extensively tested in the wild apart from my setup here, so if you are relying on this being secure you need to test it yourself before putting it into service
The following instructions will turn your BT Home Hub 5A/Plusnet One OpenWRT router into a WIFI client which has the following features:
- NAT’d network on the Yellow LAN sockets (isolated)
- Bridged network on the Red LAN socket
- Guest network called ‘Clients’ on the 2.4GHz WIFI (isolated)
- Connect to your parent router via the 5GHz WIFI
- The NAT network is secured/isolated and cannot access you primary network, however it can access the internet.
- The Bridge network is isolated from the NAT network but can see all of your parent network and of course the internet.
- You can change the network that each Ethernet sockets belongs to by changing just the VLAN tag under the switch menu.
- The router will have 2 IP addresses
- 192.168.0.1 - Local IP address, DHCP range 192.168.0.x, this is the NAT'd network
- 192.168.1.2 - NAT Network IP
- 192.168.1.3 - Bridge Network IP
- The NAT network has all traffic to private IP addresses blocked (10.0.0.0/8, 172.16.0.0/12, 192.168.0.0/16) No other traffic is blocked i.e. internet
Why?
On my test bench where I work with client laptops and PCs i need a secure network so infected computers do not attack my computers with virus, but I also have a netowrk laser printer that is not wifi capable. So i connect my printer to the red socket on my primary network allowing me to print whilst i can use the yellow ethernet sockets for an isolated network for working on client machines.
This configuration can be adapted for your needs, some people might only want 'Bridge Mode' and by following my instructions you can have that. I quite like the fact you can change the setup of the networks by jsut changing the VLAN tags (except for the AP, i need to check this)
Requirements
- BT Home Hub 5A / Plusnet One
- Flashed with the latest version of OpenWRT (v18.06.2)
- Reset to defaults.
- I will refer to this as the OpenWRT router.
- Another router (OpenWRT or 3rd party)
- Must be connected to the internet.
- You can use another OpenWRT router like I have, but it is not required.
- I will refer to this as the Parent router.
- Ethernet cables
- PC with an Ethernet connection
PART 1 - Preparing the Routers
Here we are going to set the groundwork for this project.
Parent Router Configuration
- Getting Started
- Make sure your PC is not connected to the internet (i.e. disable the wireless) and then connect it to one of the OpenWRT router’s yellow Ethernet sockets by the Ethernet cable. The PC's network card should be set to DHCP.
- Power the router on.
- Login to the OpenWRT router (192.168.1.1). Do not set a password yet, you will thank me for this later.
- Set the admin IP and DHCP range of the parent router
- If your parent router IP is not 192.168.1.1 then change it's IP to 192.168.1.1 (for the purposes of making this tutorial easier)
- You might not need to do this depending on your parent router.
- Other IP addresses and IPs will work but are outside the scope of this tutorial and must not be the same IP or range range of the parent router.
- You need 2 static IPs, and for this tutorial we will use
- 192.168.1.2
- 192.168.1.3
OpenWRT Router Configuration
- Change the Admin IP of the OpenWRT router before we can begin. I will be using 192.168.2.1 for reasons that will become clear later (but you could use almost any IP/Range you wanted).
- Set (Network --> Interfaces --> LAN --> Edit --> General Settings --> IPv4 address) = 192.168.2.1
- Click ‘Save'
- Change the 'Save & Apply' button to 'Apply unchecked' and then click
If you get stuck see [OpenWrt Wiki] Change LAN IP in LuCI (to an IP on a different subnet)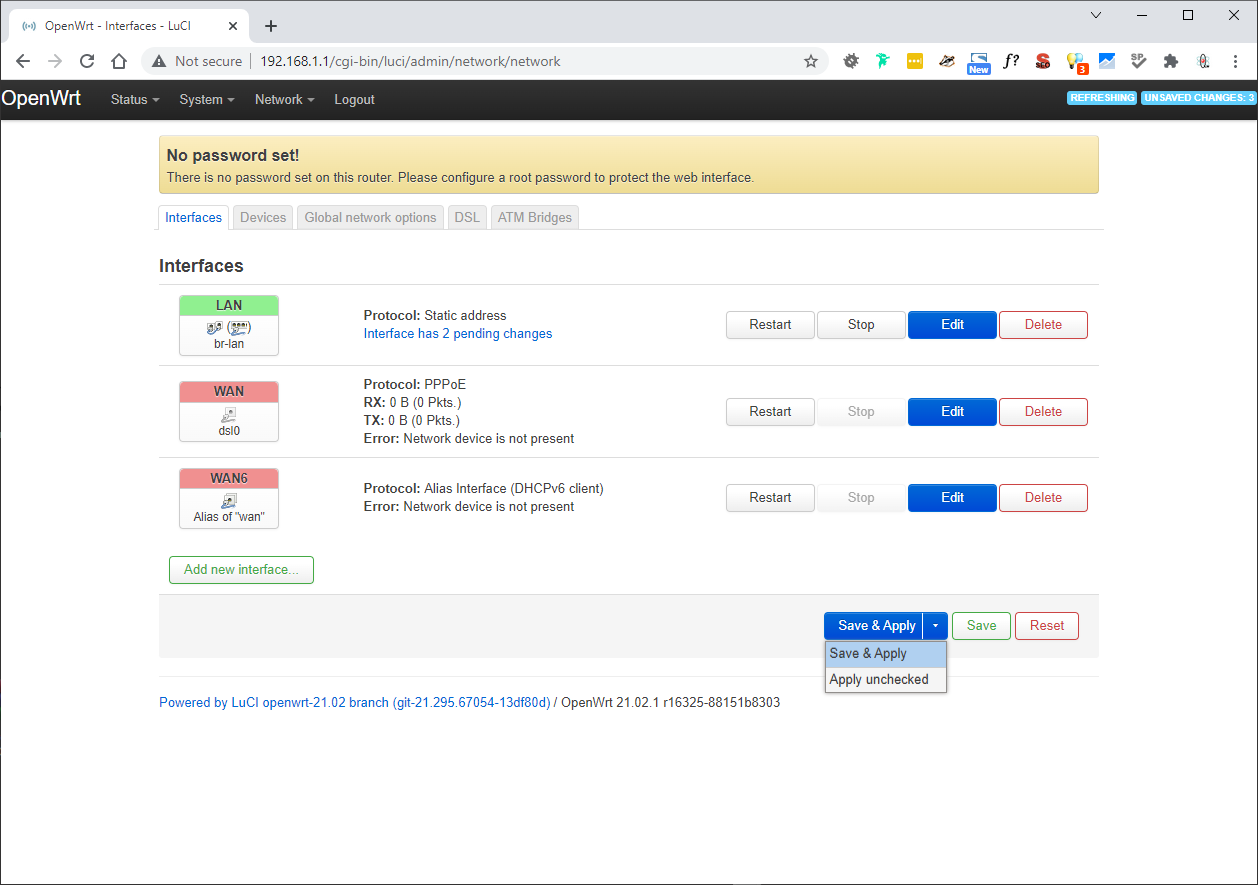
- If you just click 'Save & Apply' wait until the error message appears and click 'Apply unchecked'
- Wait the 90 seconds and then when a message comes up saying ‘Device unreachable!’, power cycle the OpenWRT router (turn it off, wait 10 seconds and then turn it back on again)
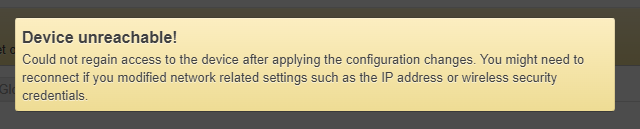
- You might need to disable/enable your ethernet connection.
- The OpenWRT router will now load up on the new IP range/subnet and the IP on your network card will have changed to match the new network range/subnet.
- Login to the router on the new IP (192.168.2.1)
- Change hostname and local time
- Goto (System --> System --> General Settings)
- Hostname: officerouter
- You can pick a name of your choosing but it is easier to keep it like this for now while doing the tutorial.
- This prevents confusion if using other OpenWRT routers
- Timezone: Europe/London (this is correct for me)
- Hostname: officerouter
- Click 'Save & Apply'
- Goto (System --> System --> General Settings)
- Delete the following interfaces (Network --> Interfaces)
- WAN
- WAN6
- Delete the ATM Bridges (Network --> Interfaces --> ATM Bridges)
- There should only be one
- Delete all Wireless Configurations (Network --> Wireless)
- There are only 2 and are labelled as disabled
- Click 'Remove' for each wireless configuration
- Click 'Save & Apply'
- DSL Reboot Bug (BT Home Hub 5A / Plusnet One only)
- A watchdog bug was discovered which causes the hub to reboot between 24-48 hours if the hub is not connected to an active xDSL line. From Ebilan Forum
- To Fix: disable dsl_control service. If the DSL port is not going to be used, which it isnt with this configuration.
- Goto (System --> Startup)
- Find the line with dsl_control
- Click the 'Enabled' button (this disabled the service from the startup configuration.
- Click the 'Stop' button (this immediately stops the service.
- You do not need to click 'Save & Apply' for these settings to take affect.
PART 2 - Make the OpenWRT router a client of your 'Parent Router'
I am going to use the 5GHz radio because my parent router is a 5GHz router and this will give much better connection speed than the 2.4GHz.
- (Network --> Wireless --> Qualcomm Atheros A9880 802.11nac --> Scan) (radio0 / This is the 5G wireless card)
- Click on 'Join Network' next to your parent routers Wi-Fi network (for the purposes of this tutorial openwrt_5g)
- Fill in your connection details (NB: 'Replace wireless configuration' will wipe any configurations belonging to this radio so dont do it. You can see them on the ‘Wireless Overview’ page)

- WPA passphrase: Your 'Parent Routers' WiFi password for openwrt_5g
- Lock to BSSID
- If you only have 1 parent router and are not moving this router about (i.e. roaming) then this might be useful and a little extra security, but no good if you are using this image for your mates router etc.. So leave it off unless you know why you need it on.
- 'Create / Assign firewall-zone' = unspecified
- we will alter the Firewall rules later
- you might see wan: (empty) if you are editing the connection and not creating a new one
- Click 'Submit'
- You have now been sent to Wireless Network: Client “openwrt_5g” (radio0.network1)
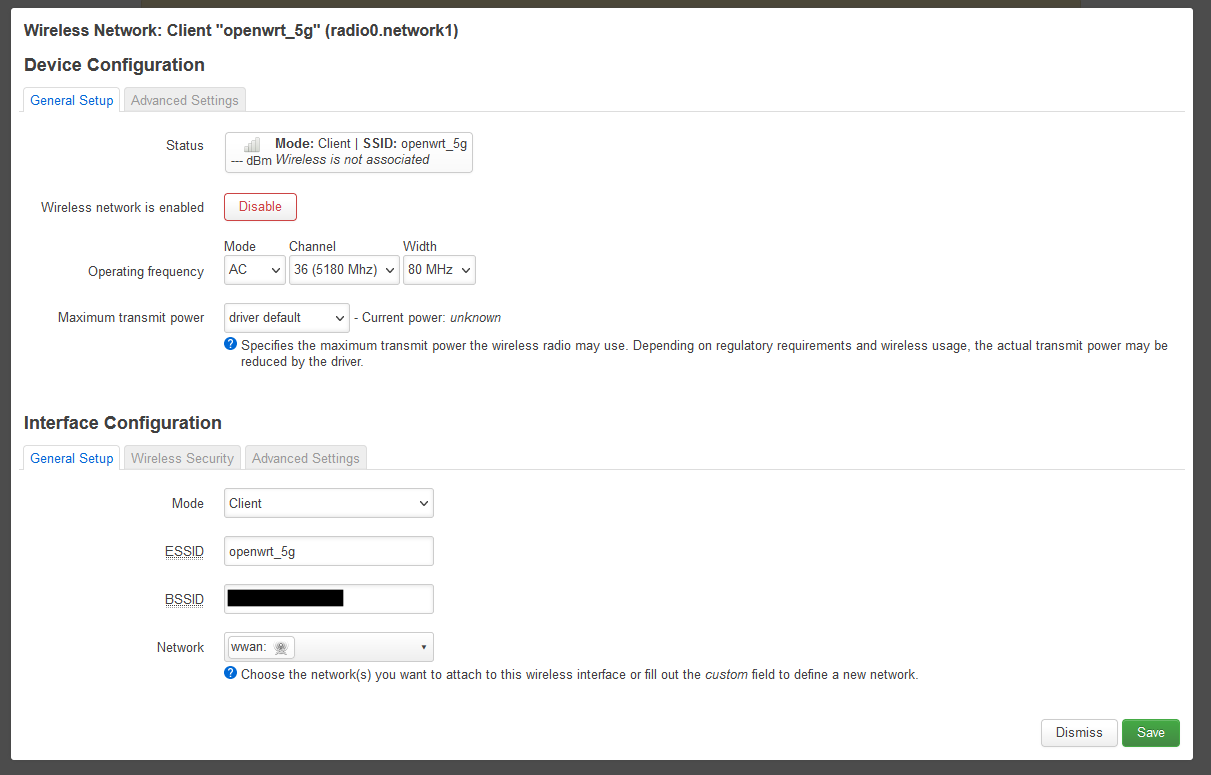
- (Interface Configuration --> Wireless Security --> Encryption) = WPA2-PSK/WPA3-SAE Mixed Mode (strong security) (or the encryption of your choice)
- Click ‘Save’
- Click ‘Save and Apply’
- Test the routers connection to the internet because it should be working now. This also assumes your 'Parent router' is on the internet.
- Goto (Network --> Diagnostics)
- Run a 'IPv4 Ping' test
PART 3 - Reconfigure the NAT Network (for secure clients)
We now are going to configure the OpenWRT to have a secure NAT'ed network and this will run on the yellow yellow LAN sockets. Make sure you follow each section below in order.
My parent WiFi SSID is openwrt_5g
Reconfigure the LAN and WAN Zone Firewall Zones
These rules only need a few changes because they are already geared up for NAT and all of the preconfigured Firewall rules are applied to these zones so we should keep them for the NAT WIFI Client
We will be re-using the rules that are already present to preserve all of the preconfigured rules for extra security. They might not all be needed, however if you do not want any of them, then delete the rules and just add the new zones with the settings below.
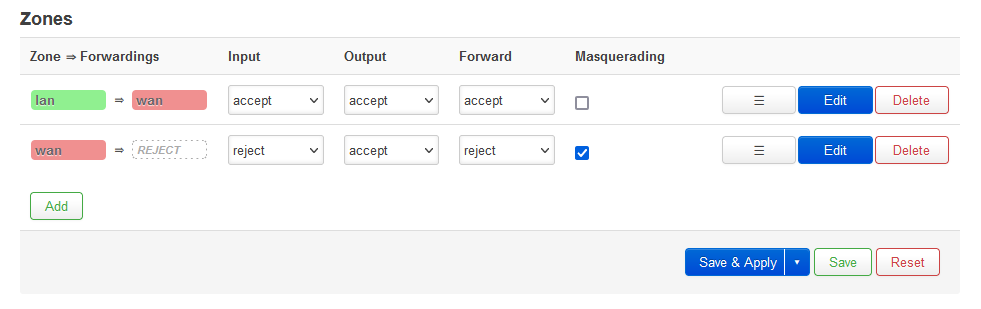
- Goto (Network --> Firewall --> Zones)
Edit LAN Zone
- Edit lan zone with the following settings

- (The settings below should be the same as the default rules (i.e. just changing the name))
- Click 'Save'
- Click 'Save & Apply'
Edit WAN Zone
- Edit wan zone with the following settings

- Only the MSS clamping should be different from the default rules and the name. This is to do with packet length and DSL traffic
- Click 'Save'
- Click 'Save & Apply'
Create new LAN Interface for Client NAT
- Goto (Network --> Interfaces)
- 'Add a new interface' called nat_lan

- Click 'Create interface'
- Fill in the following for ‘Interfaces >> NAT_LAN’ page
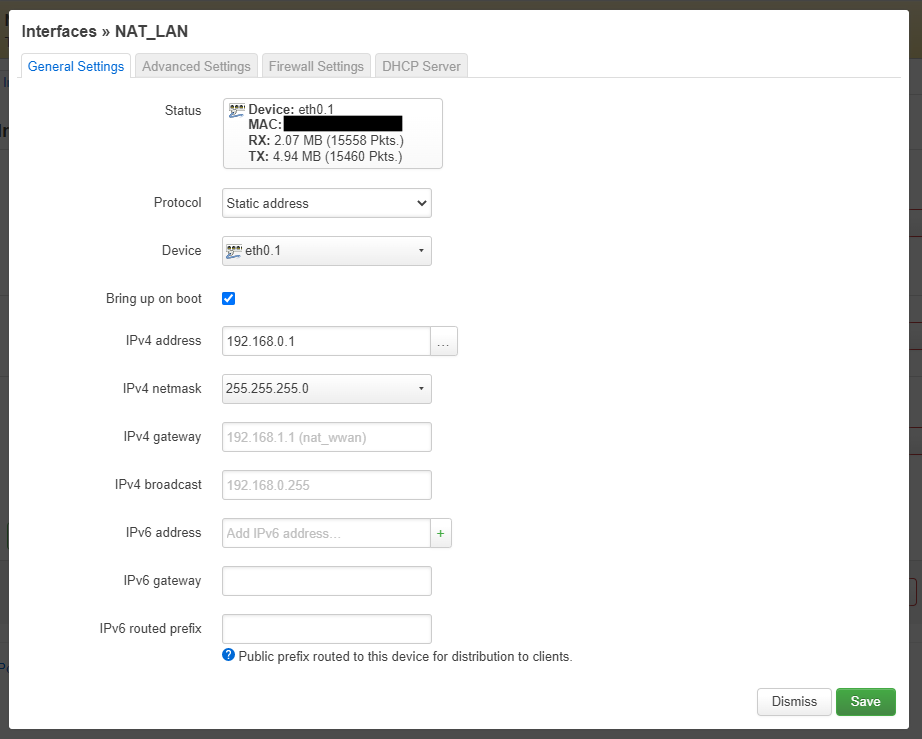
- Remember the 'Parent Router' is on the range 192.168.1.1
- On the Firewall tab ‘Create /Assign firewall-zone’ = nat_lan
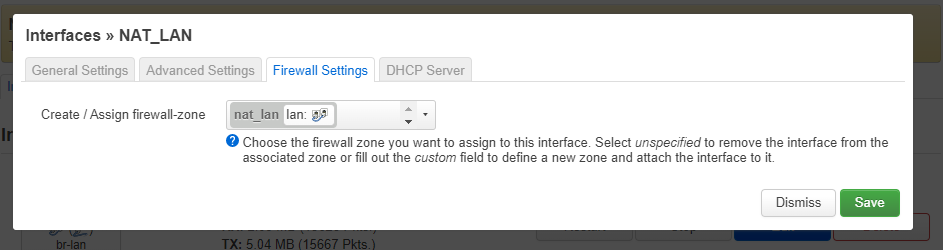
- Leave everything else as it is on the ‘Interfaces >> NAT_LAN’ page
- Click 'Save'
- Edit to the interface NAT_LAN
- Enable the DHCP server by clicking on 'Setup DHCP Server'
- Click 'Save'
- Click 'Save & Apply'
- Edit the interface (Network --> Interface --> WWAN)
- Change the protocol to Static address
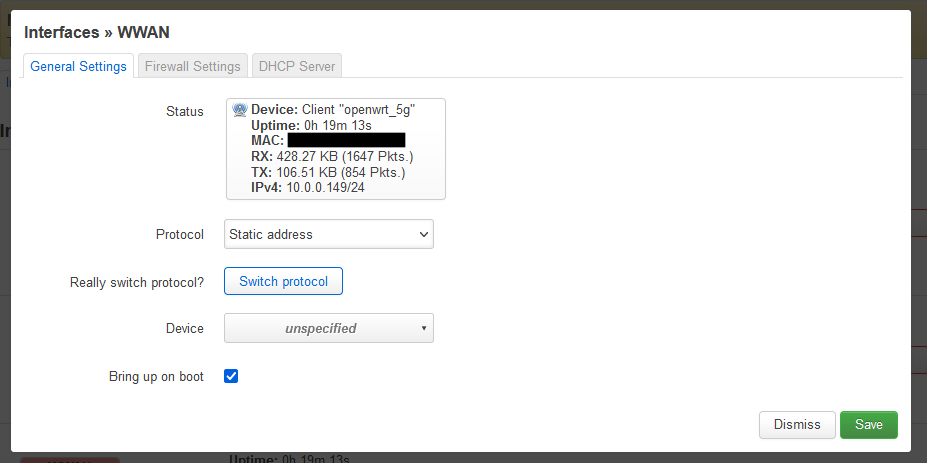
- Click 'Switch Protocol'
- After clicking 'Switch Protocol' the WWAN page will refresh and you should fill in the following information
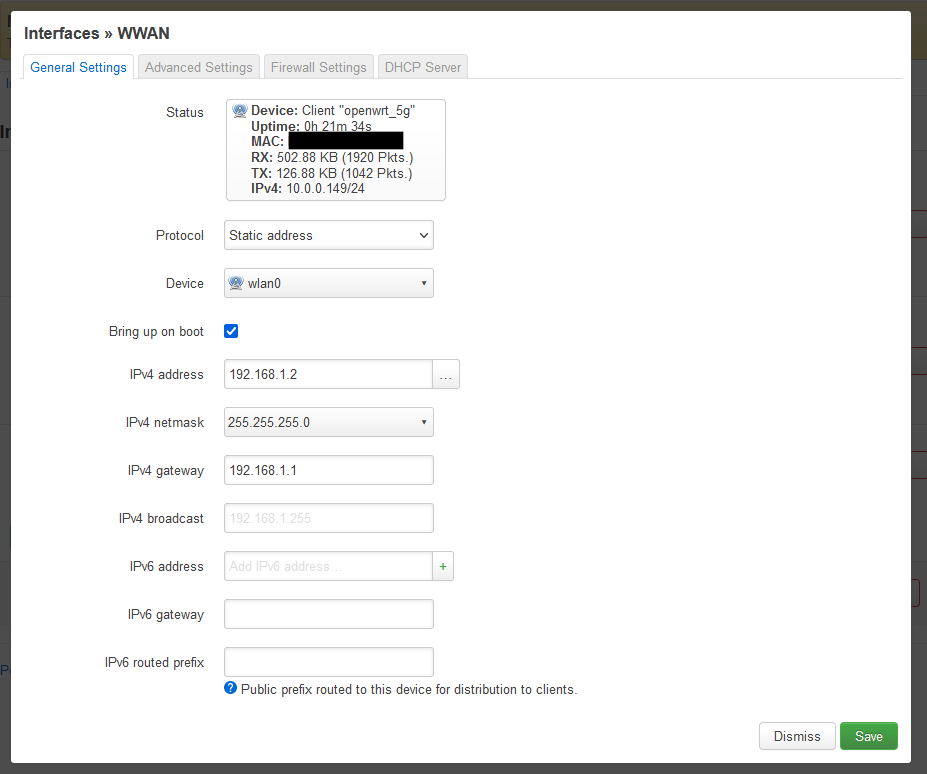
- Device = wlan0 (Wireless Network: Client “openwrt_5g”nat_wwan)

- IPv4 address = 192.168.1.2 (remember my parent router is on the range 192.168.1.1)
- Device = wlan0 (Wireless Network: Client “openwrt_5g”nat_wwan)
- Goto the 'Advanced Settings' Tab
- Use custom DNS servers = 192.168.1.1

- Do not setup a DHCP server
- Goto the Firewall tab
- ‘Create /Assign firewall-zone’ = wan (should already be set as shown below)
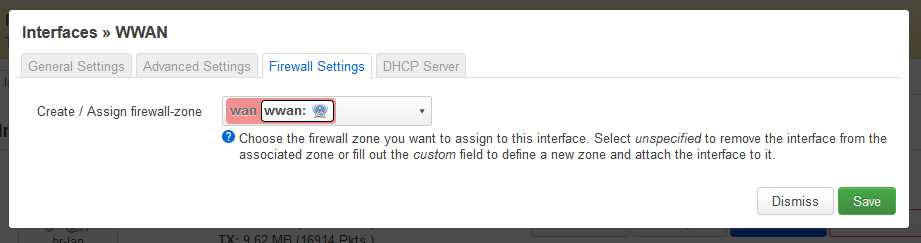
- Leave everything else as it is
- Click Save
- Click 'Save & Apply'
Finalise Settings
- Now logon on to the router on 192.168.0.1 (you will have to set a manual IP in your network card)
- Check Connections via the following methods so we know we can access the OpenWRT router via 2 different methods. A second PC is useful here so you can test all connection methods without connecting and reconnecting your PC to multiple Ethernet ports with different IPs. If all has been setup correctly you should have access as shown below:
- Access OpenWRT router (192.168.0.1) via the yellow sockets on the OpenWRT router
- Access the internet via the yellow sockets on the OpenWRT router
- The Red socket on the OpenWRT router will not work at this point
- Access OpenWRT router (192.168.1.2) from the parent router network by either using the parent router Ethernet sockets of WiFi
- NB: Sometimes the IP will not renew on your PC so stop and start your network card to fix this.
- Backup your settings before we do anything else as a precaution
- Goto (System --> Backup / Flash Firmware)
- Delete the interface LAN
- Because we used 192.168.2.1 range for the old LAN interface we can easily delete it now, and just use the 192.168.0.1 range without having to go around the houses to swap the IP ranges over.
- Goto (Network --> Interfaces)
- Click 'Delete' and the LAN will be marked for deletion.
- Change the 'Save & Apply' button to 'Apply unchecked' and then click it.
- When a message comes up saying ‘Device unreachable!’, power cycle the router
- You might need to disable/enable your ethernet connection.
- Backup your configuration again and put it somewhere safe
- System --> ‘Backup / Flash Firmware
You have now configured your OpenWRT router to act as a WiFi client on your parent network via NAT on the yellow ethernet sockets with the interfaces and firewall rules are clearly labelled
PART 4 - Bridge WIFI Client (Wireless Ethernet Bridge)
This allows us to extend your parent network to your OpenWRT router. This will work alongside the NAT WiFi Client network we just configured or as a standalone by just using the red socket on a separate VLAN.
- relayd does not currently support IPv6
- relayd is NOT a true bridge
- How the 'Relay Bridge' works
- Masquerade = NAT.
- Not all OpenWRT devices have bridge capable drivers.
- The 'Relay Bridge' bridges 2 networks together because OpenWRT cannot do this natively.
- The 'Relay Bridge' masquerades the Interface IP on the donour network (i.e. WWAN) to be able to pass and route the traffic to the target network (i.e. BRIDGE_LAN).
- The 'Relay Bridge' allows some broadcast traffic through the networks, but it is limited to DHCP (I think).
- The local addresses on the BRIDGE_LAN even though they are on the same subnet as the WWAN, the traffic is always masqueraded through the WWAN IP.
- This behaviour can cause issues with routing specific IPs with kit such as pfSense being given the WWAN Ip and not the Device IP.
Background
According to OpenWRT, the open source drivers of this router they use do not support native Client Bridge so you have to use a software workaround using relayd which required the following packages to be installed:
- luci-proto-relay
- relayd
A useful video to watch, the OpenWRT version is an old version but it should help with any issues, How to set up openwrt to be a wireless receiver [Bridge] with Relayd - YouTube
Install Packages
Extra software/packages are required to bridge the networks. We will now install them.
- Goto (System --> Software)
- Click ‘Update lists’
- In filter enter luci-proto-relay
- Click ‘Download and install package’
- When you click the button, luci-proto-relay will be installed and it will also bring down and install relayd as a dependency.
- Reboot the router.
Create the Firewall Zone (BRIDGE_LAN)
We now need to create a firewall zone for the bridge LAN network
- Goto (Network --> Firewall --> Zones)
- Add a new Firewall Zone

- Click 'Save'
- Click 'Save & Apply'
Create BRIDGE_LAN Interface
The bridge network needs interfaces creating so the router know where to talk to the network.
- Goto (Network --> Interfaces)
- Add new interface

- Click 'Create interface'
- There is nothing to fill in here for unmanaged.

- Click 'Save'
- Click 'Save & Apply'
- Edit the BRIDGE_LAN interface again
- On the firewall settings tab: `Create / Assign firewall-zone` = bridge_lan (empty)
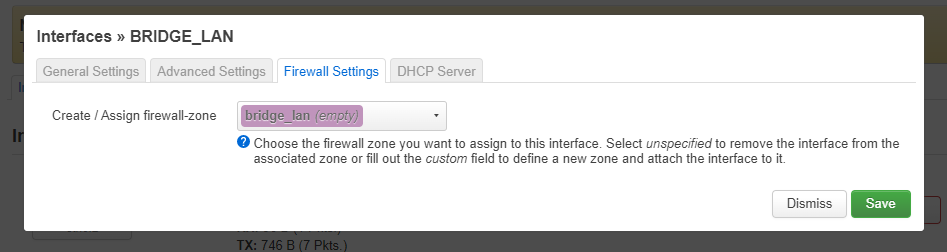
- Click 'Save'
- Click 'Save & Apply'
Create BRIDGE_RELAY Interface
This is the invisible routing node that relayd provides but it does appear as an interface.
- Goto (Network --> Interfaces)
- Add new interface called bridge_relay
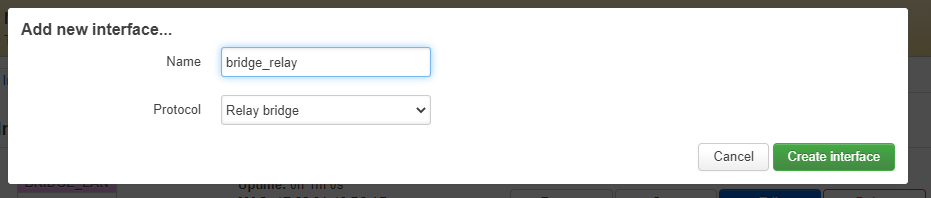
- Click 'Create interface'
- Fill in the following on the ‘Interfaces – BRIDGE_RELAY’ page

- Do not fill in ‘Local IPv4 address’ as this will break this configuration.
- On the firewall settings tab: `Create / Assign firewall-zone` = bridge_lan

- Click 'Save & Apply'
- Click 'Save'
Finalise Settings
- Power cycle the OpenWRT router, this will apply the settings above
- Once rebooted connect to the red port and make sure you can browse the internet
- Your Interfaces should now look like this

- Your Zones should now look like this
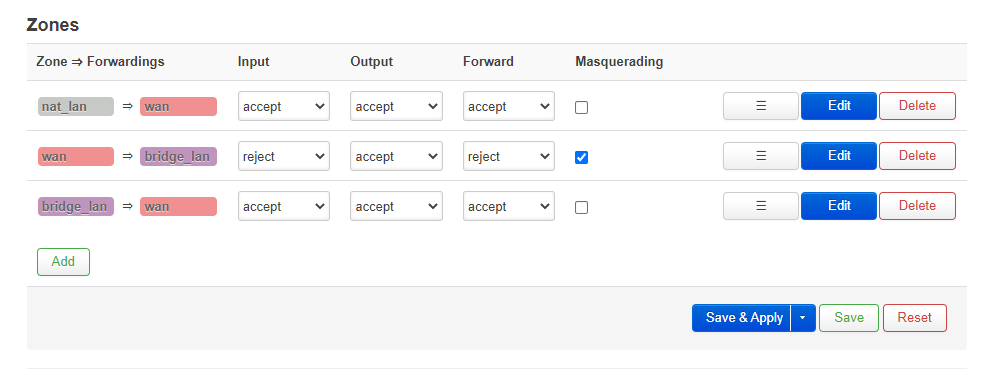
Cannot access router from BRIDGE_LAN
- With this configuration you cannot access the router from the BRIDGE_LAN
- If you add an IP to the BRIDGE_RELAY or BRIDGE_LAN routing will break.
- If anyone works out the solution please let me know.
(optional) Temporarily disable BRIDGE_RELAY and use Ethernet for BRIDGE_LAN
If you have spent time configuring your router and find that you need to connect BRIDGE_LAN to your 'Parent Network' via the ethernet because of a bad WiFi signal or you just need more speed then that is easy to do.
You cannot have the router sending traffic to the 'Parent Network' whilst getting the 'Parent Network' from the ethernet as this will casue a broadcast storm so we need to correct this with the minimum intervention.
- In the VLANs section below you need to make sure you have more than one ethernet socket available on the BRIDGE_LAN network
- Login to your router via the NAT_LAN network
- Goto (Network --> Interfaces --> BRIDGE_RELAY --> EDIT --> General Settings)
- Remove bridge_lan and wwan from 'Relay between networks'
- Click 'Save'
- Click 'Save & Apply'
- Reboot the router
Part 5 – Network Isolation
I will be investigating VLANs and how to apply them to my 'Primary Router' and it's WiFi so this network is further isolated.
I now need to isolate the NAT network (nat_lan) from my main network because both networks are present on the OpenWRT router, and OpenWRT will always try and figure out the best route for all traffic which is undesirable in this case.
This is different from Wireless client isolation.
Solution
The fix is simple, we need to configure the Firewall Traffic Rules by adding some additional rules.
Adding a Firewall Rule
- Goto (Network --> Firewall -->Traffic Rules)
- Click 'Add'
- Fill in the details for each rule (see below)
- Click 'Save'
- When they are all don, click 'Save & Apply'
- Reboot the router
The Firewall Traffic Rules
- A copy and paste list is at the bottom for those of you more familiar with OpenWrt
- Add each following rules, in order, into LuCi.
- The following rules need to be added at the top of the 'Firewall - Traffic Rules' List (LuCi)
- When you re-order rules in LuCi you need to click 'Save & Apply'
Block 'Parent Network' IPs
Currently if you ping an IP address on the 'Parent Network' from the NAT_LAN network you will get a response because the device on the 'Parent Network' will only see the IP address of the officerouter (192.168.1.2) and will not know the difference (IP Masquerading). Not only can you ping devices, you can make connections for such things as file sharing and in these modern times if an encryption malware can see a share, it will encrypt it.
- Block - WAN - Class A IPs
- Name: Block - WAN - Class A IPs
- Protocol: Any
- Source zone: nat_lan
- Destination zone: wan
- Destination address: 10.0.0.0/8
- Action: reject
- All the other options should be left as is
- Block - WAN - Class B IPs
- Name: Block - WAN - Class B IPs
- Protocol: Any
- Source zone: nat_lan
- Destination zone: wan
- Destination address: 172.16.0.0/12
- Action: reject
- All the other options should be left as is
- Block - WAN - Class C IPs
- Name: Block Parent Network - C Range
- Protocol: Any
- Source zone: nat_lan
- Destination zone: wan
- Destination address: 192.168.0.0/16
- Action: reject
- All the other options should be left as is
Allow LuCI from the WAN
These rules just allow access to the officerouter's LuCI from the 'Parent Network' via the WAN route on 192.168.1.2
- Allow - WAN - LuCI (HTTP)
- Name: Allow - WAN - LuCI (HTTP)
- Protocol: TCP
- Source zone: wan
- Destination zone = Device (input)
- Destination address: 192.168.1.2
- Destination port: 80
- Action: accept
- All the other options should be left as is
- Allow LuCI (HTTPS) - NAT Network IP
- Name: Allow LuCI - NAT Network IP
- Protocol: TCP
- Source zone: wan
- Destination zone: Device (input)
- Destination address: 192.168.1.2
- Destination port: 443
- Action: accept
- All the other options should be left as is
- Allow SSH - NAT Network IP
- Name: Allow SSH - NAT Network IP
- Protocol: TCP
- Source zone: wan
- Destination zone: Device (input)
- Destination address: 192.168.1.2
- Destination port: 22
- Action: accept
- All the other options should be left as is
Firewall Rules (Copy and Paste)
This a copy on the whole file (/etc/config/firewall) to make things easier and quicker.
Once you have updated your firewall config reboot your router.
config defaults
	option input 'ACCEPT'
	option output 'ACCEPT'
	option forward 'REJECT'
	option synflood_protect '1'

config zone
	option input 'ACCEPT'
	option output 'ACCEPT'
	option forward 'ACCEPT'
	option name 'nat_lan'
	list network 'nat_lan'

config zone
	option name 'wan'
	option input 'REJECT'
	option output 'ACCEPT'
	option forward 'REJECT'
	option masq '1'
	list network 'wwan'

config forwarding
	option dest 'wan'
	option src 'nat_lan'

config rule
	option src 'nat_lan'
	option target 'REJECT'
	option dest 'wan'
	list dest_ip '10.0.0.0/8'
	option name 'Block - WAN - Class A IPs'
	list proto 'all'

config rule
	option src 'nat_lan'
	option target 'REJECT'
	option dest 'wan'
	list dest_ip '172.16.0.0/12'
	option name 'Block - WAN - Class B IPs'
	list proto 'all'

config rule
	option target 'REJECT'
	option src 'nat_lan'
	option dest 'wan'
	list dest_ip '192.168.0.0/16'
	option name 'Block - WAN - Class C IPs'
	list proto 'all'

config rule
	option target 'ACCEPT'
	option proto 'tcp'
	option dest_port '80'
	option src 'wan'
	list dest_ip '10.0.0.3'
	option name 'Allow - WAN - LuCI (HTTP) '

config rule
	option target 'ACCEPT'
	option proto 'tcp'
	option dest_port '443'
	option src 'wan'
	list dest_ip '10.0.0.3'
	option name 'Allow - WAN - LuCI (HTTPS)'

config rule
	option target 'ACCEPT'
	option src 'wan'
	option proto 'tcp'
	option dest_port '22'
	list dest_ip '10.0.0.3'
	option name 'Allow - WAN - SSH'

config rule
	option name 'Allow-DHCP-Renew'
	option src 'wan'
	option proto 'udp'
	option dest_port '68'
	option target 'ACCEPT'
	option family 'ipv4'

config rule
	option name 'Allow-Ping'
	option src 'wan'
	option proto 'icmp'
	option icmp_type 'echo-request'
	option family 'ipv4'
	option target 'ACCEPT'

config rule
	option name 'Allow-IGMP'
	option src 'wan'
	option proto 'igmp'
	option family 'ipv4'
	option target 'ACCEPT'

config rule
	option name 'Allow-DHCPv6'
	option src 'wan'
	option proto 'udp'
	option src_ip 'fc00::/6'
	option dest_ip 'fc00::/6'
	option dest_port '546'
	option family 'ipv6'
	option target 'ACCEPT'

config rule
	option name 'Allow-MLD'
	option src 'wan'
	option proto 'icmp'
	option src_ip 'fe80::/10'
	list icmp_type '130/0'
	list icmp_type '131/0'
	list icmp_type '132/0'
	list icmp_type '143/0'
	option family 'ipv6'
	option target 'ACCEPT'

config rule
	option name 'Allow-ICMPv6-Input'
	option src 'wan'
	option proto 'icmp'
	list icmp_type 'echo-request'
	list icmp_type 'echo-reply'
	list icmp_type 'destination-unreachable'
	list icmp_type 'packet-too-big'
	list icmp_type 'time-exceeded'
	list icmp_type 'bad-header'
	list icmp_type 'unknown-header-type'
	list icmp_type 'router-solicitation'
	list icmp_type 'neighbour-solicitation'
	list icmp_type 'router-advertisement'
	list icmp_type 'neighbour-advertisement'
	option limit '1000/sec'
	option family 'ipv6'
	option target 'ACCEPT'

config rule
	option name 'Allow-ICMPv6-Forward'
	option src 'wan'
	option dest '*'
	option proto 'icmp'
	list icmp_type 'echo-request'
	list icmp_type 'echo-reply'
	list icmp_type 'destination-unreachable'
	list icmp_type 'packet-too-big'
	list icmp_type 'time-exceeded'
	list icmp_type 'bad-header'
	list icmp_type 'unknown-header-type'
	option limit '1000/sec'
	option family 'ipv6'
	option target 'ACCEPT'

config rule
	option name 'Allow-IPSec-ESP'
	option src 'wan'
	option proto 'esp'
	option target 'ACCEPT'
	option dest 'nat_lan'

config rule
	option name 'Allow-ISAKMP'
	option src 'wan'
	option dest_port '500'
	option proto 'udp'
	option target 'ACCEPT'
	option dest 'nat_lan'

config rule
	option name 'Support-UDP-Traceroute'
	option src 'wan'
	option dest_port '33434:33689'
	option proto 'udp'
	option family 'ipv4'
	option target 'REJECT'
	option enabled '0'

config include
	option path '/etc/firewall.user'

config zone
	option name 'bridge_lan'
	option input 'ACCEPT'
	option output 'ACCEPT'
	option forward 'ACCEPT'
	list network 'bridge_lan'
	list network 'bridge_relay'

config forwarding
	option src 'bridge_lan'
	option dest 'wan'

config forwarding
	option src 'wan'
	option dest 'bridge_lan'
PART 6 – Guest WiFi called 'clients'
To get the most out of this tweaked OpenWRT router I am now going to add a guest WiFi network called 'Clients' which will be attached to the NAT network affording it all of the same isolation as that network.
We need to create a an AP on the 2.4GHz kit and bridge it to the NAT network
- Goto (Network --> Wireless --> Wireless Overview --> Atheros AR9287 802.11bgn (This is the 2.4GHz WiFi card / radio1 / wlan1) --> Add
- Configure as follows:
- (Interface Configuration --> General Setup)

- Mode = Access Point
- ESSID = clients
- Network = nat_lan
- WMM Mode: ticked
- (Interface Configuration --> Wireless Security)
- Encryption = WPA-PSK/WPA2-PSK Mixed Mode (medium security) (Good for Legacy devices)
- Or the encryption of your choice
- Cipher = auto
- key = Your password you want for the client network
- Don't use the password on the router because this password will be given out to the public and will be changed often.
- Encryption = WPA-PSK/WPA2-PSK Mixed Mode (medium security) (Good for Legacy devices)
- (Interface Configuration-->Advanced Settings-->Isolate Clients) = Ticked
- (Interface Configuration --> General Setup)
- Click 'Save'
- Click 'Save & Apply'
- You are now returned to the 'Wireless Overview' page, enable the Clients network by clicking on the 'Enable' button for that network. (if not already enabled)
- You will notice you can connect to the WiFi but not get an IP address. Follow Part 7 below to fix this.
Part 7 - Bridge a WiFi node to a LAN network
Background to this issue
In pre OpenWrt 20.00/pre-DSA we were able to join the eth0.1 and wlan1 networks directly with in the nat_lan interface but this now not currently possible because it requires extra coding to be implemented in OpenWrt 20.00+ by the OpenWrt team, if ever.
These settings were located at (Network-->Interfaces-->NAT_LAN (br-nat_lan)-->Edit -->Common Configuration-->Physical Settings)

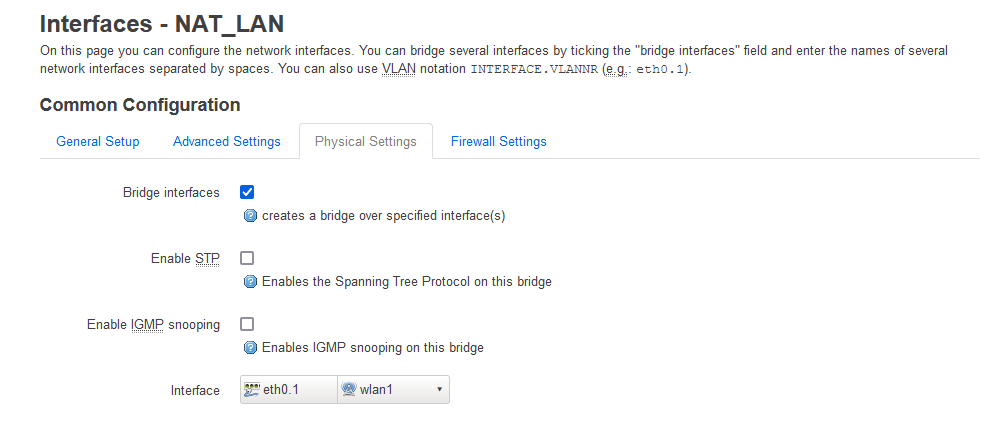
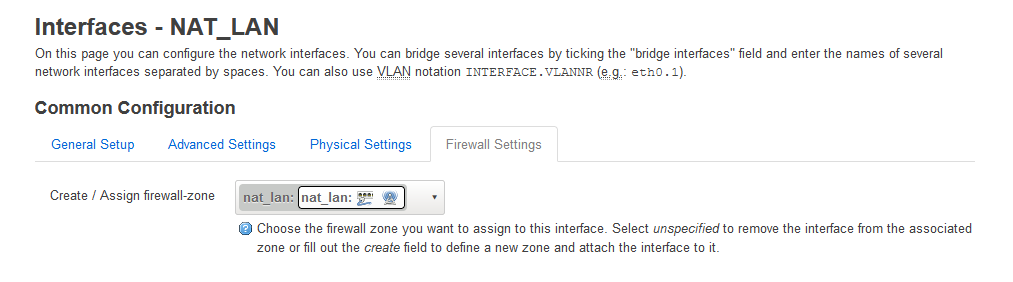
It should be noted when you try and setup a bridge device (Network-->Interfaces-->Devices) you are told that you cannot bridge WiFi and ethernet as you once did. Look at the 'Bridge ports' dropdown.
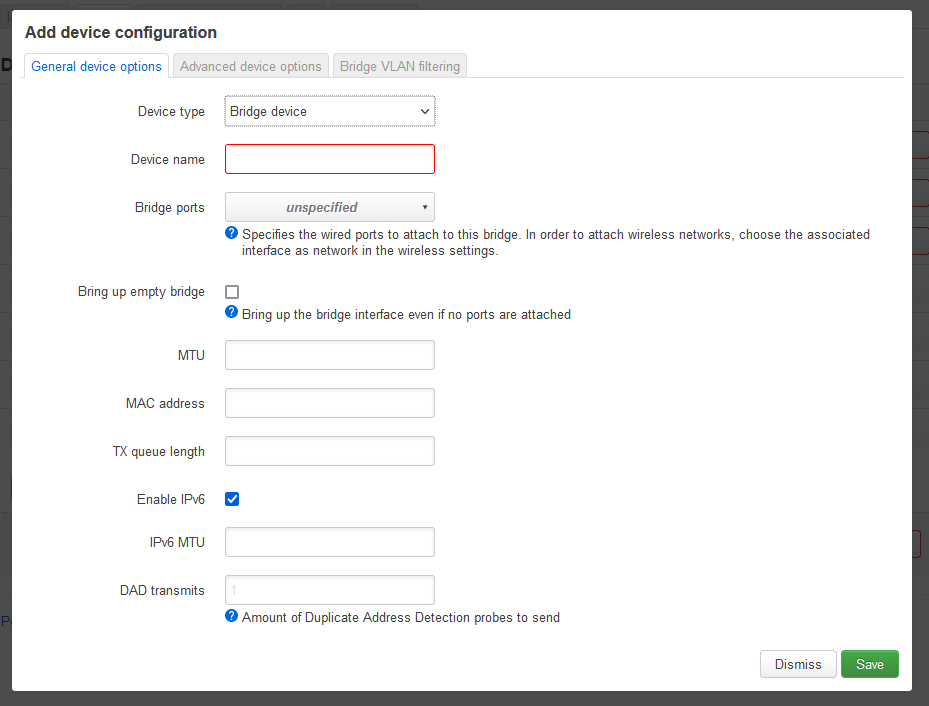
To resolve the missing bridge functionality we have to change the nat_lan device from eth0.1 to br-lan which also sort of follows the rule above. You cannot connect the WiFI to the following devices and have any routing happen. I also thinky the device must be a 'Bridge Device'.
- br-lan.1
- br-lan.2
- eth0 - Not tried this
- eth0.1
- eth0.2
Solution 1 (Easy)
- Goto (Network-->Interfaces)
- Edit the NAT_LAN
- Change the Device from eth0.1 to br-lan
- Click 'Save'
- Click 'Save & Apply'
- Traffic will now flow from the wireless on wlan0. My understanding that this traffic by default on br-lan should be on vlan1 so should still be isolated from eth0.2
- Rebooting the Router several times can sometimes help. It possible it to do with assigning new MAC addresses (my guess)
Solution 2 (Manual)
We are going to create a new 'Bridged device' (Virtualised Interface) that we can use to sit the WiFi and LAN on.
- There is currently a bug where if I delete br-lan and use br-nat_lan (or other name) to connect to eth0.1 then routing on the ethernet stops. This could well be to do with the migration to DSA and that br-lan is hardcoded somewhere to talk to eth0.1 so only use the method below for other VLANs and leave br-lan as is. Maybe a MAC addresses issue.
- You cannot have 2 'Bridge devices' on the same 'Bridge port(s)' as it breaks routing.
- You cannot have a 'Client mode' and an 'AP point' defined on the same Wireless interface, this breaks routing.
- Goto (Network --> Interfaces --> Devices)
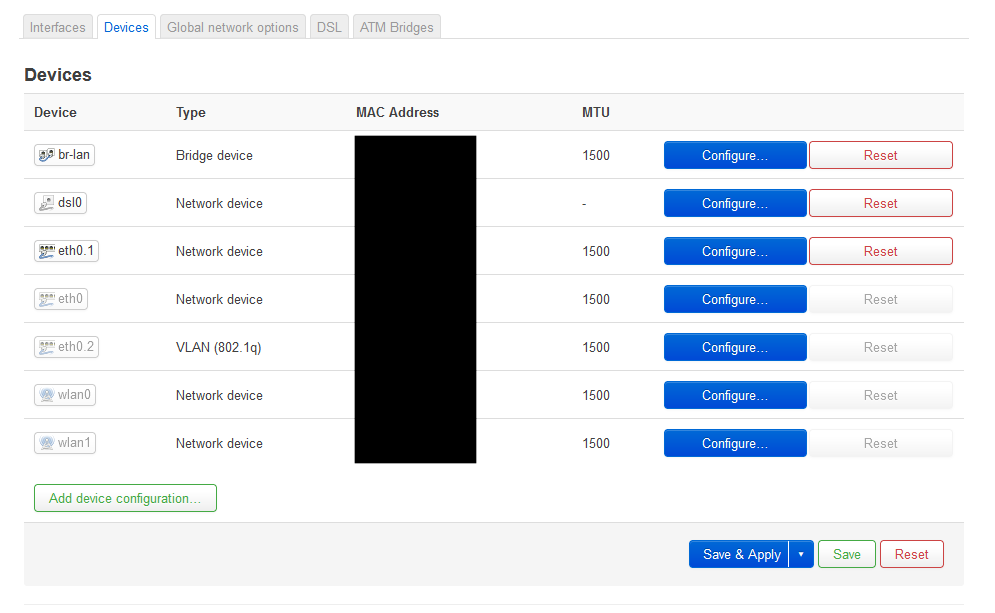
- Click 'Add device configuration'
- Device type: Bridge device
- Device name: br-nat_lan
- Bridge ports: eth0.1
- Click 'Save'
- Goto (Network --> Interfaces -->Interfaces)
- Edit NAT_LAN
- Change the Device to br-nat_lan

- Click Save
- Goto (Network --> Interfaces --> Devices)
- Click on the 'Reset' button for the br-lan device
- This will effectively remove the device
- You cannot have 2 'Bridge devices' on the same physical interface.
- Click on the 'Reset' button for the br-lan device
- Goto (Network --> Wireless --> your 'clients' network --> Edit --> Interface Configuration --> General Setup --> Network)
- change the network to br-nat_lan
- Click 'Save'
- Click 'Save & Apply'
- Reboot
Notes
- You can create multiple interfaces with different names such as br-bridge_lan and put these on other interfaces such as eth0.2
- You can use this method to add WiFi on the the BRIDGE_LAN network. In fact I have add both 24.GHz and a 5GHz Wifi AP point onto my router.
PART 8 - VLAN Assignments (Optional)
Name the VLANs for easy management
- Goto (Network --> Switch --> VLANs on "switch0" (Lantiq XRX200 Switch))
By changing the VLANs to which the ethernet socket belongs to you can change their network assignment.
There are 2 options to select from and just depends on what configuration your want
Option 1
All of the yellow sockets are on your secure 'clients' network and the red socket is on your private network.
- Goto (Network --> Switch --> VLANs on "switch0" (Lantiq XRX200 Switch))
- Fill in the description fields in as follows and you do not need to change the Port assignments.

Option 2
All of the yellow sockets are on your 'Private' network and the red socket ins on the 'clients network
- Goto (Network --> Switch --> VLANs on "switch0" (Lantiq XRX200 Switch))
- Fill in the description fields and also change the port assignments to match below.

PART 9 – Final configuration
If all is working set your admin password
- Set your admin password
- Goto (System --> Administration --> Router Password)
- This is very important now the unit is Configured.
- I prefer to use the Admin password on the card that (BT Homehub 5A / Plusnet One) router comes with. It makes things a lot easier.
- Don’t forget to click 'Save & Apply'
- Set the Wireless country code to your region
- In each of the wireless configurations do the following to set your region.
- Goto (Network-->Wireless-->SSID: whatever-->Edit-->Device Configuration-->Advanced Settings-->Country Code)
- Set your Country code to your region
- see Install OpenWrt on a BT Home Hub 5 / Plusnet One Router | QuantumWarp
- (Optional) WPS on the clients network
- (Optional) Force HTTPS (the browsers might stat upgrading if you use a domain name rather than IP)
- (Optional) Add SFTP server to make things much easier
- (Optional) LEDs (System --> LED Configuration)
- Edit wifi LED
- Name: NAT_LAN Activity
- LED Name: blue:wireless
- Trigger Network device activity (kernel: netdev)
- Device eth0.1 (Switch VLAN: "eth0.1" (nat_lan)) - This seems flacky. If I save and resave the this LED setting then monitoring will occur, other wise nothing. There might be a fault with the trigger.
- -- Trying br-lan
- Device br-lan (Bridge: "br-lan" (nat_lan)) while I cannot access eth0.1 directly.
- Trigger Mode: Transmit, Receive
- Edit dsl LED
- Name: BRIDGE_LAN Activity
- LED Name: red:broadband (matches the red socket)
- Trigger Network device activity (kernel: netdev)
- Device eth0.2 (Switch VLAN: "eth0.2" (bridge_lan)
- Trigger Mode: Transmit, Receive
- Edit dimmed
- Name: dimmed
- LED Name: dimmed
- Trigger: Always on (kernel: default-on)
- Default state: unticked
- Edit wifi LED
- (Optional) installed_packages.txt
- Add /etc/backup/installed_packages.txt to config backup
- make sure you run sysupgrade -k -u -b to get an update package with the installed_packages.txt so you can keep it as a full reference archive
PART 10 – Verify Security
I advise you to run through the following test to make sure that the different networks are blocked from each other as they should be before trusting this setup.
- On the default setup you can access the OpenWRT via the following methods
- 192.168.0.1 - From the yellow ethernet sockets and the 'Clients' WiFi
- 192.168.1.2 - From the parent network
- 192.168.1.3 - From the parent network
- 192.168.1.2 and 192.168.1.3 are unavailable via the red socket
Notes
RelayD LuCI Workaround Notes??
This are notes for a workaround for BT Home Hub 5A / Plusnet One to be able to access the LuCI admin and SSH services on the OpenWRT router on the bridged network.
- Why you cannot access admin IP on a network using relayd
- By default on OpenWRT all interface IP are bound to the routers services i.e. LuCI on port 80, SSH on port 22.
- When you use relayd, the interfaces that you bridge between have this direct access removed and traffic is piped through the relay instead so the OpenWRT services are not bound to the IP
- This means if you try and access OpenWRT admin (or other services) through 192.168.1.3 either through the Red Ethernet socket or from the parent network you will not be able to connect because it is relayd doing the routing and not the OpenWRT core so effectively you cannot see these services and the traffic is just lost/dropped as it has no destination to go to, the services do not exist on the IP 192.168.1.3
- Zones are also ignored for routing (even thought all the bridge interfaces need to be in the same zone for the bridge to work)
- Solution
- The wan interface sits on the same physical hardware (wlan0) so we can use the wan zone to allow the traffic through to the IP 192.168.1.3
- So if you examine the rules above the only real difference is the source_zone
- I am not sure if this is a good thing or causes any issues and is why I say it is optional.
- You can always access the OpenWRT admin via 192.168.1.2 along with all other services.
- 192.168.1.2 and 192.168.1.3 are still unavailable via the red socket
- Solution 2
- Access through the clients WiFi?
General
- All device names can be found in (System-->Realtime Graphs-->Traffic)
Tutorials
- OpenWRT - WiFi Bridge (LAN to LAN WiFi repeater/extender) - YouTube (Van Tech Corner) In this video, we are going to setup WiFi bridge to extend the LAN network wirelessly on OpenWRT LuCI with relayd package. This is also know as Wi-Fi extender / repeater / bridge configuration. As a result, you will have another extended network via WiFi that has the same LAN IP range/subnet with the primary router.
- Setup LAN/WLAN Bridge with OpenWrt (LuCI) (updated) - Nerd Quickies - A tutorial using relayd as a base.
- OpenWrt: Set up a Basic Network Including WiFi Bridge, IP Address, DHCP | linuxscrew - This article will show you how to configure a basic network with WiFi Bridging, DHCP on a fresh install of OpenWrt – with explanations and screenshots.
Firewall
- Start reading here for firewall information
- Masquerade is the most common form of SNAT, changing the source of traffic to WAN to the router's public IP. SNAT can also be done manually.
- OpenWRT firewall process the rules and then stops when it finds a matching rule (from top down)
- https://oldwiki.archive.openwrt.org/doc/uci/firewall (This is where you need to read to understand Firewall Rules)
- "The UCI Firewall provides a configuration interface that abstracts from the iptables system to provide a simplified configuration model"
- "The first rule that matches is executed, often leading to another rule-chain until a packet hits either ACCEPT or DROP/REJECT"
- Rule Process Order (openwrt firewall process the rules and then stops when it finds a matching rule) (double check order below!!!)
- openwrt selects the firewall zone
- then processes the firewall rules (Top to Bottom)
- then process the zone default rule set
- When browsing the internet the domain is the destination not the parent router gateway address. So it is the final destination that is key, not the route the packet takes so dont get mixed up thinking the gateway is the destination.
- The firewall configurator in openwrt (UCI Firewall) is just a 'GUI' to configure the firewall rules
- CIDR Format
- 192.168.1.1/24 = CIDR format
- IPv4 Private Address Space and Filtering - American Registry for Internet Numbers
- What does the IP "192.168.1.1/24" indicate? - Server Fault
- networking - CIDR for Dummies - Server Fault
CIDR Dotted Quad
/8 255.0.0.0
/16 255.255.0.0
/24 255.255.255.0
/32 255.255.255.255 - Why this private IP only range 172.16.0.0 - 172.31.255.255 ? - 64727 - The Cisco Learning Network - This has CIDR examples
- What does 0.0.0.0/0 mean? : Reddit
- 192.168.1.1/32 usually refers to asingle IP address
- IP Filtering in Canvas - This is a noce easy read on IP address and CIDR format.
- openwrt can only route between zones, can only apply rules between zones i.e. when routing
- Cannot apply Firewall rules on bridge network because traffic does not change zones, it is all on the same network/zone 192.168.1.x , relay is between bridge_lan and bridge_wwan. this is a bridge between 'network interfaces' and not 'physical devices'
- OpenWRT firewall rules will only work when traffic is transitioning between zones
- You can apparently control traffic on the same zone using netfilter but this seems complicated and I have not done this.
- Firewall needs an interface to have an IP to be able to route traffic
- DROP vs REJECT
- Drop = Request timed out (with this option you get no positive feedback)
- Reject = Destination host unreachable (If you use this method you can easily see if the firewall is blocking the traffic.)
- I am using REJECT in this setup - With a REJECT I can see instantly that the firewall has blocked the traffic and if I get a 'Request Timed Out' that means the target does not exist on the router and or cannot be routed to but if I get 'Destination port unreachable' then I know the firewall is actively blocking the traffic.
- Drop versus Reject (This helped me decide)
- linux - REJECT vs DROP when using iptables - Server Fault
- Always reboot after making firewall changes because they 'do not always get applied correctly' / 'IPTABLES need to be flushed'. If you think a rule should be working but it is not this is will likely fix it. I think it is because routes are cached. You can also use the command line to clear the cache.
- If a rule was blocking traffic and then you remove the rule traffic will start flowing, however if trafic was allowed and then blocked you will find the traffic still flows because of rule caching (i am guessing about this being the cause)'
- Firewall rules only work between zones so cannot be used on the same zone.
- You can use Netfilter/iptables to specify network rules but I am not sure how to do this (see link)
- A firewall rule controls what happens when a packet transitions from one device to another which crosses a zone boundary. Or to put it another way when a packet transitions from one zone to another. I.e. this is why Nat is enabled on the firewall zone because this is the point you want to NAT IP address between the interfaces and not in them because routing should be invisible to the interfaces.
- Adding Luci access from parent network
- Enabling remote SSH access on OpenWRT 12.09 - Real simple instructions on adding the required firewall rule
- networking - Can't connect via LuCI or SSH from WAN side network to Raspberry Pi 1B running OpenWRT 14.07 - Super User - Don’t forget to make sure the changes are applied
- Zone Controls:
- Zone / Name = The rule’s name
- Forwardings =
- aka Inter-Zone Forwarding which is also covered at the bottom of this list
- the icons explained in the Zones list because they are confusing
- 1st / left = this is the networks in the zone (Covered Networks). Hover over the icon to see them. You will notice that all of these first icons all have the same name as the Zone.
- 2nd / right = Allow forwarding to these destination zones
- Input = default policy for traffic entering this zone
- Output = default policy for traffic leaving this zone
- Forward = describes the policy for forwarded traffic between different networks within the zone. I think this stops the zones talking to each other (isolates them)
- Masquerading = also known as - NAT (network-address-translation)
- This is why it is required for my network to work. It bridges the networks by the rule and also does NAT on them at the same time
- MSS Clamping =
- “A workaround used by some routers is to change the maximum segment size (MSS) of all TCP connections passing through links with MTU lower than the Ethernet default of 1500. This is known as MSS clamping.”
- https://en.wikipedia.org/wiki/Path_MTU_Discovery#Problems_with_PMTUD
- Translates DSL type packets to Ethernet sized packets to prevent errors occurring. So I would guess it is only needed on Ethernet ó DSL
- Covered Networks = those networks that have this rule applied
- Inter-Zone Forwarding = The options below control the forwarding policies between this zone and other zones. Basically what zones is this zone allowed to talk to and you can also control the traffic directions.
- My WWAN zone has the following rules + explanation
- Input – reject = blocks requests originating from outside
- Output = accept – allows communication started from inside to go out the network and consequent have a conversation with that endpoint
- Forward – reject = prevents any other networks on this zone
- Masquerading = on – to NAT the connection and allow routing
- MSS Clamping – not needed because the WWAN is an Ethernet type interface and not a DSL where the MTU size could be less than 1500
- Covered networks – just itself because this is the only zone that will need NAT’ing and is the main in/out route
- Allow forward to destination zones: = none
- Allow forward from source zones: = lan + redlan – these are my 2 ethernet networks
- The Beginner’s Guide to iptables, the Linux Firewall
Distributed Switch Archeitecture (DSA)
This is replacing swconfig which uses the LuCI item (Network --> Switch)
- There is no migration path for targets that switched from swconfig to DSA. In that case, sysupgrade will refuse to proceed with an appropriate error message.
- [OpenWrt Wiki] DSA Mini-Tutorial - This DSA Mini-Tutorial explains how DSA works with OpenWrt.
- [OpenWrt Wiki] Converting to DSA - Some OpenWrt 21.02 (and newer) devices use DSA for configuring network interfaces. If you are upgrading your router to a firmware version that uses DSA, you should read this page.
- Mini tutorial for DSA network config - Network and Wireless Configuration - OpenWrt Forum - This is more a tutorial but is well explained and has pictures.
- VLANs in OpenWrt 21 | YouTube | OneMarcFifty
- The VLAN Configuration has changed in OpenWrt 21.02 - Bridge VLAN Filtering and Distributed Switch Architecture (DSA) change the way we configure the network segmentation in a Guest, IOT and LAN Network.
- A very informative video
- Assigning the WiFi to the right network is done
- https://www.youtube.com/watch?v=qeuZqRqH-ug&t=1250s
- Network --> Wireless --> [WiFi Network] --> Edit --> Interface Configuration --> General Setup --> Network
- [OpenWrt Wiki] Wireless Access Point / Dumb Access Point - Doesnt really cover 20.00+ at the minute.
- Any chance of updated "dumb" access point guide? - #3 by jaromanda - Network and Wireless Configuration - OpenWrt Forum
- Mini tutorial for DSA network config - Network and Wireless Configuration - OpenWrt Forum
- Bridging networks is not currently possbly like it was pre-DSA
- Wireless Bridge "different" than Wired - For Developers - OpenWrt Forum
- Any chance of updated "dumb" access point guide? - #7 by jow - Network and Wireless Configuration - OpenWrt Forum
Specifies the wired ports to attach to this bridge. In order to attach wireless networks, choose the associated interface as network in the wireless settings.
- Trying to create a bridge with two legs - Network and Wireless Configuration - OpenWrt Forum
- Is there a way of using VLANs to do this?
- You could use relayd to bridge the networks like I did for the bridge network.
- Install OpenWRT 21.02 & DSA VLAN Configuration for WAN Interface - YouTube (Van tech Corner) This video shows you how to configure DSA on your router (if present) and how to identify it it has DSA.
- HH5a snapshot with DSA - enabling red WAN port
- If anyone wishes to enable the red WAN port on HH5a using latest openwrt snapshot which does use DSA, here are the details
- This might be the only change needed when upgrading your HH5a to a firmware that supports DSA.
-
The vlan settings back in the days (eth0.1, eth0.2 and so on) where the
only way to separate the ports of the switch. With DSA the vlan hack
isn't required any longer. The whole idea of DSA is to expose each
switch port as a network device.
Mathias
Network
- You do not need an IP on the LAN interfaces; I have just left one on the NAT_LAN so I can access the router from its ‘internal’ network if there are issues upstream. If you convert this to ‘unmanaged’ everything will still work you just won’t be able to access the OpenWRT admin from the local network
- You can add VLAN tags by using the notation eth0 --> eth0.0 : eth0 --> eth0.1 etc... I am not sure if all interfaces support this. Certainly the Ethernet and DSL connections do. I.e. dsl.101 to allow BT and Plusnet to work
- The router needs an IP address to be able to route between networks. This is probably obvious.
- When routing between networks they must be in a different IP range to allow routing.
- I think by default interfaces are routed to VLAN.1 – not 100% about this but it seems the case. Could be me not doing things right.
- Interfaces are software endpoints that can sit on a physical interface to interact with it or simple be a bridge. These endpoints are exposed to the OpenWRT core/kernel. The interfaces are not representations of the hardware. Hardware is eth0, wlan0, etc..
Bridge Tutorials
- [OpenWrt Wiki] Wi-Fi extender / repeater / bridge configuration - An old article I think i used as reference
- Setup LAN/WLAN Bridge with OpenWrt (LuCI) (updated) - Nerd Quickies - A tutorial on setting up relayd.
- How to set up IPV6 with relay bridge - Network and Wireless Configuration - OpenWrt Forum - A tutorial on making a bridge using relayd and a BT Home Hub 5a.
WiFi/Wireless
- WMM Mode
- On the wireless interface WMM allows the use of faster speeds without it connections are crippled for some reason. Maybe it allows the use of faster frequencies 20/40/80 MHz….
- Is WMM a type of QoS?
- WMM (WiFi Multimedia) | Answer | NETGEAR Support
- You can add an ‘access point’ to your 5ghz range to add an AP on to the 5ghz Wi-Fi alongside the Client Bridge + NAT
- WiFi is not working
- network --> interfaces --> Wireless Overview --> {our new 5Ghz configuration) --> Edit
- If you see 'Wireless is not associated' this could be the username or protocol for the wireless connection is wrong.
- Or it could be a configuration issue, for me it was because I added an extra interface on under physical settings. It should only have wwan in it.
- Or you have unchecked wwan
- Rebooting the router always helps just in case the router has got mixed up
- Different Wireless Modes Explained
- General Setup--> Mode: ??
- Access Point: This is the normal mode for a router where you connect to the Wi-Fi to get internet and is the default setting.
- Client: This will have the wireless card in the router behave like a wireless card in a PC by having it connect to a network and getting an IP rather than the other way around
- Ad-Hoc:
- 802.11s:
- Pseudo Ad-Hoc (ahdemo):
- Monitor:
- Access Point (WDS):
- Client (WDS):
- When you change the wireless network that your router is a client of, you must change the ESSID (normal SSID). BSSID (mac address) and the password (optional).
- To get the BSSID
- Goto Network --> Wireless --> Qualcomm Atheros QCA9880 802.11nac --> Scan
- Hightlight the relevant BSSID and copy it. Do NOT click 'Join Network', this will destroy the setup.
- Goto Network --> Wireless --> Qualcomm Atheros QCA9880 802.11nac --> Edit --> Interface Configuration
- Under 'General Setup' change the ESSID and BSSID to match the new details.
- Change the password under 'Wireless Security' to match the new password (optional)
- Click 'Save & Apply'.
- To get the BSSID
- Device is not active / Wireless is not associated

- This can be caused by the following
- You have upgraded your router and the pacakges are no compatible either the binaries or the sytax in the config files
- The relevant packages are not installed. Most likely you have upgraded your router, applied your config but not re-installed the required packages.
- In my case I think it was because I had enabled WPS via (hostpapd/wpad-wolfssd) but had not re-installed this and this setting in the config file was causing my 2.4Ghz wireless to fail.
- FS#2737 : Radio0 Device is not active - wireless configuration issue
- Archer C7 V5 - Wireless Device is not active - Installing and Using OpenWrt - OpenWrt Forum - could be a package issue
- This can be caused by the following
- VLAN
- You should really not uses these VLAN numbers
- 0 = untagged
- 1 = control plane so do use for networks
- You should really not uses these VLAN numbers
Create a Blog - Part 8 (Q & A)
Still got questions, then hopefully they should be answered here. This is basically the research I used to make this series of articles.
Common
General Alias Articles
Profile Images
- 2017 Social Media Image Sizes: A User's Guide | vieodesign.com - As designers, we've all been there: you create a beautiful new Facebook or Twitter cover photo, only to have the platform change its social media image sizes the next day. (Editor's Note: We update this post as we become aware of changes to social media image sizes and requirements.)
- Image Sizes and Image Dimensions for each Social Network | postcron.com - Image Sizes And Dimensions For Facebook, Instagram, Twitter, Youtube, Google+, Pinterest and More (Includes Sizes for Profile Pictures, Banners, Shared Images and Much More for All the Social Network)
- Google+ Profile Picture and Cover Photo Size Guide | havecamerawilltravel.com - If you're adding photos to your Google+ profile page, here are the image sizes that are displayed.
- Your Google My Business Profile Image - The Most Important Image? - Local University - There probably isn't an image of your business that gets seen more by potential customers and searchers than your Google My Business profile image. There isn't a single image that has more impact on searcher's behaviors. And there isn't an image in the online world that is harder to "get right."
Delete a Gmail profile picture
- How to view the full size and remove old Google Profile pictures - Web Applications Stack Exchange
- How to Delete Gmail Profile Picture - This is via Google+
Forwarding Gmail email
- How to Forward Gmail to Another Email Address Automatically | lifewire
- Automatically forward Gmail messages to another account - Gmail Help
Migrate my Android phone to new Gmail account
- How to migrate contacts to a different Google account on your Android device - TechRepublic
- Google Play
- Can you transfer your Google Play purchases to another account? - Quora - It’s actually somewhat possible now with a bit of a workaround! The trick is to use Google Play’s new Family Library.
- Google Play Family Library: Share what you love with the ones you love | Google - This explains the Family Library, a way for up to six family members to share purchases on Google Play.
- You can install multiple accounts onto an adroid phone and this will give you the benefits of both. For instance the purchased apps from the old account.
- There is no way to directly move purchases from Google account to another.
- Newly purchased apps, if eligible for the Family Library will allow you to share these apps to another Google account.
- Download your data - Google Account Help
- Note: if you're adding a new Gmail address to your Google Account, you can't choose an existing Gmail username (even if you delete the other account with Gmail, you can't reuse the Gmail username.)
- the://simpso.net: How to migrate your Google Play Music to a new Google account
- How to Migrate Your Entire Google Account to a New One | lifehacker
- How to Migrate Email from One Gmail Account to Another | lifehacker
Delete an Android Calendar.
- Calendar Cleanup - Apps on Google Play - This did not work for me, but it would of been easier.
- How do I clear the calendar storage? – Business Calendar Customer Support
- How to Delete Calendar on Android with Free Risk
Google Play - You Don't Have Any Devices
- You Don't Have Any Devices - Android Forums at AndroidCentral.com
- This is how to fix "You don't have any devices" in Google Play Store and Android Device Manager | SVARTLING
- How to fix You don't have any devices error on google play store - YouTube
Wipe contacts on my android phone but not from my Google account
Android Samsung Notes / S-Memo
- Backing up S-Memo | Samsung Galaxy Note GT-N7000 - Has information on how to backup and restore S-Memo manually using Titanium backup.
- If you create a samsung account it will automatically sync them to Samsungs Cloud.
- Backup and Restore SNotes - Android Forums at AndroidCentral.com - alternative sync options.
- Recovering S-Memo Files after Flashing a ROM | AT&T Samsung Galaxy Note I717 - your old memos can be found on below Loc. even after flashing Application\SMemo\cache
- S Memo/S Note Recovery | How to Recover Notes Files on Samsung Memo App | EaseUS - This is a reputable US company and as a last resort you can try this recovery software.
How to Sync Google Calendar with Outlook
- How to Sync Google Calendar with Outlook - Tech Advisor - Here's how to sync Google and Outlook calendars so that events and all their details are in both calendars.
- How to Sync Microsoft Outlook With Google Calendar - Keep both Outlook Calendar and Google Calendar synchronized with your events, tasks, and appointments. These useful third-party tools fill the gap left behind by Google Calendar Sync.
- See your Google Calendar in Outlook - Outlook
- Import Google Calendar to Outlook - Office Support
Google Play how to see my purchased apps
Gmail Aliases
- How to instantly create a unique Gmail alias without registering | Expert Reviews - If you need a unique email address quickly without registering again, here's a few handy tips you might not know about. Uses the period (.) method for aliases.
- How to Set Up Gmail With Aliases and Import Other Inboxes | WIRED - Uses the + method for aliases.
Moving Google Services to another account
- I have multiple Google Accounts. Can I merge them? - AdWords Help - How to move Google analytics and Adwords.
- How to transfer Google AdWords account ownership | hockseng.net
- How to transfer a google analytics account - Scoop Design - Have you ever needed to transfer a google analytics account to another user profile or email address? This has pictures.
- Transfer Google Webmaster Tools data to another account - Webmasters Stack Exchange
Moving Google Analytics Property
- Easily Move Any Google Analytics Property to a New Account - Google recently made possible moving properties between Analytics accounts. Learn what are the benefits, requirements and how to do it in just a few clicks.
- How to Move a Google Analytics Property From One Google Account to Another - YouTube - In this 90 second video, Scott Hendison shows how to use Google's new "move property" feature inside of Google Analytics, to move a property from one account to another.
YouTube Channel
- How To Make A YouTube Channel! (2018 Beginners Guide) - YouTube - This is a tutorial on how to make a youtube channel for beginners 2018. In this video, i'll guide you through the process of creating an account and even show you how to upload a video along with channel art.
- Manage your Brand Account - Google Account Help - You can set up and manage a special kind of account for your business or brand, called a Brand Account. You can use certain Google services, like Google+ and YouTube, with this account to create an online presence.
- Create a new channel - YouTube Help - With a Google Account, you can watch and like videos and subscribe to channels. However, without a YouTube channel, you have no public presence on YouTube. Even if you have a Google Account, you need to create a YouTube channel to upload videos, comment or make playlists. You can use a computer or the YouTube mobile site to create a new channel.
Google Maps vs Google Places
- Google Maps vs. Google Places: Making Sense of It All - A company can reign supreme on Google Places, but they aren.t #1 on Google Maps. Greta Rose Agency delves into why and how these two differ.
- Google Places vs. Google Local vs. Google Plus • Bixa Media - Befuddled over the difference between Google+, Google Places, and Google+ Local? Bixa Media explains the difference & tells you where your company belongs.
Feedburner
- Learn how to setup Feedburner for Podcasting and Blogging - YouTube - In this video, TeacherCast University will show you how to create a user account for Google Feedburner. Learn how to take an existing feed from Lybsin, WordPress or your favorite source and submit it to iTunes Podcasting Directory.
- Set Up Feedburner RSS Feed for Your Blog in Less than 2 Minutes - YouTube - This video will show you how to set up your Feedburner RSS feed for your blog in less than 2 minutes.
Microsoft
Moving an xbox profile
- Move your Xbox Live profile to another Microsoft account on Xbox 360 - This page explains how to move your Xbox Live profile—including gamertag, achievements, content, etc.—to another Microsoft account by using your Xbox 360 console.
- Switch Your Xbox Live Gamertag to Another Microsoft Account - VisiHow - This article will take you through moving your gamertag onto your main Microsoft account so that all of your achievements and purchases are kept in one place.
Move an email alias between Microsoft accounts
There is an element in risk because the aliases become available immediately after release or up to 30 days. Read these articles to decide.
- Moving email alias to another outlook account - Microsoft Community
- transfer alias to another outlook.com account - Microsoft Community
Microsoft/Outlook.com aliases
- Manage aliases on your Microsoft account | Microsoft
- Add or remove an email alias in Outlook.com - Outlook | office.com
Change Xbox Gamertag
- How to Change Your Xbox Gamertag | xbox.com
- How to Change Microsoft Account Email Address | xbox.com
- https://account.xbox.com/en-US/changegamertag - This is the link to change your gamertag.
- Error 0x8015402d | Microsoft Account Error | Xbox 360 Error
- How do I remove spaces in my gamertag ? | xbox.com - Spaces are ignored when deciding if a gamertag is available.
Xbox Gamerpics
- Change Your Xbox One Gamerpic | xbox.com
- How to create a custom gamerpic for your Xbox Live profile | Windows Central
- Xbox One: How To Upload Custom Gamerpics | Avatar Guide | Walkthroughs | The Escapist
- Xbox One | This new feature is now being tested by Alpha Preview Ring Members | IT Pro
Installing Skype (not from the store)
I do not want to install skpe from the store because I do not want to login into windows with my Microsoft account.
Delete a Skype account
Things have changed now. If you have an old skype account you have to link it to a Microsoft account and then delete the Microsoft account which will delete both.
Change a Skype Username
The answer is you cannot. It is tied into your Microsoft account. I do not know if changing your primary alias will change your skype username.
- Windows Report - Windows 10 and Microsoft News, How-to TipsHow do I change my Skype account name?
- Change Skype ID - Microsoft Community
What is my Skype ID
Multi Skype
- How to Sign Into Two or More Skype Accounts at Once
- How can I run multiple Skype accounts at the same time? | Skype Support
outlook.com emails going into spam
- A series of articles from a Microsoft Developer explaining this issue and what you can do about it
Where to view my Microsoft/Xbox support requests ?
- https://support.microsoft.com/oas/viewincident
- https://support.microsoft.com/en-mt/my/supportrequests?wa=wsignin1.0
Yahoo
Close a Yahoo Account
- How to Delete Your Yahoo Mail Account | lifewire
- Close your Yahoo Account | Yahoo Help - SLN2044
- How to Delete a Flickr Account (with Pictures) - wikiHow
Delete a Flickr Account
You can delete a Flickr account without deleting your Yahoo account and then create a new Flickr account if you want.
Forward Yahoo email
- How to Forward Yahoo Mail to Another Email Address | lifewire
- Automatic email forwarding in Yahoo Mail | Yahoo Help - SLN22028
- Yahoo: How to set up automatic forwarding from one account to another account – Support Center | SaneBox
Switch between Classic and Basic Yahoo Mail
- How to Switch to Yahoo Mail Classic | lifewire
- Yahoo Small Business Community
- Don’t Like the New Look of Yahoo Mail? Switch it Back
- Switch back to the previous version of Yahoo Mail | Yahoo Help - SLN15936
- Overview of Basic Mail | Yahoo Help - SLN15090
Yahoo Aliases
- Can I change my Yahoo ID and email address? | Account Help - SLN2059 - You can't change your Yahoo ID or email address, but you can create an additional Yahoo ID or set up an extra email address (alias) for your existing one.
- Create, use, and delete an extra email address | Account Help - SLN15953 - How to add a single alias to your Yahoo account. There are limits on the number of times you can change this within a 12month period.
- How to Change Your Yahoo Email Address | oeupdates.com - Is your current Yahoo email address no longer appropriate? Do you want to change it?
Flickr General
- Geek to Live: Flickr Advanced User Guide | lifehacker
- Create your own personalized Flickr URL | Flickr Help - SLN7320 - Once set, there is no way to change your personalized URL. Your only option is to start over with another account and re-upload your images there
Change Flickr Screen Name / Real Name
- www.flickr.com/account/prefs/screenname/?from=personal - You can change your screen name here. It should be pointed out that your screen name cannot be one currently used by any active or closed account.
- www.flickr.com/profile_edit.gne?from=personal - Change your real name here.
- www.flickr.com/iconbuilder/?from=personal - On Flickr, your profile picture is called a 'buddy icon', you change it here.
Facebook app namespace is “Already used by some other app”
When I followed the instructions from EasyBlog I got this error. It is caused by the namespace easyblogapp is already used and you need to add your website.
- Go to your App.
- Select Settings option from the left sidebar.
- then add a namespace.
Facebook app namespace is "Already used by some other app" - Stack Overflow
and
- Click Apps and then select your app.
- Click the Settings button on the left side of the screen.
- In the Basic settings, click the Add Platform button below the settings configuration.
- Select Website in the platform dialog.
- Enter your URL (localhost works here).
- In the App Domains text input, add your domain that matches the one in the URL.
- Save your settings.
why I am unable to add apps domain to my app ? | Facebook Help Community | Facebook
Create a Facebook Page
- How To Create a Facebook Page - YouTube - How To Create a Facebook Page- Derral demonstrates and explains how to create a Facebook page for business, public figure, charity or cause, any reason that you may need to create a Facebook page.
- How to Create a Facebook Fan Page for Your Blog - A step-by-step tutorial on creating a Facebook fan page for your blog or website. I choose 'Brand or Product' and then 'Website' for my blog.
Delete posts from Facebook
Facebook Instant Articles
- How to Get Started With Facebook Instant Articles - Facebook have opened up Instant Articles to publishers of all sizes. In this post, we'll guide you through how to get started with Instant Articles.
- How to Setup Facebook Instant Articles for WordPress | wpbeginner.com - Want to add Facebook Instant Articles to your WordPress site? See our step by step instructions on how to to setup Facebook Instant Articles for WordPress.
- Instant Articles - Documentation - Facebook for Developers - Official devloper documentation from Facebook. This includes FAQ and a Quickstart Guide along with information on using Instant Articles in your Facebook account.
- Facebook Page not showing to add Instant Articles
General
- How to change your username | twitter
- Your username can be up to 15 characters long.
- Your display name can be up to 50 characters long.
- How to change your Twitter username and display name | Digital Trends
- Security and seconf Factor
- How to use login verification | twitter - This requires a mobile phone and you can only attach this to one account.
- About account security | twitter - Any time the email address associated with your Twitter account is changed, we will send an email notification to the previously-used email address on your account. In the event your account is compromised, these alerts will help you take steps to regain control of your account.
- How to reset a lost or forgotten password | twitter - If you frequently receive password reset messages that you did not request, you can require additional information be entered in order to initiate a password reset.
Wordpress
Username
- Change Your Username — Support — WordPress.com
- Videos on how to change your username.
- Once you change your username you will not be able to change it back and the old name will not be available for you or anyone to use. If you just want to show your name differently please only change your Display Name.
Gravatar
- What's Gravatar, Why and How Should You Be Using It | Solvid
- How to Set Up a Gravatar with WordPress - WordPress Theme Detector
- Manage Multiple Identities with One Gravatar Account « Gravatar Blog
Other
Change a GitHub username
- Pitfalls when Renaming your GitHub Account | Thomas Hunter II
- Change GitHub Account username - Stack Overflow
- What happens when I change my username? - User Documentation
Disqus
- Updating your Disqus Settings · Disqus - This explains the different aspects of the profile
OneSignal
- Web Push notifications in Firefox | Firefox Help - this give a great overview into 'Web Push' notfications work. They differer from browser to browser but this explanation will in general be the same for all of them.
- temp my post at stackideas - Update EasyBlog OneSignal documentation (and komento)
- temp - Onesignal Push Notification - Configuration - EasyBlog Documentation
Create a Blog - Part 7 (What Now?)
What Now!!!
So your blog is now all setup, you have you Online Social Identities at the ready, autoposting and other integrations are all done and the question you are asking is: What now?
I will outline some of my thoughts on what is next but you have to appreciate that I have only just got to this stage myself and I have used the process of building my own blog to create these instructions to help me and othersas I go.
What not to do
This is important to get a well liked blog by both Google and the general internet public:
- Popups - People hate these
- Too many adverts - It is ok to have adverts (if you want them) but dont over do it.
- Keyword adverts - not sure what this is.
- Blackhat SEO - This will get your blog penalised.
Don’t be scared to changes things
- If you change categories, slug format or other stuff that might affect Google rankings, don’t be scared to make the changes as Google will sort itself out. You most likely will only make major changes at the beginning anyway.
- I would advise not to make these changes lightly or all of the time. It is true things will sort themselves out but you should only do this when absolutely necessary.
Social Marketing / SEM
Now you have your site up and running your need to advertise it or push it, 'just because you build it, does not mean they will come’. It will take a while for Google to find/index your new site/blog and this is especially true for new domains.
- Create a site map and submit it to Yahoo/Bing/Google
- Google Analytics (does help despite what people say because Google knows you site exists and is run by a human)
- Make sure Facebook, Twitter, LinkedIn and other social media are linked correctly.
Newsletters
- Having a newsletter can be good thing if you dont send them out all of the time.
- A newsletter when you are a blog is most likely just going to be a list of recent articles, so you will might not need a seperate newsletter in this case. The 'newsletter subscription' could just be a wrapper for the blogging system article updates.
Monetise
General Advertising methods will be discussed in another tutorial.
- Disqus with advertising.
- Google/Bing/Yahoo advertising
- Affiliate Links
- Links to your own products
- RSS feeds with adverts via Feedburner
- Newsletters (with stuff in them)
- Cloaked links (where you see an ad before going to the link) – not a fan of these
- Direct advertising banners
- Sell your own advertising
Running your Blog
Just some general ideas that need a mention. I might add to this as I go.
Writing Articles
long articles: pagination / long page / separate articles
when you have to split an article into many parts, it is acceptable to use 1 folder as you might reference the same image through the article, imagine an article like 1 large word document.
All images and media will be stored in
Blog Attribution
This is a worked example of blog attribution ssing this orginal source Article - Repair a Broken Ethernet Plug: 10 Steps (with Pictures) | instructables
- Search on google for articles 'Ethernet cable plug repair clips'
- And you will see the primary article from instructables heavily copied but everyone has a link back to the original article. Usually it is the article title hyperlinks or the websites domain name.
- Example Articles that uses the instructables article in some way.
- Repair a Broken Ethernet Plug with Zip Ties | Lifehacker - This uses an image from the instructables article but with some of its own text. The article is short and its main aim is to point you tot he instructables article.
- How do You Repair an Ethernet Cable with a Broken Locking Clip? | HowToGeek -This is separate article but in the comments it uses images and text from the instructables article but does give links back to that article.