These are my notes on setting up TrueNAS from selecting the hardware to installing and configuring the software. Ypu are expected to have some IT knowledge about hardware and software as these instructions do not cover everything but will answer all of those questions that need answering.
- The TrueNAS documentation is well written and is your friend.
- HeadingsMap Firefox Add-On
- This plugin shows the tree structure of the headings in a side bar.
- It will make using this article as a reference document much easier.
Hardware
I will deal with all things hardware in this section.
My Server Hardware
This is my current configuration of my TrueNAS server and it might get updated over time.
- UPS
- PC Case
- Case Fans
- Power Supply
- Motherboard
- CPU
- AMD Ryzen™ 9 7900
- AM5, Zen 4, 12 Core, 24 Thread, 3.7GHz, 5.4GHz Turbo, 64MB Cache, PCIe 5.0, 65W, CPU
- Supports ECC RAM
- CPU Cooler
- RAM
- Disks
- Boot
- Long Term Storage Pool
- VMs and Apps Pool
- Backplane / Hot-Swap Bays / Bay Enclosure / Drive Bays / Caddy / Enclosure
- Additional NIC (for Virtualised pfSense Router)
*** Do NOT use a Hardware or Software RAID with TrueNAS or ZFS, this will lead to data loss. ZFS already handles data redundency and striping across drive so a RAID is also pointless.***
ASUS PRIME X670-P WIFI (Motherboard)
- General
- ASUS PRIME X670 P : I'm not happy! - YouTube
- The PRIME X670-P is a rather good budget board, except it is not priced at a budget level. Its launching price oscillates between 280 and 300 dollars, and that is almost twice its predecessor launching price.
- A review.
- Parts
- Rubber Things P/N: 13090-00141300 (contains 1 pad) (9mm x 9mm x 1mm)
- Standoffs P/N: 13020-01811600 (contains 1 screw and 1 standoff) (7.5mm)
- Standoffs P/N: 13020-01811500 (contains 2 screws and 2 standoffs) (7.5mm) - These appear to be the same as 13020-1811600
- How to turn off all lights
- Diagnostics / QLED
- AMD PBO (Precision Boost Overdrive)
- AMD CBS (Custom BIOS Settings)
- AMD Overclocking Terminology FAQ - Evil's Personal Palace - HisEvilness - Paul Ripmeester
- AMD Overclocking Terminology FAQ. This Terminology FAQ will cover some of the basics when overclocking AMD based CPU's from the Ryzen series.
- What is AMD CBS? Custom settings for your Ryzen CPU's that are provided by AMD, CBS stands for Custom BIOS Settings. Settings like ECC RAM that are not technically supported but work with Ryzen CPU's as well as other SoC domain settings.
- Saving BIOS Settings
- [Motherboard] How to save and load the BIOS settings? | Official Support | ASUS Global
- [SOLVED] - Best way to save BIOS settings before BIOS update? | Tom's Hardware Forum
- Q: I need to update my BIOS to fix an issue. However, I'll lose all my settings after the update. What is the best way to save BIOS settings before an update? I have a ROG STRIX Z370-H GAMING. I wish there was a way to save settings to a file and simply restore.
- A:
- Use your phone to take photos of the settings
- After updating bios it is recommended to load bios defaults from the exit menu so cmos is refreshed with new system parameters.
- Some boards do have that feature. On my MSI B450M Mortar I can save settings to a file on a USB stick, for instance. But it's next to useless as anytime I've updated BIOS and then gone to attempt reloading settings from the stick it just refuses because settings were for an earlier BIOS rev. That makes sense because I'm sure all settings are is a bitmapped series of ones and zeroes that will have no relevance from BIOS rev to rev.
- In essence, it's a broken feature. My MOBO has the same "feature." It can save settings, profiles, but they are not compatible with new revisions of the BIOS.
- I've now started keeping a record of the changes I make. Taking photos of BIOS settings displays is one way to keep a record. But I'm keeping a written log of BIOS settings changes, and annotating it with the reasons why I made each change.
- Flashing BIOS
BIOS upgrading through the BIOS GUI is not reliable
- It has failed me twice and each time I had to use the `Flash by USB` method.
- After a flash, if the power LED (usually green) is still flashing 20 mins later, something is wrong and it will not boot. You can assume the firmware failed somewhere. The PC will not even POST now.
- At the beginning of the flashing sometimes you will here a beep code, I am not sure what the purpose of this is.
Solution = Flash the firmware using the USB method below.
- ASUS BIOS FlashBack Tool (Emergency flash via USB / Flash Button Method)
To use BIOS FlashBack:
- Download the firmware for you motherboard paying great attention to the model number
- ie `PRIME X670-P WIFI BIOS 1654` not `PRIME X670-P BIOS 1654`
- Run the 'rename' app to rename the firmware
- This is required for the tool to recognise the firmware. I would guess this is to prevent accidental flashing.
- Place this firmware in the root of a empty FAT32 formatted USB pendrive.
- I recommend this pendrive has an access light so you can see what is going on.
- With the computer powered down, but still plugged in and the PSU still on, insert the pendrive into the correct BIOS FlashBack USB socket for your motherboard.
- Press and hold the FlashBack button for 3 flashes and then let go:
- Flashing Green LED: the firmware upgrade is active. It will carry on flashing green until the flashing is finished which will take 8 minutes max and then the light will turn off and stay off. I would leave for 10 minutes to be sure, but mine took 5 minutes. The pendrive will be accessed at regular intervals but not as much as you would think.
- Solid Green LED: The firmware flashing never started. This is probably because the firmware is the wrong one for your motherboard or the file has not been renamed. With this outcome you can always see the USB drive accessed once by the pendrives activity light (if it has one).
- RED LED: The firmware update failed during the process.
- [Motherboard] How to use USB BIOS FlashBack? | Official Support | ASUS Global
- Use situation: If your Motherboard cannot be turned on or the power light is on but not displayed, you can use the USB BIOS FlashBack™ function.
- Requirements Tool: Prepare a USB flash drive with a capacity of 1GB or more. *Requires a single sector USB flash drive in FAT16 / 32 MBR format.
- [Motherboard] How to use USB BIOS FlashBack? | Official Support | ASUS USA
- Use situation: If your Motherboard cannot be turned on or the power light is on but not displayed, you can use the USB BIOS FlashBack™ function.
- Requirements Tool: Prepare a USB flash drive with a capacity of 1GB or more. *Requires a single sector USB flash drive in FAT16 / 32 MBR format.
- How long is BIOS flashback? - CompuHoy.com
- How long should BIOS update take? It should take around a minute, maybe 2 minutes. I’d say if it takes more than 5 minutes I’d be worried but I wouldn’t mess with the computer until I go over the 10 minute mark. BIOS sizes are these days 16-32 MB and the write speeds are usually 100 KB/s+ so it should take about 10s per MB or less.
- This page is loaded with ADs
- What is BIOS Flashback and How to Use it? | TechLatest - Do you have any doubts regarding BIOS Flashback? No issues, we have got your back. Follow the article till the end to clear doubts regarding BIOS Flashback.
- FIX USB BIOS Flash Button Not Working MSI ASUS ASROCK GIGABYTE - YouTube | Mike's unboxing, reviews and how to
- Make sure the USB pendrive is correctly formatted.
- Try other flash drives, it is really picky sometimes.
- The biggest problem with USB qflash or mflash or just USB BIOS flash back buttons in general is the USB stick not being read properly, this is mainly due to a few possible problems one being drive incompatibility, another being incorrect or wrong BIOS file and the other is the drive not being recognised.
- On MSI motherboards this is commonly shown by the mflash LED flashing 3 times then nothing or a solid LED, no flashing or quick flashing.
- So in this video i'll show you how to correctly prepare your USB flash drive or thumb drive so it has maximum chance of working first time!
- Help: Asus Prime X670-P WiFi won't update bios (What motherboard replacement?) | TechPowerUp Forums
- The biosrenamer is for renaming the bios to something specific that the bios flashback to read for the function the universal name is ASUS.CAP and then each board have a specific name, for mine it's PX670PW.CAP.
- Configuring the BIOS
- BIOS POST is extremely long
- This can be a disturbing problem to occur, you think that you have broken your motherboard and CPU when you first power on the PC server on. Your PC can take up to 20 minutes to POST for tyhe first time if you have 128GB RAM installed POSTs after this usually take about 11 minutes on my system.
- Symptoms
- After building my PC it does not make any beeps or POST.
- Sometimes the power light flashes
- I can always get into the BIOS on first boot after I have wiped the BIOS.
- However after further examination, I found my motherboard just actually takes 20 minutes to POST on an initial run and up to 10 minutes on consequent runs.
- Things I tried
- Upgrading the BIOS.
- Clearing the BIOS with the jumper.
- Clearing the BIOS with the jumper and then pulling the battery out.
- Cause
- On the first boot the computer is building a memory profile or even just testing the RAM. I have 128GB RAM in so it takes a lot longer to finish what it is doing.
- Issues with the firmware
- Solution
- Wait for the computer to finish these tests, it is not broken. My PC took 18m55s to POST, so you should wait 20mins.
- Update the firmware.
- Notes
- The more RAM you have the longer POST takes.
- Even if I fix the POST time, the initial run will always generate a long POST while it builds certain memory mappings and configs in the BIOS.
- My board has Q-LED Core which uses the power light to indicate things. If the power light is flashing or on the computer is alive and you should just wait.
- Of course you have double checked all of the connections on the motherboard.
- After this initial boot the PC will boot up in a normal time (usually under a minute but might be 2-3 depending on your setup). Mine still takes about 10 minutes.
- The boot time will go back to this massive time if you alter any memory settings in the BIOS or indeed, wipe the BIOS. Upgrading the BIOS will also have this affect.
- I removed my old 4 port NIC and put a newer on back in, the server booted normally (i.e. almost instant POST) but only this first time, it went back to normal after this initial boot.
- Asus X670E boot time too long - Republic of Gamers Forum - 906825
- Q: I am have an issue where my boot up time for my new PC is very slow. i know that the first time boot up when i built the PC is long but this is getting ridiculous.
- A:
- All DDR5 systems have longer boot times than DDR4 since they have to do memory tests.
- Enable Context Restore in the DDR Settings menu of BIOS, you might have another one boot after that which is long, but subsequent boots should me much quicker, until you do a BIOS update or clear CMOS
- Context Restore retains the last successful POST. POST time depends on the memory parameters and configuration.
- It is important to note that settings pertaining to memory training should not be altered until the margin for system stability has been appropriately established.
- The disparity between what is electrically valid in terms of signal margin and what is stable within an OS can be significant depending on the platform and level of overclock applied. If we apply options such as Fast Boot and Context Restore and the signal margin for error is somewhat conditional, changes in temperature or circuit drift can impact how valid the conditions are within our defined timing window.
- Whilst POST times with certain memory configurations are long, these things are not there to irritate us and serve a valid purpose.
- Putting the system into S3 Resume is a perfectly acceptable remedy if finding POST / Boot times too long.
- B650E-F GAMING WIFI slow boot time with EXPO enabl... - Page 2 - Republic of Gamers Forum - 919610
- Solved: Crosshair X670E Hero - Long time to POST - Q-Code ... - Republic of Gamers Forum - 957938
- "Memory Context Restore"
- Advanced --> AMD CBS --> UMC Common Options --> DDR Options --> DDR Memory Features --> Memory Context Restore
- Long AM5 POST times | TechPowerUp Forums
- This is on a Gigabyte X670 Aorus Elite AX using latest BIOS and G.Skill DDR5 6000 CL30-40-40-96 (XMP kit, full part no in my system specs).
- On every boot/reboot it takes 45 seconds to complete POST and the DRAM LED on the board is lit for the vast majority of the time. This only happens when the XMP profile is enabled, it only takes 12-15 seconds w/o XMP enabled.
- Read W1zzard's review as he discusses the long boot time issue with AM5, in specific the 7950X:
- The more RAM the longer the post time. Mine is EXPO rather than XMP, but from what I've gathered across the forums, that shouldn't make a difference.
- Every single time the MB boots, it does some memory training. The first time you enable XMP, its like 2-3 minutes, every time after that is 30~ seconds. I did notice a option to disable the memory extra memory training, but it did some wacky stuff to perf. Also I see you have dual-rank memory. Those take even longer to boot I've noticed. I spend a lot of time watching the codes haha.
- Its deep in the menu for some reason. I think a earlier BIOS had it next to everything else on the Tweaker tab.
- Advanced BIOS (F2) > Settings Tab > AMD CBS > UMC Common Options > DDR Options > DDR Memory Features > Memory Context Restore
- Press Insert KEY while highlighting DDR Memory Features to add it to the Favorites Tab (F11)
- Thanks, POST now takes 21 seconds instead of 45 to complete!
- For AM5 it appears it does. The BIOS the boards initially shipped with were especially bad. Remember the AsRock memory slot stickers that made the news at launch?
- See the picture in the thread.
- 1st boot after clear CMSO (with 4 x 32GB) = 400 seconds (6min 40s)
- AMD Ryzen 9 7950X Review - Impressive 16-core Powerhouse - Value & Conclusion | TechPowerUp - Very long boot times
- During testing I didn't encounter any major bugs or issues; the whole AM5 / X670 platform works very well considering how many new features it brings; there's one big gotcha though and that's startup duration.
- When powering on for the first time after a processor install, your system will spend at least a minute with memory training at POST code 15 before the BIOS screen appears. When I first booted up my Zen 4 sample I assumed it was hung and kept resetting/clearing CMOS. After the first boot, the super long startup times improve, but even with everything setup, you'll stare at a blank screen for 30 seconds. To clarify: after a clean system shutdown, without loss of power, when you press the power button you're still looking at a black screen for 30 seconds, before the BIOS logo appears. I find that an incredibly long time, especially when you're not watching the POST code display that tells you something is happening. AMD and the motherboard manufacturers say they are working on improving this—they must. I'm having doubts that your parents would accept such an experience as an "upgrade," considering their previous computer showed something on-screen within seconds after pressing the power button.
- Update Sep 29: I just tested boot times using the newest ASUS 0703 Beta BIOS, which comes with AGESA ComboAM5PI 1.0.0.3 Patch A. No noticeable improvement in memory training times. It takes 38 seconds from pressing the power button (after a clean Windows shutdown), until there ASUS BIOS POST screen shots. After that, the usual BIOS POST stuff happens and Windows still start, which takes another 20 seconds or so.
- ASRock's X670 Motherboards Have Numerous Issues... With DRAM Stickers | TechPowerUp
- This one is likely to go down ASRock's internal history as a failure of sticking proportions. Namely, it seems that some ASRock motherboards in the newly-released AM5 X670 / X670E family carry stickers overlaid on the DDR5 slots.
- The idea was to provide users with a handy, visually informative guide on DDR5 memory stick installations and a warning on abnormally long boot times that were to be expected, according to RAM stick capacity.
- But it seems that these low-quality stickers are being torn apart as users attempt to remove them, leaving behind remnants that are extremely difficult to clean up and which can block DRAM installation entirely or partially.
CPU and Cooler
- AMD 7900 CPU
- Ryzen 9 7900x Normal Temps? - CPUs, Motherboards, and Memory - Linus Tech Tips
- Q: Hey everyone! So I recently got a r9 7900x coupled to a LIAN LI Galahad 240 AIO. It idles at 70C and when I open heavier games the temps spike to 95C and then goes to 90C constantly. I think that this is exaggerated and I will need to repaste and add a lot more paste. This got me wondering though...what's normal temps for the 7900x? I was thinking a 30-40 idle and 85 under load for an avg cpu. Is this realistic?
- A: The 7900x is actually built to run at 95c 24/7. its confirmed by AMD. Its very different compared to any other CPU architecture on the market. Ryzen 7000 CPUs are defaulted to boost to whatever cooler it has until 95⁰C. It is the setpoint.
- Ryzen 9 7900x idle temp 72-82 should i return the cpu? - AMD Community
- Hi, I just built my first PC in a long time after I switched to mac, and I chose the 7900x with the Noctua NH-U12S redux with 2 Fans. The first day it ran at around 50C but when booted to bios. When I run windows and look at the temp it always at 72-75 at idle, and when I open visual studio or even Spotify it goes up to 80 -82. I'm getting so confused because everywhere I read people say these processors run hot but at full load its normal for it to operate at 95.. (in cinebench while rendering with all cores it goes up to 92-95).
- The Maximum Operating Temperature of your CPU is 95c. Once it reaches 95c it will automatically start to throttle and slow down and if it can't it will shut down your computer to prevent damage.
- Best Thermal Paste for AMD Ryzen 7 7700X – PCTest - Thermal paste is an essential component of any computer system that helps to transfer heat from the CPU to the cooler. It is important to choose the right thermal paste for your system to ensure optimal performance. In this article, we will discuss some of the best thermal pastes for AMD Ryzen 7 7700X. We will provide you with a comprehensive guide on how to choose the right thermal paste for your system and what factors you should consider when making your decision. We will also provide you with a detailed review of each of the thermal pastes we have selected and explain why they are the best options for your system. So, whether you are building a new computer or upgrading an existing one, this article will help you make an informed decision about which thermal paste to use.
- AMD Wraith Prism Cooler
- Lights
- How to turn off all RGB lights on my 3700X PC build - NetOSec
- RGB lights in a PC are beautiful. But there are times when you don't want it to show off. Here's how I tweak my build to run in stealth mode.
- Covers how to turn off the fan lights via the USB.
- Covers other LED lighting systems aswell.
- Explained: How To Change RGB On AMD Wraith Prism Cooler? | Tech4Gamers
- We explain how to change RGB on your AMD Wraith Prism Cooler, covering the need-to-knows and also the different software you can use.
- You can only control all three RGB lights (ring, logo, and fan) on the Wraith Prism cooler if you plug in ONLY the USB cable into the cooler, not by plugging in both or just plugging in the RGB cable.
- You can use many different software to control the RGB on your AMD Wraith Prism cooler. These include Cooler Master’s Wraith Prism software, motherboard-specific software (Gigabyte RGB Fusion, MSI Mystic Light, etc.), or Razer’s Chroma software.
- Installation
- Removal
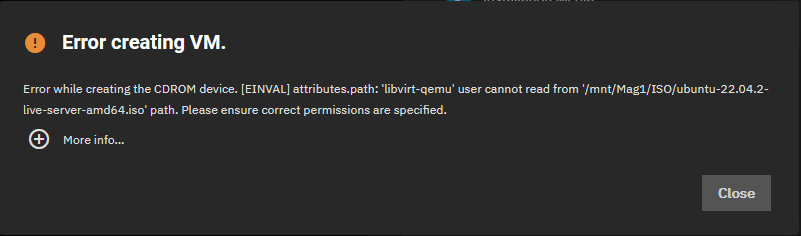
Asus Hyper M.2 x16 Gen 4 Card
Asus Accessories
- Asus Standoffs
- ASUS Rubber Pads / "M.2 rubber pad"
- There are not thermal transfer pads but are jut a pad to help push NVMe upwards for a good connection to the thermal pads on teh heatsink above. These are more useful for the longer NVMe boards ad they will tend to bow in the middle.
- M.2 rubber pad for ROG DIMM.2 - Republic of Gamers Forum - 865792
- I found the following rubber pad in the package of the Rampage VI Omega. Could you please tell me where I have to install this?
- This thread has pictures of how a single pre-installed rubber pad looks and shows you the gap and why with single sided NVMe you need to install the second pad on top.
- This setup uses 2 difference thickness pads but ASUS has changed from you swapping the pads, to you sticking another one on top of the pre-installed pads.
- M.2 rubber pad on Asus motherboard for single-sided M.2 storage device | Reddit
- Q:
- I want to insert a Samsung SSD 970 EVO Plus 1TB in a M.2 slot of the Asus ROG STRIX Z490-E GAMING motherboard.
- The motherboard comes with a "M.2 Rubber Package" and you can optionally put a "M.2 rubber pad" when installing a "single-sided M.2 storage device" according to the manual: https://i.imgur.com/4HP37NX.webp
- From my understanding, this Samsung SSD is single-sided because it has chips on one side only.
- What is this "rubber pad" for? Since it's apparently optional, what are the advantages and disadvantages of installing it? The manual doesn't even explain it, and there are 2 results about it on the whole Internet (besides the Asus manual).
- A:
- I found this thread with the same question. Now that I've actually gone through assembly, I have some more insight into this:
- My ASUS board has a metal heat sink that can screw over an M.2. On the underside of the heat sink, there's a thermal pad (which has some plastic to peel off).
- The pad on the motherboard is intended to push back against the thermal pad on the heat sink in order to minimize bending of the SSD and provide better contact with the thermal pad. I now realize that the reason ASUS only sent 1 stick-on for a single-sided SSD, is because there's only 1 metal heat sink; the board-side padding is completely unnecessary without the additional pressure of the heat sink and its thermal pad, so slots without the heat sink don't need that extra stabilization.
- So put the extra sticker with the single-sided SSD that's getting the heat sink, and don't worry about any other M.2s on the board. I left it on the default position by the CPU since it's between that and the graphics card, which makes it the most likely to have any temperature issues.
- M.2 / NVMe Thermal Pads
- Best Thermal Pad for M.2 SSD – PCTest - Using a thermal pad on an M.2 SSD is a great way to help keep it running cool and prevent throttling. With M.2 drives becoming increasingly popular, especially in gaming PCs and laptops where heat dissipation is critical, having the right thermal pad is important. In this guide, we’ll cover the benefits of using a thermal pad with an M.2 drive, factors to consider when choosing one, and provide recommendations on the best M.2 thermal pads currently available.
Case Fans
- Noctua NF-A9 PWM Case Fan
Hardware Selection
These links will help you find the kit that suits your needs best.
- If you are a company, buy a prebuilt system from iXSystems, do not roll your own.
- Only use CMR based hard disks when building your NAS with traditional drives.
- SSD and NVMe can be used. Not recommended for long term storage.
General
- SCALE Hardware Guide | Documentation Hub
- Describes the hardware specifications and system component recommendations for custom TrueNAS SCALE deployment.
- From repurposed systems to highly custom builds, the fundamental freedom of TrueNAS is the ability to run it on almost any x86 computer.
- This is a definite read before purchasing your hardware.
- TrueNAS Mini - Enterprise-Grade Storage Solution for Businesses
- TrueNAS Mini is a powerful, enterprise-grade storage solution for SOHO and businesses. Get more out of your storage with the TrueNAS Mini today.
- TrueNAS Minis come standard with Western Digital Red Plus hard drives, which are especially suited for NAS workloads and offer an excellent balance of reliability, performance, noise-reduction, and power efficiency.*
- Regardless of which drives you use for your system, purchase drives with traditional CMR technology and avoid those that use SMR technology.
- (Optional) Boost performance by adding a dedicated, high-performance read cache (L2ARC) or by adding a dedicated, high-performance write cache (ZIL/SLOG)
- I dont need this, but it is there if needed.
Tools
- Free RAIDZ Calculator - Caclulate ZFS RAIDZ Array Capacity and Fault Tolerance.
- Online RAIDz calculator to assist ZFS RAIDz planning. Calculates capacity, speed and fault tolerance characteristics for a RAIDZ0, RAIDZ1, and RAIDZ3 setups.
- This RAIDZ calculator computes zpool characteristics given the number of disk groups, the number of disks in the group, the disk capacity, and the array type both for groups and for combining. Supported RAIDZ levels are mirror, stripe, RAIDZ1, RAIDZ2, RAIDZ3.
Other People's Setups
- My crazy new Storage Server with TrueNAS Scale - YouTube | Christian Lempa
- In this video, I show you my new storage server that I have installed with TrueNAS Scale. We talk about the hardware parts and things you need to consider, and how I've used the software on this storage build.
- A very detailed video, watch before you purchase hardware.
- Use ECC memory
- He istalled 64GB, but he has a file cache configured.
- Dont buy a chip with IGP, they dont tend to support ECC memory.
- ZFS / TrueNAS Best Practices? - #5 by jode - Open Source & Web-Based - Level1Techs Forums - You hint at a very diverse set of storage requirements that benefit from tuning and proper storage selection. You will find a lot of passionate zfs fans because zfs allows very detailed tuning to different workloads, often even within a single storage pool. Let me start to translate your use cases into proper technical requirements for review and discussion. Then I’ll propose solutions again for discussion.
UPS
Motherboard
- Make sure it supports ECC RAM.
- Use the Motherboard I am using.
CPU and Cooler
- Make sure it supports ECC RAM.
- Use the CPU and Cooler I am using.
RAM
Use ECC RAM if you value your data
- All TrueNAS hardware from iXsystems comes with ECC RAM.
- ECC RAM - SCALE Hardware Guide | Documentation Hub
- Electrical or magnetic interference inside a computer system can cause a spontaneous flip of a single bit of RAM to the opposite state, resulting in a memory error. Memory errors can cause security vulnerabilities, crashes, transcription errors, lost transactions, and corrupted or lost data. So RAM, the temporary data storage location, is one of the most vital areas for preventing data loss.
- Error-correcting code or ECC RAM detects and corrects in-memory bit errors as they occur. If errors are severe enough to be uncorrectable, ECC memory causes the system to hang (become unresponsive) rather than continue with errored bits. For ZFS and TrueNAS, this behaviour virtually eliminates any chances that RAM errors pass to the drives to cause corruption of the ZFS pools or file errors.
- To summarize the lengthy, Internet-wide debate on whether to use error-correcting code (ECC) system memory with OpenZFS and TrueNAS: Most users strongly recommend ECC RAM as another data integrity defense.
- However:
- Some CPUs or motherboards support ECC RAM but not all
- Many TrueNAS systems operate every day without ECC RAM
- RAM of any type or grade can fail and cause data loss
- RAM failures usually occur in the first three months, so test all RAM before deployment.
- TrueNAS on system without ECC RAM vs other NAS OS | TrueNAS Community
- If you care about your data, intend for the NAS to be up 24x365, last for >4 years, then ECC is highly recommended.
- ZFS is like any other file systems, send corrupt data to the disks, and you have corruption that can't be fixed. People say "But, wait, I can FSCK my EXT3 file system". Sure you can, and it will likeky remove the corruption and any data associated with that corruption. That's data loss.
- However, with ZFS you can't "fix" a corrupt pool. It has to be rebuilt from scratch, and likely restored from backups. So, some people consider that too extreme and use ECC. Or don't use ZFS.
- All that said. ZFS does do something that other file systems don't. In addition to any redundancy, (RAID-Zx or Mirroring), ZFS stores 2 copies of metadata and 3 copies of critical metadata. That means if 1 block of metadata is both corrupt AND that ZFS can detect that corruption, (no certainty), ZFS will use another copy of metadata. Then fix the broken metadata block(s).
- OpenMediaVault vs. TrueNAS (FreeNAS) in 2023 - WunderTech
- Another highly debated discussion is the use of ECC memory with ZFS. Without diving too far into this, ECC memory detects and corrects memory errors, while non-ECC memory doesn’t. This is a huge benefit, as ECC memory shouldn’t write any errors to the disk. Many feel that this is a requirement for ZFS, and thus feel like ECC memory is a requirement for TrueNAS. I’m pointing this out because hardware options are minimal for ECC memory – at least when compared to non-ECC memory.
- The counterpoint to this is argument is that ECC memory helps all filesystems. The question you’ll need to answer is if you want to run ECC memory with TrueNAS because if you do, you’ll need to ensure that your hardware supports it.
- On a personal level, I don’t run TrueNAS without ECC memory, but that’s not to say that you must. This is a huge difference between OpenMediaVault and TrueNAS and you must consider it when comparing these NAS operating systems
- = you should run TrueNAS with ECC memory where possible
- How Much Memory Does ZFS Need and Does It Have To Be ECC? - YouTube | Lawrence Systems
- You do not need a lot of memory for ZFS but if you do use lots of memory you're going to get beeter performance out of ZFS (i.e cache)
- Using ECC memory is better but it is not a requirement. Tom uses ECC as shown on his TrueNAS servers.
- ECC vs non-ECC RAM and ZFS | TrueNAS Community
- I've seen many people unfortunately lose their zpools over this topic, so I'm going to try to provide as much detail as possible. If you don't want to read to the end then just go with ECC RAM.
- For those of you that want to understand just how destructive non-ECC RAM can be, then I'd encourage you to keep reading. Remember, ZFS itself functions entirely inside of system RAM. Normally your hardware RAID controller would do the same function as the ZFS code. And every hardware RAID controller you've ever used that has a cache has ECC cache. The simple reason: they know how important it is to not have a few bits that get stuck from trashing your entire array. The hardware RAID controller(just like ZFS) absolutely NEEDS to trust that the data in RAM is correct.
- For those that don't want to read, just understand that ECC is one of the legs on your kitchen table, and you've removed that leg because you wanted to reuse old hardware that uses non-ECC RAM. Just buy ECC RAM and trust ZFS. Bad RAM is like your computer having dementia. And just like those old folks homes, you can't go ask them what they forgot. They don't remember, and neither will your computer.
- A full write up and disccussion.
- Q re: ECC Ram | TrueNAS Community
- Q: Is it still recommended to use ECC Ram on a TrueNAS Scale build?
- A1:
- Yes. It still uses ZFS file system which benefits from it.
- A2:
- It's recommended to use ECC any time you care about your data--TrueNAS or not, CORE or SCALE, ZFS or not. Nothing's changed in this regard, nor is it likely to.
- A3:
- One thing people over look is that statistically Non-ECC memory WILL have failures. Okay, perhaps at extremely rare times. However, now that ZFS is protecting billions of petabytes, (okay I don't how much total... just guessing), their are bound to be failures from Non-ECC memory that cause data loss. Or pool loss.
- Specifically, in memory corruption of an already check-summed block, that ends up being written to disk may be found by ZFS during the next scrub. BUT, in all likely hood that data is lost permanently unless you have unrelated backups. (Backups of corrupt data, simply restores corrupt data...)
- Then their is the case of not yet check-summed block, that got corrupted. Along comes ZFS to give it a valid checksum and write it to disk. Except ZFS will never detect this as bad during a scrub unless it was metadata that is invalid, (like compression algorithm value not yet assigned), then still data loss. Potentially entire pool lost.
- This is just for ZFS data, which is most of the movement. However, their are program code and data blocks that could also be corrupted...
- Are these rare? Of course!!! But, do you want to be a statistic?
- Can I install an ECC DIMM on a Non-ECC motherboard? | Integral Memory
- Most motherboards that do not have an ECC function within the BIOS are still able to use a module with ECC, but the ECC functionality will not work.
- Keep in mind, there are some cases where the motherboard will not accept an ECC module, depending on the BIOS version.
- Trying to understand the real impact of not having ECC : truenas | Reddit
- A1:
- From everything I've read, there's no inherent reason ZFS needs ECC more than any other system, it's just that people tend to come to ZFS for the fault tolerance and correction and ECC is part of the chain that keeps things from getting corrupted. It's like saying you have the most highly rated safety certification for your car and not wearing your seatbelt - you should have a seatbelt in any car.
- A2:
- The TrueNAS forums have a good discussion thread on it, that I think you might have read, Non-ECC and ZFS Scrub? | TrueNAS Community. If not, I strongly encourage it.
- The idea is, ECC prevents ZFS from incurring bitflip during day-to-day operations. Without ECC, there's always a non-zero chance it can happen. Since ZFS relies on the validity of the checksum when a file is written, memory errors could result in a bad checksum written to disk or an incorrect comparison on a following read. Again, just a non-zero chance of one or both events occurring, not a guarantee. ZFS lacks an "fsck" or "chkdsk" function to repair files, so once a file is corrupted, ZFS uses the checksum to note the file differs from the checksum and recover it, if possible. So, in the case of a corrupted checksum and a corrupted file, ZFS could potentially modify the file even further towards complete unusability. Others can comment if there's any way to detect this, other than via a pool scrub, but I'm unaware.
- Some people say, "turn off ZFS pool scrubs, if you have no ECC RAM", but ZFS will still checksum files and compare during normal read activity. If you have ECC memory in your NAS, it effectively eliminates the chance of memory errors resulting in a bad checksum on disk or a bad comparison during read operations. That's the only way. You probably won't find many people that say, "I lost data due to the lack of ECC RAM in my TrueNAS", but anecdotal evidence from the forum posts around ZFS pool loss points in that direction.
- A3:
- A4:
- Because ZFS uses checksums a bitflip during read will result in ZFS incorrectly detecting the data as damaged and attempting to repair it. This repair will succeed unless the parity/redundancy it uses to repair it experiences the same bitflip, in which case ZFS will log an unrecoverable error. In neither case will ZFS replace the data on disk unless the bitflips coincidentally create a valid hash. The odds of this are about 1 in 1-with-80-zeroes-after-it.
- And lots more.....
- ECC Ram with Lz4 compression. | TrueNAS Community
- Q: I'm using IronWolf 2TB x2 drives with mirror configuration to have constant backup data. To be safe from data corruption on one of those two drives, Do I have to use ECC memory? As my server I'm using HP Prodesk 600 G1 and I don't think this PC is capable of reading ECC memory.
- A: Ericloewe
- LZ4 compression is not relevant to your question and does not affect the answer.
- The answer is that if you value your data, you should take all reasonable precautions to safeguard it, and that includes ECC RAM.
- A: winnielinnie
- ECC RAM assures the data you intend to be written (as a record) is correct before being written to the storage media.
- After this point, due to checksums and redundancy, ZFS will assure the data remains correct.
- With non-ECC RAM, if the data were to be corrupted before being written to storage, ZFS will simply keep this ("incorrectly") written record integral.
- According to ZFS, everything checks out.
- ECC RAM
- Create text file with the content: "apple"
- Before writing it to storage, the file's content is actually: "apply"
- The corruption is detected before writing it as a ZFS record to storage.
- Non-ECC RAM
- Create text file with the content: "apple"
- Before writing it to storage, the file's content is actually: "apply"
- This is not caught, and you in fact write a ZFS record to storage.
- ZFS creates a checksum and uses redundancy for the file that contains: "apply"
- Running scrubs and reading the file will not report any corruption. Because the checksum matches the record.
- Your file will always "correctly" have the content: "apply"
- A: Arwen
- While memory bit flips are rarer than disk problems, without ECC memory you don't know if you have a problem during operation. (Off line / boot time memory checks can be done if you suspect a problem...)
- And to add another complication to @winnielinnie's Non-ECC RAM first post, their is a window of time with ZFS where data could be check summed while in memory, and then the data damaged by bad memory. Thus, bad data written to disk causing permanent data loss, but detectable.
- It is about risk avoidance. How much you want to avoid, and can afford to implement.
Drive Bays
- TrueNAS Enclosure (Enterprise only)
- System Settings --> Enclosure
- This gives you a visual disk Management including bay numbers. This is a very useful feature.
- View Enclosure Screen (Enterprise Only) | Documentation Hub - Provides information on the TrueNAS View Enclosure screen available only on compatible SCALE Enterprise systems.
- Some I looked at
Storage Controllers
Drives
This is my TLDR:
- General
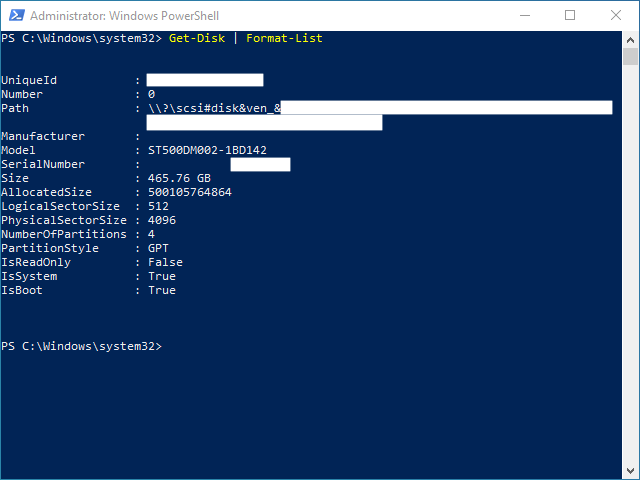
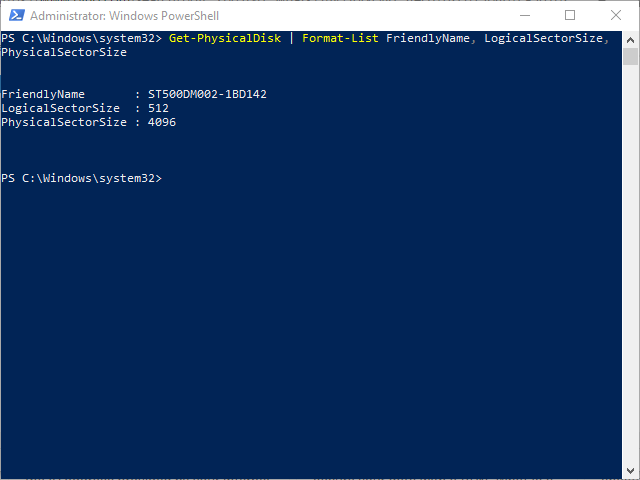
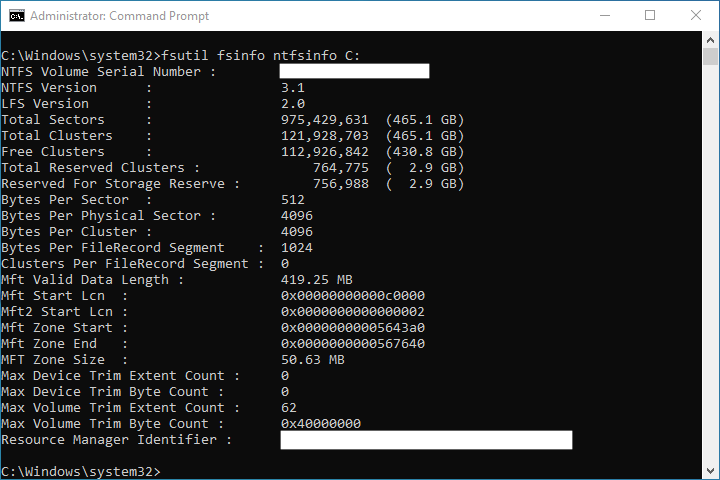
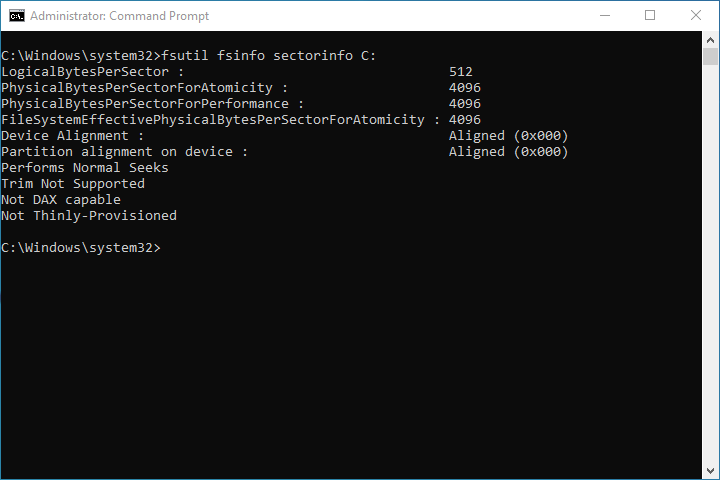
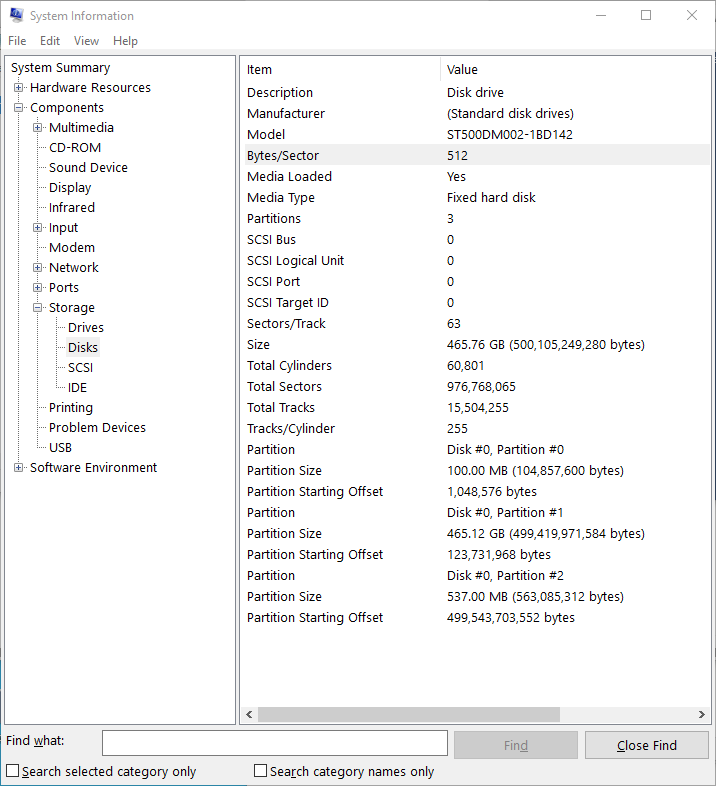
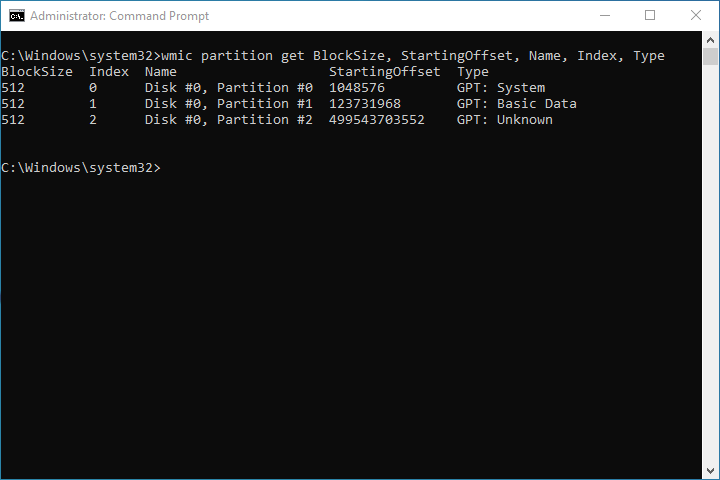
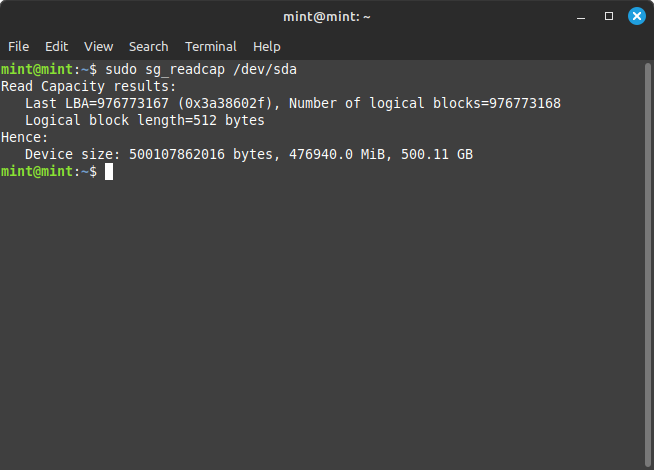
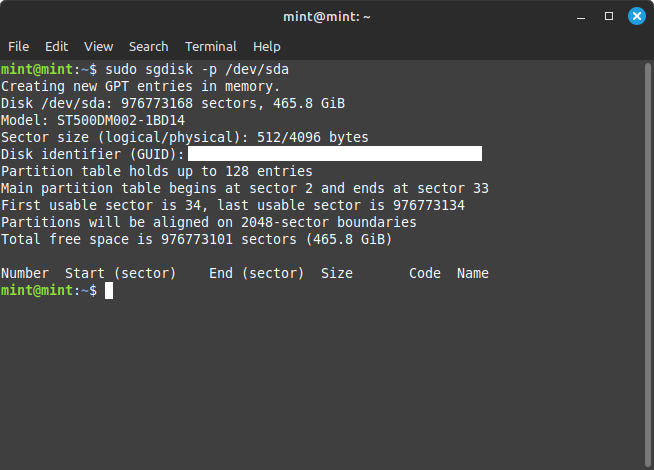
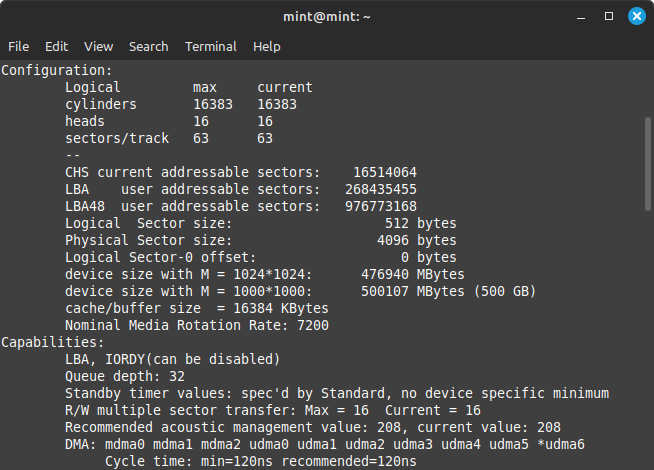
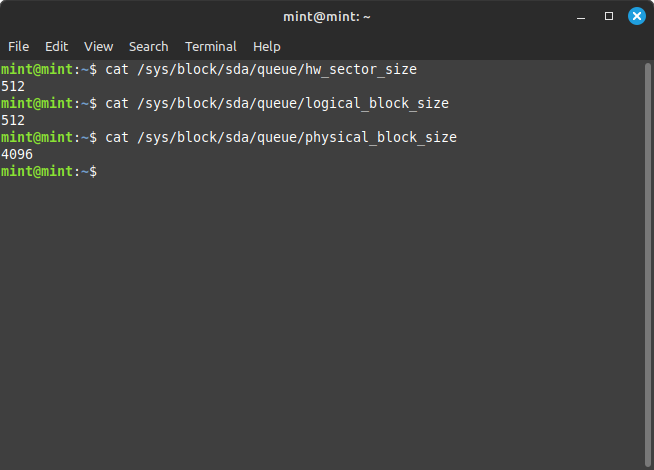
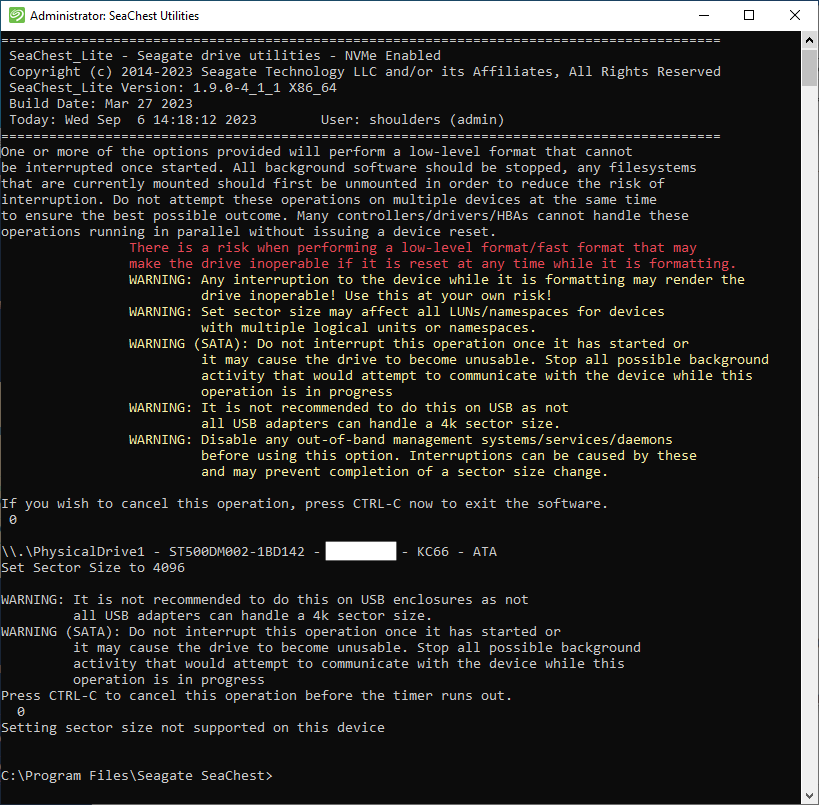
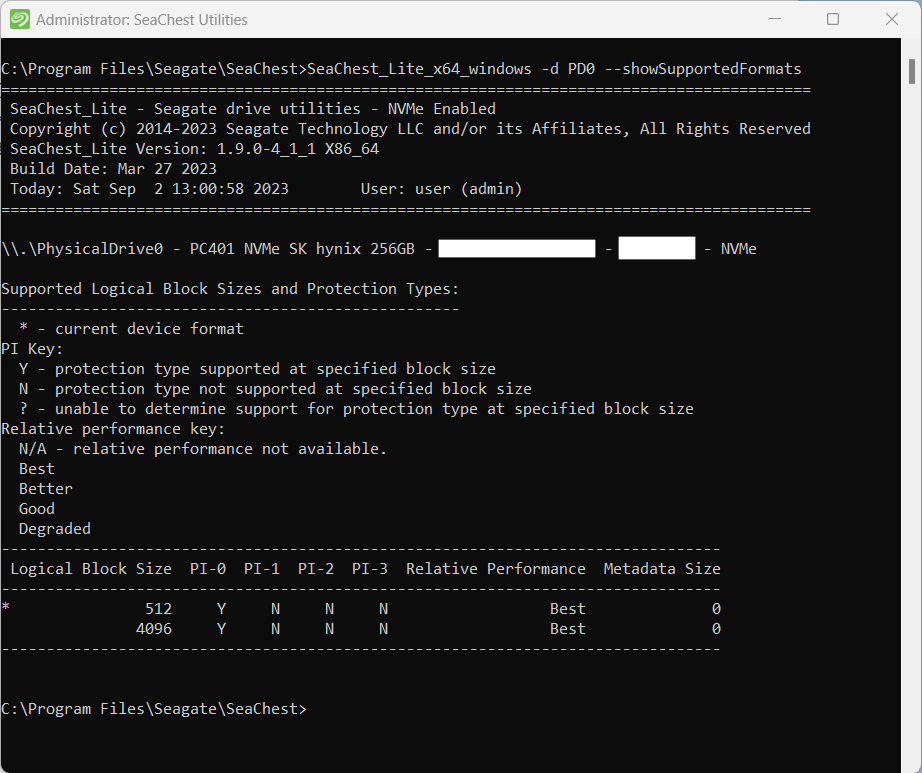
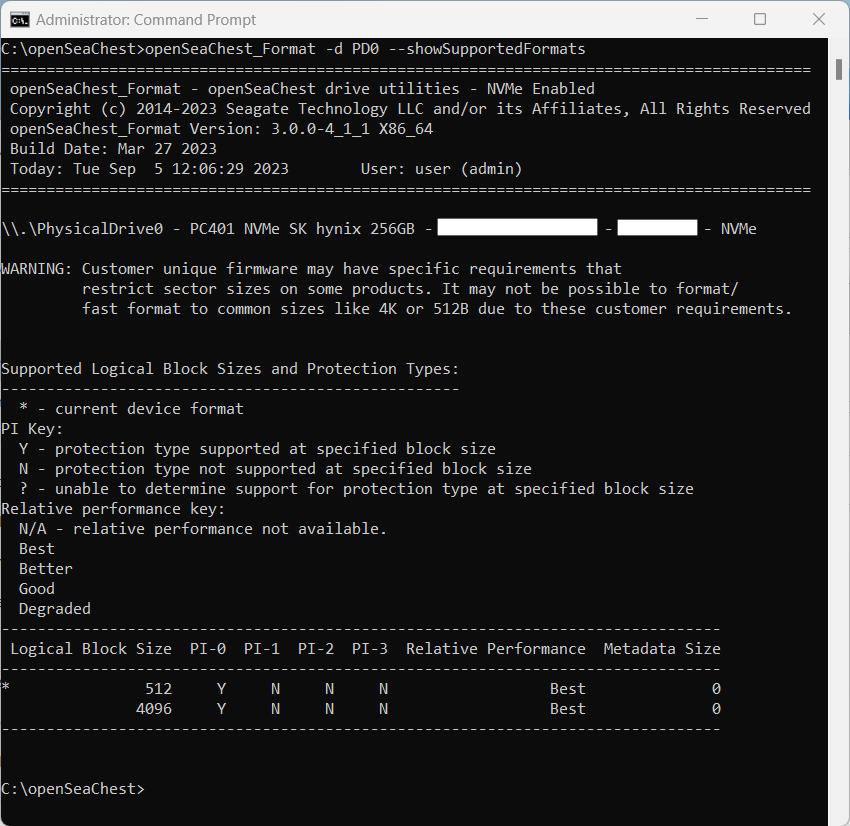
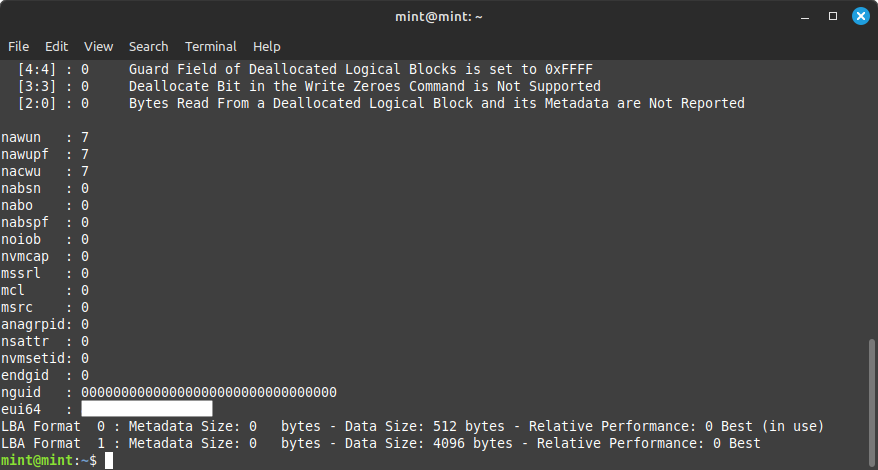
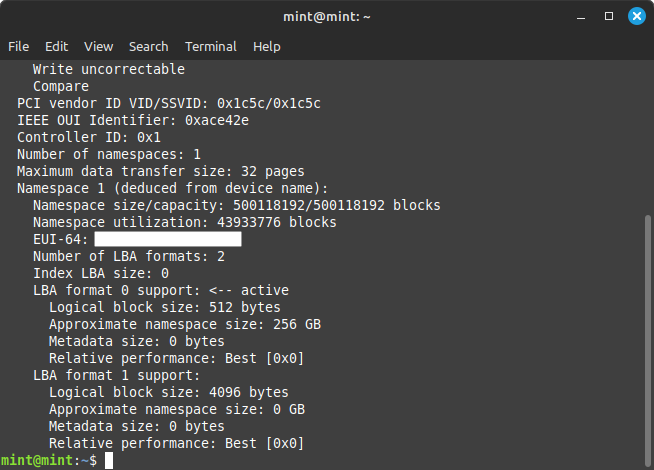
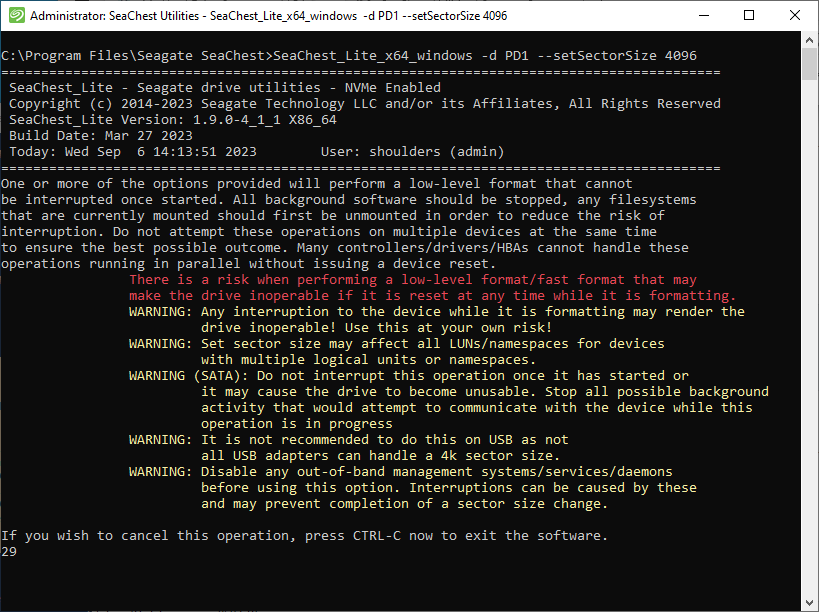
- You cannot change the Physical Sector size of any drive.
- Solid State drives do not have physical sectors as they do not have platters. The LBA is all handled internally with the Solid State drive. This means that changing a Solid State drive from 512e to 4Kn will potentially have a minimal performance increase with ZFS (ashift=12) but might be useful for NTFS whoes default cluster size is 4096B.
- HDD (SATA Spinning Disks)
- They come in a variety of Sector size configurations
- 512n (512B Logical / 512B Physical)
- 512e (512B Logical / 4096B Physical)
- The 512e drive benefits from 4096B physical sectors whilst being able to emulate a 512 Logical sector for legacy OS.
- 4096Kn (4096B Logical / 4096B Physical)
- The 4Kn drives are faster because their larger sector size required less checksum data to be stored and read (512n = 8 checksum, 4Kn = 1 checksum).
- Custom Logical
- There are very few of these disks that allow you to set custom logical sector sizes, but a quite a few that allow you to switch between 512e and 4Kn modes (usually NAS and professional drives).
- Hot-swappable drives
- SSD (SATA)
- They are Solid State
- Most if not all SSDs are 512n
- A lot quicker that Spinning Disks
- Hot-swappable drives
- SAS
- They come in Spinning Disk and Solid State.
- Because of the enviroment that these drives are going in, most of they have configurable Logical Sector sizes.
- Used mainly in Data Farms.
- The connector will allow SATA drives to be connected.
- I think SAS drives have Multi I/O unike SATA but similiar to NVMe.
- Hot-swappable drives
- NVMe
- A lot of these drives come as 512n. I have seen a few that allow you to switch from 512e to 4Kn and back and this does vary from manufacturer to manufacturer. The difference in the modes will not have a huge difference in performance.
- These drives need direct connection to the PCI Bus via PCI Lanes, usually 3 or 4.
- They can get quite hot.
- Can do multiple read and writes at the same time due to the mutliple PCI Lanes they are connected to.
- A lot quicker that SSD.
- Cannot hotswap drives.
- U.2
- This is more a connection standard rather than a new type of drive.
- I would avoid this technology not because it is bad, but because U.3 is a lot better.
- Hot-swappable drives (SATA/SAS only)
- The end points (i.e. drive bays) need to be preset to either SATA/SAS or NVMe.
- U.3 (Buy this kit when it is cheap enough)
- This is more a connection standard rather than a new type of drive.
- This is a revision of the U.2 standard and is where all drives will be moving to in the near future.
- Hot-swappable drives (SATA/SAS/NVMe)
- The same connector can accept SATA/SAS/NVMe without having to preset the drive type. This allows easy mix and matching using the same drive bays.
- Can support SAS/SATA/NVMe drives all on the same form factor and socket which means one drive bay and socket type for them all. Adpaters are easy to get.
- Will require a Tri-mode controller card.
- General
- You should use 4kn drives on ZFS as 4096 blocks are the smallest size TrueNAS will write (ashift=12).
- If your drive supports 4Kn, you should set it to this mode. It is better for performance, and if it was not, they would not of made it.
- 512e drives are ok and should be fine for most peoples how network.
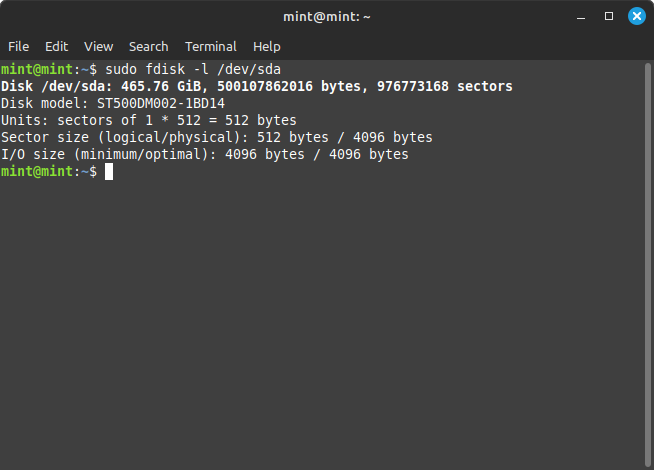
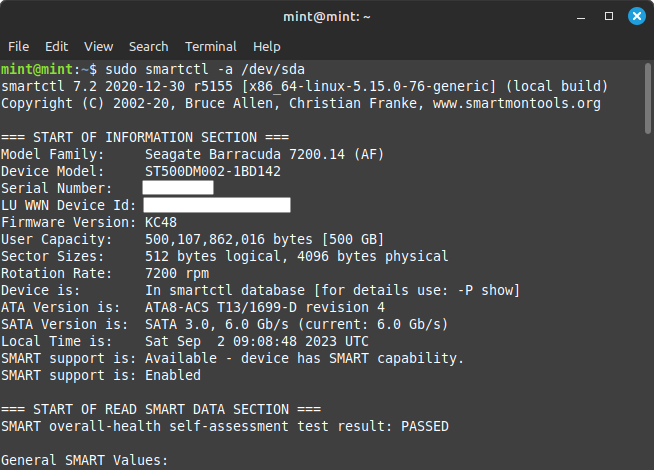
- In Linux `Sata 0` is referred to as `sda`
- Error on a disk | TrueNAS Community
- There's no need for drives to be identical, or even similar, although any vdev will obviously be limited by its least performing member.
- Note, though that WD drives are merely marketed as "5400 rpm-class", whatever that means, and actually spin at 7200 rpm.
- U.2 and NVMe - To speed up the PC performance | Delock - Sopme nice diagrams and explanations.
- SAS vs SATA - Difference and Comparison | Diffen - SATA and SAS connectors are used to hook up computer components, such as hard drives or media drives, to motherboards. SAS-based hard drives are faster and more reliable than SATA-based hard drives, but SATA drives have a much larger storage capacity. Speedy, reliable SAS drives are typically used for servers while SATA drives are cheaper and used for personal computing.
- U.2, U.3, and other server NVMe drive connector types (in mid 2022) | Chris's Wiki - A general discussion about these differetn formats and their availability.
- What Drives should I to use?
- Don't use (Pen drives / Thumb Drives / USB sticks / USB hard drives) for storage or your boot drive either.
- Use CMR HDD drives, SSD, NVMe for storage and boot.
- Update: WD Red SMR Drive Compatibility with ZFS | TrueNAS Community
- Thanks to the FreeNAS community, we uncovered and reported on a ZFS compatibility issue with some capacities (6TB and under) of WD Red drives that use SMR (Shingled Magnetic Recording) technology. Most HDDs use CMR (Conventional Magnetic Recording) technology which works well with ZFS. Below is an update on the findings and some technical advice.
- WD Red TM Pro drives are CMR based and designed for higher intensity workloads. These work well with ZFS, FreeNAS, and TrueNAS.
- WD Red TM Plus is now used to identify WD drives based on CMR technology. These work well with ZFS, FreeNAS, and TrueNAS.
- WD Red TM is now being used to identify WD drives using SMR, or more specifically, DM-SMR (Device-Managed Shingled Magnetic Recording). These do not work well with ZFS and should be avoided to minimize risk.
- There is an excellent SMR Community forum post (thanks to Yorick) that identifies SMR drives from Western Digital and other vendors. The latest TrueCommand release also identifies and alerts on all WD Red DM-SMR drives.
- The new TrueNAS Minis only use WD Red Plus (CMR) HDDs ranging from 2-14TB. Western Digital’s WD Red Plus hard drives are used due to their low power/acoustic footprint and cost-effectiveness. They are also a popular choice among FreeNAS community members building systems of up to 8 drives.
- WD Red Plus is the one of the most popular drives the FreeNAS community use.
- CMR vs SMR
- List of known SMR drives | TrueNAS Community - This explains some of the differences of `SMR vs CMR` along with a list of some drives
- Device-Managed Shingled Magnetic Recording (DMSMR) - Western Digital - Find out everything you want to know about how Device-Managed SMR (DMSMR) works.
- List of known SMR drives | TrueNAS Community
- Hard drives that write data in overlapping, "shingled" tracks, have greater areal density than ones that do not. For cost and capacity reasons, manufacturers are increasingly moving to SMR, Shingled Magnetic Recording. SMR is a form of PMR (Perpendicular Magnetic Recording). The tracks are perpendicular, they are also shingled - layered - on top of each other. This table will use CMR (Conventional Magnetic Recording) to mean "PMR without the use of shingling".
- SMR allows vendors to offer higher capacity without the need to fundamentally change the underlying recording technology.
New technology such as HAMR (Heat Assisted Magnetic Recording) can be used with or without shingling. The first drives are expected in 2020, in either flavor.
- SMR is well suited for high-capacity, low-cost use where writes are few and reads are many.
- SMR has worse sustained write performance than CMR, which can cause severe issues during resilver or other write-intensive operations, up to and including failure of that resilver. It is often desirable to choose a CMR drive instead. This thread attempts to pull together known SMR drives, and the sources for that information.
- There are three types of SMR:
- Drive Managed, DM-SMR, which is opaque to the OS. This means ZFS cannot "target" writes, and is the worst type for ZFS use. As a rule of thumb, avoid DM-SMR drives, unless you have a specific use case where the increased resilver time (a week or longer) is acceptable, and you know the drive will function for ZFS during resilver. See (h)
- Host Aware, HA-SMR, which is designed to give ZFS insight into the SMR process. Note that ZFS code to use HA-SMR does not appear to exist. Without that code, a HA-SMR drive behaves like a DM-SMR drive where ZFS is concerned.
- Host Managed, HM-SMR, which is not backwards compatible and requires ZFS to manage the SMR process.
- I am assuming ZFS does not currently handle HA-ZFS or HM-ZFS drives, as this would require Block Pointer Rewrite. See page 24 of (d) as well as (i) and (j).
- Western Digital implies WD Red NAS SMR drive users are responsible for overuse problems – Blocks and Files
- Has some excellent diagrams showing what is happening on the platters.
- Western Digital
- Western Digital Red, Red Plus, and Red Pro: Which NAS HDD is best? - NAS Master
- Western Digital has three families of NAS drives but which is best for your enclosure? I'm going to run you through WD Red, WD Red Plus, and WD Red Pro.
- Deals with CMR vs SMR
- Western Digital is trying to redefine the word “RPM” | Ars Technica
- The new complaint is that Western Digital calls 7200RPM drives "5400 RPM Class"—and the drives' own firmware report 5400 RPM via the SMART interface.
- 120 cycles/sec multiplied to 60 secs/min comes to 7,200 cycles/min. So in other words, these "5400 RPM class" drives really were spinning at 7,200rpm.
- WD Red Internal HDD SMR & CMR Network Attached Storage (NAS) Drive Information | Western Digital
- On WD Red NAS Drives - Western Digital Corporate Blog
- Colours explained
- List of Western Digital CMR and SMR hard drives (HDD) – NAS Compares
- List of WD CMR and SMR hard drives (HDD)If you know an SMR type of drive, share it with others in a table below!
- PMR, also known as conventional magnetic recording (CMR), works by aligning the poles of the magnetic elements, which represent bits of data, perpendicularly to the surface of the disk. Magnetic tracks are written side-by-side, without overlapping. SMR offers larger drive capacity than the traditional PMR because SMR technology achieves greater areal density.
- NVMe (SGFF)/U.2/U.3 - The way forward
- General
- NVM Express - Wikipedia
- U.2, formerly known as SFF-8639, is a computer interface for connecting solid-state drives to a computer. It uses up to four PCI Express lanes. Available servers can combine up to 48 U.2 NVMe solid-state drives.[35]
- U.3 is built on the U.2 spec and uses the same SFF-8639 connector. It is a 'tri-mode' standard, combining SAS, SATA and NVMe support into a single controller. U.3 can also support hot-swap between the different drives where firmware support is available. U.3 drives are still backward compatible with U.2, but U.2 drives are not compatible with U.3 hosts
- These are TOTALLY Different - Let me Explain. (U.3 Storage Comparison) - YouTube | Linus Tech Tips
- U.3 is an interface that combines the power of NVMe, SAS, and SATA drives into one controller, but how does that work?
- Different between U.2 and U.3
- Adapters / Kit
- U.2 (SFF-8639)
- U.3 (SFF-8639 or SFF-TA-1001)
- Can be used to make Universal Drive bays.
- Micron 7400 SSD’s – Featuring U.3 the next generation NVMe interface
- U.3 is a new interface standard for 2.5’’ NVME SSD’s that is an evolution of U.2 and has been used for some time. The main benefit is that the disk backplane inside the server chassis that features U.3 interfaces can carry SATA, SAS or NVMe signal through one physical connector and one cable that is connected to a Tri-Mode controller. This results in fever connectors on the backplane and less cables inside the server which in theory means lower server cost.
- Diagrams and further explanations of the standard.
- U.2 – Still the Industry Standard in 2.5” NVMe SSDs | Dell Technologies Info Hub
- This DfD is an informative technical paper meant to educate readers about the initial intentions around the U.3 interface standard, how it proceeded to fall short upon development, and why server users may want to continue using U.2 SSDs for their server storage needs.
- U.3 has been touted as a way to enable a tri-mode backplane that will support SAS, SATA and NVMe drives to work across multiple use-cases.
- What you need to know about U.3 - Quarch Technology
- What does U.3 mean for the ever-developing data storage industry? Here's a hardware engineer's perspective on this drive host controller.
- U.3 is a ‘Tri-mode’ standard, building on the U.2 spec and using the same SFF-8639 connector. It combines SAS, SATA and NVMe support into a single controller. Where firmware support is available, U.3 can also support hot-swap between the different drives.
- With U.2, you’d need a separate connector pinout/backplane, a separate mid-plane and controller for each protocol. U.3 only requires 1 backplane, 1 mid-plane and 1 controller, supporting all these drives in the same slot. This could be a great advantage, with SAS and NVMe forecasted to increase over the coming years—and SATA to decrease (according to OpenCompute).
- Shows the pinouts of U.2 and U.3
- Evolving Storage with SFF-TA-1001 (U.3) Universal Drive Bays - StorageReview.com
- U.3 is a term that refers to compliance with the SFF-TA-1001 specification, which also requires compliance with the SFF-8639 Module specification.
- U.3 can support mixed NVMe and SAS/SATA in drive bays
- U.2 drives bays have to be preset to either NVMe or SAS/SATA
- Will require a Tri-mode controller card.
- The tri-mode controller establishes connectivity between the host server and the drive backplane, supporting SAS, SATA and NVMe storage protocols.
Managing Hardware
This section deals with the times you need to interact with the hardware such as identify and swap failing disk.
UPS
Hard Disks
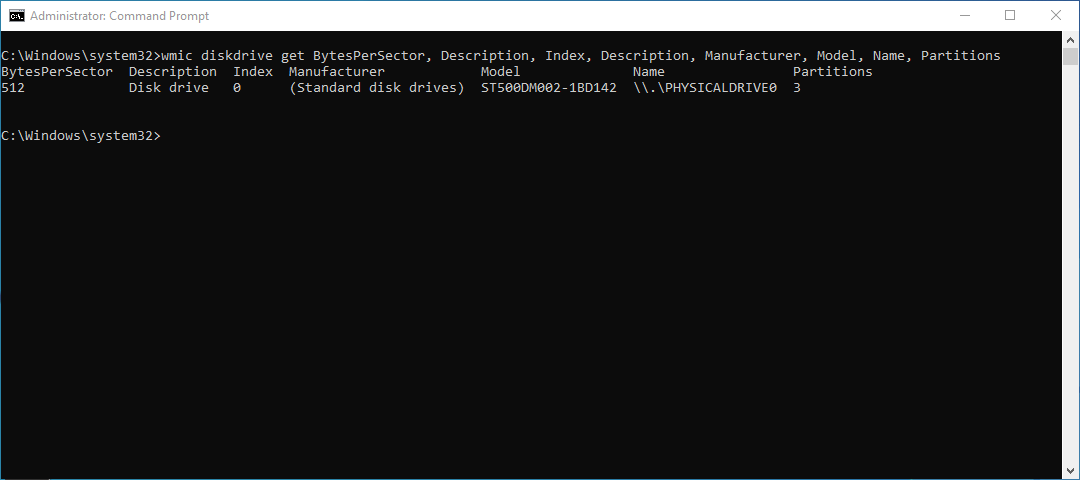
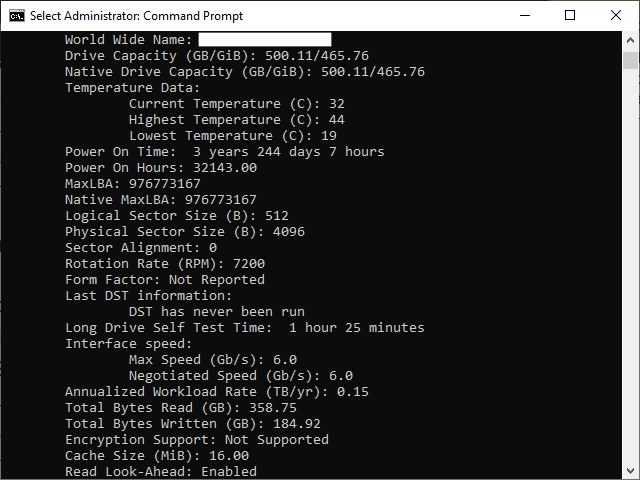
- Get boot drive serials
- Changing Drives
- Maintenance
- Intermittent SMART errors? - #9 by joeschmuck - TrueNAS General - TrueNAS Community Forums
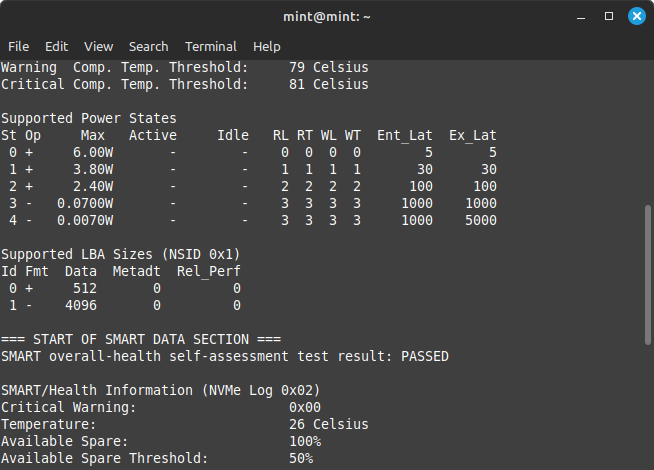
- If you cannot pass a SMART long test, it is time to replace the drive, and a short test is barely a small portion of the long test. Don’t wait on any other values, they do not matter. A failure of a Short or Long test is solid proof the drive is failing.
- I always recommend a daily SMART short test and a weekly SMART long test, with some exceptions such as if you have a high drive count (50 or 200 for example) then you may want to perform a monthly long test and spread the drives out across that month. The point is to run a long test periodically. You may have significantly more errors than you know.
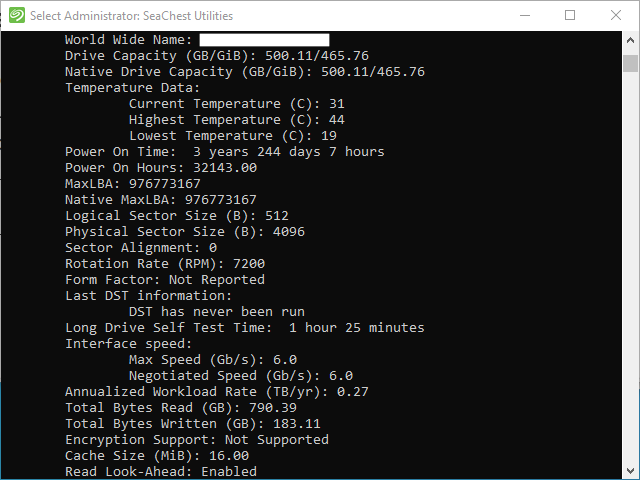
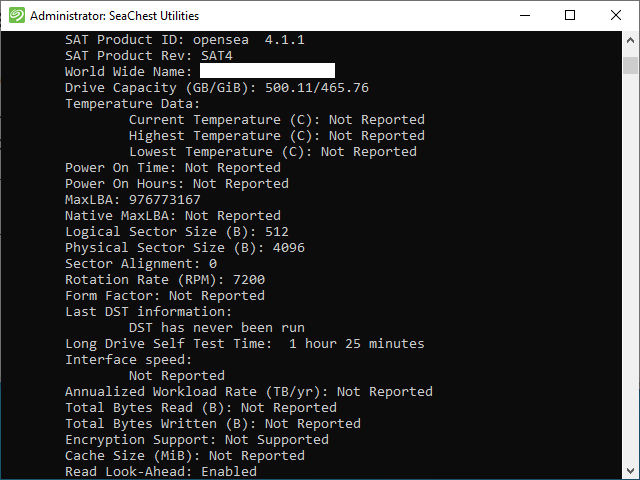
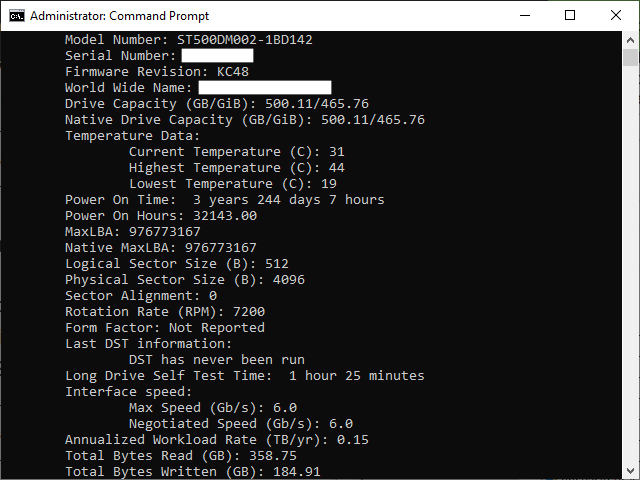
- Testing / S.M.A.R.T
- Identify Drives
- Misc
- Troubleshooting
- Hard Drive Troubleshooting Guide (All Versions of FreeNAS) | TrueNAS Community
- This guide covers the most routine single hard drive failures that are encountered and is not meant to cover every situation, specifically we will check to see if you have a physical drive failure or a communications error.
- From both the GUI and CLI
- NVME drive in a PCIe card not showing
- The PCIx16 slot needs to support PCIe bifurcation and be enabled.
- NVME PCIE Expansion Card Not Showing Drives - Troubleshooting - Linus Tech Tips
- Q:
- So, I bought the following product: Asus HYPER M.2 X16 GEN 4 CARD Hyper M.2 x16 Gen 4 Card (PCIe 4.0/3.0)
- Because I have, or plan to have 6 NVME drives (currently waiting for my WDBlack SN850 2TB to come in).
- I know the expansion card is working, because it's where my boot drive is, but the other three drives on the card are not being detected (1 formatted and 2 unformatted). They don't even show up on Disk Management.
- A:
- These cards require your motherboard to have PCIe bifurcation, which not all support. What if your motherboard model? Also, to use all the drives, it needs to be in a fully-connected x16 slot (not just physically, all the pins need to be there too).
- To get all 4 to work, you'd need to put it in the top slot and have the GPU in the bottom (not at all recommended). Those Hyper cards were designed for HEDT platforms with multiple x16 (electrical) slots. The standard consumer platforms don't have enough PCIe lanes for all the NVMe drives you want to install.
- Configure this slot to be in NVMe r=RAID mode. This only changes the birfication, it does not enable NVMe RIAD, that is elsewhere.
- [SOLVED] - How to set 2 SSD in Asus HYPER M.2 X16 CARD V2 | Tom's Hardware Forum
- Had to turn on raid mode on NVMe is drives settings and change PCIeX16_1 to _2.
- Also had to swap drives in the adapter to slot 1&2.
- [Motherboard] Compatibility of PCIE bifurcation between Hyper M.2 series Cards and Add-On Graphic Cards | Official Support | ASUS USA - Asus HYPER M.2 X16 GEN 4 CARD Hyper M.2 x16 Gen 4 Card configuration instructions.
- [SOLVED] ASUS NVMe PCIe card not showing drives - Motherboards - Level1Techs Forums
- Q: In TrueNAS 13, the drives for the ASUS Hyper M.2 x16 gen 4 9 card aren’t showing up or the drives are not.
- A:
- Did you configure bifurcation in BIOS?
Advanced --> Chipset --> PCIE Link Width should be x4x4x4x4
- Confirmed, it’s working after enabling 4x4x4x4x bifurcation. Never seen this on my high-end gamer motherboards, but maybe I just passed it by.
- It’s required for any system to use a card like this, though it may be called something else on gaming boards — ASUS likes to refer to it as “PCIe RAID”.
- What’s going on behind the scenes is that the Hyper card is physically routing each block of 4 PCIe lanes (from the x16 slot) to a separate device (M.2 slot), with some control signal duplication. It doesn’t have any real intelligence, it’s “just” rewiring the PCIe slot, so the other half of this equation is that the system’s PCIe controller needs to explicitly support this rewiring. That BIOS setting configures the controller to treat the physically wired x16 slot as four separate x4 slots.
- This is PCIe bifurcation, and currently AMD has more support for this than intel, though it’s also up to the motherboard vendor to enable it. It is more common in the server space.
- When I reboot TrueNAS, the disk names change
- Storage --> Disks

- This is normal and you should not use disk names (sda, sdb, nvme0n1, nvme0n2) to identify the disks, always use the serials.
- The reason the disk names change, is because Linux assigns the name to the disk as it becomes on line, and especially with spinning disks there is a natural variability with the timing of the disks becoming online.
Moving Server
This is a lot easier than you think.
ZFS
ZFS is a very powerful systems and is not just a filesystes, it has block devices and other mechnisms.
This is my overview of ZFS technologies:
- ZFS
- is more than a file system, it also provides logical devices for various tasks.
- ZFS is a 'COW' file system
- When copying/moving a file, it is completelty copied into RAM. The file in one go is written to the filesystem prevent file fragmentation.
- COW = Copy on Write
- Built into the ZFS spec is a caveat that you do NOT allow your ZVOL to get over 80% in use.
- Boot Pool - This is just a ZFS Storage Pool that TrueNAS uses to boot and store it's OS on. This is separate to your Storage Pools you define in TrueNAS.
- VDEV - A virtual device that controls one or more assigned hard drives in a defined topology/role, and these are specifically used to make Storage Pools.
- Storage Pool / Pool - A grouping of one or more VDEVs and this pool is usually mounted for use by the server (eg: /mnt/Magnetic_Storage).
- Dataset - These define file system containers on the storage pool in a hierarchical structure.
- ZVol - A block level device allowing the harddrives to be accessed directly with minimal interaction with the hypervisor. These are used primarily for virtual hard disks.
- Snapshot - A snapshot is a read-only copy of a filesystem taken at a moment in time.
General
- Information
- Built into the ZFS spec is a caveat that you do NOT allow your ZVOL to get over 80% in use.
- A ZVol is block storage, while Datasets are file-based. (this is a very simplistic explanation)
- Make sure your drives all have the same sector size. Preferable 4096Bytes/4KB/4Kn. ZFS smallest writes are 4K. Do not use drives with different sector sizes on ZFS, this is bad.
- ZFS - Wikipedia
- ZFS - Debian Wiki
- Introducing ZFS Properties - Oracle Solaris Administration: ZFS File Systems - This book is intended for anyone responsible for setting up and administering Oracle ZFS file systems. Topics are described for both SPARC and x86 based systems, where appropriate.
- Chapter 22. The Z File System (ZFS) | FreeBSD Documentation Portal - ZFS is an advanced file system designed to solve major problems found in previous storage subsystem software
- ZFS on Linux - Proxmox VE - An overview of the features of ZFS.
- ZFS 101—Understanding ZFS storage and performance | Ars Technica - Learn to get the most out of your ZFS filesystem in our new series on storage fundamentals.
- OpenZFS - openSUSE Wiki
- ZFS is a combined file system and logical volume manager designed by Sun Microsystems. The features of ZFS include protection against data corruption, support for high storage capacities, integration of the concepts of filesystem and volume management, snapshots and copy-on-write clones, continuous integrity checking and automatic repair, RAID-Z and native NFSv4 ACLs, and can be very precisely configured. The two main implementations, by Oracle and by the OpenZFS project, are extremely similar, making ZFS widely available within Unix-like systems.
- Kernel/Reference/ZFS - Ubuntu Wiki
- Introduction to ZFS (pdf) | TrueNAS Community - This is a short introduction to ZFS. It is really only intended to convey the bare minimum knowledge needed to start diving into ZFS and is in no way meant to cut Michael W. Lucas' and Allan Jude's book income. It is a bit of a spiritual successor to Cyberjock's presentation, but streamlined and focused on ZFS, leaving other topics to other documents.
- ZFS for Newbies - YouTube | EuroBSDcon
- Dan Langille thinks ZFS is the best thing to happen to filesystems since he stopped using floppy disks. ZFS can simplify so many things and lets you do things you could not do before. If you’re not using ZFS already, this entry-level talk will introduce you to the basics.
- This talk is designed to get you interested in ZFS and see the potential for making your your data safer and your sysadmin duties lighter. If you come away with half the enthusiasm for ZFS that Dan has, you’ll really enjoy ZFS and appreciate how much easier it makes every-day tasks.
- Things we will cover include:
- a short history of the origins
- an overview of how ZFS works
- replacing a failed drive
- why you don’t want a RAID card
- scalability
- data integrity (detection of file corruption)
- why you’ll love snapshots
- sending of filesystems to remote servers
- creating a mirror
- how to create a ZFS array with multiple drives which can lose up to 3 drives without loss of data.
- mounting datasets anywhere in other datasets
- using zfs to save your current install before upgrading it
- simple recommendations for ZFS arrays
- why single drive ZFS is better than no ZFS
- no, you don’t need ECC
- quotas
- monitoring ZFS
- ZFS Tuning Recommendations | High Availability - Guide to tuning and optimising a ZFS file system.
- XFS vs ZFS vs Linux Raid - ServerMania - What is the difference between XFS vs ZFS and Linux Raid (Redundant Array of Independent Disks)? We explain the difference with examples here.
- The path to success for block storage | TrueNAS Community - ZFS does two different things very well. One is storage of large sequentially-written files, such as archives, logs, or data files, where the file does not have the middle bits modified after creation. The other is storage of small, randomly written and randomly read data.
- Do I need to defrag ZFS?
- No, ZFS cannot be defragged because of how it works. If a drive gets heavily fragemented, the industry standard it to move it to another drive which removes the fragmentation.
- Now with the invention of SSD and NVMe their is not performances lost for fragmented data, and if there is it is a very small hit that only corporations need to worry about.
- When a Pool, ZVol or Dataset is created, it is presented as a block device here:
- Beginner's guide to ZFS. Part 1: Introduction - YouTube | Kernotex
- In this series of videos I demonstrate the fantastic file system called ZFS.
- Part 1 is an introduction explaining what ZFS is and the things it is capable of that most other file systems cannot do.
- The slide pack used with the video is avaiable for download.
- Technical information is discussed here.
- "The ZFS filesystem" - Philip Paeps (LCA 2020) - YouTube - Watch Trouble present a three-day workshop on ZFS in however little time the conference organisers were willing to allocate for it! We'll cover topics from filesystem reliability over snapshots and volume management to future directions in ZFS.
- OpenZFS Basics by Matt Ahrens and George Wilson - YouTube - Talk by one of the developers of ZFS and OpenZFS.
- OpenZFS Storage Best Practices and Use Cases
- OpenZFS Best Practices: Snapshots and Backups - In a new series of articles on OpenZFS, we’ll go over some universal best practices for OpenZFS storage, and then dig into several common use cases along with configuration tips and best practices specific to those use cases.
- OpenZFS Best Practices: File Serving and SANs - In our continuing series of ZFS best practices, we examine several of the most common use cases around file serving, and provide configuration tips and best practices to get the most out of your storage.
- OpenZFS Best Practices - Databases and VMs
- In the conclusion of our ZFS Best Practices series we’re covering two of the trickiest use cases, databases and virtual machine hosting.
- Four-wide RAIDz2 offers the same 50% storage efficiency as mirrors do, and considerably lower performance—but they offer dual fault tolerance, which some admins may find worth it.
- VDEV Types Explained
- RAIDZ Types Reference
- RAIDZ levels reference covers various aspects and tradeoffs of the different RAIDZ levels.
- brilliant and simple diagrams of different RAIDZ.
- What is RAIDZ?
- What RAIDZ is? What is the difference between RAID and RAIDZ?
- RAID Z – the technology of combining data storage devices into a single storage developed by the Sun Company. The technology has many features in common with regular RAID; however, it tightly bounds to the ZFS filesystem, which is the only one that can be used on the RAIDZ volumes.
- Although the RAIDz technology is broadly similar to the regular RAID technology, there are still significant differences.
- Understanding ZFS vdev Types
- The most common category of ZFS questions is “how should I set up my pool?” Sometimes the question ends “... using the drives I already have” and sometimes it ends with “and how many drives should I buy." Either way, today’s article can help you make sense of your options.
- Explains all of the different vdev types in simple terms, excellent article
- Single, Mirror, RAIDz1, RAIDz2, RAIDz3 and mroe explained.
- Introduction to TrueNAS Storage Pool | cnblogs.com
- The TrueNAS storage order is memory -> cache storage pool -> data storage pool.
- A storage pool can consist of multiple Vdevs, and Vdevs can be of different types.
- Excellent diagram.
- This will need to be translated but is easy to read after that.
- ZFS Storage pool layout: VDEVs - Knoldus Blogs - This describes VDEVs and their layout to deliver ZFS to the end user. It has some easy to understand graphics.
- Deduplication
- de-duplication is the capability of identifying identical blocks of data and storing just one copy of that block, thus saving disk space.
- ZFS Deduplication | TrueNAS Documentation Hub
- Provides general information on ZFS deduplication in TrueNAS,hardware recommendations, and useful deduplication CLI commands.
- Deduplication is one technique ZFS can use to store file and other data in a pool. If several files contain the same pieces (blocks) of data, or any other pool data occurs more than once in the pool, ZFS stores just one copy of it.
- In effect instead of storing many copies of a book, it stores one copy and an arbitrary number of pointers to that one copy. Only when no file uses that data, is the data actually deleted.
- ZFS keeps a reference table which links files and pool data to the actual storage blocks containing their data. This is the deduplication table (DDT).
- Tutorials
- What Do All These Terms Mean? - TrueNAS OpenZFS Dictionary | TrueNAS
- If you are new to TrueNAS and OpenZFS, its operations and terms may be a little different than those used by other storage providers. We frequently get asked for the description of an OpenZFS term or how TrueNAS technology compares to other technologies.
- This blog post addresses the most commonly requested OpenZFS definitions.
- TrueNAS Storage Primer on ZFS for Data Storage Professionals | TrueNAS
- New to TrueNAS and OpenZFS? Their operations and terms may be a little different for you. The purpose of this blog post is to provide a basic guide on how OpenZFS works for storage and to review some of the terms and definitions used to describe storage activities on OpenZFS.
- This is agreat overview of OpenZFS
- Has a diagram showing the hierarchy.
- This is an excellent overview and description and is a good place to start.
- ZFS Configuration Part 2: ZVols, LZ4, ARC, and ZILs Explained - The Passthrough POST
- In our last article, we touched upon configuration and basic usage of ZFS. We showed ZFS’s utility including snapshots, clones, datasets, and much more. ZFS includes many more advanced features, such as ZVols and ARC. This article will attempt to explain their usefulness as well.
- ZFS Volumes, commonly known as ZVols, are ZFS’s answer to raw disk images for virtualization. They are block devices sitting atop ZFS. With ZVols, one can take advantage of ZFS’s features with less overhead than a raw disk image, especially for RAID configurations.
- Outside of virtualization, ZVols have many uses as well. One such use is as a swap “partition.”
- ZFS features native compression support with surprisingly little overhead. LZ4, the most commonly recommended compression algorithm for use with ZFS, can be set for a dataset (or ZVol, if you prefer) like so:
- What is ZFS? Why are People Crazy About it?
- Today, we will take a look at ZFS, an advanced file system. We will discuss where it came from, what it is, and why it is so popular among techies and enterprise.
- Unlike most files systems, ZFS combines the features of a file system and a volume manager. This means that unlike other file systems, ZFS can create a file system that spans across a series of drives or a pool. Not only that but you can add storage to a pool by adding another drive. ZFS will handle partitioning and formatting.
- ZFS 101—Understanding ZFS storage and performance | Ars Technica - Learn to get the most out of your ZFS filesystem in our new series on storage fundamentals.
- An Introduction to ZFS A Place to Start - ServeTheHome
- In this article, Nick gives an introduction to ZFS which is a good place to start for the novice user who is contemplating ZFS on Linux or TrueNAS.
- Excellent article.
- TrueNAS
- ZFS 101: Leveraging Datasets and Zvols for Better Data Management - YouTube | Lawrence Systems
- Excellent video on datasets and ZVol
- ZFS Datasets are more like enhanced directories with a few enhaced features and why they are different to directories and how they are important to your structure and one you should be using them.
- We will also talk about z-vol and how they function as a virtual block device within the ZFS environment.
- Datasets and ZVOL live within an individual ZFS Pool
- ZVOL
- ZVOL is short for `ZFS Volume` and is a virtual block device within your ZFS storage pool.
- ZFS Volume is the virtual block device within you ZFS pool adn this virtual block device you can think of as hard drive presenting as a virtual block device.
- ZVol can be setup `Sparse` which means `Thick` or `Thin` provisioned
- Thick Provisioned = Pre-Assign all disk space (= VirtualBox Fixed disk size)
- Thin Provisioned = Only assign used space (= VirtualBox Dynamic disk size) (Sparse On ?)
- Primary Use Cases of Zvol
- Local Virtual machine block device (hard drive) for virtualization inside of TrueNAS
- iSCSI storage targets that can be used for any applications that use iSCSI
- ZVol do not present to the file system, you can only see them in the GUI
- iSCSI
- IP based hardrive. It presents as a hard drive so remote OS windows, linux and other OS can use as such.
- Tom touches briefly on iSCSI and how it uses it for his PC games and how to set it up.
- Datasets
- Datasets can be nested as directories in other datasets.
- He uses the name `Virtual_Disks` for his virtual machines, but also their is a `ISO_Storage` folder for his ISOs in that dataset.
- There is a `Primary dataset` which everything elses gets nested under.
- Different Datasets are better that different folders because you can put different policies on the datasets.
- Tom puts all apps under a dataset called `TrueCharts` and then each app has its own datasetup = makes sense (also because enxtcloud has files aswell, he calls the data set `Nextcloud_Database`
- A detailed guide to TrueNAS and OpenZFS | Jason Rose
- This guide is not intended to replace the official TrueNAS or OpenZFS documentation. It will not provide explicit instructions on how to create a pool, dataset, or share, nor will it exhaustively document everything TrueNAS and OpenZFS have to offer. Instead, it's meant to supplement the official docs by offering additional context around the huge range of features that TrueNAS and OpenZFS support.
- Also covers various aspects of hardware inlcuding a brilliant explanation of ECC RAM, not required, but better to have it.
- Setting Up Storage | Documentation hub
- Provides basic instructions for setting up your first storage pool and dataset or zvol.
- The root dataset of the first pool you create automatically becomes the system dataset.
- Some general TrueNAS and ZFS questions | TrueNAS Community
- Worth a read for people just starting out
- Question and Answers for the following topics:
- Datasets & Data Organization
- VDevs
- ZPools
- Encryption
- TrueNAS, SSD & TRIM
- Optimizations for SSDs
- Config DB
- Once you build the bootpool (through TN Install) and then add a new pool the system dataset is automatically moved.
- TrueNAS Comprehensive Solution Brief and Guides
- This amazing document, created by iXsystems in February 2022 as a “White Paper”, cleanly explains how to qualify pool performance touching briefly on how ZFS stores data and presents the advantages, performance and disadvantages of each pool layout (striped vdev, mirrored vdev, raidz vdev).
- It also presents three common scenarios highlighting their different needs, weaknesses and solutions.
- Reading the Introduction to ZFS beforehand is advisable but not required.
- Do not assume your drives have 250 IOPS, find your value by reading this resource.
- Notes from here.
- Manuals
- Cheatsheets
- Performance
- TRIM
Scrub and Resilver
- General
- zfs: scrub vs resilver (are they equivalent?) - Server Fault
- A scrub reads all the data in the zpool and checks it against its parity information.
- A resilver re-copies all the data in one device from the data and parity information in the other devices in the vdev: for a mirror it simply copies the data from the other device in the mirror, from a raidz device it reads data and parity from remaining drives to reconstruct the missing data.
- They are not the same, and in my interpretation they are not equivalent. If a resilver encounters an error when trying to reconstruct a copy of the data, this may well be a permanent error (since the data can't be correctly reconstructed any more). Conversely if a scrub detects corruption, it can usually be fixed from the remaining data and parity (and this happens silently at times in normal use as well).
- zpool-scrub.8 — OpenZFS documentation
- zpool-resilver.8 — OpenZFS documentation
- zfs: scrub vs resilver (are they equivalent?) - Server Fault
- Very technical post
- A scrub reads all the data in the zpool and checks it against its parity information.
- A resilver re-copies all the data in one device from the data and parity information in the other devices in the vdev: for a mirror it simply copies the data from the other device in the mirror, from a raidz device it reads data and parity from remaining drives to reconstruct the missing data.
- They are not the same, and in my interpretation they are not equivalent. If a resilver encounters an error when trying to reconstruct a copy of the data, this may well be a permanent error (since the data can't be correctly reconstructed any more). Conversely if a scrub detects corruption, it can usually be fixed from the remaining data and parity (and this happens silently at times in normal use as well).
- Maintenance
ashift
- What is ashift?
- TrueNAS ZFS uses by default, ashift=12 (4k reads and writes), which will work with 512n/512e/4Kn drives without issue because the ashift is larger or equal to the physical sector size of the drive.
- You can use a higher ashift than the drives physical sectors without a performance hit as ZFS will make sure the sector boundries all line up correctly, but you should never use a lower ashift size as this will cause a massive performance hit and could cause data corruption.
- You can use ashift=12 on a 512n/512e/4kn (512|4096 Bytes Logical Sectors) drives.
- ashift is immutable and is set per vdev, not per pool. Once set it cannot be changed.
- The smallest ashift ZFS uses is ashift=12
- Windows will always use the logical block size presented to it. so a 512e (512/4096) will use 512 sector sizes, but ZFS can override this and use 4K blocks by using ashift. In fact ZFS will read/write in 8x512 blocks.
- ZFS with ashift=12 will always read/write in 4k blocks and will be correctly aligned to the drives underlying physical boundries.
- Ashift=12 and 4Kn | TrueNAS Community
- Data is stored in 4k sectors, but the drive is willing to pretend to the OS it stores by 512 bytes (with write amplification).
- Ashift=12 is just what the doctor orders—and this is a pool-wide setting.
- Ashift=12 for an actual 512-byte device just means reading and writing in batches of 8 sectors.
- Optane is byte-addressable and does not really have a "sector size" in the sense of other devices; it will work just fine.
- What ashift are my vdevs/pool using?
- Performance (ashift related)
- ZFS tuning cheat sheet – JRS Systems: the blog
- Ashift tells ZFS what the underlying physical block size your disks use is. It’s in bits, so ashift=9 means 512B sectors (used by all ancient drives), ashift=12 means 4K sectors (used by most modern hard drives), and ashift=13 means 8K sectors (used by some modern SSDs).
- If you get this wrong, you want to get it wrong high. Too low an ashift value will cripple your performance. Too high an ashift value won’t have much impact on almost any normal workload.
- Ashift is per vdev, and immutable once set. This means you should manually set it at pool creation, and any time you add a vdev to an existing pool, and should never get it wrong because if you do, it will screw up your entire pool and cannot be fixed.
- Best ashift Value = 12
- ZFS Tuning Recommendations | High Availability - Guide to tuning and optimising a ZFS file system.
- The ashift property determines the block allocation size that ZFS will use per vdev (not per pool as is sometimes mistakenly thought).
- Ideally this value should be set to the sector size of the underlying physical device (the sector size being the smallest physical unit that can be read or written from/to that device).
- Traditionally hard drives had a sector size of 512 bytes; nowadays most drives come with a 4KiB sector size and some even with an 8KiB sector size (for example modern SSDs).
- When a device is added to a vdev (including at pool creation) ZFS will attempt to automatically detect the underlying sector size by querying the OS, and then set the ashift property accordingly. However, disks can mis-report this information in order to provide for older OS's that only support 512 byte sector sizes (most notably Windows XP). We therefore strongly advise administrators to be aware of the real sector size of devices being added to a pool and set the ashift parameter accordingly.
- Sector size for SSDs | TrueNAS Community
- There is no benefit to change the default values of TrueNAS, except if your NVME SSD has 8K physical sectors, in this case you have to use ashift=13
- TrueNAS 12 4kn disks | TrueNAS Community
- Q: Hi, I'm new to TrueNAS and I have some WD drives that should be capable to convert to 4k sectors. I want to do the right thing to get the best performance and avoid emulation. The drives show as 512e (512/4096)
- A: There will be no practically noticeable difference in performance as long as your writes are multiples of 4096 bytes in size and properly aligned. Your pool seems to satisfy both criteria, so it should be fine.
- FreeBSD and FreeNAS have a default ashift of 12 for some time now. Precisely for the proliferation of 4K disks. The disk presenting a logical block size of 512 for backwards compatibility is normal.
- Project and Community FAQ — OpenZFS documentation
- Improve performance by setting ashift=12: You may be able to improve performance for some workloads by setting ashift=12. This tuning can only be set when block devices are first added to a pool, such as when the pool is first created or when a new vdev is added to the pool. This tuning parameter can result in a decrease of capacity for RAIDZ configurations.
- Advanced Format (AF) is a new disk format which natively uses a 4,096 byte, instead of 512 byte, sector size. To maintain compatibility with legacy systems many AF disks emulate a sector size of 512 bytes. By default, ZFS will automatically detect the sector size of the drive. This combination can result in poorly aligned disk accesses which will greatly degrade the pool performance.
- Therefore, the ability to set the ashift property has been added to the zpool command. This allows users to explicitly assign the sector size when devices are first added to a pool (typically at pool creation time or adding a vdev to the pool). The ashift values range from 9 to 16 with the default value 0 meaning that zfs should auto-detect the sector size. This value is actually a bit shift value, so an ashift value for 512 bytes is 9 (2^9 = 512) while the ashift value for 4,096 bytes is 12 (2^12 = 4,096).
- Misc
VDEVs (OpenZFS Virtual Device)
- General
- VDEVs, or Virtual DEVices, are the logical devices that make up a Storage Pool and they are created from one or usually more Disks. ZFS has many different types of VDEV.
- Drives are arranged inside VDEVs to provide varying amounts of redundancy and performance. VDEVs allow for the creation of high-performance pools that maximize data lifetime.
- TrueNAS Storage Primer on ZFS for Data Storage Professionals | TrueNAS
- vdevs
- The next level of storage abstraction in OpenZFS, the vdev or virtual device, is one of the more unique concepts around OpenZFS storage.
- A vdev is the logical storage unit of OpenZFS storage pools. Each vdev is composed of one or more HDDs, SSDs, NVDIMMs, NVMe, or SATA DOMs.
- Data redundancy, or software RAID implementation, is defined at the vdev level. The vdev manages the storage devices within it freeing higher level ZFS functions from this task.
- A storage pool is a collection of vdevs which, in turn, are an individual collection of storage devices. When you create a storage pool in TrueNAS, you create a collection of vdevs with a certain redundancy or protection level defined.
- When data is written to the storage pool, the data is striped across all the vdevs in the storage pool. You can think of a collection of vdevs in a storage pool as a RAID 0 stripe of virtual storage devices. Much of OpenZFS performance comes from this striping of data across the vdevs in a storage pool.
- In general, the more vdevs in a storage pool, the better the performance. Similar to the general concept of RAID 0, the more storage devices in a RAID 0 stripe, the better the read and write performance.
- Understanding ZFS vdev Type | Klara Systems
- Excellent Explanation
- The most common category of ZFS questions is “how should I set up my pool?” Sometimes the question ends “... using the drives I already have” and sometimes it ends with “and how many drives should I buy." Either way, today’s article can help you make sense of your options.
- Note that a zpool does not directly contain actual disks (or other block/character devices, such as sparse files)! That’s the job of the next object down, the vdev.
- vdev (Short for virtual device) whether "support or storage", is a collection of block or character devices (for the most part, disks or SSDs) arranged in a particular topology.
- SOLVED - Clarification on different vdev types | TrueNAS Community
- Data: Stores the files themselves, and everything else if no special vdevs are used.
- Cache: I believe this is what people refer to as L2ARC, basically a pool-specific extension of the RAM-based ARC. Can improve read speeds by caching some files on higher speed drives. Should not be used on a system with less than 32/64GB (couldn't find a strong consensus there) or it may hurt performance by using up RAM. Should be less than 10x the total system RAM in size. Should be high speed and high endurance (since it's written to a lot), but failure isn't a huge deal as it won't cause data loss. This won't really do anything unless the system is getting a lot of ARC misses.
- Log: I believe this is what people refer to as SLOG, a separate, higher speed vdev for write logs. Can improve speeds for synchronous writes. A synchronous write is when the ZFS write-data (not the files themselves, but some sort of ZFS-specific write log) is written to the RAM cache (ARC) and the pool (ZIL or SLOG if available) at the same time, vs an asynchronous write where it's written to ARC, then eventually gets moved to the pool. SLOG basically replaces the ZIL, but with faster storage, allowing sync writes to complete faster. Should be high speed,
but doesn't need to be super high endurance like cache, since it sees a lot less writes. (Edit: I don't actually know this to be true. jgreco's guide on SLOGs says it should be high endurance, so maybe I don't understand exactly what the 'intent log' data is) Won't do anything for async writes, and general file storing is usually mostly async.
- Hot Spare: A backup physical drive (or multiple drives) that are kept running, but no data is written to. In the event of a disk failure, the hot spare can be used to replace the failed disk without needing to physically move any disks around. Hotspare disks should be the same disks as whatever disks they will replace.
- Metadata: A Separate vdev for storing just the metadata of the main data vdev(s), allowing it to be run on much faster storage. This speeds up file browsing or searching, as well as reading lots of files (at least, it speeds up the locating of the files, not the actual reading itself). If this vdev dies, the whole pool dies, so this should be a 2/3-way mirror. Should be high speed, but doesn't need super high endurance like cache.
- Dedup: Stores the de-duplication tables for the data vdev(s) on faster storage, (I'm guessing) to speed up de-duplication tasks. I haven't really come across many posts about this, so I don't really know what the write frequency looks like.
- Explaining ZFS LOG and L2ARC Cache (VDEV) : Do You Need One and How Do They Work? - YouTube | Lawrence Systems
- Fixing my worst TrueNAS Scale mistake! - YouTube | Christian Lempa
- In this video, I'll fix my worst mistake I made on my TrueNAS Scale Storage Server. We also talk about RAID-Z layouts, fault tolerance and ZFS performance. And what I've changed to make this server more robust and solid!
- Do not add too many drives to single Vdev
- RAID-Z2 = I can allow for 2 drives to fail
- Use SSD for the pool that holds the virtual disks and Apps
- Types/Definitions
- Data
- (from SCALE GUI) Normal vdev type, used for primary storage operations. ZFS pools always have at least one DATA vdev.
- You can configure the DATA VDEV in one of the following topologies:
- Stripe
- Requires at least one disk
- Each disk is used to store data. has no data redundancy.
- The simplest type of vdev.
- This is the absolute fastest vdev type for a given number of disks, but you’d better have your backups in order!
- Never use a Stripe type vdev to store critical data! A single disk failure results in losing all data in the vdev.
- Mirror
- Data is identical in each disk. Requires at least two disks, has the most redundancy, and the least capacity.
- This simple vdev type is the fastest fault-tolerant type.
- In a mirror vdev, all member devices have full copies of all the data written to that vdev.
- A standard RAID1 mirror
- RAID-Z1
- Requires at least three disks.
- ZFS software 'distributed' parity based RAID.
- Uses one disk for parity while all other disks store data.
- This striped parity vdev resembles the classic RAID5: the data is striped across all disks in the vdev, with one disk per row reserved for parity.
- When using 4 disks, 1 drive can fail. Minimum 4 disks required.
- RAID-Z2
- Requires at least four disks.
- ZFS software 'distributed' parity based RAID
- Uses two disks for parity while all other disks store data.
- The second (and most commonly used) of ZFS’ three striped parity vdev topologies works just like RAIDz1, but with dual parity rather than single parity
- You only have 50% of the total disk space available to use.
- When using 4 disks, 2 drives can fail. Minimum 4 disks required.
- RAID-Z3
- Requires at least five disks.
- ZFS software 'distributed' parity based RAID
- Uses three disks for parity while all other disks store data.
- This final striped parity topology uses triple parity, meaning it can survive three drive losses without catastrophic failure.
- You only have 25% of the total disk space available for use.
- When using 4 disks, 3 drives can fail. Minimum 4 disks required.
- Cache
- A ZFS L2ARC read-cache that can be used with fast devices to accelerate read operations.
- An optional vdev you can add or remove after creating the pool, and is only useful if the RAM is maxed out.
- Aaron Toponce : ZFS Administration, Part IV- The Adjustable Replacement Cache
- This is a deep-dive inot the L2ARC system.
- Level 2 Adjustable Replacement Cache, or L2ARC - A cache residing outside of physical memory, typically on a fast SSD. It is a literal, physical extension of the RAM ARC.
- OpenZFS: All about the cache vdev or L2ARC | Klara Inc - CACHE vdev, better known as L2ARC, is one of the well-known support vdev classes under OpenZFS. Learn more about how it works and when is the right time to wield this powerful tool.
- Log
- A ZFS LOG device that can improve speeds of synchronous writes.
- An optional write-cache that you can add or remove after creating the pool.
- A dedicated VDEV for ZFS’s intent log, it can improve performance
- Hot Spare
- Drive reserved for inserting into DATA pool vdevs when an active drive has failed.
- From CORE doc
- Hot Spare are drives reserved to insert into Data vdevs when an active drive fails. Hot spares are temporarily used as replacements for failed drives to prevent larger pool and data loss scenarios.
- When a failed drive is replaced with a new drive, the hot spare reverts to an inactive state and is available again as a hot spare.
- When the failed drive is only detached from the pool, the temporary hot spare is promoted to a full data vdev member and is no longer available as a hot spare.
- Metadata
- A Special Allocation class, used to create Fusion Pools.
- An optional vdev type which is used to speed up metadata and small block IO.
- A dedicated VDEV to store Metadata
- Dedup
- A dedicated VDEV to Store ZFS de-duplication tables
- Deduplication is not recommended (level1)
- Requires allocating X GiB for every X TiB of general storage. For example, 1 GiB of Dedup vdev capacity for every 1 TiB of Data vdev availability.
- File
- A pre-allocated file.
- TrueNAS does not support this.
- Physical Drive (HDD, SDD, PCIe NVME, etc)
- TrueNAS does not support this. Unless this is ZVol?.
- dRAID (aka Distributed RAID)
- TrueNAS does not support this.
- dRAID — OpenZFS documentation
- dRAID is a variant of raidz that provides integrated distributed hot spares which allows for faster resilvering while retaining the benefits of raidz. A dRAID vdev is constructed from multiple internal raidz groups, each with D data devices and P parity devices. These groups are distributed over all of the children in order to fully utilize the available disk performance. This is known as parity declustering and it has been an active area of research. The image below is simplified, but it helps illustrate this key difference between dRAID and raidz.
- OpenZFS 2.1 is out—let’s talk about its brand-new dRAID vdevs | Ars Technica - dRAID vdevs resilver very quickly, using spare capacity rather than spare disks.
- Special
- TrueNAS does not support this
- The SPECIAL vdev is the newest support class, introduced to offset the disadvantages of DRAID vdevs (which we will cover later). When you attach a SPECIAL to a pool, all future metadata writes to that pool will land on the SPECIAL, not on main storage.
- Losing any SPECIAL vdev, like losing any storage vdev, loses the entire pool along with it. For this reason, the SPECIAL must be a fault-tolerant topology
Pools (ZPool / ZFS Pool / Storage Pool)
- General
- A Pool is a combination of one or more VDEVs, but at least one DATA VDEV.
- If you have multiple VDEVs then the pool is striped across the VDEVs.
- The pool is mounted in the filesystem (eg /mnt/Magnetic_Storage) and all datasets within this.
- Pools | Documentation Hub
- Tutorials for creating and managing storage pools in TrueNAS SCALE.
- Storage pools are attached drives organized into virtual devices (vdevs). ZFS and TrueNAS periodically reviews and “heals” whenever a bad block is discovered in a pool. Drives are arranged inside vdevs to provide varying amounts of redundancy and performance. This allows for high performance pools, pools that maximize data lifetime, and all situations in between.
- TrueNAS Storage Primer on ZFS for Data Storage Professionals | TrueNAS
- Storage Pools
- The highest level of storage abstraction on TrueNAS is the storage pool. A storage pool is a collection of storage devices such as HDDs, SSDs, and NVDIMMs, NVMe, that enables the administrator to easily manage storage utilization and access on the system.
- A storage pool is where data is written or read by the various protocols that access the system. Once created, the storage pool allows you to access the storage resources by either creating and sharing file-based datasets (NAS) or block-based zvols (SAN).
- ZFS Record Size
- About ZFS recordsize – JRS Systems: the blog
- ZFS stores data in records, which are themselves composed of blocks. The block size is set by the ashift value at time of vdev creation, and is immutable.
- The recordsize, on the other hand, is individual to each dataset (although it can be inherited from parent datasets), and can be changed at any time you like. In 2019, recordsize defaults to 128K if not explicitly set.
- qemu - Disadvantages of using ZFS recordsize 16k instead of 128k - Server Fault
-
Short answer: It really depends on your expected use case. As a general rule, the default 128K recordsize is a good choice on mechanical disks (where access latency is dominated by seek time + rotational delay). For an all-SSD pool, I would probably use 16K or at most 32K (only if the latter provides a significant compression efficiency increase for your data).
- Long answer: With an HDD pool, I recommend sticking with the default 128K recordsize for datasets and using 128K volblocksize for zvol also. The rationale is that access latency for a 7.2K RPM HDD is dominated by seek time, which does not scale with recordsize/volblocksize. Lets do some math: a 7.2K HDD has an average seek time of 8.3ms, while reading a 128K block only takes ~1ms. So commanding an head seek (with 8ms+ delay) to read a small 16K blocks seems wasteful, especially considering that for smaller reads/writes you are still impaired by r/m/w latency. Moreover, a small recordsize means a bigger metadata overhead and worse compression. So while InnoDB issues 16K IOs, and for a dedicated dataset one can use 16K recordsize to avoid r/m/w and write amplification, for a mixed-use datasets (ie: ones you use not only for the DB itself but for more general workloads also) I would suggest staying at 128K, especially considering the compression impact from small recordsize.
- However, for an SSD pool I would use a much smaller volblocksize/recordsize, possibly in the range of 16-32K. The rationale is that SSD have much lower access time but limited endurance, so writing a full 128K block for smaller writes seems excessive. Moreover, the IO bandwidth amplification commanded by large recordsize is much more concerning on an high-IOPs device as modern SSDs (ie: you risk to saturate your bandwidth before reaching IOPs limit).
- volblocksize vs recordsize
- volblocksize (ZVol) = Record Size (Dataset) = The actual block size used by ZFS for disk operations.
- zfs/zvol recordsize vs zvolblocksize | Proxmox Support Forum
- whatever
- volblocksize is used only for ZVOLs
- recordsize is used for datasets
- If you try to get all properties of zvol you will realize that there is no "recordsize" and vice versa
- From my experience I could suggest to use ZVOL whenever it's possible. "volblocksize" mainly depends on pool configuration and disk model and should be chosen after some performance tests
- mir
- Another thing to take into consideration is storage efficiency. You should try to match volblock size with actual size of the written blocks. If you primarily do 4k writes, like most database systems, then favor a volblock size of 4k.
- guletz
- The size of zvolblocksize it has nothing to do and is not corelated with any DATASET recordsize. This 2 proprieties (zvolblocksize/recordsize) are 2 different things!
- ZFS datasets use an internal recordsize of 128KB by default.
- Zvols have a volblocksize property that is analogous to record size. The default size is 8KB
- Planning a Pool
- How many drives do I need for ZFS RAID-Z2? - Super User
- An in-depth and answer.
- Hence my recommendation: If you want three drives ZFS, and want redundancy, set them up as a three-way mirror vdev. If you want RAID-Z2, use a minimum of four drives, but keep in mind that you lock in the number of drives in the vdev at the time of vdev creation. Currently, the only way to grow a ZFS pool is by adding additional vdevs, or increasing the size of the devices making up a vdev, or creating a new pool and transferring the data. You cannot increase the pool's storage capacity by adding devices to an existing vdev.
- Path to Success for Structuring Datasets in Your Pool | TrueNAS Community
- So you've got a shiny new FreeNAS server, just begging to have you create a pool and start loading it up. Assuming you've read @jgreco's The path to success for block storage sticky, you've decided on the composition of your pool (RAIDZx vs mirrors), and built your pool accordingly. Now you have an empty pool and a pile of bits to throw in.
- STOP! You'll need to think at this point about how to structure your data.
- Optimal configuration for SCALE | TrueNAS Community
- Example configuration
- 850 EVO SSD = Boot Drive
- Sandisk SSD = Applications Pool (Where your installed server applications get installed. SSD can make a big performance difference because they do a lot of internal processing.)
- 2x6TB Drives = 1 Mirrored Pool (for data that need a bit more safety/redundancy)
- 1TB 980 = 1 Additional Pool (a bit riskier due to lack of redundancy)
- Choosing the right ZFS pool layout | Klara Inc - ZFS truly supports real redundant data storage with a number of options, such as mirror, RAID-Z or dRAID vdev types. Follow this guide to better understand these options.
- Naming a Pool
- 'My' Pool Naming convention
- You can use: (cartoon characters|Movie characters|planets|animalsconstallations|Types of Fraggle|Muppet names): eg: you can choose large animals for storage, (smaller|faster) animals for NVMe etc.
- Should not be short or and ordinary word so you are at less risk of making a mistake on the CLI.
- Start with a capital letter, again so you are at less risk of making a mistake on the CLI.
- (optional) it should be almost descriptionve of what the pool does i.e. `sloth` for slow drives.
- It should be a single word.
- Examples:
- Fast/Mag = too short
- Coyote + RoadRunner = almost but the double words will be awkward to type all the time.
- Lion/Cat/Kitten = Cat is could be mistaken for a Linux command and is too short.
- Wiley Coyote, Road Runner, Speedy Gonzales
- Planets, Solar System, Constellations, Universe
- Mercury, Venus, Earth, Mars, Jupiter, Saturn, Uranus, Neptune, Pluto (I know, but don't care)
- Ocean, Tank, Puddle
- Some other opinions
- Creating Pools
- Creating Storage Pools | Documentation Hub
- Provides information on creating storage pools and using VDEV layout options in TrueNAS SCALE.
- Storage pools attach drives organized into virtual devices called VDEVs. ZFS and TrueNAS periodically review and heal when discovering a bad block in a pool. Drives arranged inside VDEVs provide varying amounts of redundancy and performance. ZFS and VDEVs combined create high-performance pools that maximize data lifetime.
- All pools must have a data VDEV. You can add as many VDEV types (cache, log, spare, etc.) as you want to the pool for your use case but it must have a data VDEV.
- Creating Pools (CORE) | Documentation Hub
- Describes how to create pools on TrueNAS CORE.
- Has some more information on VDEVs.
- The storage pool is mounted under its name (/mnt_Magnetic_Storage) and all datasets (File system / ZVol / iSCSI) are nested under this and visible to the OS here.
- Managing Pools
- Expanding a Pool
- Example Pool Heirarchy (Datasets)
- When you have more than one pool it is useful to plan how they are going to be laid out, what media they are on (NVMe/SSD/HDD) and what role they performsuch as VM or long term backup. You also need to have an idea how the Datasets will be presented.
- Example (needs improving)
- MyPoolA
- Media
- Virtual_Disks
- ISOs
- Backups
- ...............................
- SSD1?
- NVME1?
- What Datasets do you use and why? - TrueNAS General - TrueNAS Community Forums
- Export/Disconnect or Delete a Pool
- There is no dedicated delete option
- You have the option when you are disconnecting the pool, to destroy the pool data on the drives and this option (I don't think) does not do a driove zero-fill style wipe for the whole drive, just the relevant pool data.
- You need to disconnect the drive cleanly from the pool so you can delete it, hence this is why there is no delete button and is only part of the disconnect process.
- Storage --> [Pool-Name] --> Export/Disconnect
- Managing Pools | Documentation Hub
- The Export/Disconnect option allows you to disconnect a pool and transfer drives to a new system where you can import the pool. It also lets you completely delete the pool and any data stored on it.
- Migrating ZFS Storage Pools
- NB: These notes are based on SolarisZFS but the wording is still true.
- Occasionally, you might need to move a storage pool between systems. To do so, the storage devices must be disconnected from the original system and reconnected to the destination system. This task can be accomplished by physically recabling the devices, or by using multiported devices such as the devices on a SAN. ZFS enables you to export the pool from one machine and import it on the destination system, even if the system are of different architectural endianness.
- Storage pools should be explicitly exported to indicate that they are ready to be migrated. This operation flushes any unwritten data to disk, writes data to the disk indicating that the export was done, and removes all information about the pool from the system.
- If you do not explicitly export the pool, but instead remove the disks manually, you can still import the resulting pool on another system. However, you might lose the last few seconds of data transactions, and the pool will appear faulted on the original system because the devices are no longer present. By default, the destination system cannot import a pool that has not been explicitly exported. This condition is necessary to prevent you from accidentally importing an active pool that consists of network-attached storage that is still in use on another system.
- Export/Disconnect Window | Documentation Hub
- Export/Disconnect opens the Export/disconnect pool: poolname window that allows users to export, disconnect, or delete a pool.
- Exporting/disconnecting can be a destructive process! Back up all data before performing this operation. You might not be able to recover data lost through this operation.
- Disks in an exported pool become available to use in a new pool but remain marked as used by an exported pool. If you select a disk used by an exported pool to use in a new pool the system displays a warning message about the disk.
- Disconnect Options
- Destroy data on this pool?
- Select to erase all data on the pool. This deletes the pool data on the disks and effectively deleting all data.
- Delete configuration of shares that use this pool?
- Remove the share connection to this pool. Exporting or disconnecting the pool deletes the configuration of shares using this pool. You must reconfigure the shares affected by this operation.
- Confirm Export/Disconnect *
- Activates the Export/Disconnect button.
- exporting my pool | TrueNAS Community
- Q: I just upgraded my TrueNAS and i need to move the drives from the old TrueNAS to my new TrueNAS. Can I just disconect theme and plug them in in to my new TrueNAS?
- A:
- Export the pool only if you're not taking the boot pool/drive with you.
- If all drives will move, it will be fine.
- Be aware of things like different NIC in the new system as that can mess with jails or VMs, but otherwise all should be simple.
- Rename a Pool
- This is not an easy thing to do.
- How To Rename a ZFS Pool | TrueNAS Community
- Instructions
- The basic process to rename a ZFS pool is to export it from the GUI, import it in the CLI with the new name, then export it again, and re-import it in the GUI.
- I find I normally want to do this after creating a new pool (with perhaps a different set of disks/layout), replicating my old pool to the new pool, and then I want to rename the new pool to the same as the old pool, and then all the shares work correctly, and its fairly transparent. Mostly.
- Changing pool name | TrueNAS Community
- Export the pool through the GUI. Be sure not to check the box to destroy all data.
- From the CLI: zpool import oldpoolname newpoolname
- From the CLI: zpool export newpoolname
- From the GUI, import the pool.
- renaming pool with jails/vms | TrueNAS Community - i need to rename a pool, its the pool with my jails and vms on it.
- TRIM / Auto TRIM / Autotrim
- This section deasl with ZFS native TRIM, not within ZVols as that is dealt with later because it is a different issue.
- Auto TRIM is off by default
- Location: Storage --> Your Pool --> ZFS Health --> Edit Auto Trim
- Auto Trim for NVMe Pool | TrueNAS Community
- morganL (iXsystems)
- Autotrim isn't enabled by default because we find that for many SSDs it actually makes ZFS performance worse and we haven't found many cases where it significantly improves anything.
- ZFS is not like most file systems... data is aggregated before it is written to the drives. The SSDs don't wear out as fast as would be expected. The SSD performance is better because there are fewer random writes.
- Autotrim ends up with more operations being issued to each SSD. The extra TRIM operations are not free... they are like writes of all zeros. The SSDs do "housekeeping" to free up the space and that housekeeping involves its own flash write operations.
- = Leave off
- Q: so I better leave it off then?
- A:
- Yes, Its one of those things that would need to be tested with your specific SSDs and with your specific workload. It's unlikely to help, but we don't mind anyone testing.
- We just don't recommend turning it on for important pools, without testing. (CYA is a reasonable accusation) Unfortunately, testing these things can take weeks.
- winnielinnie
- I use an alternative method. With a weekly Cron Task, the "zpool trim" command is issued only to my pool comprised of two SSDs:
zpool trim ssdpool
- It only runs once a week.
- EDIT: To be clear, I have "Auto Trim" disabled on all of my pools, while I have a weekly Cron Task that issues "zpool trim" on only a very specific pool (comprised solely of SSDs.)
- If your workload has a weekly "quiet" period, this makes sense. It reduces the extra TRIM workload, but takes advantage of any large deletions of data.
- winnielinnie
- Some notes on using using TRIM on SSDs with ZFS on Linux | Chris Wiki - One of the things you can do to keep your SSDs performing well over time is to explicitly discard ('TRIM') disk blocks that are currently unused. ZFS on Linux has support for TRIM commands for some time; the development version got it in 2019, and it first appeared in ZoL 0.8.0.
- boot-pool Auto TRIM? | TrueNAS Community
- Q:
- I am testing TrueNAS SCALE on a VM using a thin provisioned storage. Virtual disk for the boot pool ended at >40Gb size after a clean install and some messing around, boot-pool stats on the GUI show "Used: 3.86 GiB" Running zpool trim boot-pool solved the issue.
- Is there any reason boot pool settings do not show Auto TRIM checkbox?
- A:
- Maybe, if your boot pool is on an SSD that uses a silicon controller (such as the WD Green 3D NAND devices)... TRIM causes corruption on those devices (so you shouldn't be using them anyway).
- Quite possibly because many off-brand SSD's (and hypervisors, for that matter) are gimpy about things like TRIM, and since TrueNAS is intended to be used on physical machines, it is optimized for that use case. I'd say it's correct for it to be disabled by default. Having a checkbox to enable it would probably not be tragic.
- SSD Pool / TRIM missbehaving ? | TrueNAS Community
- Is it possible that most of your TRIM is the initial trim that ZFS does when the pool is created?
- If not, you still don't need to be worried about TRIM. In fact, you need to undo anything you have done to disable TRIM. TRIM is good for SSDs.
- If you have a problem, the problem is writes. You can use
zpool iostat -v pool 1 to watch your I/O activity. You may need to examine your VM to determine what it is doing that may cause writes.
- zpool-trim.8 — OpenZFS documentation
- Initiates an immediate on-demand TRIM operation for all of the free space in a pool. This operation informs the underlying storage devices of all blocks in the pool which are no longer allocated and allows thinly provisioned devices to reclaim the space.
- A manual on-demand TRIM operation can be initiated irrespective of the autotrim pool property setting. See the documentation for the autotrim property above for the types of vdev devices which can be trimmed.
Boot Pool (boot-pool) / Boot Drive
- Boot Pool Management | TrueNAS Documentation Hub - Provides instructions on managing the TrueNAS SCALE boot pool and boot environments.
- Check Status
- System Settings --> Boot --> Boot Pool Status
- Should I RAID/Mirror the boot drive?
- Never use a hardware RAID when you are using TrueNAS, as it is pointless and will cause errors along the way.
- TrueNAS would not put the option to RAID the boot drive if it was pointless.
- Should I Raid the Boot drive and what size should the drives be? | TrueNAS Community - My thread.
- 16 GB or more is sufficient for the boot drive.
- It's not really necessary to mirror the boot drive. It's more critical to regularly back up your config. If you have a config backup and your boot drive goes south, reinstalling to a new boot drive and then uploading your config will restore your system like it never happened.
- Setting up the mirror up during installation.
- There is really no reason to wait until later, unless you're doing more advanced tricks like partitioning the device to use a portion of it for L2ARC or other purposes.
- Is it a good policy to make the boot drive mirrored? See different responses below:
- It's not really necessary to mirror the boot drive. It's more critical to regularly back up your config. If you have a config backup and your boot drive goes south, reinstalling to a new boot drive and then uploading your config will restore your system like it never happened.
- Probably, but it depends on your tolerance for downtime.
- The config file is the important thing; if you have a backup of that (and you do, on your pool, if you can get to it; but it's better to download copies as you make significant system changes), you can restore your system to an identical state when a boot device fails. If you don't mind that downtime (however long it takes you to realize the failure, source and install a replacement boot device, reinstall TrueNAS, and upload the config file), then no, mirroring the boot devices isn't a particularly big deal.
- If that downtime would be a problem for you, a second SSD for a boot mirror is cheap insurance.
- = Yes, and I will let TrueNAS mirror the boot-drive during the installation as I don't want any downtime.
- Copy the config on the boot drive to the storage drive
- Is this the system dataset?
- Best Boot Drive Size for FreeNAS | TrueNAS Community
- And no, the only other thing you can put on the boot is the System Dataset. Which is a pity, I'd be very happy to be able to choose to put the jails dataset on there or swap.
- FreeNAS initially puts the .system dataset on the boot pool. Once you create a data pool, though, it's moved there automatically.
- Allow assigning spares to the boot pool - Feature Requests - TrueNAS Community Forums
- One downfall (one that is shared with simply having a single mirror of the boot pool) is that if the boot pool doesn’t suffer a failure that causes it to be fully invisible to the motherboard, it is quite common to have to go into the BIOS & actually select the 2nd assumed working boot drive.
- Spare boot is less of bulletproofing & more of a time reduction vs re-installing & uploading config for systems that either need high uptime or for users (like myself) that aren’t always as religious about backing up config as they should be.
- Boot: RAID-1 to No Raid | TrueNAS Community
- Q: Is there a way to remove a boot mirror and just replace it with a single USB drive, without reinstalling FreeNAS?
- A: Yes, but why would you want to?
zpool detach pool device
Datasets
- What is a dataset and what does it do? newbie explanation:
- It is a filesystem:
- It is container that holds a filesystem, similiar to a hardrive holding a single NTFS paritition.
- The dataset's file system can be `n` folders deep, there is no limit.
- This associated filesystem can be mounted or unmounted. This will not affect the datasets configurability or its place in the heirarchy but will affect the ability to access it's files in the file system.
- Can have Child Datasets:
- A dataset can have nested datasets within it.
- These datasets will appear as a folder in it's parent's dataset file system.
- These datasets can inherit the permissions from its parent dataset or it can have its own.
- Each child dataset has its own independent filesystem which is access thorugh its folder in the parent's filesystem.
- Each dataset can be configured:
- A dataset defines a single configuration that is used by all of it's file system folders and files. Child datasets will also use this configuration if they are set to inherit the config/settings.
- A dataset configuration can define: compression level, access control (ACL) and much more.
- As long as you have the pemissions, you can browse through all of a datasets files system, child datasets all from the root/parent dataset, or where you set the share from (obviously you cannot go up further than where the share is mounted). They will act like one file systems but with some folders (As defined by datasets) having different permissions.
- You set permissions (and other things) per dataset, not per folder.
- Always use SMB for dataset share type
- Unless you know different and why, you should always set your datasets to use SMB as this will utilise the modern ACL that TrueNAS provides.
General
- Datasets | Documentation Hub
- Adding and Managing Datasets | Documentation Hub
- Provides instructions on creating and managing datasets.
- A dataset is a file system within a data storage pool. Datasets can contain files, directories (child datasets), and have individual permissions or flags. Datasets can also be encrypted, either using the encryption created with the pool or with a separate encryption configuration.
- TruenNAS recommend organizing your pool with datasets before configuring data sharing, as this allows for more fine-tuning of access permissions and using different sharing protocols.
- TrueNAS Storage Primer on ZFS for Data Storage Professionals | TrueNAS
- Datasets
- A dataset is a named chunk of storage within a storage pool used for file-based access to the storage pool. A dataset may resemble a traditional filesystem for Windows, UNIX, or Mac. In OpenZFS, a raw block device, or LUN, is known as a zvol. A zvol is also a named chunk of storage with slightly different characteristics than a dataset.
- Once created, a dataset can be shared using NFS, SMB, AFP, or WebDAV, and accessed by any system supporting those protocols. Zvols are accessed using either iSCSI or Fibre Channel (FC) protocols.
- 8. Create Dataset - Storage — FreeNAS® User Guide 9.10.2-U2 Table of Contents - An existing ZFS volume can be divided into datasets. Permissions, compression, deduplication, and quotas can be set on a per-dataset basis, allowing more granular control over access to storage data. A dataset is similar to a folder in that you can set permissions; it is also similar to a filesystem in that you can set properties such as quotas and compression as well as create snapshots.
- Creating ZFS Data Sets and Compression - The Urban Penguin
System Dataset (TrueNAS Config)
- The system dataset stores critical data like debugging core files, encryption keys for pools, and Samba 4 metadata such as the user/group cache and share level permissions.
- The root dataset of the first pool you create automatically becomes the `system dataset`. In most peoples cases this is the `boot-pool` because you only have your boot drive(s) installed when setting up TrueNAS. TureNAS sets up the pool with the relevant ZFS/Pool/Vdev configuration on your boot drive(s).
- This dataset can be in a couple of places as TrueNAS automatically moves the system dataset to the most appropriate pool by using these rules:
- When you create your first storage pool, TrueNAS automatically moves the `system dataset`to the new storage pool away from the`boot-pool` as this give much better protection to your system.
- Exporting the pool with the system dataset on it will cause TrueNAS to transfer the system dataset to another available pool. If the only available pool is encrypted, that pool will no longer be able to be locked. When no other pools exist, the system dataset transfers back to the TrueNAS operating system device (`boot-pool`).
- You can manually move this dataset yourself
- System Settings --> Advanced --> Storage --> Configure --> System Dataset Pool
- Setting the System Dataset (CORE) | Documentation Hub
- Describes how to configure the system dataset on TrueNAS CORE.
- Not sure if this all still applies.
- How to change system dataset location - TrueNAS General - TrueNAS Community Forums
- You can 100% re-install Scale
- just make a backup of your config & after the fresh install you can import your config.
- Settings --> General --> Manage Config --> Download File
- then after the fresh install import your config.
- Settings --> General --> Manage Config --> Upload File
- Q: I see no Option anywhere to move it to the boot Pool.
- A:
- There is no such thing.
- There is a System dataset, that resides on the boot-pool and is moved to the first pool you create after install.
- You can manually move the System dataset to a pool of your choice by going to
- System Settings --> Advanced --> Storage, click Configure and you should see a dropdown menu and the ability to set Swap (Which is weird since swap is disabled…).
- Anyway, if you don’t see the dropdown menu, try force reloading the webpage or try a different browser.
- Best practices for System Dataset Pool location | TrueNAS Community
- Do not let your drives spin down.
- Q: From what I've read, by default the System Dataset pool is the main pool. In order to allow the HDDs on that pool to spin down, can the system dataset be moved to say a USB pen? Even to the freenas-boot - perhaps periodically keeping a mirror/backup of that drive?
- Actually, you probably DONT want your disks to spin down. When they do, they end up spinning down and back up all day long. You will ruin your disks in no time doing that. A hard drive is meant to stop and restart only so many times. It is fine for a desktop to spin down because the disks will not start for hours and hours. But for a NAS, every network activity is subject to re-start the disks and often, they will restart every few minutes.
- To have the system dataset in the main pool also helps you recover your system's data from the pool itself and not from the boot disk. So that is a second reason to keep it there.
- Let go of the world you knew young padawan. The ZFS handles the mirroring of drives. Do not let spinners stop, the thermodynamics will weaken their spirit and connection to the ZFS. USB is the path to the dark side, the ZFS is best channeled through SAS/SATA and actually prices of SSDs are down to thumb drive prices even if you don’t look at per TB price..
- Your plan looks like very complicated and again, will not be that good for the hard drive. To heat up and cool down, just like spinning up and down, is not good either. The best thing for HDD is to stay up, spinning and hot all the time.
- What do you try to achieve by moving the system dataset out of the main pool ?
- To let the main pool's drives spin down? = Bad idea
- To let the main pool's drive cool down? = Bad idea
- To save space in the main pool? = Bad idea (system dataset is very small, so no benefit here)
- Because there is no benefit doing it, doing so remains a bad idea...
- The constant IO will destroy a pendrive in a matter of months
Copy (Replicate, Clone), Move, Delete; Datasets and ZVols
This is a summary of commands and research for completing these tasks.
- Where possible you should do any data manipulation in the GUI, that is what it is there for.
- Snapshots are not backups, they only record the changes made to a dataset, but they can be used to make backups through replication of the dataset.
- Snapshots are great for ransomware protection and reverting changes made in error.
- ZVols are a special Dataset type.
- Moving a dataset is not as easy as moving a folder in Windows or a Linux GUI.
- When looking at managing datasets people can get files and datasets mixed up so quite a few of these links will have file operations instead of `ZFS Dataset` commands which is ok if you just want to make a copy of the files at the files level with no snapshots etc..
- TrueNAS GUI (Data Protection) supports:
- Periodic Snapshot Tasks
- Replication Tasks (zfs send/receive)
- Cloud Sync Tasks (AWS, S3, etc...)
- Rsync Tasks (only scheduled, no manual option)
- Commands:
- zfs-rename.8 — OpenZFS documentation
- Rename ZFS dataset.
- -r : Recursively rename the snapshots of all descendent datasets. Snapshots are the only dataset that can be renamed recursively.
- zfs-snapshot.8 — OpenZFS documentation
- Create snapshots of ZFS datasets.
- This page has an example of `Performing a Rolling Snapshot`which shows how to maintain a history of snapshots with a consistent naming scheme. To keep a week's worth of snapshots, the user destroys the oldest snapshot, renames the remaining snapshots, and then creates a new snapshot.
- -r : Recursively create snapshots of all descendent datasets.
- zfs-send.8 — OpenZFS documentation
- Generate backup stream of ZFS dataset which is written to standard output.
- -R : Generate a replication stream package, which will replicate the specified file system, and all descendent file systems, up to the named snapshot. When received, all properties, snapshots, descendent file systems, and clones are preserved.
- -I snapshot : Generate a stream package that sends all intermediary snapshots from the first snapshot to the second snapshot. For example, -I @a fs@d is similar to -i @a fs@b; -i @b fs@c; -i @c fs@d. The incremental source may be specified as with the -i option.
- -i snapshot|bookmark : Generate an incremental send stream. The incremental source must be an earlier snapshot in the destination's history. It will commonly be an earlier snapshot in the destination's file system, in which case it can be specified as the last component of the name (the # or @ character and following). If the incremental target is a clone, the incremental source can be the origin snapshot, or an earlier snapshot in the origin's filesystem, or the origin's origin, etc.
- zfs-receive.8 — OpenZFS documentation
- Create snapshot from backup stream.
- zfs recv can be used as an alias for zfs receive.
- Creates a snapshot whose contents are as specified in the stream provided on standard input. If a full stream is received, then a new file system is created as well. Streams are created using the zfs send subcommand, which by default creates a full stream.
- If an incremental stream is received, then the destination file system must already exist, and its most recent snapshot must match the incremental stream's source. For zvols, the destination device link is destroyed and recreated, which means the zvol cannot be accessed during the receive operation.
- -d : Discard the first element of the sent snapshot's file system name, using the remaining elements to determine the name of the target file system for the new snapshot as described in the paragraph above. I think this is just used to rename the root dataset in the snapshot before writing it to disk, ie.e copy and rename.
- zfs-destroy.8 — OpenZFS documentation
- Destroy ZFS dataset, snapshots, or bookmark.
- filesystem|volume
- -R : Recursively destroy all dependents, including cloned file systems outside the target hierarchy.
- snapshots
- -R : Recursively destroy all clones of these snapshots, including the clones, snapshots, and children. If this flag is specified, the -d flag will have no effect. Don't use this unless you know why!!!
- -r : Destroy (or mark for deferred deletion) all snapshots with this name in descendent file systems. This is filtered destroy so rather that wiping everything related, you can just delete a specified set of snapshots by name.
I have added sudo where required but you might not need to use this if you are using the root account (not recommended).
Rename/Move a Dataset (within the same Pool) - (zfs rename)
- Rename/Move Datasets (Mounted/Unmounted) or offline ZVols within the same Pool only.
- You should never copy/move/rename a ZVol while it is being used as the underlying VM might have issues.
The following commands will allows you to rename or move a Dataset or an offline ZVol. Pick one of the following or roll your own:
# Rename/Move a Dataset/ZVol within the same pool (it is not bothered if the dataset is mounted, but might not like an 'in-use' ZVol). Can only be used if the source and targets are in the same pool.
sudo zfs rename MyPoolA/Virtual_Disks/Virtualmin MyPoolA/Virtual_Disks/TheNewName
sudo zfs rename MyPoolA/Virtual_Disks/Virtualmin MyPoolA/TestFolder/Virtualmin
sudo zfs rename MyPoolA/Virtual_Disks/Virtualmin MyPoolA/TestFolder/TheNewName
Copy/Move a Dataset - (zfs send | zfs receive) (without Snapshots)
- Copy unmounted Datasets or offline ZVols.
- This will work across pools including remote pools.
- If you delete the sources this process will then act as a move.
- Recursive switch is optional for
- a ZVol if you just want to copy the current disk.
- normal datasets but unless you know why, leave it on.
The following will show you how to copy or move Datasets/ZVols.
- Send and Receive the Dataset/ZVol
This uses STDOUT/STDIN stream. Pick one of the following or roll your own:
sudo zfs send -R MyPoolA/Virtual_Disks/MyDatasetA | sudo zfs receive MyPoolA/Virtual_Disks/NewDatasetName
sudo zfs send -R MyPoolA/Virtual_Disks/MyDatasetA | sudo zfs receive MyPoolB/Virtual_Disks/MyDatasetA
sudo zfs send -R MyPoolA/Virtual_Disks/MyDatasetA | ssh <IP|Hostname> zfs receive RemotePool/Virtual_Disks/MyDatasetA (If no SSH trust is setup then you will be prompted for credentials of the remove server)
- Correct disks usage (ZVols only)
This will change the ZVol from sparse (Thin) provisioned to `Thick` provisioned and therefore correct the used disk space. If you want the new ZVol to be `Thin` then you can ignore this step. Pick one of the following or roll your own:
sudo zfs set refreservation=auto MyPoolA/Virtual_Disks/NewDatasetName
sudo zfs set refreservation=auto MyPoolB/Virtual_Disks/MyDatasetA
sudo zfs set refreservation=auto RemotePool/Virtual_Disks/MyDatasetA
- Delete Source Dataset/ZVol (optional)
If you do this, then the process will turn from a copy into a move. This can be done in the TrueNAS GUI.
sudo zfs destroy -R MyPoolA/Virtual_Disks/MyDatasetA
Copy/Move a Dataset - (zfs send | zfs receive) (Using Snapshots)
- Copy mounted Datasets or online ZVols (although this is not best practise as VMs should be shut down first).
- This will work across pools including remote pools.
- If you delete the sources this process will then act as a move.
- The use of snapshots is required when the Dataset is mounted or the ZVol is in use.
The following will show you how to copy or move Datasets/ZVols using snapshots.
- Create a `transfer` snapshot on the source
sudo zfs snapshot -r MyPoolA/MyDatasetA@MySnapshot
- Send and Receive the Snapshot
This uses STDOUT/STDIN stream. Pick one of the following or roll your own:
sudo zfs send -R MyPoolA/Virtual_Disks/MyDatasetA@MySnapshot | sudo zfs receive MyPoolA/Virtual_Disks/NewDatasetName
sudo zfs send -R MyPoolA/Virtual_Disks/MyDatasetA@MySnapshot | sudo zfs receive MyPoolB/Virtual_Disks/MyDatasetA
sudo zfs send -R MyPoolA/Virtual_Disks/MyDatasetA@MySnapshot | ssh <IP|Hostname> zfs receive RemotePool/Virtual_Disks/MyDatasetA (If no SSH trust is setup then you will be prompted for credentials of the remove server)
- Correct Target ZVol disk usage (ZVols only)
This will change the ZVol from `Thin` provisioned` to `Thick` provisioned and therefore correct the used disk space. If you want the new ZVol to be `Thin` then you can ignore this step. Pick one of the following or roll your own:
sudo zfs set refreservation=auto MyPoolA/Virtual_Disks/NewDatasetName
sudo zfs set refreservation=auto MyPoolB/Virtual_Disks/MyDatasetA
sudo zfs set refreservation=auto RemotePool/Virtual_Disks/MyDatasetA
- Delete Source `transfer` Snapshot (optional)
This will get rid of the Snapshot that was created only for this process. This can be done in the TrueNAS GUI.
sudo zfs destroy -r MyPoolA/Virtual_Disks/MyDatasetA@MySnapshot
- Delete Source Dataset/ZVol (optional)
If you do this, then the process will turn from a copy into a move. This can be done in the TrueNAS GUI.
sudo zfs destroy -r MyPoolA/Virtual_Disks/MyDatasetA
- Delete Target `transfer` Snapshot (optional)
You do not need this temporary Snapshot on your target pool.
# Snapshot is on the local server
sudo zfs destroy -r RemotePool/Virtual_Disks/MyDatasetA

or

# Snapshot is on a remote server
ssh <IP|Hostname> zfs destroy RemotePool/Virtual_Disks/MyDatasetA (If no SSH trust is setup then you will be prompted for credentials of the remove server)
Send to a File
Copy/Move a Dataset - (rsync) ????
Alternatively, you can use rsync -auv /mnt/pool/directory /mnt/pool/dataset to copy files and avoid permission issues. not sure where i got this from, maybe a bing search so is untested
Notes
- Guides
- Sending and Receiving ZFS Data - Oracle Solaris ZFS Administration Guide
- The zfs send command creates a stream representation of a snapshot that is written to standard output. By default, a full stream is generated. You can redirect the output to a file or to a different system. The zfs receive command creates a snapshot whose contents are specified in the stream that is provided on standard input. If a full stream is received, a new file system is created as well. You can send ZFS snapshot data and receive ZFS snapshot data and file systems with these commands. See the examples in the next section.
- You can use the zfs send command to send a copy of a snapshot stream and receive the snapshot stream in another pool on the same system or in another pool on a different system that is used to store backup data. For example, to send the snapshot stream on a different pool to the same system, use syntax similar to the following:
- This page will tell you how to send and receive snapshots.
- Sending a ZFS Snapshot | Oracle Solaris Help Center - You can use the zfs send command to send a copy of a snapshot stream and receive the snapshot stream in another pool on the same system or in another pool on a different system that is used to store backup data. For example, to send the snapshot stream on a different pool to the same system, use a command similar to the following example:
- Sending a ZFS Snapshot | Oracle Solaris ZFS Administration Guide - You can use the zfs send command to send a copy of a snapshot stream and receive the snapshot stream in another pool on the same system or in another pool on a different system that is used to store backup data.
- Receiving a ZFS Snapshot | Oracle Solaris ZFS Administration Guide - This page tells you how to receive streams from the `zfs send` command.
- Sending and Receiving Complex ZFS Snapshot Streams | Oracle Solaris ZFS Administration Guide - This section describes how to use the zfs send -I and -R options to send and receive more complex snapshot streams.
- Sending and Receiving ZFS Data - Oracle Solaris ZFS Administration Guide
- This book is intended for anyone responsible for setting up and administering ZFS file systems. Topics are described for both SPARC and x86 based systems, where appropriate.
- The zfs send command creates a stream representation of a snapshot that is written to standard output. By default, a full stream is generated. You can redirect the output to a file or to a different system. The zfs receive command creates a snapshot whose contents are specified in the stream that is provided on standard input. If a full stream is received, a new file system is created as well. You can send ZFS snapshot data and receive ZFS snapshot data and file systems with these commands. See the examples in the next section.
- Saving, Sending, and Receiving ZFS Data | Help Centre | Oracle - The
zfs send command creates a stream representation of a snapshot that is written to standard output. By default, a full stream is generated. You can redirect the output to a file or to a different system. The zfs receive command creates a snapshot whose contents are specified in the stream that is provided on standard input. If a full stream is received, a new file system is created as well. You can also send ZFS snapshot data and receive ZFS snapshot data and file systems.
- Tutorials
- How to use snapshots, clones and replication in ZFS on Linux | HowToForge
- In this tutorial, I will show you step by step how to work with ZFS snapshots, clones, and replication. Snapshot, clone. and replication are the most powerful features of the ZFS filesystem.
- Snapshot, clone, and replication are the most powerful features of ZFS. Snapshots are used to create point-in-time copies of file systems or volumes, cloning is used to create a duplicate dataset, and replication is used to replicate a dataset from one datapool to another datapool on the same machine or to replicate datapool's between different machines
- ZFS Administration, Part XIII- Sending and Receiving Filesystems | Aaron Toponce | archive.org
- An indepth document on ZFS send and receive.
- Sending a ZFS filesystem means taking a snapshot of a dataset, and sending the snapshot. This ensures that while sending the data, it will always remain consistent, which is crux for all things ZFS. By default, we send the data to a file. We then can move that single file to an offsite backup, another storage server, or whatever. The advantage a ZFS send has over “dd”, is the fact that you do not need to take the filesystem offilne to get at the data. This is a Big Win IMO.
- Again, I can’t stress the simplicity of sending and receiving ZFS filesystems. This is one of the biggest features in my book that makes ZFS a serious contender in the storage market. Put it in your nightly cron, and make offsite backups of your data with ZFS sending and receiving. You can send filesystems without unmounting them. You can change dataset properties on the receiving end. All your data remains consistent. You can combine it with other Unix utilities.
- How to send snapshots to a RAW file and back: Will this work with ZVols and RAW VirtualBox images ???
# Create RAW Backup - Generate a snapshot, then send it to a file
zfs snapshot tank/test@tuesday
zfs send tank/test@tuesday > /backup/test-tuesday.img

# Extract RAW Backup - Load the file into the specified ZVol
zfs receive tank/test2 < /backup/test-tuesday.img

or (from me)

# Create RAW Backup - NO snapshot, then send it to a file
zfs send MyPoolA/MyZvolA > /MyPoolB/backup/zvol-backup.img

# Import RAW Backup (direct)
zfs receive MyPoolA/MyZvolA < /backup/zvol-backup.img
- This chapter is part of a larger book.
- From bing
- ZFS send does not require a snapshot, but it creates a stream representation of a snapshot.
- You can redirect the output to a file or to a different system.
- ZFS receive creates a snapshot from the stream provided on standard input.
- Pool to Pool
- Misc
- SOLVED - How to move dataset | TrueNAS Community
- SOLVED - Fastest way to copy or move files to dataset? | TrueNAS Community
- Q: I want to move my /mnt/default/media dataset files to /mnt/default/media/center dataset, to align with new Scale design. I’m used to Linux ways, rsync, cp, mv. Is there a faster/better way using Scale tools?
- A:
- winnielinnie (1)
- Using the GUI, create a new dataset:
testpool/media
- Fill this dataset with some sample files under
/mnt/testpool/media/
- Using the command-line, rename the dataset temporarily
zfs rename testpool/media testpool/media1
- Using the GUI, create a new dataset (again):
testpool/media
- Now there exists
testpool/media1 and testpool/media
- Finally, rename
testpool/media1 to testpool/media/center
zfs rename testpool/media1 testpool/media/center
- The dataset formerly known as
testpool/media1 remains in tact, however, it is now located under testpool/media/center, as well as its contents under /mnt/testpool/media/center/
- winnielinnie (2)
- Whattteva
- SOLVED - Copy/Move dataset | TrueNAS Community
- Pretty much i want to copy/move/suffle some datasets around, is this possible?
- Create the datasets where you want them copy the data into them then delete the old one. When moving or deleting large amount of data be aware of your snapshots because they can end up taking up quite a bit of space.
- Also create the datasets using the GUI and use the CLI to copy the data to the new location. This will be the fastest. Then once you verify your data and all your new shares you can delete the old datasets in the GUI.
- Or, if you want to move all existing snapshots and properties, you may do something like this:
- Create final source snapshot
zfs snapshot -r Data2/Storage@copy
- Copy the data:
zfs send -Rv Data2/Storage@copy | zfs receive -F Data1/Storage
- Delete created snapshots
zfs destroy -r Data1/Storage@copy ; zfs destroy -r Data2/Storage@copy
- linux - ZFS send/recv full snapshot - Unix & Linux Stack Exchange
- Q:
- I have been backing up my ZFS pool in Server A to Server B (backup server) via zfs send/recv, and using daily incremental snapshots.
- Server B acts as a backup server, holding 2 pools to Server A and Server C respectively (zfs41 and zfs49/tank)
- Due to hardware issues, the ZFS pool in Server A is now gone - and I want to restore/recover it asap.
- I would like to send back the whole pool (including the snapshots) back to Server A, but I'm unsure of the exact command to run.
- A:
- There is a worked example with explantations.
- ZFS send/receive over ssh on linux without allowing root login - Super User
- Q: I wish to replicate the file system storage/photos from source to destination without enabling ssh login as root.
- A:
- This doesn't completely remove root login, but it does secure things beyond a full-featured login.
- Set up an SSH trust by copying the local user's public key (usually ~/.ssh/id_rsa.pub) to the authorized_keys file (~/.ssh/authorized_keys) for the remote user. This eliminates password prompts, and improves security as SSH keys are harder to bruteforce. You probably also want to make sure that sshd_config has PermitRootLogin without-password -- this restricts remote root logins to SSH keys only (even the correct password will fail).
- You can then add security by using the ForceCommand directive in the authorized_keys file to permit only the zfs command to be executed.
- ZFS send single snapshot including descendent file systems - Stack Overflow
- Q: Is there a way to send a single snapshot including descendant file systems? 'zfs send' only sends the the top level file system even if the snapshot was created using '-r'. 'zfs send -R' sends the descendant file systems but includes all the previous snapshots, which for disaster recovery purposes consumes unnecessary space if the previous snapshots are not needed in the disaster recovery pool.
- A: In any case, while you cannot achieve what you want in a direct way, you can reach the desired state. The idea is to prune your recovery set so that it only has the latest snapshot.
- Migrating Data With ZFS Send and Receive - Stephen Foskett, Pack Rat
- I like ZFS Send and Receive, but I'm not totally sold on it. I've used rsync for decades, so I'm not giving it up anytime soon. Even so, I can see the value of ZFS Send and Receive for local migration and data management tasks as well as the backup and replication tasks that are typically talked about.
- I’m a huge fan of rsync as a migration tool, but FreeNAS is ZFS-centric so I decided to take a shot at using some of the native tools to move data. I’m not sold on it for daily use, but ZFS Send and Receive is awfully useful for “internal” maintenance tasks like moving datasets and rebuilding pools. Since this kind of migration isn’t well-documented online, I figured I would make my notes public here.
- ZFS send single snapshot including descendent file systems - Stack Overflow
- Is there a way to send a single snapshot including descendant file systems?
- 'zfs send' only sends the the top level file system even if the snapshot was created using '-r'. 'zfs send -R' sends the descendant file systems but includes all the previous snapshots, which for disaster recovery purposes consumes unnecessary space if the previous snapshots are not needed in the disaster recovery pool.
ZVols
- What is a ZVol? newbie explanation:
- A ZFS Volume (zvol) is a dataset that represents a block device or virtual disk drive.
- It does not have a file system.
- It is similiar to a Virtual disk file.
- It can inherit permissions of it's parent dataset or have it's own.
General
Copying/Moving
- How to move VMs to new pool | TrueNAS Community
- Does anyone know the best approach for moving VMs to a new pool?
- Stop your VM(s)
- Move the ZVOL(s)
sudo zfs send <oldpool>/path/to/zvol | sudo zfs receive <newpool>/path/to/zvol
- Go to the Devices in the VM(s) and update the location of the disk(s).
- Start the VM(s)
- After everything is working to your satisfaction the zvols on the old pool can be destroyed as well as the automatic snapshot ("@--HEAD--", IIRC) that is created by the replication command.
- The only thing I would point out, for anyone else doing this, is that the size of the ZVOLs shrunk when copying them to the new pool. It appears that when VMs and virtual disks are created, SCALE reserves the entire virtual disk size when sizing the ZVOL, but when moving the ZVOL, it compresses it so that empty space on the disk in the guest VM results in a smaller ZVOL. This confused me at first until I realized what was going on.
- Moving a zvol | TrueNAS Community
- Moving existing VMs to another pool? | TrueNAS Community
- Just did this today, it took a bit of digging through different threads to figure it out but here's the process. I hope it'll help someone else who's also doing this for the first time.
- There are pictures to help you understand
- uses send/receive
- How to copy zvol to new pool? | TrueNAS Community
Wrong size after moving
Resize a ZVol
Provisioning (Thick / Thin / Sparse)
This section will show you the different types of provisioning for ZVols and how this affects the used space on your TrueNAS system.
These are my recommendations
- Mission Critical
- Thick Provision
- This makes sure that the VM always has enough space.
- Normal
- Thick Provision
- You don't want these machines running out of space either.
- Others
- Thin Provision
- A good example of when you would use this is when you are installing different OS to try out for a period.
Notes
- Thin or Thick provisioning will make no difference to performance, just how much space is reserved for the Virtual Machine.
- Snapshots will also take space up.
- I think if you Thick provision, then twice the space of the ZVol is reserved to allow for snapshots and the full usage of the Virtual Disk without impact to the rest of the pool.
- General
- Thin and Thick provisioning only alters the amount of space that is registered free and the purpose of this is to prevent over provisioning of disks, no thing else, no perfromance increase or even extra disk usage, just the system reducing the amount of free space advertised to the file system
- A thin volume (sparse) is a volume where the reservation is less then the volume size.
- A Thick volume is where the reserved space equals (or is greater) than the volume size.
- Thin Provisioning | TrueNAS Documentation Hub - Provides general information on thin provisioning and zvol creation, their uses cases and implementation in TrueNAS.
- When creating VM allow creating sparse zvol - Feature Requests - TrueNAS Community Forums
- Currently when creating VM you can only create thick zvol. I always use sparse zvols because that’s more storage efficient. But I have to either first create the sparse zvol or change it to sparse later in CLI.
- Like in the default behavior now, and similar to ESXI, it should still default to “fat” volumes.
- I mean, you can overprovision your pool and run out of space. Its very easy to shoot yourself in the foot if you don’t know what you are doing. But in a world with compression, block cloning and dedupe, thin provisioning’s value can’t be understated.
- Question about Zvol Space Management for VM | TrueNAS Community
- If it's ZFS due to the copy-on-write nature your Zvol will always blow up to its maximum size.
- Any block that is written at least once in the guest OS will be "used" viewed from ZFS outside the VM. TrueNAS/ZFS cannot tell how much space your VM is really using, only which blocks have been touched and which have not.
- Inside VMs UFS/Ext4 are much better choices than ZFS. You can always do snapshots and backup on the outside.
- And no, you cannot shrink a Zvol, not even with ZFS send/receive. If you copy the Zvol with send/receive you will get an identically sized copy.
- Backup your pfSense config, create a smaller Zvol, reinstall, restore config. 30-40 G should be plenty.
- But is that really a problem if it "blows up"to maximum size? Not in general but frequently people overprovision VM storage expecting a behaviour similar to VMware "thin" images. These blow up, too, if the guest OS uses ZFS.
- Feature #2319: include SSD TRIM option in installer - pfSense - pfSense bugtracker
- No longer relevant. It's automatic for ZFS and is already enabled where needed.
- Experiments with dead space reclamation and the wonders of storage over-provisioning | Arik Yavilevich's blog
- In this article I will conduct several experiments showing how available disk space fluctuates at the various layers in the system. Hopefully by following through you will be able to fully understand the wonders of dead space reclamation and storage over-provisioning.
- In an over-provisioning configuration, a central storage server will provide several storage consumers with more storage (in aggregate) than the storage server actually has. The ability to sustain this operation relies on the assumption that consumers will not utilize all of the available space.
- Change Provisioning Type
Reclaim free space from a Virtual Machine (TRIM/Unmap/Discard)
This can be a misunderstood area of virtualization but quite important
- Terms
- TRIM = ATA = Virtio-blk driver
- UNMAP = SCSI = Virtio-scsi driver
- REQ_DISCARD = Linux Kernel block operation
- Info
- The VirtIO drivers for a while have supported TRIM/UNMAP passthrough but the config in TrueNAS has not had this enabled.
discard='unmap' has been in TrueNAS since 24.04.0 (Dragonfish).
- TRIM and UNMAP both do the same feature for their relevant technologies and in the end cause
REQ_DISCARD in the Linux Kernel to be called.
- A VM system without TRIM, it's disk usage would be ever expanding until it reached the ZVol's capacity and it's usage would never shrink even if you deleted files from the Virtual Disk. The blocks in the Virtual Disk would show as clear but still show used in the ZFS. TRIMMING in the VM does not cause ZFS to run TRIM commands but just to clear related used blocks in it's file system that is has identified by reading the TRIM/UNMAP commands it has intercepted.
- TRIM/UMAP marks unused the block as unused, it does not zero them or wipe them.
- Question
- TRIMMING in VM, how does it work?
- When a VM writes to a block on it's Virtual Disk this causes a write on the ZVol on which it sits on, this ZVol block now has the data and a flag saying the ZVol block is used. the Guest OS only sees that the data has been saved to it's disk with all that entails.
- If a VM now deletes a block of data, TrueNAS will see this as a normal disk write and update the relevant blocks in the ZVols.
- Now the VM runs a TRIM (ATA) or Unmap (SCSI) command to reclaim the free space which does indeed reclaim the disk space as far as the GuestOS is concerned but how does the now unused space get creclaimed in the ZVol.
- When the TRIM/UNMAP commands are issued to the drivers, KVM intercepts the
REQ_DISCARD commands and passes them to TrueNAS/ZFS which interprets them and uses the information to clear the used flag from the relevant blocks in the ZVol.
- The space is now reclaimed in the GuestOS virtual disk and in TrueNAS ZVol.
- ZFS
- Add support for hole punching operations on files and volumes by dechamps · Pull Request #553 · openzfs/zfs · GitHub
- Just for clarification: actually, TRIM is the ATA command for doing this (e.g. on a SATA SSD). Since zvols are purely software, we're not using ATA to access them. In the Linux kernel, a ATA TRIM command (or SCSI UNMAP) internally translates to a REQ_DISCARD block operation, and this is what this patch implements.
DISCARD means "invalidate this block", not "overwrite this block with zeros".
- Discard (TRIM) with KVM Virtual Machines... in 2020! - Chris Irwin's Blog
- ZFS quietly discards all-zero blocks, but only sometimes | Chris's Wiki
- On the ZFS on Linux mailing list, a question came up about whether ZFS discards writes of all-zero blocks (as you'd get from 'dd if=/dev/zero of=...'), turning them into holes in your files or, especially, holes in your zvols. This is especially relevant for zvols, because if ZFS behaves this way it provides you with a way of returning a zvol to a sparse state from inside a virtual machine (or other environment using the zvol):
- The answer turns out to be that ZFS does discard all-zero blocks and turn them into holes, but only if you have some sort of compression turned on (ie, that you don't have the default 'compression=off').
- Note: to dispel any confusion, this is about discarding blocks on zvols so that ZFS can reclaim the space for other things. This has nothing to do with ZFS itself discarding blocks on vdevs (e.g. SSDs), which is a completely different story.
- TrueNAS
- TrueNAS-SCALE-22.12.0 | Sparse zvol showing considerably higher allocation than is actually in-use | TrueNAS Community
- Q: I have a zvol for a Debian VM. This is a sparse volume, so should only consume what it's using as far as I am aware.
- A: This is a misunderstanding on your part. ZFS has minimal visibility into what is "in use" inside a zvol. At best, ZFS can be notified via unmap/TRIM that a block is no longer in use, but let's say your zvol's block size is 16KB, and you write something to the first two 512B virtual sectors, ZFS still allocates 16KB of space, stores your 1KB of data, and life moves on. If you attempt to free or overwrite the data from the client, there are at some unexpected things that might happen. One is that if you have taken any snapshots, a new 16KB block is allocated and loaded up with the unaffected sector data from the old 16KB block, meaning you now have two 16KB blocks consumed.
- Bug
- Thin provisioned (sparse) VM/zvol not shrinking in size upon trimming | TrueNAS Community
- My thin provisioned (sparse) zvol does not free up space upon trimming from inside the allocated VM, but is blowing up in size further and further. At around 100GB used by the VM, the zvol has already reached 145GB and keeps on growing. Is this some kind of known bug, is there some kind of workaround, or may I have missed a specific setting?
- Possible Causes
- You have snapshots
- Something inside the VM such as logging whic is constantly writing to the disk, which can include deleting.
- TRIM commands are not being passed up from the Virtual Machine to the ZFS so the space can be reclaimed from the ZVol.
- Note
- TRIMMING in TrueNAS/ZFS does not TRIM the Virtual Disks held in ZVols. ZFS cannot see what is data and what is unused space inside a ZVol, so TRIMMING for this has to be done within the Virtual Machine and then the Discad commands passed up into the ZFS.
- KVM
- libvirt - Does VirtIO storage support discard (fstrim)? - Unix & Linux Stack Exchange
-
Apparently discard wasn't supported on that setting. However it can work if you change the disk from "VirtIO" to "SCSI", and change the SCSI controller to "VirtIO". I found a
walkthrough. There are several walkthroughs; that was just the first search result. This new option is called
virtio-scsi. The other, older system is called
virtio-block or
virtio-blk.
- I also found a great thread on the Ubuntu bug tracker. It points out that
virtio-blk starts supporting discard requests in Linux 5.0. It says this also requires support in QEMU, which was committed on 22 Feb 2019. Therefore in future versions, I think we will automatically get both VirtIO and discard support.
- QEMU
- QEMU User Documentation — QEMU documentation
discard=discard
- discard is one of “ignore” (or “off”) or “unmap” (or “on”) and controls whether discard (also known as trim or unmap) requests are ignored or passed to the filesystem. Some machine types may not support discard requests.
detect-zeroes=detect-zeroes
- detect-zeroes is “off”, “on” or “unmap” and enables the automatic conversion of plain zero writes by the OS to driver specific optimized zero write commands. You may even choose “unmap” if discard is set to “unmap” to allow a zero write to be converted to an unmap operation.
- Trim/Discard - Qemu/KVM Virtual Machines - Proxmox VE
- If your storage supports thin provisioning (see the storage chapter in the Proxmox VE guide), you can activate the Discard option on a drive. With Discard set and a TRIM-enabled guest OS , when the VM’s filesystem marks blocks as unused after deleting files, the controller will relay this information to the storage, which will then shrink the disk image accordingly. For the guest to be able to issue TRIM commands, you must enable the Discard option on the drive. Some guest operating systems may also require the SSD Emulation flag to be set. Note that Discard on VirtIO Block drives is only supported on guests using Linux Kernel 5.0 or higher.
- If you would like a drive to be presented to the guest as a solid-state drive rather than a rotational hard disk, you can set the SSD emulation option on that drive. There is no requirement that the underlying storage actually be backed by SSDs; this feature can be used with physical media of any type. Note that SSD emulation is not supported on VirtIO Block drives.
- QEMU, KVM and trim | Anteru's Blog - I’m using KVM for (nearly) all my virtualization needs, and over time, disk images get bigger and bigger. That’s quite annoying if you know that a lot of the disk space is unused, and it’s only due to blocks not getting freed in the guest OS and thus remaining non-zero on the host.
- QEMU Guest Agent
- QEMU Guest Agent — QEMU documentation - The QEMU Guest Agent is a daemon intended to be run within virtual machines. It allows the hypervisor host to perform various operations in the guest.
- Qemu-guest-agent - Proxmox VE - The qemu-guest-agent is a helper daemon, which is installed in the guest. It is used to exchange information between the host and guest, and to execute command in the guest.
ZVol and iSCSI Sector Size and Compression
Compression
Use LZ4 compression (More indepth notes above)
- Help: Compression level (Tooltip)
- Encode information in less space than the original data occupies. It is recommended to choose a compression algorithm that balances disk performance with the amount of saved space.
- LZ4 is generally recommended as it maximizes performance and dynamically identifies the best files to compress.
- GZIP options range from 1 for least compression, best performance, through 9 for maximum compression with greatest performance impact.
- ZLE is a fast algorithm that only elminates runs of zeroes.
- This tooltip implies that compression causes the disk access to be slower.
- in a VM there are no files to see, if you do NOT thin/Sparse provision the space is all used up anyway so compression is a bit pointless.
- It does not matter whether you 'Thin' or 'Thick' provision a ZVol, it is only when data is written to a block it actually takes up space, and it is only this data that can be compressed.
- This behaviour is exactly the same as a dynamic disks in VirtualBox.
- I do not know if ZFS is aware of the file system in the ZVol, I suspect it is only binary aware (i.e. block level).
- When using NVMe, the argument that loading and uncompressing compressed data is quicker than loading normal data from the disk might not hold water. This could be true for Magnetic disks.
Quotas
- Setting ZFS Quotas and Reservations - Oracle Solaris ZFS Administration Guide
- You can use the quota property to set a limit on the amount of disk space a file system can use. In addition, you can use the reservation property to guarantee that a specified amount of disk space is available to a file system. Both properties apply to the dataset on which they are set and all descendents of that dataset.
- A ZFS reservation is an allocation of disk space from the pool that is guaranteed to be available to a dataset. As such, you cannot reserve disk space for a dataset if that space is not currently available in the pool. The total amount of all outstanding, unconsumed reservations cannot exceed the amount of unused disk space in the pool. ZFS reservations can be set and displayed by using the zfs set and zfs get commands.
Snapshots
Snapshots can be a great defence against ransomware attacks but should not be used as a substitution of a proper backup policy.
General
- Official documentation
- Information
- You cannot chain, creating a snapshot with send and receive, as it fails.
- zfs - Do parent file system snapshot reference it's children datasets data or only their onw data? - Ask Ubuntu
- Each dataset, whether child or parent, is its own file system. The file system is where files and directories are referenced and saved.
- If you make a recursive snapshot for rpool, it doesn't create a single snapshot. It creates multiple snapshots, one for each dataset.
- A very good explanation.
- Datasets are in a lose hieracrchy and if you want to snapshot the dataset and it's sub-datasets, then you need to use the -R switch. Each dataset will be snapshotted seperately but the snapshots will all share the same name allowing them to be addressed as one.
- A snapshot is a read-only copy of a filesystem taken at a moment in time.
- Snapshots only record differences between the snapshot and the current filesystem. This means that, until you start making changes to the active filesystem, snapshots won’t take up any additional storage.
- A snapshot can’t be directly accessed; they are cloned, backed up and rolled back to. They are persistent and consume disk space from the same storage pool in which they were created.
- Tutorials
- TrueNAS Scale: Setting up and using Tiered Snapshots // ZFS Data Recovery - YouTube | Capt Stux
- ZFS Snapshots are a TrueNAS super-power allowing you to travel back in time for data recovery
- In this video I'll explain ZFS Tiered Snapshots, how to set them up, and how to use them on Windows, macOS and in the shell for Data Recovery and Rollback
- Stux from TrueNAS forum
- Snaptshots are hidden in the folder
./zfs/snapshot/
- A very cool video and he is going to do more.
- How to create, clone, rollback, delete snapshots on TrueNAS - Server Decode - TrueNAS snapshots can help protect your data, and in this guide, you will learn steps to create, close, rollback, and delete TrueNAS snapshots using the GUI.
- Some basic questions on TrueNAS replications - Visual Representation Diagram and more| TrueNAS Community
- These diagrams are excellent.
- Tthe arrows are pointers.
- If you're a visual person, such as myself (curse the rest of this analytical world!), then perhaps this might help. Remember that a "snapshot" is in fact a read-only filesystem at the exact moment in time that the snapshot was taken.
- Snapshots are not "stored". Without being totally technically accurate here, think about it like this: a block in ZFS can be used by one or more consumers, just like when you use a UNIX hardlink, where you have two or more filenames pointing at the same file contents (which therefore takes no additional space for the second filename and beyond).
- When you take a snapshot, ZFS does a clever thing where it assigns the current metadata tree for the dataset (or zvol in your case) to a label. This happens almost instantaneously, because it's a very easy operation. It doesn't make a copy of the data. It just lets it sit where it was. However, because ZFS is a copy-on-write filesystem, when you write a NEW block to the zvol, a new block is allocated, the OLD block is not freed (because it is a member of the snapshot), and the metadata tree for the live zvol is updated to accommodate the new block. NO changes are made to the snapshot, which remains identical to the way it was when the snapshot was taken.
- So it is really data from the live zvol which is "stored", and when you take a snapshot, it just freezes the metadata view of the zvol. You can then read either the live zvol or any snapshot you'd prefer. If this sounds like a visualization nightmare for the metadata, ... well, yeah.
- When you destroy a ZFS snapshot, the system will then free blocks to which no other references exist.
- Snapshots defy math and logic. "THEY DON'T MAKE SENSE!" - Resources - TrueNAS Community Forums
- Why ZFS “snapshots” don’t make sense A children’s book for dummies, by a dummy.
- Update diagrams
- Using ZFS Snapshots and Clones | Ubuntu
- In this tutorial we will learn about ZFS snapshots and ZFS clones, what they are and how to use them.
- A snapshot is a read-only copy of a filesystem taken at a moment in time.
- Snapshots only record differences between the snapshot and the current filesystem. This means that, until you start making changes to the active filesystem, snapshots won’t take up any additional storage.
- A snapshot can’t be directly accessed; they are cloned, backed up and rolled back to. They are persistent and consume disk space from the same storage pool in which they were created.
- Beginners Guide to ZFS Snapshots - This guide is intended to show a new user the capabilities of the ZFS snapshots feature. It describes the steps necessary to set up a ZFS filesystem and the use of snapshots including how to create them, use them for backup and restore purposes, and how to migrate them between systems. After reading this guide, the user will have a basic understanding of how snapshots can be integrated into system administration procedures.
- Working With ZFS Snapshots and Clones - ZFS Administration Guide - This chapter describes how to create and manage ZFS snapshots and clones. Information about saving snapshots is also provided in this chapter.
- How ZFS snapshots really work And why they perform well (usually) by Matt Ahrens - YouTube | BSDCan
- Snapshots are one of the defining features of ZFS. They are also the foundation of other advanced features, such as clones and replication with zfs send / receive.
- If you have ever wondered how much space your snapshots are using, you’ll want to come to this talk so that you can understand what “used” really means!
- If you want to know how snapshots can be so fast (or why they are sometimes so slow), this talk is for you!
- I designed and implemented ZFS snapshots, starting in 2001.
- Come to this talk and learn from my mistakes!
- How ZFS snapshots really work And why they perform well (usually) by Matt Ahrens - YouTube
- Snapshots are one of the defining features of ZFS. They are also the foundation of other advanced features, such as clones and replication with zfs send / receive.
- If you have ever wondered how much space your snapshots are using, you’ll want to come to this talk so that you can understand what “used” really means!
- If you want to know how snapshots can be so fast (or why they are sometimes so slow), this talk is for you!
- I designed and implemented ZFS snapshots, starting in 2001.
- Come to this talk and learn from my mistakes!
- Preventing Ransomware
Deleting
- Delete a Dataset's Snapshot(s)
Notice: there is a difference between -R and -r
- Deleting snapshots | TrueNAS Community
- [Question] How to delete all snapshots from a specific folder? | Reddit
- Q:
- Recently I discovered my home NAS created 20.000+ snapshots in my main pool, way beyond the recommended 10000 limit and causing a considerable performance hit on it. After looking for the culprit, I discovered most of them in a single folder with a very large file structure inside (which I can't delete or better manage it because years and years of data legacy on it).
- I don't want to destroy all my snapshots, I just want to get rid of them in that specific folder.
- A1:
- A2:
- You can filter snapshots like you are doing, and select the checkbox at the top left, it will select all filtered snapshots even in other pages and click delete, it should ask for confirmation etc. it will be slower than the other option mentioned here for CLI. If you need to concurrently administrate from GUI open another tab and enter GUI as the page where you deleted snapshots will hang until it’s done, probably 20-30 min.
- How to delete all but last [n] ZFS snapshots? - Server Fault
- Q:
- 'm currently snapshotting my ZFS-based NAS nightly and weekly, a process that has saved my ass a few times. However, while the creation of the snapshot is automatic (from cron), the deletion of old snapshots is still a manual task. Obviously there's a risk that if I get hit by a bus, or the manual task isn't carried out, the NAS will run out of disk space.
- Does anyone have any good ways / scripts they use to manage the number of snapshots stored on their ZFS systems? Ideally, I'd like a script that iterates through all the snapshots for a given ZFS filesystem and deletes all but the last n snapshots for that filesystem.
- E.g. I've got two filesystems, one called tank and another called sastank. Snapshots are named with the date on which they were created: sastank@AutoD-2011-12-13 so a simple sort command should list them in order. I'm looking to keep the last 2 week's worth of daily snapshots on tank, but only the last two days worth of snapshots on sastank.
- A1:
- A2
- How to get rid of 12000 snapshots? | TrueNAS Community
- Q:
- I received a notification saying that I have over the recommended number of snapshots (12000+!!!).
- I'm not quite sure how or why I would have this many as I don't have any snapshot tasks running at all.
- The GUI allows me to see 100 snapshots at a time and bulk delete 100 at a time. But, even when I do this it fails to delete half of the snapshots because they have a dependent clone. It would take a very long time to go through 12000 and delete this way. So, am looking for a better way.
- How can I safely delete all (or every one that I can) of these snapshots?
- A:
- In a root shell run
zfs list -t snapshot | awk '/<pattern>/ { printf "zfs destroy %s\n", $1 }'
- Examine the output and adjust <pattern> until you see the destroy statements you want. Then append to the command:
zfs list -t snapshot | awk '/<pattern>/ { printf "zfs destroy %s\n", $1 }' | sh
- Dataset is Busy - Cannot delete snapshot error
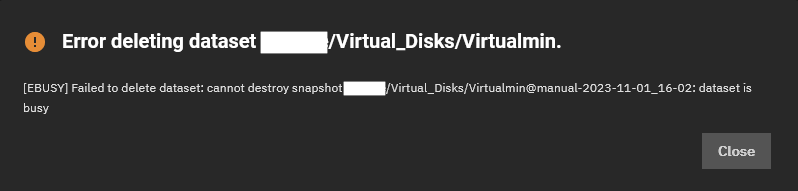
- There are a couple of different things than can cause this error.
- A Hold is applied to a snapshot of that dataset.
- The ZVol is being used in a VM.
- The ZVol is being used in an iSCSI.
- The ZVol/Dataset is currently being used in a replication process.
- What is a Hold? This is method of protecting a snapshot from modification and deletion.
- Navigate to the snapshot, exaned the details and you will see the option.
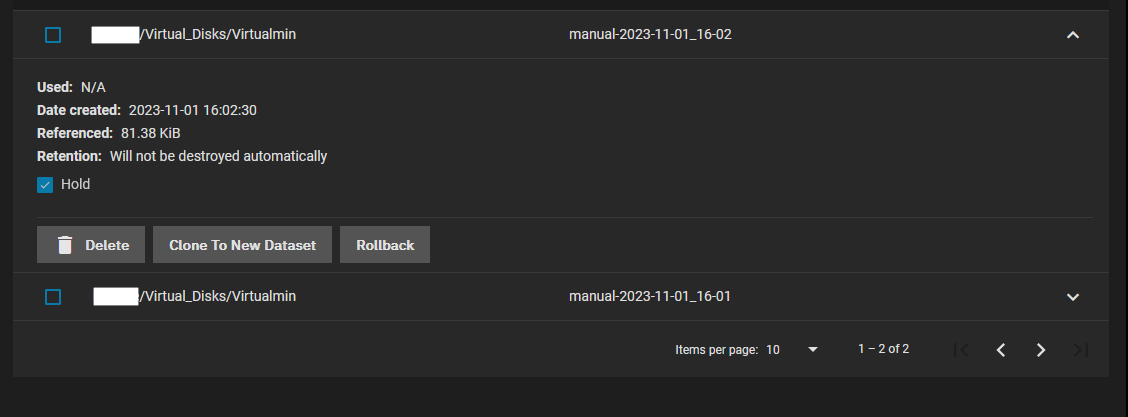
- How to fix 'dataset is busy' caused by this error.
- Deleting Snapshots. | TrueNAS Community
- Q: My question is, 12 months down the line if I need to delete all snapshots, as a broad example would it delete data from the drive which was subsequently added since snapshots were created?
- A: No. The data on the live filesystem (dataset) will not be affected by destroying all of the dataset's snapshots. It means that the only data that will remain is that which lives on the live filesystem. (Any "deleted" records that only existed because they still had snapshots pointing to them will be gone forever. If you suddenly remember "Doh! That one snapshot I had contained a previously deleted file which I now realize was important!" Too bad, whoops! It's gone forever.)
- Q:Also when a snapshot is deleted does it free up the data being used by that snapshot?
- A: The only space you will liberate are records that exclusively belong to that snapshot. Otherwise, you won't free up such space until all snapshots (that point to the records in question) are likewise destroyed.
See this post for a graphical representation. (I realize I should have added a fourth "color" to represent the "live filesystem".)
- Am I the only one who would find this useful? (ZFS "hold" to protect important snapshots) | TrueNAS Community
- I'm trying to make the best argument possible for why this feature needs to be available in the GUI:
- [NAS-106300] - iXsystems TrueNAS Jira - The "hold" feature for zfs snapshots is significant enough that it should have its own checkmark. This is especially true for automically generated snapshots created by a Periodic Snapshot task.
Promoting
- Clone and Promote Snapshot Dataset | Documentation Hub
- System updated to 11.1 stable: promote dataset? | TrueNAS Community
- Promote Dataset: only applies to clones. When a clone is promoted, the origin filesystem becomes a clone of the clone making it possible to destroy the filesystem that the clone was created from. Otherwise, a clone can not be destroyed while its origin filesystem exists.
- zfs-promote.8 — OpenZFS documentation
- Promote clone dataset to no longer depend on origin snapshot.
- The
zfs promote command makes it possible to destroy the dataset that the clone was created from. The clone parent-child dependency relationship is reversed, so that the origin dataset becomes a clone of the specified dataset.
- The snapshot that was cloned, and any snapshots previous to this snapshot, are now owned by the promoted clone. The space they use moves from the origin dataset to the promoted clone, so enough space must be available to accommodate these snapshots. No new space is consumed by this operation, but the space accounting is adjusted. The promoted clone must not have any conflicting snapshot names of its own. The
zfs rename subcommand can be used to rename any conflicting snapshots.
Rolling Snapshots
- Snapshots are NOT backups on their own
- They only record changes (file deltas), the previous snapshots and file system are required to build the full dataset.
- These are good to protect from Ransomware.
- Snapshots can be used to create backups on a remote pool.
- Can be used for Incremental Backups / Rolling Backups
Keeping data on a single pool in one location exposes it to risks like theft and natural or human disasters. Making regular backups of the entire pool is vital. ZFS provides a built-in serialization feature that can send a stream representation of the data to standard output. Using this feature, storing this data on another pool connected to the local system is possible, as is sending it over a network to another system. Snapshots are the basis for this replication (see the section on ZFS snapshots). The commands used for replicating data are zfs send and zfs receive.
An incremental stream replicates the changed data rather than the entirety of the dataset. Sending the differences alone takes much less time to transfer and saved disk space by not copying the whole dataset each time. This is useful when replicating over a slow network or one charging per transferred byte.
Although I refer to datasets you can use this on the pool itself by selecting the `root dataset`.
- `zfs send` switches explained
- -I
- Sends all of the snapshots between the 2 defined snapshots as seperate snapshots.
- This should be used for making a full copy of a dataset.
- Generate a stream package that sends all intermediary snapshots from the first snapshot to the second snapshot.
- I think it also sends the first and last snapshot as specified in the command).
- If this is used, it will generate an incremental replication stream.
- This succeeds if the initial snapshot already exists on the receiving side.
- -i
- Calculates the delta/changes between the 2 defined snapshots and then sends that as a snapshot.
- If this is used, it will generate an incremental replication stream.
- This succeeds if the initial snapshot already exists on the receiving side.
- -p
- Copies the dataset properties including compression settings, quotas, and mount points.
- -R
- This selects the dataset and all of its children (sub-datasets) rather than just the dataset itself.
- Generate a replication stream package, which will replicate the specified file system, and all descendent file systems, up to the named snapshot. When received, all properties, snapshots, descendent file systems, and clones are preserved
- If the
-i or -I flags are used in conjunction with the -R flag, an incremental replication stream is generated. The current values of properties, and current snapshot and file system names are set when the stream is received. If the -F flag is specified when this stream is received, snapshots and file systems that do not exist on the sending side are destroyed. If the -R flag is used to send encrypted datasets, then -w must also be specified.
- `zfs receive` switches explained
- -d
- If the
-d option is specified, all but the first element of the sent snapshot's file system path (usually the pool name) is used and any required intermediate file systems within the specified one are created.
- The dataset's path will be maintained (apart from the pool/root-dataset element removal) on the new pool but start from the target dataset. If any intermediate datasets need to be created, they will be.
- If you leave this switch on whilst transfering between the same pool you might have issues.
- Discard the first element of the sent snapshot's file system name, using the remaining elements to determine the name of the target file system for the new snapshot as described in the paragraph above.
- The
-d and -e options cause the file system name of the target snapshot to be determined by appending a portion of the sent snapshot's name to the specified target filesystem.
- -e
- If the
-e option is specified, then only the last element of the sent snapshot's file system name (i.e. the name of the source file system itself) is used as the target file system name.
- This takes the target dataset as the location to put this dataset into.
- Discard all but the last element of the sent snapshot's file system name, using that element to determine the name of the target file system for the new snapshot as described in the paragraph above.
- The
-d and -e options cause the file system name of the target snapshot to be determined by appending a portion of the sent snapshot's name to the specified target filesystem.
- -F
- Be careful with this switch.
- This is only required if the remote filesystem has had changes made to it.
- Can be used to effectively wipe the target and replace with the send stream.
- Its main benefit is that your automated backup jobs won't fail because an unexpected/unwanted change to the remote filesystem has been made.
- Force a rollback of the file system to the most recent snapshot before performing the receive operation.
- If receiving an incremental replication stream (for example, one generated by
zfs send -R [-i|-I]), destroy snapshots and file systems that do not exist on the sending side.
- -u
- Prevents mounting of the remote backup.
- File system that is associated with the received stream is not mounted.
- `zfs snapshot` switches explained
- -r
- Recursively create snapshots of all descendent datasets
- `zfs destroy` switches explained
- -R
- Use this for deleting Datasets and ZVols.
- Recursively destroy all dependents, including cloned file systems outside the target hierarchy.
- -r
- Use this for deleting snapshots.
- Recursively destroy all children.
This is done by copying snapshots to the backup location......... ie.e -i/-I switches
- The command example - Specify increments to send
- Create a new snapshot of the filesystem.
sudo zfs snapshot -r MyPoolA/MyDatasetA@MySnapshot4
- Determine the last snapshot that was sent to the backup server. eg:
@MySnapshot2
- Send all snapshots, from the snapshot found in step 2 up to the new snapshot created in step 1, to the backup server/location. They will be unmounted so be at very low risk of being modified.
sudo zfs send -I @MySnapshot2 @MySnapshot4 | sudo zfs receive -u MyPoolB/Backup/MyDatasetA

or

sudo zfs send -I @MySnapshot2 @MySnapshot4 | ssh <IP/Hostname> zfs receive -u MyPoolB/Backup/MyDatasetA
- what about send -RI ???
Notes
- Chapter 22. The Z File System (ZFS) - 'zfs send' - Replication | FreeBSD Documentation Portal
- Keeping data on a single pool in one location exposes it to risks like theft and natural or human disasters. Making regular backups of the entire pool is vital. ZFS provides a built-in serialization feature that can send a stream representation of the data to standard output. Using this feature, storing this data on another pool connected to the local system is possible, as is sending it over a network to another system. Snapshots are the basis for this replication (see the section on ZFS snapshots). The commands used for replicating data are zfs send and zfs receive.
- This is an excellent read.
- Chapter 22. The Z File System (ZFS) - 'zfs send' - Incremental Backups | FreeBSD Documentation Portal
- zfs send can also determine the difference between two snapshots and send individual differences between the two. This saves disk space and transfer time.
- This is an exellent read.
- ZFS: send / receive with rolling snapshots - Unix & Linux Stack Exchange
- Q: I would like to store an offsite backup of some of the file systems on a USB drive in my office. The plan is to update the drive every other week. However, due to the rolling snapshot scheme, I have troubles implementing incremental snapshots.
- A1:
- You can't do exactly what you want.
- Whenever you create a zfs send stream, that stream is created as the delta between two snapshots. (That's the only way to do it as ZFS is currently implemented.) In order to apply that stream to a different dataset, the target dataset must contain the starting snapshot of the stream; if it doesn't, there is no common point of reference for the two. When you destroy the @snap0 snapshot on the source dataset, you create a situation that is impossible for ZFS to reconcile.
- The way to do what you are asking is to keep one snapshot in common between both datasets at all times, and use that common snapshot as the starting point for the next send stream.
- A2:
- Snapshots have arbitrary names. And zfs send -i [snapshot1] [snapshot2] can send the difference between any two snapshots. You can make use of that to have two (or more) sets of snapshots with different retention policies.
- e.g. have one set of snapshots with names like @snap.$timestamp (where $timestamp is whatever date/time format works for you (time_t is easiest to do calculations with, but not exactly easy to read for humans. @snap.%s.%Y%M%D%H%M%S provides both). Your hourly/daily/weekly/monthly snapshot deletion code should ignore all snapshots that don't begin with @snap.
- Incremental backups with zfs send/recv | ./xai.sh - A guide on how to use zfs send/recv for incremental backups
- Fast & frequent incremental ZFS backups with zrep – GRENDELMAN.NET
- ZFS has a few features that make it really easy to back up efficiently and fasta dnt his guide goes through a lot of the settings in an easy to read mannor.
- ZFS allows you to take a shapshot and send it to another location as a byte stream with the
zfs send command. The byte stream is sent to standard output, so you can do with it what you like: redirect it to a file, or pipe it through another process, for example ssh. On the other side of the pipe, the zfs receive command can take the byte stream and rebuild the ZFS snapshot. zfs send can also send incremental changes. If you have multiple snapshots, you can specify two snapshots and zfs send can send all snapshots inbetween as a single byte stream.
- So basically, creating a fast incremental backup of a ZFS filesystem consists of the following steps:
- Create a new snapshot of the filesystem.
- Determine the last snapshot that was sent to the backup server.
- Send all snapshots, from the snapshot found in step 2 up to the new snapshot created in step 1, to the backup server, using SSH:
zfs send -I <old snapshot> <new snapshot> | ssh <backupserver> zfs receive <filesystem>
- Zrep is a shell script (written in Ksh) that was originally designed as a solution for asynchronous (but continuous) replication of file systems for the purpose of high availability (using a push mechanism).
- Zrep needs to be installed on both sides.
- The root user on the backup server needs to be able to ssh to the fileserver as root. This has security implications, see below.
- A cron job on the backup server periodically calls
zrep refresh. Currently, I run two backups hourly during office hours and another two during the night.
- Zrep sets up an SSH connection to the file server and, after some sanity checking and proper locking, calls
zfs send on the file server, piping the output through zfs receive:
ssh <fileserver> zfs send -I <old snapshot> <new snapshot> | zfs receive <filesystem>
- Snapshots on the fileserver need not be kept for a long time, so we remove all but the last few snapshot in an hourly cron job (see below).
- Snapshots on the backup server are expired and removed according to a certain retention schedule (see below).
- ZFS incremental send on recursive snapshot | TrueNAS Community
- Q:
- I am trying to understand ZFS send behavior, when sending incrementally, for the purposes of backup to another (local) drive.
- How do people typically handle this situation where you would like to keep things incremental, but datasets may be created at a later time?
- What happens to tank/stuff3, since it was not present in the initial snapshot set sent over?
- A:
- It's ignoring the incremental option and creating a full stream for that dataset. A comment from libzfs_sendrecv.c:
- If you try to do a non recursive replication while missing the initial snapshot you will get a hard error -- the replication will fail. If you do a recursive replication you will see the warning, but the replication will proceed sending a full stream.
- Understanding zfs send receive with snapshots | TrueNAS Community
- Q:
- I would like to seek some clarity with the usage of zfs send receive with snapshots. When i want to update the pool that i just sent to the other pool via ssh with incremental flag. It seems i can't get it to work. I want the original snapshot compared to new snapshot1 to send the difference to the remote server, is this correct?
- Q:
- Would i not still require the -dF switches for the receiving end ?
- A1:
- Not necessarily. If the volume receiving the snapshots is set to "read only", then using the -F option shouldn't be necessary as it is intended to perform a Rollback.
This is only required if the system on the remote has made changes to the filesystem.
- A2:
- If the -d option is specified, all but the first element of the sent snapshot's file system path (usually the pool name) is used and any required intermediate file systems within the specified one are created. It maintains the receiving pools name, rather than renaming it to resemble the sending pool name. So i consider it important since i call it "Pool2" .
- Q:
- One Other thing, just wish i could do the above, easily with the . Would make life much easier than typing it in to ssh.
- A:
- Surprise - you can. Look up Replication Tasks in the manual.
- Incremental backups with zfs send/recv | ./xai.sh - A guide on how to use zfs send/recv for incremental backups
- ZFS: send / receive with rolling snapshots - Unix & Linux Stack Exchange
- Q: I would like to store an offsite backup of some of the file systems on a USB drive in my office. The plan is to update the drive every other week. However, due to the rolling snapshot scheme, I have troubles implementing incremental snapshots.
- A: Whenever you create a
zfs send stream, that stream is created as the delta between two snapshots. (That's the only way to do it as ZFS is currently implemented.) In order to apply that stream to a different dataset, the target dataset must contain the starting snapshot of the stream; if it doesn't, there is no common point of reference for the two. When you destroy the @snap0 snapshot on the source dataset, you create a situation that is impossible for ZFS to reconcile.
Replication
Replication is primarily used to back data up but can also be used to migrate data to another system. Underneath it might use the send and receive commands but I am not 100%.
There is a replication example in the `Replication` Phase section below.
- Official Documentation
- Tutorials
- ZVol (backing up a Virtual Machine)
- General
- What is the most appropriate way to do backup of a VM in a TrueNAS scale system? - TrueNAS General - TrueNAS Community Forums
- Instructions:
- Shutdown VM gracefully by issuing a shutdown request.
- this is must otherwise data will get corrupt or at the very least go missing.
- Once the VM is shutdown, run a snapshot of the VM.
- After the snapshot is complete, restart the VM.
- Now run a replication task to send the snapshot to my remote TrueNAS.
- Has any one got any pointers?
- I know I can set a up a replication task and if it finds any snapshots it will PUSH them to the remote backup, but I do not know how to get it to look for manually created snapshots with the Naming Convention thing.
- Quintessence / Shutdown the VM first
- SOLVED - Snapshot Virtual Machines | TrueNAS Community
- If you want a snapshot of the ZVOL that's likely to be consistent and start, then yes, the VM should be stopped when taking a snapshot.
- But in case @sretalla did not state that explicitly enough: for a rollback it is absolutely mandatory to power down the VM, roll back, boot. File system check (in most cases automatic) and possibly database check recommended.
- Backing up virtual machines | TrueNAS Community
- The problem with VM images is that you are taking a snapshot of the disk at some point when the OS may not necessarily have a coherent state on disk. In general, the OS is unlikely to have a coherent state unless maybe the filesystem is mounted read-only or something like that. You are indeed effectively getting a disk image that looks for all intents and purposes like someone powered off the machine while it was up and running. Most OS's will need a consistency check or fsck.
- Products like Veeam have put in hooks into VMware and Windows to cause the system to be able to generate a quiesced snapshot, but this basically requires some hooks at the hypervisor and OS level in order to make it happen, and additionally it often doesn't work if your VM's are busy with lots of I/O.
- A really long explanation quintessence is here, see: Okay, now, here's the problem. This paragraph is background for the audience....
- Snapshots
- TrueNAS - Taking Snapshots of Virtual Machines - Taking Snapshot of Virtual Machines are an easy way of saving the current state of a virtual machine. It’s not equivalent of having a full backup, but a great tool when you want to try out some new configuration without risking to break everything beyond repair.
- Periodic Snapshots
Compression on Datasets, ZVols and Free Space
Leave LZ4 compression on unless you know why you don't need it.
- LZ4 compression is on by default.
- LZ4 works on a per block basis.
- LZ4 checks to see if it will make any difference to the datas size before compressing the block.
- LZ4 can actually increase performance as disk I/O is usually the bottleneck (especially on HDD).
- Leave LZ4 on unless you know why you don't need it.
- LZ4 can make a big difference in disk usage.
- Serve The Home did a comparrision of with and without and recommends it to be left on.
- General
- Datasets | Documentation Hub | TrueNAS
- LZ4 is generally recommended as it maximizes performance and dynamically identifies the best files to compress.
- LZ4 maximizes performance and dynamically identifies the best files to compress.
- LZ4 provides lightning-fast compression/decompression speeds and comes coupled with a high-speed decoder. This makes it one of the best Linux compression tools for enterprise customers.
- Is the ZFS compression good thing or not to save space on backup disk on TrueNAS? | TrueNAS Community
- LZ4 is on by default, it has a negligible performance impact and will compress anything that can be.
- VM's using LZ4 compression - don't? | Reddit
- After fighting and fighting to get any sort of stability out of my VM's running on ZFS I found the only way to get them to run with any useful level of performance I had to disable LZ4 compression. Performance went from 1 minutes to boot to 5 seconds, and doing generic things such as catting a log file would take many seconds, now it is instant.
- Bet you it wasn’t lz4 but the fact that you don’t have an SLOG and have sync writes on the VMs.
- Been running several terabytes of VM's on LZ4 for 5 years now. Just about any modern CPU will be able to compress/decompress at line speed.
- I've ran dozens of VM's off of FreeNAS/TrueNAS with LZ4 enabled over NFS and iSCSI. Never had a problem. On an all flash array I had(with tons of RAM and 10Gb networking), reboots generally took less than 6 seconds from hitting "reboot" to being at the login screen again.
- The Case For Using ZFS Compression | Serve The Home
- We present a case as to why you should use ZFS compression on your storage servers as it provides tangible benefits even at a relatively low performance impact. In some cases, it can improve performance.
- Leave LZ4 on, the I/O is the bottleneck, not the CPU.
- An absolutely killer feature of ZFS is the ability to add compression with little hassle. As we turn into 2018, there is an obvious new year’s resolution: use ZFS compression. Combined with sparse volumes (ZFS thin provisioning) this is a must-do option to get more performance and better disk space utilization.
- To some compression=off may seem like the obvious choice for the highest performance, it is not. While we would prefer to use gzip for better compression, lz4 provides “good enough” compression ratios at relatively lower performance impacts making it our current recommendation.
- lz4 has an early abort mechanism that after having tried to compress x% or max-MB of a file will abort the operation and save the file uncompressed. This is why you can enable lz4 on a compressed media volume almost without performance hit.
- Also, if you zfs send receive an filesystem from an uncompressed zpool, to a compressed zpool, then the sent filesystem will be uncompressed on the new zpool. So in that case, it is better to copy the data if you want compression.
- makes sense when you look at it
- Yeah in this day and age you’re almost always IO or memory bound rather than CPU bound, and even if it looks CPU bound it’s probably just that the CPU is having to wait around all day for memory latency and only looks busy, plus compression algorithms have improved so significantly in both software and hardware there’s almost never a good reason to be shuffling around uncompressed data.
- `Paul C` comment
- Yeah in this day and age you’re almost always IO or memory bound rather than CPU bound, and even if it looks CPU bound it’s probably just that the CPU is having to wait around all day for memory latency and only looks busy, plus compression algorithms have improved so significantly in both software and hardware there’s almost never a good reason to be shuffling around uncompressed data. (Make sure to disable swapfile and enable ZRAM too if you’re stuck with one of these ridiculous 4 or 8 GB non-ECC DRAM type of machines that can’t be upgraded and have only flash memory or consumer-grade SSD for swap space)
- `Paul C` comment
- That said, if all your files consist solely of long blocks of zeroes and pseudorandom data, such as already-compressed media files, archives, or encrypted files, you can still save yourself even that little bit of CPU time, and almost exactly the same amount of disk space with ZLE – run length encoding for zeroes which many other filesystems such as ext4, xfs, and apfs use by default these days.
- The only typical reason I can think of off the top of my head that you would want to set compression=off is if you are doing heavy i/o on very sparse files, such as torrent downloads and virtual machine disk images, stored on magnetic spinning disks, because, in that case you pretty much need to preallocate the entire block of zeroes before filling them in or you’ll end up with a file fragmentation nightmare that absolutely wrecks your throughput in addition to your already-wrecked latency from using magnetic disks in the first place. Not nearly as much of an issue on SSDs though.
- If your disks have data integrity issues, and you don’t care about losing said data, you just want to lose less of it, it would also help and at least ZFS would let you know when there was a failure unlike other filesystems which will happily give you back random corrupt data, but, in that case you probably should be more worried about replacing the disks before they fail entirely which is usually not too long after they start having such issues.
- Paul C` comment
- (It likely does try to account for the future filling in of ZLE encoded files by leaving some blank space but if the number of non-allocated zeroes exceeds the free space on the disk it will definitely happen because there’s nowhere else to put the data)
- `Alessandro Zigliani` comment
- Actually i read you should always turn lz4 on for media files, unless you EXCLUSIVELY have relatively big files (> 100MB ?). Even if you have JPEG photos you’ll end up wasting space if you don’t, unless you reduce the recordsize from 128KB. While compressed datasets would compress unallocated chunks (so a 50KB file would use 64 KB), uncompressed datasets would not (so a 50Kb file would still use 128KB on disk).
- Suppose you have a million JPEG files, averaging 10MB each, hence 10TB. If half the files waste on average 64KB, it’s 30 GiB wasted. It can become significant if the files a smaller. Am I wrong?
- Will disk compression impact the performance of a MySQL database? - Server Fault
- It will likely make little to zero difference in terms of performance. Unless your workload is heavily based on performing full table scans, MySQL performance is governed by IOPS/disk latency. If you are performing these r/w's across the network (TrueNAS), then that will be the performance bottleneck.
- The other detail to keep in mind is that ZFS compression is per block, and performs a heuristic (byte peeking) to determine if compression will have a material effect upon each block. So depending on the data you store in MySQL, it may not even be compressed.
- With that said, MySQL on ZFS in general is known to need tuning to perform well - see: https://www.percona.com/blog/mysql-zfs-performance-update/
- Space Saving
- Available Space difference from FreeNAS and VMware | TrueNAS Community
- You don't have any business trying to use all the space. ZFS is a copy on write filesystem, and needs significant amounts of space free in order to keep performing at acceptable levels. Your pool should probably never be filled more than 50% if you want ESXi to continue to like your FreeNAS ZFS datastore.
- So. Moving on. Compression is ABSOLUTELY a great idea. First, a compressed block will transfer from disk more quickly, and CPU decompression is gobs faster than SATA/SAS transfer of a larger sized uncompressed block of data. Second, compression increases the pool free space. Since ZFS write performance is loosely tied to the pool occupancy rate, having more free space tends to increase write performance.
- Well, ZFS won't be super happy at 50-60%. Over time, what happens is that fragmentation increases on the pool and the ability of ZFS to rapidly find contiguous ranges of free space drops, which impacts write performance. You won't see this right away... some people fill their pool to 80% and say "oh speeds are great, I'll just do this then" but then as time passes and they do a lot of writes to their pool, the performance falls like a rock, because fragmentation has increased. ZFS fools you at first because it can be VERY fast even out to 95% the first time around.
- Over time, there is more or less a bottom to where performance falls to. If you're not doing a lot of pool writes, you won't get there. If you are, you'll eventually get there. So the guys at Delphix actually took a single disk and tested this, and came up with what follows:
- An excelent diagram of %Pool Full vs. Steady State Throughput
- ZFS compression on sparce zvol - space difference · Issue #10260 · openzfs/zfs · GitHub
- Q: I'm compressing a dd img of a 3TB drive onto a zvol in ZFS for Linux. I enabled compression (lz4) and let it transfer. The pool just consists of one 3TB drive (for now). I am expecting to have 86Gigs more in zfs list than I appear to.
- A:
- 2.72 TiB * 0.03125 = approximately 85 GiB reserved for spa_slop_space - that is, the space ZFS reserves for its own use so that you can't run out of space while, say, deleting things.
- If you think that's too much reserved, you can tune spa_slop_shift from 5 to 6 - the formula is [total space] * 1/2^(spa_slop_shift), so increasing it from 5 to 6 will halve the usage.
- I'm not going to try and guess whether this is a good idea for your pool. It used to default to 6, so it's probably not going to cause you problems unless you get into serious edge cases and completely out of space.
- My real world example
- Performance
- LZ4 vs. ZStd | TrueNAS Community
- It has also been said that since the CPU is soooooo much faster than even SSDs, the bottleneck will not be the inline compression but rather the storage infrastructure. So that is promising.
- For most systems, using compression actually makes them faster because of the speed factor you describe actually reducing the amount of work the mechanical disks need to do because the data is smaller.
- Something I'm trying to wrap my head around is if you change the compression option for a dataset that already has many files inside, do the existing blocks get re-written eventually (under-the-hood maintenance) with the new compression method? What if you modify an existing file? Does the copy-on-write write the new blocks with the updated compression method, or with the file's / block's original compression method?
- Enabling compression on an already exisiting dataset
- Enabling lz4 compression on existing dataset. Can I compress existing data? | TrueNAS Community
- Q: I'm running FreeNAS-9.10.1-U1 and have enabled lz4 compression on the exisiting datasets that are already populated with data. From what I've read I'm under the impression that the lz4 compression will now only apply to new data added to the datasets. Is this correct? If so, is there a command I can run to run lz4 over the existing data, or is the only option to copy the data off and then back onto the volume?
- A:
- This is correct, you have to copy the data off and then back again for it to become compressed on this dataset.
- Note that you just have to move the data across datasets.
- Can you retroactively enable LZ4 compression and compress existing data? | TrueNAS Community
- Any changes you make to the dataset will be effective for data written after the time you make the change. So anything that rewrites the data should get it compressed. But there was no reason to turn it off in the first place.
- If you move all the data to another dataset and then back again it will be compressed. You can do this on the command line with mv or rsync if you are concerned about attributes etc.
- But if you have snapshots then the old data will be remembered.
- I think this means the snapshots will still be uncompressed.
- Or replication, if you want the pain-free experience and speed. You can even replicate everything (including the old snapshots) to a new dataset, delete the old one, rename the new one, and go on your merry way.
Example ZFS Commands
- A small collection of ZFS Commands
# Manual/Documentation = Output the commands helpfile
man <command>
man zfs
man zfs send

# Shows all ZFS mounts, not Linux mounts.
zfs mount

# Show asset information
zfs list
zfs list -o name,quota,refquota,reservation,refreservation
zfs get all rpool/data1
zfs get used,referenced,reservation,volsize,volblocksize,refreservation,usedbyrefreservation MyPoolA/Virtual_Disks/roadrunner

# Get pool ashift value
zpool get ashift MyPoolA
Maintenance
- 80% Rule
- ZFS 80 Percent Rule | 45Drives - So ZFS kinda is very transactional in how it makes a right. It's almost more like a database than a streaming file system, and this way it's very atomic, when it commits right, it commits the whole right.
- Preventing ZFS Rot - Long-term Management Best Practices | [H]ard|Forum
- dilidolo
- It is very important to keep enough free space for COW. I don't know the magic number on ZFS, but on NetApp, when you hit 85% used in aggregate, performance degrades dramatically.
- patrickdk
- This is caused cause it's COW. the raw speed you get when it's empty, is cause everything is written and then read seq from the drives.
- Over normal usage, your write to the whole drive many times, and delete stuff, and you end up creating random free spots of variable size.
- Over normal usage, your write to the whole drive many times, and delete stuff, and you end up creating random free spots of variable size.
- This is worse and worse the more full your drive is. This happens also on ext(2/3/4), but needs to be much fuller to notice the effect.My work performance systems I'm keeping under 50% usage. Backup and large file storage, I'll fill up, as it won't fragment.
- bexamous
- Oh and I think at 80% full is when zfs switches from 'first fit' to 'best fit'... you can change when this happens somehow. Soon as it switches to 'best fit' I would think new data would start getting much more fragmented.
- Defrag
Upgrading
- Information
- The ZFS file system needs to be upgraded to get the lastest features.
- Upgrading ZFS is different to upgrading TrueNAS and has to be done separately.
- when you upgrade different flags and features are added.
- After upgrading ZFS, you cannot roll back to an earlier version.
- ZFS whatever version is very compatible with whatever is using ZFS, and that software can see what that particular version of ZFS can do by reading the flags.
- Documentation
- Troubleshooting
- SOLVED - zfs pool upgrade mistake (I upgraded boot-pool) | TrueNAS Community
- Q: I got mail from my truenas-server, stating that there was an upgrade to the zfs pool: "New ZFS version or feature flags are available". Unfortunately I made the mistake to use the command to upgrade all pools, including the boot pool. Now I am a little scared to reboot, because there is a hint that I might need to update the boot code.
- A:
- This shouldn't be happening and there should be several mechanisms in place to prevent it.
- However, I expect what you did will have zero impact, as the feature would only be enabled if you added a draid vdev to the boot pool, which you wouldn't do.
- To this day I don't understand why this is a "WARNING" notification with a yellow hazard triangle symbol that invokes urgency. Here's my proposal for the notification.
- Get rid of the "WARNING" label.
- Get rid of the yellow hazard triangle
- Use a non-urgent "Did you know?" approach instead.
Troubleshooting
- Pools
- Can’t import pools on new system after motherboard burnt on power up | TrueNAS Community
- My motherboard made zappy sounds and burnt electrical smell yesterday as I was powering it on. So I pulled the power straight away.
- We almost need a Newbie / Noob guide to success. Something that says, don't use L2ARC, SLOG, De-Dup, Special Meta-devices, USB, hardware RAID, and other things we see here. After they are no longer Newbies / Noobs, they will then understand what some of those are and when to use / not use them.
- A worked forum thread on some ideas on how to proceed and a good example of what to do in case of mobo failure.
- Update went wrong | Page 2 | TrueNAS Community
- The config db file is named freenas-v1.db and is located at: /data
- However, if that directory is located on the USB boot device that is failed, this may not help at all.
- You can recover a copy that is automatically saved for you in the system dataset, if the system dataset is on the storage pool.
- For people like me, I moved the system dataset to the boot pool, this is no help, but the default location of the system dataset is on the storage pool.
- If you do a fresh install of FreeNAS on a new boot media, and import the storage pool, you should find the previous config db at this path:
/var/db/system/ plus another directory that will be named configs-****random_characters****.
- Datasets
- Does a dataset get imported automatically when a pool from a previous version is imported? | TrueNAS Community
- Q:
- My drive for the NAS boot physically failed and I had to install a new boot drive. I installed the most current version of FreeNAS on it. Then Accounts were re-created and I imported the pool from the existing storage disk.
- The instructions are unclear at this point. Does the pool import also import the dataset that was created in the previous install or will I need to add a new dataset to the pool that I just imported? Seems like the later is the correct answer but I want to make sure before I make an non-reversible mistake.
- A:
- Yes - importing a pool means you imported the pool's datasets as well, because they are part of the pool.
- It might be better to say that there's no "import" for datasets, because, as you note, they're simply part of the pool. Importing the pool imports everything on the pool, including files and zvols and datasets and everything.
- However, you will have lost any configuration related to sharing out datasets or zvols unless you had a saved version of the configuration.
- Q:
- In reference to the imported pool/data on this storage disk. The manual states that data is deleted when a dataset is deleted. It doesn't clarify what happens when the configuration is lost. Can I just create a new dataset and set up new permissions to access the files from the previous build or is the data in this pool unaccessable forever. (I.E. do I need to start over or can I reattach access permissions to the existing data)?
- A:
- FreeNAS saves the configuration early each morning by default. If you had your system dataset on your data pool you'll be able to get to it. See post 35 in this thread Update went wrong | Page 2 | TrueNAS Community for details.
- You may want to consider putting the system dataset on your data pool if not already done so - (CORE) System --> System Dataset
- Those two things are wildly different kind. Your configuration database is data written to a ZFS pool. A ZFS pool is a collection of vdevs on which you create filesystems called datasets. If you delete a filesystem, the information written on it is lost. Some things can be done to recover the data on destroyed filesystems, but in the case of ZFS it’s harder then in other cases. If you delete a dataset, consider the data lost, or send the drives to a data recovery company specializing in ZFS.
- Snapshots
- Snapshots are not shown
- Snapshots are not getting deleted
- They probably are. You cna tell this by there being a blurred effect over some of the details, similiar to this.
- Logout and back in again and they will be gone.
- This is an issue with the GUI (tested on Bluefin).
- ZFS Recovery
- Tutorials
- How to Recover Data from a RAID-z Array, ZFS File System, and a NAS with TrueNAS Core with Hetman RAID Recovery | Hetman Software
- In this video, you’ll see how to recover lost data from the ZFS file system and a RAID-z array using `Hetman RAID Recovery`.
- Recover software or hardware RAID of any type: JBOD, RAID 0, RAID 1, RAID 10, RAID 5, RAID 50, RAID 6, RAID 60, etc.
- really good software.
- Fair price.
- Can try for free.
- ZFS Recovery - How to recover ZFS files with DiskInternals ZFS Recovery software | DiskInternals
- Recover data from damaged or deleted ZFS pools: single, stripe, mirror and RAIDZ.
- Also has some basic information on ZFS filesystem.
- Software
- ZFS Recovery - ReclaiMe Pro - ZFS data recovery with ReclaiMe Pro – recover data from various ZFS pools: single, stripe, mirror and RAIDZ.
- Differences between ReclaiMe Standard, Ultimate and Pro - Reading this page you will know from which devices ReclaiMe can recover data. Also you will find information about the differences between ReclaiMe Standard, Ultimate and Pro.
- Klennet ZFS Recovery - Klennet ZFS Recovery software - recover data from damaged or deleted ZFS pools. Fully automatic pool layout, RAID level, and disk order detection.
iSCSI (Storage Over Ethernet, FCoE, NFS, SAN)
General
- IP based hardrive. It presents as a hard drive so remote OS windows, Linux and other OS can use as such.
- This can be formatted like any drive to whatever format you want.
- What is iSCSI and How Does it Work? - The iSCSI protocol allows the SCSI command to be sent over LANs, WANs and the internet. Learn about its role in modern data storage environments and iSCSI SANs.
- iSCSI is a transport layer protocol that describes how Small Computer System Interface (SCSI) packets should be transported over a TCP/IP network.
- allows the SCSI command to be sent end-to-end over local-area networks (LANs), wide-area networks (WANs) or the internet.
- What Is iSCSI & How Does It Work? | Enterprise Storage Forum - iSCSI (Internet Small Computer Systems Interface) is a transport layer protocol that works on top of the transport control protocol.
- What is iSCSI and How Does it Work? - The iSCSI protocol allows the SCSI command to be sent over LANs, WANs and the internet. Learn about its role in modern data storage environments and iSCSI SANs.
- iSCSI and zvols | [H]ard|Forum
- Q:
- Beginning the finals stages of my new server setup and I am aiming to use iSCSI to share my ZFS storage out to a Windows machine(WHS 2011 that will manage it and serve it to the PCs in my network), however I'm a little confused.
- Can I simply use iSCSI to share an entire ZFS pool? I have read a lot of guides that all show sharing a zvol, if I DO use a zvol is it possible in the future to expand it and thereby increase the iSCSI volume that the remote computer will see?
- A:
- iSCSI is a SAN-protocol, and as such the CLIENT computer (windows) will control the filesystem, not the server which is running ZFS.
- So how does this work: ZFS reserves a specific amount of space (say 20GB) in a zvol which acts as a virtual harddrive with block-level storage. This zvol is passed to iSCSI-target daemon which exports over the network. Finally your windows iSCSI driver presents a local disk, which you can then format with NTFS and actually use.
- In this example, the server is not aware of any files stored on the iSCSI volume. As such you cannot share your entire pool; you can only share zvols or files. ZVOLs obey flush commands and as such are the preferred way to handle iSCSI images where data security/integrity is important. For performance bulk data which is less important, a file-based iSCSI disk is possible. This would just be a 8GB file or something that you export.
- You can of course make zvol or file very big to share your data this way, but keep in mind only ONE computer can access this data at one time. So you wouldn't be running a NAS in this case, but only a SAN.
- Fibre Channel over Ethernet - Wikipedia - Fibre Channel over Ethernet (FCoE) is a computer network technology that encapsulates Fibre Channel frames over Ethernet networks. This allows Fibre Channel to use 10 Gigabit Ethernet networks (or higher speeds) while preserving the Fibre Channel protocol.
- FCoE - SAN Protocols Explained | Packet Coders
- Fibre Channel over Ethernet (FCoE) is a computer network technology that encapsulates Fibre Channel frames over Ethernet networks. This allows Fibre Channel to use 10 Gigabit Ethernet networks (or higher speeds) while preserving the Fibre Channel protocol.
- This removes the need to run separate LAN and SAN networks, allowing both networks to be run over a single converged network. In turn, allowing you to keep the latency, security, and traffic management benefits of FC, whilst reducing the number of switches, cables, adapters required within the network - resulting in a reduction to your network TCO.
Tutorials
TrueNAS Instructions
- Upload a disk image into a ZVol on your TrueNAS:
- TrueNAS
- Create a ZVol on your TrueNAS
- Create a an iSCSI share of the ZVol on your TrueNAS.
- If not sure, I would use: Sharing Platform : Modern OS: Extent block size 4k, TPC enabled, no Xen compat mode, SSD speed
- Windows
- Startup and connect the iSCSI share on your TrueNAS using the iSCSI initiator on Windows.
- Mount target
- Attach the hard disk you want to copy to the ZVol.
or
- Make sure you have a RAW disk image of the said drive instead.
- Load your Disk Imaging software, on Windows.
- Copy your source hard drive or send your RAW disk image to the target ZVol (presenting as a hard drive).
- Release the ZVol from the iSCSI initiator.
- TrueNAS
- Disconnect the ZVol from the iSCSI share.
- Create VM using the ZVol as its hard drive
- Done
- NB: This can also be used to make a backup of the ZVol
- Change Block Size
- iSCSI --> Configure --> Extents --> 'your name' --> Edit Extent --> Logical Block Size
- This does both Logical and Physical.
- If you cannot use a ZVol after using it in iSCSI
- Check the general iSCSI config and delete related stuff in there. I have not idea what most of it is.
Misc
Files
Files are what you imagine, they are not Datasets and are therefore not handled as Datasets.
Management
There are various GUIs and apps you can use to move files on your TrueNAS with, mileage may vary. Moving files is not the same as moving Datasets or ZVols and you must make sure no-one is using the files that your are manipulating.
GUIs
- Midnight Commander (mc)
- Other SSH software
- Graphical file manager application/plugin? | TrueNAS Community
- I was doing a search to see if there was a graphical file manager that, for example, Qnap offers with their NAS units/in their NAS operating system and so far, I haven't really been able to find one.
- feature requests:
- How do people migrate select data/files between TrueNAS servers then? : They use replications, ZFS to ZFS.
- If you want to leverage ZFS's efficiency ("block-based", not "file-based") and "like for like" copy of a dataset/snapshot, then ZFS-to-ZFS is what to use.
- In your case, you want to copy and move files around like a traditional file manager ("file-based"), so your options are to use the command-line, or your file browser, and move/copy files from one share to another. Akin to local file operations, but in your case these would be network folders, not local folders.
- As for the built-in GUI file manager for TrueNAS, it's likely only going to be available for SCALE, and possibly only supports local file management (not server-to-server.) It appears to be backlogged, and not sure what iXsystems' priority is.
- The thread ia a bit of a discussion abotu this subject aswell.
CLI
- Fastest way to copy (or move) files between shares | TrueNAS Community
- John Digital
- The most straightforward way to do this is likely mv. Issue this command at the TN host terminal. Adjust command for your actual use case.
mv /mnt/tank/source /mnt/tank/destination
- However it wont tell you progress or anything. So a fancier way is to go like this. Again adjust your use case. The command is included with the --dry-run flag.. When your sure youve got it right remove the --dry-run.
rsync -avzhP --remove-source-files /mnt/tank/dataset1 /mnt/tank/dataset2 --dry-run
- Then after you are satisfied its doing what you need, run the command without the --dry-run flag, youll need to do this to remove all the empty directories (if any).
find /mnt/tank/dataset1 -type d -empty -delete
- Pitfrr
- You could also use mc in the terminal. It gives you an interface and works even with remote systems.
- Basil Hendroff
- If what you're effectively doing is trying to rename the original dataset, the following approach will not move any files at all:
- Remove the share attached to the dataset.
- Rename the dataset e.g. if your pool is named
tank then zfs rename tank/old_dataset_name tank/new_dataset_name
- Set up the share against the renamed dataset.
- macmuchmore
- The ultimate guide to manage your files via SSH
- Learning how to manage files in SSH is quite easy. Commands are simple; only a simple click is needed to run and execute.
- All commands are explained.
- There is a downlaodable PDF version.
Dummy Files
These can be very useful in normal day to day operations on your TrueNAS.
ZVol Dummy
These are useful if you need to re-use a ZVol attached to a VM somewhere else but you want keep the VM intact. The Dummy ZVol allows you to save a TrueNAS config.
Example Dummy ZVol Names:
As you can see the names referer to the type of disk they are and where they are being used. Although this is not important it might be useful from an admin point of view and you can make these names as complex as required as these are just my examples.
- For VMs
- Dummy_VM
- Dummy_iSCSI_512
- Dummy_iSCSI_4096
- For iSCSI
- legacy-os-512
- modern-os-4096
Instructions
Just create a ZVol in your prefered location and maike it 1MB in size.
ISO Dummy
This can be used to maintain a CDROM device in a VM.
Create blank ISO using one of the following options and the name file Dummy.iso:
- Use MagicISO, UltraISO and save the empty ISO.
- Open text editor and save Dummy.iso
- Image a blank CD (if possible)
- Linux - use DD to make an image of an ISO file (not tested this).
- Download a blank ISO image.
Users and Groups
- General
- A user must be a member of a group. There is a checkbox/switch to add a user to an exiting group when creating a user, rather than creating a group with the same name.
- Official Documentation
- Setting Up Users and Groups | TrueNAS Documentation Hub - Describes how to set up users and groups in TrueNAS CORE.
- Managing Users | TrueNAS Documentation Hub - Provides instructions on adding and managing administrator and user accounts.
- Using Administrator Logins | TrueNAS Documentation Hub
- Explains role-based administrator logins and functions. Provides instructions on configuring SSH and working with the admin and root user passwords.
- SCALE 24.04 (Dragonfish) introduces administrators privileges and role-based administrator accounts. The root or local administrator user can create new administrators with limited privileges based on their needs. Predefined administrator roles are read only, share admin, and the default full access local administrator account.
- Tutorials
ACL
- ACL Primer | TrueNAS Documentation Hub
- Provides general information on POSIX and NFSv4 access control lists (ACLs) in TrueNAS systems and when to use them.
- Explains the permissions on the different types of shares.
- Generic = POSIX, SMB = NTFsv4 (advanced permissons ACL)
- Access control lists - Win32 apps | Microsoft Learn - Learn about access control lists, which list access control entries that specify trustees and control access rights to them.
- ACL on top of Unix permission? | TrueNAS Community
- Q: I spoke with some people on discord, and they told me generic dataset/unix permission don't mix well with ACL. Is that right?
- A: No. That's wrong. They probably aren't familiar with ACL implementation in Linux. "Messy" ACL is somewhat expected if you're using POSIX1E ACLs since there are actually two lists (default and access) being represented in the form and both are relevant to how permissions are interpreted. The rules for what makes a valid POSIX1E ACL are also somewhat more complex than the NFSv4 style used for SMB preset.
- Q: Their advice is if I'm using windows to access network files on the nas, then set the dataset as SMB and proceed with creating a SMB share, which is more cleaner.
- A: That part is correct. We have an SMB preset specifically to provide what we consider the best possible SMB configuration.
- SOLVED - Help Understanding ACL Permission | TrueNAS Community
- Q&A
- Beware here : there are Unix ACLs (owner - group - others) and Windows ACLs. These ones are completely different and do not work the same way at all. They are all ACLs, but completely different ACLs.
- Edit Filesystem ACL - two different ACL menus? | TrueNAS Community
- Q: First time setting up Truenas.Why does one of my shares have a different ACL menu than another one?
- A:
- The one on the right is actually the NFSv4 ACL editor.
- There are two different ACL choices on SCALE. The error you posted looks like you tried to create a POSIX1E ACL without a mask entry.
- acltype is a ZFS dataset (filesystem) property. The underlying paths have different ACL types, ergo different editors.
- There are various different reasons why you may want (or need) to use one vs the other. It has a lot to do with features required for a deployment and compatibility with different clients.
Shares
General
- Permissions - this is in the wrong place??
- Reset permissions on a Root Dataset
- You cannot use admin or root user account to access windows shares
- Tutorials
- TrueNAS Core: Configuring Shares, Permissions, Snapshots & Shadow Copies - YouTube | Lawrence Systems
- TrueNAS Scale: A Step-by-Step Guide to Dataset, Shares, and App Permissions | Lawrence Systems
- Overview
- Covers Apps and Shares.
- A Dataset overlays a folder wiht permissions.
- It attaches permissions to a Unix folder.
- Use SMB, this uses the more advanced ACL rathe than generic SMB.
- The root Dataset is always Unix permissions (POSIX) and cannot be edited anyway.
- Covers Apps as well - but for the old Helm Charts system so might not be the same as the Docker stuff coming in newer TrueNAS versions.
- From the video
- 00:00 TrueNAS Scale User and App Permissions
- 01:35 Creating Users
- Create User
- Credentials --> Local Users --> Add
- Create Group
- Credentials --> Local Groups --> Add
- NB: users seem to be listed here aswell.
- 02:28 Creating Datasets & Permission ACL Types
- Create Dataset
- Share Type: SMB
- By default has the 'Group - builtin_users' which includes 'tom'
- 'Group - builtin_users' = (allow|Modify) by default
- 04:12 Creating SMB Share
- 05:05 Nested Dataset Permissions
- Because it is a nested Dataset, it will take us straight to the ACL manager.
- If you strip the ACL, there are no permissions left on the Dataset.
- When you edit permissions, it will ask if you want to use a preset or create custom one.
- Preset is like the default one you get when you first create a dataset
- A custom one is blank where you make your own. It does not create a template unless you "Save As Preset" wich can be doen at any time
- Add "Tom" to the YouTube Group
- Credentials --> Local Groups --> YouTube --> Members: Add 'Tom'
- SMB service will need restarting
- When you change users or members of groups, SMB service will need restarting
- Shares --> Windows (SMB) Shares --> (Turn On Service | Turn Off Service)
or
- System Settings --> Services --> SMB --> Toggle Running
- 05:42 Setting Dataset Permissions
- 10:49 App Permissions With Shares
- 'Apps User' and 'Apps Group' is what needs to be assigned to a dataset in order to get applications to read and write to a dataset.
- Apps --> Advanced Settings --> 'Enable Host Path Safety Checks': Disabled
- This disables 'Valitdate Host Path'.
- The software will not work properly with this on as it will cause errors.
- This allows the Docker Apps to use ZFS Datasets as local mounts within the Docker rather than using an all self-contained file system.
- 14:32 Troubleshooting tips for permissions and shares
- Strip ACL and start again = best troubleshooting tip
- Restarting SMB (Samba)
- Restarting Windows when it holds on to credentials (like when you change a password)
- After you have set permissions, always re-edit them and check they are set correctly.
- From Comments
@Oliver-Arnold: Great video Tom! One quick way I've found on Windows to stop it holding onto the last user is to simply restart the "Workstation" (LanmanWorkstation) service. This will then prompt again for credentials when connecting to a share (Providing the remember me option wasn't ticked). Has saved a lot of time in the past when troubleshooting permissions with different users. @RebelliousX82: @2:50 No you can NOT change it later. Warning: if you set the share type to SMB (case insensitive for files), you won't be able to use WebDAV for that dataset. It needs Unix permissions, so Generic type will work for both. You can NOT change it once dataset is created, it is immutable. I had to move 2TB of data to new dataset and create the shares.@vangeeson: The Share Types cant be switched later, as i had to experience painfully. But your explanation of the different Share Types helped me to get into a problem i had with some datasets and prevented me from making some bad decisions while still working on my first TrueNAS setup. @petmic202: Hello Tom, my way to leave the running acces on a share is to use "net use" command to see the share and folow by "net use \\ip address\ipc$ /del" or the share corresponding. By do this, no logoff or restart is required, you can type \\host\share et the system ask you for new credential
- TrueNAS Core: Configuring Shares, Permissions, Snapshots & Shadow Copies - YouTube | Lawrence Systems
- How to create a SMB Share in TrueNAS SCALE - The basics | SpaceRex - This tutorial goes over how to setup TrueNAS Scale as an SMB server.
- TrueNAS Core 12 User and Group ACL Permissions and SMB Sharing - YouTube | Lawrence Systems
Network Discovery / NetBIOS / WSD
Network discover use to be done soley by SMBv1 but now network discovery has mopved on to using mDNS and WSD among others.
- Hostname
- Network --> Global Configuration --> Settings --> Hostname and Domain: truenas
- This is now used as the server name for SMBv2, SMBv3, WSD and mDNS network discovery protocols.
- One server name for all services.
- NetBIOS Settings
- These setting all related to
NetBIOS which are used in conjuction with SMBv1, both of which are now a legacy protocols that should not be used.
- Disable the `NetBIOS name server`
- Network --> Global Configuration --> Settings --> Service Announcement --> NetBIOS-NS: Disabled
- Legacy SMB clients rely on NetBIOS name resolution to discover SMB servers on a network.
- (nmbd / NetBIOS-NS)
- TrueNAS disables the NetBIOS Name Server (nmbd) by default, but you should check as only the newer versions of TrueNAS have this default value.
- Configure the NetBIOS name.
- Shares --> Windows (SMB) Shares --> Config Service --> NetBIOS Name
- This should be the same as your hostname unless you absolutely have a need for different name
- Keep in lowercase.
- NetBIOS names are inherently case-sensitive.
- Defaults:
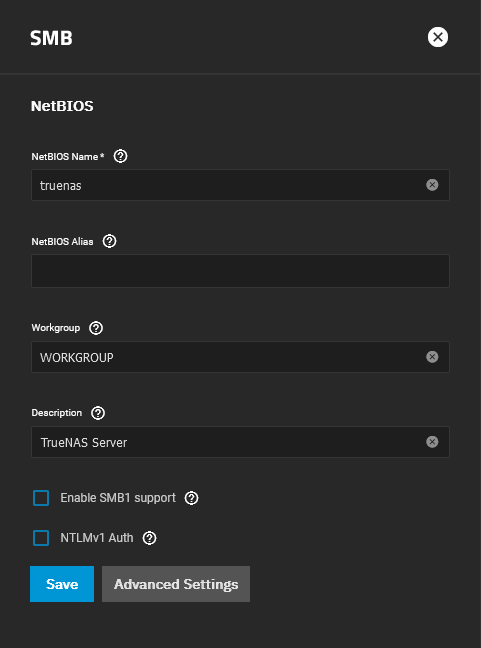
- This is only needed for SMBv1 legacy protocol and the NetBIOS-NS server for network discovery.
- NetBIOS naming convention is UPPERCASE
- Convention is to use uppercase but this name is case-insensitive so i would not bother and just have it matching your TrueNAS hostname. Also this name is only used for legacys clients using the SMBv1 protocol so it is nto that important.
- Change Netbios domain name to uppercase – Kristof's virtual life
- This post can help you, if you're trying to join your vRA deployment to an Active Directory domain, but you receive below error. No, it's not linked to a wrong userid/password, in my case it was linked to the fact that my Active Directory Netbios domain name was in lower case.
- By default, if you deploy a new Windows domain, the Netbios domain name is automatically set in uppercase.
- Name computers, domains, sites, and OUs - Windows Server | Microsoft Learn - Describes how to name computers, domains, sites, and organizational units in Active Directory.
- Computer Names - Win32 apps | Microsoft Learn
- NetBIOS names, by convention, are represented in uppercase where the translation algorithm from lowercase to uppercase is OEM character set dependent.
- [MS-NBTE]: NetBIOS Name Syntax | Microsoft Learn
- Neither [RFC1001] nor [RFC1002] discusses whether names are case-sensitive.
- This document clarifies this ambiguity by specifying that because the name space is defined as sixteen 8-bit binary bytes, a comparison MUST be done for equality against the entire 16 bytes.
- As a result, NetBIOS names are inherently case-sensitive.
- Network Discovery
- Windows Shares (SMB) | TrueNAS Documentation Hub - Provides information on SMB shares and instruction creating a basic share and setting up various specific configurations of SMB shares.
- Legacy SMB clients rely on NetBIOS name resolution to discover SMB servers on a network.
- TrueNAS disables the `NetBIOS Name Server` (nmbd / NetBIOS-NS) by default. Enable it on the `Network --> Global Settings` screen if you require this functionality.
- it seems to be on by default on Dragonfish 24.04.2, maybe newer versions will match the documentation
- MacOS clients use mDNS to discover SMB servers present on the network. TrueNAS enables the mDNS server (avahi) by default.
- Windows clients use WS-Discovery to discover the presence of SMB servers, but you can disable network discovery by default depending on the Windows client version.
- Discoverability through broadcast protocols is a convenience feature and is not required to access an SMB server.
- SOLVED - Strange issue with changing SMB NetBIOS name (can't access) | TrueNAS Community
- Did a little more digging. It seems that the NetBIOS name option is only relevant for legacy SMB (SMB1) connections and if you have NetBIOS-NS enabled.
- For modern SMB, what actually matters is the name of the machine, which SCALE inherits from the "Hostname" field under Network --> Global Configuration. So it's not just the hostname for the machine in the context of DNS, SSL certs, and the like, but it also used as the proper machine name that will be shown when connecting via SSH and connecting to the systems SMB server.
- In Linux the term "hostname" refers to the system name. As someone with much more of a Windows background I was not aware of this, since usually "system name" or "computer name" is more traditional there. It does make sense since "host name" refers to a literal host, but it just never clicked outside of the context of HTTP for me until now.
- What's strange is how even though I'm connecting from Windows 10 (so not SMB1) and don't have NetBIOS-NS enabled, changing the NetBIOS name entry did "partially" change the SMB share server name as described in my issue...
- While technically this is standard Unix/Samba, I do wish that the TrueNAS UI tooltip for NetBIOS name under the SMB section let you know that you need to change the hostname if you're using modern Samba, or if the hostname tool tip let you know that it affects the machine name (and therefore SMB shares) as well.
- How to kill off SMB1, NetBIOS, WINS and *still* have Windows' Network Neighbourhood better than ever | TrueNAS Community
- The first is a protocol called "WS-Discovery" (WSD). It's a little-known replacement discovery protocol built into Windows, since Windows Vista.
- One problem - WSD isn't built into Samba, so non-Windows shares offering SMB/CIFS sharing, may not be discovered. Solution - a small open source scripted daemon that provides WSD for BSD and Linux systems. (And is included in TrueNAS 12+). Run that, and now your non-Windows shares can join the party too. It's written in Python3, so it's highly cross-platform-able. I'm using it here and turned off everything else and for the first time ever - I feel confident that Network Neighbourhood is indeed, "Just Working" (TM).
- On TrueNAS 12+, no need to do anything apart from disable SMB1/NetBIOS on WIndows. WSD and wsdd should run by default on your NAS box.
Datasets
- Case sensitivity cannot be changed after it is set, it is immutable.
- Share Types
- This tells ZFS what this dataset is going to be used for and to enable the relevant permission types (i.e. SMB = Windows Permissions)
- Generic
- The share will use normal `Unix Permissions`
- POSIX
- SMB
- More Advanced ACL when creting shares, use this one
- The share will use Windows Permissions
- NFSv4
- Apps
- More Advanced ACL + pre-configured for TrueNAS apps
- NFSv4
- Official Documentation
- Datasets | Documentation Hub
- Dataset Preset (Share Type) - Select the option from the dropdown list to define the type of data sharing the dataset uses. The options optimize the dataset for a sharing protocol or app and set the ACL type best suited to the dataset purpose. Options are:
- Generic - Select for general storage datasets that are not associated with SMB shares, or apps. Sets the ACL to POSIX.
- SMB - Select to optimize the dataset for SMB shares. Displays the Create SMB Share option pre-selected and SMB Name field populated with the value entered in Name. Sets the ACL to NFSv4.
- Apps - Select to optimize the dataset for use by any application. Sets the ACL to NFSv4. If you plan to deploy container applications, the system automatically creates the ix-applications dataset but this is not used for application data storage.
- Multiprotocol - Select if configuring a multi-protocol or mixed-mode NFS and SMB sharing protocols. Allows clients to use either protocol to access the same data. Displays the Create NFS Share and Create SMB Share options pre-selected and the SMB Name field populated with the value entered in Name. See Multiprotcol Shares for more information. Sets the ACL to NFSv4.
- Setting cannot be edited after saving the dataset.
- If you plan to deploy container applications, the system automatically creates the ix-applications dataset but this is not used for application data storage. You cannot change this setting after saving the dataset.
- Adding and Managing Datasets | TrueNAS Documentation Hub - Provides instructions on creating and managing datasets.
- Select the Dataset Preset option you want to use. Options are:
- Generic for non-SMB share datasets such as iSCSI and NFS share datasets or datasets not associated with application storage.
- Multiprotocol for datasets optimized for SMB and NFS multi-mode shares or to create a dataset for NFS shares.
- SMB for datasets optimized for SMB shares.
- Apps for datasets optimized for application storage.
- Generic sets ACL permissions equivalent to Unix permissions 755, granting the owner full control and the group and other users read and execute privileges.
- SMB, Apps, and Multiprotocol inherit ACL permissions based on the parent dataset. If there is no ACL to inherit, one is calculated granting full control to the owner@, group@, members of the builtin_administrators group, and domain administrators. Modify control is granted to other members of the builtin_users group and directory services domain users.
- Apps includes an additional entry granting modify control to group 568 (Apps).
- Changing a Dataset's Share Type after initial setup.
- Dataset Preset (Share Type) should I use?
- Best way to create a Truenas dataset for Windows and Linux clients? - #3 by rugorak - Linux - Level1Techs Forums
- I know I would make an SMB share. But I am asking specifically for the creation of the data set, not the share.
- Case Sensitivity and Share Type depend on your Use Case.
- If Files will be accessed by Linux Clients, e.g. a Jellyfin Container or Linux PCs, then leave Case Sensitivity at “Sensitive” and Share Type at “Generic”
- If you’re planning to serve files to Windows Clients directly, switch Case Sensitivity to “Insensitive” and Share Type to “SMB”
- Help me understand case sensitivity on SMB type Dataset | TrueNAS Community
- Windows is case-insensitive, so that's what should be used with SMB. Why do you feel the need to share via SMB a dataset that's case-sensitive?
- If you want a casesensitive dataset then just don't use the dataset share_type preset. There's nothing preventing you from sharing a "GENERIC" dataset over SMB, you will just need to set up ACLs on your own (SMB preset sets some generic defaults that grant local SMB users MODIFY access
- SOLVED - Best configuration to share files with Linux clients | TrueNAS Community
- NFS vs SMB - What's the Difference (Pros and Cons)
- NFS vs SMB, What’s the difference?, lets start from the beginning. The ability to cooperate, communicate, and share files effectively is what makes an organization’s management effective. When sharing files over a network, you have two main protocols to select from NFS and SMB.
- You cannot rename a file in SMB irrespective of the files are open or closed.
- iSCSI vs NFS vs SMB - Having a TrueNAS system gives you the opportunity to use multiple types of network attached storage. Depending on the use case or OS, you can use iSCSI, NFS or SMB shares.
- Dataset Share Type purpose? | TrueNAS Community
- The dataset options set the permissions type. This is best defined initially and not changed, otherwise the results won't be pretty.
- Think of the dataset as a superfolder that is effectively a separate filesystem. That means you can easily set some wide-ranging options (like permissions type).
- iSCSI is a raw format. Permissions don't really apply in the traditional sense.
- Diagnostics
- Check if an existing dataset has "Share Type"-->"SMB"? | TrueNAS Community
- Q: I don't remember what I set when I created my Dataset and I want to check if it is set to SMB or to "Generic". Is there a way to know this? Couldn't find it in the UI.
- A: SMB shares just set case sensitivity to "insensitive", and applies a basic default ACL. In 12.0 we're also setting xattr to "sa".
Windows (SMB) Shares
This is one of the most essential parts of TrueNAS, getting access to your files but for the beginner can be tricky.
- Official Documentation
- General
- After setting up your first SMB share, you need to enable the service.
- You need to create one `local user` to be able to login to these shares. I could not get
admin to work and root is disabled.
- Also known as CIFS
- SMB shares require the presence of the ACL (i.e. you select SMB)
- You cannot login to shares using
admin or root.
- Dont use the same login credentials as your windows PC?
- But why you say when if i use the same ones I can log in without prompts
- If your computer gets hit with ransomware it cannot automatically access all of the files on TrueNAS
- Dont use mapped drives
- Same as above, the ransomware will not be able to spread to non-mapped drive especially if it does not have the credentials
- Make sure you take a least one snapshot before sharing data out so you have a small barrier against ransomware, but you should also make sure you have a suitable snapshot schedule setup.
- Ideally do not save credentials (Remember my credentials) to important shares.
- Shares should be read only unless absolutely needed.
- Permissions are set by Windows on SMB
- SMB shares - allow access to subfolder(s) only to specific user or group | TrueNAS Community
- Q:
- I have:
- User A (me, admin)
- User B (employee)
- I want to:
- give User A access to all folders and subfolders within a dataset
- restrict User B access to specific folders/subfolders (as they contain sensitive information), while allowing him full access to everything else
- A:
- Yes. You can use a Windows client to fine-tune permissions however you wish on the subdirectories. Though you may want to consider just creating a second dataset / share for the sensitive information (so that you don't have to worry about this, and can keep permissions easily auditable via the webui).
- Q:
- Do I understand correctly that this could be achieved by accessing the share as User A, from a windows machine, should have both User A and User B as user accounts under windows, right?
- Then
- Select the Child Folder I want to restrict access to
- Right-Click > Properties > Security > Edit
- Select the User
- Click Deny for Full Control
- A:
- The way you would typically do this in Windows SMB client is to disable auto-inheritance, and then add an ACL entry for _only_ the group(s) that should have access to the directory. Grant modify in Windows and not Full Control.
- Setting difficult / different permissions on same Share (Windows) | TrueNAS Community
- Windows shares' permissions should be managed on Windows via
icacls, or via Advanced Security (Right Click on share -> Advanced Sharing), NOT via FreeNAS.
- BSD/Linux/Mac shares can be managed via FreeNAS, but Windows shares need to be managed on Windows, else files and directories will have extremely screwed up permissions, and once they're screwed up, they stay that way, even if the share is removed. The only way to fix permissions at that point will be substantial time spent with
icacls.
- Advanced Security should be tried first, as
icacls gets complicated quite quickly. There are permissions and access rules icacls can configure that the GUI Advanced Security settings cannot, but for your usage, you should be fine with utilizing Advanced Security.
- The only permissions that should be set via FreeNAS for Windows is user:group ownership
- You'll create users and groups on FreeNAS for each user that needs to access the share, with each user receiving their own group.
- If you have multiple users needing to access the same folder (i.e. a "Public" or "Work" directory), you can create a group specific to those users, but each user should still have their own group specific to that user
- Then on Windows, you can set access permissions for each user and user's group.
- Tutorials
- TrueNAS Scale Share Your Files with SMB - SO EASY! - YouTube | Techworks - Set up a network share with TrueNas Scale and finally get using that extra drive space and storage over your network! File sharing really is this easy.
- FreeNAS 11.3 - Users, Permissions, ACLs - YouTube
- This tutorial was written for FreeNAS but some of the methodology still stands true.
- In this tutorial, we’re going to talk about setting up Users, Permissions, and ACLs in FreeNAS. ACL stands for Access Control List, which designates access control entries for users and administrators on FreeNAS systems, specifically for Windows SMB shares. This tutorial assumes you already have your pool configured. If you need help getting started with configuring a pool, we recommend you watch our ZFS Pools Overview video first.
- We will talk abut ACLs or access control lists. ACL is a security feature used in Microsoft which designates access control entrees for users and administrators on the system. FreeNAS interacts with it through the SMB protocol.
- FreeNAS and Samba (SMB) permissions (Video) | TrueNAS Community
- This is an old post with some old videos on it for FreeNAS but the logic should be very similiar.
- This is a topic that keeps coming up, new users get confused with a multitude of different options when configuring a Samba (CIFS) share in FreeNAS. I've created two video's, the first demonstrates how to set-up a Samba share which can be accessed by multiple users, allowing each user to read/write to the dataset, the second tackles advanced permissions.
- FreeNAS 9.10 & 11 and Samba (SMB) permissions
- This video demonstrates how to set Samba (SMB) permissions in FreeNAS to allow multiple users read/write access to a shared dataset.
- PLEASE NOTE: The CIFS service has been renamed to SMB.
- Advanced Samba (CIFS) permissions on FreeNAS 9.10 & 11
- This is a follow up to my original "FreeNAS and Samba (CIFS) permissions" video on how to set advanced permissions in FreeNAS using Windows Explorer.
- Methods For Fine-Tuning Samba Permissions | TrueNAS Community
- An excellent tutorial on the different aspects of permissions for SMB on FreeNAS, but will be the same for TrueNAS.
- Access Control Methods for FreeNAS Samba Servers
- Access control for SMB shares on a Windows server are determined through two sets of permissions:
- NTFS Access Control Lists (ACLs)
- and share permissions (which are primarily used for access control on Windows filesystems that do not support ACLs).
- In contrast with this, there are four primary access control facilities for Samba on FreeNAS:
- dataset user and group permissions in the FreeNAS webgui,
- Access Control Lists (ACLs),
- Samba share definitions,
- and share permissions.
- Troubleshooting
iSCSI Shares (ZVol)
This can be used to import and export ZVols very easily. iSCSI functionality is built into Windows 10 and Windows 11.
- Tutorials
- Creating an iSCSI share on TrueNAS | David's tidbits - This information will help you create an iSCSI share on TrueNAS. iSCSI shares are a “block” storage device. They are defined as a particular size which can be increased later.
- Guide: iSCSI Target/Server on Linux with ZFS for Windows initiator/clients - Operating Systems & Open Source - Level1Techs Forums
- Today I set up an iSCSI target/server on my Debian Linux server/NAS to be used as a Steam drive for my Windows gaming PC. I found that it was much more confusing than it needed to be so I’m writing this up so others with a similar use case may have a better starting point than I did. The biggest hurdle was finding adequately detailed documentation for targetcli-fb, the iSCSI target package I’m using.
- I only figured out this out today and I’m not a professional. Please take my advise as such. I did piece a lot of this information from other places but have not referenced all of it.
- Misc
Backup Strategy
Backup Types
- TrueNAS Config
- Your servers settings including such things as: ACL, Users, Virtual Machine configs, iSCSI configs.
- Dataset Full Replication
- Useful for making a single backup of a dataset manually.
- Dataset Incremental Replication (Rolling Backup)
- A full backup is maintained but only changes are sent reducing bandwidth usage.
- These are useful for setting up automated backups.
- Files - Copy files only
- This is the traditional method of backing up.
- This can be used to copy files to a non-ZFS system.
- Cloud Sync Task
- PUSH/PULL files from a Cloud provider
General
- Backing Up TrueNAS | Documentation Hub
- Provides general information and instructions on setting up data storage backup solutions, saving the system configuration and initial system debug files, and creating a boot environment.
- Cloud sync for Data Backup
- Replication for Data Backup
- Backing Up the System Configuration
- Downloading the Initial System Debug File
- Data Backups | Documentation Hub
- Describes how to configure data backups on TrueNAS CORE. With storage created and shared, it’s time to ensure TrueNAS data is effectively backed up.
- TrueNAS offers several options for backing up data. `Cloud Sync`, and `Replication`
- Data Protection | Documentation Hub - Tutorials related to configuring data backup features in TrueNAS SCALE.
- System Dataset (CORE) | Documentation Hub
- The system dataset stores debugging core files, encryption keys for encrypted pools, and Samba4 metadata such as the user and group cache and share level permissions.
- TruenNAS: Backup Immutability & Hardening - YouTube Lawrence Systems - A strategic overview of the backup process using immutable backup repositories.
- Backup and Restore TrueNAS Config location
- System Settings --> General --> Manual Configuration --> Download File
- System Settings --> General --> Manual Configuration --> Upload File
- Get boot config??
TrueNAS Configuration Backup
- Using Configuration Backups (CORE) | Documentation Hub
- Provides information concerning configuration backups on TrueNAS CORE. I copuld not find the SCALE version.
- Backup configs store information for accounts, network, services, tasks, virtual machines, and system settings. Backup configs also index ID’s and credentials for account, network, and system services. Users can view the contents of the backup config using database viewing software like SQLite DB Browser.
- Automatic Backup - TrueNAS automatically backs up the configuration database to the system dataset every morning at 3:45 (relative to system time settings). However, this backup does not occur if the system is off at that time. If the system dataset is on the boot pool and it becomes unavailable, the backup also loses availability.
- Important - You must backup SSH keys separately. TrueNAS does not store them in the configuration database. System host keys are files with names beginning with ssh_host_ in /usr/local/etc/ssh/. The root user keys are stored in /root/.ssh.
- These notes are based on CORE.
- Download location
- (CORE) System --> General --> Save Config
- (SCALE) system Settings --> General --> Manage Configuration (button top left) --> Download File
Backups Scripts
- Scheduled Backups
- Backup Scripts
Misc
- Hardened Backup Repository for Veeam | Documentation Hub
- This guide explains in details how to create a Hardened Backup Repository for VeeamBackup with TrueNAS Scale that means a repository that will survive to any remote attack.
- The main idea of this guide is the disabling of the webUI with an inititialisation script and a cron job to prevent remote deletion of the ZFS snapshots that guarantee data immutability.
- The key points are:
- Rely on ZFS snapshots to guarantee data immutability
- Reduce the surface of attack to the minimum
- When the setup is finished, disable all remote management interfaces
- Remote deletion of snapshots is impossible even if all the credentials are stolen.
- The only way to delete the snapshot is having physically access to the TrueNAS Server Console.
- This is similar top what Wasabi can offer and is a great protection from Ransomware.
Cloud Backup / AWS S3 / Remote Backup
Cloud based and S3 Bucket based backups.
- Native S3 support has been removed, you now have to use minio
- Client/ Cloud Sync (for backups to remote server)
- TrueNAS to TrueNAS (you control all the data)
- S3 Storage Providers
- S3 Server on TrueNAS
- Amazon S3
- Wasabi
- BackBlaze
- Other
Virtualisation
TrueNAS allows you to run Virtual Machines using KVM and docker images. These combined make TrueNAS a very powerful platform.
- TrueNAS CORE uses: bhyve
- TrueNAS SCALE uses: KVM
- QEMU vs KVM hypervisor: What's the difference? - Linux Tutorials - Learn Linux Configuration
- In this tutorial, we look at QEMU vs KVM hypervisor, weigh their pros and cons, and help you decide which one is better for various virtualization needs on Linux.
- It is important to understand the difference between a type 1 hypervisor and a type 2 hypervisor.
- KVM is a type 1 hypervisor, which essentially means it is able to run on bare metal.
- QEMU is a type 2 hypervisor, which means that it runs on top of the operating system. In this case, QEMU will utilize KVM in order to utilize the machine’s physical resources for the virtual machines.
This is just a little instroduction video I would watch first to show you what things look like.
KVM
- Sector Size
- VM settings are stored in the TrueNAS config and not the ZVol.
- All your Virtual Machine sector sizes should be on 4096 unless you need 512.
General
- Sites
- Feature Requests
- Emulated hardware
- KVM pre-assigns RAM, it is not dynamic, possibly to secure ZFS. The new version of TrueNAS allows you to set minimum and maximum RAM values now. I am not sure if this is truely dynamic.
- I have noticed 2 fields during the VM setup but I am not sure how they apply.
- Memory Size (Examples: 500 KiB, 500M, 2 TB) - Allocate RAM for the VM. Minimum value is 256 MiB. This field accepts human-readable input (Ex. 50 GiB, 500M, 2 TB). If units are not specified, the value defaults to bytes.
- Minimum Memory Size - When not specified, guest system is given fixed amount of memory specified above. When minimum memory is specified, guest system is given memory within range between minimum and fixed as needed.
- Which hypervisor does TrueNAS SCALE use? | TrueNAS Community
- = KVM
- Also their is an indepth discussion on how KVM uses Zvols
- TPM Support
- Windows VirtIO Drivers - Proxmox VE - Download link and further explanations of the drivers here.
- Virtio Drivers
- CPU Pinning / NUMA (Non-Uniform Memory Access)
- Add a PC speaker/beeper to VM, how do i do that?
- KVM: `Host model` vs `host passthrough` for CPU ??
- QEMU / KVM CPU model configuration — QEMU documentation
- Host Passthrough:
- This passes the host CPU model features, model, stepping, exactly to the guest.
- Note that KVM may filter out some host CPU model features if they cannot be supported with virtualization. Live migration is unsafe when this mode is used as libvirt / QEMU cannot guarantee a stable CPU is exposed to the guest across hosts. This is the recommended CPU to use, provided live migration is not required.
- Named Model (Custom):
- Select from a list.
- QEMU comes with a number of predefined named CPU models, that typically refer to specific generations of hardware released by Intel and AMD. These allow the guest VMs to have a degree of isolation from the host CPU, allowing greater flexibility in live migrating between hosts with differing hardware.
- Host Model:
- Automatically pick the best matching CPU and add additional features on to it.
- Libvirt supports a third way to configure CPU models known as “Host model”. This uses the QEMU “Named model” feature, automatically picking a CPU model that is similar the host CPU, and then adding extra features to approximate the host model as closely as possible. This does not guarantee the CPU family, stepping, etc will precisely match the host CPU, as they would with “Host passthrough”, but gives much of the benefit of passthrough, while making live migration safe.
- Managing
- Discussions
- Can TrueNAS Scale Replace your Hypervisor? - YouTube | Craft Computing
- The amount of RAM you specify for the VM is fixed and their is no dynamic mangement of this even though KVM supports it.
- VirtIO drivers are better (and preferred) as they allow direct access to hardware rather than going through an emulation layer.
- Virtual HDD Drivers for UEFI
- AHCI
- Is nearly universally compatible out of the box with every operating system as it is also just emulating physical hardware.
- SATA limitations and speed will apply here so you will be limited to 6GB/s connectivity on you virtual disks.
- VirtIO
- Allows VM client to access block storage directly from the host without the need for system calls to the hypervisor. In otherwords a client VM can access the block storage as if it were directly attached.
- VirtIO drivers are rolled into most Linux distros making installation pretty straight forward.
- For windows clients you will need to install a compatible linux driver before you're able to install the OS.
- Virtual NIC Drivers
- Intel e82585 (e1000)
- Intel drivers are universally supported but you are limited to the emulated hardware speeds of 1GB/s
- VirtIO
- Allows direct access to the network adapter used by your host meaning you are only limited by the speed of your physical link and you can access the link without making system calls to the hypervisor layer which means lower latency and faster throughput
- VirtIO drivers are rolled into most Linux distros making installation pretty straight forward.
- For windows clients you will need to install a compatible Linux driver before you're able to install the OS.
- Additional VM configurations can be done later after the wizard.
- FreeBSD vs. Linux – Virtualization Showdown with bhyve and KVM | Klara Inc - Not too long ago, we walked you through setting up bhyve on FreeBSD 13.1. Today, we’re going to take a look specifically at how bhyve stacks up against the Linux Kernel Virtual Machine—but before we can do that, we need to talk about the best performing configurations under bhyve itself.
- Tutorials
Pre-Configured Virtual Machines
Disk Image Handling
TrueNAS/KVM can handle several types of disk image (RAW, ZVol and possibly others) but where possible you should always use ZVol so you can take advantage of ZFS and its features.
General
- ZVol vs RAW, which is better?
- ZVol can use snapshots, RAW is just a simple binary file.
- FreeBSD vs. Linux – Virtualization Showdown with bhyve and KVM | Klara Inc - Not too long ago, we walked you through setting up bhyve on FreeBSD 13.1. Today, we’re going to take a look specifically at how bhyve stacks up against the Linux Kernel Virtual Machine—but before we can do that, we need to talk about the best performing configurations under bhyve itself.
- Proxmox VE: RAW, QCOW2 or ZVOL? | IKUS - How to choose your storage format in Proxmox Virtual Environment?
- Local / RAW - This storage format is probably the least sophisticated. The Virtual Machine disk is represented by a flat file. If your virtual drive is 8GiB in size, then this file will be 8GiB. Please note that this storage format does not allow "snapshot" creation. One of the RAW format advantages is that it is easy to save and copy because it is only a file.
- Local / QCOW2 - This storage format is more sophisticated than the RAW format. The virtual disk will always be presented as a file. On the other hand, QCOW2 allows you to create a "thin provisioning" disc; that is, you can create a virtual disk of 8GiB, but its actual size will not be 8GiB. Its exact size will increase as data is added to the virtual disk. Also, this format allows the creation of "snapshot". However, the time required to do a rollback is a bit longer compared to ZVOL.
- ZVOL - This storage format is only available if you use ZFS. You also need to set up a ZPOOL in Proxmox. Therefore, a ZVOL volume can be used directly by KVM with all the benefits of ZFS: data integrity, snapshots, clone, compression, deduplication, etc. Proxmox gives you the possibility to create a ZVOL in "thin provisioning".
- has an excellent diagram
- In all likelihood, ZVOL should outperform RAW and QCOW2. That's what we're going to check with our tests.
- Has a Pros and Cons table
- Conclusion - In conclusion, it would appear that the ZVOL format is a good choice compared to RAW and QCOW2. A little slower in writing but provides significant functionality.
- Proxmox VE: RAW, QCOW2 or ZVOL? | by Patrik Dufresne | Medium
- In our previous article, we compared the two virtualization technologies available in Proxmox; LXC and KVM. After analysis, we find that both technologies deliver good CPU performance, similar to the host. On the other hand, disc reading and writing performance are far from advantageous for KVM. This article will delve deeper into our analysis to see how the different storage formats available for KVM, namely ZVOL, RAW and QCOW2, compare with the default configurations. Although we analyze only three formats, Proxmox supports several others such as NFS, GluserFS, LVM, iSCSI, Ceph, etc.
- Originally published at https://www.ikus-soft.com
- ZFS vs raw disk for storing virtual machines: trade-offs - Super User
- ZFS can be (much) faster or safer in the following situations........
- Bhyve. Zvol vs Raw file | TrueNAS Community
- Quoting from the documentation: https://www.ixsystems.com/documentation/freenas/11.2/virtualmachines.html#vms-raw-file
- Raw Files are similar to Zvol disk devices, but the disk image comes from a file. These are typically used with existing read-only binary images of drives, like an installer disk image file meant to be copied onto a USB stick.
- It's essentially the same. There are a few parameters that you can set separately from the parent dataset on a zvol, compared to a RAW file being forced to inherit from its dataset parent since it's just a file like any other.
- ZVOLs are also just files stored in a special location in the filesystem, but physically on the pool/dataset where you create it. It gets special treatment per the settings you can see in the GUI when you set it up, but otherwise, it's also just a file.
- ZVOLs are required in some cases, such as iSCSI to provide block storage.
- 16. Virtual Machines — FreeNAS®11.2-U3 User Guide Table of Contents
- Raw Files are similar to Zvol disk devices, but the disk image comes from a file. These are typically used with existing read-only binary images of drives, like an installer disk image file meant to be copied onto a USB stick.
- After obtaining and copying the image file to the FreeNAS® system,
- click (Options) -->,
- click ADD,
- then set the Type to Raw File.
- TrueNAS SCALE - Virtualization Plugin - File/qcow2 support for QEMU/KVM instead of using zvol | TrueNAS Community
- The only exception, I was trying to figure out how to use a "qcow2" disk image as the boot source for a VM within the angular ui.
- So basically, to create a VM around an existing virtual disk I still need to do:
1) qemu-img convert: raw, qcow2, qed, vdi, vmdk, vhd to raw
2) dd if=drive.raw of=/dev/zvol/volume2/zvol
- I got HomeAssistant running by using
sudo qemu-img convert -O raw hassos_ova-5.11.qcow2 /dev/zvol/main/HasOSS-f11jpf
- Use VirtualBox (VDI), Microsoft (VHD) or VMWare virtual disks (VMDK) disk images in TrueNAS
- You cannot directly use these disk formats on TrueNAS KVM.
- You need to convert the disk images to RAW image file, and then import into a ZVol on TrueNAS.
- NB: TrueNAS does allow the use of RAW image files for Virtual Machines.
Expand an existing ZVol
- Resize Ubuntu VM Disk on TrueNAS Scale · GitHub
- Shutdown the target VM
- Locate the zvol where the storage is allocated in the Storage blade in the TrueNAS Scale Web UI
- Resize the zvol by editing it-this can ONLY be increased, not shrunk!
- Save your changes
- Start your target VM up again
- Log in to the VM
- Execute the
growpart command, ie. sudo growpart /dev/vda2
- Execute the
resize2fs command, ie. sudo resize2fs /dev/vda2
- Verify that the disk has increased in size using
df -h
- Done
Converting a VM disk file to RAW
Sometimes you get a Virtual Disk from an external source but it is not in a RAW format so will need converting before importing to a ZVol.
Import/Export a ZVol to/from a RAW file
ZVols are very useful, but unless you know how you can import/export them their usage can become restrictive.
Below are several methods for importing and exporting but they fall into 2 categories:
- Using network aware disk imaging software from within the VM.
- Converting a RAW image directly into a ZVol block device and vice-versa.
- General
- for those where you cannot use iSCSI because of LVM (or other dodgy stuff), create RAW file of your VMs harddisk, then convert the RAW image file to the required format.
- use dd (does not care about file format but will result in all LBA being written too)
- you could mount the image as a file/harddisk (+ your traget drive) in devices and then use clonezilla or gpart
- Transfer VirtualBox machine to physical machine - Windows 10 Forums
- Simple instructions (file)
- Take the VM image and convert it to an RAW image
- Copy the file to your TrueNAS
- Create a ZVol first? (not sure if this step is needed)
- Use the
dd command to create a ZVol via a block device
- My Network Image Option (Agent)
- Create a virtual machine with the correct disk size and an active network
- Run a HDD imaging agent on the VM
- Run the imaging software on the source
- Start the clone
- My Network Image Option (iSCSI)
- Create an iSCSI drive on TrueNAS (which is a mounted ZVol)
- Share out the iSCSI
- Mount the iSCSI on PC
- Mount the source drive on the PC
- Run the imaging software on the PC
- Start the clone
- qemu-img
- DD
- GZip
- Clonezilla
- Clonezilla - Clonezilla is a partition and disk imaging/cloning program.
- For unsupported file system, sector-to-sector copy is done by dd in Clonezilla.
- Clonezilla Images are NOT RAW
- linux - Clonezilla made a smaller image than actual drive size - Unix & Linux Stack Exchange
- Clonezilla does (by default) two things that make images smaller (and often faster) than you'd expect:
- it does not copy free space, at least on filesystems it knows about. A new laptop hopefully has most of the space free (this saves a lot of time, not just space).
- it compresses the image (saves space, may speed up or slow down, depending on output device I/O speed vs. CPU speed)
- Clonezilla images are not, by default, raw disk images. You'll need to use Clonezilla (or the tools it uses) to restore them. You can't, e.g., directly mount them with the loopback device.
- Free Imaging software - CloneZilla & PartImage - Tutorial - Extensive tutorial about two popular free imaging software - CloneZilla and PartImage
- Clone Virtual Disk using just a Virtual Machine
- Load both disks on a Virtual Machine and use an app like Clonezilla or GPart to copy one disk to the other.
CDROM
- Error while creating the CDROM device | TrueNAS Community
- Cannot eject CDROM
- Power down the VM and delete the CDROM, there is no eject option.
- Try Changing the order so that Disk is before CDROM.
- Use a Dummy.ISO (an empty ISO).
- Use a real CDROM drive
- Stop booting from a CDROM
- Delete the device from the VM.
- Attach a Dummy/Blank iso.
- Changing the boot number to be last doesn't work.
Networking
- I want TrueNAS to communicate with a virtualised firewall even when there is no cable connected to the TrueNAS’s physical NIC | TrueNAS Community
- No:
- This is by design for security and there is noway to change this behaviour.
- Tom @ Lawrence Systems has asked for this as an option (or at least mentioned it).
- This is still true for TrueNAS SCALE
- Can not visit host ip address inside virtual machine | TrueNAS Community
- You need to create a bridge. Add your primary NIC to that BRIDGE and assign your VM to the BRIDGE instead of the NIC itself.
- To set up the bridge for your main interface correctly from the WebGUI you need to follow specific order of steps to not loose connectivity:
- Set up your main interface with static IP by disabling DHCP and adding IP alias (use the same IP you are connected to for easy results)
- Test Changes and then Save them (important)
- Edit your main interface, remove the alias IP
- Don't click Test Changes
- Add a bridge, name it something like br0, select your main interface as a member and add the IP alias that you had on main interface
- Click Apply and then Test Changes
- It will take longer to apply than just setting static IP, you can even get a screen telling you that your NAS in offline but just wait - worst case scenario TrueNas will revert to old network settings.
- After 30sec you should see an option to save changes.
- After you save them you should see both your main interface and new bridge active but bridge should have the IP
- Now you just assign the bridge as an interface for your VM.
- SOLVED - No external network for VMs with bridged interface | TrueNAS Community
- I hope somebody here has pointers for a solution. I'm not familiar with KVM so perhaps am missing an obvious step.
- Environment: TrueNAS SCALE 22.02.1 for testing on ESXi with 2x VMware E1000e NICs on separate subnets plus bridged network. Confirmed that shares, permissions, general networking, etc. work.
- Following the steps in the forum, this Jira ticket, and on YouTube I'm able to setup a bridged interface for VM's by assigning the IP to the bridged interface instead of the NIC. Internally this seems to work as intended, but no matter what I try, I cannot get external network connections to work from and to the bridged network.
- When I remove the bridged interface and assign the IP back to the NIC itself, external connections are available again, I can ping in and out, and the GUI and shares can be contacted.
GuestOS System Clock (RTC)
- Leaving the "System Clock" on "Local" is best, and works fine with Webmin/Virtualmin.
- When you start a KVM, the time (UTC/Local) from your Host is used as the start time for the emulated RTC of the Guest, a paravirtualized clock (kvm-clock), then it is soley maintained in the VM.
- You can update the Guest RTC as required and it will not affect the Host's clock.
- Chapter 8. KVM Guest Timing Management Red Hat Enterprise Linux 7 | Red Hat Customer Portal
- Virtualization involves several challenges for time keeping in guest virtual machines.
- Guest virtual machines without accurate time keeping may experience issues with network applications and processes, as session validity, migration, and other network activities rely on timestamps to remain correct.
- KVM avoids these issues by providing guest virtual machines with a paravirtualized clock (kvm-clock).
- The mechanics of guest virtual machine time synchronization. By default, the guest synchronizes its time with the hypervisor as follows:
- When the guest system boots, the guest reads the time from the emulated Real Time Clock (RTC).
- When the NTP protocol is initiated, it automatically synchronizes the guest clock. Afterwards, during normal guest operation, NTP performs clock adjustments in the guest.
- I'm experiencing timer drift issues in my VM guests, what to do? | FAQ - KVM
- Maemo docs state that it's important to disable UTC and set the correct time zone, however I don't really see how that would help in case of diverging host/guest clocks.
- IMHO much more useful and important is to configure properly working NTP server (chrony recommended, or ntpd) on both host and guest.
- linux - Clock synchronisation on kvm guests - Server Fault
- Fundamentally the clock is going to drift some, I think there is a limit to what can be done at this time.
- You say that you don't run NTP in the guests but I think that is what you should do,
- The best option for a precise clock on the guest is to use the kvm-clock source (pvclock) which is synchronized with clock's host.
- Here is a link to the VMware paper Timekeeping in VMware Virtual Machines (pdf - 2008)
- KVM Clocks and Time Zone Settings - SophieDogg
- So the other day there was an extended power outage down at the dogg pound, and one of my non-essential server racks had to be taken off-line. This particular server rack only has UPS battery backup, but no generator power (like the others), and upon reboot, the clocks in all my QEMU Linux VM’s were wrong! They kept getting set to UTC time instead of local time… After much searching and testing, I finally found out what was necessary to fix this issue.
- Detailed command line solution for this problem.
- VM - Windows Time Wrong | TrueNAS Community
- Unix systems run their clock in UTC, always. And convert to and from local time for output/input of dates. It's a multi user system - so multiple users can each have their own timezone settings.
Graceful Shutdown / ACPI Shutdown
- Sending an "ACPI power down command" / "poweroff ACPI call" from either the Host OS, via a power button, or by running the `poweroff` command from within the Guest OS will cause the OS to shutdown gracefully.
- Virtualization | TrueNAS Documentation Hub - Tutorials for configuring TrueNAS SCALE virtualization features.
- When a user initiates a TrueNAS shutdown:
- TrueNAS will send an "ACPI power down command" to all Guest VMs.
- TrueNAS will wait for each VM to send it a `Shutdown Success` message up until to the maximum time defined in the "Shutdown Timeout" for each VM. If a VM is not shut down when this period is expired, TrueNAS will immediately power off the VM.
- Once all the VMs have been shutdown, TrueNAS will complete it's shutdown procedure.
- Buttons
Power Off: This performs an immediate power down of the VM. This is not graceful. This is the same as holding in the power button for 4 seconds (on most PCs). All CPU processing is immediately stopped.Stop: This sends an "ACPI power down command" to the VM. This will start a graceful shutdown of the guest OS. This is the same as briefly pressing the power button.State toggle: When VM Off = Pressing the power button, When On = "ACPI power down command"- The
State toggle and Stop buttons send an "ACPI power down command" to the VM operating system but if there is not an ACPI aware OS installed, these commands time out. In this case, use the Power Off button instead.
- From Docs
- Use the State toggle or click Stop to follow a standard procedure to do a clean shutdown of the running VM.
- Click power_settings_new Power Off to halt and deactivate the VM, which is similar to unplugging a computer.
- If the VM does not have a guest OS installed, the VM State toggle and stop Stop button might not function as expected.
- The
State toggle and Stop buttons send an "ACPI power down command" to the VM operating system, but since an OS is not installed, these commands time out. Use the Power Off button instead.
Cloned VMs are not clones, they are snapshots!
- Do NOT use the 'Clone' button and expect an independent clone of your VM.
- This functionality is simliar to snapshots and how they work in VirtualBox, except here, TrueNAS bolts a separate KVM instance on the newly created snapshot and presents it as a new KVM.
- This should only be used for testing new features and things out on existing VMs.
- TrueNAS should rename the button 'Clone' --> 'Snapshot VM' as this is a better description.
I had to look into this because I assumed the 'Clone' button made a full clone of the VM, it does not.
I will outline what happens and what you get when you 'Clone' a VM.
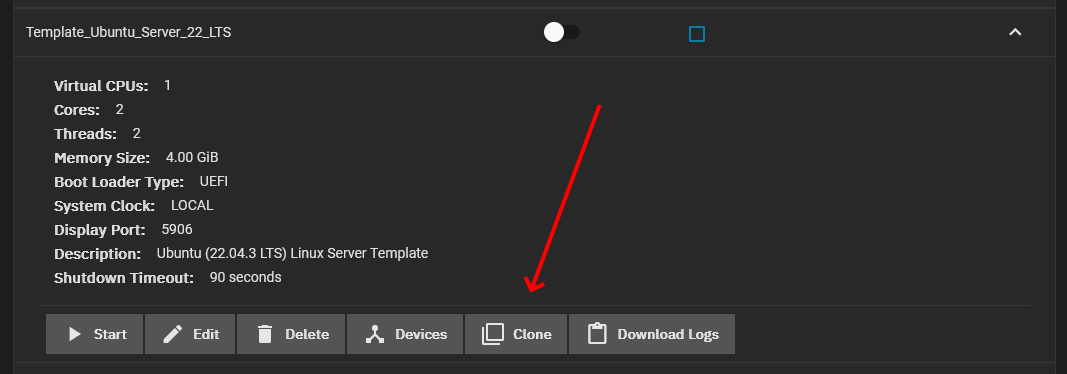
- Click the 'Clone' button.
- TN creates a snapshot of the VM's ZVol.
- TN clones this snapshot to a new ZVol.
- TN creates a new VM using the meta settings from the 'parent' VM and the newly created ZVol.
FAQ
- You cannot delete a Parent VM if it has Child/Cloned VMs. You need to delete the children first.
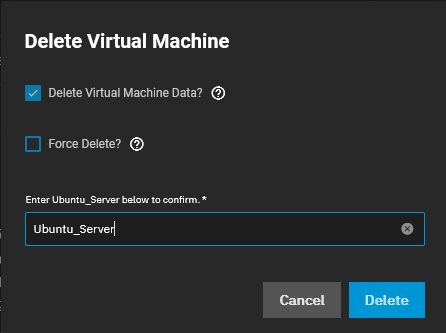
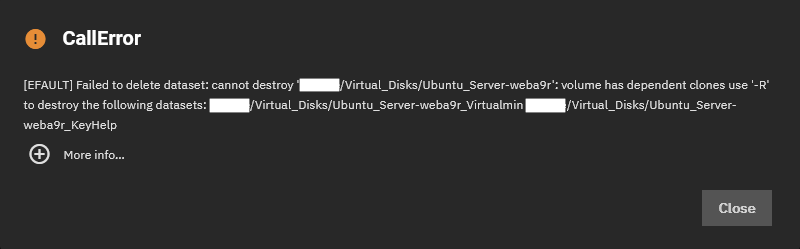
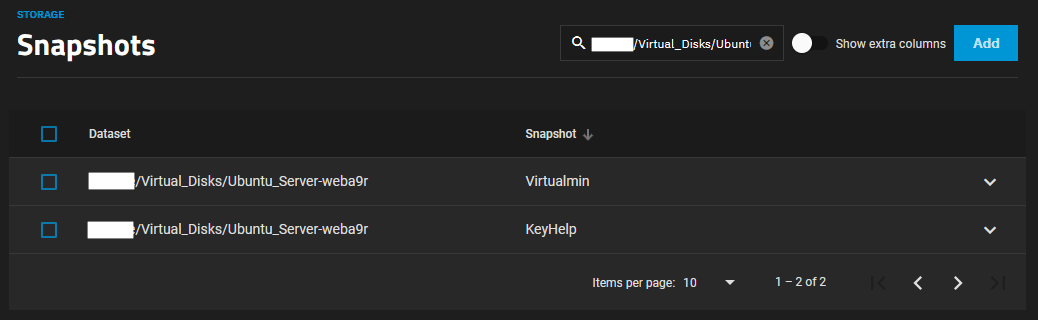
- You cannot delete a Parent ZVol if it has Child/Cloned ZVols. You need to delete the children first.
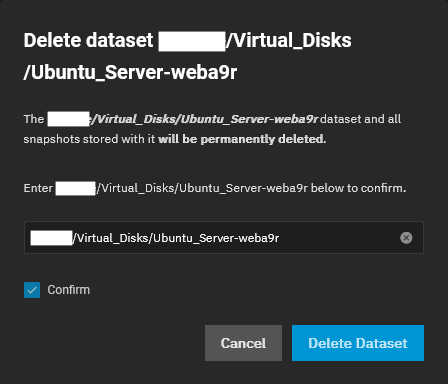

- Deleting a Child/Cloned VM (with the option 'Delete Virtual Machine Data') only deletes the ZVol, not the snapshot that it was created from on the parent.
- When you delete the Parent VM (with the option 'Delete Virtual Machine Data'), all the snapshots are deleted as you would expect.
- Are the child VM (meta settings only) linked or is it just the ZVols.
- I am assuming the ZVols are linked, the meta information is not.
- How can I tell if the ZVol is a child of another?
- Select the ZVol in the 'Datasets' section. It will show a 'Promote' button next to the delete button.
- The naming convention of the ZVol will help. The clone's name that you selected will be added to the end of the parents name to give you the full name of the ZVol. So all children of that parent, will start with the parents name.
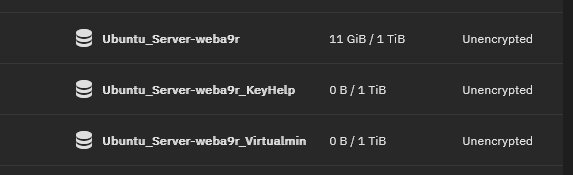
- Don't manually rename the ZVols, as this helps visually identify to which parent it belongs.
- The only true way to get a clone of a VM is it use send|recv to create a new (full) instance of the ZVol, and then manually create a new VM assigning the newly created ZVol.
- 'Promote' will not fix anything here.
Notes
GPU Passthrough
- GPU passthrough | TrueNAS Community
- You need 2 GPUs to do both passthrough and have one available to your container apps. To make it available to VMs for passthrough it isolates the GPU from the rest of the system.
Configuring BIOS
AMD Virtualization (AMD-V)
- SVM (Secure Virtual Machine)
- SR-IOV (Single Root IO Virtualization Support)
- It allows different virtual machines in a virtual environment to share a single PCI Express hardware interface.
- The hardware itself need to support SR-IOV.
- Very few devices support SR-IOV.
- Each VM will get it's own containerised instance of the card (shadows).
- x86 virtualization - Wikipedia
- In SR-IOV, the most common of these, a host VMM configures supported devices to create and allocate virtual "shadows" of their configuration spaces so that virtual machine guests can directly configure and access such "shadow" device resources.[52] With SR-IOV enabled, virtualized network interfaces are directly accessible to the guests,[53] avoiding involvement of the VMM and resulting in high overall performance
- Overview of Single Root I/O Virtualization (SR-IOV) - Windows drivers | Microsoft Learn - The SR-IOV interface is an extension to the PCI Express (PCIe) specification.
- Configure SR-IOV for Hyper-V Virtual Machines on Windows Server | Windows OS Hub
- SR-IOV (Single Root Input/Output Virtualization) is a host hardware device virtualization technology that allows virtual machines to have direct access to host devices. It can virtualize different types of devices, but most often it is used to virtualize network adapters.
- In this article, we’ll show you how to enable and configure SR-IOV for virtual machine network adapters on a Windows Hyper-V server.
- Enable SR-IOV on KVM | VM-Series Deployment Guide
- Single root I/O virtualization (SR-IOV) allows a single PCIe physical device under a single root port to appear to be multiple separate physical devices to the hypervisor or guest.
- To enable SR-IOV on a KVM guest, define a pool of virtual function (VF) devices associated with a physical NIC and automatically assign VF devices from the pool to PCI IDs.
- Enable SR-IOV on KVM | VMWare - To enable SR-IOV on KVM, perform the following steps.
- Single Root IO Virtualization (SR-IOV) - MLNX_OFED v5.4-1.0.3.0 - NVIDIA Networking Docs
- Single Root IO Virtualization (SR-IOV) is a technology that allows a physical PCIe device to present itself multiple times through the PCIe bus.
- This technology enables multiple virtual instances of the device with separate resources.
- NVIDIA adapters are capable of exposing up to 127 virtual instances (Virtual Functions (VFs) for each port in the NVIDIA ConnectX® family cards. These virtual functions can then be provisioned separately. Each VF can be seen as an additional device connected to the Physical Function. It shares the same resources with the Physical Function, and its number of ports equals those of the Physical Function.
- SR-IOV is commonly used in conjunction with an SR-IOV enabled hypervisor to provide virtual machines direct hardware access to network resources hence increasing its performance.
In this chapter we will demonstrate setup and configuration of SR-IOV in a Red Hat Linux environment using ConnectX® VPI adapter cards.
- IOMMU (AMD-VI ) (VT-d) (Input-Output Memory Management) (PCI Passthrough)
- An input/output memory management unit (IOMMU) allows guest virtual machines to directly use peripheral devices, such as Ethernet, accelerated graphics cards, and hard-drive controllers, through DMA and interrupt remapping. This is sometimes called PCI Passthrough.
- It can isolate I/O and memory accesses (from other VMs and the Host system) to prevent DMA attacks on the physical server hardware.
- There will be a small performance hit using this technology but nothing that will be noticed.
- IOMMU (Input-output memory management unit) manage I/O and MMU (memory management unit) manage memory access.
- So long story short, the only way an IOMMU will help you is if you start assigning HW resources directly to the VM.
- Thoughts dereferenced from the scratchpad noise. | What is IOMMU and how it can be used?
- Describes, in-depth, IOMMU, SR-IOV and PCIe passthrough and is well written by a firmware engineer.
- General
- IOMMU is a generic name for technologies such as VT-d by Intel, AMD-Vi by AMD, TCE by IBM and SMMU by ARM.
- First of all, IOMMU has to be initiated by UEFI/BIOS and information about it has to be passed to the kernel in ACPI tables
- One of the most interesting use cases of IOMMU is PCIe Passthrough. With the help of the IOMMU, it is possible to remap all DMA accesses and interrupts of a device to a guest virtual machine OS address space, by doing so, the host gives up complete control of the device to the guest OS.
- SR-IOV allows different virtual machines in a virtual environment to share a single PCI Express hardware interface, though very few devices support SR-IOV.
- Overview
- The I/O memory management unit (IOMMU) is a type of memory management unit (MMU) that connects a Direct Memory Access (DMA) capable expansion bus to the main memory.
- It extends the system architecture by adding support for the virtualization of memory addresses used by peripheral devices.
- Additionally, it provides memory isolation and protection by enabling system software to control which areas of physical memory an I/O device may access.
- It also helps filter and remap interrupts from peripheral devices
- Advantages
- Memory isolation and protection: device can only access memory regions that are mapped for it. Hence faulty and/or malicious devices can’t corrupt memory.
- Memory isolation allows safe device assignment to a virtual machine without compromising host and other guest OSes.
- Disadvantages
- Latency in dynamic DMA mapping, translation overhead penalty.
- Host software has to maintain in-memory data structures for use by the IOMMU
- Enable IOMMU or VT-d in your motherboard BIOS - BIOS - Tutorials - InformatiWeb
- If you want to "pass" the graphics card or other PCI device to a virtual machine by using PCI passthrough, you should enable IOMMU (or Intel VT-d for Intel) in the motherboard BIOS of your server.
- This technology allows you:
- to pass a PCI device to a HVM (hardware or virtual machine hardware-assisted virtualization) virtual machine
- isolate I/O and memory accesses to prevent DMA attacks on the physical server hardware.
- PCI passthrough with Citrix XenServer 6.5 - Citrix - Tutorials - InformatiWeb Pro
- Why use this feature ?
- To use physical devices of the server (USB devices, PCI cards, ...).
- Thus, the machine is isolated from the system (through virtualization of the machine), but she will have direct access to the PCI device. Then, we realize that the virtual machine has direct access to the PCI device and therefore to the server hardware. This poses a security problem because this virtual machine will have a direct memory access (DMA) to it.
- How to correct this DMA vulnerability ?
- It's very simple, just enable the IOMMU (or Intel VT-d) option in the motherboard BIOS. This feature allows the motherboard to "remap" access to hardware and memory, to limit access to the device associated to the virtual machine.
- In summary, the virtual machine can use the PCI device, but it will not have access to the rest of the server hardware.
- Note : IOMMU (Input-output memory management unit) manage I/O and MMU (memory management unit) manage memory access.
- There is a simply graphic that explains things.
- IOMMU or VT-d is required to use PCI passthrough ?
- IOMMU is optional but recommended for paravirtualized virtual machines (PV guests)
- IOMMU is required for HVM (Hardware virtual machine) virtual machines. HVM is identical to the "Hardware-assisted virtualization" technology.
- IOMMU is required for the VGA passthrough. To use the VGA passthrough, refer to our tutorial : Citrix XenServer - VGA passthrough
- What is IOMMU? | PeerSpot
- IOMMU stands for Input-Output Memory Management Unit. It connects i/o devices to the DMA bus the same way processor is connected to the memory via the DMA bus.
- SR-IOV is different, the peripheral itself must carry the support. The HW knows it's being virtualized and can delegate a HW slice of itself to the VM. Many VMs can talk to an SR-IOV device concurrently with very low overhead.
- The only thing faster than SR-IOV is PCI passthrough though in that case only one VM can make use of that device, not even the host operating system can use it. PCI passthrough would be useful for say a VM that runs an intense database that would benefit from being attached to a FiberChannel SAN.
- IOMMU is a component in a memory controller that translates device virtual addresses into physical addresses.
- The IOMMU’s DMA re-mapping functionality is necessary in order for VMDirectPath I/O to work. DMA transactions sent by the passthrough PCI function carry guest OS physical addresses which must be translated into host physical addresses by the IOMMU.
- Hardware-assisted I/O MMU virtualization called Intel Virtualization Technology for Directed I/O (VT-d) in Intel processors and AMD I/O Virtualization (AMD-Vi or IOMMU) in AMD processors, is an I/O memory management feature that remaps I/O DMA transfers and device interrupts. This feature (strictly speaking, is a function of the chipset, rather than the CPU) can allow virtual machines to have direct access to hardware I/O devices, such as network cards, storage controllers (HBAs), and GPUs.
- x86 virtualization - Wikipedia
- An input/output memory management unit (IOMMU) allows guest virtual machines to directly use peripheral devices, such as Ethernet, accelerated graphics cards, and hard-drive controllers, through DMA and interrupt remapping. This is sometimes called PCI passthrough.
- virtualbox - What is IOMMU and will it improve my VM performance? - Ask Ubuntu
- So long story short, the only way an IOMMU will help you is if you start assigning HW resources directly to the VM.
- Linux virtualization and PCI passthrough | IBM Developer - This article explores the concept of passthrough, discusses its implementation in hypervisors, and details the hypervisors that support this recent innovation.
- PCI(e) Passthrough - Proxmox VE
- PCI(e) passthrough is a mechanism to give a virtual machine control over a PCI device from the host. This can have some advantages over using virtualized hardware, for example lower latency, higher performance, or more features (e.g., offloading).
- But, if you pass through a device to a virtual machine, you cannot use that device anymore on the host or in any other VM.
- Beginner friendly guide to GPU passthrough on Ubuntu 18.04
- Beginner friendly guide, on setting up a windows virtual machine for gaming, using VFIO GPU passthrough on Ubuntu 18.04 (including AMD Ryzen hardware selection).
- Devices connected to the mainboard, are members of (IOMMU) groups – depending on where and how they are connected. It is possible to pass devices into a virtual machine. Passed through devices have nearly bare metal performance when used inside the VM.
- On the downside, passed through devices are isolated and thus no longer available to the host system. Furthermore it is only possible to isolate all devices of one IOMMU group at the same time. This means, even when not used in the VM if a devices is IOMMU-group sibling of a passed through device, it can not be used on the host system.
- PCI passthrough via OVMF - Ensuring that the groups are valid | ArchWiki
- The following script should allow you to see how your various PCI devices are mapped to IOMMU groups. If it does not return anything, you either have not enabled IOMMU support properly or your hardware does not support it.
This might need changing for TrueNAS.
#!/bin/bash
shopt -s nullglob
for g in $(find /sys/kernel/iommu_groups/* -maxdepth 0 -type d | sort -V); do
    echo "IOMMU Group ${g##*/}:"
    for d in $g/devices/*; do
        echo -e "\t$(lspci -nns ${d##*/})"
    done;
done;
- Example output
IOMMU Group 1:
	00:01.0 PCI bridge: Intel Corporation Xeon E3-1200 v2/3rd Gen Core processor PCI Express Root Port [8086:0151] (rev 09)
IOMMU Group 2:
	00:14.0 USB controller: Intel Corporation 7 Series/C210 Series Chipset Family USB xHCI Host Controller [8086:0e31] (rev 04)
IOMMU Group 4:
	00:1a.0 USB controller: Intel Corporation 7 Series/C210 Series Chipset Family USB Enhanced Host Controller #2 [8086:0e2d] (rev 04)
IOMMU Group 10:
	00:1d.0 USB controller: Intel Corporation 7 Series/C210 Series Chipset Family USB Enhanced Host Controller #1 [8086:0e26] (rev 04)
IOMMU Group 13:
	06:00.0 VGA compatible controller: NVIDIA Corporation GM204 [GeForce GTX 970] [10de:13c2] (rev a1)
	06:00.1 Audio device: NVIDIA Corporation GM204 High Definition Audio Controller [10de:0fbb] (rev a1)
- An IOMMU group is the smallest set of physical devices that can be passed to a virtual machine. For instance, in the example above, both the GPU in 06:00.0 and its audio controller in 6:00.1 belong to IOMMU group 13 and can only be passed together. The frontal USB controller, however, has its own group (group 2) which is separate from both the USB expansion controller (group 10) and the rear USB controller (group 4), meaning that any of them could be passed to a virtual machine without affecting the others.
- PCI Passthrough in TrueNAS (IOMMU / VT-d)
- PCI nic Passthrough | TrueNAS Community
- It's usually not possible to pass single ports on dual-port NICs, because they're all downstream of the same PCI host. The error message means the VM wasn't able to grab the PCI path 1/0, as that's in use in the host TrueNAS system. Try a separate PCI NIC, and passing that through, or passing through both ports.
- PCI Passthrough, choose device | TrueNAS Community
- Q: I am trying to passthrough a PCI TV Tuner. I choose PCI Passthrough Device, but there's a huge list of devices, but no reference. How to figure out which device is the TV Tuner?
- A: perhaps you're looking for
lspci -v
- Issue with PCIe Passthrough to VM - Scale | TrueNAS Community
- I am unable to see any of my PCIe devices in the PCIe passthrough selection of the add device window in the vm device manager.
- I have read a few threads on the forum and can confidently say:
- My Intel E52650l-v2 supports VT-d
- Virtualization support is enabled in my Asus P9x79 WS
- I believe IOMMU is enabled as this is my output:
dmesg | grep -e DMAR -e IOMMU
[    0.043001] DMAR: IOMMU enabled
[    5.918460] AMD-Vi: AMD IOMMUv2 functionality not available on this system - This is not a bug.
- Does dmesg show that VT-x is enabled? I don't see anything in your board's BIOS settings to enable VT-x.
- Your CPU is of a generation that according to others (not my area of expertise) has limitations when it comes to virtualization.
- SOLVED - How to pass through a pcie device such as a network card to VM | TrueNAS Community
- PCI Passthrough | TrueNAS Community
- Q: I'm currently attempting to pass through a PCIe USB controller to a VM in TrueNAS core with the aim of attaching my printers to it allowing me to create a print server that I previously had on an M72 mini pc.
- A:
- pfSense inside of TrueNAS guide (TrueNAS PCI passthrough) | Reddit
- Hello everyone, this is my first time posting in here, I just want to make a guide on how to passthrough PCI devices on TrueNAS, because I wasted a lot of time trying a lot of iobhyve codes in TrueNAS shell just to find out that it wont work at all plus there seems to not be a lot of documentation about PCI passthrough on bhyve/FreeNAS/TrueNAS.
- Having vmm.ko to be preloaded at boot-time in loader.conf.
- Go to System --> Tunables, add a line and type in "vmm_load" in the Variable, "YES" as the Value and LOADER as Type. Click save
- Group X is not viable Please ensure all devices within the iommu_group are bound to their vfio bus driver.
Intel Virtualization Technology (VMX)
- VT-x
- Base Virtualization
- virtualization - What is difference between VMX and VT-x? - Super User
- The CPU flag for Intel Hardware Virtualization is VMX. VT-x is Intel Hardware Virtualization which means they are exactly the same. You change the value of the CPU flag by enabling or disabling VT-x within BIOS. If there isn't an option to enable VT-x within the firmware for your device then it cannot be enabled.
- VT-d (IOMMU)
- VT-c (Virtualization Technology for Connectivity)
- Intel® Virtualization Technology for Connectivity (Intel® VT-c) is a key feature of many Intel® Ethernet Controllers.
- With I/O virtualization and Quality of Service (QoS) features designed directly into the controller’s silicon, Intel VT-c enables I/O virtualization that transitions the traditional physical network models used in data centers to more efficient virtualized models by providing port partitioning, multiple Rx/Tx queues, and on-controller QoS functionality that can be used in both virtual and non-virtual server deployments.
Setting up a Virtual Machine (Worked Example / Virtualmin)
This is a worked example on how to setup a virtual machine using the wizard. with some of the settings explained where needed.
- The wizard is very limited on the configuration of the ZVol and does not allow you to set the:
- ZVol name
- Logical/Physical block size
- Compression type
- ZVols created by the Wizard
- have a random suffixed added to the end of the name you choose.
- will be `Thick` Provisioned.
- I would recommend creating the ZVol manually with your required settings but you can use the instructions below to get started.
- You can thin provision the virtual disks as it makes no difference to performance, the only reason you would thick provision is to make you never over allocate disk resources as this could be very bad for a Virtual Machine with potential data loss.
- Set the block size to be 4096KB (this is the default). 512KB is classed as a legacy format but is requird for some older OS.
- Operating System
- Guest Operating System: Linux
- Name: Virtualmin
- Description: My Webserver
- System Clock: Local
- Boot Method: UEFI
- Shutdown Timeout: 90
- When you shutdown TrueNAS it will send an "ACPI power down command" to all Guest VMs.
- This setting is the maximum time TrueNAS will wait for this 'Guest VM' to gracefully shutdown and send a `Shutdown Success` message to it, after which TrueNAS will immediately power off the VM.
- A longer timeout might be required for more complicated VMs.
- This allows TrueNAS to gracefully shutdown all of it's Guest VMs.
- You should make sure you test how long a particular VM takes to shutdown before shutting TrueNAS down with this VM running.
- Start on Boot: Yes
- Enable Display: Yes
- This allows you to remotely see your display.
- TrueNAS will configure NoVNC (through the GUI) here to see the VM's screen.
- You can change this after installation to SPICE if required.
- NoVNC is more stable than SPICE and I cannot get copy and paste to work in SPICE.
- Display type: VNC
- Bind: 0.0.0.0
- Unless you have multiple adapters this will probably always be 0.0.0.0, but you can specify the ip. maybe look at this.
- CPUs and Memory
- Virtual CPUs: 1
- Cores: 2
- Threads: 2
- Optional: CPU Set (Examples: 0-3,8-11):
- Pin vcpus: unticked
- CPU Mode: Host Model
- CPU Model: Empty
- Memory Size (Examples: 500 KiB, 500M, 2 TB): 8GiB
- Minimum Memory Size: Empty
- Optional: NUMA nodeset (Example: 0-1): Empty
- Disks
- Create new disk image: Yes
- Select Disk Type: VirtIO
- VirtIO requires extra drivers for Windows but is quicker.
- Zvol Location: /Fast/Virtual_Disks
- Size (Examples: 500 KiB, 500M, 2 TB): 50GiB
- NB: the disks created directly in the wizard will have a block size of 4096KB
- Network Interface
- Adapter Type: VirtIO
- VirtIO requires extra drivers for Windows but is quicker.
- Mac Address: As specified
- Attach NIC: enp1s0
- Might be different for yours such as eno1
- Trust Guest filters: No
- Trust Guest Filters | Documentation Hub
- Default setting is not enabled. Set this attribute to allow the virtual server to change its MAC address. As a consequence, the virtual server can join multicast groups. The ability to join multicast groups is a prerequisite for the IPv6 Neighbor Discovery Protocol (NDP).
- Setting Trust Guest Filters to “yes” has security risks, because it allows the virtual server to change its MAC address and so receive all frames delivered to this address.
- Installation Media
- GPU
- Hide from MSR: No
- Ensure Display Device: Yes
- GPU's:
- Confirm Options / VM Summary
- Guest Operating System: Linux
- Number of CPUs: 1
- Number of Cores: 2
- Number of Threads: 2
- Memory: 3 GiB
- Name: Virtualmin
- CPU Mode: CUSTOM
- Minimum Memory: 0
- Installation Media: /mnt/MyPoolA/ISO/ubuntu-22.04.2-live-server-amd64.iso
- CPU Model: null
- Disk Size: 50 GiB
- Rename the ZVol (optional)
- Change the VM block size to 4Kn/4096KB (optional)
- The default block size for VMs created during the wizard is 512B, but for modern operating systems it is better to use 4Kn. ZFS default block size is 4Kn.
- Virtualization --> Virtualmin --> Devices --> Disk --> Edit --> Disk Sector Size: 4096
- Correct the ZVol Metadata Sector Size (DO NOT do this, reference only)
The following are true:
This means:
- volblocksize
- A ZVol created during the VM wizard still has volblocksize=16KB but this is not the value used by the VM for it's block size.
- I believe this setting is used by the ZFS filesystem and alters how it handles the data rather than how the block device is presented.
- You cannot change this value after the ZVol is created.
- It does not affect the blocksize that your VM or iSCSI will use.
- When I manually create a ZVol
- and I set the block size to 4KB, I get a warning: `Recommended block size based on pool topology: 16K. A smaller block size can reduce sequential I/O performance and space efficiency.`
- The tooltip says: `The zvol default block size is automatically chosen based on the number of the disks in the pool for a general use case.`
- When I edit the VM disk
- Help: Disk Sector Size (tooltip): Select a sector size in bytes. Default leaves the sector size unset and uses the ZFS volume values. Setting a sector size changes both the logical and physical sector size.
- I have the options of (Default|512|4096)
- Default will be 512B as the VM is setting the blocksize and not the ZVol volblocksize.
- Change ZVol Compression (optional)
- The compression can be setup by the folder hierarchy or specifically on the ZVol. I will show you how to change this option.
- Datasets --> Mag --> Virtualmin (ZVol) --> ZVol Details --> Edit --> Compression level
- Add/Remove devices (optional)
- The wizard is limited in what devices you can add but you can fix that now by manually adding or removing devices attached to your VM.
- Virtualization --> Virtualmin --> Devices --> Add
- Install Ubunutu as per this article (ready for virtualmin)
Troubleshooting
- noVNC - Does not have copy and paste
- Use SSH/PuTTY
- Use SPICE that way you have clipboard sharing between host & guest
- Run 3rd Party Remote Desktop software in the VM.
- Permissions issue when starting VM | TrueNAS Community

- I created a group for my SMB user and added libvirt-qemu to the group, now it works.
- Kernel Panic when installing pfSense
- You get this error when you try to install pfSense on a Virtual Machine.

- Cause
- pfSense does not like the current CPU
- Solution
- Links
- Misc
- VM will not start after cloning
- pfSense - igb3 network interface is missing
- Misc
- Hyper-v processor compatibility fatal trap 1 | Reddit
- Q: My primary pfSense vm crashes at startup with "fatal trap 1 privileged instruction fault while in kernel mode" UNLESS I have CPU Compatibility turned on. This is on an amd epyc 7452 32-core. Any ideas? is it a known bug?
- A: Match the CPU to your host, or use compatibility (shouldn't have any noticeable impact). Usually this is caused when the guest tries using CPU flags that aren't present on the host.
- Accessing NAS From a VM | TrueNAS Documentation Hub - Provides instructions on how to create a bridge interface for the VM and provides Linux and Windows examples.
Docker
All apps on TrueNAS are premade docker images (they will be) but you can roll your own if you want.
- General
- Using Launch Docker Image | Documentation Hub
- Provides information on using Launch Docker Image to configure custom or third-party applications in TrueNAS SCALE.
- What is Docker? Docker is an open-source platform for developing, shipping, and running applications. Docker enables the separation of applications from infrastructure through OS-level virtualization to deliver software in containers.
- What is Kubernetes? Kubernetes (K8s) is an open-source system for automating deployment, scaling, and managing containerized applications.
- Tutorials
- Static IP / DCHP
- TrueNAS Scale / Docker / Multiple IPs | TrueNAS Community
- Q: Normally, on my docker server, I like to set multiples IPs and dedicate IP to most of my docker.
- A: From the network page, click on the Interface you want to add the IP. Then at the bottom, click the Add button. (= IP Aliases)
- Docker Image with Static IP | TrueNAS Community
- Hello. I've searched the forum and found a couple instances, but nothing that seems to solve this issue. When I create a new docker image, I can use the host network fine, and I can use a DHCP IP just fine as well. However, for my use case (ie Pihole or Heimdall), choosing a static IP doesn't work.
- Gives some insight on how to set an IP for a Docker.
- How to Use Separate IPs from IP Host for Apps? | TrueNAS Community
- Q: My Truenas Scale only has 1 LAN port which that's port has 192.168.99.212 as Host IP to access TrueNAS Scale. Can someone explain me step by step, how to Use Separate IPs from IP Host for Apps?
- A: Under Networking, Add an External Interface, selecting the host interface and either selecting DHCP or static IP and specifying an IP address in the case of the latter.
- Q: Add an External Interface, I can't find this menu.
- A: It's in the App setup when you click the Launch Docker Image button.
- This post has pictures.
- Troubleshooting
Apps
Apps will become an essential part of TrueNAS becoming more of a platform than just a NAS.
- Apps are changing from Helm Charts to Docker based.
- Most of this reseach was done while TrueNAS used Helm Charts and TrueCharts was an option.
- I will update these notes as I install the new style Apps.
- The Future of Electric Eel and Apps - Announcements - TrueNAS Community Forums
- As mentioned in the original announcement thread ( The Future of Electric Eel and Apps 38 ) all of the TrueNAS Apps catalog (and apps launched through the Custom App button) will migrate to the new Docker Compose back end without requiring users to take any manual actions.
Official Sites
General
- Apps when you set them up, can either leave all data in the Docker container or set mount points in your ZFS system.
- Use LZ4 on all datasets except things that are highly compresed such as movies. (jon says: I have not decided about ZVols and compression yet)
- Apps | Documentation Hub
- Expanding TrueNAS SCALE functionality with additional applications.
- The first time you open the Applications screen, the UI asks you to choose a storage pool for applications.
- TrueNAS creates an `ix-applications` dataset on the chosen pool and uses it to store all container-related data. The dataset is for internal use only. Set up a new dataset before installing your applications if you want to store your application data in a location separate from other storage on your system. For example, create the datasets for the Nextcloud application, and, if installing Plex, create the dataset(s) for Plex data storage needs.
- Special consideration should be given when TrueNAS is installed in a VM, as VMs are not configured to use HTTPS. Enabling HTTPS redirect can interfere with the accessibility of some apps. To determine if HTTPS redirect is active, go to System Settings --> GUI --> Settings and locate the Web Interface HTTP -> HTTPS Redirect checkbox. To disable HTTPS redirects, clear this option and click Save, then clear the browser cache before attempting to connect to the app again.
ix-applications
- ix-applications is the dataset in which TrueNAS stores all of the Docker images.
- It cannot be renamed.
- You can set the pool the apps use for the internal storage
- Apps --> Settings --> Choose Pool
- Move apps (ix-applications) from one pool to another
- Apps --> Settings --> Choose Pool --> Migrate applications to the new pool
- Moving ix-applications with installed apps | TrueNAS Community - I have some running apps, like Nextcloud, traefik, ghost and couple more and I would like to move ix-applications from one pool to another. Is it possible without breaking something in the process?
General Tutorials
Individual Apps
Upgrading
TrueCharts (an additional Apps Catalogue)
- General
- This is not the same catalog of apps that are already available in your TrueNAS SCALE.
- TrueCharts - Your source For TrueNAS SCALE Apps
- Meet TrueCharts – the First App Catalog for TrueNAS SCALE - TrueNAS - Welcome to the Open Storage Era
- The First Catalog Store for TrueNAS SCALE that makes App management easy.
- Users and third parties can now build catalogs of application charts for deployment with the ease of an app store experience.
- These catalogs are like app stores for TrueNAS SCALE.
- iXsystems has been collaborating and sponsoring the team developing TrueCharts, the first and most comprehensive of these app stores.
- Best of all, the TrueCharts Apps are free and Open Source.
- TrueCharts was built by the founders of a group for installation scripts for TrueNAS CORE, called “Jailman”. TrueCharts aims to be more than what Jailman was capable of: a user-friendly installer, offering all the flexibility the average user needs and deserves!
- Easy setup instructions in the video
- Setting Up
- Getting Started with TrueCharts | TrueCharts
- Below you'll find recommended steps to go from a blank or fresh TrueNAS SCALE installation to using TrueCharts with the best possible experience and performance as determined by the TrueCharts team. It does not replace the application specific guides and/or specific guides on certain subjects (PVCs, VPN, linking apps, etc) either, so please continue to check the app specific documentation and the TrueNAS SCALE specific guides we've provided on this website. If more info is needed about TrueNAS SCALE please check out our introduction to SCALE page.
- Once you've added the TrueCharts catalog, we also recommend installing Heavyscript and configuring it to run nightly with a cron job. It's a bash script for managing Truenas SCALE applications, automatically update applications, backup applications datasets, open a shell for containers, and many other features.
- Adding TrueCharts Catalog on TrueNAS SCALE | TrueCharts
- Catalog Details
- Name: TrueCharts
- Repository: https://github.com/truecharts/catalog
- Preferred Trains: enterprise, stable, operators
- Others are available: incubator, dependency
- Type each one manually that you want adding
- i just stick to stable.
- Branch: main
- Errors
- If you are stuck at 40% (usually Validating Catalog), just leave it a while as the process can take a long time.
- [EFAULT] Kubernetes service is not running.
Additional Features
OpenVPN Client (removed in new versions)
Logging
This is not a well developed side of TrueNAS, in fact there is no GUI for looking at the logs as it seems to all be geared to pushing logs to a Syslog server, which I suppose it the corporate thing to do and why re-invent thewheel when there are some excellent solutions out there.
- Offical Documentation
- Ways to read the logs
- Manually
/var/log/
/var/log/messages
- TrueCommand (also from iXsystems)
- Syslog server (i.e. Graylog)
System Time (chronyd)
- chronyd
- has replaced ntpd as the TrueNAS time system.
- will cause the system to gradually correct any time offset, by slowing down or speeding up the clock as required.
- is daemon for chrony
- chronyc
- is the is command line interface of chrony
- can be used to for make adjustments to chronyd
- Chrony synchronizes a system clock’s time faster and with better accuracy than the ntpd.
General
- Settings Location
- System Settings --> General --> NTP Servers
- Official Documentation
- Synchronizing System and SCALE Time | TrueNAS Documentation Hub
- Provides instructions on synchronizing the system server and TrueNAS SCALE time when both are out of alignment with each other.
- Click the Synchronize Time loop icon button to initiate the time-synchronization operation.
- NTP Servers | TrueNAS Documentation Hub - Describes the fields for the NTP Server Settings screen on TrueNAS CORE.
- Add NTP Server Screen | General Settings Screen | TrueNAS Documentation Hub - Provides information on General system setting screen, widgets, and settings for getting support, changing console or the GUI, localization and keyboard setups, and adding NTP servers.
- chrony – Documentation | chrony - chrony is a versatile implementation of the Network Time Protocol (NTP). It can synchronise the system clock with NTP servers, reference clocks (e.g. GPS receiver), and manual input using wristwatch and keyboard. It can also operate as an NTPv4 (RFC 5905) server and peer to provide a time service to other computers in the network.
- chronyc Manual Page | chrony - chronyc is a command-line interface program which can be used to monitor chronyd's performance and to change various operating parameters whilst it is running.
- Misc
- Force Time Sync Via NTP servers ? | TrueNAS Community
- If you're in SCALE, the webui dashboard has a warning symbol if time is out of sync with what's in your browser.
- You can click on it to force the times to sync up.
- This is usually enough to get NTP on track.
- Though if you're constantly getting out of sync you may need to look for the underlying cause.
- NB: if you set a browsers clock well out of time, this might display the button and you can either press it or see the command???
- Tutorials
- CLI Commands
## Open the chronyc client terminal, which is useful for issuing multiple commands
sudo chronyc

## shows configured NTP servers (same as: System Settings --> General --> NTP Servers)
sudo cronyc sourcestats

## show man page for extra information
man chronyc

## Restart should cause an immdiate NTP poll (with no large clock offset corrections)
sudo systemctl restart chronyd

## This will cause an immediate NTP poll and correction of the the system clock (use with caution, see notes)
sudo chronyc makestep

## After making changes restart chrony service and track chrony
sudo systemctl restart chronyd ; watch chronyc tracking
- makestep
- This will update your system clock quickly (might break some running applications), using the time sources defined in
/etc/chronyd.conf.
- Normally chronyd will cause the system to gradually correct any time offset, by slowing down or speeding up the clock as required. In certain situations, the system clock might be so far adrift that this slewing process would take a very long time to correct the system clock.
- The makestep command can be used in this situation. There are two forms of the command. The first form has no parameters. It tells chronyd to cancel any remaining correction that was being slewed and jump the system clock by the equivalent amount, making it correct immediately.
- The second form configures the automatic stepping, similarly to the makestep directive. It has two parameters, stepping threshold (in seconds) and number of future clock updates for which the threshold will be active. This can be used with the burst command to quickly make a new measurement and correct the clock by stepping if needed, without waiting for chronyd to complete the measurement and update the clock.
- BE WARNED: Certain software will be seriously affected by such jumps in the system time. (That is the reason why chronyd uses slewing normally.)
- synchronization - How to do "one shot" time sync using chrony? - Stack Overflow - variations of the relvant commands are here in context.
- Synchronise time using timedatectl and timesyncd - Ubuntu Server documentation - Ubuntu uses timedatectl and timesyncd for synchronising time, and they are installed by default as part of systemd. You can optionally use chrony to serve the Network Time Protocol. In this guide, we will show you how to configure these services.
- Default NTP Server Settings
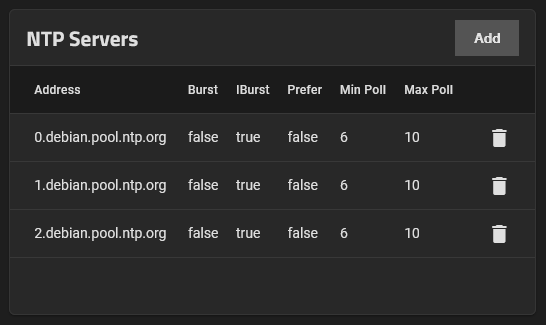
- Address: (0.debian.pool.ntp.org | 1.debian.pool.ntp.org | 2.debian.pool.ntp.org)
- Burst: false
- IBurst: true
- Prefer: false
- Min Poll: 6
- Max Poll: 10
- Force: unticked
- List of NTP servers
Troubleshooting
Misc
- chronyd seems be pulling random NTP servers from somewhere each time it restarts
- Chronyd instead of NTP - TrueNAS General - TrueNAS Community Forums
- This is a result of the
pool 0.pool.ntp.org (or similar) lines that are part of the default config. Querying that hostname with DNS results in a answer from a round-robin list of actual hosts. These are the names you when using chronyc sources.
- To have a really robust time system, you either need a local clock that is stratum 0 (e.g., a GPS receiver used as a time source), or multiple peers from outside your network. If your pfSense box has multiple peers for time sources, then you can remove the defaults from your TrueNAS box and only use your pfSense box as a time source.
- You would need to edit the default config file and remove these (either
/etc/chrony/chrony.conf or a file in /etc/chrony/sources.d).
Hardware BIOS Clock (RTC) and TrueNAS System Time are not in sync
NTP health check failed - No Active NTP peers
You can get the following error when TrueNAS tries to contact an NTP server too sync the time, which is very important for a properly running server.
API
This is a powerful and confusing area of TrueNAS to work with because the documentation can be lacking, also it is hard to find real world examples.
The API has 2 strands to it's bow, a REST API access using HTTP(s) and a shell based API using the middleware which is said to have parity with the REST API.
midclt (shell based) (Websocket Protocol?)
- I can find no official documentation or any documentation for this command.
- The command can be used over SSH or directly in the local terminal.
- I think
midclt is part of the Websocket Protocol API because the cammands seem the same.
REST API (HTTP based)
- This allows the API to be access from external sources
Disable "Web Interface HTTP -> HTTPS Redirect" (Worked Example)
The best way to learn how the API works is to see a real world example.
REST Example Commands
## Update a Specific setting (ui_httpsredirect) - These will all update the setting to disabled. (you can swap root for admin if the account is enabled)
curl --basic -u admin -k -X PUT "https://<Your TrueNAS IP>/api/v2.0/system/general" -H "accept: */*" -H "Content-Type: application/json" -d '{"ui_httpsredirect":false}'

## Restart the WebGUI (both commands do the same thing)
curl --basic -u admin -k -X GET "https://10.0.0.191/api/v2.0/system/general/ui_restart"
curl --basic -u admin -k -X POST "https://10.0.0.191/api/v2.0/system/general/ui_restart"
Notes
- Ubuntu Manpage: curl - transfer a URL
-u, --user <user:password>
- Specifies a username and password. If you don't specify a password you will be prompted for one.
- -
k, --insecure
- (TLS / SFTP / SCP) By default, every secure connection curl makes is verified to be secure before the transfer takes place. This option makes curl skip the verification step and proceed without checking.
-X, --request <method>
- (HTTP) Specifies a custom request method to use when communicating with the HTTP server.
-H, --header <header/@file>
-d, --data <data>
- Sends the specified data in a POST request to the HTTP server, in the same way that a browser does when a user has filled in an HTML form and presses the submit button.
midclt Example Commands
## Get System General Values
midclt call system.general.config
midclt call system.general.config | jq
midclt call system.general.config | jq | grep ui_httpsredirect

## Update a Specific setting (ui_httpsredirect) - These will all update the setting to disabled.
midclt call system.general.update '{ "ui_httpsredirect": false }'
midclt call system.general.update '{ "ui_httpsredirect": false }' | jq
midclt call system.general.update '{ "ui_httpsredirect": false }' | jq | grep ui_httpsredirect

## Restart the WebGUI
midclt call system.general.ui_restart

## Disable "Web Interface HTTP -> HTTPS Redirect"
midclt call system.general.config
midclt call system.general.update '{ "ui_httpsredirect": false }'
midclt call system.general.ui_restart
Notes
- If you don't filter the results you might get onscreen what appears to be a load of gargbage, but obviously it isnt.
jq = The resultst are in JSON format and this switch formats them correctly.grep = this filters all the lines with the texr=t specified and drops the others. The results are initially sent back in one line so f or this to work jq must be specified first.system.general = the system general settings object..config = is the method to display the config.update = is the method for updating- To see the change reflected in the GUI, you need to login and out but this does not apply the change.
- For the setting to take effect, you need to restart the WebGUI or TrueNAS.
Research Links
- API Documentation
- Append
/api/docs/ to your TrueNAS host name or IP address in a browser to access the API documentation. You don't have to be logged in.
- SCALE API Reference | TrueNAS Documentation Hub
- Instructions to access built-in TrueNAS SCALE API documentation and links to static copies of the API documentation.
- UI configuration is not applied automatically. Call system.general.ui_restart to apply new UI settings (all HTTP connections will be aborted) or specify ui_restart_delay (in seconds) to automatically apply them after some small amount of time necessary you might need to receive the response for your settings update request.
- TrueNAS Websocket Documentation
- TrueNAS uses DDP: https://github.com/meteor/meteor/blob/devel/packages/ddp/DDP.md .
- DDP (Distributed Data Protocol) is the stateful websocket protocol to communicate between the client and the server.
- UI configuration is not applied automatically. Call
system.general.ui_restart to apply new UI settings (all HTTP connections will be aborted) or specify ui_restart_delay (in seconds) to automatically apply them after some small amount of time necessary you might need to receive the response for your settings update request.
- TrueNAS RESTful API (Scale 24.04.2)
- UI configuration is not applied automatically. Call
system.general.ui_restart to apply new UI settings (all HTTP connections will be aborted) or specify ui_restart_delay (in seconds) to automatically apply them after some small amount of time necessary you might need to receive the response for your settings update request.
- General | TrueNAS Documentation Hub - Introduces the TrueNAS CLI general namespace that configures GUI and localization related settings found in the API and web UI.
- middleware/src/middlewared/middlewared/main.py at master · truenas/middleware · GitHub - This is the file that handles the
midctl calls.
- CORE API Reference | TrueNAS Documentation Hub - Describes how to access the API documentation in TrueNAS CORE.
- midclt and REST examples
- REST Examples
- midclt examples
Quick Setup Instructions
This is an overview of the setup and you can just fill in the blanks.
- Important Notes
- ZFS does not like a pool to be more than 50% full otherwise it has performance issues.
- Built into the ZFS spec is a caveat that you do NOT allow your ZVOL to get over 80% in use.
- Use LZ4 compression for Datasets (Including ZVols). This is the default setting for Datasets.
- Use ECC RAM You don't have to, but it is better for data security although you will loose a bit of performance (10-15%).
- TrueNAS minimum required RAM: 8GB
- If you use an onboard graphics card (iGPU) then the system RAM is nicked for this. Using a discrete graphics card (not onboard) will return the RAM to the system.
- The password reset on the 'physical terminal` does not like special characters in it. So when TrueNAS installation is complete, immediately change the password in the GUI with a normal password. This might get fixed in later versions of TrueNAS.
- The screens documentation has a lot of settings explained. Further notes are sometimes hidden under expandable sections.
- Super Quick Instructions
- Build physical server
- without the Quad NIC, as this prevents TrueNAS mounting the ports in the system so we can then use them independently in the VMs.
- Install TrueNAS
- Configure Settings
- Make a note of the active Network port
- Install the Quad NIC (optional)
- (Create `Storage Pool` --> Create `Data VDEV`)
- Create `Dataset`
- Setup backups
- Validate Backups
- Setup Virtual Machines
- Upload (files/ISOs/Media/Documents) as required
- Check backups are running correctly
Buy your kit (and assemble)
- Large PC case with at least 4 x 5.25" and 1 x 3.5" drive bays.
- Motherboard - SATA must be hot swappable and enabled
- RAM - You should run TrueNAS with ECC memory where possible, but it is not a requirement.
- twin 2.5" drive caddy that fits into a 3.5" drive bay
- Quad 3.5" drive caddy that fits into 3 x 5.25" drive bays
- boot drive = 2 x SSD (as raid for redundancy)
- Long Term Storage / Slow Storage / Magnetic
- 4 x 3.5" Spinning Disks (HDD)
- Western Digital
- CMR only
- you can use drives with the following sector formats starting with the best:
- 4Kn
- 512e
- 512n
- Virtual Disks Storage = 2 x 2TB NVMe
- Large power supply
Identify your drive bays
- Make an excel file to match your drive serials to the physical locations on your server
- Put Stickers on your Enclosure(s)/PC for drive locations
- Just as it says, print some labels with 1-8 numbers and then stick them on your PC.
Make a storage diagram (Enclosure) (Optional)
- Take a photo of your tower.
- Use Paint.NET and add the storage references (sda, sdb, sdc...) to the right location on the image.
- Save this picture
- Add this picture to your TrueNAS Dashboard. Instructions to follow.
Or the follwing method which I have not employed, but you can run both.
Configure BIOS
First BIOS POST takes ages (My system does this)
- Wait 20 mins for the memory profiles to be built and the PC to POST.
- If your PC POSTs quickly, you don't have to wait.
- See later on in the article for more information and possible solutions
- Update firmware
- Setup thermal monitoring
- Enable ECC RAM
- It needs to be set to `Enabled` in the BIOS, `Auto` is no good.
- Enable Virtualization Technology
- Enable
- Base Virtualization: AMD-V / Intel VMX
- PCIe passthrough: IOMMU / AMD-Vi / VT-d
- My ASUS PRIME X670-P WIFI Motherboard BIOS settings:
- Advanced --> CPU Configuration --> SVM: Enabled
- Advanced --> PCI Subsystem Settings --> SR-IOV: Disabled
- Advanced --> CBS --> IOMMU: Enabled
- Backup BIOS config (if possible) to USB and keep safe.
- Set BIOS Time (RTC)
Test Hardware
- Test RAM
- Burn-in test your hard drives
- Whether they are new or second hand
- You should only use new drives for mission critical servers.
- If you have multiple dricves try and get them from different batches.
- You can use the server to test them before you install TrueNAS or use another machine.
- Storage --> Disks --> select a disk --> Manual Test: LONG
- This will read each sector on a disk and will take a long time.
Install and initially configure TrueNAS
- Install TrueNAS
- Mirrored on your 2 x Boot Drives
- Use the
admin option, do NOT use root.
- Use a simple password for admin (for now) as the installer does not like complicated passwords with symbols in it.
- Login to TrueNAS
- Set Network Globals
- Network --> Global Configuration --> Settings --> (Hostname | Domain | Primary DNS Server | IPv4 Default Gateway)
- Set Static IP
- Network --> Interfaces --> click interface name (i.e. `enp1s0')
- Untick DHCP
- Click `Add` button next to Aliases
- Add your IP in format 10.0.0.x /24
- Test Changes
- Navigate to the TrueNAS on the new IP in another browser tab
- Goto Network and save the changes permanently
- NB:
- The changing process is timesensite to prevent you getting locked out
- The process above can tricky when using a single network adapter, use the console/terminal instead and then reboot.
- Re-Connect via the hostname instead of the IP
- Configure the System Settings
- System Settings --> (GUI | Localization)
- Go through all of the settings here and set as required.
- Set/Sync Real Time Clock (RTC)
- Update TrueNAS
- System Settings --> Update
- Reconnect to your TrueNAS using the FQDN (optional)
- This assumes you have all of this setup.
Account Security
- Secure your Admin account (security)
- Do not disable
root and admin accounts at the same time, you always need one of them.
- Using Administrator Logins | TrueNAS Documentation Hub
- As a security measure, the root user is no longer the default account and the password is disabled when you create the admin user during installation.
- Do not disable the admin account and root passwords at the same time. If both root and admin account passwords become disabled at the same time and the web interface session times out, a one-time sign-in screen allows access to the system.
- Make your `admin` password strong
- Credentials --> Local Users --> admin --> Edit
- Set a complex one and add it to your password manager (Bitwarden or LastPass etc...)
- Fill in your email address while you are at it so you can get system notifications.
- Login and out to make sure the password works.
- Create a sub-admin account
- This will be an account you use for day to day operations and connecting to shares
- Using the main admin account when not needed is security risk.
UPS (optional)
If you have an UPS you can connect it, and configure TrueNAS to respond to it i.e shutdown when you swap over to battery or wait so long before shutting down after a power cut.
- Configure Physical UPS settings
- You need to configure the settings on your physical UP such as:
- Low Battery Warning Level
- There are several ways to set these settings
- The front panel
- although not all advanced settings will be available using this method
- PowerChute
- NUT
- not all UPS support being programmed by NUT
- I would not recommend this method unless you know what you are doing.
- Configure UPS Service (SMT1500IC via USB)
- Connect your UPS by USB
- Open
Shell and run this command to identify your UPS
sudo nut-scanner -U
- System Settings --> Services --> UPS:
- Running: Enabled
- Start Automatically: Enabled
- System Settings --> Services --> UPS --> Configure
- Leave the defaults as they don't need to be changed
- These are the settings for my UPS but they are easy to change to match your needs.
- Change the drive to match the UPS you identified earlier.
- Set the shutdown timer to a time your UPS can safely power your kit and then do safe shutdown.
- Identifier: ups
- UPS Mode: Master
- Driver:
- USB: APC ups 2 Smart-UPS (USB) USB (usbhid-ups)
- apc_modbus when available might offer more features and data, see notes later in this article.
- Port or Hostname: auto
- Monitor User: upsmon
- Monitor Password: ********
- Extra Users:
- Remove monitor: unticked
- Shutdown Mode: UPS goes on battery
- Shutdown Timer: 1800 (30 mins)
- Shutdown Command:
- There is a default shutdown command which is: /sbin/shutdown -P now
- A clarification report has been made here here.
- Power Off UPS: unticked
- No Communication Warning Time:
- Host Sync: 15
- Description: My TrueNAS UPS on USB
- Auxiliary Parameters (ups.conf):
- Auxiliary Parameters (upsd.conf):
- Reporting check
- Now you have setup your UPS you need to make sure it is reporting correctly and this can be check in either of these places:
- Reporting --> UPS
- Reporting --> Netdata --> UPS
Notifications
- System Settings --> Alert Settings
- (Also available through: Alerts Bell --> Settings Cog --> Alert Settings)
- Configure what you want notifications you want to receive, their frequency, their trigger level and their transport method.
- Their are many notification methods, not just email.
- The defaults are pretty good and you should leave these until later date if you do not understand them.
- System Settings --> Alert Settings --> E-Mail --> Edit
- Level
- The default level is WARNING.
- Authentication --> Email
- This will set what email account receives the email notfication.
- If unset, the email address associated with the
admin account will receive the notifications.
- Send Test Alert
- This button will allow you to send test alert and see if it is working.
- System Settings --> General --> Email --> Settings
- (Also available through: Alerts Bell --> Settings Cog --> Email)
- Configure the relevant email account details here.
- This is only required if you want to send email notifications.
- Make sure you use secure email settings.
- The Send Test Mail button will send the test email to the address configure for the
admin user.
- From Email
- This is the Reply-To header
- Tooltip: The user account Email address to use for the envelope From email address. The user account Email in Accounts > Users > Edit must be configured first.
- Ignore the tooltip as it does not make any sense.
- Just fill in the email address of the email account you are using to send emails.
- Notes
- Setting Up System Email | TrueNAS Documentation Hub - Provides instructions on configuring email using SMTP or GMail OAuth and setting up the email alert service in SCALE.
- Error: Only plain text characters (7-bit ASCII) are allowed in passwords. UTF or composed characters are not allowed.
- Make your password follow the rules.
- I could not use the £ (pound) symbol.
- ASCII table - Table of ASCII codes, characters and symbols - A complete list of all ASCII codes, characters, symbols and signs included in the 7-bit ASCII table and the extended ASCII table according to the Windows-1252 character set, which is a superset of ISO 8859-1 in terms of printable characters.
Further Settings
- Check HTTPS TLS ciphers meet your needs
- System Settings --> General --> GUI --> Settings --> HTTPS Protocols
- Managing TLS Ciphers | TrueNAS Documentation Hub - Describes how to manage TLS ciphers on TrueNAS CORE.
- Force HTTPS on the GUI
- System Settings --> GUI --> Settings --> Web Interface HTTP -> HTTPS Redirect
- Redirect HTTP connections to HTTPS. A GUI SSL Certificate is required for HTTPS. Activating this also sets the HTTP Strict Transport Security (HSTS) maximum age to 31536000 seconds (one year). This means that after a browser connects to the web interface for the first time, the browser continues to use HTTPS and renews this setting every year.
- I only have a self signed certificate that comes with TrueNAS and I can still login afterwards.
- You can reverse this setting via the API if you get locked out because of this.
- Disable IPv6 (optional)
- Show Console Messages on the dashboard
- System Settings --> General --> GUI --Settings --> Show Console Messages
- The messages are shown in real time.
- There is no setting to make it show more than 3 lines.
- Clicking on the messages widget will bring up a larger modal window with many more lines that you can scroll through.
Physically install your storage disks
- Storage --> Disks
- Have a look at your disks. You should see you 2 x SSD that have been raided for your boot volume that TrueNAS sits on, named `boot-pool` and this pool cannot be used for normal data.
- If you have NVME disks that are already installed on your motherboard they might be shown.
- Insert one `Long term storage`disk in to your HDD caddy.
- Make a note of the serial number.
- When you put new disks in they will automatically appear.
- Do them one by one and make a note of their name (sda, sdb, sdc...) and physical location (i.e. the slot you just put it in)
Creating Pools
- Setting up your first pool
See:
- Planning a Pool to decide how your pool hierarchy will be.
- 'My' Pool Naming convention notes on choosing your pool's name.
- Example Pool Heirarchy for an example layout.
- Storage --> Create Pool
- Select all 4 of your `Long term storage` disks and TrueNAS will make a best guess at what configuration you should have, for me it was:
- Data VDEVs (1 x RAIDZ2 | 4 wide | 465.76 GiB)
- 4 Disks = RAIDZ2 (2 x data disks, 2 x parity disks = I can loose any 2 disks)
- Make sure you give it a name.
- This is not easy to change at a later date so choose wisely.
- Click `Create` and wait for completion
- Create additional pools if required
- or you can do them later.
- Check the location of your System Dataset and move it if required
- System Settings --> Advanced --> Storage --> Configure --> System Dataset Pool
- NB: The `System Dataset` will be automatically moved to the first pool you create.
Networking
- NetBIOS
- These setting all related to
NetBIOS which are used in conjuction with SMBv1, both of which are now a legacy protocols that should not be used.
- Configure the NetBIOS name
- Shares --> Windows (SMB) Shares --> Config Service --> NetBIOS Name
- This should be the same as your hostname unless you absolutely have a need for different name
- Keep in lowercase.
- NetBIOS names are inherently case-sensitive.
- Disable the `NetBIOS name server` (optional)
- Network --> Global Configuration --> Settings --> Service Announcement --> NetBIOS-NS: Disabled
- Legacy SMB clients rely on NetBIOS name resolution to discover SMB servers on a network.
- (nmbd / NetBIOS-NS)
- TrueNAS disables the NetBIOS Name Server (nmbd) by default, but you should check as only the newer versions of TrueNAS have this default value.
- SMB service will need to be restarted
- System Settings --> Services --> SMB --> Toggle Running
- Windows (SMB) Shares (optional)
- Config the SMB service and shares as you required.
- Not everyone wants to share out data over shares.
- Instructions can be found earlier in this article on how to create them.
Virtual Machines (VMs)
- Instructions can be found earlier in this article on how to create them. (See the `Virtualisation` section)
Apps
- add truecharts (optional) or the new equivalent
- Install Apps (optional)
- + 6 things you should do
- setup nextcloud app + host file paths what are they?
- Add TrueCharts catalog + takes ages to install, it is not
Backup Strategy
- Backup the TrueNAS config now
- System Settings --> General --> Manual Configuration --> Download File
- Include the encryption keys and back this file somewhere safe.
- Store somewhere safe
- Snapshot Strategy
- Replicate all of your pools (including snapshots) to a second TrueNAS
- Encrypted Datasets (optional)
- Export the keys for each data set.
- Remote backup (S3)
- What data do I want to upload offsite?
- Website Databases (Daily) (sent from within VM)
- Websites (once a week) (sent from within VM)
- App Databases (sent from within APP)
- Safe shutdown when power loss (UPS)
- This has been address above, do i need to mention it again here?
Maintenance
- SMART Testing HDD
- A daily SMART short test and a weekly SMART long test
- If you have a high drive count (50 or 200 for example) then you may want to perform a monthly long test and spread the drives out across that month.
- Pool Scrubbing
- Both Boot and Data pools.
- This keeps the data intact and stops bit-rot.
System Upgrade
- This assumes you have no automatic backups configured and you will not want to downgrade your TrueNAS version when the upgrade is complete.
`Planning Upgrade` Phase
Planning your upgrade path is important to maintain data intergrity and setting validity.
- Navigate to the following page and see what version your TrueNAS is at
- System Settings --> Update
- Here you can see there is a minor upgrade waiting for the current train, which is now end of life.
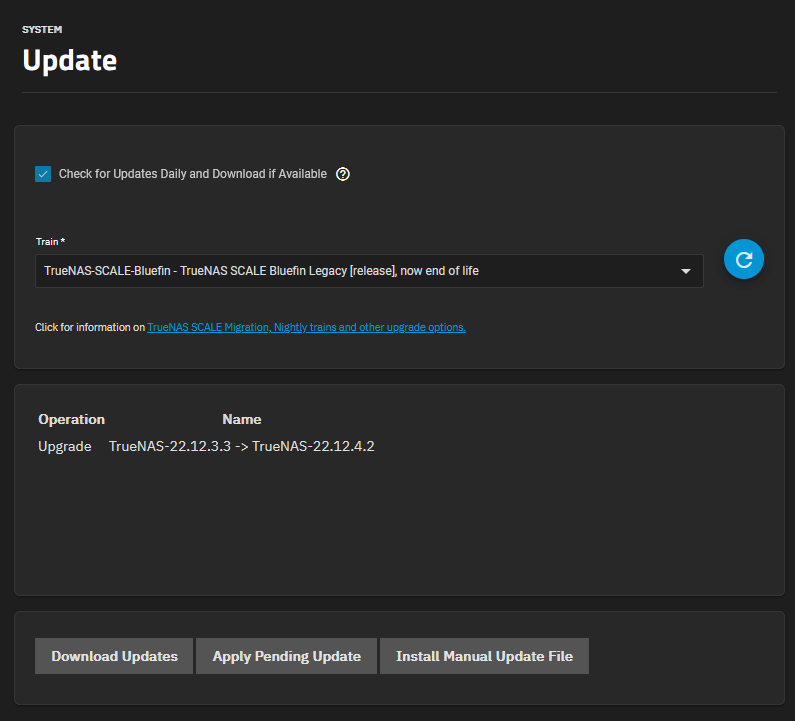
- If you click on the train you can see there are other options available.

- See what the latest version of TrueNAS is, and select your target version
- Study the upgrade paths
- Software Releases | TrueNAS Documentation Hub
- Centralized schedules and upgrade charts for software releases.
- Using the information on the page, and you current TrueNAS version you can now plot out your upgrade path.
- Excellent diqagram that shows you your options and dynamically updates when new versions of TrueNAS are released.
- Read the release notes for the next versions
`Shutdown` Phase
If you don't have any of these you can skip this step.
- Virtual Machines
- Gracefully shut any running VMs down.
- Disable autostart on all VMs..
- The autostart can be re-enabled after a successful upgrade.
- iXsystems have probably made it where you can leave virtual machines on autostart during upgrades but i do not 100% know and as I don't have many I just follow my guidelines outlined here.
- Apps
- See: Upgrading from Bluefin to Cobia when applications are deployed is a one-way operation.
- Dockers
- If any of these are running, shut them downa and disable any autostarts.
- Jails
- I don't know what these are but if you have any running you might want to stop them and disable any autostarts.
- SMB Shares
- If you have any users connected to an SMB share, have them disconnect.
- Disable the SMB server and disable "Start Automatically".
- NFS Shares
- If you have any users connected to an NFS share, have them disconnect.
- Disable the NFS server and disable "Start Automatically".
- iSCSI
- If you have any users connected to an iSCSI share, have them disconnect.
- Disable the iSCSI server and disable "Start Automatically".
`Check Disk Health` Phase
Before doing any heavy disk operations (i.e. this upgrade) it is worth just checking the health of all your Disks, VDEVs and Pools.
- Storage --> Each of your VDEVs
- Toplogy
- Usage
- ZFS Health
- Disk Health
- Check the log and alerts for messages.
`Config Backup` Phase
The TrueNAS config and dataset keys are very important and should be kept some where safe.
- TrueNAS Config
- System Settings --> General --> Manage Configuration --> Download File
- make sure you "Export Password Secret Seed"
- Store somewhere safe
- Encrypted Datasets
- If you have any encrypted datasets you should download their encryptions keys
- I do not have any encrypted datasets to test whether the keys are now all stored in the TrueNAS config backup.
`Deciding what to backup` Phase
What should I backup up with TrueNAS replication? This is different for everybody but below is a good list to start with.
- Examples of what to backup:
- ix-applications
- Apps - TrueNAS apps are versions specific, so a backup of these is required for rolling back.
- Dockers
- Virtual Machines
- Documents
- Other Files
This is just a checklist of stuff to backup without using TrueNAS. I did these manually while I was learning replication and snapshots. This section is just for me and can be ignored.
- Virtualmin Config + Websites
- Webmin Config
- pfSense Config
- TrueNAS Config
`Replication` Phase (using Periodic Snapshots)
So in this phase we will replicate all of your Pools (including snapshots) to a second TrueNAS using ZFS Replication. This is the recommend method of backing up and because the target is ZFS, the data structure can be preserved. It is also much easier keeping data in the ZFS ecosystem.
- Replication instructions are based on this video and should be watched first
- Multiple Replication Tasks
- You can have as many replication tasks as you want, but is definitely easier to use the recursive option and exclude any datasets you don't want.
- Setup a remote TrueNAS to accept the files
- This can be on the same network or somewhere else.
- The target ZFS version must be the same as or newer than the source ZFS version.
- On the backup TrueNAS make sure you have a pool ready to accept.
- Get the admin password to hand.
- Start the "Replication Task Wizard" from any of these locations:
- Dashboard --> Backup Tasks widget --> ZFS Replication to another TrueNAS
- This will not be present if you already have replication tasks as the widget now shows replication task summary,
- Data Protection --> Replication Tasks --> Add
- Datasets --> pick the relevent dataset --> Data Protection --> Manage Replication Tasks --> Add
- Use these settings for the "Replication Task Wizard"
- Follow the instructions in the video
- Select Recursive when you want the all the child datasets to be included.
- Choosing the right destination path
- If you are using a virtualised pfSense, make sure you use the IP address of the remote TrueNAS for the connection not it's hostname.
- Edit the "Periodic Snapshot Task" to next run far in the future to prevent it running again (optional)
- This might not need to be done if a suitable value was selected in the scheduling above.
- Data Protection --> Periodic Snapshot Tasks
- Navigate to another page and back to Data Protection (optional)
- This is just to make sure the "Periodic Snapshot Task" is actually populated on the Data Protection Dashboard.
- Run the "Replication Task" manually
- Data Protection --> Replication Tasks --> Run Now
- The replication task will need to be run manually because it is waiting for it's next scheduled trigger..
- When the "Replication Task" has finished successfully, disable:
- Replication Task
- Periodic Snapshot Task
- Delete the "Replication Task" (optional)
- If you never intend to use this task again you might aswell delete:
- Replication Task
- Periodic Snapshot Task + it's snapshots
- Deleting these tasks will possibly break the snapshot links with the remote TrueNAS. This is explained in Tom's video.
- Deleting is ok if you only ever intended this to be a one-time backup.
- If you leave the tasks disabled and don't delete them, you can reuse them at a later date and use the same remote TrueNAS and the repos there without have to resend the whole data set again, just the changes (i.e. deltas)
Notes
- Description
- "Periodic Snapshots" are their own snapshots. they are managed by the system (in this case, replication task) and are separate to manually created snapshots (but yes they are both deltas from a point in time).
- After the first snapshot transfer only the changes will be sent.
- The first snapshot is effectively the delta changes from a blank dataset.
- Replication Tasks only work on snapshots, not the live data.
- Selecting Source data (and Recursion)
- When you specify the `Recursive` option, a separate snapshot "set" is created for each dataset (including all children). So whenever snapshots are made it is on a per dataset basis, this means that deltas are handled on a per dataset basis.
- You need to click 'Recursive' to get the sub datasets however you can then exclude certain child datasets.
- You can select what ever datasets you want, you do not have to specify them recursive to get them all.
- Full Filesystem Replication: will do a vertbatim copy of the selected dataset including all of its contents and it's child datasets and their contents etc...
- Selecting Target
- The target ZFS version must be the same as or newer than the source ZFS version.
- Don't replicate to the root of a pool.
- Although this can be done it would deeply restrict what you can use the pool for.
- Replicating to the pool should be reserved for when you are completely backing up or moving a whole server pool.
- Choosing the right destination path
- Make sure the destination is a new dataset.
- This might not always be the case if you want to move the embeded file systems rather than the complete dataset,
- but for the purposes of backing up, always make sure the target is a new dataset.
- Backup & Recovery Made Easy: TrueNAS ZFS Replication Tutorial - YouTube | Lawrence Systems @380
- Select a target location with the drop down menu
- Then add a name segment (i.e.
/mydataset/) to the end of the Destination path which will become the remote dataset to which you are transfering your files to.
- If you dont add this name on the end, you will not create a dataset and the data will no be handled as you expect.
- If you choose an existing dataset with the dropdown for a replication target (using the wizard simple settings only) what happens next depends on whether there is content present in the dataset or not:
- If there is content:
- If there is no content:
- The source dataset's content will be imported into the target dataset's content.
- It will not appear as a dataset.
- There might be an option in advanced settings to override this behaviour, but the wizard does not give you this option and I don't know what advanced options I would change.
- Running
- To disable a "Periodic Snapshot Task" created by the "Replication Tasks" Wizard you need to disable the related "Replication Task" first.
- If the replication task runs and there are no additional snapshots it will not have anything to copy and will be fine about it.
- When you finish creating a "Replication Task" with the wizard, the related snapshot task will be run immediately and then will be run again as per the configured scheduled.
- The snapshot task might not appear straight away, so refresh the page (browser to another page and back).
- Managing Tasks
- You can use the wizard to edit a previously created Replication Task.
- If you delete the replication and snapshot tasks on TrueNAS, the related snapshots will not automatically be deleted so you will need to delete them manually.
- The "Replication Task" and the related "Periodic Snapshot Task" both need to be enabled for the replication to run.
- You can add a "Periodic Snapshot Task" and then tie a "Replication Task" to it at a later time.
- Periodic Snapshot Management
- How are Periodic Snapshots marked for deletion? | Page 2 | TrueNAS Community
- Handling snapshot tasks (even expirations) under TrueNAS is exclusively based on the snapshot's name. Not metadata. Not a separate database / table. Just the names.
- The minimum naming requirement is that it has a parseable Unix-time format down to the "day" (I believe). So YYYY-MM-DD works, for example. Zettarepl tries to interpret which number is the day or month, depending on the pattern used.
- If a date string is not in the snapshot's name, Zettarepl ignores it. (This usually won't be an issue, since creating a Periodic Snapshot Task by default uses a Unix time string.)
- Any existing snapshots (created by a periodic task) will be skipped/ignored when Zettarepl does its pruning of expired snapshots, if you rename the the snapshot task, even by a single character. (Snapshots created as "auto-YYYY-MM-DD" will never be pruned if you later rename the task to "autosnap-YYYY-MM-DD". This is because the task now instructs Zettarepl to search for and parse "autosnap-YYYY-MM-DD", rather than the existing snapshots of "auto-YYYY-MM-DD".)
- Point #4 is how snapshots created automatically under a Periodic Snapshot Task will become "immortal" and never pruned. You can also manually intervene to exploit this method to "indefinitely save" an automatic snapshot by renaming it from "auto-2022-01-15" to "saved-2022-01-15" for example.) Zettarepl will skip it, even if it is "expired". Because in the eyes of Zettarepl, "expired" actually means "Snapshot names that match the string of this particular snapshot task, of which the date string within the name is older than the set expiration length, shall be removed."
- All the above, and how Zettarepl handles this, can also be dangerous. The short summary is: you can accidentally have long-term snapshots destroyed and not even know it! Simply by using the GUI to manage your snapshot tasks, you can inadvertently have Zettarepl delete what you believed were long-term snapshots.
- I explain point #6 in more detail in this post.
- Staged snapshot schedule | TrueNAS Community - How would I best go about creating a schedule that creates snapshots of a dataset?
`Validate Backups` Phase
Just because a backup is performed does not mean it was successful and the data is valid.
- Check the data on the remote TrueNAS:
- Are all the datasets there
- Can you browse the files (use shell or the file browser App)
- ZVols
- You can also mount any ZVols and see if they work, but this can be quite a lot of work unless you preconfigure the remote TrueNAS to have matching VMs and iSCSI configs to accept these ZVols.
`Enable Internet` Phase
- If your pfSense is virtualised in a KVM
- You should turn this back on and enable autostart on it.
- We have taken a valid snapshot and replicated it above so data will not be compromised.
- We need the internet to perform the update (using the method below).
- Download the relevant TrueNAS ISOs
- This is just incase you cannot connect to the internet or there is an issue where TrueNAS becomes unresponsive.
- This is really only going to be an issue if you use a virtualised pfSense rotuer which is on a non-fuctioning TrueNAS system.
- TrueNAS SCALE Direct Downloads
`Apply System Updates` Phase
Update the system to the latest maintenance release of your current version of TrueNAS, the upgrade by stepping through each major version.
You go from the last minor release of your current version to the most recent release of each major version, eg:
- Dragonfish-24.04.2 → Dragonfish-24.04.2.5
- Dragonfish-24.04.2.5 → Electric Eel-24.10.2.3
- Electric Eel-24.10.2.3 → Fangtooth-25.04.2.1
{Current Version - Apply Minor updates} --> {Step through the Major versions till your target version} --> {check everything works} --> {Upgrade ZFS Pools}
- Update to the latest
Minor release for you current version:
- Read the release notes for the update, if not already.
- System Settings --> Update --> Apply Pending Update
- This will update you to the lastest version on this Train.
- (i.e. Upgrade TrueNAS-22.12.3.3 -> TrueNAS-22.12.4.2)
- Save configuration settings from this machine before updating?
- Save configuration + Export Password Secret Seed
- Name the file with the relevant version (i.e. Bluefin / Cobia / Dragonsifh) so you know which version it belongs too.
- Confirm and click Continue
- TrueNAS will now download and install the update.
- Wait until TrueNAS has fully rebooted after applying the update.
- i.e. don't rush to do the next update as there might be a few background tasks better left to finish, althought this is not mandatory it is a wise precaution.
- Download a fresh system configuration file with the secret seed.
- Update to the next
Major update (Bluefin --> Cobia)
You can only ever upgrade to the latest version of the new selected train when upgrading between major versions.
- Read the release notes for the update, if not already.
- System Settings --> Update --> Train: Cobia
- This is called changing the Train.
- Confirm the change
- System Settings --> Update --> Apply Pending Update
- This will update your TrueNAS to Cobia
- (i.e. Upgrade TrueNAS-22.12.4.2 -> TrueNAS-23.10.2)
- Save configuration settings from this machine before updating?
- Save configuration + Export Password Secret Seed
- Name the file with the relevant version (i.e. Bluefin / Cobia / Dragonsifh) so you know which version it belongs too.
- Confirm and click Continue
- Wait until TrueNAS has fully rebooted after applying the update.
- i.e. don't rush to do the next update as there might be a few background tasks better left to finish, althought this is not mandatory it is a wise precaution.
- Login to TrueNAS
- Clear Browser Cache
- After updating, clear the browser cache (CTRL+F5) before logging in to TrueNAS. This ensures stale data doesn’t interfere with loading the TrueNAS UI.
- Download a fresh system configuration file with the secret seed.
- Now repeat this section for Cobia to Dragonfish and so on until you are on the latest version of TrueNAS or the version you want.
`Checking` Phase
Ypu should now checks everything works as expected
- SMB/NFS can you read and wrtite, does the data open and work such asa you open images and they are pictures and not corrupt.
- Are all of your snapshot and Replication tasks still present.
- Do all of your Virtual Machines boot up and run normally.
- All the other stuff I cannot think of.
`ZFS Pool Update` Phase
- You don't have to do this and certainign don't have to do it straight away.
- I would only do this once you are happy you system is running correctly and interfacing properly woth any other systems.
- If you have an absolute need to upgrade the ZFS Flags straight away, then you probably know the risks etc.
Upgrading pools is a one-time process that can prevent rolling the system back to an earlier TrueNAS version. It is recommended to read the TrueNAS release notes and confirm you need the new ZFS feature flags before upgrading a pool.
- General
- How
- For each Pool that needs upgrading you do it as follows:
- Storage --> Your Pool --> Upgrade
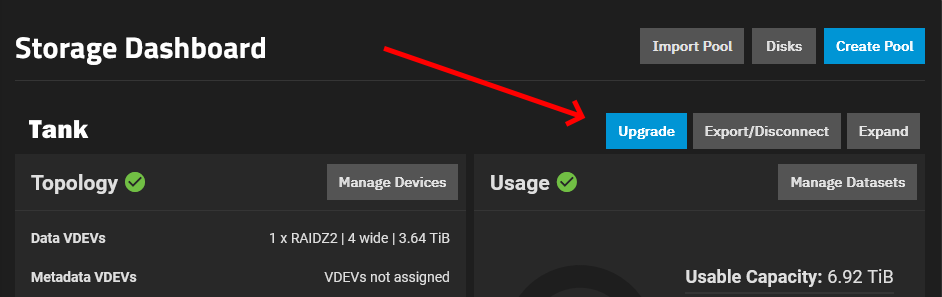
`House Keeping` Phase
- Remove unwanted Boot Environments
- Only do this when you are satified the upgrade was a success and you will never want to roll back.
- You don't need 10 prior versions of the TrueNAS boot environment stored, but maybe keep the last one or two.
Rolling Back
- This is not part of the upgrade process and should only be used if you have some major issues.
- It is here for reference only.
- This is not advised if your have upgraded over several major version in one go.
- You also need to read the release notes to make sure you can rollback.
- With proper planning rollback should not be needed
- Rolling back will not modify your data stored on the ZFS pools but if you have upgraded the ZFS pool flags then you will have issues.
- In some verions upgrades APPs were modified preventing rollback without a lot of effort.
- It is generally safe to do a rollback, but check the release notes of both versions of TrueNAS involved.
Notes
- Official Documentation
- Software Releases | TrueNAS Documentation Hub - Centralized schedules and upgrade charts for software releases.
- Software Releases | TrueNAS Documentation Hub (this link is from the upgrade page in TrueNAS GUI)
- Centralized schedules and upgrade charts for software releases.
- Upgrade paths are shown here
- Shows release timelines
- Legacy TrueNAS versions are provided for historical context and upgrade pathways. They are provided “as-is” and typically do not receive further maintenance releases. Individual releases are within each major version.
- Legacy releases can only be used by downloading the .iso file and freshly installing to the hardware. See the Documentation Archive for content related to these releases.
- Releases for major versions can overlap while a new major version is working towards a stable release and the previous major version is still receiving maintenance updates.
- Updating SCALE | TrueNAS Documentation Hub (Bluefin, Old) (Bluefin, Old)
- Provides instructions on how to update SCALE releases in the UI.
- TrueNAS has several software branches (linear update paths) known as trains.
- After updating, you might find that you can update your storage pools and boot-pool to enable some supported and requested features that are not enabled on the pool.
- Upgrading pools is a one-way operation. After upgrading pools to the latest zfs features, you might not be able to boot into older versions of TrueNAS.
- check commands are given here
- It is recommended to use replication tasks to copy snapshots to a remote server used for backups of your data.
- When apps are deployed in an earlier SCALE major version, you must take snapshots of all datasets that the deployed apps use, then create and run replication tasks to back up those snapshots.
- 23.10 (Cobia) Upgrades | TrueNAS Documentation Hub (Cobia, new)
- Overview and processes for upgrading from earlier SCALE major versions and from 23.10 to newer major versions.
- Update the system to the latest maintenance release of the installed major version before attempting to upgrade to a new TrueNAS SCALE major version.
- Upgrading from Bluefin to Cobia when applications are deployed is a one-way operation.
- It is recommended to use replication tasks to copy snapshots to a remote server used for backups of your data.
- App verification steps before upgrading
- Updating SCALE | TrueNAS Documentation Hub - Provides instructions on updating SCALE releases in the UI.
- Updating SCALE | TrueNAS Documentation Hub (Dragonfish) - Provides instructions on updating SCALE releases in the UI.
- TrueNAS has several software branches (linear update paths) known as trains. If SCALE is in a prerelease train it can have various preview/early build releases of the software.
- We recommend updating SCALE when the system is idle (no clients connected, no disk activity, etc.). The system restarts after an upgrade. Update during scheduled maintenance times to avoid disrupting user activities.
- 24.04 (Dragonfish) Version Notes | TrueNAS Documentation Hub
- Highlights, change log, and known issues for the latest SCALE nightly development vzzzersion.
- This has information about minor and major updates
- With a stable release, upgrading to SCALE 24.04 (Dragonfish) from an earlier SCALE release is primarily done through the web interface update process.
- Another upgrade option is to use a SCALE .iso file to perform a fresh install on the system and then restore a system configuration file.
- OpenZFS Feature Flags: The items listed here represent new feature flags implemented since the previous update to the built-in OpenZFS version (2.1.11).
- Information on new feature flags is found in the release notes for that release.
- Upgrading
- Can be done from an ISO or preferably from the GUI which is much easier and is how the instructions below area arranged.
- If you do it from the GUI, TrueNAS downloads the update, reboots and applies the update. This mean that both methods upgrade TrueNAS with the same mechanisim but with just a different start point.
- The new update are fully contained OSes that are installed side-by-side and are completely separate from each other and your storage pools.
- Upgrade Paths - SCALE 23.10 Release Notes | TrueNAS Documentation Hub
- There are a variety of options for upgrading to SCALE 23.10.
- Upgrading to SCALE 23.10 (Cobia) is primarily done through the web interface update process. Another upgrade option is to perform a fresh install on the system and then restore a system configuration file.
- Update the system to the latest maintenance release of the installed major version before attempting to upgrade to a new TrueNAS SCALE major version.
- Boot Enviroments
- Major minor upgrades install the later version of the OS side-by-side your old one(s) and these are called Boot Environments.
- When tutorials refer to rolling back the OS, they just mean reboot and load the old OS.
- These Boot Enviroments are independent from your data storage and are stored on the
boot-pool.
- With TrueNAS you can manipulate the Boot Environments in the following ways:
- Set as bootable
- Set bootable for next reboot only
- Delete
- Managing Boot Environments | TrueNAS Documentation Hub - Provides instructions on managing TrueNAS SCALE boot environments.
- System Settings --> Boot --> Boot Environments
- One Way Upgrades
- If you upgrade your ZFS Pools to get newer features you might not be able to user an older version of TrueNAS because it cannot use the ZFS, so when you upgrade your pools it is reguarded as one-way.
- If you have Apps these can suffer one-way upgrades so it is recommended to back these up prior to an upgrade, irrespective of whatehr you upgrade your ZFS Pools.
- What happens during an upgrade (minor and major)?
- (System Settings --> Update --> Apply Pending Update)
- TrueNAS downloads the update, reboots and installs the update.
- This new version of TrueNAS will:
- Read the config from your last TrueNAS version (the one you applied the upgrade from) and convert it as required with any additions or deletions to use this modified version as it's own config.
- Upgrade any System Apps you have installed (i.e. the ones that have data in the
ix-applications dataset). I am not sure how the new Docker App system will be processed during upgrades, but it might be similiar, one-way.
- When you upgrade System Apps, this is a one-way operation and these apps will no longer work with older versions of TrueNAS without issue.
- You are always recommended to get an Apps backedup before upgrade because of this issue so you can rollback if required
- This new version of TrueNAS will not:
- Patch the current OS
- It builds a new dataset on the
boot-pool which it then sets as "active" (or the one to boot from). These different datasets are called Boot Environments.
- Alter your storage pools.
- You are left to manually upgrade these yourself because you might want to use these pools on an older verion of TrueNAS which does not support the new flags.
- Why do I download multiple TrueNAS Configuration Files?
- Config files from different versions are not always compatible with each other.
- Update Buttons Explained
Download updates
- Downloads the update file if the system detects one available, but also gives you the option to apply this system update at the same time.
- To do a manual update click
Download Updates and wait for the file to download to your system.
Apply Pending Update
- Gets and the applies the update.
- Myabe this button should be called `Update Now`.
- I
nstall Manual Update File
- If you already have the update file, you can upload and apply it using this button.
- This is useful for offline installs
- Update Screens | TrueNAS Documentation Hub
- The update is dowloaded locally before bein applied, this must use almost the same nmecahnisim as the iso becasue it reboots before applying
- Tutorials
- Troubleshooting
- System Settings --> (GUI | Localization | Email ) widgets are missing
- This is a browser cache issue.
- Empty cache, disable browser cache, try another browser etc..
TrueNAS General Notes
Particular pages I found useful. The TrueNAS Documentation Hub has excellent tutorials and information. For some things you have to refer to the TrueNAS CORE documentation as it is more complete.
Websites
- Official Websites
- NAS Websites
Setup Tutorials
- Uncle Fester's Basic TrueNAS Configuration Guide | Dan's Wiki - A beginners guide to planning, installing and configuring TrueNAS.
- How to setup TrueNAS, free NAS operating system - How to setup TrueNAS - detailed step-by-step guide on how setup TrueNAS system on a Windows PC and use it for storing data.
- How to setup your own NAS server | TechRadar - OpenMediaVault helps you DIY your way to a robust, secure, and extensive NAS device
- Getting Started with TrueNAS Scale | Part 1 | Hardware, Installation and Initial Configuration - Wikis & How-to Guides - Level1Techs Forums - This Guide will be the first in a series of Wikis to get you started with TrueNAS Scale. In this Wiki, you’ll learn everything you need to get from zero to being ready for setting up your first storage pool. Hardware Recommendations The Following Specifications are what I would personally recommend for a reasonable minimum of a Server that will run in (Home) Production 24/7. If you’re just experimenting with TrueNAS, less will be sufficient and it is even possible to do so in a Virtual Machine.
- 6 Crucial Settings to Enable on TrueNAS SCALE - YouTube
- This video goes over many common settings (automations) that I highly recommend ever user enables when setting up TrueNAS SCALE or even TrueNAS CORE.
- The 6 things:
- Backup system dataset
- HDD Smart Tests
- HDD Long Tests
- Pool Scrubs
- Running this often prevent pool/file corruption.
- Goes through/reads every single file on the pool and makes sure they don't have any errors by checking their checksums and if it there is no bit rot or corruption found, then TrueNAS knows the pool is ok.
- If file errors are found, TrueNAS to fixes them without prompting as long as the file is not too corrupt.
- You want to run them fairly often is because if you have too many errors stacking because it can only repair so many errors and it might be a sign of a failing drive.
- Snapshots and scheduling them.
- Setting up periodic snapshots prevents malware ransomware from robbing you of your data.
- TrueNAS backup
- RSync (a lot of endpoints)
- Cloud Sync (any cloud provider)
- Replication (to another TrueNAS box)
- Check you can restore backups at least every 6 months or more often depending on the data you keep.
- Getting Started With TrueNAS Scale Beta - YouTube | Lawrence Systems - A short video on how to start with TrueNAS SCALE but with an emphasis on moving from TrueNAS CORE.
- TrueNAS Scale - Linux based NAS with Docker based Application Add-ons using Kubernetes and Helm. - YouTube | Awesome Open Source
- TrueNAS is a name you should know. Maybe you know it as FreeNAS, but it's been TrueNAS core for a while now. It is BSD based, and solid as afar as the NAS systems go. But now, they've started making a bold move to bring us this great NAS system in Linux form. Using Docker and Helm as the basis of their add-ons they have taken what was already an amazing, open source project, and given it new life. The Dockere eco-system, even in the early alpha / beta stages has added so much to this amazing NAS!
- This video is relatively old but it does show the whole procedure to from intially setting up TrueNAS SCALE to installing apps.
- Mastering pfSense: An In-Depth Installation and Setup Tutorial | by Cyber Grover | Medium - Whether you’re new to pfSense or looking to refine your skills, this comprehensive guide will walk you through the installation and configuration process, equipping you with the knowledge and confidence to harness the full potential of this robust network tool.
- 10 tips and tricks every TrueNAS user should know
- iXsystem's TrueNAS lineup pairs well with self-assembled NAS devices, and here are ten tips to help you make the most of these operating systems.
- A really cool article outlining some of the most features in TrueNAS.
Settings
- Setting a Static IP Address for the TrueNAS UI | Documentation Hub - Provides instructions on configuring a network interface for static routes on TrueNAS CORE.
- Setting Up System Email | Documentation Hub - Provides instructions on configuring email using SMTP or GMail OAuth and setting up the email alert service in SCALE.
- Alarm icon (top right of the GUI) --> Cog -->
- Enable SSH
- SSH | Documentation Hub - Provides information on configuring the SSH service in TrueNAS SCALE and using an SFTP connection.
- Configuring SSH | TrueNAS Documentation Hub - Provides instructions on configuring Secure Shell (SSH) on your TrueNAS.
- Only enable when SSH is required as it is a security risk. If you must expose this to the internet secure the SSH ports with a restrictive Firewall policy, better yet only allow local access and user wanting SSH access should VPN into the network first then you do not need to expose SSH to the internet.
- Instructions
- System Settings --> Services --> SSH --> configure -->
- 'Password Login Groups': add 'admin' to allow admin users to logon. You can choose another user group if required.
- `Log in as Admin with password`: Enabled (disable this when finished, it is better to create another user for this)
- System Settings --> Services --> SSH -->
- Running: Enabled
- Start Automatically: (as required, but leaving off is more secure) (optional)
- Removed unused LAN adapters
TrueNAS Alternatives
- HexOS
- This is a control panel based in the web that communicates with your truenas using an agent and is design to make using TrueNAS easier to use but without exposing TrueNAS to the user (unless they want to) but there is a draw back that there are less functions avaiable. This is clearly aimed as less IT profficient users who do not want the advanced features of TrueNAS but do want some of its features such as NAS storage and so on.
- HexOS - The home server OS that is designed for simplicity and lets you regain control over your data and privacy.
- Command Deck | HexOS - HexOS Login (Command Deck)
- HexOS: Powered by TrueNAS - Announcements - TrueNAS Community Forums - The official HexOS forum thread at TrueNAS.
- What is HexOS? A Truly User-Friendly TrueNAS Scale NAS Based Option? – NAS Compares - HexOS - Trying to Make NAS and BYO NAS More User-Friendly.
- HexOS AMA – User Questions Answered – TrueNAS Partnership? Online? Licensing? Buddy Backups? – NAS Compares
- Finding Out More About the HexOS NAS Software, Where it lives with TrueNAS Scale and Whether it Might Deserve Your Data
- Remote access is handled through the HexOS Command Deck, which offers secure, straightforward management without directly interacting with user data.
- Although the HexOS UI is designed to be fully responsive and work well on mobile devices, features like a dedicated mobile app, in-system HexOS control UI, and additional client app tools are planned but will only be confirmed after the 1.0 release.
- One of the key strengths of HexOS is its flexibility; users can easily switch back to managing their systems directly through TrueNAS SCALE without any complicated conversions or additional steps, ensuring that they are never locked into the HexOS ecosystem if they decide they need something different.
- Has a YouTube video interview.
- Other Platforms
- Unraid | Unleash Your Hardware - Unraid is an operating system that brings enterprise-class features for personal and small business applications. Configure your computer systems to maximize performance and capacity using any combination of OS, storage devices, and hardware.
- Proxmox - Powerful open-source server solutions - Proxmox develops powerful and efficient open-source server solutions like the Proxmox VE platform, Proxmox Backup Server, and Proxmox Mail Gateway.
- Synology Inc. - Synology uniquely enables you to manage, secure, and protect your data – at the scale needed to accommodate the exponential data growth of the digital world.
- Xpenology: Run Synology Software on Your Own Hardware
- Want to run Synology DSM on your own hardware? This is called Xpenology and we are here to provide you with a full guide on what it is and how to successfully run Xpenology on your own NAS.
- Continuous file syncronising: server --> NAS (or daily/day/hour)
- Daily snapshot of nas file system (BRFS on synology/xpenoloy)
- They might have software that does the verioning on the client and then only pushes the changes i.e. cloudbackup
UPS
TrueNAS
- General
- TrueNAS uses Network UPS Tools (NUT) as the underlying daemon for interacting with UPS.
- UPS has it's own reporting page:
- If you have an UPS you can connect it, and configure TrueNAS to respond to it i.e shutdown when you swap over to battery or wait so long before shutting down after a power cut.
- Official Docs
- Tutorials
Network UPS Tools (NUT)
- Websites
- NUT
- Modbus Official
- The Modbus Organization - MODBUS Protocol is a messaging structure developed by Modicon in 1979, used to establish client-server communication between intelligent devices.
- libmodbus Official
- libmodbus.org
- Documentation of the Open Source libmodbus project
- The most popular Open Source library to communicate with Modbus devices.
- GitHub - stephane/libmodbus: A Modbus library for Linux, Mac OS, FreeBSD and Windows
- A Modbus library for Linux, Mac OS, FreeBSD and Windows.
- libmodbus is a free software library to send/receive data with a device which respects the Modbus protocol.
- This library can use a serial port or an Ethernet connection.
- The functions included in the library have been derived from the Modicon Modbus Protocol Reference Guide which can be obtained from www.modbus.org.
- Tutorials
- Network UPS Tools (NUT) Ultimate Guide | Techno Tim
- Meet NUT Server, or Network UPS Tools.It’s an open UPS networking monitoring tool that runs on many different operating systems and processors.This means you can run the server on Linux, MacOS, or BSD and run the client on Windows, MacOS, Linux, and more.It’ perfect for your Pi, server, or desktop.It works with hundreds of UPS devices, PDUs, and many other power management systems.
- Also has a YouTube video.
- Monitoring a UPS with NUT on the Raspberry Pi - Pi My Life Up - Read information from a UPS
- Home Assistant How To - integrate UPS by using Network UPS Tools - NUT - YouTube - If you have Home Assistant giving you Smart Home capabilities, you should protect it from power failure by using UPS. Not only will it allow you to run system if power fails, but it will protect your hardware for any sudden power loss or power surges.
- Network UPS Tools - ArchWiki - This document describes how to install the Network UPS Tools (NUT).
- Network UPS Tools (NUT) | www.ipfire.org - NUT is an uninterruptible power supply (UPS) monitoring system that allows the sharing of one (or more) UPS systems between several computers. It has a 'server' component, which monitors the UPS status and notifies a 'client' component when the UPS has a low battery. There can be multiple computers running the client component and each can be configured to shut down cleanly in a power failure (before the UPS batteries run out of charge).
- Detailed NUT Configuration | www.ipfire.org
- Driver General
- nut/data/driver.list.in at master · networkupstools/nut · GitHub - The internal list of supported devices matched against compatible NUT drivers. I have linked to mine for a good example.
- USBHID-UPS(8) | Network UPS Tools (NUT) - Driver for USB/HID UPS equipment
- The usbhid-ups driver has two polling intervals.
- The "pollinterval" configuration option controls what can be considered the "inner loop", where the driver polls and waits briefly for "interrupt" reports.
- The "pollfreq" option is for less frequent updates of a larger set of values, and as such, we recommend setting that interval to several times the value of "pollinterval".
- Many UPSes will respond to a USB Interrupt In transfer with HID reports corresponding to values which have changed. This saves the driver from having to poll each value individually with USB Control transfers. Since the OB and LB status flags are important for a clean shutdown, the driver also explicitly polls the HID paths corresponding to those status bits during the inner "pollinterval" time period. The "pollonly" option can be used to skip the Interrupt In transfers if they are known not to work.
- APC_MODBUS(8) | Network UPS Tools (NUT) - Driver for APC Smart-UPS Modbus protocol
- Tested with SMT1500 (Smart-UPS 1500, Firmware 9.6)
- Generally this driver should work for all the APC Modbus UPS devices. Some devices might expose more than is currently supported, like multiple phases. A general rule of thumb is that APC devices (or firmware versions) released after 2010 are more likely to support Modbus than the USB HID standard.
- Note that you will have to enable Modbus communication. In the front panel of the UPS, go to Advanced Menu mode, under Configuration and enable Modbus.
- This driver was tested with Serial, TCP and USB interfaces for Modbus. Notably, the Serial ports are not available on all devices nowadays; the TCP support may require a purchase of an additional network management card; and the USB support currently requires a non-standard build of libmodbus (pull request against the upstream library is pending, as of at the time of this publication) as a pre-requisite to building NUT with this part of the support. For more details (including how to build the custom library and NUT with it) please see NUT PR #2063
- As currently published, this driver supports reading information from the UPS. Implementation of support to write (set modifiable variables or send commands) is expected with a later release. This can impact the host shutdown routines in particular (no ability to actively tell the UPS to power off or cycle in the end). As a workaround, you can try integrating
apctest (from the "apcupsd" project) with a "Test to kill power" into your late-shutdown procedure, if needed.
- Driver Development
- APC SMT1500IC UPS not showing all of the data points in TrueNAS (Summary)
- This is not an issue of TrueNAS, it is the NUT driver (usbhid-ups) not being able to provide the information.
- Since 2010 APC has been developing the ModBus protocol to provide the data points rather than HID, and NUT does not fully support this protocol over USB yet.
- Currently NUT supports ModBus on TCP/IP and serial bit not USB. This is getting implemented but requires a
libmodusb modified with rtu_usb. The relevant changes are being merged into the master repo for libmodusb.
- So we have to wait for ModBus to be fully supported and TrueNAS to update the NUT package because currently Dragonfish-24.04.2 has NUT v2.80
- ModBus has to be enabled from the UPS's front anel. It probably can be done from Powerchute as well.
- Network UPS Tools - Smart-UPS 1500 - This has the same model name as mine in the settings dump via NUT, but doesn't mention SMT so is probably the same electronics or near enough.
- APC ModBus Protocol (apc_modbus)
- When available, the
apc_modbus driver might offer more features and data over the usbhid-ups driver.
- ModBus is currently working on Serial and TCP/IP.
- APC UPS with Modbus protocol · networkupstools/nut Wiki · GitHub
- Since about 2010, many APC devices have largely deprecated the use of standard USB HID protocol in favor of a ModBus based one, which they can use over other media (Serial, TCP/IP) as well.
- With an "out of the box"
libmodbus (without that rtu_usb change), the APC devices using the protocol over Serial and TCP/IP links should "just work" with the new apc_modbus NUT driver.
- But as of PR #2063 with initial read-only handling support (and some linked issues and PRs before and after it) such support did appear in NUT release v2.8.1 and is still expanding (e.g. for commands and writable variables with PR #2184 added to NUT v2.8.2 or later releases).
- One caveat here is that the work with modbus from NUT relies on
libmodbus, and the upstream project currently lacks the USB layer support. The author of PR #2063 linked above did implement it in https://github.com/EchterAgo/libmodbus/commits/rtu_usb (PR pending CLA acceptance in upstream) with instructions to build the custom libmodbus and then build NUT against it detailed in the PR #2063.
- Add support for new APC Modbus protocol · Issue #139 · networkupstools/nut · GitHub
- aquette
- From APCUPSD (http://apcupsd.cvs.sourceforge.net/viewvc/apcupsd/apcupsd/ReleaseNotes?pathrev=Release-3_14_11):
- "APC publicly released documentation[1] on a new UPS control and monitoring protocol, loosely referred to as MODBUS (after the historic industrial control protocol it is based on).
- The new protocol operates over RS232 serial lines as well as USB connections and is intended to supplement APC's proprietary Microlink protocol. Microlink is not going away, but APC has realized that third parties require access to UPS status and control information.
- Rather than publicly open Microlink, they have created another protocol to operate along side it.
- pjcreath
- According to the white paper, all SRT models and SMT models (excluding rack mount 1U) running firmware >= UPS 09.0 support modbus. SMT models with firmware >= UPS 08.0 can be updated to 09.x, which according to the FAQ includes all 2U models and some tower models.
- Given that, @anthonysomerset's SMT2200 with 09.3 should support modbus.
- Note that modbus is disabled by default, and has to be enabled in the Advanced menu from the front control panel.
- All of these devices have serial ports (RJ45) in addition to USB. The white paper documents APC's implementation of modbus, along with its USB encapsulation.
- edalquist
- Is there any progress here? I have a SMC1500 and two SMT1500s. They both have basic functionality in NUT but don't report input/output voltage or load.
- EchtherAgo
- I pushed a commit that changes power/realpower to absolute numbers. Edit: Also added the nominal values.
- This will fix the values display as percentages in TrueNAS.
- EetuRasilainen
- Do I need the patched
libmodbus if I am using ModBus over a serial link (with APC AP940-0625A cable)? As far as I understand the patched libmodbus is only required for Modbus-over-USB.
- Right now I am querying my SMT1500 using a custom Python script and
pymodbus through this serial cable but I'd prefer to use NUT for this.
- EchtherAgo
- @EetuRasilainen you don't need a patched
libmodbus for serial.
- apc_modbus: Support for APC Modbus protocol by EchterAgo · Pull Request #2063 · networkupstools/nut · GitHub
- APC_MODBUS _apc_modbus_read_registers Timeouts · Issue #2609 · networkupstools/nut · GitHub - On an APC SMT1500C device using the rtu_usb version of libmodbus and a USB cable, reads fail with a timeout..
- Follow-up for `apc_modbus` driver by jimklimov · Pull Request #2117 · networkupstools/nut · GitHub - NUT scaffolding add-ons for apc_modbus driver introduced with #2063CC @EchterAgo - LGTY?
- 2. NUT Release Notes (and other feature details)
- apc_modbus driver was introduced, to cover the feature gap between existing NUT drivers for APC hardware and the actual USB-connected devices (or their firmwares) released since roughly 2010, which deprecated standard USB HID support in favor of Modbus-based protocol which is used across the board (also with their network management cards). The new driver can monitor APC UPS devices over TCP and Serial connections, as well as USB with a patched libmodbus (check https://github.com/EchterAgo/libmodbus/commits/rtu_usb for now, PR pending). [#139, #2063]
- For a decade until this driver got introduced, people were advised to use
apcupsd project as the actual program which talks to a device, and NUT apcupsd-ups driver to relay information back and forth. This was a limited solution due to lack of command and variable setting support, as well as relaying of just some readings (just whatever apcupsd exposes, further constrained by what our driver knows to re-translate), with little leverage for NUT to tap into everything the device has to offer. There were also issues on some systems due to packaging (e.g. marking NUT and apcupsd as competing implementations of the same features) which required clumsy workarounds to get both installed and running. Finally, there is a small matter of long-term viability of that approach: last commits to apcupsd sources were in 2017 (with last release 3.14.14 in May 2016): https://sourceforge.net/p/apcupsd/svn/HEAD/tree/
- Modbus support for SMT, SMC, SMTL, SCL Smart Connected UPS - APC USA - Issue: What Smart Connected UPS support Modbus communications?
- Build a driver from source for an existing installation: apc_modbus + USB · Issue #2348 · networkupstools/nut · GitHub - Information on how to compile NUT with the required modified library for Modbus over USB.
- RTU USB · EchterAgo/libmodbus@deb657e · GitHub - The patch to add USB into the libmodbus library.
- Commands
- View the version number of NUT (nut-scanner)
sudo upsd -V

-->

Network UPS Tools upsd 2.8.0
- Identify the attached UPS
sudo nut-scanner -U

-->

Scanning USB bus.
[nutdev1]
        driver = "usbhid-ups"
        port = "auto"
        vendorid = "051D"
        productid = "0003"
        product = "Smart-UPS_1500 FW:UPS 15.5 / ID=1015"
        serial = "AS1234123412"
        vendor = "American Power Conversion"
        bus = "001"
- View the available data points of you UPS (this is the data you get when TrueNAS polls via NUT)
upsc                 = List all UPS and their details on "localhost" (i am guessing it returns all of them, I only have one attached and this is returned)
upsc myups           = To list all variables on an UPS named "myups" on the default host (localhost)
upsc myups@localhost = To list all variables on an UPS named "myups" on a host called "localhost"

These commands will output the same details if you only have 1 UPS attached via USB, so TL;DR type: upsc
- The default UPS identifier in TruenNAS is `UPS`
- as recommend by the official docs
- can be changed
- so make sure you understand this when running the commands.
- This identifier is defiend in the TrueNAS settings: System Settings --> Services --> UPS
- UPSC(8) Man page - A lightweight UPS client
- `ups` is a placeholder to be swapped out with `upsname[@hostname[:port]]`
- `hostname` and therefore `port` are optional.
- `port` requires `hostname` I guess
Misc
- TrueNAS as an APP
- Browse to your TrueNAS server with your Mobile Phone or Tablet
- Bring up the browser menu and click on "Add to Home Screen"
- Click Add
- You now have TrueNAS as an APP on your mobile device.
- Monitoring / Syslog / Graylog
- Storage
- Importing Data | Documentation Hub
- Provides instructions for importing data (from a disk) and monitoring the import progress.
- Importing is a one-time procedure that copies data (from a physical disk) into a TrueNAS dataset.
- TrueNAS can only import one disk at a time, and you must install or physically connect it to the TrueNAS system.
- Supports the following filesystems
- UFS
- NTFS
- MSDOSFS
- EXT2FS
- EXT3 (partially)
- EXT4 (Partially)
- Reviews
- TrueNAS Software Review – NAS Compares
- Have you been considering a NAS for a few years, but looked at the price tag that off the shelf featured solutions from Synology or QNAP and thought “wow, that seems rather expensive for THAT hardware”? Or are you someone that wants a NAS, but also has an old PC system or components around that could go towards building one? Or perhaps you are a user who wants a NAS, but HAS the budget, HAS the hardware, but also HAS the technical knowledge to understand EXACTLY the system setup, services and storage configuration you need? If you fall into one of those three categories, then there is a good chance that you have considered TrueNAS (formally FreeNAS).
- This is a massive review of TrueNAS CORE and is a must read.
- SCALE vs CORE vs Enterprise vs Others
- Cloud
- Cloud Backup Services
- P2P Backup Agents
- Syncthing - Syncthing is a continuous file synchronization program. It synchronizes files between two or more computers in real time, safely protected from prying eyes. Your data is your data alone and you deserve to choose where it is stored, whether it is shared with some third party, and how it’s transmitted over the internet.
TrueCommand
- TrueCommand - Manage TrueNAS Fleet All From One Place
- A powerful, easy-to-use management and monitoring platform to manage TrueNAS systems from one central location.
- TrueCommand Cloud is a secure and easy-to-use cloud service.
- Each TrueCommand instance is hosted by iXsystems® in a private cloud and uses WireGuard VPN technology to secure communications with each NAS system and with each user or storage admin.
- There is a Self-hosted TrueCommand Container.
- This software is free to use to manage up to 50 drives, and can be deployed as a Docker Container.
- Has good video overview.
- TrueCommand | Documentation Hub
- Public documentation for TrueCommand, the TrueNAS fleet monitoring and managing application.
- Doesnt mention the migradte dataset option, docs are out of date.
- Has a `Migrate Dataset` option
- Installing or Updating TrueCommand | Documentation Hub - Guides to install or update TrueCommand.
TrueNAS Troubleshooting
Some issues and solutions I came across during my build.
There might be other troubleshooting sections in the related categories in this article.
Misc
- Username or password is wrong even though I know my password.
- When setting up TrueNAS, do not use # symbols in the password, it does not like it.
- `admin` is the GUI user unless you choose to use `root`
- You can use the # symbol in your password when you change the `admin` account password from the GUI
- So you should use a simple password on setup and then change it in the GUI after your TrueNAS is setup.
- To view storage errors, start here:
RAM (Diagnostics)
- General
- Large amounts of RAM can cause the first boot of your PC to take ages to POST. Mine took 20mins (I am not kidding, but I do have 128GB ECC RAM installed).
- dmidecode
- This is a CLI tool a lot of people use to look at their RAM and other BIOS related stuff.
- Dmidecode reports information about your system's hardware as described in your system BIOS according to the SMBIOS/DMI standard. This information typically includes system manufacturer, model name, serial number, BIOS version, asset tag as well as a lot of other details of varying level of interest and reliability depending on the manufacturer. This will often include usage status for the CPU sockets, expansion slots (e.g. AGP, PCI, ISA) and memory module slots, and the list of I/O ports (e.g. serial, parallel, USB).
- linux - RAM info with dmidecode --type 17 - Stack Overflow
- dmidecode --type 17
- dmidecode --type 18
- Source Code
- Misc
ECC RAM (Diagnostics)
- General
- You need to explicitly enable ECC RAM in your BIOS.
- ECC RAM uses extra pins on the RAM/Socket so this is why your CPU and Motherboard need to support ECC for it to work.
- Check you have ECC RAM (installed and enabled)
- Your ECC RAM is enabled if you see the notification on your dashboard

- MemTest86
- In the main menu you can see if you RAM supports ECC RAM or if it is turned off or on.
- dmidecode
- 'dmidecode -t 16' or 'dmidecode --type 16' (they are both the same)
- 'Physical Memory Array' information.
- If you have ECC RAM the result will look something liek this:
Handle 0x0011, DMI type 16, 23 bytes
Physical Memory Array
        Location: System Board Or Motherboard
        Use: System Memory
        Error Correction Type: Multi-bit ECC
        Maximum Capacity: 128 GB
        Error Information Handle: 0x0010
        Number Of Devices: 4
- 'dmidecode -t 17' or 'dmidecode --type 17' (they are both the same)
- 'dmidecode -t memory'
- This just runs both the 'Type 16' and 'Type 17' tests one after the other giving you combined results to save time.
- Create ECC Errors for testing
- MemTest86 Pro has an ECC injection feature. A current list of chipsets with ECC injection capability supported by MemTest86 can be found here.
- SOLVED - The usefulness of ECC (if we can't assess it's working)? | TrueNAS Community
- Q:
- Given that ECC functionality depends on several components working well together (e.g. cpu, mobo, mem) there are many things that can go wrong resulting in a user detectable lack of ECC support.
- I consider ECC reporting (and a way to test if that is still working) a requirement as to be able to preemptively replace memory that is about to go bad.
- I am asking for opinion of the community, and most notably senior technicians @ixsystems, regarding this stance because I am quite a bit stuck now not daring to proceed with a mission critical project.
- This thread deals with all sorts of crazy ways fo testing ECC RAM from the physical to software Row Hammer tests.
- This for reference only.
- ECC Errors being reported
High CPU usage - Find the culprit
My TrueNAS is running high CPU usage but I do not have anything that should becasuing this so I need to dig into this.
- TrueNAS part
- Use these CLI commands to check process CPU usage in TrueNAS.
top
htop
- In my case it was qwemu, so this meant it was either the service or more likely a particular VM
- I shut down all of my VM except pfSense and the high CPU usage was still present meaning this was the most likely cause.
- pfSense part
- Other checks you can do in pfSense
- Solution
- So it was not a failing of the Hypervisor, but a particular VM using a lot of resources, in this case pfSense due to a known issue.
- Rebooting pfSense fixes the issue.
Questions (to sort)
- Backups Qs
- where are the 3.45am configbackup option
- Pulling disks
- Should I put a drive offline before removing it?
- ZFS
- how do i safely purge/reduce ZFS cache?
- ie just did a massive transfer and it is now all in ram
- BIOS
- what is fast boot? do i need this on?
- do i need fast boot on my truenas, still enabled, should i disable?
- what is asus nvme native driver? do i need it?
Suggestions
- app via couple of lines of code: check then do bug/feature with examples
- it might be done, check and then add to notes
- = is done, so add somes notes
- needs some imporvement, the name should be the host name and the icon is black withj no backb=ground so is hard to see. send update to add white background
- should populate name with IP or FQDN
- at the least add a white background to the icon.
- "install as APP - mainfest.site is out of date"
- make SMB default selection in wizard (link to lawrence video + time stamp)
- add (POSIX) and (NSFS4) to genric and SMD in wizard. when you edit the share type later this is what is used.
- on dataset delete dialogue, disable mouse right click to prevent copy and paste.
- dataset record size shows 512 and 512B, is this a bug? insepct the html
- Increasing iSCSI Available Storage | --> Increasing iSCSI Available Storage | Documentation Hub need to add documentation hub onto their apge titles
- users should have description field. i.e. this user is for watching videos