Items filtered by date: December 2014
Outlook 2013 wants to delete .ost file when removing pop3 account
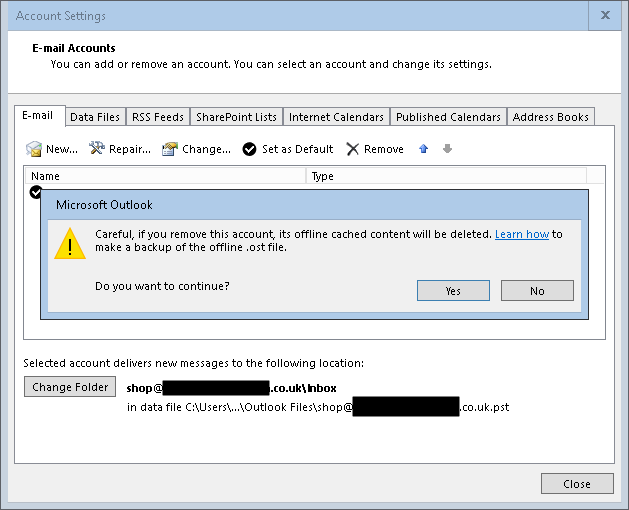
I wanted to remove a POP3 account in Outlook 2013 but receive the following error message
Careful, if you remove this account, its offline cached content will be deleted. Learn how to make a backup of the .ost file.
I have both an Exchange account and a standard POP3 account in my Outloook profile.
I understand a pop3 account stores information in the .pst file to which it's directed, not a .ost file. Exchange activesync stores the information in a .ost file. However I am trying to remove the pop3 account, not the exchange activesync account. So I am afraid that if I go ahead and remove, the error message is indicating that it will delete everything in the .ost file.
Answer
The only bug is that the message about the .ost file shouldn't appear when deleting an Outlook.com configured as a PST file while it's also configured as an EAS file in the same profile. Just tested this by deleting the POP version of the Outlook.com account also configured as an EAS account the same profile and everything remained intact.Even it were to delete the OST file - it would automatically get recreated when Outlook is restarted with the only data loss would be related to the folders identified with "This Computer Only" (Drafts, Notes, Journal)I can confirm that if you delete the POP3 account that neither the .PST or the .OST file are deleted. The error message should not be displayed and is definately a bug.
Links
Cannot send POP3 emails after upgrading to Windows 10 (0x800CCC13)
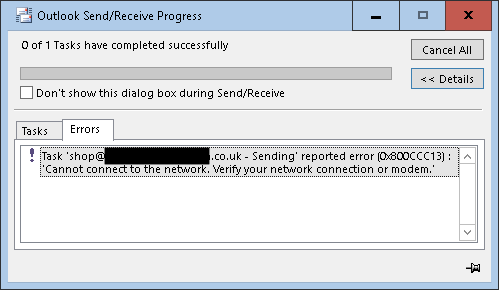
So you have just upgraded to Windows 10, you are running Outlook 2007/2010/2013 and you cannot send emails because you are getting the following error message when trying to send POP3 emails. Exchange accounts seem to still work fine:
0x800CCC13 “Cannot connect to the network”
Solution
The recommended fix is to run the following from the command prompt as an administrator. Make sure Outlook is not running and when the process is complete you should restart the computer
sfc /scannow
Other Solutions
This should fix the majority of people's setups but it is not 100%. I have a few more fixes you can try:
- Antivirus
- Disable antivirus
- Remove the antivirus it completly and see if the emails then send.
- Update antivirus to the latest version, program and definitions (especially Avast)
- I was running Avast antivirus which scans emails for virus, in and out, which means it hooks into Outlook. I updated Avast with the updates it found to the program, rebooted windows. The emails still did not send. I then found that if i disabled Avast I could then send emails. I also discovered that when i re-enabled the Antivirus I could still send emails
- Download and install all updates for Windows and Office.
- Delete email profile and then re-create it - this is a worst case scenario but has been know to fix things.
Links
- Known issues with Office and Windows 10 - Microsoft Office
- Outlook Send/Receive error: 0x800CCC13 after upgrading to Windows 10 - Outlook
- Solved Outlook 2013 Error 0x800CCC13 Cannot connect to the network - Page 8 - Windows 10 Forums
- networking - outlook 2013 - 0x800CCC13 "Cannot connect to the network" - Super User
Phoca Gallery - putting the category images in a grid
i have read the forum and the manual, but i cannot find a way to put categories that i include in an article in to a grid or at least all float left (display: inline-block) rather than a vertical list using:
{phocagallery view=categories|imagecategories=1|imagecategoriessize=1}
- i am aware that i can surround stuff in divs and then style that, but the output using this plugin seems to be table based. I did give it a go.
- i could not find a template file or css for the plugin.
- is it possible to make the categories output in a grid, preferably one that i can set or a responsive float left or float right ?
- will i have to actually edit the plugin code itself?
thanks
Solution
I had a look at editing the plugin, but i was not really keen to do that. You will love the solution i figured out and no core code or phocagallery code was harmed in the making of this.
Phocagallery when displaying a category through a link floats the categories exactly as i want, but my problem was that i wanted to display 2 categories like that, floated and below each other. However when you create a menu item you can only select 1 category and tweak it as needed.
So i used the following method to get the result i wanted:
- I created a menu (but not attached to a module)
- in this menu i created 2 phocagallery category links, each link pointing at their own respective category and tweaked as required
- i created an article called Portfolio
- I then use a plugin called 'Plugin include component' (available for free on jooml extensions) and included each of the menu items (via jlink) into the portfolio article. (i used a clear: both command between the two items just incase)
- I then pointed a main menu item to the article, portfolio
- i now have 2 x separate sub categories displayed on the same page, floated
You can use this method to get different layouts and the best thing is, upgrading will not break this method.
i hope this helps
My original post was on the Phoca Forums.
Using the Draytek Vigor System Log
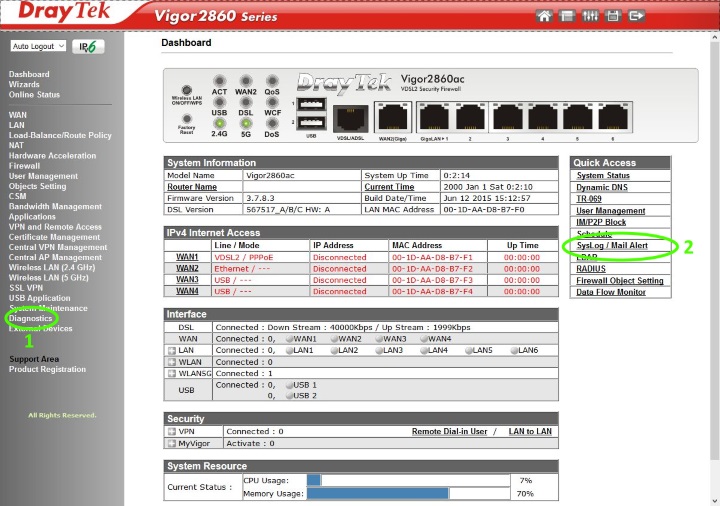
For some reason Draytek hide their router log and unless you know how to find it you might have a hard time seeing what is going on.
There are 2 types of system logging in draytek routers:
- Normal local system log - The system log is located @ Diagnostics / Syslog Explorer
- Remote System Log - This is where you can haeva log emailed to you on events or use an external program to read the log
Links
- Vigor Router FAQ - Syslog
- How do I capture Vigor router's log for DrayTek support engineer's analysis? - DrayTek Corp
Setting up a Draytek Vigor to connect to BT Infinity
Symptoms
- You have set up the router exactly as you should and it still does not work on BT fibre or some other BT supplied line.
- You have tried a factory reset and tried again with no joy.
- There is nothing wrong with your router and the one Plusnet / BT supplied you is working just fine.
Solution
- When setting up your fibre connection you must make sure you set VDSL VLAN Tag to be 101
- Some say the serve name should be left empty - it certainly does nto harm not to fill it in.
Setup wizard
Just as a reference this is the setup procedure I followed in the router:
- Click on wizards
- Quick start wizard
- Set admin password (optional) - if you dont it will stay as admin/admin
- Click next

- Configure wan interface

As you can see i have set the mode to VDSL only, makes connection/setup silghtly quicker, i have enabled 'VLAN Tag insertion (VDSL2):' and set it to 101. This is the important thing to get working on the BT network - Click next
- On this page you should leave the protocol as PPPoE/PPPoA, you can change the the DNS servers to your custom DNS serrvers (Ie opendns, comododns etc...) but unless instructed by your ISP do not chanfge the other IP settings.
- Click next
- Enter you username and passwords here. do not enter 'Service Name (Optional)' because this can cause some issues with some providers.
- Click next
- Check the information
- Click finish
- 'Quick Start Wizard Setup OK!' will now appear
- Now wait 20 - 30 secs before checking the status on the dashobaorad as the router is restarting and then connecting to the internet etc....
- The setup is now done, the router will restart and that is it. I have gone through the setup so you know it is a simplea as it seems.
- Dial PPPoE / Drop PPPoe on the Online Status --> Physical Conenction Page now works
Links
- Draytek Vigor 2750 series. Connecting to BT Infinity. - YouTube
- Vigor Router FAQ - Vigor 2750 VDSL Setup with BT Infinity
- Draytek 2760N VDSL router working fine on plusnet fibre | Community Site
- Vigor Router FAQ - Vigor 2850 VDSL Setup with BT Infinity
- Replacing openreach modem with Draytek 2760 - BTCare Community Forums
- problems connecting with new draytek 2760 with fibre | Community Site
- VDSL2 Wireless FTTC on plusnet | Community Site
GApps installation, issues and solutions
Issues when installing GApps
Some times when you install GApps you get Google Play services errors or similar things. This is because of the following reasons
- Wrong gapps version
- You have used a too large package (not 100% on this)
- You already had a corrupt/damaged/incorrect version of gapps installed
- The system partition is too full. (use smaller GApps)
Solution
When you have issues with gapps the only way to fix it is to do the following (verified by me)
- Download the correct version of gapps that matches your android version. Select the slim version if you have less that 500mb /system/ partition. You might be able to install large packages but istalling the slim version will work. You can later install the larger version following these instruictions or if you like can start with the larger package but just be aware of this possible issue
- Copy over your CM ROM and GApps package to your SD Card on your phone
- Boot into recovery mode and I have CWM (clockworkmod)
- format /system/
- wipe /cache/
- wipe /dalvik-cache/ (in advanced options)
- install your CM ROM again via the install.zip
- install the correct gapps package via the install.zip
- reboot
- enter your Google Account data again
- you should now have a working Google Play
information for these instructions found here and expanded by me.
- http://forum.cyanogenmod.org/topic/95394-google-play-services-problem-wcm-11-20140608-snapshot-m7-epicmtd/#entry469927 by razorloves
- http://forum.cyanogenmod.org/topic/96328-google-play-services-stopped-build-11-20140627-help-please/#entry470938 – similar post by razorloves
** add websites where appropriate to my links directory
Notes
- small version is for 512mb system partition or less, i think 512mb is very close
- also make sure that the GApps package is the same as the installed version of android, those on cyanogenmod are not up to date and are possibly mislabelled
- You might be able to use a larger package, and you could probably do this by installing over, however if there are issues a wipe and re-install method as listed above is recommended.
- If you have faults with you google apps, you must system wipe an re-install, it is not likely you will fix anything by just uploading a new copy of GApps
- tried the 'small' GApps from download.cyanogemod.com for my version of android and i got errors.
- the package size of google Apps you choose is basically limited on your system partition size. However if uncertain install the slim verion and see if that works first.
Various errors that can happen with the wrong GApps installed:
- Crashing Play Store (also “no connection”)
- Crashing Browser/Hangouts/Play Service..
- Also, I was not able to register my google account anymore and it terminated with an error like “could not connect to the google servers”.
- Some of the error messages I encountered:
- “Unfortunately, Google Play Store has stopped”
- “Unfortunately, Google Play Services has stopped”
- “No connection” in Google Play Store
Links
- Samsung Galaxy SII I9100 – Cyanogenmod 11, correct gapps version – shows the issues you can have if you use the wrong gapps version
Setting “My Phone Number” (MSISDN)
When you change your sim card they do not always come with your phone number programmed and unless you know how to set this it can feel like dark magic.
Via Cyanogenmod 12
- Open the phone dialer
- Navigate to Settings/Calls/Additional settings/My Phone Number
- now enter you phone number and save.
You can now check your phone numebr has been set by going to settings/About Phone/Status/SIM Status/My Phone Number
Links
- How to add your mobile number to your phone - The giffgaff community- List of phones capable of manually entering the number correctly
- Setting “My Phone Number” (MSISDN) via Android | Random Nothings
Virgin Mobile Voicemail
Enable Voicemail Instructions
- Dial 222
- Listen to message
- Press 1 if prompted
- Listen to all of the message, if you dont the voicemail might not get activated
- Wait 20 mins
- Restart phone
or call Virgin on 789 via your mobile phone or 0345 454 1111
Notes
- The default pin is 7890
How to access Voicemail / Mailbox
- Press the voicemail button
- Press and hold the 1 button on the dial pad
- Dial 222
- In Android, pull the notification bar down and click the message
Example Virgin Voicemail number
Most voicemail numbers will be made using the same syntax
{Real Number} --> {Voicemail Number}
07747 123456 --> +440037747123456
To make the number (Assuming you are in the UK)
- Remove the 0 at the begining
- Prepend +44003
- Done
How to aquire the voicemail number from the handset
- Dial *#67# from the handset
- The following message is returned
Call forwarding
Voice: +440037747123456
FAX: +440037747123456
Sync: +440037747123456
Async: +440037747123456
- As you can see all of the numbers are the same
Adjust the number of rings before voicemail picks up
To adjust your no answer voicemail length dial the following from your phone:
**61*44xxxxxxxxxxxxx**30#
Where xxxxxxxxxxxxx is the full 13 digit number given to you for your voicemail box, 30 denotes 30 seconds.
Voicemail still not working
On you handset you will have some settings 'Call Divert' / 'Call Forwarding', these must be enabled and pointing to your Voicemail number.
These setting are retrieved from the network so can either be set by you or Virgin. It does not matter who sets them up as long aas your Voicemail is enabled.
Default setting when Virgin set my Voicemail
- Always forward - Not enabled, No number set
- Forwad when busy - Enabled, number set to the Voicemail Number
- Forward when unanswered - Enabled, number set to the Voicemail Number
- Forward when unreachable - Enabled, number set to the Voicemail Number
Links
Moving Layers from one PSD to Another PSD
OK, this is where im at. I'm trying to make a sig for a message board. What i have done. removed background from 4 different photos using erase tool in cs4. So in one psd i got 2 b-ball players with the bg gone then. In 2 other psd i have one b=ball player with backgrounds removed Now I want to take all that and put it together in a new background. I hope that makes scene, lol. Help please!!!!!!!
Solutions
- ok guys I just found the DUPLICATE option. So if anyone else needs to know this just open your Psd of layer u want to move and psd where u want it , right click on layer u want to move. Then DUPLICATE, at bottom of box click file name of psd. and poof it should be there
- Another (easier for me) way is to have both documents open and click and drag the layer from the layer pallet onto the other document. I believe, if you hold down shift while dragging, it auto centers the layer into the document as well.
Joomla Modal Boxes (Inbuilt and 3rd Party Extensions)
Joomla modals are tricky. There is inbuilt support for squeezebox modals in joomla, but instructions on how to use them are limited. I have explored the inbuilt support and also the major 3rd party modal extensions.
- All the 3rd party addons accept the use of links, internal and external, and so does Squeezebox
- Using links for modals rather than module is better because when you load modules in to the content, for this code to be used in a modal box, the code is copied into the modal box so you then get the issues of duplicate IDs, display of the code twice and some other issues. This is the case for Squeeze box but not verfied for the 3rd party extensions.
Creating Joomla Links (component/pages/articles)
This will be very handy whether you use an extension or Joomla's inbuilt library. I will outline how to get the non-sef links for use in your modal box code and some other link information. These links can be used by any of the methods outlined below.
Notes before Starting
- &tmpl=component - when added to the end of the called URL this removes most of the template from the Joomla page loaded but leaves the component alone. This is very useful and you will probably use it on most component links
- &tmpl=modal - when added to the end of the called URL this removes all of the template and CSS styling from the Joomla page loaded but leaves the basic component. This is a real parameter but I cannot find and further information on it.
- Linking to a component via Menu Item or directly is much better than loading a module in your code if you required interation
- The only difference between the Non-SEF link found in the Menu Items 'Details Tab' in the Joomla admin agaist that in the frontend is that the frontend Non-SEF URL will have the Menu Item ID added (i.e. &Itemid=167)
- iframe - Is most likely needed when using interactive forms so the data is submitted correctly and redirects happen as they should. You should remember that when you load module code into an article it becomes part of that page but the modal box is probably outside of the DOM and this can cause reference issues hence iframes. This is definately true when using Joomlashine Uniform, the forms will not work properly if you do not load using an iframe. To use an iframe you must use a link pointing to a page and therefore you cannot use a module for this.
Component URLs via Menu Items which can be configured in the Menu Item Config
This is very handy if you need a menu item to configure options and is also the qucikest way of creating a link. If you use a menu item for your link then you can have and use SEF URLs. Most menu items point to a component. These links might get indexed so you need to add exceptions to your site maps to prevent this.
- Create a menu item in a hidden menu (if you want it hidden), configure the options you want for that link and click save.
- Temporaily make the hidden menu visible and without Joomla's URL re-writing turned on in Global setings, browse to your newly created link and copy the URL. You can now use this link in your modal box link. When you turn URL rewriting back on the link in the menu and the modal box link will be parsed to a SEF URL and this will still work when you hide your hidden menu again.
- You can also use the link builders in most WYSIWYG to make a link to that menu item
Component Standalone URLs
These links will link to components but only have the options that are passed to it via the non-sef url. I think unless you add any rules to convert these links to SEF in a program shuch as SH404SEF then they will stay as NON-SEF. These links might get indexed so you need to add exceptions to your site maps to prevent this.
- Temporarily create a menu item to the item you want, configure the options you want for that link and click save.
- You can now copy the URL created on the 'Details Tab' labelled link in the menu item's admin page
or - Without Joomla's URL re-writing turned on in Global setings, browse to your newly created link and copy the URL. You can now use this link in your modal box link but you should removed the &Itemid=167 if present from the end of the URL as this is the reference to the menu item and it is not longer needed.
- You can now copy the URL created on the 'Details Tab' labelled link in the menu item's admin page
- Now you can delete the menu item. When you turn URL rewriting back on the link in the menu and the modal box link most likely will NOT be parsed to a SEF URL and will only keep the options that are set in the URL itself via GET.
Bootstrap Modal Library - Joomla Inbuilt Modal Boxes (J3.x+)
- This method for creating modals re-uses the code, it does not copy. What this means there is no duplicate code created with duplicate IDs that the browser must remove allowing for the full use of joomla modules that have unique IDs
This is now the prefered method to create modals in Joomla 3.x+ but requires Twitter Bootstrap Libraries. Most modern templates are based on Bootstrap in some fashion so have these libraries turned on. The implementation from what i can read is exactly the same as if you were working on a straing Bootstrap website.
Bootstrap Modals Examined without Joomla
It is probably helpful to look at Bootstrap modals without Joomla getting in the way as there are lots of examples already out there and as mention they called the same way.
Enable Bootstrap in Joomla
If your Joomla does not have bootstrap avaiable you need to do one of the following to enable it
- enable it in php
- enable it in your template by the config options
- install a Bootstrap template and use that
The bare minimum code to create a modal in Joomla
This assumes that Bootstrap is enabled.
<a href="#" class="btn" data-target="#myModal" data-toggle="modal">Launch First</a>

<div id="myModal" class="modal fade hide" tabindex="-1">
    Add your Payload here
</div>
Example - Load Joomla Standard Login Form in a Modal
The following example will get the Standard Joomla Login Module displayed in a modal box when a button is pressed. You can add in the missing parts of the modal template if you want or style with CSS as I have done.
- Enable Bootstrap (if not already)
- Create a Login Module and publish it with your required settings. Do not set a position.
- Open up any article and use the Module button to insert the Login Module loadmodule code. Do this by selecting the Login Module by name and NOT position. Copy this code for later if required.
- Make sure the loadmodule plugin is enabled. I do not know what it is called
- Create a Custom Module with Prepare Content enabled
- Insert the following code, changing [loadmodule mod_login,Login Form] if required
<!-- Button to trigger Bootstrap Modal Box -->
<p>
    <a href="#" class="btn" data-target="#myModal" data-toggle="modal">Launch First</a>
</p>

<!-- Bootstrap Modal Box Payload Container -->
<div id="myModal" class="modal fade hide" style="max-width: 300px; padding: 10px;" tabindex="-1">
    <button type="button" class="close" data-dismiss="modal" aria-hidden="true">×</button>
    [loadmodule mod_login,Login Form]
</div>
NB: Swap [] for {} - I changed this to prevent the login form getting rendered here - Publish to a position and all required pages, then save
- Done
Trigger from a menu (Optional)
- remove the button code and follow the instructions below to trigger from a Joomla Menu item
Trigger a Modal from a Joomla Menu Item
- data-toggle="modal" and other attributes cannot be added in joomla with it's GUI - you need to use javascript to add this attribute to the menu link (check this is an issue raised at joomla, j3.7 might have this)
- so to add a menu modal activation i will need to use javascript
- cannot add data-target="#myModal" data-toggle="modal" into a joomla menu item thorught he GUI, is phpmyadmin a way
Solutions
- edit menu item via phpMyAdmin
- use javascript to add attributes
Joomla Menu Link Title Attribute Hack
This currently only works when the menu is rendered through a gantry menu
This little hack allows you to inject custom attributes into a link without any code modifications and you can have it with or without a title. It causes a small validation issue on your link html but only if you go looking for it will you find any issue other than the browser has corrected it for you.
- Create an External URL menu item as normal with # as the target
- Edit the Link Title Attribute filed and add the following code (alter as needed)
Title Goes Here" data-target="#myModal" data-toggle="modal" "
Improved variations with no errors
This code is slightly modifed and does not cause any html errors. There are 2 x quotes removed which are duly addced back in by joomla when it parses this code. It might reduce compatability but I have nothing to test this againt
Custom Title" data-target="#myModal" data-toggle="modal
Notes
- Leave the spaces after the first " and before the last " this is intentional so there is no compatability issues with other things added to the link (i.e. concatenation)
- If you do not want a title just remove it and make sure there are no spaces at the begining
- There should be no space between the end of the title and the first " unless you want a space at the end of the Title
- This allows you to add any custom tags with or with a title
- This does add 1 set of empty "" at the end of the link statement but this will not cause any problems
- adding rel="nofollow" to joomla menu item - Joomla! - I got the solution from a Joomla user egonzalez . There are also instructions on what core code to edit if you really wanted to.
Add custom attributes by Javascript
I have not used this method but the principle is simple. Execute some Javascript that appends custom attributes onto the identified link.
Instructions
- Create an External URL menu item as normal with # as the target and a Link CSS Style of addModalAttributes
- add this code in your custom module that has your modal code
<script type="text/javascript">
   (function($){
        $(document).ready(function() {
            $('.addModalAttributes').attr('data-target', '#myModal');
            $('.addModalAttributes').attr('data-toggle', 'modal');
        });
    })(jQuery);
</script>
This will now usie javascript and add the missing attibutes to all elements that have the class addModalAttributes , I assume you will only have the one item with this class. You can always change the class if there are conflicts.
The complete code will look like
<script type="text/javascript">
   (function($){
        $(document).ready(function() {
            $('.addModalAttributes').attr('data-target', '#myModal');
            $('.addModalAttributes').attr('data-toggle', 'modal');
        });
    })(jQuery);
</script>

<div id="myModal" class="modal fade hide" style="max-width: 300px; padding: 10px;" tabindex="-1">
    <button type="button" class="close" data-dismiss="modal">×</button>
    [loadmodule mod_login,Login Form]
</div>
NB: swap [] for {}
Also you can use other selectors such as
$('.g-social > a:first').attr('data-target', '#myModal');
$('.g-social > a:first').attr('data-toggle', 'modal');
Links
- Bootstrap drop down menus - Joomla! - A Javascript solution to add the relevant attributes to a specified link
- javascript - Add custom attribute on Joomla menus - Stack Overflow
Edit Menu Item via phpMyAdmin
The menu item attributes are stored in the database @ #__menu --> params
The primary example used above generates this code.
{"menu-anchor_title":"Custom Title\" data-target=\"#myModal\" data-toggle=\"modal\" \"","menu-anchor_css":"","menu-anchor_rel":"","menu_image":"","menu_text":1,"menu_show":1}
This generates the following code:
Joomla menu
<a href="#" title="Custom Title" data-target="#myModal" data-toggle="modal" "" >Modal Test</a>
Gantry Menu
<a class="g-menu-item-container" href="#" title="Custom Title" data-target="#myModal" data-toggle="modal" "">
You can alter the code to remove the double quote issue, that code wold look like (Improved Variation). As you can see I have removed 2 x quotes. This generates the following code (your output might be slightly different)
{"menu-anchor_title":"Custom Title\" data-target=\"#myModal\" data-toggle=\"modal","menu-anchor_css":"","menu-anchor_rel":"","menu_image":"","menu_text":1,"menu_show":1}
This generates the following code:
Joomla Menu
<a href="#" title="Custom Title" data-target="#myModal" data-toggle="modal" >Modal Test</a>
Gantry Menu
<a class="g-menu-item-container" href="#" title="Custom Title" data-target="#myModal" data-toggle="modal">
Modal Menu Links
- [menu item modal field] Adds Create Menu Item button and other improvements (3.7.x branch) by andrepereiradasilva · Pull Request #11916 · joomla/joomla-cms · GitHub - Have then added create modal from within a Joomla menu
- Make the menu more accessible - Joomla! - A thread with the same issue i am addressing here
- Add attributes to Menu Item - Joomla! - A thread with the same issue i am addressing here
Bootstrap Modal Notes
- bootstrap uses a html template that can be styled with CSS inline or by a CSS file
- extra bootstrap templateing ie modal-header, modal-body, modal-footer are optional
- it is responsive by default
- The href="" call does not allow you to use external URLs. They do not work because of a same origin policy?
Bootstrap Modal Links
Joomla Implementations
- How use JHtml::_('bootstrap.modal') with remote source? · Issue #694 · joomla/joomla-cms · GitHub - I started here
- Modal Windows in Joomla! 3 | Joomla Tips | How-To - an indepth totorial on Bootstrap Modals in Joomla
- joomla 3.x - Right way to make a modal form - Joomla Stack Exchange - Good examples
- Seeking a Better Way to do Modals in Joomla 3.0.x - Array Web Development LLC - a tutorial
- jQuery and Bootstrap in Joomla 2.5 - This describes some of the library include methods for Bootstrap and others in joomla
- RSJoomla! Forum :: Topic: How to popup a form? (1/1) - some excellent code examples on implementing a Bootstrap Modal
- Bootstrap modal in joomla 3.1 - Stack Overflow - An example at the bottom showing you how to include parameters
- Modal Tools | Windwalker Joomla RAD - Some documentation on the Joomla Bootstrap Modals
Bootstrap Implementations
- Excellent Bootstrap Modal Code Example | Plunker - I recommend you look at this example
- Bootstrap Modal Plugin | w3schools - very clear descriptions
- Bootstrap Modal v4 | Official Documentation
- Bootstrap JavaScript Documentation (including Modals) | Official Documentation
- Bootstrap modal snippets | Bootply - Working Bootstrap Examples with HTML, CSS, JavaScript and jQuery
- Understanding Bootstrap Modals | SitePoint - In this tutorial we will be talking about one of the most useful jQuery Bootstrap plugins, The Modal.
- Twitter Bootstrap Modals Tutorial | w3resource.com - In this tutorial, it is discussed how to create Modal windows using Twitter Bootstrap with several examples and explanations. Besides defaults, it also discusses various options available for customization.
- Bootstrap Modal | FormGet - An easy to follow tutorial
- Bootstrap Modal Plugin | tutorialspoint - A tutorial on Boostrap Modals
Squeezebox - Joomla Inbuilt Modal Boxes (Legacy)
- When using Squeezebox: Browsers remove duplicate IDs, so if you use IDs in your source code (what you want in the modal), such as the login module, then when the code is copied by Squeezebox your browser will remove the duplicate IDs from the code in the modal windows and styling WILL be affect and possibly functionality if it depends on IDs. See Case study below.
Before starting it is important to know that you need to copy the following code into your php/Extension/Template to enable the modal library. Most people put this in the templates index.php, but this will load the library throught the site however is good for quick testing.
// Enable Squeezebox
JHTML::_('behavior.modal');
If you are using a suitable template, any from Joomlashine, there might be an option to turn this feature on in the template rather that manually adding the code yourself.
Extensions --> Templates --> [Your JSN Template] --> SEO & System Tab --> Enable SqueezeBox
When this library is enabled a CSS and javascript file are loaded into the header.
<link rel="stylesheet" href="/media/system/css/modal.css" type="text/css" />
<script src="/media/system/js/modal.js" type="text/javascript"></script>
The CSS might be overidden in your template if that is how it was designed but is not mandatory or you can make your own alterations if needed.
Simple Link Examples
Load an image in a modal box
<a href="http://www.example.com/images/myimage.jpg" class="modal">Click here to see my image</a>
This will display an image in a modal box when clicked. You can add other styling to it if needed i.e. Joomlashine link class or button class. You dont need to put it in an iFrame.
Load an image in a modal box of fixed size
<a href="http://www.example.com/images/myimage.jpg" rel="{size: {x: 200, y: 100}}" class="modal">Click here to see my image</a>
I have defined a fixed size for the modal box using the rel="{size: {x: 200, y: 100}}" - There are more switches you can use here.
Load a Module via a simple link
When a module has interaction you might find that it does not work as expected. The easiest way around this is to load the module in to an article/page and then load the page in to the modal box without any styling, this allows you to load any module and have it work correctly such as forms.
- Create a page
- Add the module via {loadmodule} plugin (or any other method you prefer) into that page
- Create a menu item for that page using the hidden page method (a menu that is not published to a module)
- Call the page via the pages URL and add the following on the end of the URL, &tmpl=component
You now have a working and interactive module in a modal box.
Initiate a Modal Box from a Menu Item
This can be used to use a menu item to open a modal box so you ar enot stuck to using a link in content. the methos is really easy.
- Get the ID of the modal div you want to load (i.e. #modal-login-form )
- Create a External URL menu item with the following:
- URL = #modal-login-form
- Link CSS Style = modal
- Make sure this link is present on the page with the modal and it will trigger it when clicked.
Split DOM (button and separate code block)
Create a modal box with standard content
- Add this code in your article where you want it. It does not really matter where you put this code because it will be hidden. Replace "Modal Content Here" with your content that you want in your modal which can be text or HTML, there are no restrictions except the standard Joomla ones. The id="testmodal" must be unique and you can have as many as you want so you can create multiple modal boxes on the same page. There is a wrapper DIV because you need to hide the code in the main page but the child code that is grabbed needs to be visible.
<div style="display: none;">
    <div id="testmodal">Modal Content Goes Here</div>
</div>
NB: The style="display: none;" hides the original code to prevent duplication and this is important because that the display:none is on a parent div other wise the content grabbed will be set to display:none
- Add the activator link/button making sure that href="#testmodal" matches the unique value of your modal code bloack that you want to activate.
<a href="#testmodal" class="modal">Testmodal Button</a>
- If you are adding this into a module you need to make sure you enable the "Prepare Content" option
- Done
Load a module in a modal box
To go one step further and load a module instead of code already in the content, you just need to load your module into the modal content block via a plugin.
Follow the instructions above but replace the inner line of the modal code block
<div id="testmodal">Modal Content Goes Here</div>
with any of the following or similiar plugin calls:
<div id="testmodal">[loadposition]</div>
<div id="testmodal">[loadmodule]</div>
<div id="testmodal">[module Some module]</div>
<div id="testmodal">[module 27]</div>
<div id="testmodal">[modulepos position-7]</div>

NB: Swap [] for {} - I used brackets instead of curly braces so Joomla did not parse the demo text.
Enforce an Iframe
<a href="http://www.example.com/images/myimage.jpg" rel="{handler:'iframe'}" class="modal">Click here to see my image</a>
or
<a href="#testmodal" rel="{handler:'iframe'}" class="modal">Testmodal Button</a>
Adding rel="{handler:'iframe'}" to the activator/button code enforces an iframe. Squeezebox usually can intelligently select this but sometimes needs a hand.
Close the Squeezebox
The modal box in Joomla is usually rendered with a close button at the top right but if you want to create your own close button in the content, then use the following javascript code in your content.
<!-- Close the Squeezebox using Text -->
<a href="#" onclick="window.parent.SqueezeBox.close()">Close Modal></a>

<!-- Close the Squeezebox using an image -->
<a href="#" onclick="window.parent.SqueezeBox.close()"><img src="/images/modules/enter-website-button.jpg" alt="" /></a>

<!-- Close the Squeezebox using a cross from Font Awesome -->
<a href="#" onclick="window.parent.SqueezeBox.close()"><img src="/images/modules/enter-website-button.jpg" alt="" /></a>
You can see the onclick="window.parent.SqueezeBox.close() , this says to the parent close its child modal.
Other modal box close codes
I have not tried these variations:
<a href="javascript:splashpage.closeit()">link</a>

<a href="#" onclick="window.parent.splashpage.closeit();return false;">link</a>

<a href="#" onclick="window.parent.splashpage.closeit();"><img alt="" src="/images/modules/enter-website-button.jpg" /></a>

<a href="#" onclick="window.parent.SqueezeBox.closeit();"><img alt="" src="/images/modules/enter-website-button.jpg" /></a>
These definitely work:
parent.SqueezeBox.close();
windows.parent.SqueezeBox.close();

parent.jModalClose();
window.parent.jModalClose();
Squeezebox - CSS Styling is missing (Case Study)
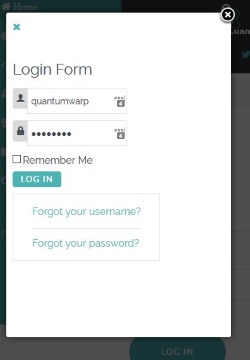
This baffled me for a while so I will just show you a quick case of when I wanted to display the Login Module in a modal and all of the styling was missing.
In the modal box with no styling / How it should look
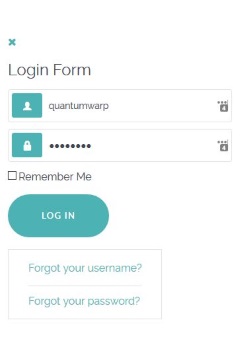
Scenario
I want to display the native Joomla Login Module in a Squeezebox Modal Box.
Cause
- The reason the modal login form is not styled is because the form is missing id="login-form" in the modal. Adding it via Firebug makes the form look correct but it is not a permanent solution.
- When code is copied from the donour location by Squeezebox (it is not re-used) and then rendered by the browser, the browser strips the second instance of id="login-form" from the code in the modal code to keep the IDs unique.
- The removal of the ID causes the styling not to work (I was using Gantry5 with the Helium Template). This will most likely be the same for a lot of modules that employe IDs for reference in the CSS.
Solution
- Use CSS classes and not IDs
- Possibly use Bootstrap Modal code instead of Squeezebox
- Use Modal Extensions mentioned here
- Use a Login Module that has been prebuilt to appear in a Modal (from https://extensions.joomla.org/ )
- Alter the modal wrapper and the get the login form CSS from the main template and alter it so it works.
- search the template CSS files for all instances of #login-form and copy the code into 1 file
/* Gantry Login Form CSS */ /* Taken from /templates/g5_helium/custom/css-compiled/helium-joomla_13.css */ /* line 1, templates/g5_helium/scss/helium-joomla/styles/_core.scss */ .edit.item-page .btn-toolbar .btn, .pager.pagenav a, .moduletable #login-form .control-group .btn, p.readmore .btn, .contact .form-actions .btn, #contact-form .controls .btn-primary.validate, .profile .btn, .login .btn, .logout .btn, .registration .btn, .profile-edit .btn, .remind .btn, .reset .btn, .search #searchForm .btn, .finder #searchForm .btn, .search #search-form .btn, .finder #search-form .btn { display: inline-block; font-family: "Lato", "Helvetica", "Tahoma", "Geneva", "Arial", sans-serif; font-weight: 600; font-size: 0.8rem; line-height: 1.15; letter-spacing: 0.1rem; text-transform: uppercase; background: #4db2b3; color: #fff; border: 1px solid transparent; border-radius: 2.5rem; margin: 0 0 0.5rem 0; padding: 1.5rem 3.125rem; vertical-align: middle; text-shadow: none; -webkit-transition: all 0.2s; -moz-transition: all 0.2s; transition: all 0.2s; } /* line 19, templates/g5_helium/scss/helium-joomla/styles/_core.scss */ .edit.item-page .btn-toolbar .btn:hover, .pager.pagenav a:hover, .moduletable #login-form .control-group .btn:hover, p.readmore .btn:hover, .contact .form-actions .btn:hover, #contact-form .controls .btn-primary.validate:hover, .profile .btn:hover, .login .btn:hover, .logout .btn:hover, .registration .btn:hover, .profile-edit .btn:hover, .remind .btn:hover, .reset .btn:hover, .search #searchForm .btn:hover, .finder #searchForm .btn:hover, .search #search-form .btn:hover, .finder #search-form .btn:hover, .edit.item-page .btn-toolbar .btn:active, .pager.pagenav a:active, .moduletable #login-form .control-group .btn:active, p.readmore .btn:active, .contact .form-actions .btn:active, #contact-form .controls .btn-primary.validate:active, .profile .btn:active, .login .btn:active, .logout .btn:active, .registration .btn:active, .profile-edit .btn:active, .remind .btn:active, .reset .btn:active, .search #searchForm .btn:active, .finder #searchForm .btn:active, .search #search-form .btn:active, .finder #search-form .btn:active, .edit.item-page .btn-toolbar .btn:focus, .pager.pagenav a:focus, .moduletable #login-form .control-group .btn:focus, p.readmore .btn:focus, .contact .form-actions .btn:focus, #contact-form .controls .btn-primary.validate:focus, .profile .btn:focus, .login .btn:focus, .logout .btn:focus, .registration .btn:focus, .profile-edit .btn:focus, .remind .btn:focus, .reset .btn:focus, .search #searchForm .btn:focus, .finder #searchForm .btn:focus, .search #search-form .btn:focus, .finder #search-form .btn:focus { background: #3d8f90; color: #fff; } /* line 101, templates/g5_helium/scss/helium-joomla/styles/_modules.scss */ /* line 102, templates/g5_helium/scss/helium-joomla/styles/_modules.scss */ .moduletable #login-form .control-group { margin-bottom: 10px; } /* line 105, templates/g5_helium/scss/helium-joomla/styles/_modules.scss */ /* line 106, templates/g5_helium/scss/helium-joomla/styles/_modules.scss */ .moduletable #login-form .control-group .input-prepend .add-on { color: #fff; background: none; padding: 5px; } /* line 111, templates/g5_helium/scss/helium-joomla/styles/_modules.scss */ .moduletable #login-form .control-group .input-prepend .add-on [class^="icon-"], .moduletable #login-form .control-group .input-prepend .add-on [class*=" icon-"] { width: auto; background: #4db2b3; padding: 0.45rem 1rem; border-radius: 3px; } /* line 119, templates/g5_helium/scss/helium-joomla/styles/_modules.scss */ .moduletable #login-form .control-group .input-prepend input { border-left: none; } /* line 122, templates/g5_helium/scss/helium-joomla/styles/_modules.scss */ .moduletable #login-form .control-group .input-prepend input:hover { border-color: #e0e0e5; } /* line 126, templates/g5_helium/scss/helium-joomla/styles/_modules.scss */ .moduletable #login-form .control-group .input-prepend input:focus { box-shadow: none; border-color: #e0e0e5; } /* line 130, templates/g5_helium/scss/helium-joomla/styles/_forms.scss */ #login-form .input-prepend .input-small, #login-form .input-append .input-small { width: 80%; } /* line 135, templates/g5_helium/scss/helium-joomla/styles/_forms.scss */ #login-form #modlgn-secretkey { width: 65%; } - in the new code remove all instances of #login-form
- on the begining of each CSS reference add the class .modal-login-form
- add another div into your modal wrapper with the class .modal-login-form
- Should give something like
<!-- Login Form Modal Wrapper -->
<div style="display: none;">
    <div id="login-modal">
        <div class="modal-login-form">
            [loadmodule mod_login,Login Form]
        </div>
    </div>
</div>
NB: {} swapped for [] to prevent Joomla rendering the Login Module here
- Make sure the Joomla Module loading plugin is enabled
- Add this code to a custom module and publish
- search the template CSS files for all instances of #login-form and copy the code into 1 file
Joomlashine Uniform in a Modal Box (Squeezebox Example)
- To get a form to work properly in a modal box you must load the form via a component URL and in an iframe. You must also make sure you append the &tmpl=component to the end of the url to remove all the unwanted template. Use the notes above to get the appropriate URL for your form.
- If you dont load the form via a component URL in an iframe you will get some of the following errors:
- Email gets sent on clicking the submit button but the whole page redirects to a white page
- Only the Submit button appears but with no fields
Uniform Component Form example URL
index.php?option=com_uniform&view=form&form_id=2&show_form_title=0&show_form_description=0
This is what a basic link that you have aquired out of the Menu Item config page
index.php?option=com_uniform&view=form&form_id=2&show_form_title=0&show_form_description=0&Itemid=207
Here you can see the addition of the &Itemid=207 showing that you are linnking to a menu item, which of course is optional.
Uniform Joomla Squeezebox Component Form example URL
<a h ref="index.php?option=com_uniform&view=form&form_id=2&show_form_title=0&show_form_description=0&Itemid=207&tmpl=component" rel="{handler:'iframe'}" class="modal">Uniform Modal Link</a>
- In this example you can see i have added rel="{handler:'iframe'}" which forces the modal to load the code in an iFrame and that it is linked to an actual menu item. You can just delete &Itemid=207 which will remove the link to the Menu Item if required.
- The link above gets altered by Joomla parsing the links so change h ref (notice the space) to href if you want the full link
Uniform RokBox Component Form example URL
<a h ref="index.php?option=com_uniform&view=form&form_id=2&show_form_title=0&show_form_description=0&Itemid=207&tmpl=component" data-rokbox="">Uniform Modal Link</a>
- You can just delete &Itemid=207 which will remove the link to the Menu Item if required
- The link above gets altered by Joomla parsing the links so change h ref (notice the space) to href if you want the full link
Uniform NoNumber Component Form example URL
[modal index.php?option=com_uniform&view=form&form_id=2&show_form_title=0&show_form_description=0&Itemid=207&tmpl=component|iframe=true]Uniform Modal Link[/modal]

NB: Swap [] for {} - I used brackets instead of curly braces so Joomla did not parse the demo text.
- You can just delete &Itemid=207 which will remove the link to the Menu Item if required
Uniform Links
- NoNumber Forum - No modal window with Uniform - tells you that using an iframe allows Uniform to work
- JoomlaShine Support Forum: JSN Uniform in Popup (2/2) - this gives the code Joomlashine have used in a modal box. This does load a whole apge though but adding a &tmpl=component would fix this
Squeezebox Notes
- The modal box will fill out appropriately to the screen size but when it is opened it is a fixed size whether you define it or not. You can use JQuery to make the modal box completely dynamic but is little more involved. So for most responsive platforms this will be ok because most people do not go and resize their screen to try and break responsive websites.
- Might be better picking a position you already have modules already present (in gantry and other templates) otherwise this hidden code can cause a position or section to be displayed and appear to have no content.
- There seems also to be a maximum size set for the different screen sizes. This might be tempalte specific
- Creates scroll bars because there is a maximum height set somewhere
- The link seems to float to the top of the page when you go to mobile browser width. This might be an issue with my template and can fixed with CSS
- Fixing the modal button/link going out of position in smaller browser widths. This is cause by line 14 in bootstrap-responsive-frontend.min.css
- JoomlaShine Support Forum: Modalbox in module-postion (1/3) - this thread gives a solution to the modal box button going out of position. This works
@media (max-width: 767px) { .modal { position: inherit !important; } } - My solution
.modal {
	position: relative;
	top: intial;
	left: intial;
	right: intial;
	width: intial;
	margin: 0px;
}
this is also probably valid
.modal {
	position: relative;
	top: 0px;
	left: 0px;
	right: 0px;
	width: intial;
	margin: 0px;
}
- JoomlaShine Support Forum: Modalbox in module-postion (1/3) - this thread gives a solution to the modal box button going out of position. This works
Squeezebox Links
- SqueezeBox - Expandable Lightbox » digitarald:Harald Kirschner - The homepage of the library used in Joomla
- Creating a modal form field - Joomla! Documentation - This tutorial will demonstrate how to create a custom form field that will open a list view in a modal window for the selection of a single item (similar to the Select Article modal in com_content). In this case, the form field will be added to the default.xml of a view so that the field/value pair will be added to the menu item URL. For our example, assume we have a component named com_library, which includes views for "books" and "book".
- Using Modal Windows With Joomla | Spiral Scripts - This article shows you how to use the inbuilt modal code and seems to cover everything you need to know.
- Putting module in modal box Joomla - Stack Overflow - A great little trick showing how to use this method to load modules
- Joomla! • View topic - Using the modal popup box - Forum thread on how to use a modal popup box
- Open content in a modal pop-up in Joomla | Jeepstone - A short and well written article on how to use JHTML::_('behavior.modal');
- Joomla Modal Pop Up | Jextension - a how to
- Make the Joomla Modal Popup Responsive - The Techjoomla Blog - how to use JQuery to make the modal box fully responsive
- Joomla! • View topic - Opening a SqueezeBox iframe with javascript? - a forum thread on this topic
- How to use modal box in Joomla | Joomla! developer
- joomla1.5 - how to use JHTML::_('behavior.modal') in Joomla? - Stack Overflow
- Joomla Squeezebox Modal | Joomla Lightbox - A nice turorial which includes information and examples on how to close the modal window.
- Joomla JHtml Behavior.Modal to apply on sliding side bar - www.scriptscoop.net
3rd Party Modal Extensions
- Joomla Inbuilt Modal - Squeezebox - This is an inbuilt feature/library of Joomla and can be enabled in Joomlashine Templates easily.
- RokBox - Joomla! Extension Directory - RokBox is a fully responsive modal "pop-up" plug-in for the Joomla CMS. This very popular extension can showcase many different media formats such as images, videos, music, embedded widgets, Ajax content, and Joomla modules, all from a three-dimensional display. It also takes advantage of new technologies such as HTML5/CSS3. Fully feature modal extension with an editor button and nice animations.
- NoNumber Modals - Joomla! Extension Directory - Free and Pro versions available. The free version is excellent and this extension allows you to directly convert any menu item into a modal box by adding [modal] tags in the menu's item name
- JoomlaXTC Modal Box - Joomla! Extension Directory - Create light box links with this simple Modal Box plugin. This plugin replaces your normal a href call with the modal call to open the content with a mootools lightbox effect.
- Any Module Modal Box | Webkul - Joomla! Extension Directory - This is a paid module that simple allows you to load a module via a {tag} in your articles or modules.
- JCE MediaBox - Joomla! Extension Directory - This is a JCE Editor extensionand is made up of 2 parts. The first part is the extra functionality it adds to the editor, when creating links there is an extra Tab called Modal/Pop-UP where you can configure your modal options and then upon save adds the correct syntax to your content. It has lots of options and supports YouTube. The second paet of the extension is a Joomla system plugin to parse the code and create the Modals
Modal Splash Extensions
- NoNumber Modals - Joomla! Extension Directory - Only the Pro supports the splash screen
- SplashR | RicheyWeb - I have a modified version of this and it just works.
- JH Splash Screen - Joomla! Extension Directory
RokBox Extension
Simple Link
With Rokox you get an editor button that can perform most of the link building for you. You can either just highlight the code in the editor and press the RokBox Editor button or you can create a link from scratch by just clicking the RokBox editor button. Only the link field is mandatory in the RokBok link builder button but if creating a link from scratch it is probably wise to fill in the content title other wise it uses the details from the link field.
The modal box will fill out appropriately to the screen size and is completely responsive unless you set a fixed size.
Load an image in a modal box
<a href="http://www.example.com/images/myimage.jpg" data-rokbox="">Click here to see my image</a>
This will display an image in a modal box when clicked. You can add other styling to it if needed i.e. Joomlashine link class or button class. You dont need to put it in an iFrame.
Load an image in a modal box of fixed size
<a href="http://www.example.com/images/myimage.jpg" data-rokbox="" data-rokbox-size="210 213">Click here to see my image</a>
I have defined a fixed size for the modal box using the data-rokbox-size="210 213" where 210 is the width and 313 is the height of the popup image. You can alternatively use data-rokbox-size="210 100%" as this will enable automatic height for a box 210px wide. you can also use percentages.
There are more switches you can use here.
Split DOM (button and seperate code block)
When using the DOM method you need to configure the code you want to be turned in to a modal box and also define a link/href after this code that will act as an activation button. Rokbox for some reason clones the code and uses this in the modal box which can causes several issues, duplication of unique values, incorrect DOM referneces, duplication of code on the page, styling issues, page redirection etc... If you want to load a module into an article and then have it become a modal box you need to load it with your prefered in-content loading plugin and then surround it's {tags} with a unique DIV so that you can reference it in the button/href activator for the modal box. Rokbox does not seem to offer a direct module loading ability. The modal code block and the activate button/href are seperate on purpose so that the button comes after the code. The modal code block is converted when the href/link is parsed. Using this method also allows the [loadposition], [loadmodule] etc.. tags to be converted into real code before the modal boc is created. Rokbox is responsive.
Create a modal box with standard content
- Add this code in your article where you want it. It does not really matter where you put this code because it will be hidden. Replace "Modal Content Here" with your content that you want in your modal which can be text or HTML, there are no restrictions except the standard Joomla ones. The id="testmodal" must be unique and you can have as many as you want so you can create multiple modal boxes on the same page.
<div id="testmodal" style="display: none;">Modal Content Goes Here</div>
NB: The style="display: none;" hides the original code to prevent duplication
- Add the activator link/button making sure that data-rokbox-element="#testmodal" matches the unique value of your modal code bloack that you want to activate.
<a href="#" data-rokbox="" data-rokbox-element="#testmodal">Testmodal Button</a>
- If you are adding this into a module you need to make sure you enable the "Prepare Content" option
- Done
Load a module in a modal box
To go one step further and load a module instead of code already in the content, you just need to load your module into the modal content block via a plugin.
Follow the instructions above but replace the modal code block
<div id="testmodal" style="display: none;">Modal Content Goes Here</div>
with any of the following or similiar plugin calls:
<div id="testmodal" style="display: none;">[loadposition]</div>
<div id="testmodal" style="display: none;">[loadmodule]</div>
<div id="testmodal" style="display: none;">[module Some module]</div>
<div id="testmodal" style="display: none;">[module 27]</div>
<div id="testmodal" style="display: none;">[modulepos position-7]</div>

NB: Swap [] for {} - I used brackets instead of curly braces so Joomla did not parse the demo text.
Enforce an Iframe
Thre are no particular switches that enforces and iframe, RokBox automatically selects it if required.
RokBox Links
- RokBox Docs | RocketTheme - Documentation
- How to Use the Popup Module Feature | RocketTheme Documentation
- RokBox Examples | RocketTheme
NoNumber Modals
There are Free and Pro flavours but for for most people the Free version will be fine. NoNumber Modals is also feature rich, not only does it do standard modal things but:
- Open menu items in modals- This is a cool little feature where you can surroung the mneu item's title (in the menu item config) with these tags and the extension will convert the menu item's output directly to a modal box.
- Youtube - can easy modal youtube videos
- Quick link to an article - no hassle enclose a joomla article in a modal box
- Auto Galleries and Slideshows - what it says
- Splash Pages - Open modal on pageload
- Convert Classes - you can specify classes to convert into modal links which allows the conversion of squeezebox links that you might have already used. There are some limitations with this.
Simple Link
Load an image in a modal box
[modal http://www.example.com/images/myimage.jpg]Click here to see my image[/modal]

NB: Swap [] for {} - I used brackets instead of curly braces so Joomla did not parse the demo text.
This will display an image in a modal box when clicked. You can add other styling to it if needed i.e. Joomlashine link class or button class. You dont need to put it in an iFrame.
Load an image in a modal box of fixed size
[modal http://www.example.com/images/myimage.jpg|width=200|height=100]Click here to see my image[/modal]

NB: Swap [] for {} - I used brackets instead of curly braces so Joomla did not parse the demo text.
I have defined a fixed size for the modal box using the |width=200|height=100 you can also use percentages.
There are more switches you can use here.
Split DOM (button and seperate code block) - Untested
Using NoNumbers for inline content and loading modules is a bit more akward than other methods to get working but is not difficult. i need to test with code and a module.
Create a modal box with standard content
- Add this code in your article where you want it. Replace "...Modal Content Here..." with your content that you want in your modal which can be text or HTML, there are no restrictions except the standard Joomla ones. {test this}
[modal content=testmodal]Testmodal Button[/modal]

[modalcontent testmodal]
...Modal Content Goes Here...
[/modalcontent]

NB: The style="display: none;" hides the original code to prevent duplication
- If you are adding this into a module you need to make sure you enable the "Prepare Content" option
- Done
Load a module in a modal box
To go one step further and load a module instead of code already in the content, you just need to load your module into the modal content block via a plugin.
Follow the instructions above but replace the modal code block
[modal content=testmodal]Testmodal Button[/modal]
with any of the following or similiar plugin calls:
[modal content=testmodal][loadposition][/modal]
[modal content=testmodal][loadmodule][/modal]
[modal content=testmodal][module Some module][/modal]
[modal content=testmodal][module 27][/modal]
[modal content=testmodal][modulepos position-7][/modal]

NB: Swap [] for {} - I used brackets instead of curly braces so Joomla did not parse the demo text.
Enforce an Iframe
[modal http://www.example.com/images/myimage.jpg|iframe=true]Click here to see my image[/modal]
or
[modal content=testmodal|iframe=true]This gets replaced with the content block testmodal[/modal]
Adding to the button code |iframe=true enforces an iframe. All external URLs are rendered in iframes by default.
NoNumber Notes
- |title=My Modal Title - this sets a heading of the modal window that opens. replace My Modal Title for whatever you wnat for the title
- inteligently applys &tmpl=component for internal links
- when you have finished resizing your window, the modal box will then resize itself to fit again rather than as you go.
NoNumber Links
- Create Lightboxes in Joomla with Modals using NoNumber Modal extension
- NoNumber Forum - No modal window with Uniform - Tell you that using iframe=1 fixes loading Uniform correctly
Useful CSS
I do not know if this fixes anything but it is here just incase
/* Correct Modal Positioning */
@media (max-width: 767px) {
    .modal { position: inherit !important; }
}