Items filtered by date: December 2015
My Keep a Changelog Notes
These are my note for Keep a Changelog
Version Number Links
The links on the version number [1.0.0] will not work unless they have the corresponding link below i.e.
[Unreleased]: https://github.com/olivierlacan/keep-a-changelog/compare/v1.0.0...HEAD
[1.0.0]: https://github.com/olivierlacan/keep-a-changelog/compare/v0.3.0...v1.0.0
[0.3.0]: https://github.com/olivierlacan/keep-a-changelog/compare/v0.2.0...v0.3.0
Blockquote
Centered Blockquotes
Option 1
This is an example blockquote.
<div style="text-align: center;">
    <blockquote style="display: inline-block; width: 200px;">This is an example blockquote.</blockquote>
</div>
Option 2
This is an example blockquote.
<div style="text-align: center;">
    <blockquote style="display: inline-block; max-width: 450px;">
        <p>This is an example blockquote.</p>
    </blockquote>
</div>
Option 3
This is an example blockquote.
<blockquote style="display: table; max-width: 450px; margin: 0 auto;">This is an example blockquote.</blockquote>
Notes
These width settings work aswell:
- width: 50%
- max-width: 450px;
Links
Divi - Basic client usage instructions
These ar the absolute basic instructions I give out to client who insist on editing their website.
Hi Client,
Here are the details for editing the website.
- URL: http://www.example.com/
- Admin URL: http://www.example.com/admin
- User Name: the-user
- Password: xxxxxxxxxxxxxx
Your website is powered by WordPress that uses the Divi builder by elegant themes.
Help Sources
- youtube.com
- https://www.elegantthemes.com/documentation/divi/
- https://www.youtube.com/channel/UCuasRuWliU48RwnKXf9GesA - Divi YouTube channel
How to get to a page and edit it (quick start)
- Use Google Chrome browser
- Login to the admin section with the details above
- Open up a new tab and navigate to the page in question
- Click on enable visual builder
- You can now drag, drop and edit the page
- To save the page
- At the bottom there is a ball with 3 dots in it, click it
- Then click on the save button that has appeared
- Now exit the visual builder by clicking the button at the top ‘exit visual builder’
- You can now navigate to another page and repeat the process
- Done
- Now logout
Thanks
QuantumWarp
Responsive Menu Layout
This is a standard menu layout that ustilises the Joomlashine framework for its fluid structure but could easily be adapted to bootstrap.
Demo
This will not look right because the columns are not fluid due to theri being no JSN Framework installed, but it will give you an idea.
The Example Menu
Starters
This is a tag line
| Soup of the day Served with a roll and butter |
£4.25 |
| Prawn Cocktail Greenland prawns on a bed of crisp lettuce and topped with a marie rose sauce |
£4.95 |
| Ardennes Pate Served with a salad garnie & toast |
£5.75 |
Main Course
Steaks from the Grill
Cooked to your liking
| 8 oz Rib-Eye Steak | £14.95 |
| Steak sauce Pepper - a cracked black peppercorn sauce Creamy Stilton Sauce |
£2.25 |
| Gammon Steak with Pineapple & egg | Large Small |
Fish
This is a tag line
| Breaded Golden Scampi & Chips | Large Small |
| Fresh Fish & Chips Peas/Salad | Large Small |
Vegetarian
This is a tag line
| Vegetarian Lasagne Served with Slices of garlic bread topped with grilled mozzarella chees |
£8.25 |
| Vegetable Curry. Served with Boiled rice or 1/2 & 1/2 Curry’s served with a puppodum |
£8.25 |
English
Main courses served with a choice of potatoes and vegetables
| Roast Beef & Yorkshire pudding | £8.95 |
| Steak and Ale Pie | £8.75 |
| Cumberland Sausages & onion gravy | £8.25 |
| Beef Burger and Chips Served with a salad garnish and a salsa dip |
£6.95 |
| Cheeseburger and Chips Served with a salad garnish and a salsa dip |
£7.25 |
| Bacon Cheeseburger and Chips Served with a salad garnish and a salsa dip |
£7.75 |
| 3 Sausages Chips and beans | £5.50 |
| 2 Sausages 2 Bacon Chips and beans | £5.80 |
If you have any allergy requirements ask to speak to the chef.
All our meals are cooked to order so during busy times there may be a wait, this is because everything is as fresh as possible and has been sourced locally where possible.
Continental
This is a tag line
| Lasagne Classico (Meat) Served with Salad & garlic bread |
£9.25 |
| Chilli and Rice or Chips | £8.75 |
| Chicken Tikka Masala (Medium/Hot) | £9.25 |
| Beef Madras (Hot) | £9.25 |
Main courses served with Boiled rice or 1/2 & 1/2
Curry’s served with a puppodum
Salads
This is a tag line
| Home Roast Ham Salad | £7.25 |
| Breast of Chicken Salad | £7.25 |
| Roast Beef Salad | £7.25 |
| Tuna and Prawn Salad | £7.65 |
Jacket Potatoes
Served with a salad garnish and coleslaw
| Chilli | £7.25 |
| Prawn & Tuna | £7.75 |
| Ham, Pineapple and Cheese | £7.25 |
| Cheese and Pineapple | £6.95 |
| Cheese and Beans | £6.95 |
Side Orders
This is a tag line
| Chips | £2.50 |
| Side Salad | £2.25 |
| Onion rings | £2.50 |
| Deli roll and butter | £1.40 |
| Garlic Bread with Cheese | £4.25 |
| Egg | £0.95 |
Soup of the day and a sandwich on brown or white bread served with a salad garnish & coleslaw..£5.00 *
Sandwichs
On brown or white bread
Served with a salad & coleslaw
| Home Cooked Gammon Ham | £4.25 |
| Roast Topside of Beef | £4.25 |
| Breast of Chicken | £4.25 |
| Tuna | £4.25 |
| Cheese and Tomato or Onion or Branston | £4.25 |
| Prawn | £4.50 |
If you have any allergy requirements ask to speak to the chef.
All our meals are cooked to order so during busy times there may be a wait, this is because everything is as fresh as possible and has been sourced locally where possible.
Code
<h1>The Example Menu</h1>

<div class="grid-layout">
<div>

    <h2 style="margin-top: 20px;">Starters</h2>

    <p><span style="font-size: 14pt; color: #878887;">This is a tag line</span></p>

    <table border="0" cellspacing="0" cellpadding="10">
        <colgroup>
            <col style="width: 300px; height: 16.4pt;" valign="top">
            <col style="width: 40px; height: 16.4pt;" valign="top">
        </colgroup>
        <tbody>
            <tr style="height: 30px;">
                <td><strong>Soup of the day</strong><br>Served with a roll and butter</td>
                <td><strong>£4.25</strong></td>
            </tr>
            <tr style="height: 30px;">
                <td><strong>Prawn Cocktail</strong><br>Greenland prawns on a bed of crisp lettuce and topped with a marie rose sauce</td>
                <td><strong>£4.95</strong></td>
            </tr>
            <tr style="height: 30px;">
                <td><strong>Ardennes Pate</strong><br>Served with a salad garnie & toast</td>
                <td><strong>£5.75</strong></td>
            </tr>
        </tbody>
    </table>

    <h2 style="margin-top: 20px;">Main Course</h2>

    <p><span style="font-size: 14pt; color: #878887;">Steaks from the Grill<br>Cooked to your liking</span></p>

    <table border="0" cellspacing="0" cellpadding="10">
        <colgroup>
            <col style="width: 300px; height: 16.4pt;" valign="top">
            <col style="width: 40px; height: 16.4pt;" valign="top">
        </colgroup>
        <tbody>
            <tr style="height: 30px;">
                <td><strong>8 oz Rib-Eye Steak</strong></td>
                <td><strong>£14.95</strong></td>
            </tr>
            <tr style="height: 30px;">
                <td><strong>Steak sauce</strong><br><strong>Pepper</strong> - a cracked black peppercorn sauce<br><strong>Creamy Stilton Sauce</strong></td>
                <td><strong>£2.25</strong></td>
            </tr>
            <tr style="height: 30px;">
                <td><strong>Gammon Steak with Pineapple & egg</strong></td>
                <td><p><strong>Large<br>£11.95</strong></p><p><strong>Small<br>£6.95</strong></td>
            </tr>
        </tbody>
    </table>

    <h2 style="margin-top: 20px;">Fish</h2>

    <p><span style="font-size: 14pt; color: #878887;">This is a tag line</span></p>

    <table border="0" cellspacing="0" cellpadding="10">
        <colgroup>
            <col style="width: 300px; height: 16.4pt;" valign="top">
            <col style="width: 40px; height: 16.4pt;" valign="top">
        </colgroup>
        <tbody>
            <tr style="height: 30px;">
                <td><strong>Breaded Golden Scampi & Chips</strong></td>
                <td><p><strong>Large<br>£9.25</strong></p><p><strong>Small<br>£5.75</strong></td>
            </tr>
            <tr style="height: 30px;">
                <td><strong>Fresh Fish & Chips Peas/Salad</strong></td>
                <td><p><strong>Large<br>£9.25</strong></p><p><strong>Small<br>£5.75</strong></td>
            </tr>
        </tbody>
    </table>

</div>
<div>

    <h2 style="margin-top: 20px;">Vegetarian</h2>

    <p><span style="font-size: 14pt; color: #878887;">This is a tag line</span></p>

    <table border="0" cellspacing="0" cellpadding="10">
        <colgroup>
            <col style="width: 300px; height: 16.4pt;" valign="top">
            <col style="width: 40px; height: 16.4pt;" valign="top">
        </colgroup>
        <tbody>
            <tr style="height: 30px;">
                <td><strong>Vegetarian Lasagne</strong><br>Served with Slices of garlic bread topped with grilled mozzarella chees</td>
                <td><strong>£8.25</strong></td>
            </tr>
            <tr style="height: 30px;">
                <td><strong>Vegetable Curry.</strong><br>Served with Boiled rice or 1/2 & 1/2<br>Curry’s served with a puppodum</td>
                <td><strong>£8.25</strong></td>
            </tr>
        </tbody>
    </table>

    <h2 style="margin-top: 20px;">English</h2>

    <p><span style="font-size: 14pt; color: #878887;">Main courses served with a choice of potatoes and vegetables</span></p>

    <table border="0" cellspacing="0" cellpadding="10">
        <colgroup>
            <col style="width: 300px; height: 16.4pt;" valign="top">
            <col style="width: 40px; height: 16.4pt;" valign="top">
        </colgroup>
        <tbody>
            <tr style="height: 30px;">
                <td><strong>Roast Beef & Yorkshire pudding</strong></td>
                <td><strong>£8.95</strong></td>
            </tr>
            <tr style="height: 30px;">
                <td><strong>Steak and Ale Pie</strong></td>
                <td><strong>£8.75</strong></td>
            </tr>
            <tr style="height: 30px;">
                <td><strong>Cumberland Sausages & onion gravy</strong></td>
                <td><strong>£8.25</strong></td>
            </tr>
            <tr style="height: 30px;">
                <td><strong>Beef Burger and Chips</strong><br>Served with a salad garnish and a salsa dip</td>
                <td><strong>£6.95</strong></td>
            </tr>
            <tr style="height: 30px;">
                <td><strong>Cheeseburger and Chips</strong><br>Served with a salad garnish and a salsa dip</td>
                <td><strong>£7.25</strong></td>
            </tr>
            <tr style="height: 30px;">
                <td><strong>Bacon Cheeseburger and Chips</strong><br>Served with a salad garnish and a salsa dip</td>
                <td><strong>£7.75</strong></td>
            </tr>
            <tr style="height: 30px;">
                <td><strong>3 Sausages Chips and beans</strong></td>
                <td><strong>£5.50</strong></td>
            </tr>
            <tr style="height: 30px;">
                <td><strong>2 Sausages 2 Bacon Chips and beans</strong></td>
                <td><strong>£5.80</strong></td>
            </tr>
        </tbody>
    </table>

</div>
</div>

<p style="margin-bottom: 20px; padding: 20px; text-align: center; background-color: #878887;"><strong><em><span style="font-size: 11pt; color: #fffefd;">If you have any allergy requirements ask to speak to the chef.<br /><br />All our meals are cooked to order so during busy times there may be a wait, this is because everything is as fresh as possible and has been sourced locally where possible.</span></em></strong></p>

<div class="grid-layout">
<div>

    <h2 style="margin-top: 20px;">Continental</h2>

    <p><span style="font-size: 14pt; color: #878887;">This is a tag line</span></p>

    <table border="0" cellspacing="0" cellpadding="10">
        <colgroup>
            <col style="width: 300px; height: 16.4pt;" valign="top">
            <col style="width: 40px; height: 16.4pt;" valign="top">
        </colgroup>
        <tbody>
            <tr style="height: 30px;">
                <td><strong>Lasagne Classico (Meat)</strong><br>Served with Salad & garlic bread</td>
                <td><strong>£9.25</strong></td>
            </tr>
            <tr style="height: 30px;">
                <td><strong>Chilli and Rice or Chips</strong></td>
                <td><strong>£8.75</strong></td>
            </tr>
            <tr style="height: 30px;">
                <td><strong>Chicken Tikka Masala (Medium/Hot)</strong></td>
                <td><strong>£9.25</strong></td>
            </tr>
            <tr style="height: 30px;">
                <td><strong>Beef Madras (Hot)</strong></td>
                <td><strong>£9.25</strong></td>
            </tr>
        </tbody>
    </table>

    <p><span style="font-size: 14pt; color: #878887;">Main courses served with Boiled rice or 1/2 & 1/2<br>Curry’s served with a puppodum</span></p>

    <h2 style="margin-top: 20px;">Salads</h2>

    <p><span style="font-size: 14pt; color: #878887;">This is a tag line</span></p>

    <table border="0" cellspacing="0" cellpadding="10">
        <colgroup>
            <col style="width: 300px; height: 16.4pt;" valign="top">
            <col style="width: 40px; height: 16.4pt;" valign="top">
        </colgroup>
        <tbody>
            <tr style="height: 30px;">
                <td><strong>Home Roast Ham Salad</strong></td>
                <td><strong>£7.25</strong></td>
            </tr>
            <tr style="height: 30px;">
                <td><strong>Breast of Chicken Salad</strong></td>
                <td><strong>£7.25</strong></td>
            </tr>
            <tr style="height: 30px;">
                <td><strong>Roast Beef Salad</strong></td>
                <td><strong>£7.25</strong></td>
            </tr>
            <tr style="height: 30px;">
                <td><strong>Tuna and Prawn Salad</strong></td>
                <td><strong>£7.65</strong></td>
            </tr>
        </tbody>
    </table>

    <h2 style="margin-top: 20px;">Jacket Potatoes</h2>

    <p><span style="font-size: 14pt; color: #878887;">Served with a salad garnish and coleslaw</span></p>

    <table border="0" cellspacing="0" cellpadding="10">
        <colgroup>
            <col style="width: 300px; height: 16.4pt;" valign="top">
            <col style="width: 40px; height: 16.4pt;" valign="top">
        </colgroup>
        <tbody>
            <tr style="height: 30px;">
                <td><strong>Chilli</strong></td>
                <td><strong>£7.25</strong></td>
            </tr>
            <tr style="height: 30px;">
                <td><strong>Prawn & Tuna</strong></td>
                <td><strong>£7.75</strong></td>
            </tr>
            <tr style="height: 30px;">
                <td><strong>Ham, Pineapple and Cheese</strong></td>
                <td><strong>£7.25</strong></td>
            </tr>
            <tr style="height: 30px;">
                <td><strong>Cheese and Pineapple</strong></td>
                <td><strong>£6.95</strong></td>
            </tr>
            <tr style="height: 30px;">
                <td><strong>Cheese and Beans</strong></td>
                <td><strong>£6.95</strong></td>
            </tr>
        </tbody>
    </table>

</div>
<div>

    <h2 style="margin-top: 20px;">Side Orders</h2>

    <p><span style="font-size: 14pt; color: #878887;">This is a tag line</span></p>

    <table border="0" cellspacing="0" cellpadding="10">
        <colgroup>
            <col style="width: 300px; height: 16.4pt;" valign="top">
            <col style="width: 40px; height: 16.4pt;" valign="top">
        </colgroup>
        <tbody>
            <tr style="height: 30px;">
                <td><strong>Chips</strong></td>
                <td><strong>£2.50</strong></td>
            </tr>
            <tr style="height: 30px;">
                <td><strong>Side Salad</strong></td>
                <td><strong>£2.25</strong></td>
            </tr>
            <tr style="height: 30px;">
                <td><strong>Onion rings</strong></td>
                <td><strong>£2.50</strong></td>
            </tr>
            <tr style="height: 30px;">
                <td><strong>Deli roll and butter</strong></td>
                <td><strong>£1.40</strong></td>
            </tr>
            <tr style="height: 30px;">
                <td><strong>Garlic Bread with Cheese</strong></td>
                <td><strong>£4.25</strong></td>
            </tr>
            <tr style="height: 30px;">
                <td><strong>Egg</strong></td>
                <td><strong>£0.95</strong></td>
            </tr>
        </tbody>
    </table>

    <p><span style="font-size: 14pt; color: #878887;">Soup of the day and a sandwich on brown or white bread served with a salad garnish & coleslaw..£5.00 *</span></p>

    <h2 style="margin-top: 20px;">Sandwichs</h2>

    <p><span style="font-size: 14pt; color: #878887;">On brown or white bread<br>Served with a salad & coleslaw</span></p>

    <table border="0" cellspacing="0" cellpadding="10">
        <colgroup>
            <col style="width: 300px; height: 16.4pt;" valign="top">
            <col style="width: 40px; height: 16.4pt;" valign="top">
        </colgroup>
        <tbody>
            <tr style="height: 30px;">
                <td><strong>Home Cooked Gammon Ham</strong></td>
                <td><strong>£4.25</strong></td>
            </tr>
            <tr style="height: 30px;">
                <td><strong>Roast Topside of Beef</strong></td>
                <td><strong>£4.25</strong></td>
            </tr>
            <tr style="height: 30px;">
                <td><strong>Breast of Chicken</strong></td>
                <td><strong>£4.25</strong></td>
            </tr>
            <tr style="height: 30px;">
                <td><strong>Tuna</strong></td>
                <td><strong>£4.25</strong></td>
            </tr>
            <tr style="height: 30px;">
                <td><strong>Cheese and Tomato or Onion or Branston</strong></td>
                <td><strong>£4.25</strong></td>
            </tr>
            <tr style="height: 30px;">
                <td><strong>Prawn </strong></td>
                <td><strong>£4.50</strong></td>
            </tr>
        </tbody>
    </table>

</div>
</div>

<p style="margin-bottom: 20px; padding: 20px; text-align: center; background-color: #878887;"><strong><em><span style="font-size: 11pt; color: #fffefd;">If you have any allergy requirements ask to speak to the chef.<br /><br />All our meals are cooked to order so during busy times there may be a wait, this is because everything is as fresh as possible and has been sourced locally where possible.</span></em></strong></p>
1054 Unknown column 'client_id' in 'field list' after upgrade
After upgrading your Joomla install you get the one of following or similiar error:
-
Error displaying the error page: Unknown column 'a.client_id' in 'where clause': Unknown column 'a.client_id' in 'where clause'
-
1054 Unknown column 'client_id' in 'field list'
Cause
This is cause by the finalising scripts being run for some reason. I think the joomla team know about this and is probably fixed by now.
Solution
I ran the Joomla upgrade and then the error 1054 occurs
- I kept the windows open and did not click on anything
http://www.example.com/administrator/index.php?option=com_joomlaupdate&view=update&layout=finaliseconfirm - I opened a new window in which i loaded the page
http://www.example.com/administrator/index.php?option=com_installer&task=database.fix - This found issues and fixed them - it said the 'fields_groups' table was missing, perhaps add this in before running the upgrade.
- I went back to the other window and refreshed the page and it loaded to the 'login and cleanup page'
http://www.example.com/administrator/index.php?option=com_joomlaupdate&view=update&layout=finaliseconfirm
i logged in
Menu Items are missing
- after research i came across thess threads which said this script had not run script for some reason. it is for 3.7.0 but i used it for 3.8.0 as the code looks what is needed.
- Re-Run 'fix database' just in-case
Done
Links
Fix missing social icons
On generation 1 tempaltes you can find the social icons dissapear after an upgrade. This is because they have broken the FontAwesome icon usage because thy have not included the libraries (or removed them).
Joomlashine Fix
To fix this add the following code
<script src="https://use.fontawesome.com/1f6d68dad8.js"></script>
into either of the the following places
- Edit the template index.php and add it right under the <head> tag
- Goto (Your Template)-->SEO & System --> Analytics code --> Put the code in above any analytics code
Alternative Fix
Using a 3rd Party Font Awesome extension such as NS Font Awesome - Joomla! Extension Directory would do the same by adding the FontAwesome library back in.
JDownloads - Make downloads only available to registered users
These are the easy instructions because the ones on jdownloads.com documents are really complex.
This assumes you have not already messed around with permissions. If you have change everything back to inherited.
- Goto JDownloads admin and click on Options at the top right.
- Click on Public and change the Download permission to Denied.
- Click on Registered and change the Download permission to Allowed.
- Click Save & Close. Permissions will now cascade down
- Done
Notes
- You can override individual download items permissions downstream by edit their permissions individually.
- Not 100% related - The permissions set within JDownloads for the daily limits might not cascade down so have to be set for every group.
Refurbishing second user laptops checklist
If you want to sell second hand laptops then you need to make sure they are ok and there is nothign better than a checklist.
- clean fan
- check ram
- full hdd test
- wifi test
- test optical drive
- test battery
- wipe hdd (after grabbing drivers)
- run for 4 hours
- cpu test
- perhaps run burn in test pro
- graphics test
- run smart fan to check temperatures
- check SMART readings
- zero fill if required
- keyboard check with utility
- check mouse pad and buttons
- check power jack
- check power supply
- check plastics for damage
- check screen, pixel test, resolution test, blemishes and then grade
- hinge test, wobble, stiff, broken etc..
Setting up a Windows 2003 domain server
1. Setting up a windows 2003 domain server
- Run Windows Server 2003 setup from the CD/DVD
- When setting up the server from scratch put all data files on a separate drive (physical ideally) as follows when prompted in setup:
- Folder list – share names are automatically setup
- D:\ClientApps - shared as ClientApps
- D:\fax
- D:\Users Shared Folders - shared as Users
- These are not automatically setup
- D:\Home Folders - shared as Home
- D:\Profiles - shared as Profiles
- D:\Profiles\Mandatory
- D:\Profiles\Roaming
- Folder list – share names are automatically setup
- Add in the other folders including where I put the exchange database etc…
- These should be default locations except they need to be pointed to D: drive
- D:\Program Files\Exchsrvr\MDBDATA
- D:\Program Files\Microsoft SQL Server
- These should be default locations except they need to be pointed to D: drive
- The server name is awkward so I always use server for the local name
- All User files and data should be on the D: drive
- Activate Windows Server 2003 if required
- Run Windows update and apply all updates
2. Setting up windows 2003 roaming profiles
A roaming profile consists of four basics sections:
- Shared folders ( for profiles and redirected folders)
- GPOs (Group Policy Objects)
- Redirected Folders
- Profiles
And a profile can be one of two variations:
- Mandatory – users cannot change anything, all changes are lost on logoff
- Non mandatory – users changes are kept and stored in the profile
To make a mandatory profile rename NTUSER.DAT to NTUSER.MAN in the profile
- Shared Folders:
Before using roaming profiles it is important to set up the required folders and their permissions, ie administrator access to roaming profile folders and shared user folders.
After the folders are initially setup their permissions and are difficult to change (but not impossible).
The folder structure I use for roaming profiles is
%username% shows where the user specific folder will appear, it does not need to be created manually. They are created when the user first logs in and then logsoff , the local profile is then copied backup to the server and the profile is created
Always use a separate drive and not the servers system drive. You could use another server or NAS drive on the network.
This article from Microsoft suggests permissions for the profile folders. Security Recommendations for Roaming User Profiles Shared Folders
Profile Folders (create as needed)
- D:\Profiles\ – shared as Profiles
- D:\Profiles\Mandatory\ - for manadatory profiles only
- D:\Profiles\Mandatory\%username% - this is a specific user profile location for a mandatory profile.
- D:\Profiles\Roaming - for roaming profiles only
- D:\Profiles\Roaming\%username% - this is a specific user profile location for a roaming profile
D:\Profiles should be shared out as Profiles
You can use your own folder names for profiles. I have just used the separate ones for these instructions to cover larger companies, ie you could just have a ‘Profiles’ directory with no sub folder
Add - what are permmissions on the shares and what security needs to be added
Users shared folders
I think this folder is setup during server setup (please check)
- D:\Users Shared Folders\ – shared as Users
- D:\Users Shared Folders\%username% – shared as Users
Disable Folder Caching
(it prevents a load of stupid folder synchronisation not covered in GPO)
Disable folder caching on the following folders, otherwise you will get folder syncing at the log off procedure and you will not know why
- \\server\Profiles - D:\Profiles
- \\server\Users - D:\Users Shared Folders
Possibly
- \\server\ClientApps - D:\ClientApps
Disable Quotas on D:\ drive
When quotas are enbled by default they have a user limit of 1GB which is no good. Either turn this of or change the limit. This can be done by going in to ‘My Computer’ and selecting drive properties and Quotas are a tab in side the box.
3. Group Policy (GPO) – including folder redirection
Access Group Policy Management Console (GPMC)
- Type gpedit.msc in the run menu
- via start menu start/programs/Administrative Tools/Group Policy Editor
- open AD, find user and edit container
Before I create individual user profiles I want to set up the group policy (profile settings) I want for them. This GPO (group policy object) will apply to all the users in the group I add it to similar to CSS cascading. You can apply GPO to specific users or apply more than one. The reason I do this first is so I can set all the shared user folder permmisions and locations first so I do not have to change indivual users or chase problems I cause for myself.
Create a GPO
Group Policy Management Console (GPMC) – How to create a GPO
Add the GPO to the users group that you want it to be applied to. I have the following simple groups setup and I ony apply this GPO to the staff group because the managers have laptops and do not need roaming profiles. I also do not apply it to SBS users because this would apply it to both Managers and Staff groups
- SBS Users
- Managers
- Staff
- Add the small business default location for users
- Add the default method for creating a user
Desktop Policy GPO settings:
Here is a list of the user profile settings I need to change/set in a GPO (descriptions are available in their properties):
USER SECTION ( Log on / log off options / general profile stuff )
User Configuration/Administrative Template/Network/Offline Files
Policy----------------------------------------------------------------Setting
Do not automatically make redirected folder available offline -- Enabled
Prevent use of Offline File Folder-----------------------------------Enabled
Prohibit user configuration of Offline Files-------------------------Enabled
Remove ‘Make Available Offline’-----------------------------------Enabled
Synchronize all offline files before logging off--------------------Disabled
Synchronize all offline files when logging on----------------------Disabled
Synchronize offline files before suspend---------------------------Disabled
Folder Redirection
User Configuration/Windows Settings/Folder Redirection/
Set the following options for the following folders:
- Application Data
- Desktop
- My Documents
- Start Menu – not used
Target Tab
Basic – Redirect everyone’s folder to the same folder
Target folder Location
Create a folder for each user under the root path
\\server\Users or \\server\Users$ if hidden
Settings Tab
Deselect ‘Grant the user exclusive rights to ….. ‘
- Move the contents of My Documents to the new location, might be useful converting from static to roaming otherwise not used
- The \\server\Users\%username% folder will be automatically created when the user logs on
Computer Section
Computer Configuration/Administrative Templates/System/User Profiles
Delete cached copies of roaming profiles --------------------------enabled (this is optional)
Add the Administrators security group to roaming user profiles --------- enabled
Prevent Roaming Profile changes from propagating to the server ------enabled (optional)
Computer Configuration/Administrative Templates/Network/Offline Files
(these might only be applicable to a Desktop PC)
Policy------------------------------------------------------Setting
Allow or Disallow use of the Offline Files Feature ------Disabled
Prevent use of Offline File Folder-------------------------Enabled (optional)
Prohibit user configuration of Offline Files---------------Enabled
Remove ‘Make Available Offline’-------------------------Enabled (optional)
Synchronize all offline files before logging off----------Disabled
Synchronize all offline files when logging on------------Disabled
Synchronize offline files before suspend-----------------Disabled
GPO Resources
Configuring Folder Redirection
Group Policy Recommendations for Roaming User Profiles – Not used reference only
Profile and Folder Redirection In Windows Server 2003 – Excellent tutorial
How To Configure Folder Redirection – a tutorial on setting up folder redirection (aimed at terminal server)
4. Creating a profile
Now that all the folders, permissions and redirects are setup creating the profiles is easy as everything should be automatic except for the next few steps.
- Create a domain user normally
- On the profile tab under profile path enter
\\server\Profiles\Roaming\%username%
this single step makes the user have a roaming profile
if the profiles share is hidden add the $ as required and if using mandatory use the Mandatory folder etc..
By adding the profile location the client PC will look to this location for its profile, if there is not one there it will write back the local one of the client PC the first time and then use the server copy from then on. - Create a folder D:\Profiles\Roaming\%username% manually on the server logged on as administrator (not essential but allows administrators to look in the users profile directory without having to mess with ownership and permissions)
- Now log the user on a client PC.
- Log the client off
- A fully created profile now resides on the server ready for use
If it is not created manually the users profile folder (\\server\Profiles\Roaming\%username%) is owned by the user and the administrator cannot view inside unless ownership is taken by the administrator. This is due to how the automation creates the permmisions on the folder and seems to ignore propagation or inheritance.
To restore access properly do the following,
- take ownership as administrator and propagate to all child objects,
- make sure the administrator is added in to the permmissions (full control) in the top folder and allowed to propagate to child objects
- then change owner back to the %username%.
- Then to make permmisions exactly the same as creating manually, change the owner of the top folder to administrator and do not replace on child objects
User Roaming Profile
Using a home directory is now classed as a legacy feature and is only included for compatability with NT4, Folder redirection should be used instead.
Notes
To copy and paste GPOs in group policy management
- go to forest/domains/Group Policy Objects (this is where they are all listed)
- you can then copy the GPO and then paste them into the navigation tree where you want them.
Notes
- possibly add $ for hiding shares
- permmisions on roaming profiles is fixed by manually creating the users roaming profile folder first. or take ownership afterwards as this works ok
- if roaming profiles is setup correctely and it will not load/appear to wait after login for network responese this can be because of 2 things. 1. either you have to login without a roaming profile first, or 2. permissions are wrong on the profile directories for the user
- add Admin rights to userprofile folders, configuration/administrative templates/system/user profiles this should be done in the same GPO
- to get the folder you need to edit a GPO that is attached to the user/group you want to affect. this is done by opening active directory, right clicking the object you want to alter, then create new GPO appropiately. This can then edited and you will find a 'Folder Redirection' Folder where all the instructions tell you it should be. User Configuration\Windows Settings\Folder Redirection.
- to allow administrator to view all profile files etc you must turn the following on first in the GPO for the users/group you want it to be applied to. 'computer configuration/administrative templates/system/user profiles/'Add the Administrators security group to roaming user profiles'
- syncronisqtion occurs because offline folders are turned on. turn this off and straigh folder redirection will occur. disable in the gpo
- using a home directory is a legacy act and is not needed
- You can’t redirect every folder in a user’s profile, but you can redirect the ones that tend to be the largest and take the longest to copy each time a user logs in or out. The folders that you can redirect are Application Data, Desktop, My Documents, and Start Menu. Don’t use home folder
- Example server names
\\server – unc name
local – NT Domain Name
unc and domain name cannot be the same - %Username% can be used instead of a users full username
- ? enable 'Folder Redirection policy processing Properties' in, gpedit.msc, computer configuration/administrative templates/system/group policy
- to get at folder redirection (and manage GPO), go to active directory, select either users or a specific user etc. right click 'Create and \Link a GPO' and carry on.
- create user manuall in AD, testuser Internet1 - user does not appear in AD but in server management users only ? – possibly look in sub groups (business one)
- GPO - add administrators to all new roaming profiles created. group policy editor Computer Configuration > Administrative Templates > System > User Profiles> Add the Administrators security group to roaming user profiles
Note: The setting must be configured on the client computer, not the server, for it to have any effect, because the client computer sets the file share permissions for the roaming profile at creation time. - Cannot delete a profile
Ok, I figured out the problem. Basically what I had to do is login in safemode with my local admin account. Backup the person's pc, then Delete all the profiles in Documents & Setting. Log in their account in safemode, then log off so all the necessary folders can be created. Then log in as the local admin and move their backed up desktop/favorites, etc.. to their profile. I think it has to do with the profile.dat but I have no way to mod it so that's the trick.
http://www.experts-exchange.com/OS/Microsoft_Operating_Systems/Server/2003_Server/Q_21464745.html - When setting up a folder redirection make sure grant exclusive user access is unticked so administrator can read. This must be done before an folders are created otherwise administrator does not have access similar to profiles folder
- Copy a GPO to Create a New GPO
- Best Practice: Roaming Profiles and Folder Redirection (a.k.a. User State Virtualization) – Excellent video tutorial on roaming profiles and folder redirection. It also includes full instructions on how to set them up. These seem to be based on the latest version of Server 2008 R2
- Automatic creation of user folders for home, roaming profile and redirected folders – an excellent all round tutorial on setting up roaming profiles and folder redirection including permmissions
roaming profiles
- setup profiles/roaming folders
- check share permmisons so clients can create folders
- check permissions on folders etc..
- set roaming profile location ie. \\server\profiles\roaming\pc1
- settup folder redirection to the users home folder ie my docs, desktop etc..
mandatory profile issues
Hi, could someone help please. i have setup a server for testing and am looking to use the mandatory profile so users cannot make changes to their profile. i have gotten the profile to work but for some reason the pc needs to be restarted to forget what was done on the computer. if i make changes then log-off and logon with a different user, and then logon again with the original user the changes have been remembered. it only forgets if i reboot the pc. have i missed something.
Also i have added a user to an OU group and set a group policy for folder redirection but it doesn't work. i have gone to the properties of the OU and added the policy there but it won't work. again have i missed something.
--
Suggestion 1.
well, you will need to change the extension of the NTUSER.DAT --> NTUSER.MAN in the user Profile to create mandatory profile so all the changes you do on the XP Client will be restored as soon as the user loge off.
Suggestion 2.
If i understood your question,you will need to do the following
Look for the following setting in group policy and edit it:
You can configure a Group Policy Object (GPO) to perform the preceding behavior by performing the following steps:
1. Edit the GPO that you want to modify.
2. Locate the following section: Computer Configuration \ Administrative Templates \ System \ User Profiles.
3. Double-click Delete cached copies of roaming profiles (the Group Policy setting).
4. Click Enabled
Using Group Policy to delete cached copies of roaming profiles
If you enable Group Policy, any local copy of a user's roaming profile is deleted when the user logs off. However, the roaming profile still remains on the network server that stores it.
You can configure a Group Policy Object (GPO) to perform the preceding behavior by performing the following steps:
- Edit the GPO that you want to modify.
- Locate the following section: Computer Configuration \ Administrative Templates \ System \ User Profiles.
- Double-click Delete cached copies of roaming profiles (the Group Policy setting).
- Click Enabled.
Cached profile not deleting
I am running a terminal server and have a gpo in place. I have it set to
delete cached roaming profiles. I have it set to keep only the windows
install information for each user and this is stored on another drive. The
problem is deleting the cached profiles was working and now it is not and I
cannot figure out why.
Do you have UPHClean installed? If not, it may be that handles are not
being closed properly on your profiles thereby preventing them from
being deleted.
but I've noticed that when a user logs in, the roaming
profile directory is created for that user (on the server) but I can't
access it from the admin account.
What add'l security do I have to add to allow me to access these
dirs? I tried Admin with subdir and file permissions, but it would
appear the the user account trumps it and keeps me out.
Solution:
- For any new roaming profiles, you can avoid this annoyance by enabling "Add
the Administrators group to user profiles" via GP (see below). Create your
own GPOs - don't edit the defaults. - For existing ones, you'll need to take owership of each folder as the
Administrators group - then re-set the NTFS permissions to user +
Administrators + system = Full Control. Do this after hours.
General Tips (seems popular online the following text)
********************
General tips:
1. Set up a share on the server. For example - d:\profiles, shared as
profiles$ to make it hidden from browsing. Make sure this share is *not* set
to allow offline files/caching! (that's on by default - disable it)
2. Make sure the share permissions on profiles$ indicate everyone=full
control. Set the NTFS security to administrators, system, and users=full
control.
3. In the users' ADUC properties, specify \\server\profiles$\%username% in
the profiles field
4. Have each user log into the domain once - if this is an existing user
with a profile you wish to keep, have them log in at their usual
workstationand log out. The profile is now roaming.
5. If you want the administrators group to automatically have permissions to
the profiles folders, you'll need to make the appropriate change in group
policy. Look in computer configuration/administrative templates/system/user
profiles - there's an option to add administrators group to the roaming
profiles permissions. Do this *before* the users' roaming profile folders
are created - it isn't retroactive.
********************
Notes:
Make sure users understand that they should not log into multiple computers
at the same time when they have roaming profiles (unless you make the
profiles mandatory by renaming ntuser.dat to ntuser.man so they can't change
them, which has major disadvantages),. Explain that the 'last one out wins'
when it comes to uploading the final, changed copy of the profile. If you
want to restrict multiple simultaneous network logins, look at LimitLogon
(too much overhead for me), or this:
http://www.jsifaq.com/SF/Tips/Tip.aspx?id=8768
********************
Keep your profiles TINY. Via group policy, you should be redirecting My
Documents (at the very least) - to a subfolder of the user's home directory
or user folder. Also consider redirecting Desktop & Application Data
similarly..... so the user will end up with:
\\server\users\%username%\My Documents,
\\server\users\%username%\Desktop,
\\server\users\%username%\Application Data.
[Alternatively, just manually re-target My Documents to
\\server\users\%username% (this is not optimal, however!)]
You should use folder redirection even without roaming profiles, but it's
especially critical if you *are* using them.
If you aren't going to also redirect the desktop using policies, tell users
that they are not to store any files on the desktop or you will beat them
with a
stick. Big profile=slow login/logout, and possible profile corruption.
********************
Note that user profiles are not compatible between different OS versions,
even between W2k/XP. Keep all your computers. Keep your workstations as
identical as possible - meaning, OS version is the same, SP level is the
same, app load is (as much as possible) the same.
*********************
If you also have Terminal Services users, make sure you set up a different
TS profile path for them in their ADUC properties - e.g.,
\\server\tsprofiles$\%username%
********************
Do not let people store any data locally - all data belongs on the server.
********************
The User Profile Hive Cleanup Utility should be running on all your
computers. You can download it here:
http://www.microsoft.com/downloads/details.aspx?familyid=1B286E6D-8912-4E18-B570
-42470E2F3582&displaylang=en
********************
Roaming profile & folder redirection article -
http://www.windowsnetworking.com/articles_tutorials/Profile-Folder-Redirection-W
indows-Server-2003.html
Quick setup checklist for Roaming Profiles
Prepare server for roaming profiles
- setup folders on D: with permissions
- disable quotas on D:
- setup shares and use $ if they need to be hidden
- disable caching on shares via share properties
- configure GPO for the staff group as per instructions
- configure folder redirection for staff group GPO
Setup Profile
- Create folder on the server with the administrator account: D:\Profiles\Roaming\%username%
- create NT profile for the %username%
- add user to correct group ie. staff/managers/admin
- edit profile and add \\server\Profiles\Roaming\%username%
- log on a suitable client PC with the %username% details
- log off client PC
- a roaming profile with redirected folders is now setup and can be configured as required
- NB each roaming profile should only be used in once instance at a time as the last one to log off takes priority
- for email create an Email folder in the 'My Documents' folder and use this for the PST location
User Groups
Active Directory Users and Computers [SERVER.mydomain.local]
- mydomain.Local
- MyBusiness
- Users
- Managers
- Staff
- Managers
- Users
- MyBusiness
Folder Permissions (Must Be Media)
All Allow unless specified
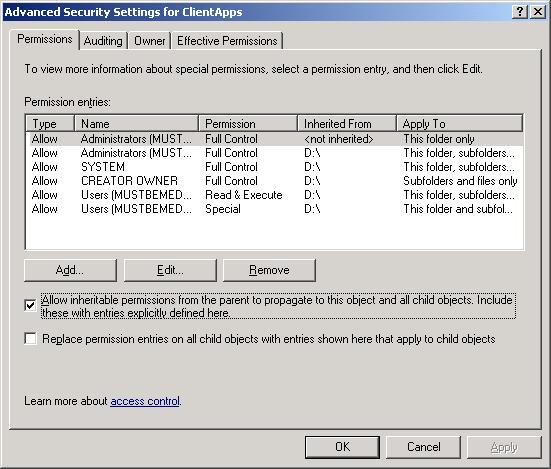
D:\ClientApps
- Share Name - ClientApps
- Sharing Description - Windows Small Business Server Client Applications
- Share Permmisions
- Domain Users (MUSTBEMEDIA\Domain Users) - Full Control, Change, Read
- Security
- Administrators (MUSTBEMEDIA\Administrator) - Full Control
- CREATOR OWNER - Special Permissions
- SYSTEM - All but Special Permissions
- Users (MUSTBEMEDIA\Users) - Read & Execute, List Folder Contents, Read, Special Permmisions
- Owner - Administrators (MUSTBEMEDIA\Administrators)
- Advanced
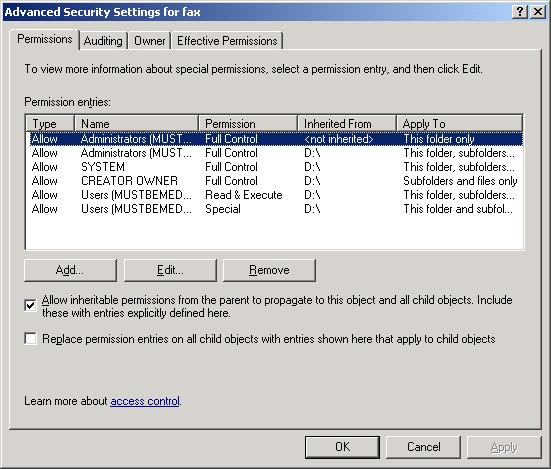
D:\fax
- Security
- Administrators (MUSTBEMEDIA\Administrator) - Full Control
- CREATOR OWNER - Special Permissions
- SYSTEM - All but Special Permissions
- Users (MUSTBEMEDIA\Users) - Read & Execute, List Folder Contents, Read, Special Permmisions
- Owner - Administrators (MUSTBEMEDIA\Administrators)
- Advanced
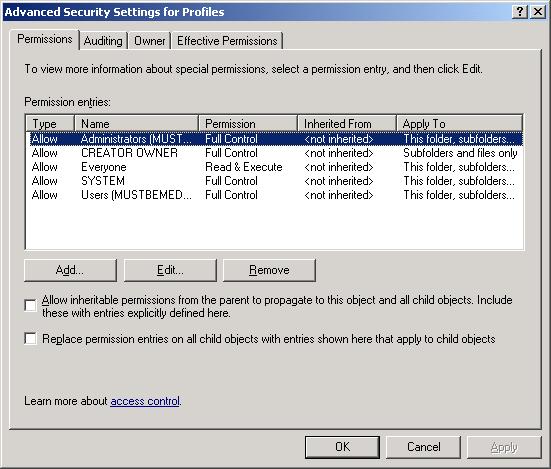
D:\Profiles
- Share Name - Profiles
- Sharing Description
- Share Permmisions
- Administrators (MUSTBEMEDIA\Administrators) - Full Control, Change, Read
- Everyone - Full Control, Change, Read
- SYSTEM - Full Control, Change, Read
- Security
- Administrators (MUSTBEMEDIA\Administrator) - Full Control
- CREATOR OWNER - Special Permissions
- Everyone - Read & Execute, List Folder Contents, Read
- SYSTEM - Full Control
- Users (MUSTBEMEDIA\Users) - Full Control
- Owner - Administrators (MUSTBEMEDIA\Administrators)
- Advanced
D:\Profiles\Mandatory
- Security
- Administrators (MUSTBEMEDIA\Administrator) - Full Control
- CREATOR OWNER - Special Permissions
- Everyone - Read & Execute, List Folder Contents, Read
- SYSTEM - Full Control
- Users (MUSTBEMEDIA\Users) - Full Control
- Owner - Administrators (MUSTBEMEDIA\Administrators)
- Advanced
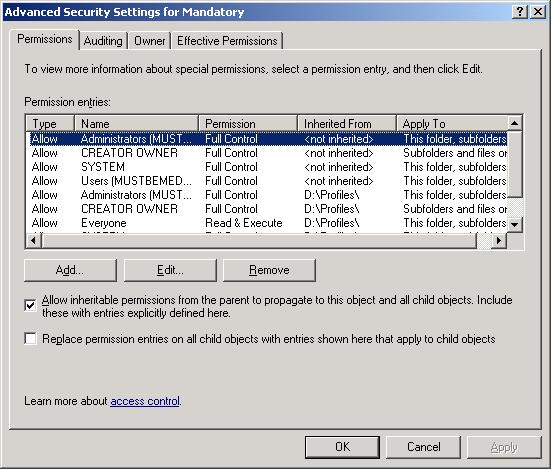
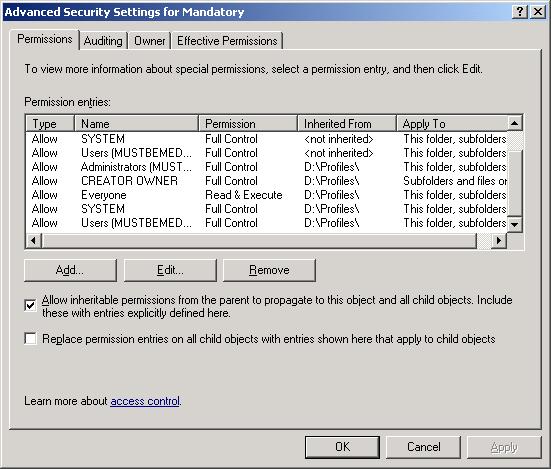
D:\Profiles\Roaming
- Security
- Administrators (MUSTBEMEDIA\Administrator) - Full Control
- CREATOR OWNER - Special Permissions
- Everyone - Read & Execute, List Folder Contents, Read
- SYSTEM - Full Control
- Users (MUSTBEMEDIA\Users) - Full Control
- Owner - Administrators (MUSTBEMEDIA\Administrators)
- Advanced
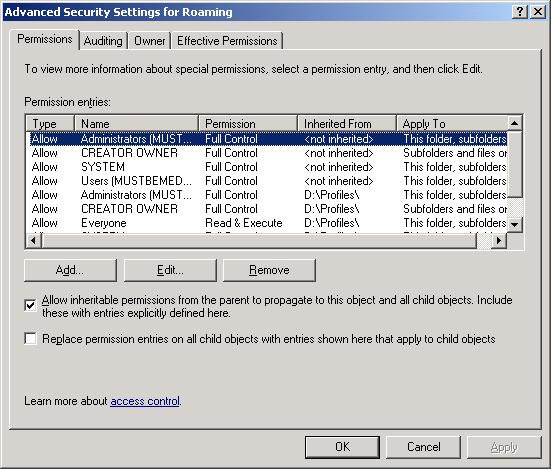
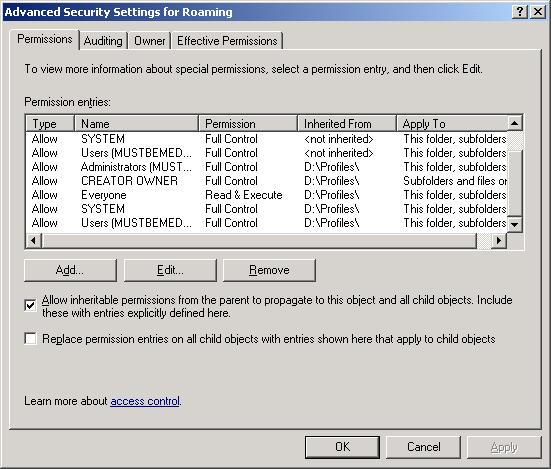
Example Profile Folder - D:\Profiles\Roaming\Sammy
- Security - All ticks have greyed backgrounds - possibly inheritable permmisions)
- Administrators (MUSTBEMEDIA\Administrator) - Full Control
- CREATOR OWNER - Special Permissions
- Everyone - Read & Execute, List Folder Contents, Read
- SYSTEM - Full Control
- Users (MUSTBEMEDIA\Users) - Full Control
- Owner - Administrators (MUSTBEMEDIA\Administrators)
- Advanced
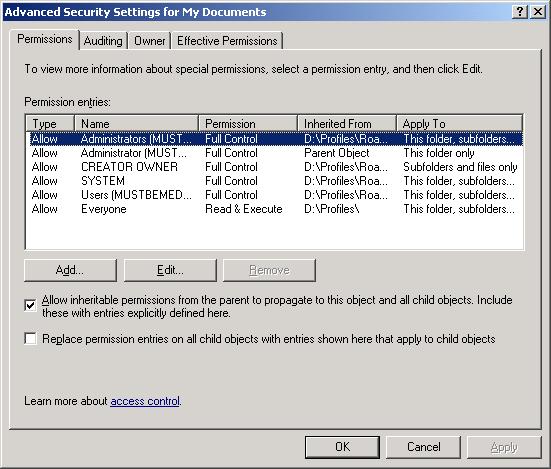
Example Profile Folder - D:\Profiles\Roaming\Sammy\My Documents
- Security - All ticks have greyed backgrounds - possibly inheritable permmisions)
- Administrator (MUSTBEMEDIA\Administrator) - special permmisions
- Administrators (MUSTBEMEDIA\Administrators) - Full Control
- CREATOR OWNER - Special Permissions
- Everyone - Read & Execute, List Folder Contents, Read
- SYSTEM - Full Control
- Users (MUSTBEMEDIA\Users) - Full Control
- Owner - Samantha Test (sammy@MustBeMedia.Local)
- Advanced
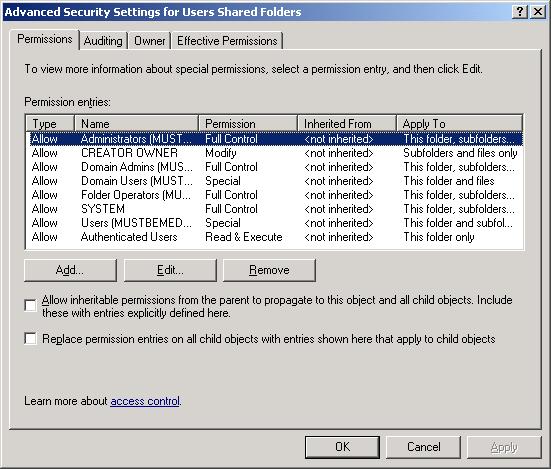
D:\Users Shared Folders
- Share Name - Users
- Sharing Description - Users Shared Folders
- Share Permmisions
- Domain Admins (MUSTBEMEDIA\Domain Admins) - Full control
- Domain Users (MUSTBEMEDIA\Domain Users) - Full Control
- Folder Operators (MUSTBEMEDIA\SBS Folder Operations) - Full Control
- Security
- Administrators (MUSTBEMEDIA\Administrator) - Full Control
- Authenticated Users - Special Permisions
- CREATOR OWNER - Special Permissions
- Domain Admins (MUSTBEMEDIA\Domain Admins) - Full Control
- Domain Users (MUSTBEMEDIA\Domain Users) - Special Permissions
- Fodler Operators (MUSTBEMEDIA\SBS Folder Operators) - Full Control
- Everyone - Read & Execute, List Folder Contents, Read
- SYSTEM - Full Control
- Users (MUSTBEMEDIA\Users) - Special Permisions
- Owner - Administrators (MUSTBEMEDIA\Administrators)
- Advanced
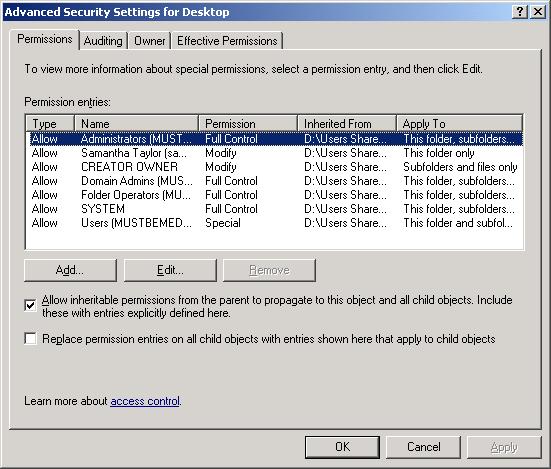
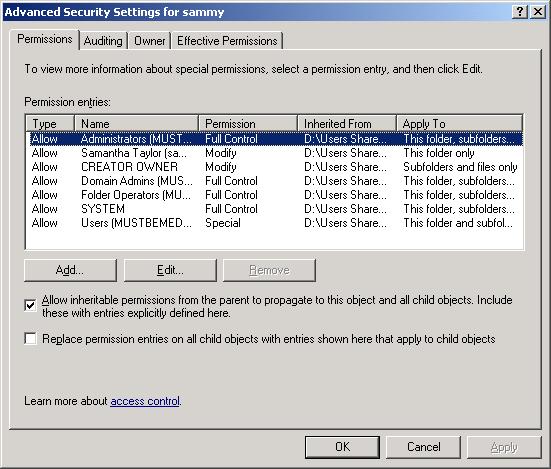
D:\Users Shared Folders\sammy
- Security - all ticks have grey back grounds possibly because of inheritable permissions
- Administrators (MUSTBEMEDIA\Administrator) - Full Control
- CREATOR OWNER - Special Permissions
- Domain Admins (MUSTBEMEDIA\Domain Admins) - Full Control
- Domain Users (MUSTBEMEDIA\Domain Users) - Special Permissions
- Folder Operators (MUSTBEMEDIA\SBS Folder Operators) - Full Control
- Samantha Test (sammy@MustBeMedia.local) - Special Permisions
- SYSTEM - Full Control
- Users (MUSTBEMEDIA\Users) - Special Permisions
- Owner - Samantha Test (sammy@MustBeMedia.Local)
- Advanced

D:\Users Shared Folders\sammy\Desktop
- Security - all ticks have grey back grounds possibly because of inheritable permisions
- Administrators (MUSTBEMEDIA\Administrator) - Full Control
- CREATOR OWNER - Special Permissions
- Domain Admins (MUSTBEMEDIA\Domain Admins) - Full Control
- Domain Users (MUSTBEMEDIA\Domain Users) - Special Permissions
- Folder Operators (MUSTBEMEDIA\SBS Folder Operators) - Full Control
- Samantha Test (sammy@MustBeMedia.local) - Special Permisions
- SYSTEM - Full Control
- Users (MUSTBEMEDIA\Users) - Special Permisions
- Owner - Samantha Test (sammy@MustBeMedia.Local)
- Advanced
