Items filtered by date: December 2015
Windows 7 only loads to the wallpaper screen with cursor and hangs.
I also want to add this to the solutions for installing windows 7, it happened to me, I would get all the way up to the splash screen for the Windows 7 before you get windows install button. However, I didn't have a floppy in the computer(no one does anymore) though it was enabled in the bios and apparently the installer was looking for the floppy and just hangs, so disable it in bios and you will come up with no problems.
how to convert an Excel date to a correct Unix timestamp
=(A1 - 25569)*86400
Where A1 is a cell set to display as a date. Set the cell with the above formula to display as a plain numder, and I think it will display the timestamp value.
Based on this page about the reverse transformation.
=(A1 / 86400) + 25569
This method does not seem to be correct
If we assume the date in Excel is in A1 cell formatted as Date and the Unix timestamp should be in a A2 cell formatted as number the formula in A2 should be:
= (A1 * 86400) - 2209075200
where:
86400 is the number of seconds in the day 2209075200 is the number of seconds between 1900-01-01 and 1970-01-01 which are the base dates for Excel and Unix timestamps.
The above is true for Windows. On Mac the base date in Excel is 1904-01-01 and the seconds number should be corrected to: 2082844800
Checking for an Entry in an Excel Cell
Summary: You may be looking for a way to have a formula determine if a particular cell has anything in it. Here's how you can find the information. (This tip works with Microsoft Excel 97, Excel 2000, Excel 2002, Excel 2003, and Excel 2007.)
There are times when it is helpful to know if a cell contains something—it doesn't really matter what it contains, just so it contains something. In these instances there are two ways you can approach the problem.
The first solution is to simply use the LEN function to determine if there is a length to what is contained in a cell. For instance, let's say you wanted to check if there was a value in cell F1. You could use the following:
=IF(LEN(F1)>0,"Found something there","Nothing is there")
If there is nothing in cell F1, then the length will be equal to zero. If there is something in the cell, even a number, then the length will be greater than zero.
The second solution is a variation on the LEN approach. All you need to do is check to see if there is anything in the cell. This may sound odd, but it is easier when you see the formula. For example, the following will check to see if there is anything in cell B4:
=IF(B4<>"","Found something there","Nothing is there")
The test in this formula is True if there is anything in the cell. If the cell is empty, then the test fails.
Another solution you can use is the ISBLANK worksheet function. This function returns True if the target cell is blank, and False if it contains anything.
As an example, let's suppose you want to check if the user has entered something in cell D7. You can use the following to make the determination:
=IF(ISBLANK(D7),"Input values missing",D7)
In this case the cell containing this formula would contain the same value as in D7, provided something was there. If there is nothing in D7, then the cell contains the text "Input values missing."
ExcelTips is your source for cost-effective Microsoft Excel training. This tip (2112) applies to Microsoft Excel versions: 97 2000 2002 2003 2007
Norton Ghost Examples
Use this link for Ghost 2003 Build 793, Ghost 8 and some .docs
http://www.demonoid.com/redirect.php?url=http://www.demonoid.com/files/details/1656887/
First:
PROCEED AT YOUR OWN RISK !!!
Using this Program, or my hints how to use it, could EASILY DESTROY your XP-Installation
to a state where repair is DIFFICULT. VERY.
IF you don´t know how to handle it...
If this torrent is not seeded yet, i upped it to rapidshare too.
Link:
(http://rapidshare.com/files/154279496/GHOST_2003_USB_NTFS_BACKUP.rar.html)
Norton Ghost 2003 basically is a DOS-BASED program that BACKS UP your drive(s), partition(s),
no matter if they are FAT32 or NTFS !
BUILD IN USB 2.0 SUPPORT for External Drives ! (If your BIOS supports it)
CD/DVD-Burner support. Norton Ghost 2003 can burn your backup-files
directly to CD or DVD. Bootable !
NO NEED to reinstall XP first, just restore your installation from the backup files !
THAT is the BIG advantage compared to "newer" versions of Norton Ghost.
INCLUDED in this torrent-file:
Boot-Disk version as *.ima file (and WinImage V.8 to burn it to disk)
(Yes, program is small enough to fit on a HD-Disk, but worth its bytes in gold, believe me :-)
CD-ROM version as bootable *.ISO file. (Disk-drives are not common anymore)
(NOTE: Burned CD will look "empty" in XP, don´t worry. Just pop in and restart)
Paragon Partition Manager Professional 7.00.000.1057 Full Retail
This description as README.TXT
Hints:
To backup your XP-Partition, you need either:
1. An external USB-Drive (If your BIOS supports it)
2. A CD/DVD-Burner AND a 3.5"-HD-DiskDrive
3. A second built-in Partition Or HardDrive, FAT32 or NTFS.
(Smart thing to do is having your XP on a SMALL partion, like 10-15 GB, and all major stuff on a second partition. Reduces backup-time to 20 minutes or so :-)
IF you only have 1 HDD with 1 Partition (e.g. LapTop),
you will have to use Paragon Partition Manager to DOWNSIZE your partition, then create a second
one for backup. Obviously, this will only work if your HDD has enough free space...
I recommend DEFRAGMENTING your drive before you do that.
(Btw, backup your system, RESIZE partition or SPLIT drive in 2 partions with Partition Manager, then restore to small partition...NO PROBLEM with Ghost 2003.)
Ghost 2003 has an option to COMPRESS your backup files, so, lets say, your HDD is 120 GB, 35 GB used, you will need about 30 GB on your new partition.
Norton Ghost will split up backup to 2GB pieces, which you can burn on DVD(s).
If Norton Ghost 2003 seems to get confused recognizing your external USB-drive, try to DISABLE
"LEGACY USB SUPPORT" in BIOS. Worked for me :-)
Norton Ghost 2003 Should ALSO WORK on VISTA or any other system, but i didn´t try yet, so i can´t be sure.
I tested about everything before uploading, should you still get
problems, send me a PM.
Ok, think that´s it !
Happy Backups !
Jpeg
I found info on Commandline switches.
(Usefull ONLY if you plan creating a fully automated Restore-DVD)
------------------------------------------------------------------------------------------------------------------------------------------------------------------------
Examples of the CLONE switch
Example 1
Copy drive one to drive two on a computer without the final prompt:
ghost.exe -clone,mode=copy,src=1,dst=2 -sure
Example 2
Connect through NetBIOS to another computer that is running Ghost in slave mode, and dump a disk image of the second local drive to the remote file c:\drive2.gho:
ghost.exe -clone,mode=dump,src=2,dst=C:\drive2.gho -nbm
Note that Ghost at the slave computer can be started with ghost -nbs.
Example 3
Copy the second partition on drive one to the first partition on drive two on the same computer without the final prompt:
ghost.exe -clone,mode=pcopy,src=1:2,dst=2:1 -sure
Example 4
Load the disk image file savedsk.gho on the server drive mapped locally to drive E onto drive 1 of the local computer. Do not prompt if OK to proceed:
ghost.exe -clone,mode=load,src=E:\savedsk.gho,dst=1 -sure
This example is typical what would be in a batch file that automates workstation installations from a network server.
Example 5
Dump the second partition of drive one to an image file on the G: drive:
ghost.exe -clone,mode=pdump,src=1:2,dst=g:\part2.gho
Example 6
Load partition 2 from a two-partition image file on a mapped drive G: onto the second partition of the local disk:
ghost -clone,mode=pload,src=g:\part2.gho:2,dst=1:2
Example 7
Load drive 2 from an image file, and resize the destination partitions into a 60:40 allocation:
ghost.exe -clone,mode=load,src=g:\2prtdisk.gho,dst=2,sze1=60P,sze2=40P
Example 8
Clone a three partition disk and keep the first partition on the destination drive the same size as on the source disk, but divide up the remaining space between the other partitions leaving no unallocated space:
ghost.exe -clone,mode=copy,src=1,dst=2,sze1=F,sze2=V,sze3=V
Example 9
Load drive one from an image file and resize the first partition to 450 MB, the second to 1599 MB and the third to 2047 MB:
ghost.exe -clone,mode=load,src=g:\3prtdisk.gho,dst=1,sze1=450M,sze2=1599M,sze3=2047M
Example 10
Load a disk from an image file and resize the last partition to its capacity. The first partition utilizes the remaining space:
ghost.exe -clone,mode=load,src=g:\2prtdisk.gho,dst=1,szeL
Example 11
Load drive one from an image file being sent from the multicast server with the session name SESSIONNAME without final prompt:
ghost.exe -clone,src=@mcSESSIONNAME,dst=1 -sure
Example 12
Create an image file of drive one to an image file being created by the multicast server with the session name SESSIONNAME without final prompt:
ghost.exe -clone,src=1,dst=@mcSESSIONNAME -sure
Example 13
Create an image file of drive two's partitions to an image file being created by the multicast server with the session name SESSIONNAME:
ghost.exe -clone,src=2,dst=@mcSESSIONNAME
Example 14
Write an image that has three partitions to drive one. Use an image file that is sent by the Multicast Server or GhostCast Server using the session name SESSIONNAME. Also resize the first partition to 450 MB, the second partition to 1599 MB and the third partition to 2047 MB.
Because this task requires one imaging operation for each partition that you will resize, the task requires that you use a batch file. Using a batch file with error checking prevents the need for user intervention if a problem occurs.
In the following batch file, the first line executes the -CLONE command three times. The first instance uses the word -CLONE, and the other two instances (which are ,sze1=450M and ,sze3=2047M), use the comma to instruct Ghost to use default commands.
The following batch file is incomplete and is intended only as an example of typical commands that a batch file for Ghost might use.
ghost.exe -clone,src=@mcSESSIONNAME,dst=1,sze1=450M,sze2=1599M,sze3=2047M -batch
IF ERRORLEVEL 1 GOTO PROBLEM
ECHO Ghost exited with value of 0 which indicates success.
REM **Add any extra commands that are required here if Ghost succeeds**
GOTO FINISH
:PROBLEM
ECHO GHOST returned with an Error value of 1 or greater.
ECHO Ghosting was not completed successfully
REM **Add any extra commands that are required here if Ghost fails**
:FINISH
ECHO Batch File Finished.
Example 15
In this example, under Symantec Ghost 8.0, there is one hard drive with two partitions. One or both partitions could be an NTFS partition. The following command writes the image of the first partition to the second partition under the image.gho file name.
ghost.exe -clone,mode=pdump,src=1:1,dst=1:2\image.gho
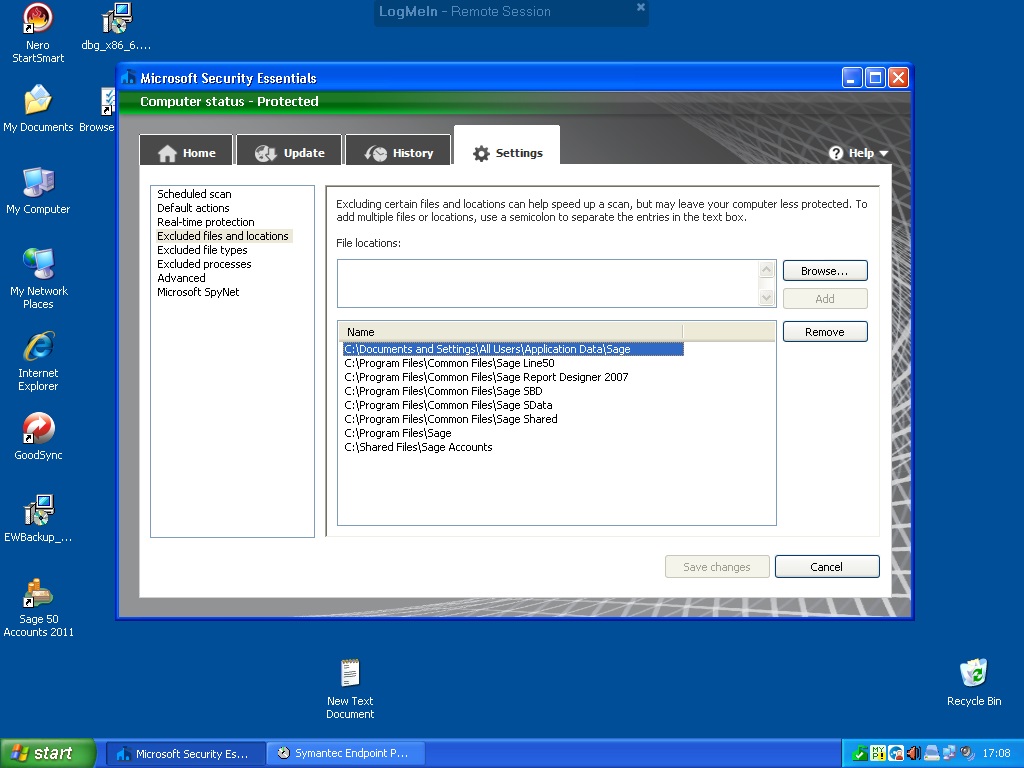
Sage Line 50 runs very slow
Apart from the obvious minimum equipment level:
- 1GBS Network
- Fast Computer
- 4GB RAM
If sage still runs slow it is probably because of your antivirus, do the following.
Sage Antivirus Exclusions (from official sage document / email)
The following folders are used only by Sage software. Excluding these from the antivirus may go a long way to improving the performance of Sage Accounts whilst retaining the security of the antivirus software. The reason must be cause the files are constantly accessed and changed and the antivirus then sees it as a new file.
Because of how sage works it doesnt really like Anti Virus software interfering with it. What happens antivirus can cause a slow down in sage because the antivirus sees the constant changes in the database files (amongst others) and as such keeps checking that it is not a virus. The results can vary from Anti Virus to Anti Virus. A full software failure is never the case and it is just a matter of performance.
This is a known issue with sage and they have issue a list of folders that need excluding. They are as follows:
See Microsoft Antivirus Sage Line 50 Exclusions at the bottom for the list of exclusions i actually use.
- The Sage Accounts program directory.
- The Sage Accounts data directory.
Tip: Exclude the folder that contains the ACCDATA folder. If the customer does not want to exclude this entire folder, they should exclude ACCDATA and the following folders that are located in the same folder as ACCDATA: ARCHIVES, ATTACHMENTS, BITMAP, CONFIGS, CRITERIA, DEFAULTS, EXPORTS, FAX, IMPORTS, INVOICES, JOURNALS, LABELS, LAYOUTS, LETTERS, MEMO, REPORTS, TASKOPT, TEMPLATE, TMail, VATRTNS - C:\Program Files\Common Files\SageSBD
- C:\Program Files\Common Files\Sage Line50
- C:\Program Files\Common Files\Sage Report Designer 2007
- C:\Program Files\Common Files\Sage Shared
- C:\Program Files\Sage EBanking
- C:\Documents and Settings\All Users\Application Data\Sage (Non Windows Vista)
- C:\ProgramData\Sage (Windows 7 / Vista)
Note: Depending on the version of Sage Accounts, some of the folders listed above may not exist.
Note: Wherever possible, you should exclude the folders used exclusively by Sage Accounts as this will cover the file extensions listed in this section.
If this is not possible, you may be able to exclude files with a particular file extension. However, the file extensions listed here may not be unique to files used by Sage Accounts and the customer may not want to exclude these from their antivirus software. If the customer is in any doubt please refer them to their IT Administrator.
Data Files
*.DTA
*.DTH
*.COA
Report and Layout Files - Sage Accounts v12 and below
*.SRT
*.SLY
*.SLT
*.SLB
*.RPT
Report and Layout Files - Sage Accounts v13 and above
*.report
*.layout
*.letter
*.label
Memo Files
*.SLM
*.PLM
*.NLM
*.ILM
*.BLM
*.CLM
*.DLM
Criteria Files
*.SLC
*.SLI
*.PRC
*.PRI
*.NMC
*.NMI
*.BKC
*.BKI
*.SKC
*.SKI
*.IVC
*.IVI
*.SPC
*.SPI
*.PCC
*.PPI
*.PCI
*.PPC
*.REC
*.REI
*.SAC
*.SAI
*.IPC
*.IPI
*.PDC
*.PDI
*.DPC
*.DPI
*.FIC
*.FII
*.CPC
*.CPI
*.CSC
*.CSI
Microsoft Antivirus Sage Line 50 Exclusions (by Lancastrian IT)
- C:\Documents and Settings\All Users\Application Data\Sage (might only be present in XP)
- C:\Program Files\Common Files\Sage Line50
- C:\Program Files\Common Files\Sage Report Designer 2007
- C:\Program Files\Common Files\Sage SBD
- C:\Program Files\Common Files\Sage SData
- C:\Program Files\Common Files\Sage Shared
- C:\Program Files\Sage
- C:\Program Files\Sage EBanking
- C:\ProgramData\Sage (Windows 7 / Vista)
NB: when using remote sage you should map the drive and not use direct uncs paths, for some reason this causes massive issues with data and speed.
Update to the Anti Virus exclusions advise from Sage
[12122] Modifying your anti virus software to avoid conflicts with Sage Accounts and Sage Drive
Some are all of this might be applicable.
- The Sage Accounts program directory.
- The Sage Accounts data directory.
As above but slightly modified. I cant remember if these need to excluded anymore
- C:\Program Files\Common Files\Sage SBD
- C:\Program Files\Common Files\Sage Line50
- C:\Program Files\Common Files\Sage Report Designer 2007
- C:\Program Files\Common Files\Sage Shared
- C:\Program Files\Sage EBanking
- C:\Program Files\Sage\AccountsService - v21 and above
Tip: If you're using a 64-bit version of Windows, replace Program Flies with Program Files (x86).
- C:\Documents and Settings\All Users\Application Data\Sage
- If you're using Windows 7 or Windows Vista this folder is C:\ProgramData\Sage
- C:\Program Files\Sage
- C:\Program Files\Sage\Accounts
- C:\Program Files\Sage\Assemblies
As per the information in sage's about page
- Program Directory - C:\Program Files\Sage\Accounts\
- Data Directory - C:\Shared Files\Sage Accounts\PM2011\ACCDATA
- Settings Directory - C:\ProgramData\Sage\Accounts\
How to Install Sage Taxation & Instant Taxation
- sage taxation is SQL based
- you need to run a manual backup so that the backup is then placed at
c:\Shared Files\Sage Tax Backups\
it is then backed up from that location - there are good install and upgrade instructions on the install disc
To install sage taxation as a network system:
on the server:
- Install sage Taxation on the server
- install microsoft mysl express 2005 sp3 only
- add these to the firewall
1433 TCP
1434 UDP
sqlbrowser possibly not - C:\Program files\Microsoft SQL Server\90\shared\sqlbrowser.exe
mysqlserver - C:\Program files\Microsoft SQL Server\MSSQL.1\MSSQL\Binn\sqlservr.exec - create a folder c:\SageTax and share it out as 'Tax Share'
- map it locally as t:\
then when installed on server,
On the Client PC:
- map t: to \\server\Tax Share
- install workstation version,(files only)
- location of mysql server is
SERVER\SageTax
password needed is $agedadm1n
Additional Stuff:
To run a manual backup
- go to programs/Sage Practice/Tools/Sage Taxation/Sage Taxation/Backup & Restore.lnk
- all users should be logged out, if there are users still in sage taxation it will warn
- check backup location is set to c:\Shared Files\Sage Tax Backups\ , this should be replicated automatically throughout your clients. The setting can be accessed by clicking settings in the 'Backup and Restore' utility
- and then click backup
- This process is intitiated manually via this process and then by the fact that the backup is then created in c:\Shared Files\Sage Tax Backups\ it is backedup by the main backup system
Setup a schedule backup on the server
- the backup location is configured in the start menu.
- all progs/sage/tools/backup and restore under settings.
- the security option that is there is recommended by the sage guy prior to upgrades because of
the security data it stores, but not data essential as i am aware. - next, a schedules task needs to be set in windows.
- goto control panel
- select scheduled tasks
- run this
c:\Tax Share\SageData\UKTax\Master\Apps\Tools\BackupRestore.exe /BACKUP - Set weekly or whatever, data will now backup to specified directory
To restore data:
- put the backup file on the server,
- then run backup and restore tool on the workstation
restore password is :
mck2ptbgdt
New Install from network
once sage personal tax is installed on the server you can just do the following to install sage tax from the server
- create the following persistent network share
net use T:"\\server\Tax Share" /yes - run T:\SageData\UKTax\Master\Install
Upgrading
when you have set sage personal tax up as a network installation:
- insert the cd from sage in to the server and proceed with an upgrade (similiar procedure as downlod section below)
- when performing an upgrade the system will perform a mandatory backup
- when the upgrade is perfomed on the server it will pass the update to the client machines when they log on for the first time they will performa workstation update
when you download the update or installer (it is a self conatined archive)
- run it, next,
- i accept and next,
- installer now checks resoucses and installed stuff, when finished click next
- your practice has v14.01 installed, this will be updated to v15.00, (note server is called SERVER/SAGETAX), click next
- check info and click install
- it will now check the database and the data etc..
- the installer will continue thourgh its procedure now and at some point will do an automatic backup (i assume default location)
- then click next
- click finish
Additional notes
Sage Taxation will not work. it cannot find the master database and timed out.
- This occured after installing comodo firewall. i also used comodos own dns settings.
- sage instant taxation/compliance utilises DNS to find the servers name and what as happening while using these dns serves was the computers name it was searching for was coming back prefixed like server.dlink.com and therefore would never be found.
- So Remove comodo DNS from the ethernet or WIFI of Sage client machines. It could possibly be added tot he router itself.
There were some new backups relate to sage practice soltions at C:\ProgramData\Sage\Practice Solution\SQLBackups
These were caused by sage practice solution being installed as part of the XRBL update from sage which we do not have a licesnse for and they have shelved it for the purpose it was intended for.
So sage installed a temporary license to edit the automatic backups to set the to C:\Shared Files\Sage Practice Solution Backups and to also turn them of as they are not needed. later iterations fo sage software will require sage practice solutions so this why it is left installed.
How to extract msu/msp/msi/exe files on the command line
I find these commands quite helpful — maybe you know them already — if not, here you go:
Microsoft Hotfix Installer (.exe)
setup.exe /t:C:\extracted_files\ /c
Microsoft Update Standalone Package (.msu)
expand -F:* update.msu C:\extracted_files

cd  extracted_files

expand -F:* update.cab C:\extracted_files
Microsoft Patch File (.msp)
msix patch.msp /out C:\extracted_files
msix.zip
Windows Installer Package (.msi)
msiexec /a setup.msi /qb TARGETDIR=C:\extracted_files
0xc0000225 windows failed to load because the bios is not acpi compatable
This error can occur for several different reasons and can sometimes be after a windows update.
- BIOS is not ACPI compatable
- Memory configuration. This error can occur because of the memory arrangement you have. Usually if you go above 2GB.
- Faulty RAM
Try these solutions in order.
- Try a different RAM configuration - If this turns out to be the solution more than likely there is windows updates waiting that will fix this issue so run all updates and you should be able to use the extended memroy configuration.
- Check RAM
- Update BIOS to an ACPI compatable version
In all case run windows update and download all updates.
Mod_Deflate vs. Mod_Gzip
I have gotten some good questions about my previous posting, The Benefits of Gzip. Some people have asked about the difference between gzip and deflate, which comes pre-installed on the newer versions of Apache Web Server.
The primary difference between the two, is as I mentioned, deflate comes pre-installed. That doesn’t mean that it’s already deployed. You will usually have to go in and manually deploy the component, but this is much easier than installing gzip.
The second difference is the amount of compression. Gzip will compress 4 – 6 % more than deflate. This means the page will load a little faster with Gzip than deflate.
So why use deflate? The third difference is the server power required to do the compression. Keep in mind that the compression is not being handled when you upload the code to your site, it’s happening when a visitor with Gzip in their browser hits your site. So each time, your Web server has to package up these files to send over. This is where deflate shines. Deflate requires a lot less energy to compress the files. Which means that on high traffic servers, deflate will load faster than Gzip. Confused?
Simply put, if you have a site that gets less than 1,000 unique visitors per day, and you really want the fastest page time available, go ahead and install mod_gzip. This will be extra work, but may be worth it for you. If your site gets over 1,000 unique visitors, still with mod_deflate. Your pages will load faster.
Is mod_rewrite installed on your server
Use this code to test if mod_rewrite installed on your server
- Create a rewrite.php file
- Paste this code into it
<h2>How To Test mod_rewrite in Apache Linux Server by <a href="http://www.webune.com">Webune</a></h2>
<p><a href="/rewrite.php?link=1">LINK1</a> = rewrite.php?link=1</p>
<p><a href="/link2.html">LINK2</a> = link2.html</p>
<p>How this works: both links are for this same page, except they both are different. link one is without the mod_rewrite and link2 is using mod_rewrite. Link1 show the php file, with with mod_rewrite we are mascarading the php file into a html file. you can use whatever type of extension you want, you can change it to .htm or .shtml etc... all you have to do is to make sure you also chang it in the .htaccess file</p>
<p><a href="http://www.webune.com/forums/viewtopic-p-43.html">Go back to webune forums.</a></p>
- Create a .htaccess file with the following code
RewriteEngine On
RewriteRule ^link([^/]*).html$ rewrite.php?link=$1 [L]
- Upload both files to your www root
- Execute rewrite.php
Links
- How To Test Mod Rewrite Works In With Apache Web Server - Original article from Webune